joelsmith
Full Member

Member since: July 2012
There no winners in war, only survivors.
Posts: 1,404
Jul 5, 2012 22:33:58 GMT -5
Jul 5, 2012 22:33:58 GMT -5
|
Post by joelsmith on Apr 17, 2017 8:01:23 GMT -5
We are not old! We are just "very experienced"!
|
|
willc453
Junior Member

Member since: April 2017
Posts: 85 
|
Post by willc453 on Apr 17, 2017 16:14:25 GMT -5
Thanks for showing off everything and glad to hear you're Australian because when I saw the cars on your bridge, felt like screaming in horror that THEY'RE DRIVING ON THE WRONG SIDE OF THE ROAD!-)
|
|
Neo Phyte
Full Member
Member since: March 2017
Posts: 188
|
Post by Neo Phyte on Apr 18, 2017 19:21:03 GMT -5
Thank you all for registering your 'likes', it's good to get them. willc453, it must have been a tourist deciding to be on the RIGHT side of the road.  |
|
Neo Phyte
Full Member
Member since: March 2017
Posts: 188
|
Post by Neo Phyte on Jul 22, 2017 2:30:31 GMT -5
Hi. The last few months has been full of distractions from visiting this forum and posting any updates. Illness, grief and loss, have been the main obstacles for me to deal with. Hopefully the illness is now under management. Back to the project. A few months ago I had the bridge operating console delivered to my place for easier access and making the necessary modifications. Before assembling the instruments to the panel I had to cleaning, add extra labels, make some pointers, and do some touch-up painting. The idea was to keep it looking old but somewhat cleaned up. Since the console is going to be a diorama in itself, I decided to add a bit of aesthetic drama by painting some yellow stripes to one of the switch brackets. 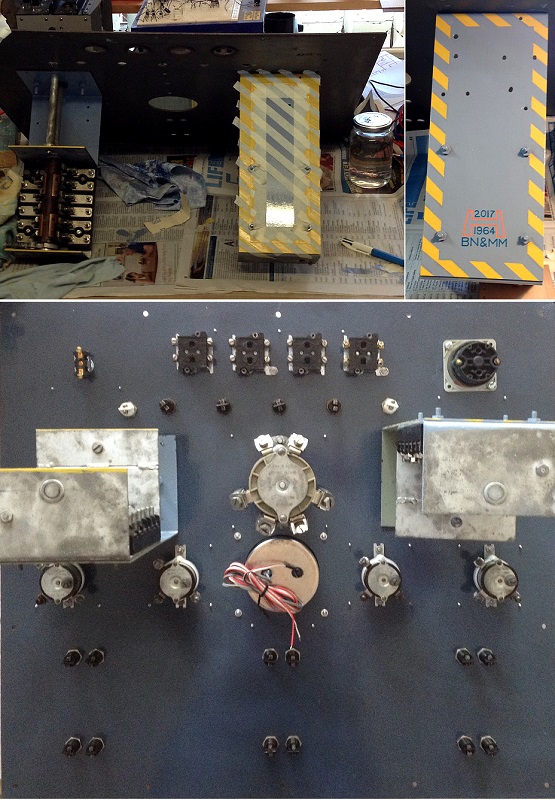 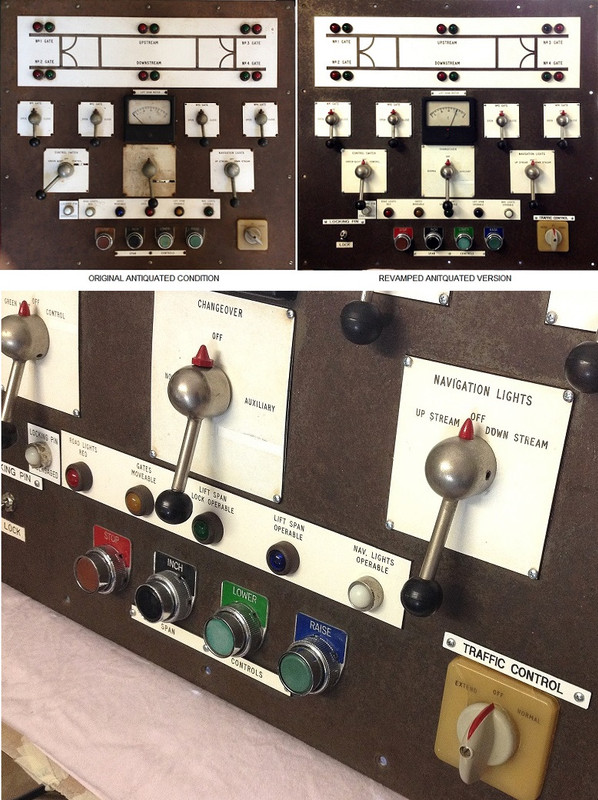 |
|
|
|
Post by Leon on Jul 22, 2017 5:17:57 GMT -5
Glad to see you back Neo and doing ok! The control panel looks awesome.  |
|
joelsmith
Full Member
Member since: July 2012
There no winners in war, only survivors.
Posts: 1,404
Jul 5, 2012 22:33:58 GMT -5
Jul 5, 2012 22:33:58 GMT -5
|
Post by joelsmith on Jul 22, 2017 5:52:19 GMT -5
Good to see you back! Hope everything works out for you!
|
|
|
|
Post by TRM on Jul 22, 2017 8:18:29 GMT -5
Life will toss plenty of curve balls at us! Hope things are coming around for you! Fine work on the controls!
|
|
Neo Phyte
Full Member
Member since: March 2017
Posts: 188
|
Post by Neo Phyte on Jul 22, 2017 22:29:41 GMT -5
Thanks Leon, joelsmith, and TRM for kind words. Glad to get back here and into creativity (good for the soul). Spent a day breaking up cork sanding blocks for making riverbank rocks. After break-up three cork blocks, I put all the pieces in a colander and stirred it up to break off any loose and sharp edges. This left a fair bit of finer material which looks like gravel, and will use that for a few bare patches around the trees. I plan to glue the cork rocks in place and then paint it to look like Basalt. 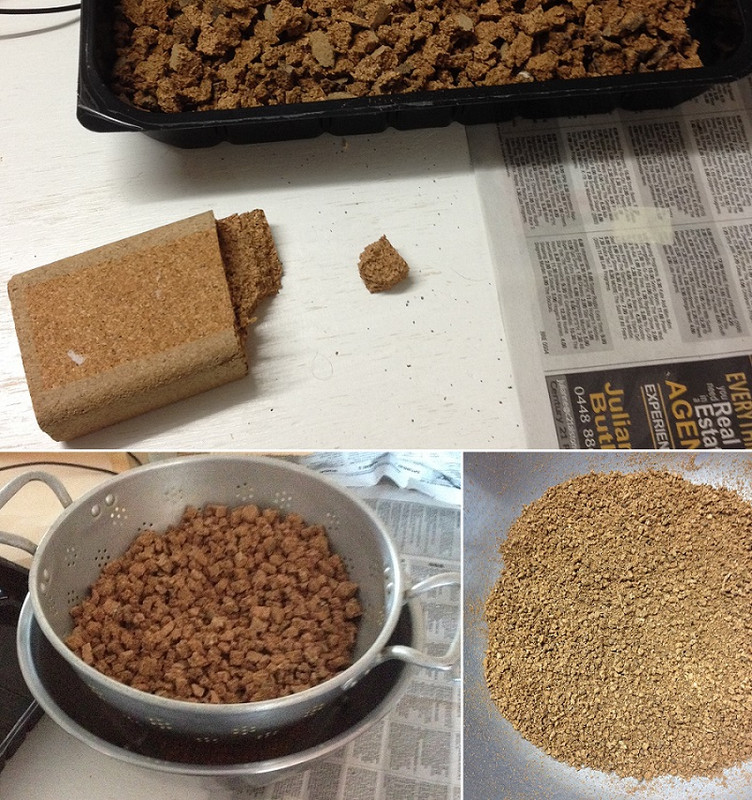
|
|
joelsmith
Full Member
Member since: July 2012
There no winners in war, only survivors.
Posts: 1,404
Jul 5, 2012 22:33:58 GMT -5
Jul 5, 2012 22:33:58 GMT -5
|
Post by joelsmith on Jul 23, 2017 7:01:47 GMT -5
That is a very interesting technique! Thanks for sharing!
|
|
Neo Phyte
Full Member
Member since: March 2017
Posts: 188
|
Post by Neo Phyte on Jul 23, 2017 20:58:39 GMT -5
Have also been working on the wiring harness for the console. Because of the large scale of the project, and the difficulty of wiring the control panel in situ, the wiring harness had to be built separately. I never done this before and proved to be quite an interesting approach. I got this idea from Internet pictures of how they make harnesses for wiring cars. It looks like some weird nervous system of one ugly looking deep sea creature.  |
|
joelsmith
Full Member
Member since: July 2012
There no winners in war, only survivors.
Posts: 1,404
Jul 5, 2012 22:33:58 GMT -5
Jul 5, 2012 22:33:58 GMT -5
|
Post by joelsmith on Jul 24, 2017 17:53:42 GMT -5
What you did is exactly! how it is done. The only thing I might suggest is let the ends a little "looser" to make it easier to mount up.
|
|
Neo Phyte
Full Member
Member since: March 2017
Posts: 188
|
Post by Neo Phyte on Jul 24, 2017 18:19:58 GMT -5
Thanks joelsmith. I actually had added about 5mm extra at the terminal ends (eyelets). The white board does have markings which tell me exactly where each terminal goes. The only loose bits are the wire ends that are to be attached to the switches, etc. Anyway, it worked out just fine. 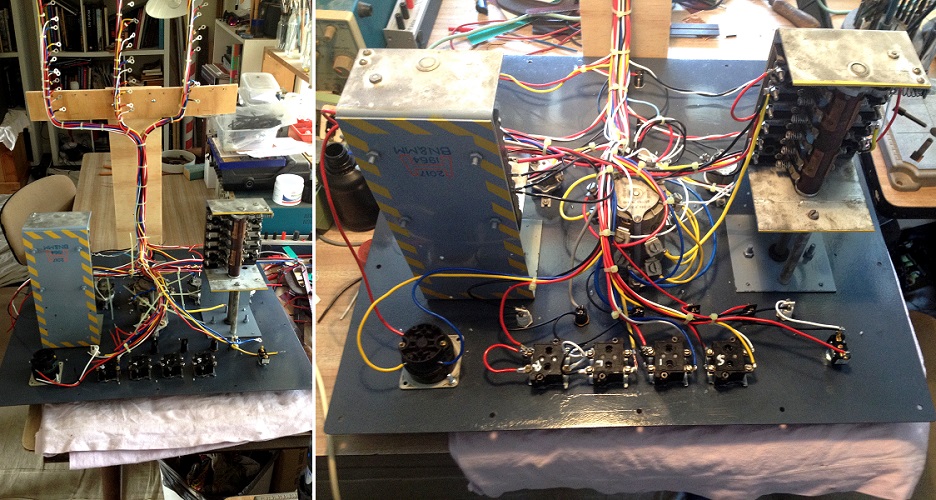 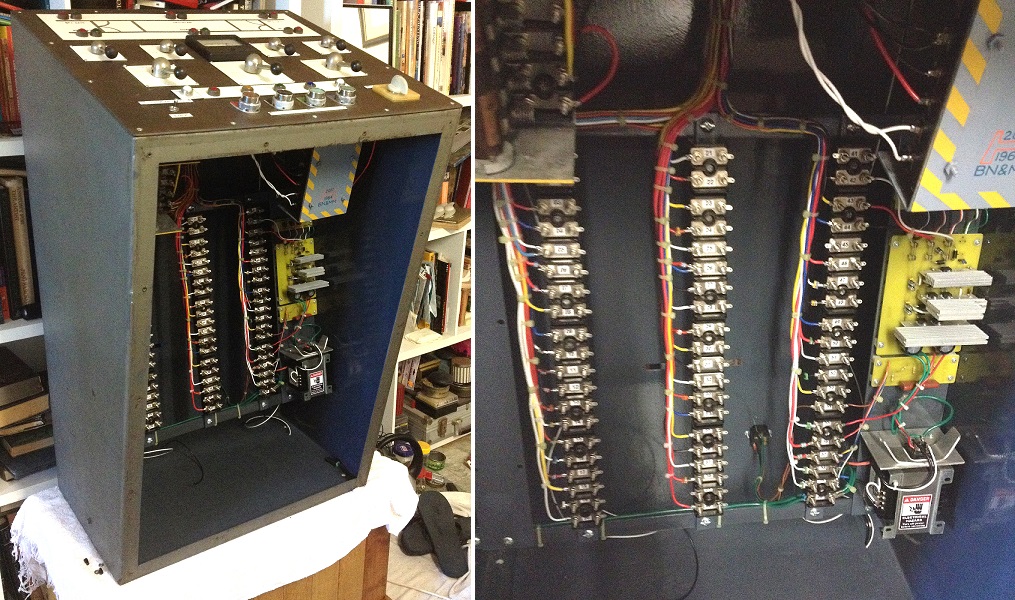 |
|
|
|
Post by Leon on Jul 24, 2017 18:22:17 GMT -5
Excellent work Neo! Nice and neat. |
|
Neo Phyte
Full Member
Member since: March 2017
Posts: 188
|
Post by Neo Phyte on Jul 25, 2017 6:06:01 GMT -5
Thanks Leon. The next step was to attach another wiring harness between the three terminal strips and the D-Connectors attached to the back of the console. The D-Connectors (25 pins) are commonly seen in old fashioned computers. These connectors, will allow the console to be connected to the Control Box under the display table. 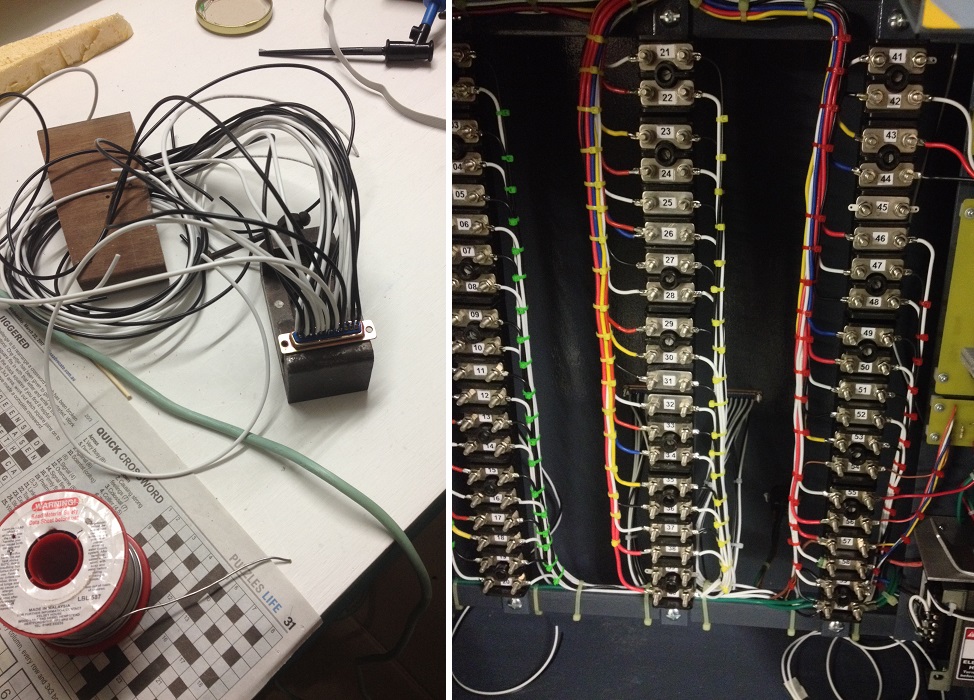 |
|
|
|
Post by wbill76 on Jul 25, 2017 12:24:41 GMT -5
The harness looks good! Just be sure it doesn't deliver any random shocks to the users...unless, of course, you actually want that effect to liven up the interactive nature of the exhibit! |
|
John Everett
Full Member
Member since: January 2012
July, 2016 MoM Winner
Posts: 1,278
Jan 17, 2012 0:53:48 GMT -5
Jan 17, 2012 0:53:48 GMT -5
|
Post by John Everett on Jul 25, 2017 13:18:30 GMT -5
This has been a joy to watch.
|
|
joelsmith
Full Member
Member since: July 2012
There no winners in war, only survivors.
Posts: 1,404
Jul 5, 2012 22:33:58 GMT -5
Jul 5, 2012 22:33:58 GMT -5
|
Post by joelsmith on Jul 25, 2017 19:09:22 GMT -5
Ditto to what John said!!
|
|
Neo Phyte
Full Member
Member since: March 2017
Posts: 188
|
Post by Neo Phyte on Jul 25, 2017 22:07:17 GMT -5
Photobucket planted an unwanted message into this post, it was short of blackmail. They basically said to pay money now to get your images shown, though I have not used their service since they changed their policies.
I would not mind if they told me that future use of their services to implant images into other websites would require me to first pay a fee. But they did not, and now just replace the images with their messages. They sure know how to upset some people.
|
|
Neo Phyte
Full Member
Member since: March 2017
Posts: 188
|
Post by Neo Phyte on Jul 25, 2017 22:49:43 GMT -5
Sorry wbill76, but I cannot use, or paste, your funny quote without Photobucket dropping in a message. It was a shocker of a quote! However, I do have a warning sticker attached to the transformer. This hopefully will remind anybody fiddling with the circuitry to first turn off the power. Also as I am sure you know that there will be a thick perspex sheet over the front panel. 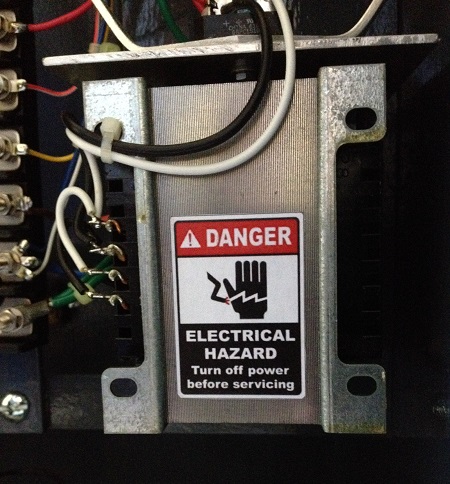 |
|
Neo Phyte
Full Member
Member since: March 2017
Posts: 188
|
Post by Neo Phyte on Jul 25, 2017 23:10:47 GMT -5
To carry on. I decided awhile ago to have a Passive Infra Red (PIR) movement sensor trigger the lighting for the Console Wiring Diorama. The PIR would work best with it installed inside the console, since its lighting and power source will be inside. The best place to put the PIR would be in the centre somewhere near the bottom (out of the way from the view of the wiring). However, a metal kick-plate will covering the bottom section of the perspex front panel. The PIR needs to be above that. So a wooden bracket was made for raising the PIR into place. 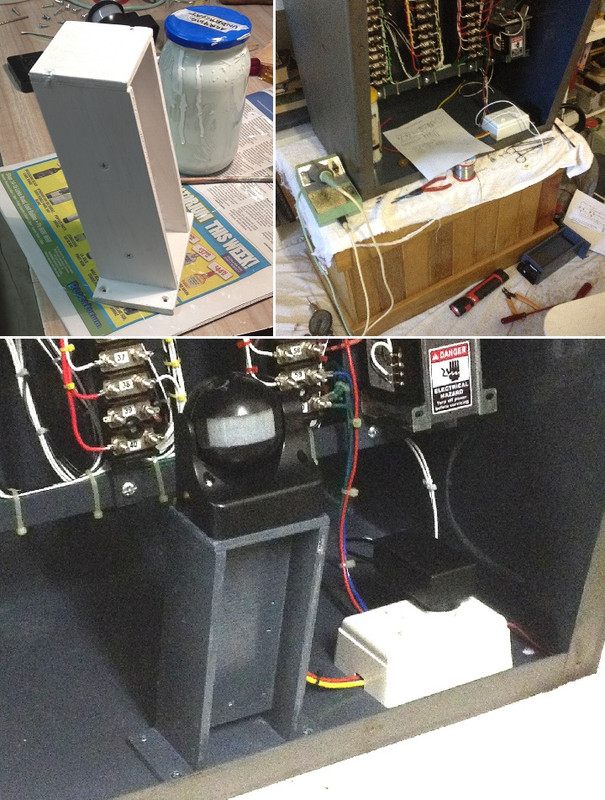 |
|
Neo Phyte
Full Member
Member since: March 2017
Posts: 188
|
Post by Neo Phyte on Jul 25, 2017 23:20:08 GMT -5
I wanted to use a thin strip of grey felt between the perspex and the metal console. But there were no grey coloured felt available (here). So I bought some cream coloured felt and dyed it grey. It turned out okay. 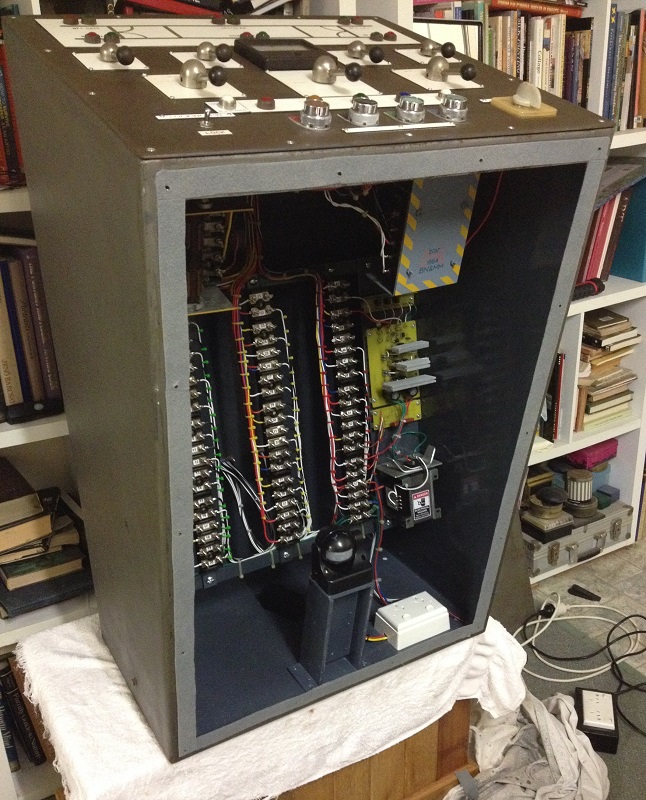 Bought three metres of flexible LED strip. You can cut them to certain lengths, and connect them with wires, so as to go around sharp corners.  |
|
Neo Phyte
Full Member
Member since: March 2017
Posts: 188
|
Post by Neo Phyte on Jul 25, 2017 23:31:41 GMT -5
After I installed the perspex sheet, and kick-plate I discovered that the PIR sensor was not working. However it did work without the perspex. Then it dawned onto me that Infrared is less about light-waves than it is about heat-waves. An Internet research explained that a PIR does not work behind thick perspex or a glass window. So what to do now I decided to drill a series of holes across and in front of the PIR sensor window. This ought to allow the heat-waves to reach the PIR. It did the trick. 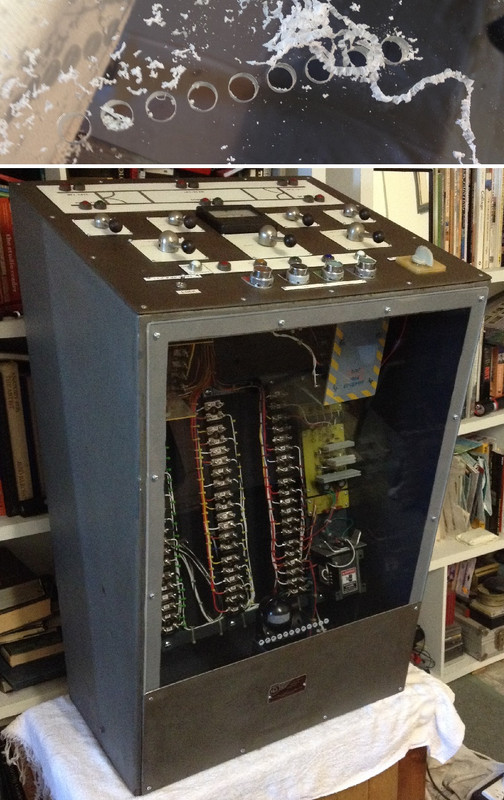 Here is how the Console Diorama looks in its dormant and activated states. 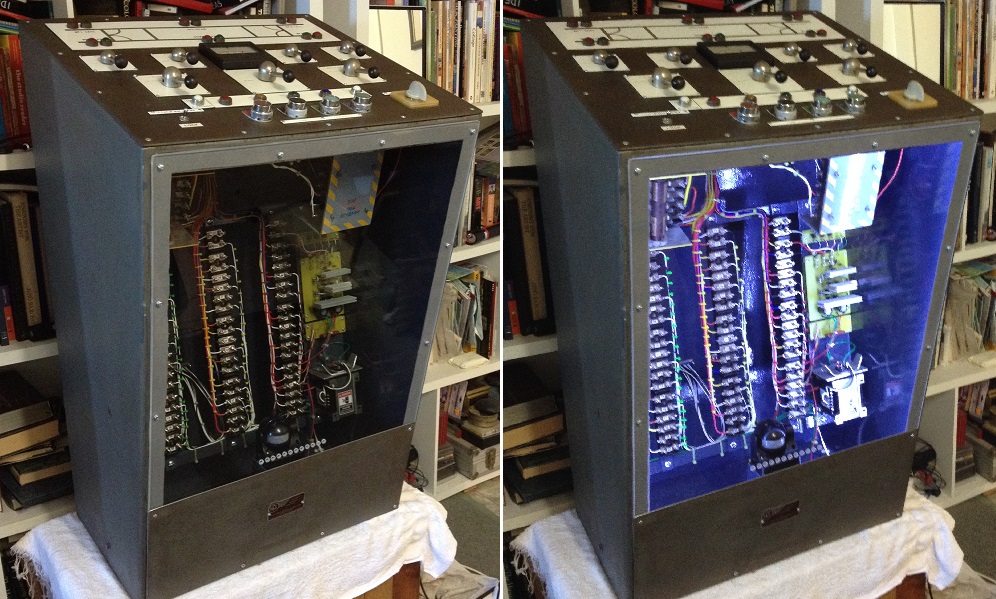 Now that the console is completed, it is waiting to be connected to the Control Box under the Display table. Hoping I no longer will need to open the front panel to service the console. My next step is to start working on the Bridge Diorama. |
|
|
|
Post by Leon on Jul 26, 2017 4:18:29 GMT -5
Neo,that looks awesome with the LED lights and cool idea with the sensor. |
|
|
|
Post by wbill76 on Jul 26, 2017 16:17:18 GMT -5
Man this just keeps getting better and better! Nice trick with the holes in front of the sensor.
|
|
joelsmith
Full Member
Member since: July 2012
There no winners in war, only survivors.
Posts: 1,404
Jul 5, 2012 22:33:58 GMT -5
Jul 5, 2012 22:33:58 GMT -5
|
Post by joelsmith on Jul 26, 2017 16:33:34 GMT -5
Keep up the great work Neo! Don't worry about photoschmuck, they are shooting them selves in the foot.
|
|
Neo Phyte
Full Member
Member since: March 2017
Posts: 188
|
Post by Neo Phyte on Jul 26, 2017 20:06:46 GMT -5
Thanks Leon, Bill, and joelsmith for the positive responses.
I am having a few days away from hands on modelling. I need to update my drawings (plans and schematics) for this project before I forget what my actual notes refer to. Will return shortly.
|
|
Neo Phyte
Full Member
Member since: March 2017
Posts: 188
|
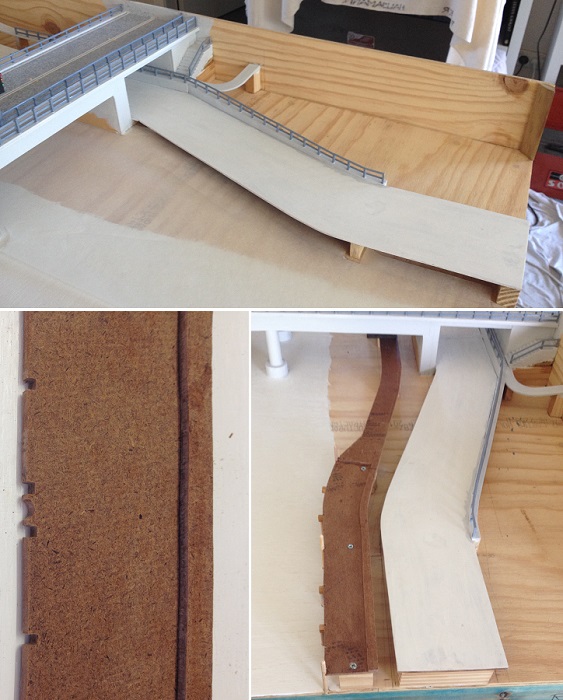
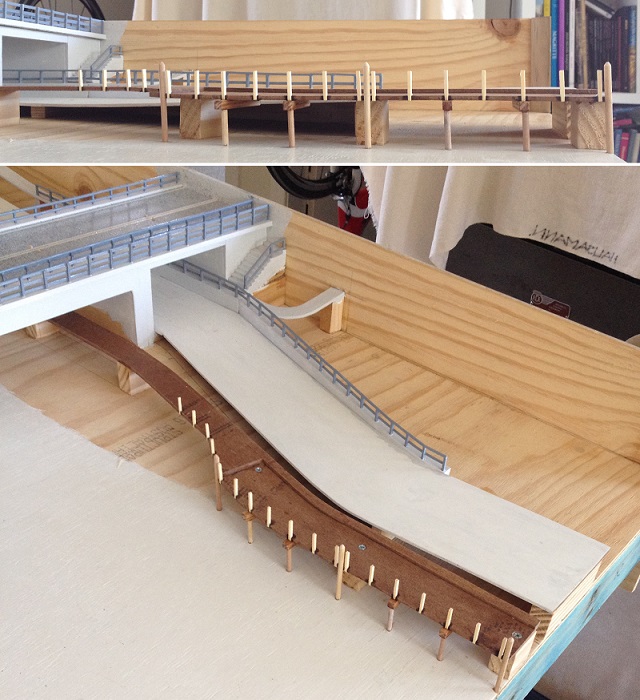
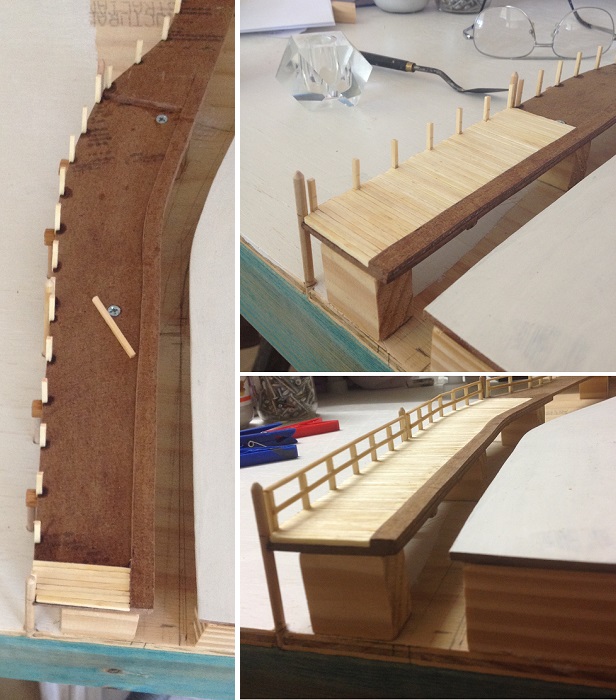
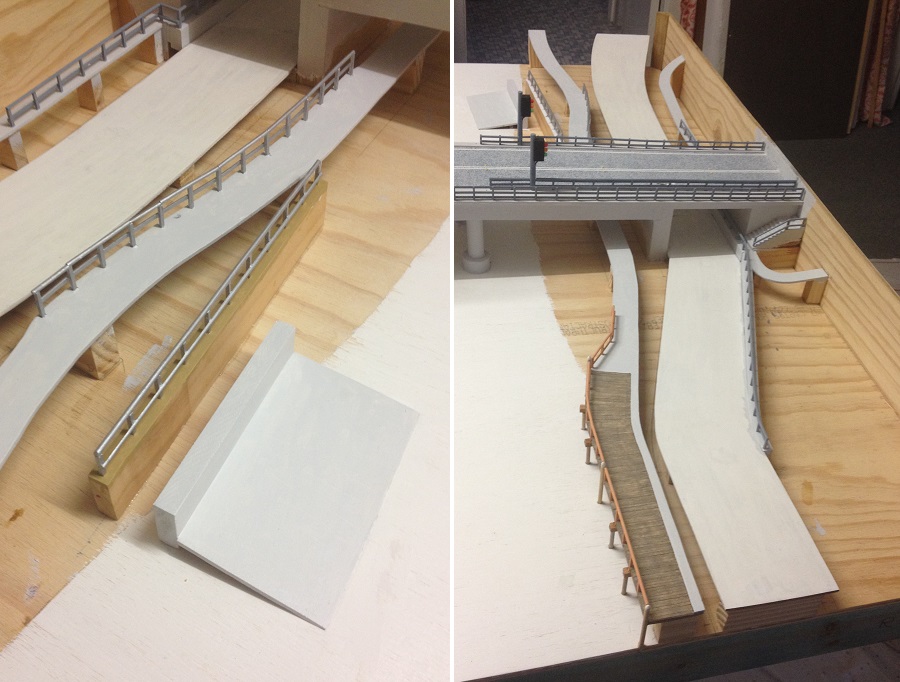
Post by Neo Phyte on Dec 13, 2017 5:21:56 GMT -5
I am back again. Here are some updates: part of a stairway from Bridge St to the Highway.  Pathway under bridge.  Bridge Street. 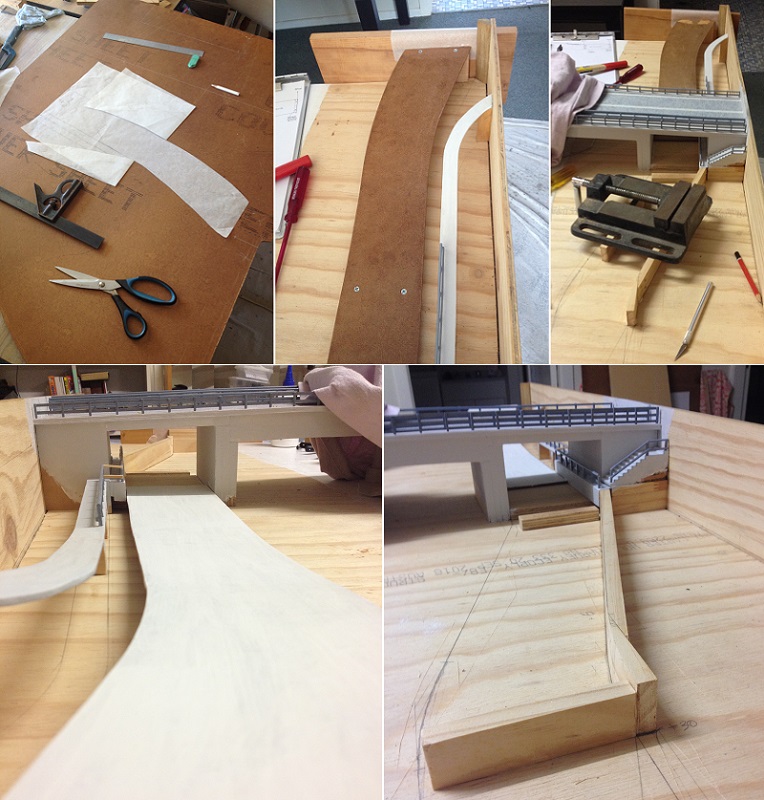 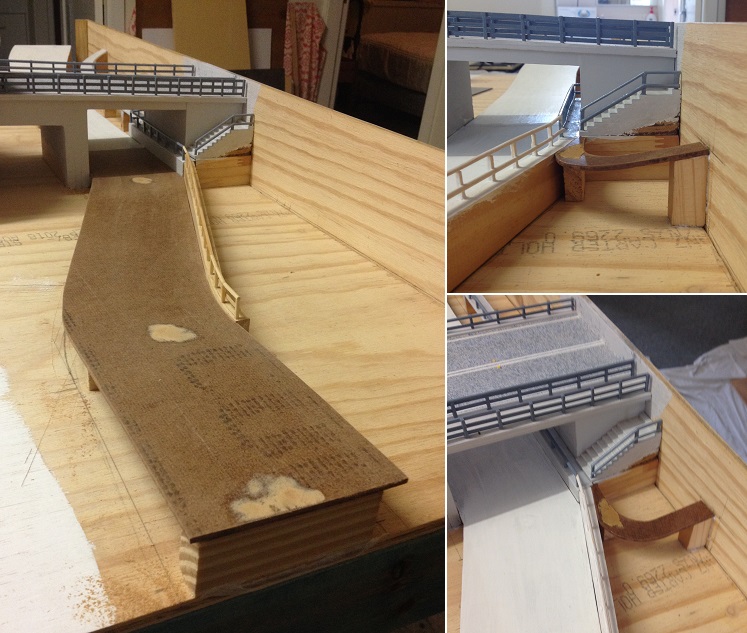 |
|
Neo Phyte
Full Member
Member since: March 2017
Posts: 188
|
Post by Neo Phyte on Dec 13, 2017 5:24:06 GMT -5
|
|
joelsmith
Full Member
Member since: July 2012
There no winners in war, only survivors.
Posts: 1,404
Jul 5, 2012 22:33:58 GMT -5
Jul 5, 2012 22:33:58 GMT -5
|
Post by joelsmith on Dec 13, 2017 6:38:30 GMT -5
Looking very, very well done! Keep up the outstanding work!, Joel.
|
|
|
|
Post by TRM on Dec 13, 2017 8:00:20 GMT -5
Beautiful work so far Joel! Making some great progress!
|
|