Post by redleg12 on Sept 2, 2012 20:57:23 GMT -5
Introduction
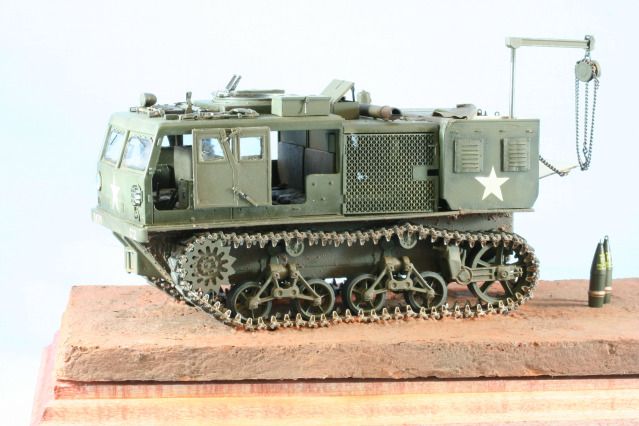
The M4 was based on the chassis and drive train of the obsolescent M2 Light Tank. This common practice of re-using old vehicles simplified design, allowed for easy production, and made maintenance in the field easier.
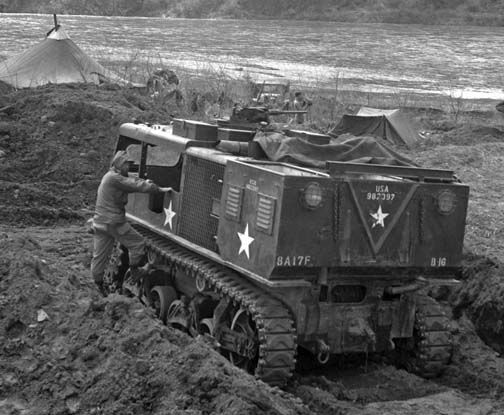
One variant was designed to tow anti-aircraft guns and another for howitzers. The rear compartment carried the gun crew and other equipment. The howitzer variants included a crane to assist with heavier projectiles
The M4 was manufactured by Allis-Chalmers of Milwaukee, starting in 1942 and was in U.S. military service until approximately 1960.
The M4 version I will be building will be the howitzer version with the ammunition box designed to carry 8 inch howitzer ammunition.
My building reference is the book High Speed Tractors by David Doyle
The Kit
The kit I wil be using is the Hobby Boss M4 Tractor 155mm/240mm (which is incorrect as the 8 inch projectile is 203mm), kit #82408

I will also be adding the Eduard PE sets 36072 which is the outside details and 36073 which is the cab doors. I will also replace the M2 MG with a Tasca MG.
By the start of building this kit I quickly realized it will also require, liquid putty, Mr. Surfacer, .010, .020 & .040 styrene sheet and lots of sandpaper as you will see below.
The Build
Because of the nature of this kit and how it is assembled, the instructions are for guidance but it has to be assembled and painted in small sub assemblies otherwise it will be almost impossible to paint all the details.
First I began with lower hull assembly. This included the hull front plate, rear plate and interior floor plate. The side panels which cover the tracks were completely covered with large deep pin marks, about 6 on each side. After trying to fill and sand, I went the route of using .010 styrene sheet and just covering the marks.
I then primed the top half with Vallejo OD primer and painted with Poly Scale Olive Drab 505 370. The engine compartment was weathered to prepare for the engine and winch installation with AK track wash.

The same problem exists with the inside of the engine roof, covered with part position holes and big pin marks. I covered it again with .010 styrene sheet. Here it is with a roof part added.
While I have the styrene out, the inside roof of the cab is a mess of pin marks and part holes. It is a bit more complicated and requires panels. Here is the roof in process.
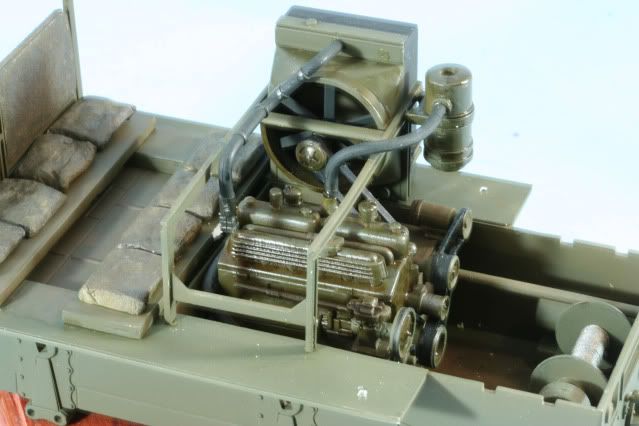
As a break from the styrene sheet puzzle, I assembled the engine. The engine on the M4 was painted OD with black hoses and steel hose clamps. After assembly and priming the main engine was painted with Poly Scale OD. The hoses and belts are painted with a rubber mix of Flat & NATO Black. The clamps and belt pulleys are painted with Alclad Steel. The engine was then weathered with AK Track wash.
Also in the engine compartment is the winch assembly. Again after assembly and priming I painted with Poly Scale OD. I then wound some wax coated ship builders string onto the winch spool to create the winch cable. Then I painted the cable with Alclad Steel. Also the PTO connection on the winch was also painted with Alclad Steel.
OK….now for this weeks update
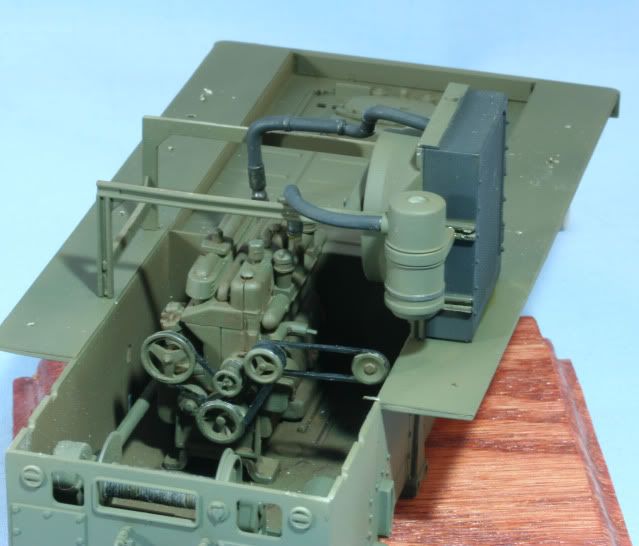
Going in one direction was completing the lower hull by installing the engine and the radiator and fan assembly
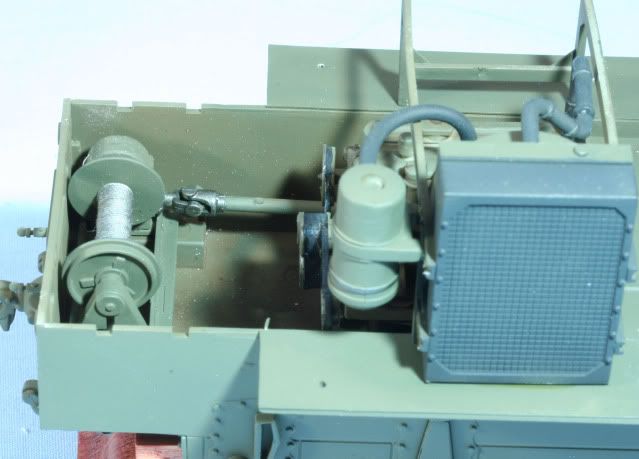
Then I installed the winch assembly and power takeoff
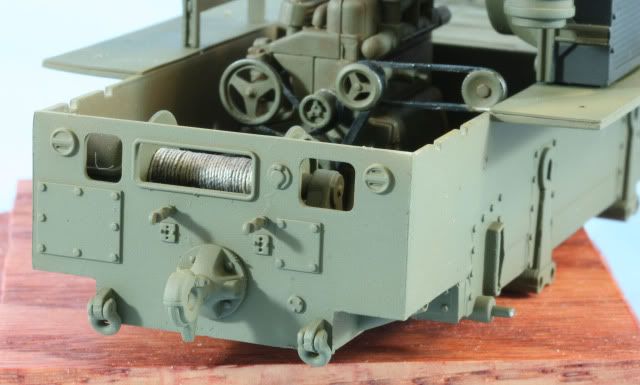
The rear of the hull has some details to add such as the towing hook, Chicago fittings for the air lines and towing clevises. Once these were complete I gave the lower half and bottom a prime coat with Vallejo OD primer and a base coat with Poly Scale OD
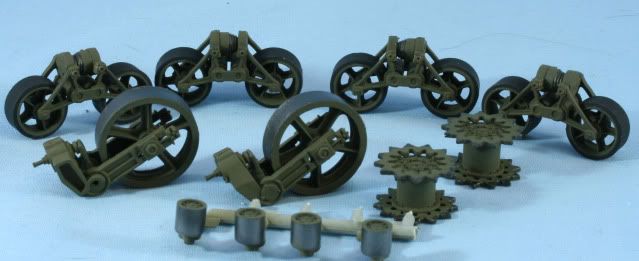
In another direction are the road wheels and assemblies. The drive is a two-part assembly, the rear idler wheel is 3 parts for the wheel and then another 3 parts for the assembly. The boogies are a three-part assembly plus the two wheels. The upper idler rollers are mounted on there axels.
After cleaning up and priming all the parts the road wheels were painted with a tire black mix of 50/50% Flat & NATO black. The idler and upper idlers were painted with Alclad Steel. After drying the rims and mounting parts were painted with Poly Scale OD. Once dry, I completed final assembly of the road wheel assemblies.
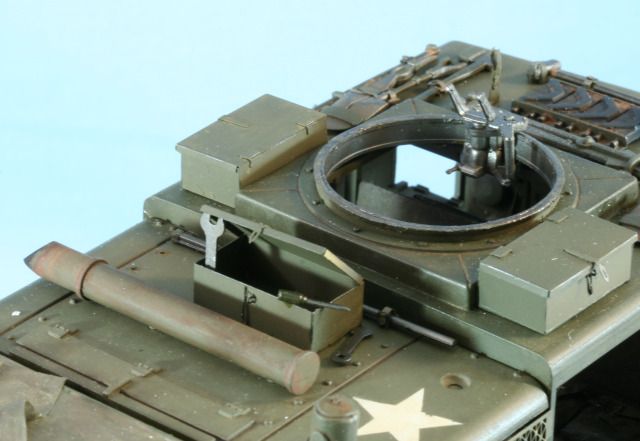
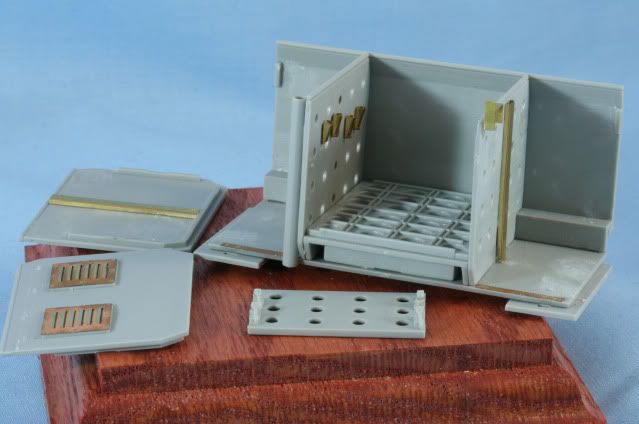
Now…in a third direction, I began assembly of the ammo box. This included the center floor plate with recess holes for 8 inch projectiles. The kit gives you a choice of two different sizes for 155mm or 8 inch (203 mm). Even with the large size the projectiles are a bit tight. On the internal walls, are the brackets for the projectile holders from the Eduard PE set. On the opposite side of each center wall panel is a divider bracket also from the Eduard PE set
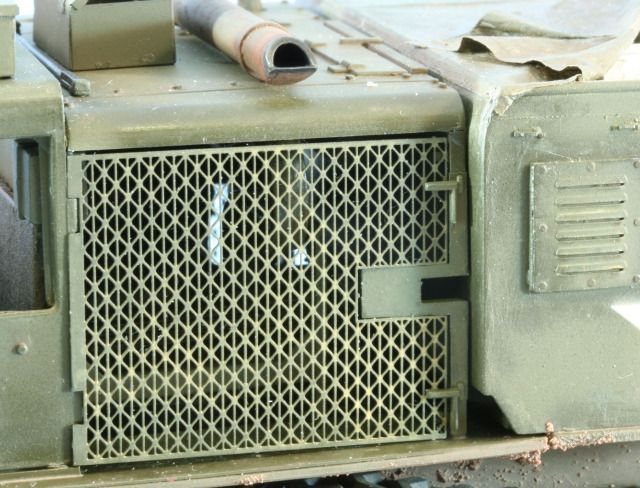
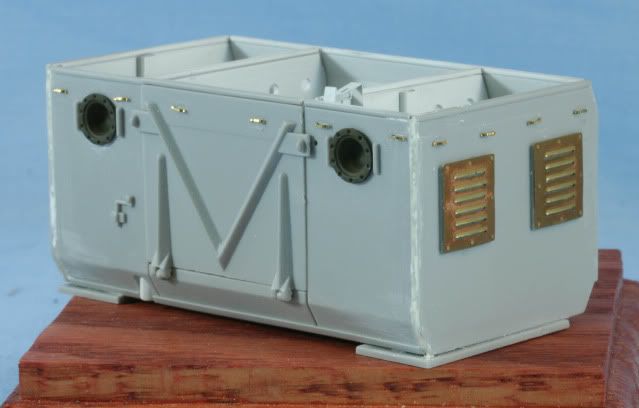
I mounted the internal divider walls and on the right wall is also mounted the crane locking bracket from the Eduard PE set. I then worked on the outside sidewalls removing the styrene blobs for the tie downs and the vent grill. I applied the Eduard vent grills to the outside walls. The Eduard set gives you parts so you can cut the holes through the end walls for the vents. Even though I will have the ammo box partially open when finished, I will have powder cans in those compartments so I took the easy way out and just mounted the grilles since the holes would not be visible. Also, on the inside wall of the end panels is a PE panel divider.
Also working on the ammo box front wall removing blobs for the tie downs and filling some big ejector pin marks on the inside of the door and front panels
First I painted the interior components of the ammunition box section with Tamiya Flat White. After the paint dried I assembled the box. The fit of the side panel to the rear panel left a lot to be desired and all the seams needed a fair amount of putty and sanding.
Here is the current status of the ammunition box. I have removed the molded blobs for tie downs and I still have to replace them with PE tie downs.

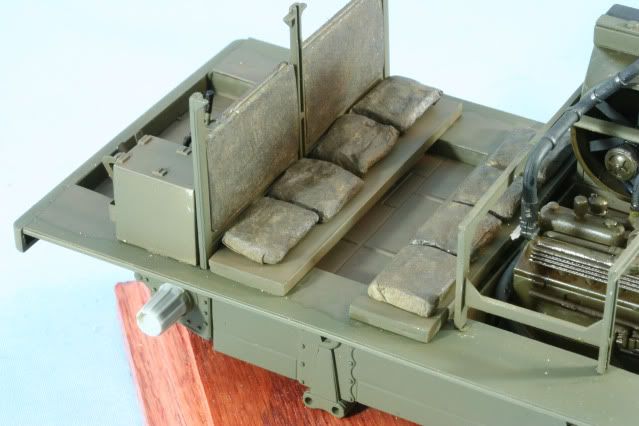
The interior cushions looked like blobs of plastic. The seat cushions are totally wrong. So, to give the side and back cushions the look of cloth, I covered them in aircraft tissue. The seat cushions are long molded double seats with no character. The interior photos in High Speed Tractors by Doyle shows single seat cushions, which look like old used pillows.
To create these I used two-part epoxy putty rolled out to about the right thickness then cut to size. After they set up I also covered them with aircraft tissue. With all the cushions covered, the cushions were primed and then painted with Tamiya Drab Green.

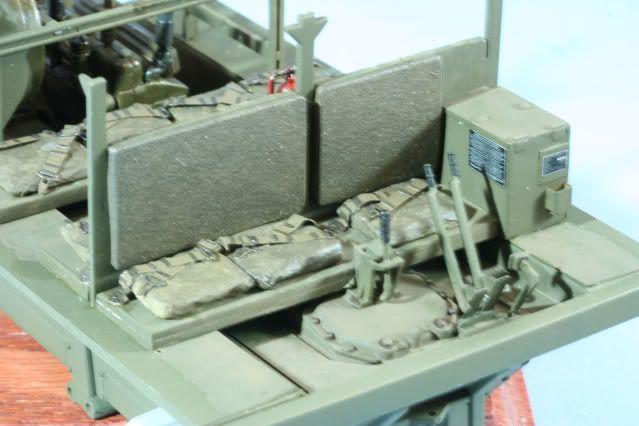
The benches were scratched from two sheets of .040 styrene, laminated together. After cutting and sanding the benches were primed and painted with Poly Scale OD. While working on the benches I weathered the floor of the cabin with AK Mud Effects. While I was in the weathering mode, all of the cushions were weathered with MIG Ochre Wash, then a pin wash using MIG dark wash for deep spots on the cushions. After installing the benches, I installed the back cushions on the divider panel and installed the divider panel. Then I installed the rear cushions.
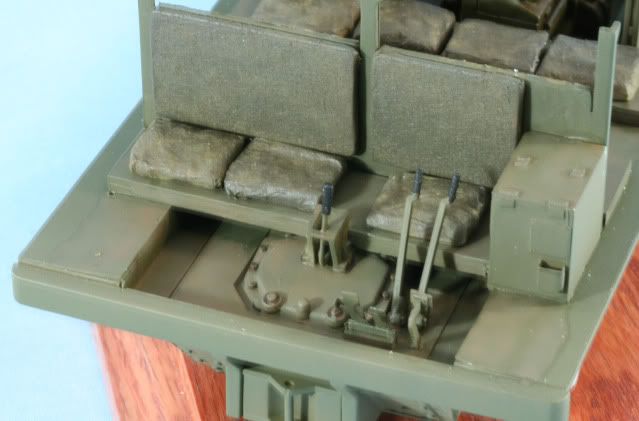
In the front section I used the PE set for the pedals, and installed the driving arms and clutch. The handles were painted black while the frames were Poly scale OD and some Alclad Steel dry brushed for wear on the track levers and pedals. Here is the view with the front seats installed.
With all the weathering products open, the engine was coated and pin washed with AK Engine Grime
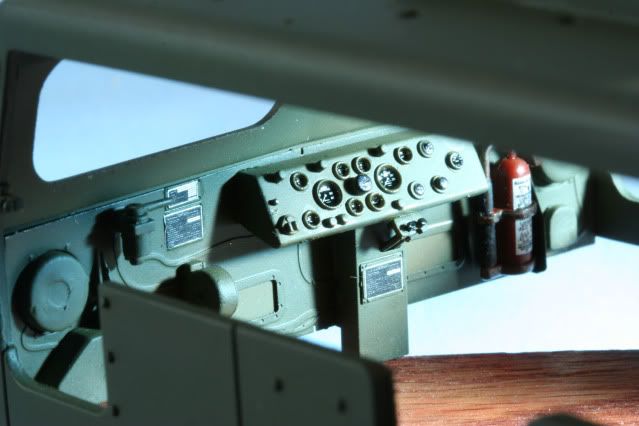
I worked on the dashboard using the Eduard PE dash as a substitute for the kit dash. This requires mounting some of the kit parts on the dash. The instrument cluster is from the kit. The instruments are from the Archer Transfers set for the M4 tractor. After the gauges were set in place, I filled the instrument bezel with Future and let it dry and then repeated it to create the illusion of glass on the bezel. Also the Archer sheet comes with some data plates, which also go on the dashboard. The fire extinguisher is done with Tamiya Flat Red, NATO Black and Alclad Steel. Again the markings on the fire extinguisher are included in the Archer set. Overall the dash is painted with Poly Scale OD after priming with Vallejo OD primer.
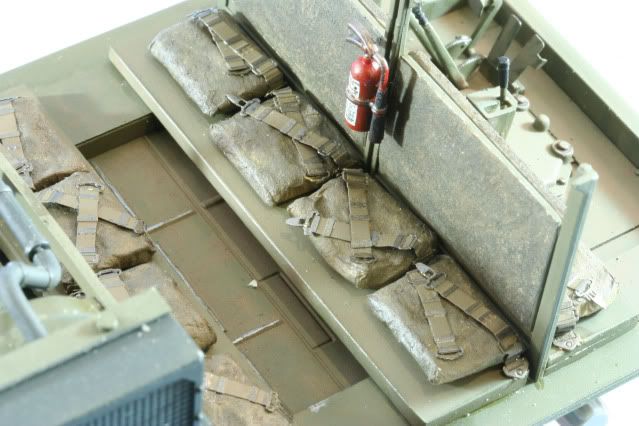
The seat cushions all had seat belts as seen in High Speed Tractors by Doyle. The Eduard set has the seat belts, which I painted with Vallejo OD primer and Vallejo Uniform Green. The metal clasps were painted with Alclad Steel. Putting them in and trying to bend each set into a different position was a time consuming and laborious task. The floor and other high spots were also given edge wear with a 2H pencil. This fire extinguisher was painted and finished same as the one above. Here is the view of the back set of crew seats.
Here is the view of front seats. Also note the additional data plates also from the Archer Transfer set.
Well, I cut off the 16 tie down blobs on the ammo box and used the PE tie downs. As usual about 15% went into the “outer limits” before I was able to complete the set. The painted green is the headlight inserts. The seams on this were also a PITA as the overall shell did not fit well.
The ammo box was primed with Vallejo OD Primer and the painted with Poly Scale OD.
With paint on all the exterior major components I used some Tamiya OD mixed with about 10% Tamiya Dark Yellow for darker shadow lines. Here is the ammo box.
Here is the forward crew cabin
Next, using PE stencil set I created masks for 20-inch stars and a 12-inch star for the rear. The masks are created using 1-inch wide painters tape. After the masks are applied and the area is generally masked to prevent overspray, the stars were applied using Tamiya Flat White. Here is the ammo box and the roof of the engine compartment. The small star on the rear door of the ammo box is the 12-inch. All the rest are 20-inch stars.
Here is the forward crew cabin
In between all this painting I have begun working on the tools, toolboxes and the rear crane.
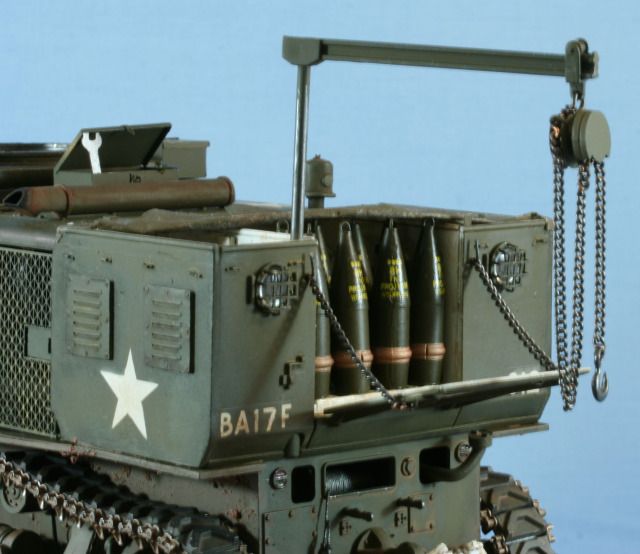
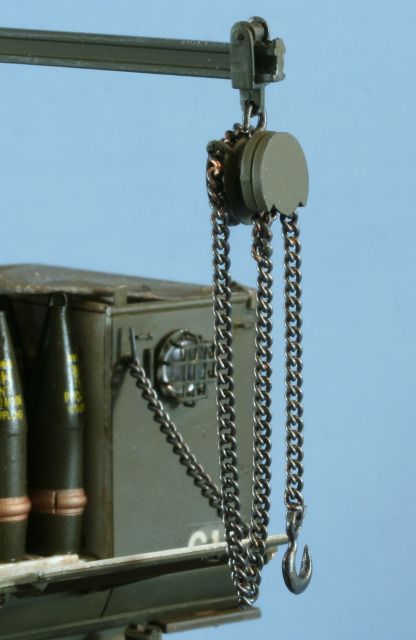
The rear crane is Primed with Vallejo OD primer then painted with Poly Scale OD. The metal contact surfaces are painted with Alclad Steel. The hoist roller, hoist chain, hoist hook are all also painted with Alclad Steel. Here is the finished rear ammunition crane
After installing the PE front window hinges it was time to fit up the cab and engine compartment. The ammunition compartment is just dry fit for a check.
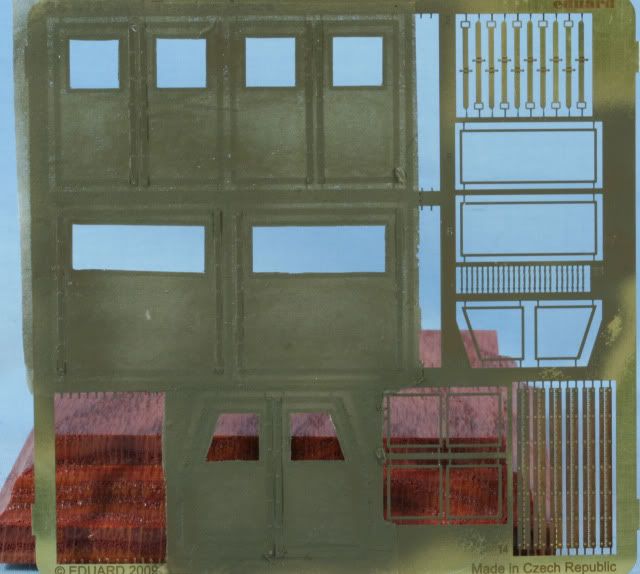
Getting the doors ready will require some time to allow drying. The Eduard PE doors require paper for the canvas. Instead of paper, I used my favorite for canvas, aircraft (jap) tissue. Here you can see the tissue attached using landscape cement. After attaching it each side is coated to seal up the tissue and give it strength.
After coating the doors with airplane tissue, the doors were painted on one side with Vallejo OD Green. After the paint was given overnight to dry, I then using a new sharp #11 blade cut out the window areas and removed the tissue.
After the windows were cleared the other side of the doors was painted. I also painted one side of the window frames. On the unpainted side I applied contact cement. In my particular case, 3M photo mounting cement. This was done by spraying a small amount of the cement into a disposable cup and then applying the cement to the frame with a small detail cotton swab.
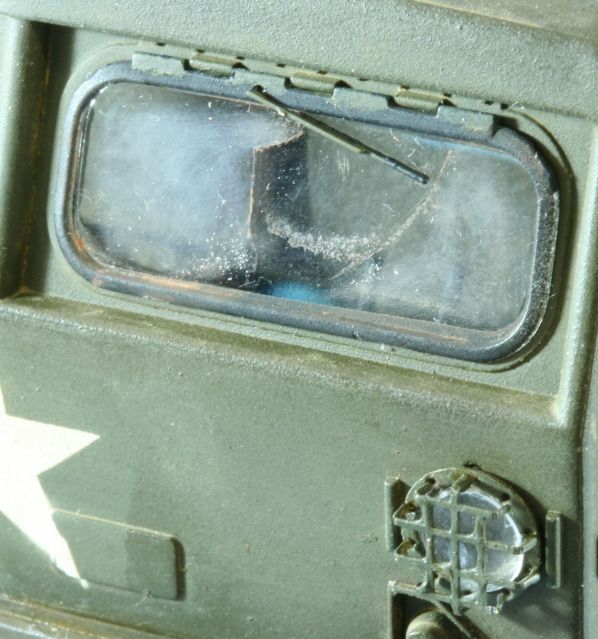
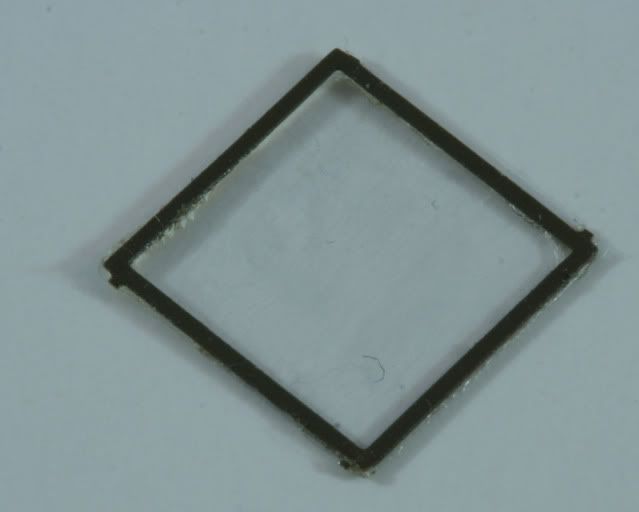
Once a set of frames was ready with I cut, with a new sharp #11 blade, a strip of clear stretch wrap plastic. Then I applied the stretch wrap to the frames starting on one side and working to the other while keeping the stretch wrap taught and straight. After pressing to the frames, again using the sharp #11 blade I cut around each frame and removed it from the PE sheet. Here is one of the small windows when removed.
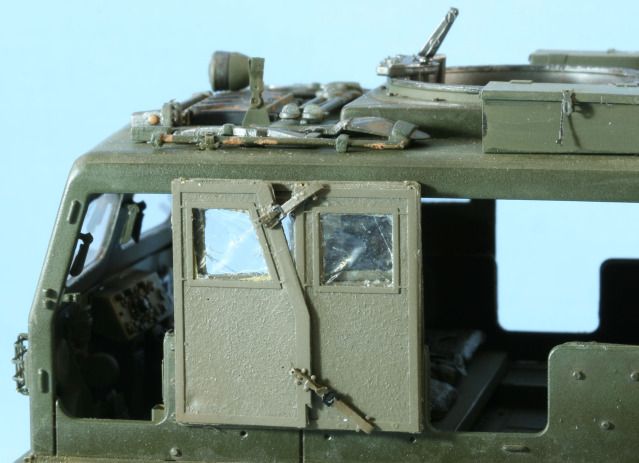
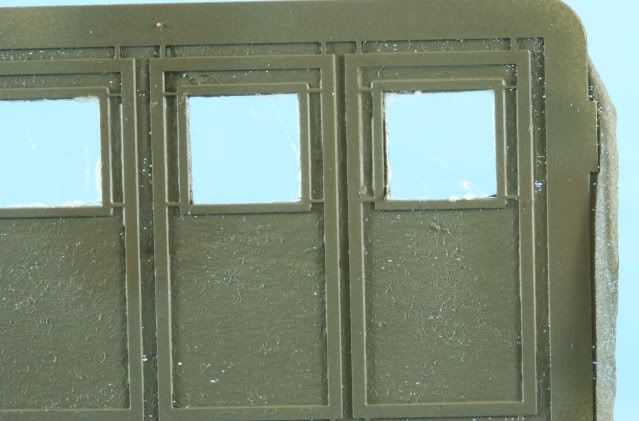
Again, using the contact cement, I place a small bead on the tissue side of the window opening on the door and then applied the frame with the clear window to the door. Here is a view of the small doors with the windows applied.
Once all the windows are applied it is time to remove the doors from the PE Sheet. Here is how the sheet looks with everything installed
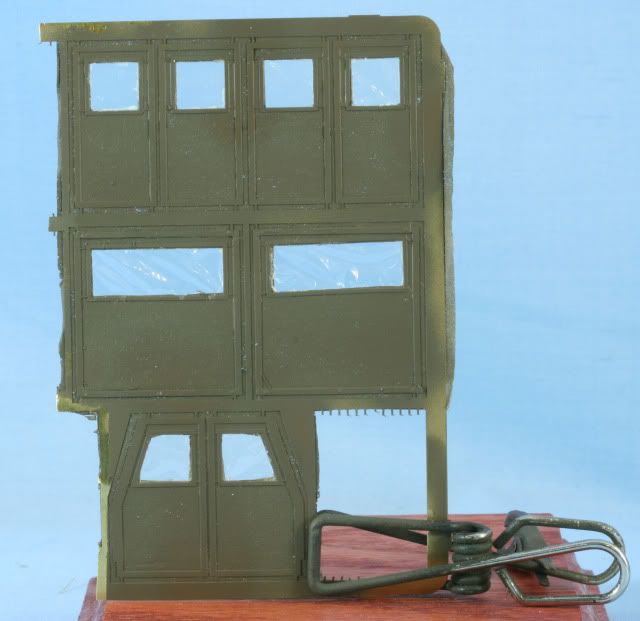
Once again using a sharp #11 blade I removed all the doors and the hinges. Since I intend to display with the crew compartment open, I folded the hinges and assembled the doors in the folded position using Gator Glue. Here is the finished set of doors, minus their tie down straps, but ready to mount.
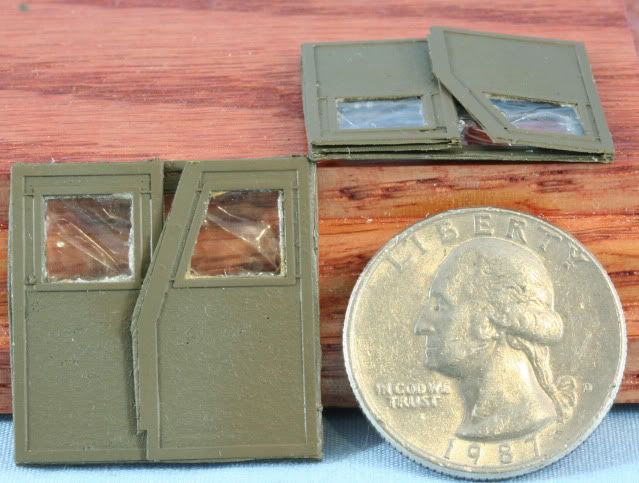
As you can see in the photo, how thin the folded set is which is much closer to scale than piling all the plastic doors together, which would have been more than .080 thick, which would be way out of scale. The Eduard doors are time consuming but much closer to scale
It is Labor Day weekend and it was time to hit the bench.
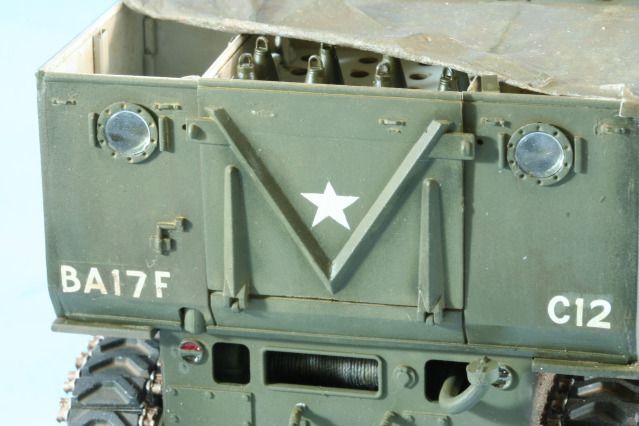
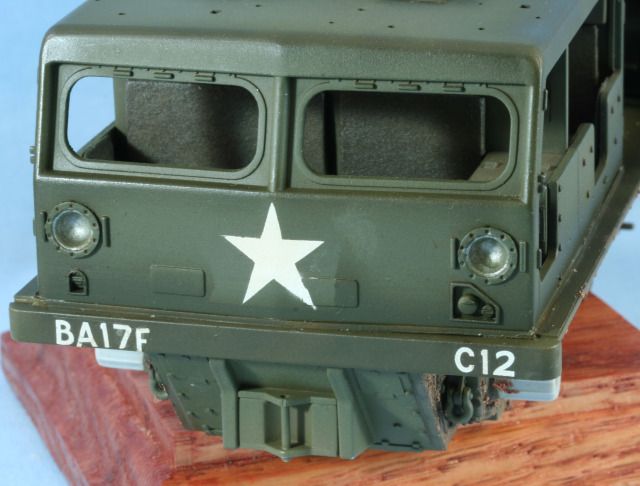
First I needed to get the bumper markings for the vehicle. These are the markings of the 17th Field Artillery, one of 3 eights inch towed units in Korea. Using Archer Transfers, I created the bumper markings on clear decal sheet. After the letters and numbers are placed on the decal paper, the bumper decals were sprayed with Gloss Future. After drying overnight the decals are ready to be applied. After application, the decals are allowed to snug down overnight. After the decals are set, the bumper is over-sprayed with Dull Future.
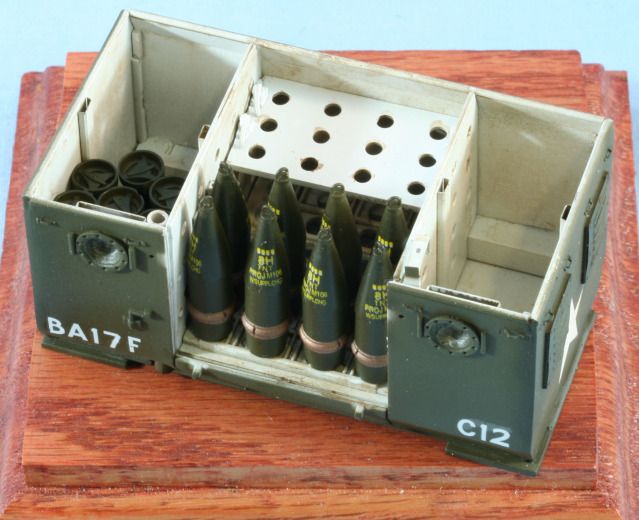
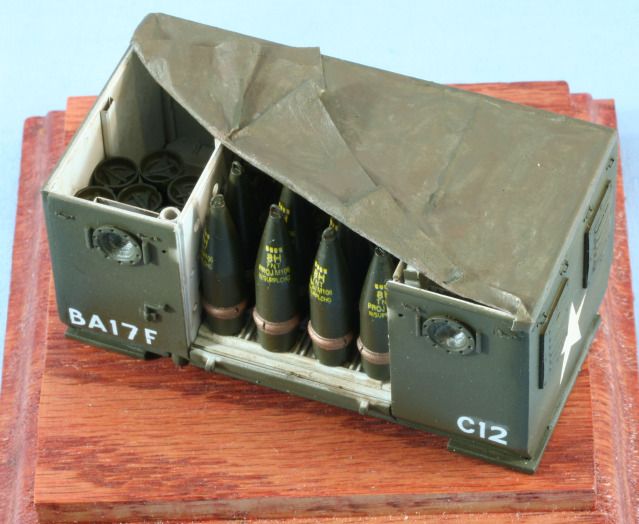
To try to complete the ammunition container, I assembled 8 inch ammunition from the AFV 155mm/8inch ammunition kit. The projectiles and powder cans were painted with Tamiya OD. Once dry, the projectiles were masked and the rotating band was painted with Tamiya Flat Copper. After the paint was dry, the 8 inch projectile decals were applied and then the ammunition was loaded into the ammunition box
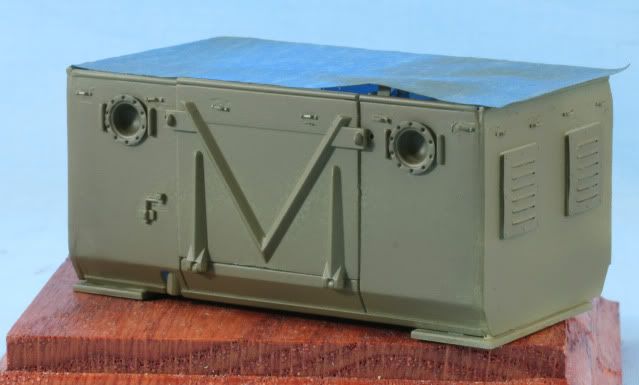
With the ammunition loaded, I created a tarp with aircraft tissue. After measuring and allowing an additional 1/8 inch on each edge, the edges are folded and sealed using landscape cement to create the tarp edge cuff. After the cement dries then the tarp was applied to the ammunition box with landscape cement. Then, the entire tarp is coated with landscape cement to seal the tissue. I applied the tarp with one side folded back where the crane will be attached.
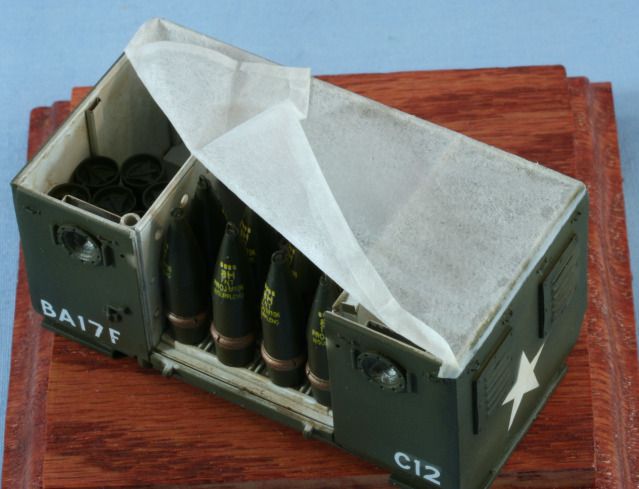
After allowing the landscape cement to dry overnight, the tarp was painted with Vallejo OD and high edges shaded with Poly Scale OD
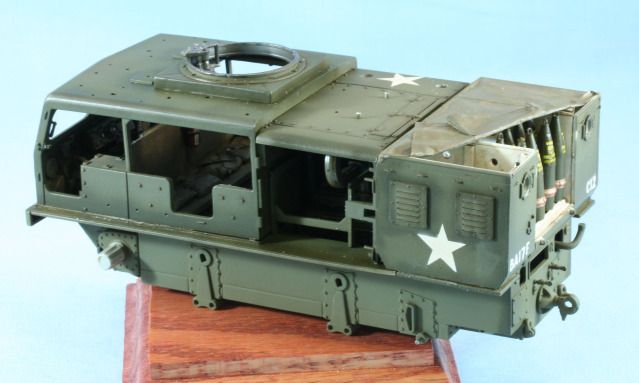
With the ammunition in the box and the tarp on the roof, the box was attached to the main frame.
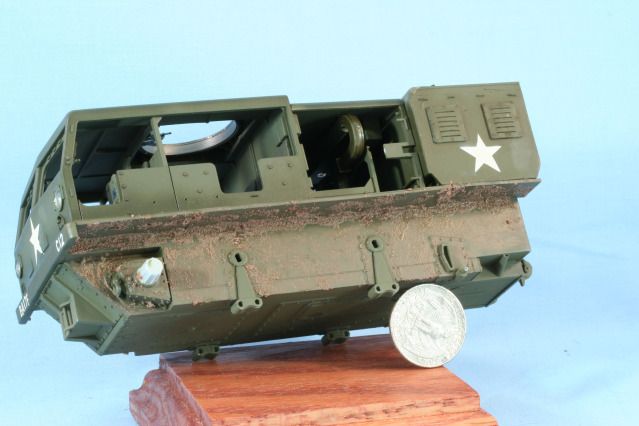
Now I moved on to some pre weathering in the track area. To create some depth, I colored some Liquatex Ceramic Stucco with Tamiya NATO Brown. This was applied in the track area where mud would cake up. This was allowed to dry overnight.
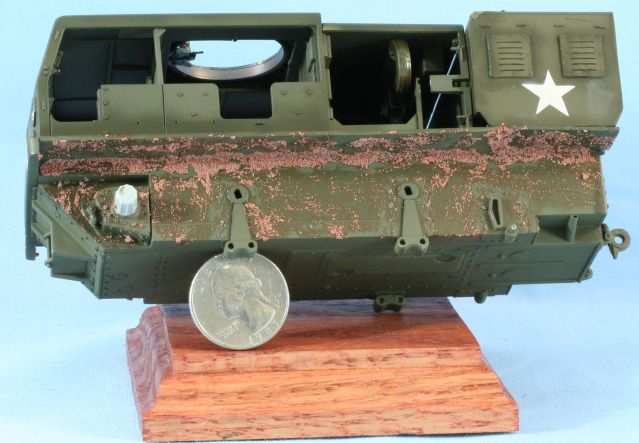
Once dry I applied AK Earth Effects to the underside
Next up are some filters and then it is time to start applying tools and other details
As always all comments are welcome.
Rounds Complete!!
The M4 was based on the chassis and drive train of the obsolescent M2 Light Tank. This common practice of re-using old vehicles simplified design, allowed for easy production, and made maintenance in the field easier.
One variant was designed to tow anti-aircraft guns and another for howitzers. The rear compartment carried the gun crew and other equipment. The howitzer variants included a crane to assist with heavier projectiles
The M4 was manufactured by Allis-Chalmers of Milwaukee, starting in 1942 and was in U.S. military service until approximately 1960.
The M4 version I will be building will be the howitzer version with the ammunition box designed to carry 8 inch howitzer ammunition.
My building reference is the book High Speed Tractors by David Doyle
The Kit
The kit I wil be using is the Hobby Boss M4 Tractor 155mm/240mm (which is incorrect as the 8 inch projectile is 203mm), kit #82408
I will also be adding the Eduard PE sets 36072 which is the outside details and 36073 which is the cab doors. I will also replace the M2 MG with a Tasca MG.
By the start of building this kit I quickly realized it will also require, liquid putty, Mr. Surfacer, .010, .020 & .040 styrene sheet and lots of sandpaper as you will see below.
The Build
Because of the nature of this kit and how it is assembled, the instructions are for guidance but it has to be assembled and painted in small sub assemblies otherwise it will be almost impossible to paint all the details.
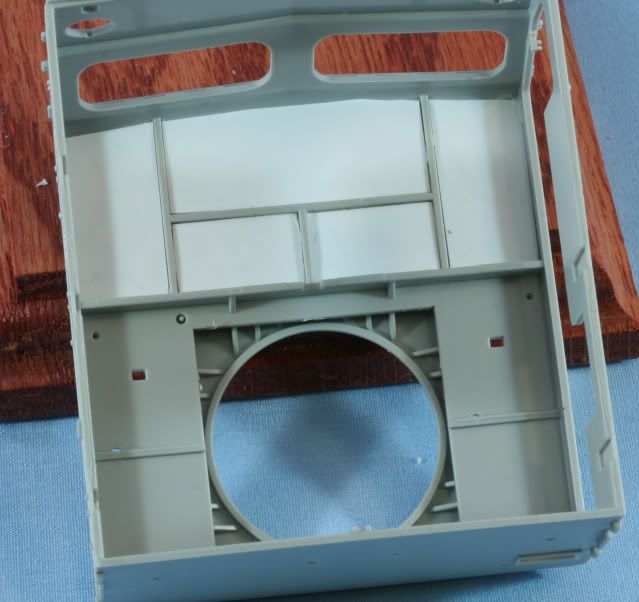
First I began with lower hull assembly. This included the hull front plate, rear plate and interior floor plate. The side panels which cover the tracks were completely covered with large deep pin marks, about 6 on each side. After trying to fill and sand, I went the route of using .010 styrene sheet and just covering the marks.
I then primed the top half with Vallejo OD primer and painted with Poly Scale Olive Drab 505 370. The engine compartment was weathered to prepare for the engine and winch installation with AK track wash.
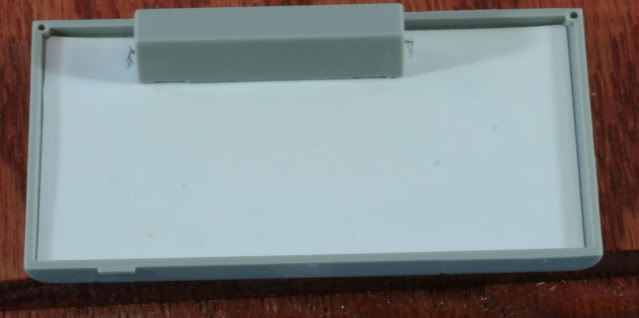
The same problem exists with the inside of the engine roof, covered with part position holes and big pin marks. I covered it again with .010 styrene sheet. Here it is with a roof part added.
While I have the styrene out, the inside roof of the cab is a mess of pin marks and part holes. It is a bit more complicated and requires panels. Here is the roof in process.
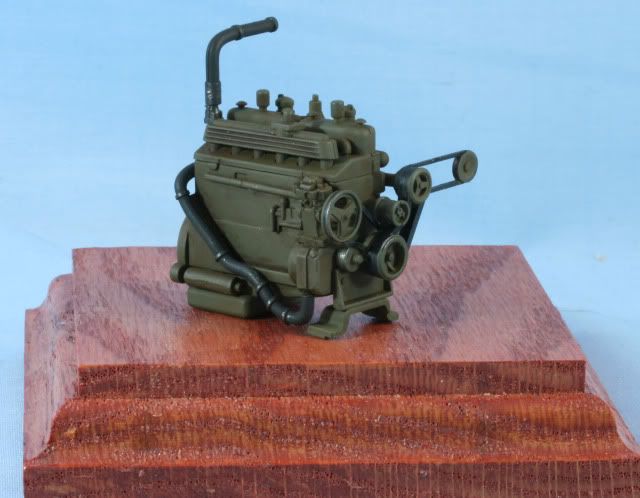
As a break from the styrene sheet puzzle, I assembled the engine. The engine on the M4 was painted OD with black hoses and steel hose clamps. After assembly and priming the main engine was painted with Poly Scale OD. The hoses and belts are painted with a rubber mix of Flat & NATO Black. The clamps and belt pulleys are painted with Alclad Steel. The engine was then weathered with AK Track wash.
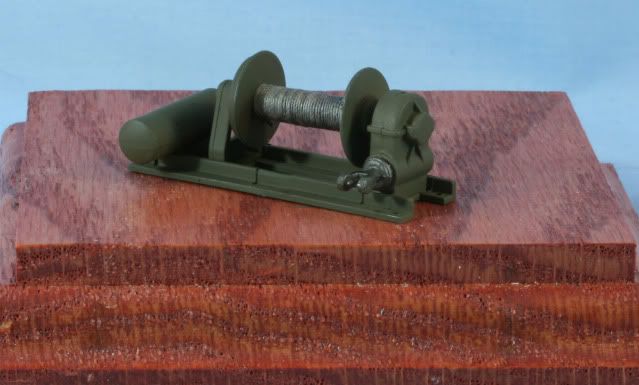
Also in the engine compartment is the winch assembly. Again after assembly and priming I painted with Poly Scale OD. I then wound some wax coated ship builders string onto the winch spool to create the winch cable. Then I painted the cable with Alclad Steel. Also the PTO connection on the winch was also painted with Alclad Steel.
OK….now for this weeks update
Going in one direction was completing the lower hull by installing the engine and the radiator and fan assembly
Then I installed the winch assembly and power takeoff
The rear of the hull has some details to add such as the towing hook, Chicago fittings for the air lines and towing clevises. Once these were complete I gave the lower half and bottom a prime coat with Vallejo OD primer and a base coat with Poly Scale OD
In another direction are the road wheels and assemblies. The drive is a two-part assembly, the rear idler wheel is 3 parts for the wheel and then another 3 parts for the assembly. The boogies are a three-part assembly plus the two wheels. The upper idler rollers are mounted on there axels.
After cleaning up and priming all the parts the road wheels were painted with a tire black mix of 50/50% Flat & NATO black. The idler and upper idlers were painted with Alclad Steel. After drying the rims and mounting parts were painted with Poly Scale OD. Once dry, I completed final assembly of the road wheel assemblies.
Now…in a third direction, I began assembly of the ammo box. This included the center floor plate with recess holes for 8 inch projectiles. The kit gives you a choice of two different sizes for 155mm or 8 inch (203 mm). Even with the large size the projectiles are a bit tight. On the internal walls, are the brackets for the projectile holders from the Eduard PE set. On the opposite side of each center wall panel is a divider bracket also from the Eduard PE set
I mounted the internal divider walls and on the right wall is also mounted the crane locking bracket from the Eduard PE set. I then worked on the outside sidewalls removing the styrene blobs for the tie downs and the vent grill. I applied the Eduard vent grills to the outside walls. The Eduard set gives you parts so you can cut the holes through the end walls for the vents. Even though I will have the ammo box partially open when finished, I will have powder cans in those compartments so I took the easy way out and just mounted the grilles since the holes would not be visible. Also, on the inside wall of the end panels is a PE panel divider.
Also working on the ammo box front wall removing blobs for the tie downs and filling some big ejector pin marks on the inside of the door and front panels
First I painted the interior components of the ammunition box section with Tamiya Flat White. After the paint dried I assembled the box. The fit of the side panel to the rear panel left a lot to be desired and all the seams needed a fair amount of putty and sanding.
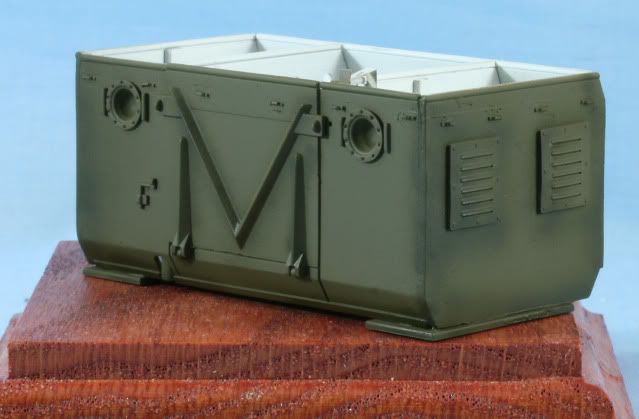
Here is the current status of the ammunition box. I have removed the molded blobs for tie downs and I still have to replace them with PE tie downs.
The interior cushions looked like blobs of plastic. The seat cushions are totally wrong. So, to give the side and back cushions the look of cloth, I covered them in aircraft tissue. The seat cushions are long molded double seats with no character. The interior photos in High Speed Tractors by Doyle shows single seat cushions, which look like old used pillows.
To create these I used two-part epoxy putty rolled out to about the right thickness then cut to size. After they set up I also covered them with aircraft tissue. With all the cushions covered, the cushions were primed and then painted with Tamiya Drab Green.
The benches were scratched from two sheets of .040 styrene, laminated together. After cutting and sanding the benches were primed and painted with Poly Scale OD. While working on the benches I weathered the floor of the cabin with AK Mud Effects. While I was in the weathering mode, all of the cushions were weathered with MIG Ochre Wash, then a pin wash using MIG dark wash for deep spots on the cushions. After installing the benches, I installed the back cushions on the divider panel and installed the divider panel. Then I installed the rear cushions.
In the front section I used the PE set for the pedals, and installed the driving arms and clutch. The handles were painted black while the frames were Poly scale OD and some Alclad Steel dry brushed for wear on the track levers and pedals. Here is the view with the front seats installed.
With all the weathering products open, the engine was coated and pin washed with AK Engine Grime
I worked on the dashboard using the Eduard PE dash as a substitute for the kit dash. This requires mounting some of the kit parts on the dash. The instrument cluster is from the kit. The instruments are from the Archer Transfers set for the M4 tractor. After the gauges were set in place, I filled the instrument bezel with Future and let it dry and then repeated it to create the illusion of glass on the bezel. Also the Archer sheet comes with some data plates, which also go on the dashboard. The fire extinguisher is done with Tamiya Flat Red, NATO Black and Alclad Steel. Again the markings on the fire extinguisher are included in the Archer set. Overall the dash is painted with Poly Scale OD after priming with Vallejo OD primer.
The seat cushions all had seat belts as seen in High Speed Tractors by Doyle. The Eduard set has the seat belts, which I painted with Vallejo OD primer and Vallejo Uniform Green. The metal clasps were painted with Alclad Steel. Putting them in and trying to bend each set into a different position was a time consuming and laborious task. The floor and other high spots were also given edge wear with a 2H pencil. This fire extinguisher was painted and finished same as the one above. Here is the view of the back set of crew seats.
Here is the view of front seats. Also note the additional data plates also from the Archer Transfer set.
Well, I cut off the 16 tie down blobs on the ammo box and used the PE tie downs. As usual about 15% went into the “outer limits” before I was able to complete the set. The painted green is the headlight inserts. The seams on this were also a PITA as the overall shell did not fit well.
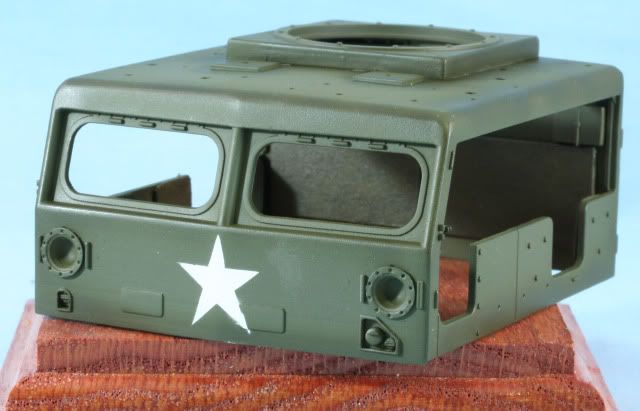
The ammo box was primed with Vallejo OD Primer and the painted with Poly Scale OD.
With paint on all the exterior major components I used some Tamiya OD mixed with about 10% Tamiya Dark Yellow for darker shadow lines. Here is the ammo box.
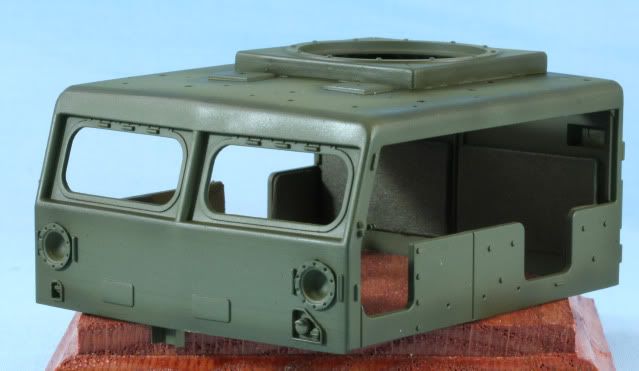
Here is the forward crew cabin
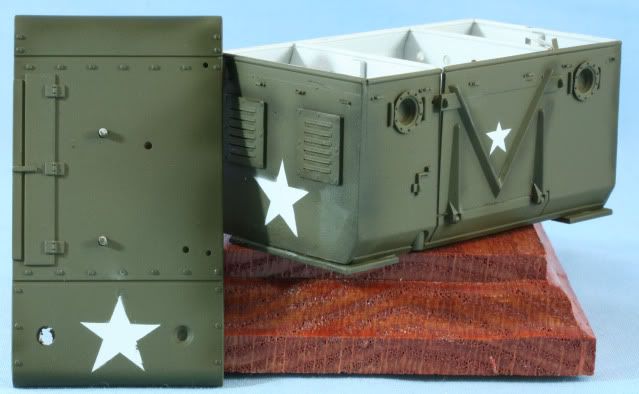
Next, using PE stencil set I created masks for 20-inch stars and a 12-inch star for the rear. The masks are created using 1-inch wide painters tape. After the masks are applied and the area is generally masked to prevent overspray, the stars were applied using Tamiya Flat White. Here is the ammo box and the roof of the engine compartment. The small star on the rear door of the ammo box is the 12-inch. All the rest are 20-inch stars.
Here is the forward crew cabin
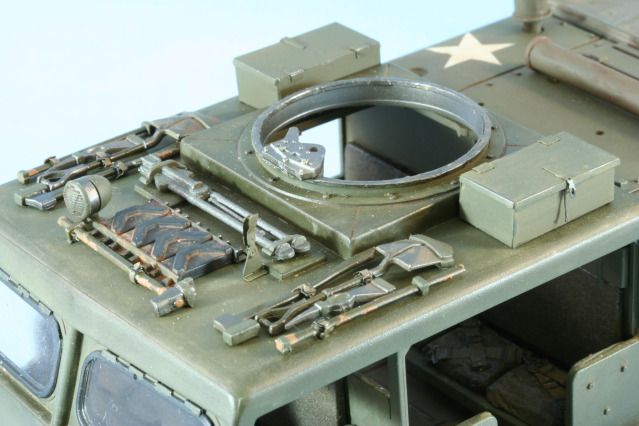
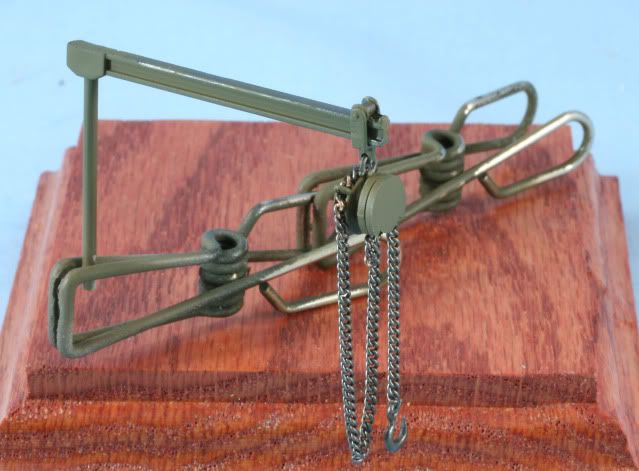
In between all this painting I have begun working on the tools, toolboxes and the rear crane.
The rear crane is Primed with Vallejo OD primer then painted with Poly Scale OD. The metal contact surfaces are painted with Alclad Steel. The hoist roller, hoist chain, hoist hook are all also painted with Alclad Steel. Here is the finished rear ammunition crane
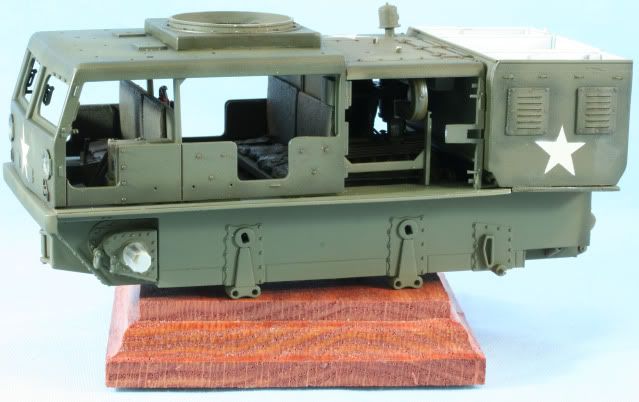
After installing the PE front window hinges it was time to fit up the cab and engine compartment. The ammunition compartment is just dry fit for a check.
Getting the doors ready will require some time to allow drying. The Eduard PE doors require paper for the canvas. Instead of paper, I used my favorite for canvas, aircraft (jap) tissue. Here you can see the tissue attached using landscape cement. After attaching it each side is coated to seal up the tissue and give it strength.
After coating the doors with airplane tissue, the doors were painted on one side with Vallejo OD Green. After the paint was given overnight to dry, I then using a new sharp #11 blade cut out the window areas and removed the tissue.
After the windows were cleared the other side of the doors was painted. I also painted one side of the window frames. On the unpainted side I applied contact cement. In my particular case, 3M photo mounting cement. This was done by spraying a small amount of the cement into a disposable cup and then applying the cement to the frame with a small detail cotton swab.
Once a set of frames was ready with I cut, with a new sharp #11 blade, a strip of clear stretch wrap plastic. Then I applied the stretch wrap to the frames starting on one side and working to the other while keeping the stretch wrap taught and straight. After pressing to the frames, again using the sharp #11 blade I cut around each frame and removed it from the PE sheet. Here is one of the small windows when removed.
Again, using the contact cement, I place a small bead on the tissue side of the window opening on the door and then applied the frame with the clear window to the door. Here is a view of the small doors with the windows applied.
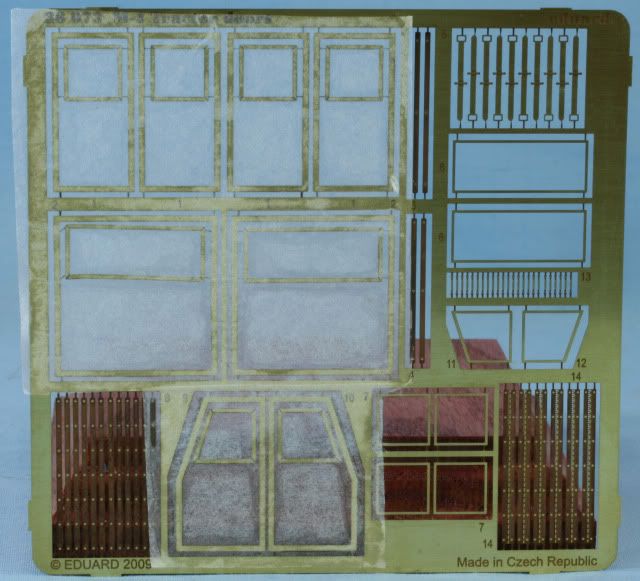
Once all the windows are applied it is time to remove the doors from the PE Sheet. Here is how the sheet looks with everything installed
Once again using a sharp #11 blade I removed all the doors and the hinges. Since I intend to display with the crew compartment open, I folded the hinges and assembled the doors in the folded position using Gator Glue. Here is the finished set of doors, minus their tie down straps, but ready to mount.
As you can see in the photo, how thin the folded set is which is much closer to scale than piling all the plastic doors together, which would have been more than .080 thick, which would be way out of scale. The Eduard doors are time consuming but much closer to scale
It is Labor Day weekend and it was time to hit the bench.
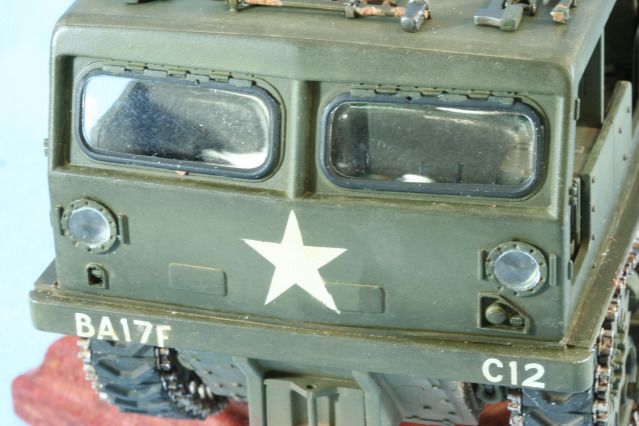
First I needed to get the bumper markings for the vehicle. These are the markings of the 17th Field Artillery, one of 3 eights inch towed units in Korea. Using Archer Transfers, I created the bumper markings on clear decal sheet. After the letters and numbers are placed on the decal paper, the bumper decals were sprayed with Gloss Future. After drying overnight the decals are ready to be applied. After application, the decals are allowed to snug down overnight. After the decals are set, the bumper is over-sprayed with Dull Future.
To try to complete the ammunition container, I assembled 8 inch ammunition from the AFV 155mm/8inch ammunition kit. The projectiles and powder cans were painted with Tamiya OD. Once dry, the projectiles were masked and the rotating band was painted with Tamiya Flat Copper. After the paint was dry, the 8 inch projectile decals were applied and then the ammunition was loaded into the ammunition box
With the ammunition loaded, I created a tarp with aircraft tissue. After measuring and allowing an additional 1/8 inch on each edge, the edges are folded and sealed using landscape cement to create the tarp edge cuff. After the cement dries then the tarp was applied to the ammunition box with landscape cement. Then, the entire tarp is coated with landscape cement to seal the tissue. I applied the tarp with one side folded back where the crane will be attached.
After allowing the landscape cement to dry overnight, the tarp was painted with Vallejo OD and high edges shaded with Poly Scale OD
With the ammunition in the box and the tarp on the roof, the box was attached to the main frame.
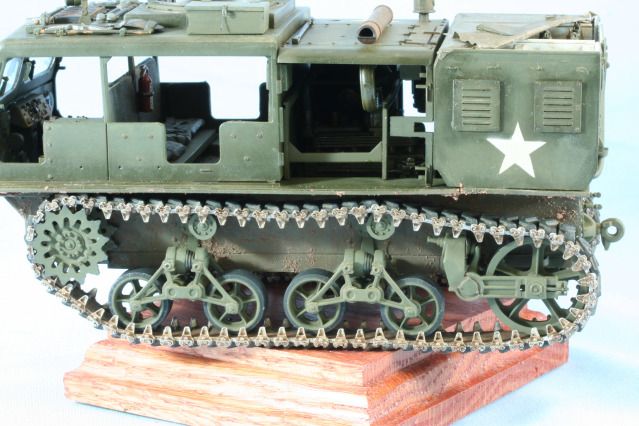
Now I moved on to some pre weathering in the track area. To create some depth, I colored some Liquatex Ceramic Stucco with Tamiya NATO Brown. This was applied in the track area where mud would cake up. This was allowed to dry overnight.
Once dry I applied AK Earth Effects to the underside
Next up are some filters and then it is time to start applying tools and other details
As always all comments are welcome.
Rounds Complete!!