406 Silverado
Global Administrator 
Member since: November 2011
Posts: 8,542
Member is Online
MSC Staff
|
Post by 406 Silverado on Aug 31, 2012 15:44:16 GMT -5
Yep, looks damn good from here. Road and barrier both look good, but the JP is the cat's meow.
|
|
danb
Reviews member  March 2013 MoM Winner
Member since: November 2011
Posts: 2,808
Nov 17, 2011 9:22:52 GMT -5
Nov 17, 2011 9:22:52 GMT -5
|
Post by danb on Aug 31, 2012 16:00:21 GMT -5
Thankyou kind sirs much appreciated hopefully i should get another chunk done tomorrow evening if all goes well
Dan B
|
|
|
|
Post by robbo on Aug 31, 2012 16:18:40 GMT -5
Now that base is coming along a treat Dan
|
|
bigjohn
Reviews member
Member since: December 2011
John Hale
Posts: 3,438
Dec 21, 2011 2:17:45 GMT -5
Dec 21, 2011 2:17:45 GMT -5
|
Post by bigjohn on Aug 31, 2012 18:42:05 GMT -5
Hey Dan,
The weathering on that JP is certainly my cup of tea, I think it looks bloody fantastic! I'm really digging the base as well, nice job with the paving stones.
|
|
|
|
Post by bbd468 on Aug 31, 2012 23:35:51 GMT -5
Dan, the base is coming along nicely! Looks Great!!!  Gary |
|
|
|
Post by wbill76 on Sept 1, 2012 20:09:39 GMT -5
What's not to like about this whole setup? Very cool looking Dan, love the dirt and barrels behind the barricade and the cobblestone work is nice as well. Going to make a fine home for your JP!
|
|
modelfreak72
Full Member

Member since: January 2012
Why worry, each of us is wearing an unlicensed nuclear accelerator on his back.
Posts: 1,479
Jan 28, 2012 23:21:46 GMT -5
Jan 28, 2012 23:21:46 GMT -5
|
Post by modelfreak72 on Sept 1, 2012 20:39:58 GMT -5
Dan please forgive me for not seeing this one sooner! Great work on the Jadgpanther, paint job is sweet and the weathering is outstanding! The dio is looking good, love the brick work!
|
|
|
|
Post by deafpanzer on Sept 2, 2012 0:33:41 GMT -5
Fantastic work on the cobblestones!!! Cork? You got to be kidding me... great tip!
|
|
|
|
Post by wouter on Sept 2, 2012 1:10:35 GMT -5
wow mate, adding each and every cobblestone individually??? Impressive mate, and it looks very good!
Cheers
|
|
danb
Reviews member
March 2013 MoM Winner
Member since: November 2011
Posts: 2,808
Nov 17, 2011 9:22:52 GMT -5
Nov 17, 2011 9:22:52 GMT -5
|
Post by danb on Sept 2, 2012 7:46:17 GMT -5
Thanks chaps for the the comments
Deafpanzer: I use cork for all my buildings and cobblestones its great stuff to work with but very labour intensive!!!!!
Wouter: Yes mate every one is laid seperately it takes ages!!!!!!
Dan B
|
|
multicam
Senior Member

Member since: January 2012
Nate
Posts: 2,039
Jan 10, 2012 14:35:41 GMT -5
Jan 10, 2012 14:35:41 GMT -5
|
Post by multicam on Sept 2, 2012 18:58:12 GMT -5
This looks really good. Can't wait for paint. The cobblestones look the business:)
|
|
danb
Reviews member
March 2013 MoM Winner
Member since: November 2011
Posts: 2,808
Nov 17, 2011 9:22:52 GMT -5
Nov 17, 2011 9:22:52 GMT -5
|
Post by danb on Sept 11, 2012 15:44:13 GMT -5
Right chaps after a long time with no update i have finally got the Jadgpanther finished the last few bits were fitting the tracks and some fine details hope ya all like it now i need to get a small base done ready for Euro. More photo will be put in the gallery.   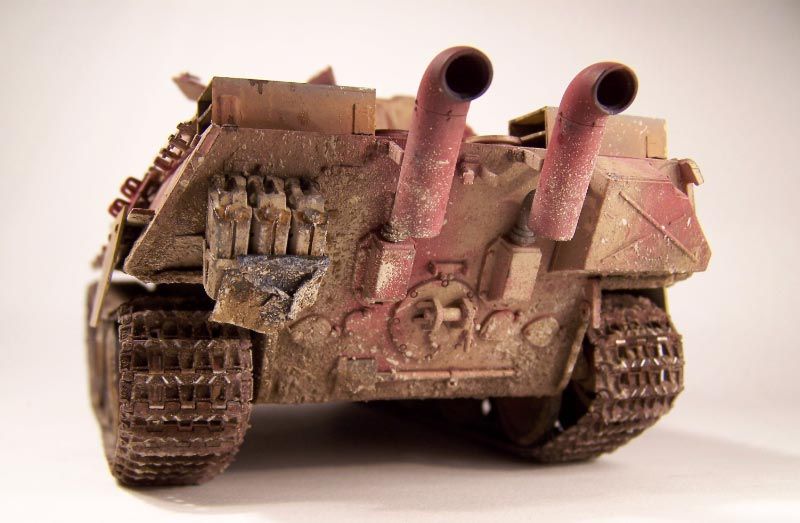 Dan B |
|
sollie
Full Member
Member since: January 2012
Posts: 456
Jan 21, 2012 5:07:22 GMT -5
Jan 21, 2012 5:07:22 GMT -5
|
Post by sollie on Sept 11, 2012 16:17:39 GMT -5
wow, that's art man. Great work , love it
|
|
|
|
Post by wbill76 on Sept 11, 2012 16:50:36 GMT -5
Very nice Dan, super job on this one all around.
|
|
danb
Reviews member
March 2013 MoM Winner
Member since: November 2011
Posts: 2,808
Nov 17, 2011 9:22:52 GMT -5
Nov 17, 2011 9:22:52 GMT -5
|
Post by danb on Sept 11, 2012 16:50:40 GMT -5
Thanks Dicky yes sir the barricade dio will be its home just need a plinth for Euro as i will not get the base finished in time
Cheers Sollie the comments really pushes me to get to a higher standard.
Dan B
|
|
danb
Reviews member
March 2013 MoM Winner
Member since: November 2011
Posts: 2,808
Nov 17, 2011 9:22:52 GMT -5
Nov 17, 2011 9:22:52 GMT -5
|
Post by danb on Sept 11, 2012 16:52:32 GMT -5
Many thanks Bill much appreciated
Dan B
|
|
|
|
Post by bbd468 on Sept 11, 2012 22:24:53 GMT -5
Dan, i think it looks BAD A$$!!! Very unique on a masterful build and finish. Gary |
|
danb
Reviews member
March 2013 MoM Winner
Member since: November 2011
Posts: 2,808
Nov 17, 2011 9:22:52 GMT -5
Nov 17, 2011 9:22:52 GMT -5
|
Post by danb on Sept 26, 2012 16:28:24 GMT -5
|
|
sollie
Full Member
Member since: January 2012
Posts: 456
Jan 21, 2012 5:07:22 GMT -5
Jan 21, 2012 5:07:22 GMT -5
|
Post by sollie on Sept 26, 2012 16:32:35 GMT -5
applause x10
|
|
|
|
Post by robbo on Sept 26, 2012 16:44:13 GMT -5
Top job Dan, they look great mate
|
|
danb
Reviews member
March 2013 MoM Winner
Member since: November 2011
Posts: 2,808
Nov 17, 2011 9:22:52 GMT -5
Nov 17, 2011 9:22:52 GMT -5
|
Post by danb on Sept 26, 2012 16:55:50 GMT -5
Many thanks boys really appreciate it.
Dan B
|
|
|
|
Post by spud on Sept 26, 2012 17:02:38 GMT -5
Very Nice Dan
|
|
|
|
Post by deafpanzer on Sept 26, 2012 17:42:27 GMT -5
Freaking cool figures!!! I like em!!!
|
|
|
|
Post by TRM on Sept 26, 2012 18:16:31 GMT -5
Well done on the figs!!! They really bring the perspective out!! |
|
|
|
Post by bbd468 on Sept 26, 2012 19:58:43 GMT -5
Figs look great man! Damn...that camo on the pants is awsome!! Gary |
|
bigjohn
Reviews member
Member since: December 2011
John Hale
Posts: 3,438
Dec 21, 2011 2:17:45 GMT -5
Dec 21, 2011 2:17:45 GMT -5
|
Post by bigjohn on Sept 26, 2012 20:02:20 GMT -5
Figs look great dan!! I too seam to get lost trying to follow a SBS on painting figures.
|
|
|
|
Post by wbill76 on Sept 26, 2012 20:17:34 GMT -5
Nice job on the pair of figs for this one Dan...a great complement to an already stunning build.
|
|
danb
Reviews member
March 2013 MoM Winner
Member since: November 2011
Posts: 2,808
Nov 17, 2011 9:22:52 GMT -5
Nov 17, 2011 9:22:52 GMT -5
|
Post by danb on Sept 27, 2012 10:39:58 GMT -5
Thanks for the all the positive comments much appreciated
Gary: the camo took ages 4 colours and millions of dots later i think it captured the winter oak leaf pattern!!!!!
Big John the SBS's i have seen look easy but when i try to recreate it it goes horribly wrong!!!! when i get some time and another suitable fig i will do a small SBS if everyone wants me to do 1?
Now onto the base need to get that finished before the next MSC outing in Nov!!!!!
Dan B
|
|
406 Silverado
Global Administrator
Member since: November 2011
Posts: 8,542
Member is Online
MSC Staff
|
Post by 406 Silverado on Sept 28, 2012 7:42:10 GMT -5
Nice work on the figs Dan.
|
|
danb
Reviews member
March 2013 MoM Winner
Member since: November 2011
Posts: 2,808
Nov 17, 2011 9:22:52 GMT -5
Nov 17, 2011 9:22:52 GMT -5
|
Post by danb on Sept 30, 2012 12:23:25 GMT -5
Hey all Right as i have got on and completed the figures it has given me some inspiration and drive to get the base finished so i sat staring at it and could not get any ideas on how to finish it so i googled Berlin 1946 to come up with some ideas as i was trolling through some pics i came across a pic of some Jadcats in Hungary and found that the pic was of the 10th Panzer Div in retreat then found they were the last div to recieve Jacats as the factory was captured by the U.S so this is now the new idea for the mini dio So i started by making a plywood base then stuck 80mm styrofoam to it to gain some height to hide the rough edges i used 1mm plasticard this was attached using UHU power adhesive!!!!! Once this had dried it was on to making a basic house shape out of plasticard i searched for some pics of a hungarian house in the 40's and found a school house pic this looked an easy shape to reproduce many of these builings were a wooden structure and often brick clad so this is my progress so far. Base and school house:  The wall and brick work were made from styrofoam underlay here is a quick SBS for anyone wanting a faster way of replicating brick walls: 1. Cut your desired wall size then decide what size bricks you want replicate (i made mine 6mm long and 4mm high) lightly draw the bricks onto the foam using a pen once your happy lightly cut the lines using a sharp scalpal.   2. Now get a Stanley knife blade and place the blade into the lines you just cut and wiggle side to side (not you the blade!!!!lol) this makes the mortar joints  3. To make the wall look old i took a toothpick an pushed in a few bricks and using the pointed end chip the edges of the bricks also sandpaper gives a nice effect to roughen the surface.  now some pics of the finishe piece:  Some pics of the builing so far figures ae for scale:    Dan B |
|