|
|
Post by deafpanzer on Dec 16, 2012 20:44:46 GMT -5
Too many wheels and complicated suspension system will give me nightmares for many nights!
Looking real good buddy!
|
|
|
|
Post by eastrock on Dec 16, 2012 21:04:08 GMT -5
Lotsa wheelies  |
|
|
|
Post by wbill76 on Dec 16, 2012 22:22:17 GMT -5
Rob, T, Andy, and ER, thanks for following along with me. I think the multiple turret syndrome was infectious and carried over to the suspension design team! 
|
|
|
|
Post by deafpanzer on Dec 16, 2012 22:26:19 GMT -5
Looks like your team is doing very well. I will raise your karma if they wins. If they loose, well I will have to do the opposite. LOL I hate Patriots more than any team out there... L
|
|
Deleted
Member since: January 1970
Posts: 0
May 6, 2024 7:54:02 GMT -5
May 6, 2024 7:54:02 GMT -5
|
Post by Deleted on Dec 16, 2012 23:05:24 GMT -5
Nice , nice ....nice Bill  |
|
|
|
Post by wbill76 on Dec 17, 2012 12:36:55 GMT -5
Andy, talk about a wild game...I told my wife as we were watching it that I wasn't sure if a 28 point lead was going to be enough against the Patriots. Sure was fun to watch, no question about it!
Carl, thanks, felt good to get this one rolling. It's going to be a multi-stage effort due to that hull and suspension design.
|
|
bbrowniii
Full Member

Member since: March 2012
If you are not part of the solution, you are part of the precipitate.
Posts: 1,229
Mar 25, 2012 22:08:04 GMT -5
Mar 25, 2012 22:08:04 GMT -5
|
Post by bbrowniii on Dec 17, 2012 14:44:58 GMT -5
Looking good Bill. Looking good!
|
|
|
|
Post by bbd468 on Dec 17, 2012 20:17:10 GMT -5
Too many wheels and complicated suspension system will give me nightmares for many nights! ANDY!!! I saw all that PE on your Tiger! Surely you arent intimidated by a little extra wheels and suspesion parts? ;D ;D Bill, nice start on the Neubeuarefferezarrug Thing! ;D  Gary |
|
|
|
Post by wbill76 on Dec 17, 2012 21:24:37 GMT -5
Thanks ICP, Boyd, and Gary! Glad to have you fellas along for the ride. Dicky, perhaps that could be just the thing to tempt you away into the world of WW2 armor! |
|
|
|
Post by wouter on Dec 18, 2012 0:29:23 GMT -5
aha, Bill final 2012 build ey...should make up for a nice one. I'm defo interested mate ^^
Cheers
|
|
|
|
Post by wbill76 on Dec 18, 2012 15:35:13 GMT -5
Thanks wouts! This one is started in 2012 but probably won't finish in 2012...but you never know! |
|
|
|
Post by wbill76 on Dec 18, 2012 19:30:39 GMT -5
Dicky's going to do a WW2 subject! Woohooo! Lots and lots of go-round parts on this one...not looking forward to dealing with the tracks either as they are not "Magic" types and have 3 attachment points per link to contend with. |
|
Deleted
Member since: January 1970
Posts: 0
May 6, 2024 7:54:02 GMT -5
May 6, 2024 7:54:02 GMT -5
|
Post by Deleted on Dec 19, 2012 0:17:14 GMT -5
Bill , no update till this weekend ?  |
|
|
|
Post by deafpanzer on Dec 19, 2012 0:26:12 GMT -5
Yep, no update until Sunday UNLESS you blackmail Bill into doing a 'mid-week' update. I did that once and it worked!
|
|
redleg12
Full Member
Member since: August 2012
www.redleg2scale.com
Posts: 401
Aug 28, 2012 18:59:10 GMT -5
Aug 28, 2012 18:59:10 GMT -5
|
Post by redleg12 on Dec 19, 2012 6:32:46 GMT -5
Sneaky...trying to get out of the gate early with the xmas projects. Looks like a nice clean start.
Rounds Complete!!
|
|
|
|
Post by wbill76 on Dec 19, 2012 12:36:34 GMT -5
Carl, you've got to listen to Andy, he's figured out the formula. Next week is my 'holiday week' so you just might see a non-weekend update then...but have to wait and see! Mike, you caught me redhanded...or lefthanded...or handed! Something like that...thanks for the comments!
|
|
|
|
Post by wbill76 on Dec 23, 2012 14:40:12 GMT -5
After studying the rest of the hull construction steps and wanting to avoid having to do multiple paint-work sessions, I decided to go ahead and install as much as possible on the hull first before starting to paint. So of course that lead me to continue on from the last update and add the details from Step 5. This includes all the driver's area hatches and the left side hull hatches as well as the front headlight. The option is given to pose it raised or lowered and since the kit provides a clear lens, I opted to pose it raised. The grab handle for the driver's hood hatch needed a little bit of putty help as the holes provided are slightly larger than the handle bases. The track installation called for in this step was skipped for now. 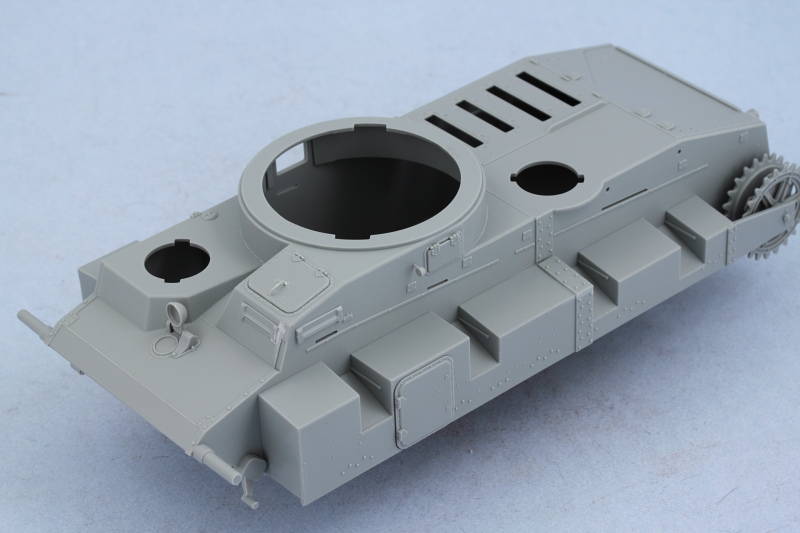 Steps 6-8 deal with the fenders and also adds details to the right hull side that more or less mirror what was already on on the left hull side. One little difference is the need to drill out a hole in the turret ring base to take the 2nd width indicator light, this is a little tricky as you have to guesstimate where the hole should go and you should NOT drill the hole all the way through the hull in order for the light to sit at the right depth to match the other side. I used a #76 finger drill for that purpose. 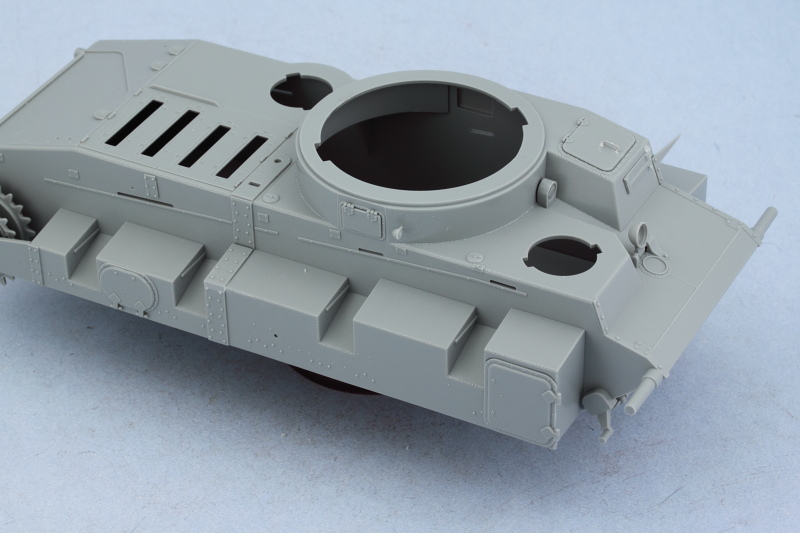 I cleaned up the fenders and did a test fit with some poster putty to see how they would sit and whether or not I could add the front mud flaps or not and still be able to install them over the tracks and idlers when those are added. The answer to that is no, so the front flaps had to be kept off for now. The fender tools and details will get added later after painting. 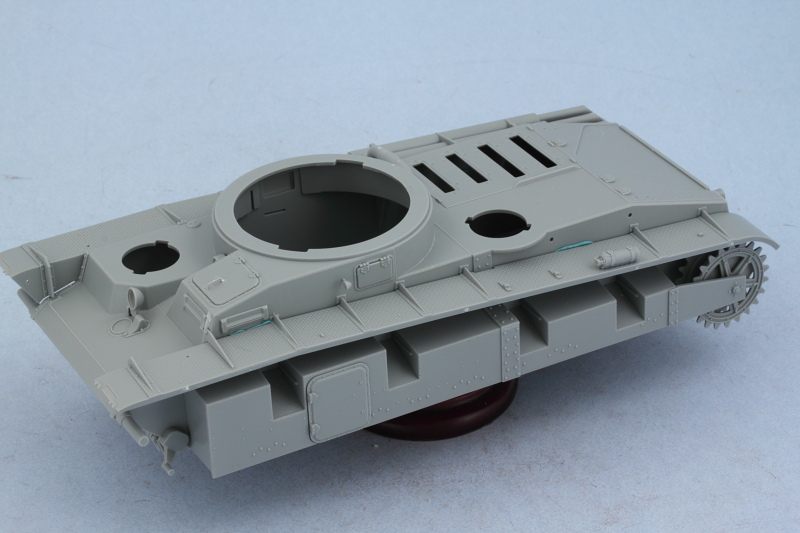 I went ahead and assembled the main twin muffler/exhausts for the right fender side. The exhaust ends only have depressions to represent their openings so I drilled them out to give them more depth. I also added the curved extension pipe that connects into the engine deck, the fit here needs to be precise to avoid issues with the fender and exhaust sitting correctly, so the dry-fit with the fender helped ensure that occurred. The full exhaust is removable for easier painting and detailing off the fender as a result. 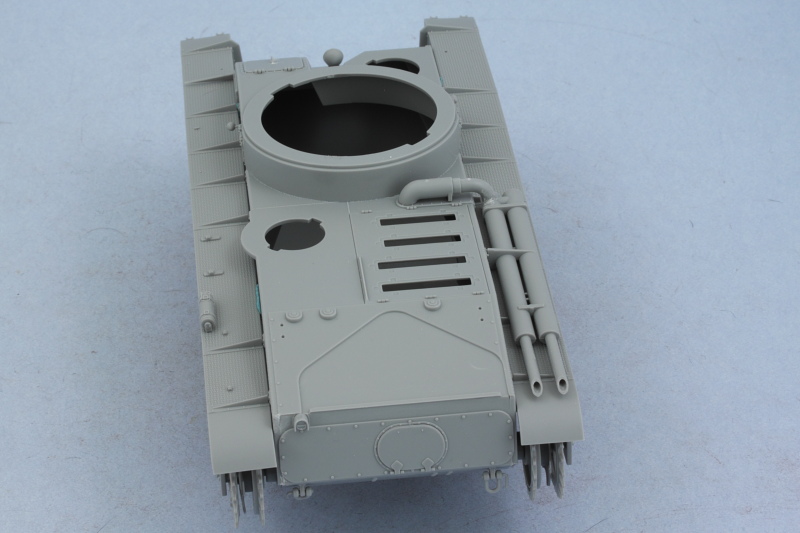 Step 9 deals only with the front mud flaps. Those were assembled and set off to the side for separate painting. 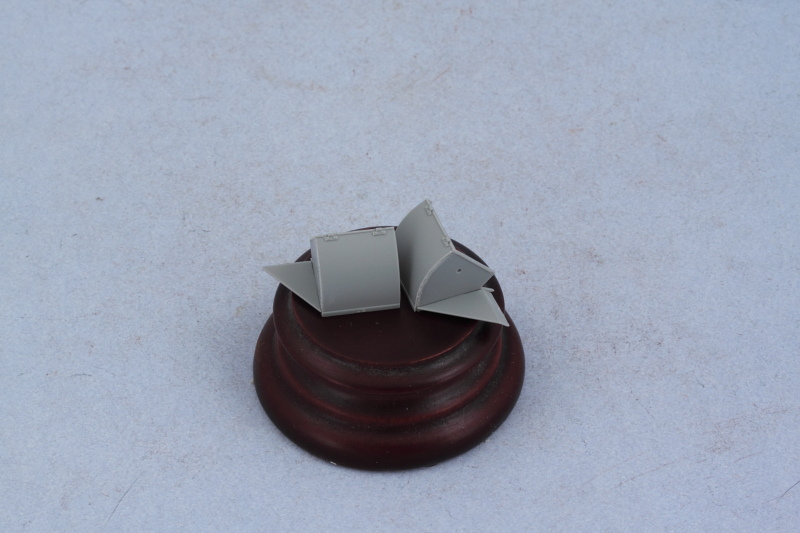 Completing things for the hull is Step 10 which adds the details to the rear engine deck. I opted for the styrene air intake grill slats as the PE option was pretty fragile to work with and didn't offer much of a gain in the looks department. It's also worth noting that the diagram shows the grills (both the styrene and PE option) installing upside down, so be careful to get the orientation right prior to committing to glue on that part. 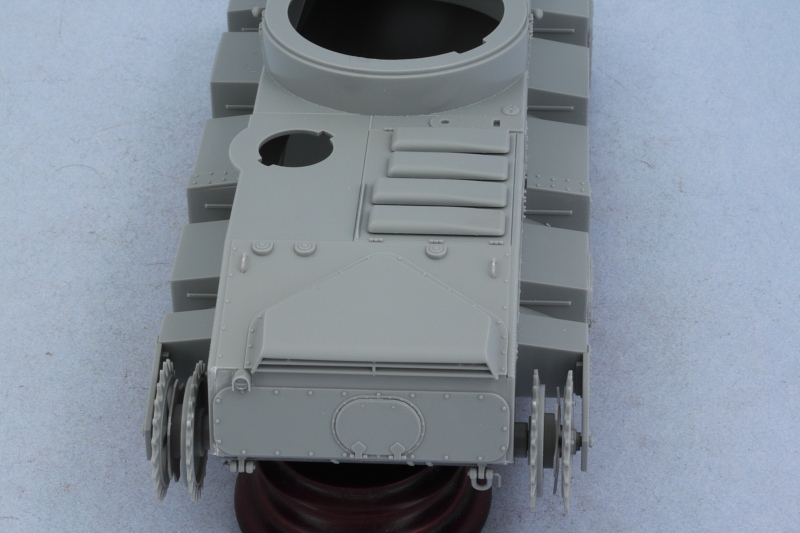 Next up will be working on the turrets. |
|
|
|
Post by wbill76 on Dec 23, 2012 15:07:37 GMT -5
Thanks Dicky! Trying to make the most of the available holiday bench time. Turret session will be interesting since there's 3 of them!
|
|
|
|
Post by 406 Silverado on Dec 23, 2012 17:30:35 GMT -5
Of and running. Hull stuff is looking good Bil. This is gonna be a fun one to paint. Might have to grab me one of these someday.
|
|
|
|
Post by deafpanzer on Dec 23, 2012 17:46:33 GMT -5
Keep it coming!! I realize this is the first WIP for this armor for me to follow. I have seen couple of finished builds but no WIP so I have been watching this with keen interest. Looking forward to 'mid-week' update... |
|
Deleted
Member since: January 1970
Posts: 0
May 6, 2024 7:54:02 GMT -5
May 6, 2024 7:54:02 GMT -5
|
Post by Deleted on Dec 23, 2012 18:13:54 GMT -5
Bill , your in progress builds are certainly clean like Dicky said . I dont know how you do it . Mine always look like i've handle them with dirty gloves , which i havent cause i dont wear gloves while working on models ................  ,must be my hands then ?  |
|
|
|
Post by tonylee on Dec 23, 2012 18:45:57 GMT -5
Go Go Go Billy Boy Tony lee |
|
|
|
Post by wbill76 on Dec 23, 2012 19:51:11 GMT -5
Rob, definitely lots of 'canvas' to play with on this one between the hull sponsons and the wide slab-sided turret. I'm looking forward to having some fun with it! Andy, like you I'm a little surprised at just how few of these have been built up since it was released. Hope the WIP is helpful! Don't worry about the mid-week update...it's just going to be a question of when, not if. Carl, I guess it all depends on what you do with your hands prior to or during the builds!  I've taken to using liquid glue for almost all my assembly work and that does wonders for keeping the build 'clean' I've found. Uncle Tony, you betcha!
|
|
|
|
Post by spud on Dec 23, 2012 19:54:36 GMT -5
Very Nice Bill
|
|
|
|
Post by eastrock on Dec 23, 2012 21:23:35 GMT -5
keep diggin it Bill, |
|
|
|
Post by TRM on Dec 23, 2012 21:50:55 GMT -5
Nice going Bill!! I am liking the looks of this!! 3 Turrets ey? Interesting!! Carry on sir!!! Merry Christmas!!
|
|
Thom
Full Member
Member since: November 2011
Models Impossible (There is more to come.)
Posts: 439
Nov 16, 2011 12:47:25 GMT -5
Nov 16, 2011 12:47:25 GMT -5
|
Post by Thom on Dec 23, 2012 23:02:09 GMT -5
Bill that is looking great, it is such an interesting tank I have one of these however it is in the 1:72 range. Looking forward to seeing more. Cheers, Thom |
|
|
|
Post by wouter on Dec 24, 2012 0:34:20 GMT -5
Nice to see some progress Bill. Love the addition that you drilled out the exhausts. It's these little details which really add some 'oomph' to the model ^^
Cheers
|
|
modelfreak72
Full Member
Member since: January 2012
Why worry, each of us is wearing an unlicensed nuclear accelerator on his back.
Posts: 1,479
Jan 28, 2012 23:21:46 GMT -5
Jan 28, 2012 23:21:46 GMT -5
|
Post by modelfreak72 on Dec 24, 2012 1:12:52 GMT -5
Coming along nicely Bill! ;D
|
|
|
|
Post by bullardino on Dec 24, 2012 3:25:54 GMT -5
Clean build as usual, Bill. That's definitely one of the weirdest tanks I've ever seen, can't wait to see it finished |
|


 ,must be my hands then ?


 I've taken to using liquid glue for almost all my assembly work and that does wonders for keeping the build 'clean' I've found.


