|
|
Post by wbill76 on Mar 31, 2013 20:08:32 GMT -5
Thanks BJ! Been waiting a looooong time to get to the paint work on this baby. Spent about 5 hours working with it today and the time just flew by!  Gary Gary and Leon much appreciated amigos! T thank you kindly sir! The MM Schokoladenbraun is almost a dead ringer for the color chip in Panzer Tracts for Dunkelbraun and it provides an excellent point to weather from...which is somewhat ironic IMHO because in the MM line it's designated as part of the '43 three-tone scheme!  |
|
|
|
Post by TRM on Mar 31, 2013 21:09:17 GMT -5
Nice!! Been a while since I have used MM but considering it with that one. Picked up a 38T a couple weeks ago and was thinking something on the lines of this!! Will head out tomorrow for some popcorn and get ready for the weathering fest!!
|
|
|
|
Post by fightnjoe on Mar 31, 2013 21:09:31 GMT -5
bill that looks awesome. excellent paint work.
joe
|
|
|
|
Post by eastrock on Mar 31, 2013 22:00:41 GMT -5
and we got paint work, as always Bill easy at it goes |
|
|
|
Post by wbill76 on Mar 31, 2013 22:30:38 GMT -5
T, the 38(t) family is my top favorite class of vehicles. Would love to see you work your magic on one.  Joe Joe and ER, thanks for the comments. Clearing the paint hurdle's always a major milestone and this one's had to clear it twice!
|
|
|
|
Post by bullardino on Apr 1, 2013 7:54:22 GMT -5
Very nice camo pattern, Bill |
|
|
|
Post by wbill76 on Apr 1, 2013 11:30:49 GMT -5
Thanks Luigi!
|
|
bish
Full Member

Member since: January 2013
Horatio Nelson 'I am a Norfolk man, and i glory in being so'
Posts: 555
Jan 13, 2013 8:57:43 GMT -5
Jan 13, 2013 8:57:43 GMT -5
|
Post by bish on Apr 1, 2013 14:10:28 GMT -5
Another great build Bill. I know you have been in the forefront of bringing to peoples attention the use of this scheme into 1940. You deffinatly convinced me some time ago. I finally got that PT issue a few months back but hadn't yet worked out which colour to use for the Dunkelbraun. I think i might have to try out my Xtracolour Schokoladenbraun.
|
|
|
|
Post by 406 Silverado on Apr 1, 2013 14:12:04 GMT -5
That's what I'm talking about. great to see you at the bench again and love the camo on this early war tank.
Fun part is up next eh.
|
|
|
|
Post by wbill76 on Apr 1, 2013 19:19:37 GMT -5
Bish, thanks and glad to hear of another convert! Look forward to your effort when the time comes, got to love the early war stuff! Rob, I am soooo looking forward to the weathering stages on this baby. So much room to play with. Almost there! Dicky, thank you sir! Getting the fenders on was essential...I needed something to grab onto to maneuver it around...every time I went to pick it up I had to remind myself 'no no no!' because of disturbing those tracks.
|
|
reserve
Senior Member

Member since: July 2012
Si vis pacem para bellum
Posts: 2,368
Jul 11, 2012 9:11:45 GMT -5
Jul 11, 2012 9:11:45 GMT -5
|
Post by reserve on Apr 2, 2013 9:55:26 GMT -5
I look away for an instant and it's 7/8 done that's what I get for sleepin. This is shaping up to be awful nice brother; the brown against the grey looks great
Regards,
Mark
|
|
|
|
Post by wbill76 on Apr 2, 2013 10:11:20 GMT -5
Thanks Mark! But to be fair...it did slumber for quite a while between Jan and March...so even though it seems like it made a huge leap, it really didn't. I hope I can keep up this kind of regular schedule more often! |
|
|
|
Post by deafpanzer on Apr 2, 2013 20:46:46 GMT -5
Catching up here... you know why. Really dig the camo!!!
|
|
|
|
Post by wbill76 on Apr 2, 2013 20:58:41 GMT -5
Thanks Andy! Hope you're having fun in sunny Florida! |
|
|
|
Post by armorguy on Apr 3, 2013 14:22:44 GMT -5
This is exactly how the camo should look Bill, a brown, misty and cloudy pattern, 100% balance between grey and brown, this is pure mastership !
|
|
|
|
Post by wbill76 on Apr 3, 2013 17:30:36 GMT -5
Dicky Glad you like it. Perhaps we can convince Gary to adopt it as his next kiltutu pattern? Guy, appreciate the comments, don't know about mastership, isn't that what the aliens take you away in to perform weird medical experiments?
|
|
|
|
Post by tonylee on Apr 3, 2013 17:41:10 GMT -5
Well now Tex you know that's just the way I would've done it too. We did good huh Tony lee  |
|
|
|
Post by wbill76 on Apr 3, 2013 20:36:44 GMT -5
Well now Tex you know that's just the way I would've done it too. We did good huh Tony lee Absolutely! |
|
|
|
Post by 406 Silverado on Apr 3, 2013 20:50:02 GMT -5
Gonna have to give that camo a go one of these days, but first the two toned DAK scheme since I have the AK paints for it.
|
|
|
|
Post by wbill76 on Apr 3, 2013 21:10:33 GMT -5
Gonna have to give that camo a go one of these days, but first the two toned DAK scheme since I have the AK paints for it. Can't blame you for giving the DAK schemes priority...but that's the beauty of German armor. So many different possibilities to choose from! |
|
|
|
Post by wouter on Apr 6, 2013 0:44:22 GMT -5
wow Bill, great build. Love how you made those handles for the turrets, one to remember. And what a paintjob...really love the colors you used and that disruptive camo looks very good to me
Cheers
|
|
|
|
Post by wbill76 on Apr 6, 2013 10:29:47 GMT -5
Thanks wouter! Should be able to get in some more time on this one this weekend to keep it moving along. |
|
|
|
Post by 406 Silverado on Apr 6, 2013 14:17:14 GMT -5
Looking forward to the Wild Bill weekend update.
|
|
|
|
Post by wbill76 on Apr 7, 2013 17:05:24 GMT -5
Latest round of effort focused on the details for the fenders. The Neubau has a lot of fender space for tools and such but doesn't use the 'normal' type of clamps for them, so I stayed with the kit-supplied clamps and made minor modifications in thinning a couple of the molded-on handles to be more in-scale. Reference pics showed that the crews added two sets of spare tracks to the right hand fender so I used some spare PE brass strip and some Lion Roar hex nuts to create some simple mounts along with two runs of 4 links from the left-over kit supplied tracks. I used a #76 finger drill to open up the pin holes on the first and last link for each spare run for added detail. Last but not least, using the same finger drill, I also opened up the threaded ends on the gun-cleaning rods and used a short length of white rod styrene to simulate the 'male' end of the rod with the cleaning swab. All the tools were painted using various colors. Metal portions were base coated with MM non-buffing metalizer Gunmetal and lightly dry-brushed with MM Steel. Wood portions were given a base coat of 50/50 MM Dunkelgelb/Light Gray followed by a wash of MM Leather and then dusted with Burnt Umber artist pastels. For the mufflers, I applied a base coat of metalizer Gunmetal, followed by a wash of MM Leather, then stippled MM Rust to create a random pattern. This was followed up with some dry-brushed MM enamel Burnt Umber to blend things back together a bit and tone down the Rust. 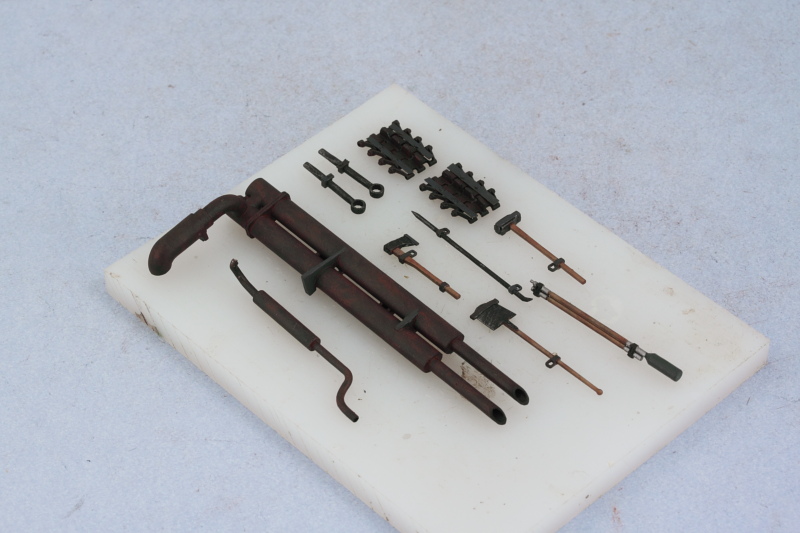 Then the tools were installed in place on the vehicle. It's worth noting that the small MG turrets need to be in place before doing this as the front turret in particular can't clear the track tensioning wrench once it's installed. The rear turret also has clearance issues with the jack mount but can still rotate enough in the opposite direction to allow it to be removed. The turret MGs were painted and detailed in the same fashion as the metal tools and glued into place in their respective mounts. I also used the available time to add some subtle variation to the Schokoladenbraun camo pattern applied last time around. I used MM Italian Dark Brown via airbrush to create some slight lightening and shadows here and there as further prep for the weathering work to come. 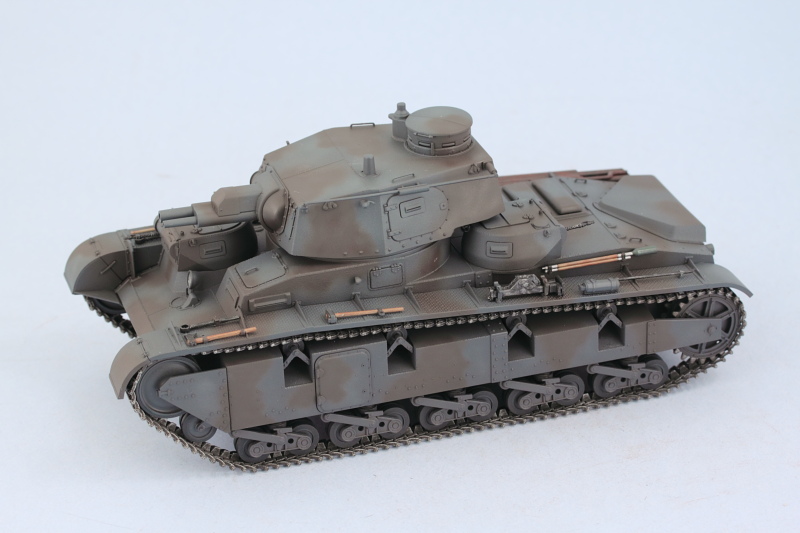 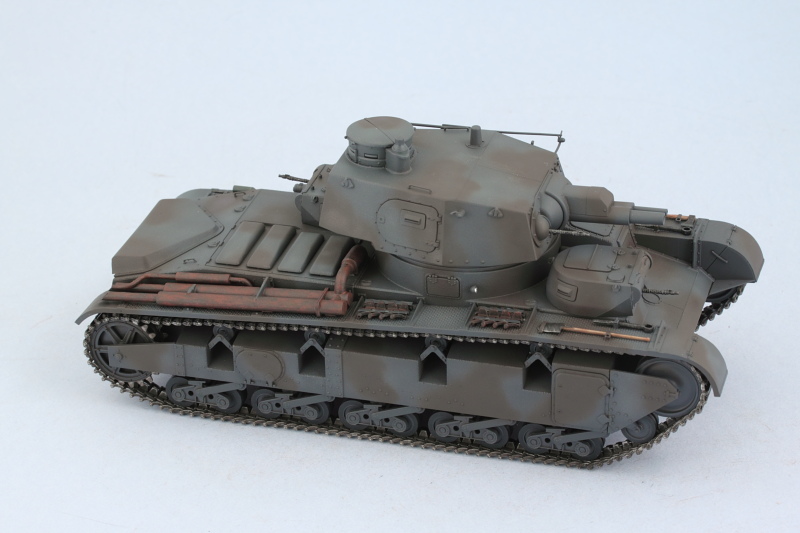 Although not shown clearly in the above photos, I also used some regular enamel Silver to paint the interior faces of the small side lights and the large front headlight. Tamiya Clear Red was used for the rear brake light as well to round things out in the detail department. Next up will be sealing everything and applying the markings. |
|
|
|
Post by bbd468 on Apr 7, 2013 18:35:15 GMT -5
Man, thats a fine machine ya built there Bill. Fantastic works buddy! Makes me want to build mine, but too many other pre-scheduled builds.  |
|
bigjohn
Reviews member 
Member since: December 2011
John Hale
Posts: 3,438
Dec 21, 2011 2:17:45 GMT -5
Dec 21, 2011 2:17:45 GMT -5
|
Post by bigjohn on Apr 7, 2013 18:56:23 GMT -5
Thats some great Detail work on those tool Bill! The color adjustments on the brown look killer too!
|
|
reserve
Senior Member
Member since: July 2012
Si vis pacem para bellum
Posts: 2,368
Jul 11, 2012 9:11:45 GMT -5
Jul 11, 2012 9:11:45 GMT -5
|
Post by reserve on Apr 7, 2013 19:07:59 GMT -5
Beauty!
Regards,
Mark
|
|
sfcmikej
Full Member
Member since: December 2012
Peace through superior firepower.
Posts: 153
Dec 4, 2012 10:00:36 GMT -5
Dec 4, 2012 10:00:36 GMT -5
|
Post by sfcmikej on Apr 7, 2013 19:31:09 GMT -5
She is looking mighty good Bill.
Mike
|
|
|
|
Post by tonylee on Apr 7, 2013 20:04:22 GMT -5
Sorry I messed up
|
|
|
|
Post by wbill76 on Apr 7, 2013 20:04:23 GMT -5
Man, thats a fine machine ya built there Bill. Fantastic works buddy! Makes me want to build mine, but too many other pre-scheduled builds. You'll have to fit this one in somewhere down the line Gary, it's got so much potential! BJ thank you kindly sir! Spent the full day hand-detailing the tools a little bit at a time as I worked around the set. Time flies when you're detailing! Mark and sfcmike thanks as well! |
|