redleg12
Full Member
  
Member since: August 2012
www.redleg2scale.com
Posts: 401
Aug 28, 2012 18:59:10 GMT -5
Aug 28, 2012 18:59:10 GMT -5
|
Post by redleg12 on Mar 17, 2013 18:29:55 GMT -5
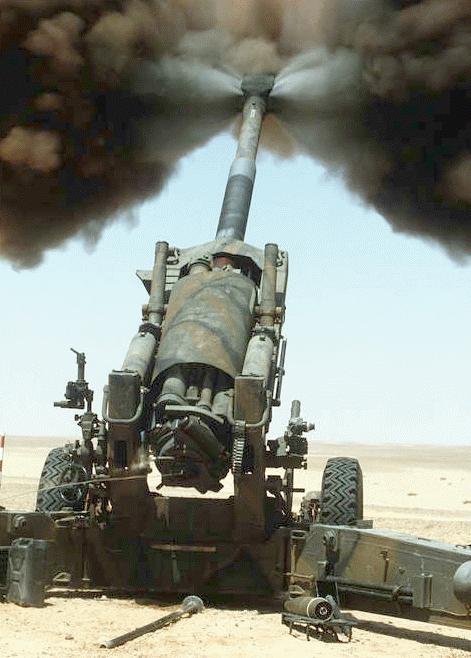
Fire Mission 1/35 M114A1 Howitzer in Viet Nam Introduction The M114A1 began development in the late 1930s as a replacement for the aging M1918 howitzer. Introduced in early 1942 as M1 155mm howitzer, the carriage was also used in limited production to mount a 4.5 inch gun. The howitzer went thru some modifications thru time to the brake system and firing pedestal becoming the M1A1. By the Korean War the weapon was also mounted on a M26 Chaffee chassis to be the M41 155mm HMC. In 1962 the M1A1 was re-designated the M114A1 howitzer. It had a few more changes in the mid 70s to become the M114A2 which included a newer barrel. The howitzer remained in service until the mid 1980s when it was phased out by the new M198 155mm howitzer which has recently been phased out for the new M777 155mm howitzer. Known affectionately as “the pig” the M114A1 was a notable site on many firebases in Viet Nam. 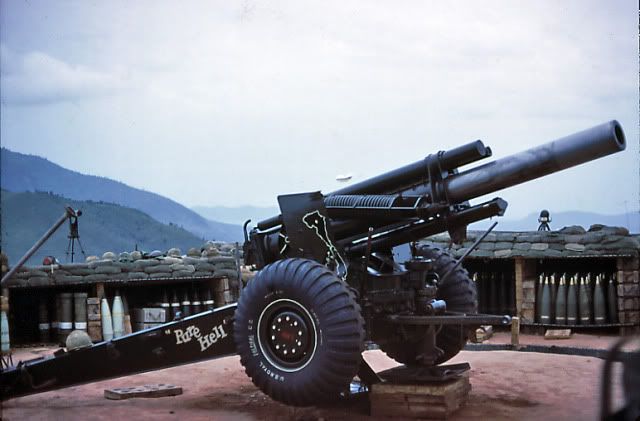 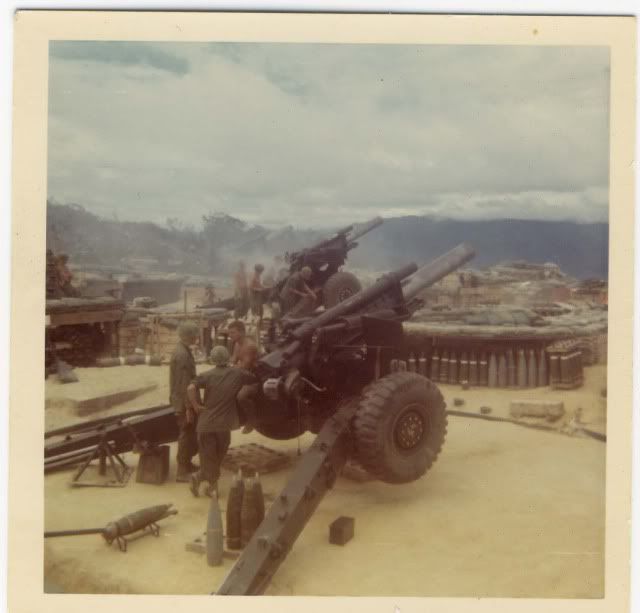 The Kit I will be using the new Bronco M114A1 155mm Howitzer kit. The kit is far superior to the old Italeri kit with much more detail. The kit has 8 sprues, two for the tires, two for projectiles and powder cans, a small sprue of powder bags and the rest for the howitzer. It also includes a small PE fret. As usual I will be adding other items to emplace the howitzer when finished. 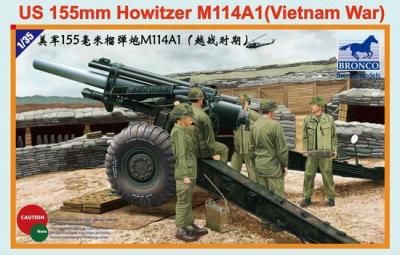 The Build The first five steps in the instructions involve assembling the breech, barrel and recoil cylinders. I will be using the Bronco metal barrel. You need to use the Bronco barrel for the M1 to be correct for the M114A1. Their metal barrel for the M114A1 is actually for the M114A2. As for the kit assembly, all of the recoil cylinders and the rear barrel sleeve are all split cylinders. Also the plastic is hard and when removing from the sprue leaves a divot in the plastic. Needless to say all the cylinders needed to be sanded and seams sealed with Mr. Surfacer. The forward brackets had pin marks which would be visible and had to be filled and sanded. The breech though cast as one piece had a bad mold seam and a divot from removing from the sprue. The heat vanes on the side of the barrel also had a few pin marks which were a royal pain to fill and sand. After a bunch of time spent filling and sanding here is he cannon assembly with breech. 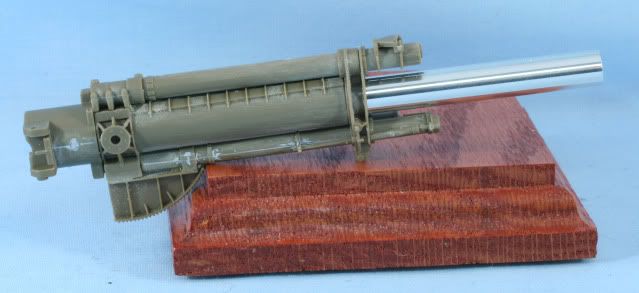 While waiting for coats of the Mr. Surfacer to dry on the cannon parts, I decided to assemble the tires. The M1 kit uses a number of rings to create the tire with treads. The M114A1 used a military tire so Bronco went with a solid cast tread ring. The rim is actually the rim and part of the tire side wall. After careful assembly there is still a fine seam on the sidewall portion which will need Mr. Surfacer. The inside rim is not quite flush and will require some sanding before sealing. These will be a project while waiting for other parts to dry as I go along. Here is what the assembled tires look like. 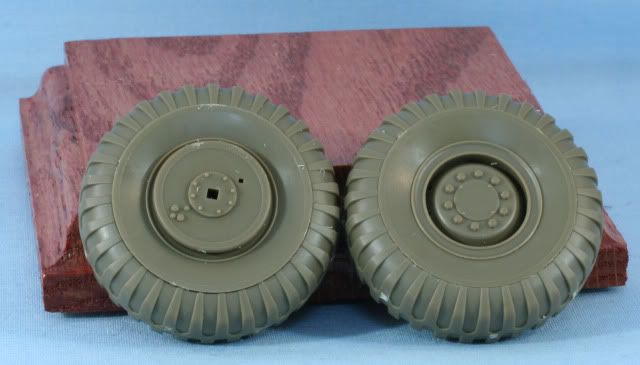 We are off and running. Next I will skip forward to the lower carriage assembly. As always if you have any comments, please feel free to drop in. Rounds Complete!! |
|
bigjohn
Reviews member    
Member since: December 2011
John Hale
Posts: 3,438
Dec 21, 2011 2:17:45 GMT -5
Dec 21, 2011 2:17:45 GMT -5
|
Post by bigjohn on Mar 17, 2013 18:32:38 GMT -5
Cool!! I'm all over this one like Olive Drab on a sherman!  |
|
|
|
Post by wbill76 on Mar 17, 2013 18:34:22 GMT -5
Yay! Mike's back to building arty pieces. Going to be a fun project Mike, I can only assume this one will get the full redleg base/dio treatment to go with it, right?  |
|
|
|
Post by Leon on Mar 17, 2013 18:38:47 GMT -5
Count me in.Nice to see a Howitzer being built.  |
|
|
|
Post by deafpanzer on Mar 17, 2013 19:34:49 GMT -5
Hell yeah count me in! Always thought those guns were cool...
|
|
redleg12
Full Member
  
Member since: August 2012
www.redleg2scale.com
Posts: 401
Aug 28, 2012 18:59:10 GMT -5
Aug 28, 2012 18:59:10 GMT -5
|
Post by redleg12 on Mar 17, 2013 21:38:01 GMT -5
Big John - Great to have you along. As you can see by that era the OD will be dark and semi gloss.
Bill - Just setting up the firing point!!! As you see in the opening two photos, I intend to set up the fire base look. Lots of ammo and powder!!
Leon - Climb aboard my first howitzer mission here
Andy - Cool maybe.... We did not call it the pig for no reason.. But it was damm dependable
Thank guys
Rounds Complete!!
|
|
|
|
Post by bbd468 on Mar 17, 2013 21:53:33 GMT -5
Right on Red, count me in as well man!  |
|
|
|
Post by fightnjoe on Mar 17, 2013 22:07:58 GMT -5
count me in.
joe
|
|
|
|
Post by bullardino on Mar 18, 2013 2:38:34 GMT -5
I'm in, great start  |
|
|
|
Post by Mence on Mar 18, 2013 2:43:07 GMT -5
Big guns, lovely stuff, I'm in...
|
|
redleg12
Full Member
  
Member since: August 2012
www.redleg2scale.com
Posts: 401
Aug 28, 2012 18:59:10 GMT -5
Aug 28, 2012 18:59:10 GMT -5
|
Post by redleg12 on Mar 18, 2013 5:39:14 GMT -5
BBD - Glad to have you on the crew
Joe - Thanks for the peek
Luigi - Glad to have you here
Prof - Well its medium but a medium howitzer is always good!!
Rounds Complete!!
|
|
sturmbird
Full Member
  
Member since: June 2012
Posts: 1,406
Jun 21, 2012 13:51:45 GMT -5
Jun 21, 2012 13:51:45 GMT -5
|
Post by sturmbird on Mar 18, 2013 12:40:57 GMT -5
tears in my right eye!
Looks like they are registering in the two pigs in the lower picture. The giveaway is the lack of powder and nobody is in a hurry. The white smoke round will be the first or last (depending on the F.O.). They must have just moved into the neighborhood. Glad I didn't have to drag rounds out of their bunker! Built very low to the ground, and that makes it hard to handle a 98lb. chunk of iron. Also the loader has got to be left handed, and is in the way of the AG all the time
You guys take note of the appearence of the barrel in the photo! It's not silver anymore (actually hard chromed and ground)Barrels were always coated with grease, and if you look really close you will see the grease has been wiped off about two feet from the trunion. Tyipcally the grease was translucent green in color, but have seen brown and red as well. After a couple rounds the barrels are always a blackish grey color. That tells us they are probably shooting a charge one green bag or a charge three white bag. Why such a low charge when registering I don't know as we always used a Charge seven white bag from the contact lot. And then there's the loading tray!!!!! One of the extremely few I ever saw. (must have a lot of men in that section)
nice dry day for once on the Hiep Duc Ridge
gary
|
|
|
|
Post by rbaer on Mar 18, 2013 14:39:10 GMT -5
As always, watching a "Mike build"...
|
|
|
|
Post by tonylee-Rest In Peace on Mar 18, 2013 15:00:20 GMT -5
I listened to those almost every night once upon a time.  Tony lee |
|
redleg12
Full Member
  
Member since: August 2012
www.redleg2scale.com
Posts: 401
Aug 28, 2012 18:59:10 GMT -5
Aug 28, 2012 18:59:10 GMT -5
|
Post by redleg12 on Mar 18, 2013 19:18:29 GMT -5
Gary - More than anyone, glad you are on the crew here. This one will be especially interesting for you and I look forward to your comments. On the base I intend to have the under bunker ammo storage. Projo tray for wussies!! LOL.... Look forward to this fire mission with you!
Rbaer - Always a pleasure to have you drop in
Tony - They make sweet music!! Better than counting sheep!
Dicky - An artillery piece has some unique shapes and items. The plastic reminds me of the old Renwal plastic or kits from the 60s which tended to be stiff or hard. In some instances that is good but the removal from the sprue can leave a indentation to be filled. The different cylinders would have been better molded in one piece rather than two which require seam work. Then again, we are model makers, its all part of the trade.
As for artillery builds....I will try to fill the void!
Thanks Guys
Rounds Complete!!
|
|
sturmbird
Full Member
  
Member since: June 2012
Posts: 1,406
Jun 21, 2012 13:51:45 GMT -5
Jun 21, 2012 13:51:45 GMT -5
|
Post by sturmbird on Mar 18, 2013 19:36:16 GMT -5
Gary - More than anyone, glad you are on the crew here. This one will be especially interesting for you and I look forward to your comments. On the base I intend to have the under bunker ammo storage. Projo tray for wussies!! LOL.... Look forward to this fire mission with you! Rbaer - Always a pleasure to have you drop in Tony - They make sweet music!! Better than counting sheep! Dicky - An artillery piece has some unique shapes and items. The plastic reminds me of the old Renwal plastic or kits from the 60s which tended to be stiff or hard. In some instances that is good but the removal from the sprue can leave a indentation to be filled. The different cylinders would have been better molded in one piece rather than two which require seam work. Then again, we are model makers, its all part of the trade. As for artillery builds....I will try to fill the void! Thanks Guys Rounds Complete!! we had a kid from Kansas that was a farm boy, and strong as an ox. He could take an HE projo and literally throw it in the breech hard enough to seat the driving band in the rifeling! Be sure to place the helmet on the gunner backwards as most guys had to do this to get a good eye picture in the scope. I never wore the helmet when I was the gunner, as it sat so low it covered my eyes half the time. I'll hunt up a hand full of pics for you, and we'll get them posted on here. One is the base piece down on Gator registering with the barrel pretty much in full recoil. gary |
|
redleg12
Full Member
  
Member since: August 2012
www.redleg2scale.com
Posts: 401
Aug 28, 2012 18:59:10 GMT -5
Aug 28, 2012 18:59:10 GMT -5
|
Post by redleg12 on Mar 19, 2013 5:44:57 GMT -5
Gary - You post some pics, that may give me the inspiration for markings/finish. As for humping the projo, I think every battery has at least one guy like that. That why we are not INFANTry, the big guys always end up in FA.
Rounds Complete!!
|
|
sturmbird
Full Member
  
Member since: June 2012
Posts: 1,406
Jun 21, 2012 13:51:45 GMT -5
Jun 21, 2012 13:51:45 GMT -5
|
Post by sturmbird on Mar 19, 2013 13:56:17 GMT -5
Gary - You post some pics, that may give me the inspiration for markings/finish. As for humping the projo, I think every battery has at least one guy like that. That why we are not INFANTry, the big guys always end up in FA. Rounds Complete!! there was a guy on five four that wasart oh the 3rd of the 18th on M110's. He could put his fingers thru the nose plugs on two rounds at the same time and pick the them up for guys taking pictures. I hate to think about how many thousands of pounds we all humped over there. gary |
|
redleg12
Full Member
  
Member since: August 2012
www.redleg2scale.com
Posts: 401
Aug 28, 2012 18:59:10 GMT -5
Aug 28, 2012 18:59:10 GMT -5
|
Post by redleg12 on Mar 20, 2013 19:07:24 GMT -5
Nemesis - This is a new kit. As I remember, early last year. Now as far as the problems, let me say this to everyone. It is not perfect but...
Go build an Italeri kit...go build an old Renwal kit. Now those are a problem. It is all how you look at it.
Now if I built this kit vs. the old Italeri/UPC/Peerless kit of the M1/M114 you would be saying how good this kit is. That is both sides of the argument!!
Rounds Complete!!
|
|
sturmbird
Full Member
  
Member since: June 2012
Posts: 1,406
Jun 21, 2012 13:51:45 GMT -5
Jun 21, 2012 13:51:45 GMT -5
|
Post by sturmbird on Mar 21, 2013 11:40:56 GMT -5
Those kits are near impossible to find in my locale. Guess I'm going to have to buy three or four of them off the internet. I really want to build at least one Korean war pig in a revetment. Nice thing about the older m1 is that I have one parked close buy to study.
The M114 kit as I said before (too many times) has the wrong barrel for a Vietnam based howitzer. Simply use the M1 barrel and be done with it. Now if your gonna build a certain pig you saw in a picture, studdy all the hardware brackets closely! A lot of units cut the OEM ones off and mounted them differently. Also there were at least two, amd maybe a third style lifting bar at the end of the trail on the gunner's side. Ours was about sixteen inches long, but have seen them well over 24" long and in a tapered profile (was this OEM? I simply don't know). You may even see some pictures of howitzers from what we called "the jump battery." Every batallion has one, and they move quite often by CH46. Lots of times the pigs won't even have shields mounted on them, and other times they will. Now these howitzers are some of the very serious work horses of the battery and often move every week or so. They'll look dusty, but trust me are very clean mechanically. It's common to see a makeshift seat on the trail for the gunner to sit on. We didn't give our gunner's that luxery, or else they never thought about. Yet in June thrus the middle of September tou'd often see a towl on the trail where he sat due to the heat. Otherwise he'd get burnt in a not too friendly place. You'll often see a towl or a sand bag laying across all the hand wheels and the lifting bar as well due to the heat. The barrel in the rainy months will always be in the negative position (elevation) to keep water from entering the I.D. of the barrel.Usually the breech was kept open slightly to allow the air to flow thru it all the time. In dusty places (most of the time) that had choppers in and out of there a lot you often would put a sandbag over the muzzel (dry season) and a towl over the breech.
155mm howitzers just are not fun to shoot in high angle fire (I did it three or four times). The recoil is 60", so you gotta either dig a pit for clearence during full recoil or jack the gun up a couple feet. Luckly you normally are shooting low charge weights so the recoil is usually about half. Normally just one gun will be selected to shoot high angle when it comes down and even then there is plenty of notice when it happens. (takes a good hour to get it ready) The rammer staff is a cut off one that's only about three feet long, and the loader will not help as he's holding the round in the breech with two hands. But a good crew can fire two rounds in about a minute and a half.
There will usually be one gun out of the normal six that will be shooting H&I's. If your in a three gun group and have to shoot H&I's it will normally be minimal amounts of shots (less than 75 rounds). But a six gun battery will often shoot 300 rounds from about 9:00pm till first light, and often till about seven in the morning. We started out shooting 300 to 350 rounds a night on this alone, and it became a serious chore every morning restocking powder and projos. So we started shooting rounds brought to us by chopper (CH46), and just dumping them right outside the parapits. This created a secondary problem with all the dust and debree flying thru the air. So we had the H&I ammo dropped inside a truck, and simply backed the truck up to the parapit. The powder canisters were also brought out that way but dumped on the ground banded up. Still when it was over there'd be pallots and banding laying all over the place as you can only imagine. Normally every charge you shot on H&I's was a charge seven white bag with an HE round and a standard PD fuse. The H&I gun never had to be in any serious hurry, where as the guys shooting a fire mission were. A contact fire mission would mean that somebody had the bad guys ontop of them and had to have rounds in the air as fast as you could get them there. A night on the H&I gun out near the Hiep Duc Ridge always started out shoot charge ones and threes green bag at the front of the ridge line, but would steadilly increase till it got into the charge seven white bag powders. You soon learned that the faster you shot these targets the faster they'd make you shoot the same targets all over again. We usually shot the same targets three times a night except for the very low charge weights. We'd often shoot them once with HE and then an hour or two later shoot them again with WP to keep the otherguys moving. We'd also be shooting 360 degrees, so shifting the gun was a regular event all night long. If we had targets that amounted to over 350 shots we'd have to bring in a second gun, and then let them shoot all the low charges four or five times a night. The H&I gun never shot fire missions per say, unless it was a battery arrest or a contact fire mission.
Also remember that flak jackets were frowned upon with anybody between the trails of the gun, but have had to wear them a few times during counter fire. You just have to be extremely carefull not to get close to anything you'll snag on. When you shot counterfire it became a life and death thing, and was not something you looked forward to (I've shot WP with less than two seconds on the fuse and a charge one green bag a couple times at least)
During a fire mission the section chief normally stands outside the trials and slightly to the left of the loader between him and the gunner. He will hand the loader the powder charge over the trail and check to make sure it's cut right. (the section chief had to do something right?)The projos will be placed to the right of the loader unless he's left handed. The water can is at the left rear of the AG (we used a bomb fuse canister). The guy with the swab is also the guy on the rammer staff. Kinda critical in that if the swab is too wet it creates a gas fume that will make you sick in your stomach. Plus he has to have near perfect timing with the loader and the AG. He and the other three are the only people allowed between the trails of the gun unless your bringing in ammo to shoot (saftey reasons alone). It becomes a mechanical motion that starts and ends with eye/hand motions as you can't hear much. The AG fires when the loader gives him the sign. Never the section chief as he has no idea if your ready or not. (didn't trust him anyway). Normally the loader will cut the powder charge and others will bring the ammo (everybody but the telephone guy). He lays them on the ground right next to the chief, and like I said the rounds are exactly where the loader wants them. There is no radio circut used between the Chief of Smoke and the gun! It's all land line. The phone guys tells the section chief and he tells the gunner what the solution is. The round is never seated till the elevation data comes down (usually a little later than the deflection).
A really good gun crew can shoot a one round zone sweep (nine targets) and be done before the first round impacts at near max range (about a minute). If it's raining they will be slower, but still less than two minutes.
gary
|
|
redleg12
Full Member
  
Member since: August 2012
www.redleg2scale.com
Posts: 401
Aug 28, 2012 18:59:10 GMT -5
Aug 28, 2012 18:59:10 GMT -5
|
Post by redleg12 on Mar 22, 2013 6:05:39 GMT -5
Gary - Love the memories. HA is a PITA no matter what weapon but the older weapons having to dig a pit and separate loading....big PITA. Hummm... killer junior with WP... nice. H&I...another term I have not heard in a while. Almost all the firebases would set up to allow 6400 mil firing, not sure if my model base will be big enough for the full circle. I will work on that a bit later in the build. As for the trails, tools and brackets, yep I.m looking at the photos. Lastly, the seat for the gunner, I hear you, as I remember jeep seat bottoms were the favorite.
Always a pleasure to hear your stories
Rounds Complete!!
|
|
sturmbird
Full Member
  
Member since: June 2012
Posts: 1,406
Jun 21, 2012 13:51:45 GMT -5
Jun 21, 2012 13:51:45 GMT -5
|
Post by sturmbird on Mar 22, 2013 11:20:24 GMT -5
Gary - Love the memories. HA is a PITA no matter what weapon but the older weapons having to dig a pit and separate loading....big PITA. Hummm... killer junior with WP... nice. H&I...another term I have not heard in a while. Almost all the firebases would set up to allow 6400 mil firing, not sure if my model base will be big enough for the full circle. I will work on that a bit later in the build. As for the trails, tools and brackets, yep I.m looking at the photos. Lastly, the seat for the gunner, I hear you, as I remember jeep seat bottoms were the favorite. Always a pleasure to hear your stories Rounds Complete!! to do a 155 right in that era, you'd need a minimum of 300 projos (HE), about 100 WP, and another 75 illumination rounds. Then you get the oddballs like the Cofram, and smoke (we probably didn't have a dozen smoke rounds per tube). Add to this the contact projo lots (about a hundred rounds). Then there is the powder bunker. It's divided into three groups. White bag, green bag (about 33% green bag, and your contact powder lots that are kept seperate from the others. It would be a serious undertaking to make one like like the real thing! And that dosn't inclue the fuse bunker! Onething I forgot all about is that normally the gunner will always have somekind of cover over the scope. We used a plastic bag that pills came in. Last thing he wants is to have to look thru an eyepiece that's wet. Even the dew will mess you up. How well did Bronco do the breech? Did they get the stepped threads right? Early howitzers were just bare metal in the treads and mushrum head, but from early 68 and later they started changing them all over to hard chromed stuff that had kind of a satin finish and cleaned easier. Lastly did they even come close on the firing lock? The other guys missed that one a mile. One thing most guys get wrong about them is the rammer staff. Most all were about six to seven feet long. End bells were painted black or OD like the actual rod. We usually had a 4.2" mortar team tag along for the high angle stuff, and close illumination rounds. Otherwise they never done much. But we did have three 81mm mortars from time to time for very close range stuff. Why they wouldn't issue beehive rounds to us is still on my mind even to this very day. gary |
|
sturmbird
Full Member
  
Member since: June 2012
Posts: 1,406
Jun 21, 2012 13:51:45 GMT -5
Jun 21, 2012 13:51:45 GMT -5
|
Post by sturmbird on Mar 22, 2013 11:32:27 GMT -5
Gary - Love the memories. HA is a PITA no matter what weapon but the older weapons having to dig a pit and separate loading....big PITA. Hummm... killer junior with WP... nice. H&I...another term I have not heard in a while. Almost all the firebases would set up to allow 6400 mil firing, not sure if my model base will be big enough for the full circle. I will work on that a bit later in the build. As for the trails, tools and brackets, yep I.m looking at the photos. Lastly, the seat for the gunner, I hear you, as I remember jeep seat bottoms were the favorite. Always a pleasure to hear your stories Rounds Complete!! most folks think that an arty battery is placed miles back from the action, and that's just not so! They are placed right in the middle of it an a piece of high ground. Never shot much on one general direction, and often shot the full 360 degrees everyday. By being up close and personal, you can usually follow the bad guy's retreat, and really ruin his day. Plus a lot of units were never assigned to a single infantry unit, and just operated under a division umbrella. Mine ws like that, and we shot for everybody that was within range. It was not uncommon to shoot for Marines back north east, and fifteen minutes later be shooting for the Army in the northwest. I've even seen two fire mission going on at the sametime in much different directions. You get to meet a lot of different folks when your in an independant outfit. gary |
|
redleg12
Full Member
  
Member since: August 2012
www.redleg2scale.com
Posts: 401
Aug 28, 2012 18:59:10 GMT -5
Aug 28, 2012 18:59:10 GMT -5
|
Post by redleg12 on Jun 9, 2013 19:46:47 GMT -5
It has been awhile since my last update. Spring always brings lots of distractions. First, here are the tires with Mr. Surfacer to close up the seams. This photo gives you a better idea where the seam is on the tire. 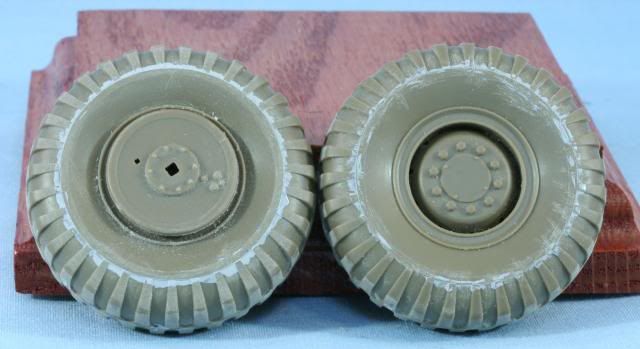 Began work on the lower carriage. The base for the lower carriage involves two steps of the instructions. No real fit or seam problems with this assembly. 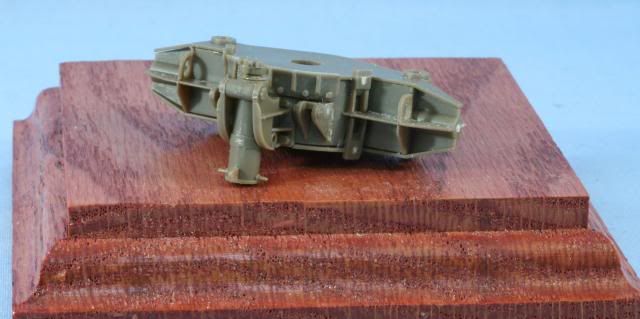 The trails also involve a few steps in the instructions. After the main assembly of each trail, only minor seam sealing was required on each. I have added some of the hanger brackets. I will have to fabricate empty ramming staff/aiming post brackets as the kit brackets come with the staffs in them. Here are the partially completed trails. 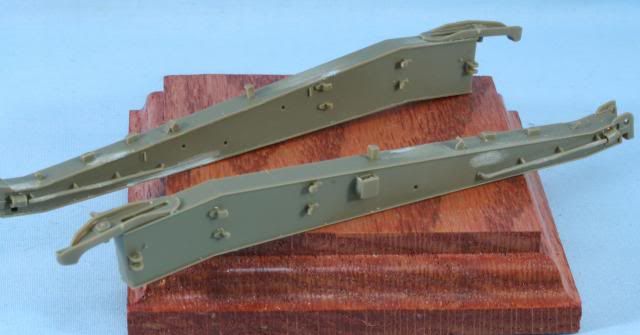 Also worked on the upper carriage assembly, which is split into two halves. The right half has a bunch of items to be added. I left off the sights which will be painted a slight shade different and will be added once the howitzer is mounted so the sights are level and pointing in the correct direction. What is added is all the gearing and gear boxes for the traversing and elevating mechanisms. 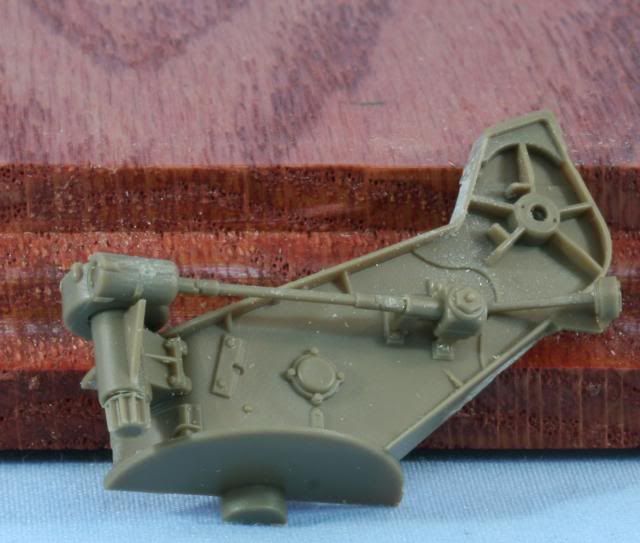 In between glue and filler drying, I also went off to the wood shop. I made the base and after staining and sealing, I applied 3/8 inch Styrofoam with the cutout for the spades to allow 6400 mil (360 degree) traverse. On the wider solid side I will scratch build an ammunition bunker. Here is the start of the base. 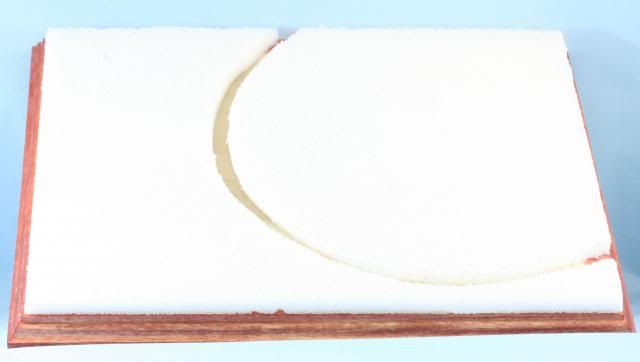 That’s it for now. Hope to keep going thru completion now that I am back at the bench. Time for some primer soon as the assemblies come together. As always if you have any comments, please feel free to drop in. Rounds Complete!! |
|
|
|
Post by TRM on Jun 9, 2013 20:09:05 GMT -5
Pretty sure I know how I missed this one Mike...Just way too many builds happening here on the MSC....not a bad thing at all!!
Awesome project!! I have been really wanting to build up a BIG gun!! Keep it coming, she is looking fantastic!!
|
|
|
|
Post by wbill76 on Jun 9, 2013 20:44:56 GMT -5
Nice to see you getting back to the bench Mike! Some good progress on this one, looking forward to more.  |
|
|
|
Post by fightnjoe on Jun 9, 2013 21:11:26 GMT -5
good to see you back at the bench buddy.
good stuff.
joe
|
|
redleg12
Full Member
  
Member since: August 2012
www.redleg2scale.com
Posts: 401
Aug 28, 2012 18:59:10 GMT -5
Aug 28, 2012 18:59:10 GMT -5
|
Post by redleg12 on Jun 10, 2013 6:19:18 GMT -5
T - No problem, I can understand, things are busy here, I need to catch up with all the builds myself. Thanks for the peek.
Bill - Always a pleasure to have you stop by. It felt good to get to the bench. RL just seems to keep getting in the way!!
Joe - Thanks...it feels good to get back. Thanks for stopping in.
Rounds Complete!!
|
|
|
|
Post by bullardino on Jun 10, 2013 13:11:59 GMT -5
Nice to see some progress, redleg  |
|
Deleted
Member since: January 1970
Posts: 0
Dec 2, 2024 17:59:31 GMT -5
Dec 2, 2024 17:59:31 GMT -5
|
Post by Deleted on Jun 10, 2013 13:20:33 GMT -5
I can't believe I missed this one, Im just be a lightweight part timer!
Always looking and learning!
|
|


