adampolo13
Reviews member 
Member since: April 2012
Posts: 275
Apr 29, 2012 23:17:52 GMT -5
Apr 29, 2012 23:17:52 GMT -5
|
Post by adampolo13 on Sept 16, 2014 21:46:49 GMT -5
Not too long ago I was having a chat with a friend about my love for all things modern more specifically all modern wheeled vehicles. We chatted about my somewhat recent Humvee, Buffalo, and Bushmaster builds. And for those of you that are wondering, yes we even chatted about the Stryker I smashed. Well, after a while the discussion turned to the new Kinetic Maxx Pro kit and we decided that I should go ahead and do a build review for you all here on MSC. 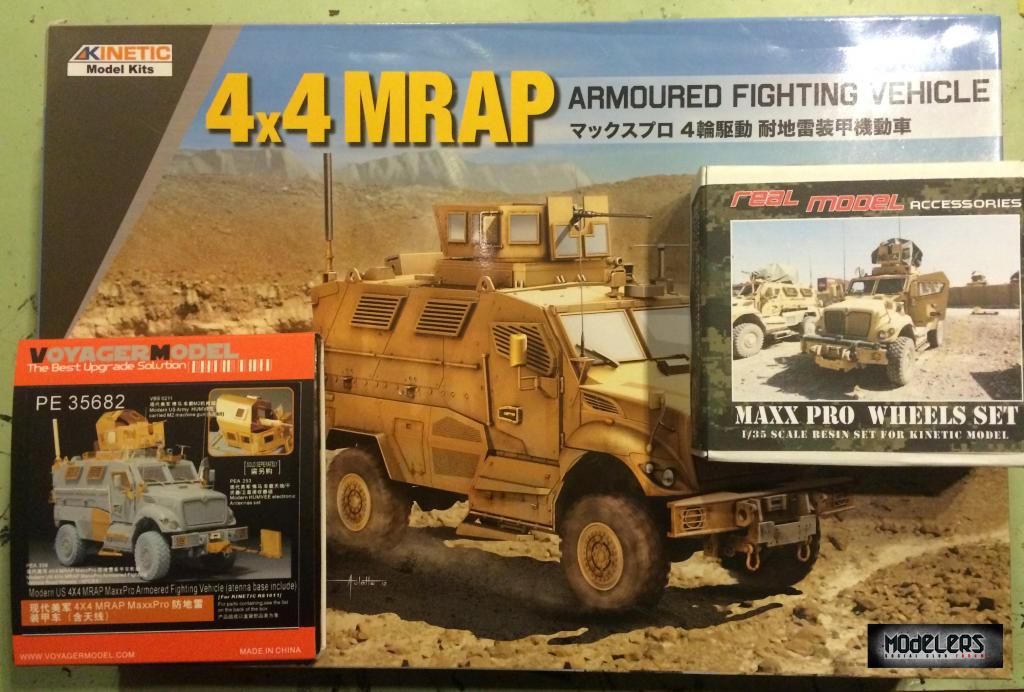 Being a total sucker for resin replacement wheels and all things aftermarket I decided to dress this one up just a bit. A word of warning though, I'm not one for replacing parts that are molded in plastic so I probably wont be using the Voyager set in all its intended glory. My intention with the Voyager set is to dress up the crew compartment and add details where the PE will add more details without sacrificing too much time. 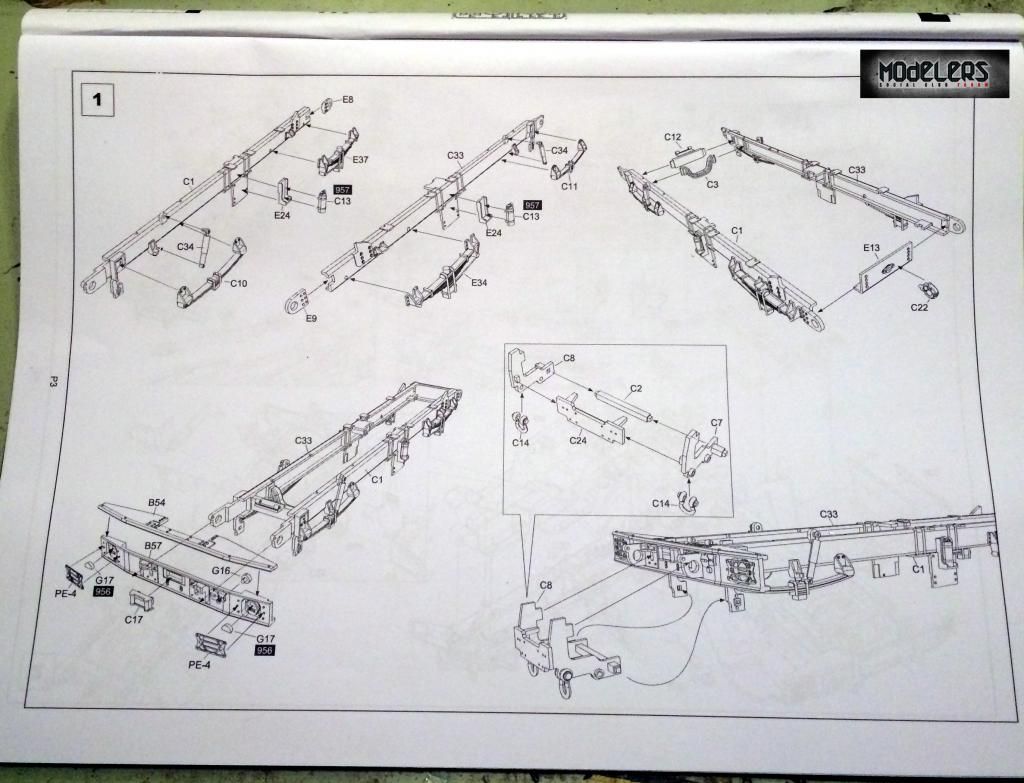 Just as with the M-ATV, this kit has the awkward flip up style instruction sheets. I'm really not a fan of the instructions as the black and white really leaves something to be desired. At first glace though, the book does seem to give somewhat clear directions. I have to ruin the surprise now and let you know that they are pretty bad. Parts are not listed, things are backward etc. As you will see below, I began construction with the frame. The detail really isn't anything special, the bolt detail is very soft and the mold lines are very thick. Cleanup was by far the longest part of this whole thing. 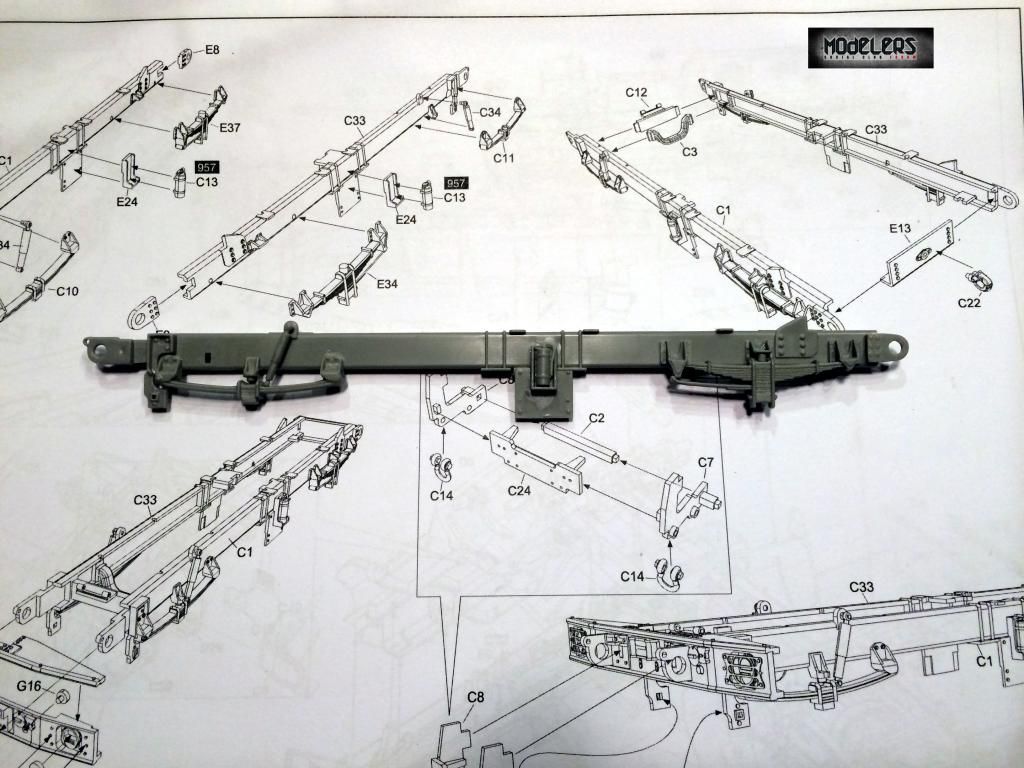 As I moved on to the next section of the frame I noticed something odd, a bit of detail was missing here. This should be molded with a plate there to stop the suspension from moving. 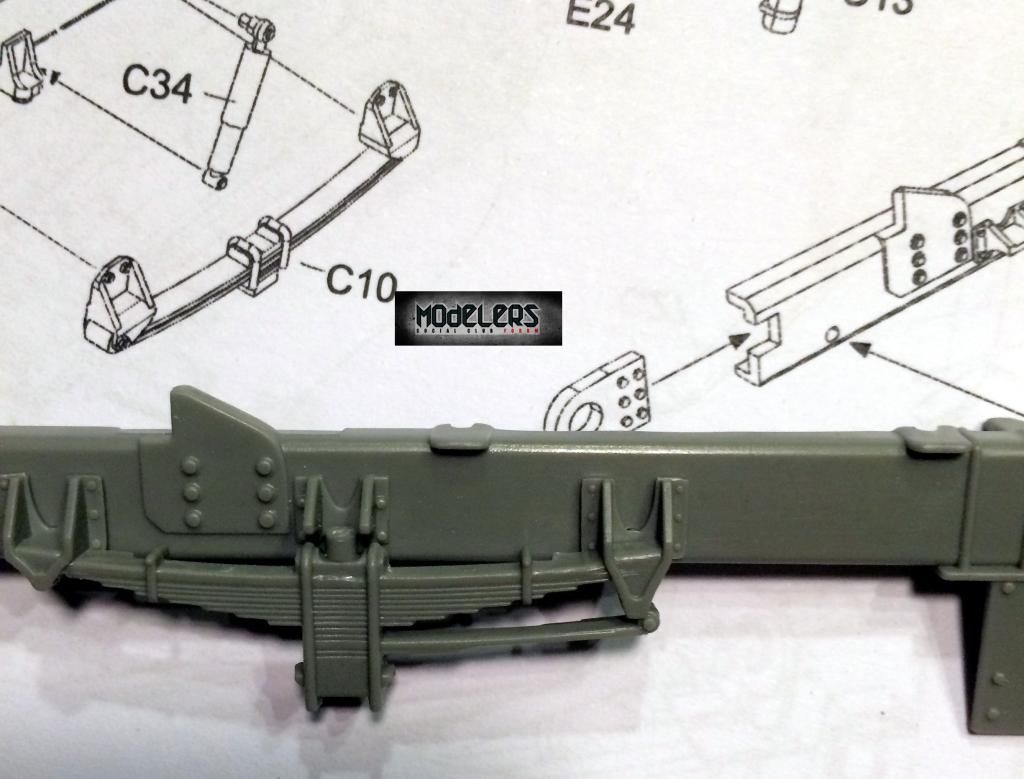 Even though no one will ever be able to see it I did have to fix it. 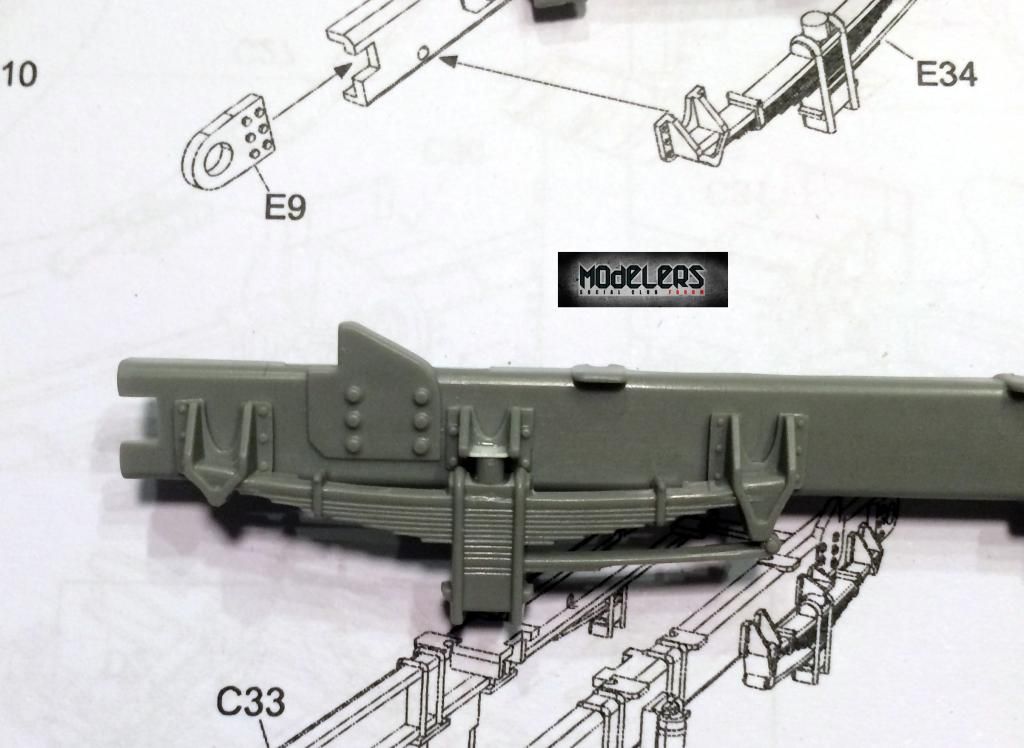 Once the two frame rails were complete it was time to glue them together via the remaining frame pieces. 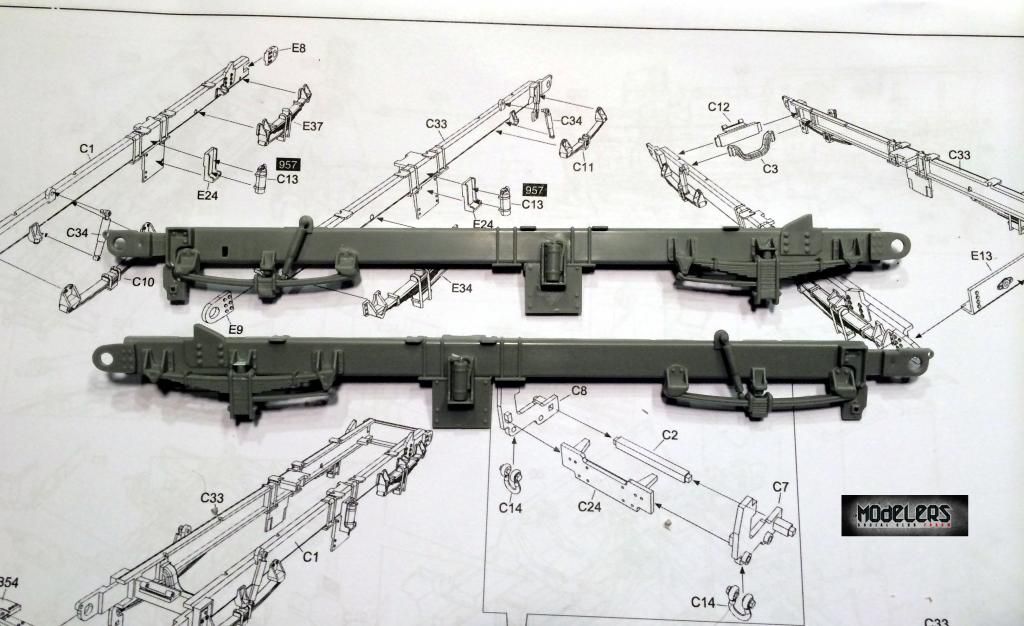 Because I wasn't too happy with the overall fit of things up to this point, I decided to use the lower half of the body as a jig. I put everything in place, which fit pretty snug, and glued it all in place. 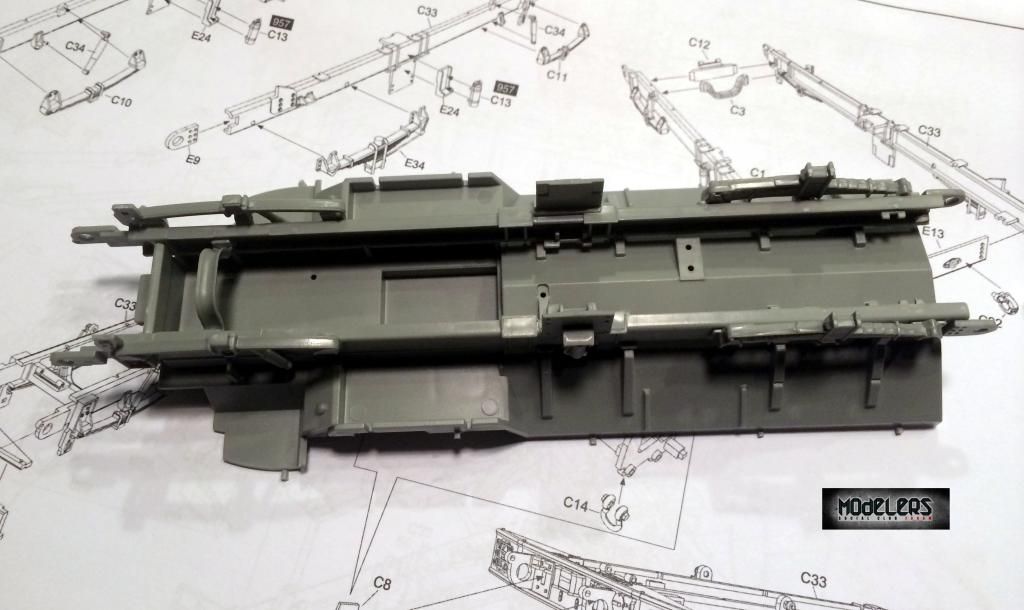 Once that was done it was the front bumper and various details. There really weren't any problems putting this section together other than the tremendous amount of time it took to clean up heavy mold lines. 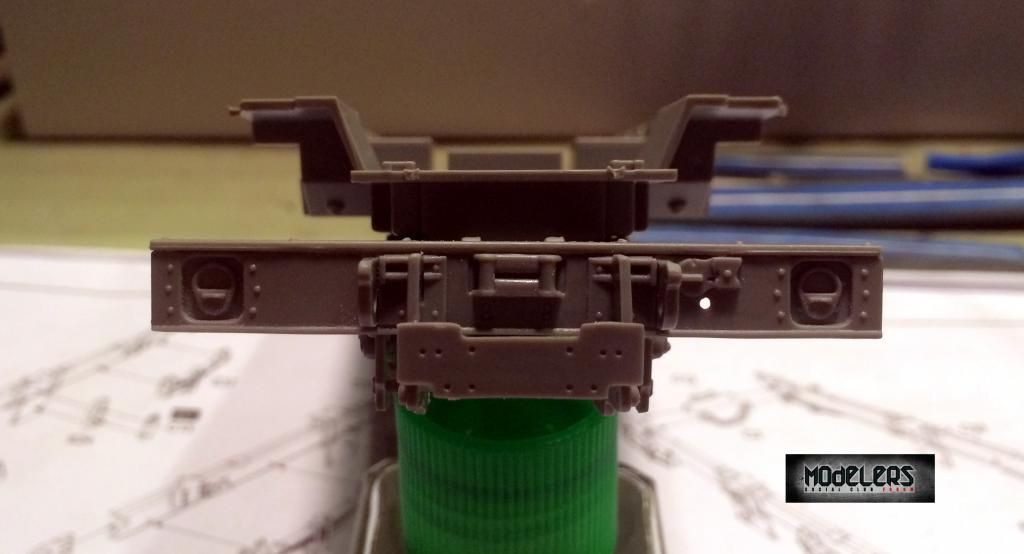 Once that was all done I was able to go ahead and get the axles put together. There was no problem with fit here but again, heavy mold lines and very soft detail. The one nice thing I have to point out, with careful construction, the front tires will be free to move or pose. 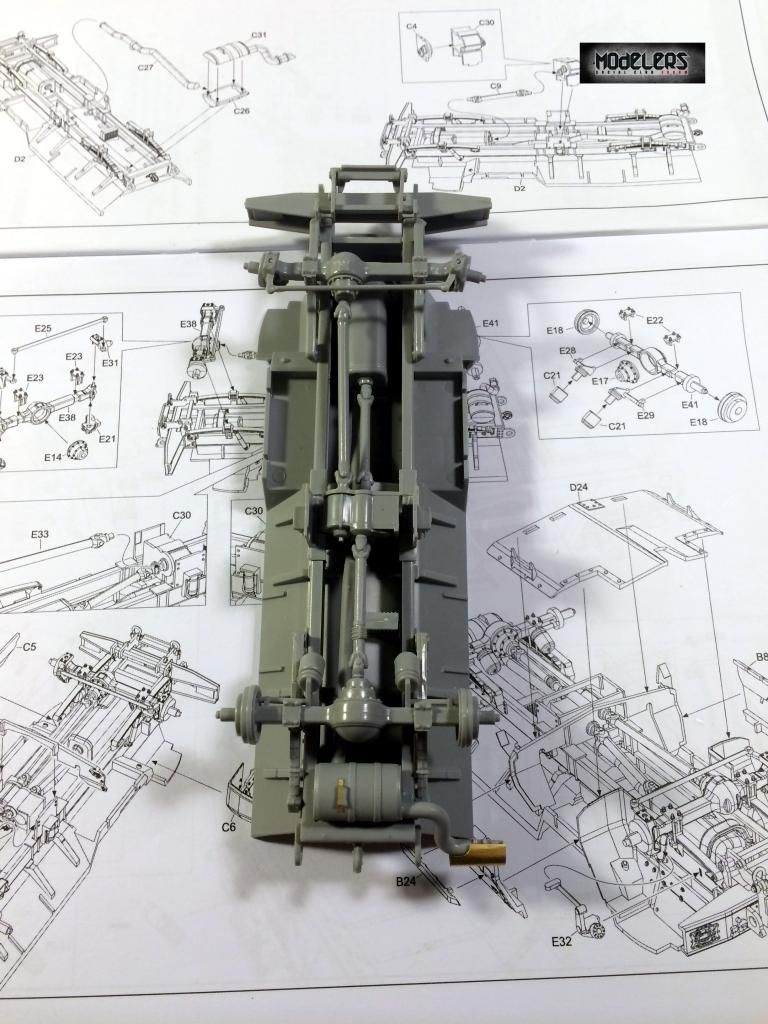 Also, during this portion of the build I came across something that drives me nuts. The instructions show a part with more detail than is actually molded. In the picture below it is part E32 and there is no way the detail on the part looks like the instructions. Therefore, a search was undertaken until I found what looked like the right part, there it was E16. Glue them up and place on the frame. 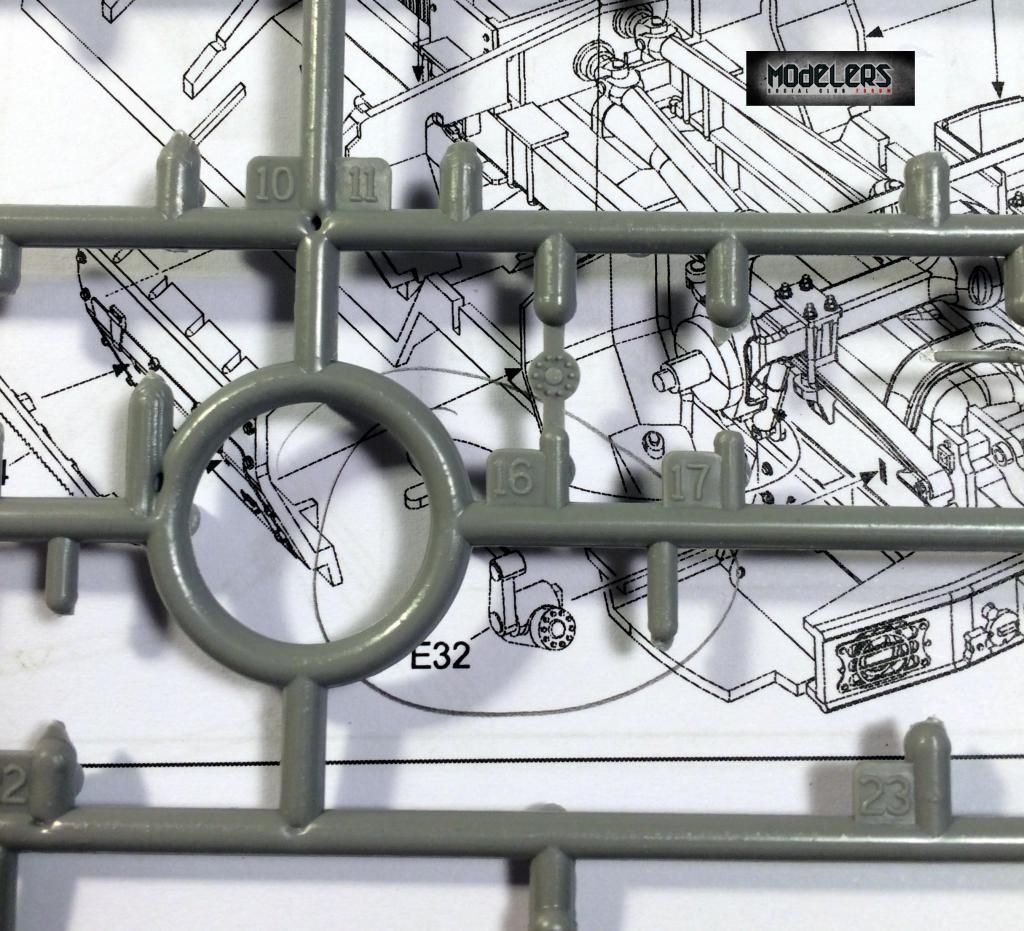 Somewhere in there I couldn't help myself from giving the whole thing a quick test shot to see how it looks on its feet. 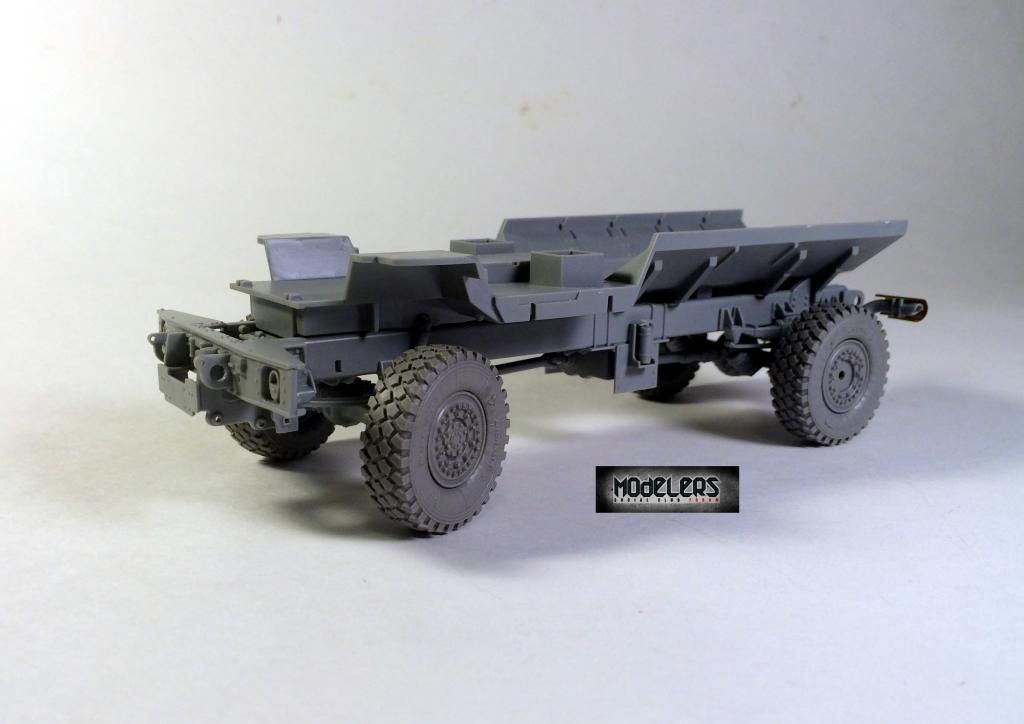 But back to work. Here's another frustrating part, the locating holes are too big for the corresponding part. 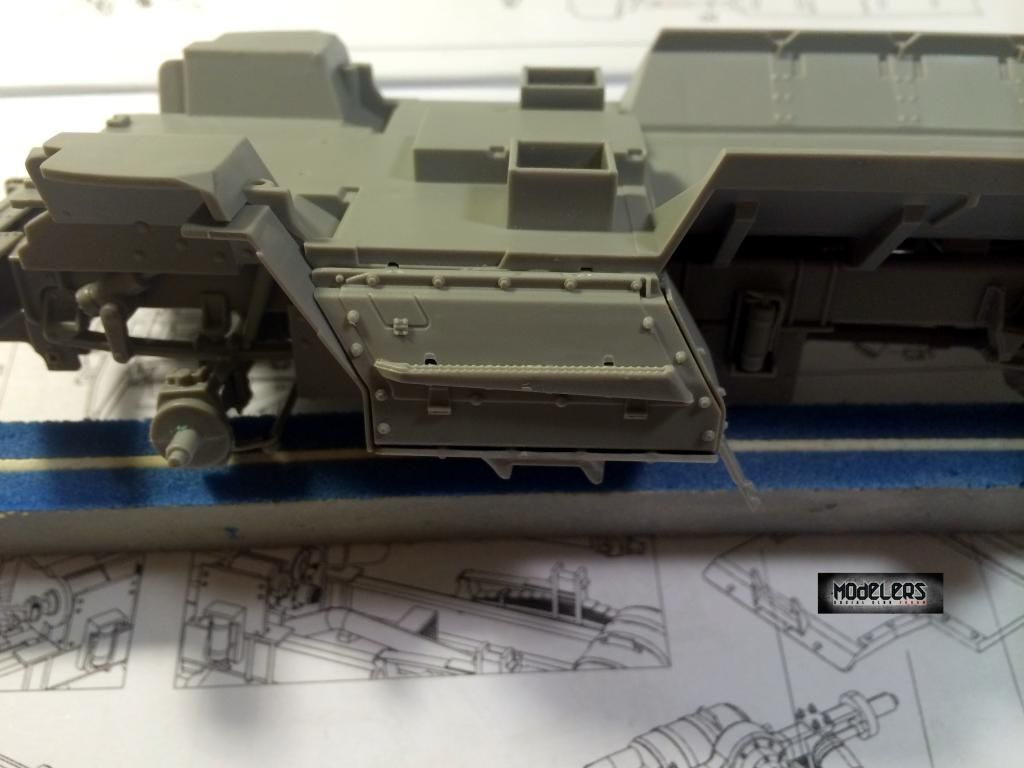 Nothing a little Vallejo putty can't fix. I have to say, the Vallejo Acrylic putty is my favorite for filling this kinds of gaps/issues. Because it's acrylic you can wet a cotton bud and wipe away the excess leaving a perfect fill job. 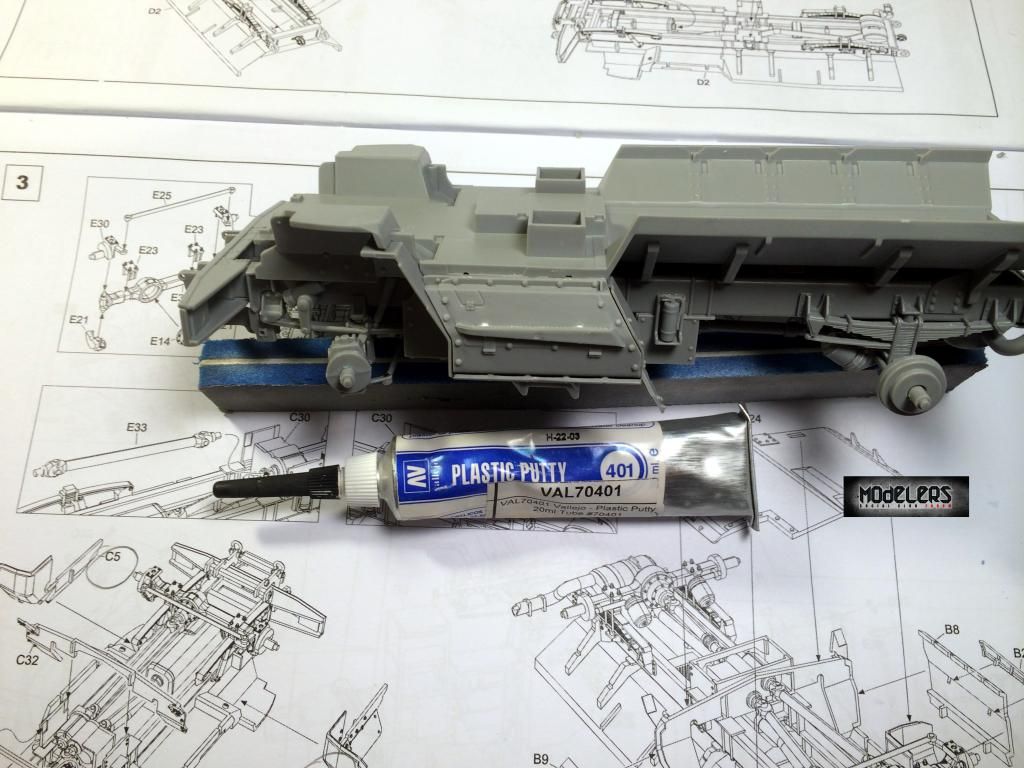 Another little test fit. Looks more like a Maxx Pro now. 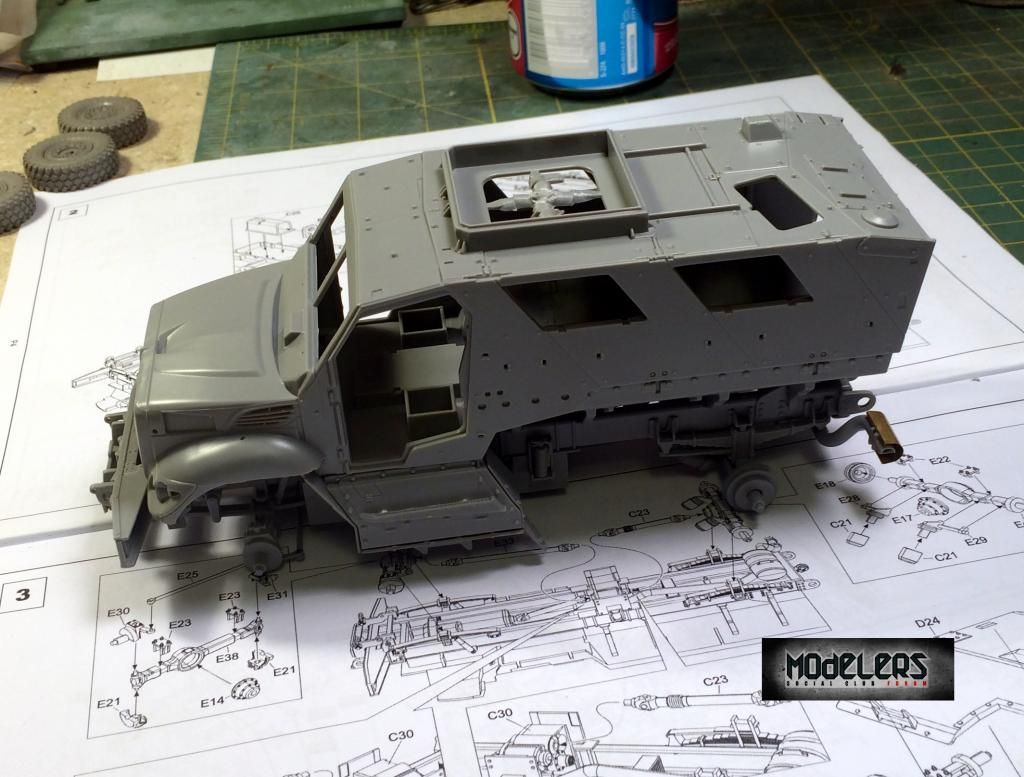 More work has to be done on the lower portion of the vehicle, specifically the storage compartments and AC units. 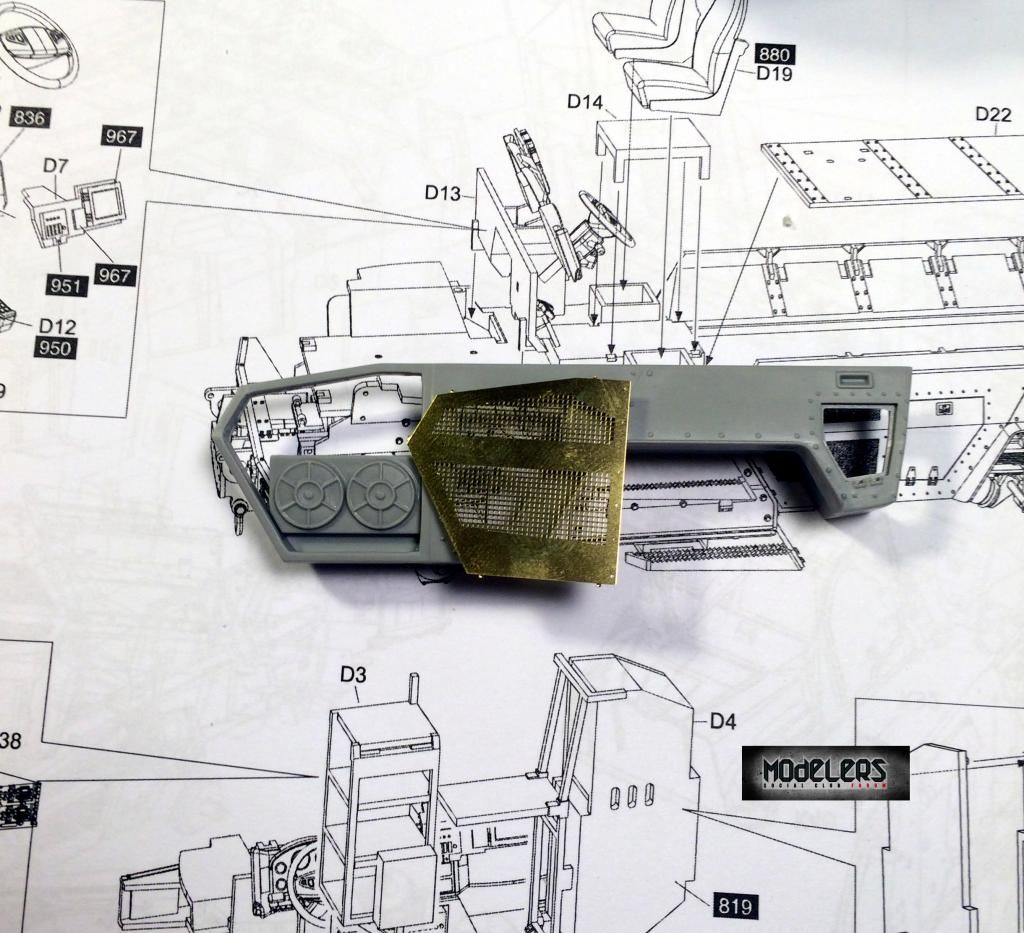 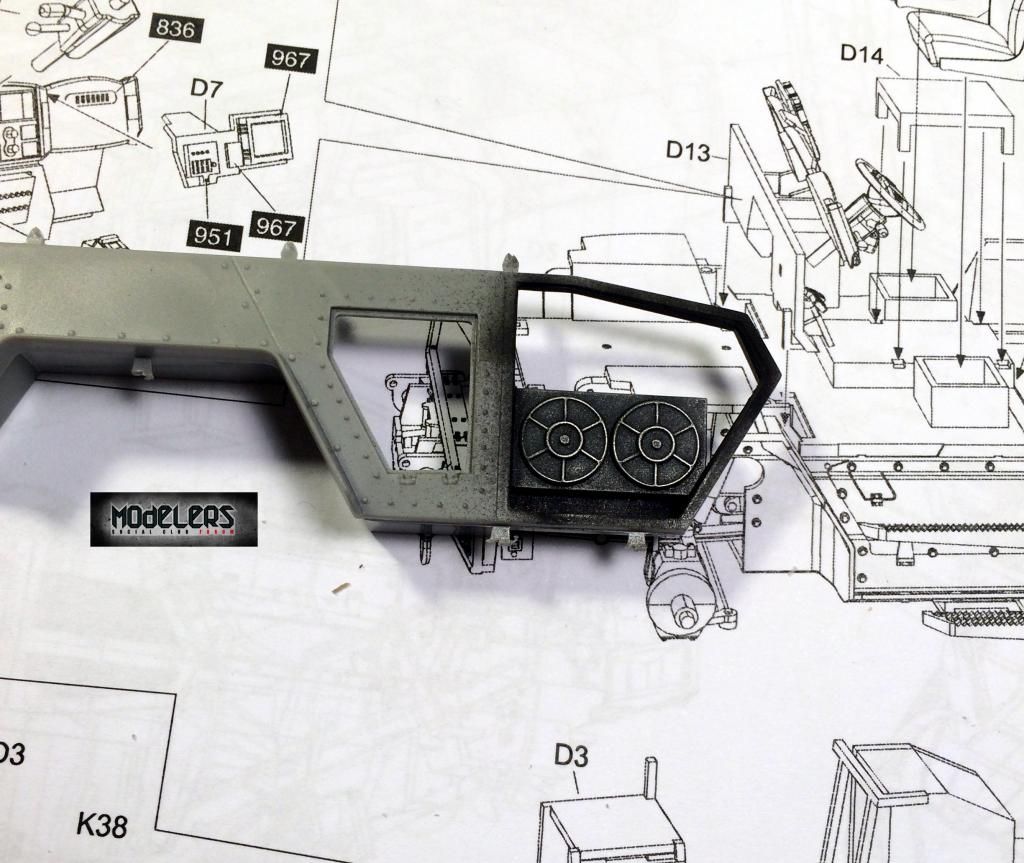 Now, here's a tricky part, because there's no fold line on the PE you have to guesstimate where to bend it. I'm very glad I have a nice PE bending tool. 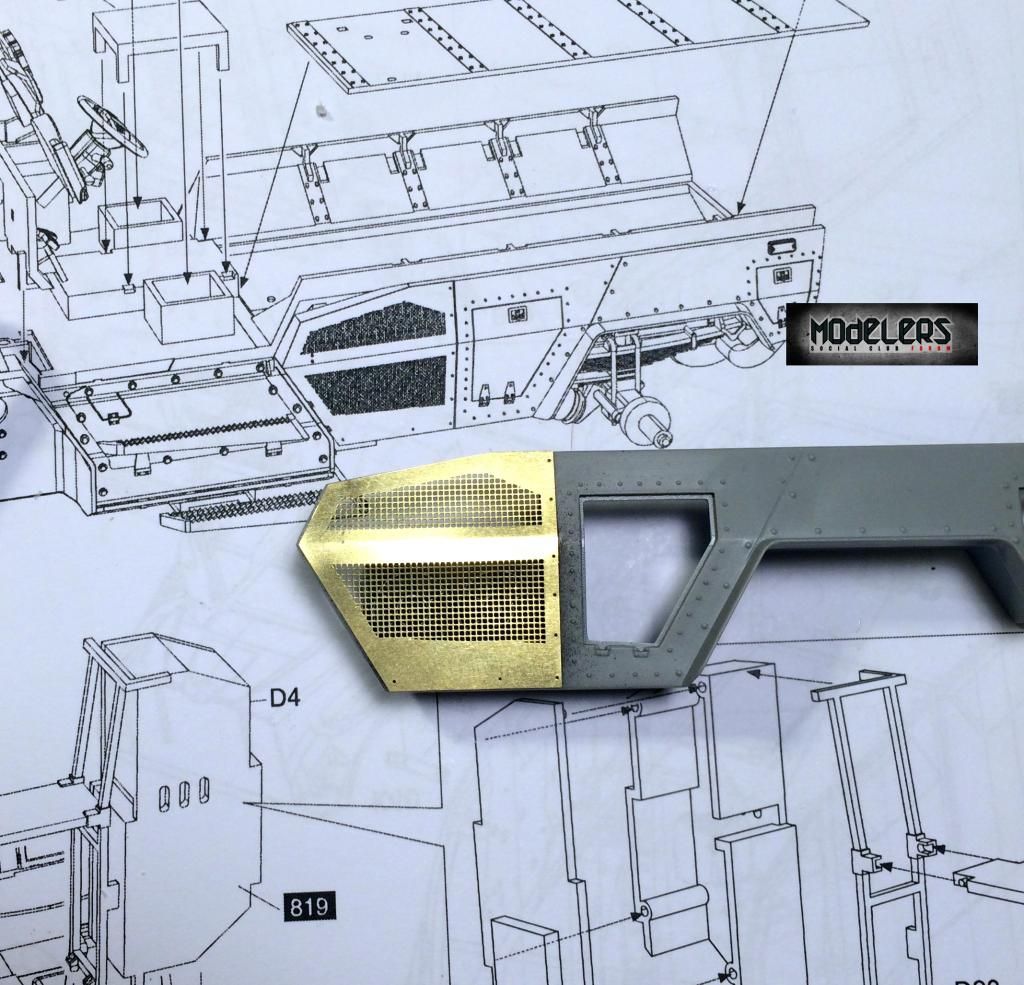 Welp, the frustration didn't stop there as a few of the hatches didn't want to fit right. This is after about 20 minutes of sanding and fitting. It's not perfect but I'll take it. 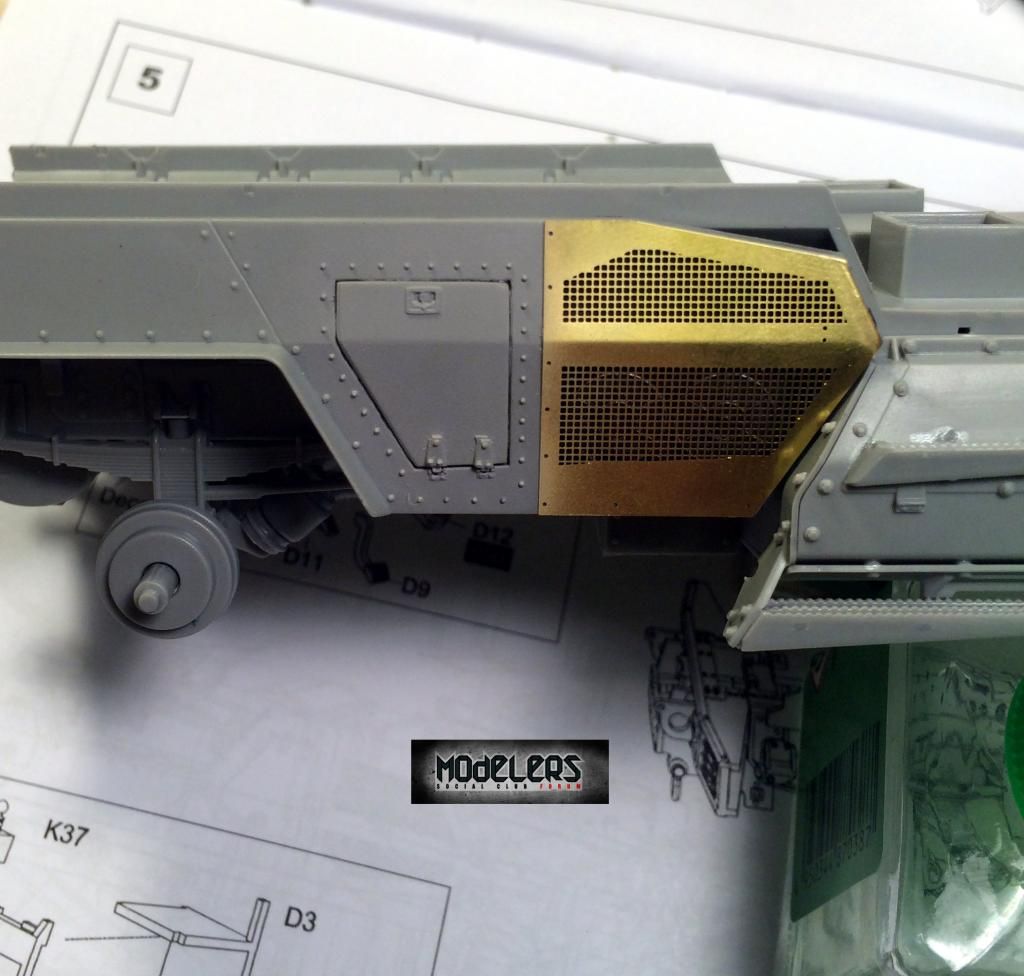 And that will about do it for this first portion of the review. Don't worry though, I did do another dry fit before I cleaned the excess sprue off the bench. 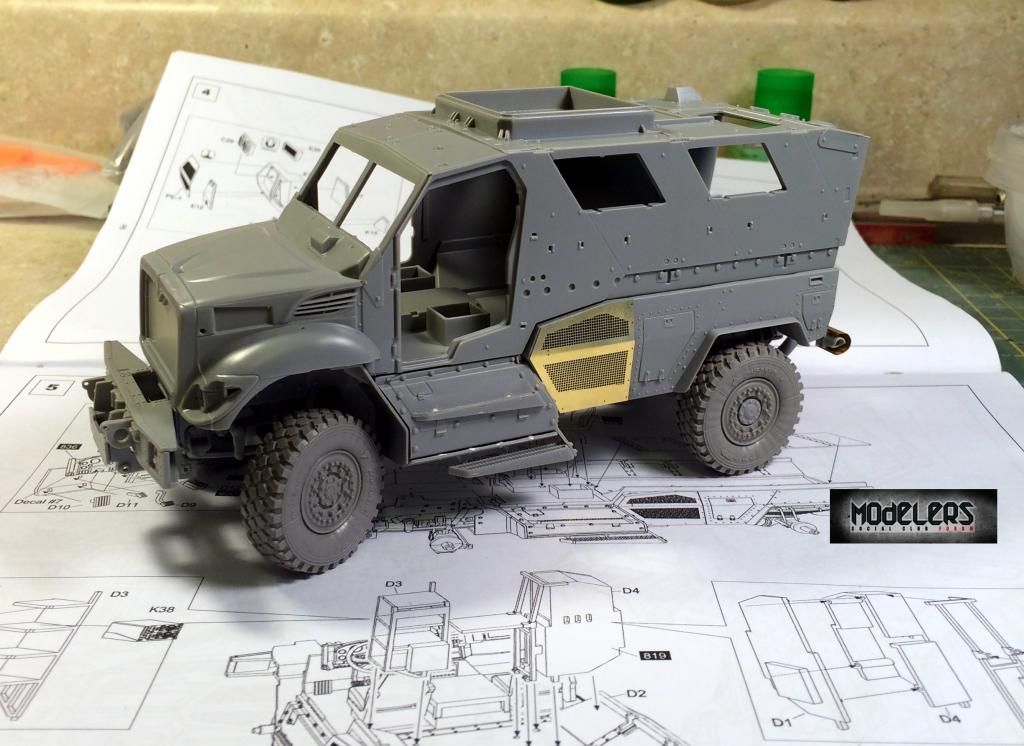 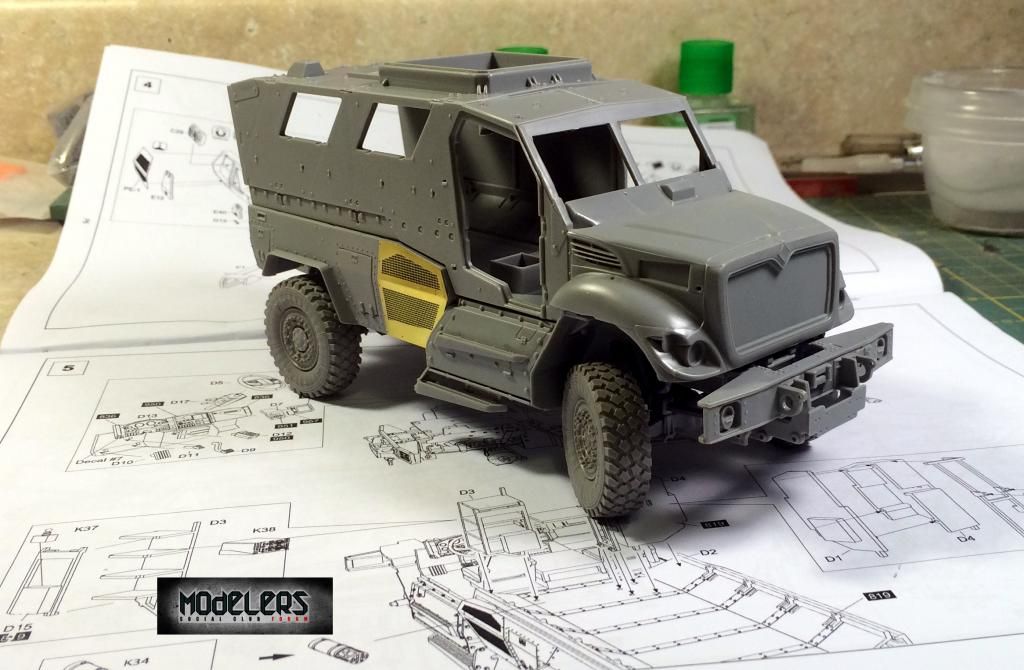 Thanks for taking a look! |
|
|
|
Post by TRM on Sept 16, 2014 22:11:23 GMT -5
Great job so far Adam!! Thanks for taking the time to put this one together!! Making it look easy!!
|
|
|
|
Post by eastrock on Sept 16, 2014 22:29:04 GMT -5
Looks great!!! Thinking of adding it to my Xmas List lol
|
|
|
|
Post by Leon on Sept 17, 2014 1:58:36 GMT -5
Nice work so far despite the clean up Adam.Looking good.
|
|
adampolo13
Reviews member
Member since: April 2012
Posts: 275
Apr 29, 2012 23:17:52 GMT -5
Apr 29, 2012 23:17:52 GMT -5
|
Post by adampolo13 on Sept 18, 2014 9:57:12 GMT -5
Great job so far Adam!! Thanks for taking the time to put this one together!! Making it look easy!! Thanks TRM! It's certainly not easy, but I'm glad I'm making it look that way. Looks great!!! Thinking of adding it to my Xmas List lol Eastrock, I'm not saying you shouldn't get the kit, but I believe Bronco is coming out with a version too. Just something to keep in mind. Nice work so far despite the clean up Adam.Looking good. Thanks Leon! I have already gone through a few #11 blades and have gotten some great use out of my sanders. Hopefully I'll have another update for you guys this weekend. Next up will be the interior and I'm still deciding how much of the Voyager I want to use. Right now I'm leaning towards just the seat belts but that's just cause I'm lazy. I'm sure the PE radio racks and trays will look better in PE, but do I really want to do all that work? |
|
|
|
Post by TRM on Sept 18, 2014 10:42:33 GMT -5
DO THE PE>>>>FEEL THE FORCE FLOWING THROUGH YOU!! We can get together and have a soldering class!!  |
|
|
|
Post by Leon on Sept 18, 2014 17:13:08 GMT -5
Go for it Adam,a little bling will look great. |
|
|
|
Post by dupes on Sept 18, 2014 17:16:42 GMT -5
We can get together and have a soldering class!! You mean in a thread here on MSC, right Todd? I'm sure that's what you meant! |
|
|
|
Post by deafpanzer on Sept 21, 2014 0:46:05 GMT -5
Pulling my chair in... sorry I am late! LOL
|
|
adampolo13
Reviews member
Member since: April 2012
Posts: 275
Apr 29, 2012 23:17:52 GMT -5
Apr 29, 2012 23:17:52 GMT -5
|
Post by adampolo13 on Sept 21, 2014 8:07:52 GMT -5
Hey guys, update imminent... Let's just say TRM pushed me over the edge a bit and I did make a start on some of the photo etch.
|
|
|
|
Post by Leon on Sept 21, 2014 10:22:14 GMT -5
Waiting patiencely Adam. |
|
adampolo13
Reviews member
Member since: April 2012
Posts: 275
Apr 29, 2012 23:17:52 GMT -5
Apr 29, 2012 23:17:52 GMT -5
|
Post by adampolo13 on Sept 22, 2014 18:12:34 GMT -5
Hey guys, Sorry for the delay in getting this update to you. I spent yesterday afternoon and evening dealing with this:  It now looks like this:  Okay, but now on to the Maxx Pro... At the end of the last bench session I thought I would get a start on the interior but I decided to go a different route this time. The body itself has some pretty rough seam lines on it so I had to get ride of those and make sure the panel lines didn't get obliterated.  Along the same lines I had to get a start on getting rid of those ugly panels on the hood. I believe Kinetic put them here because some of the variants have a vent, but this one does not so these got to go. 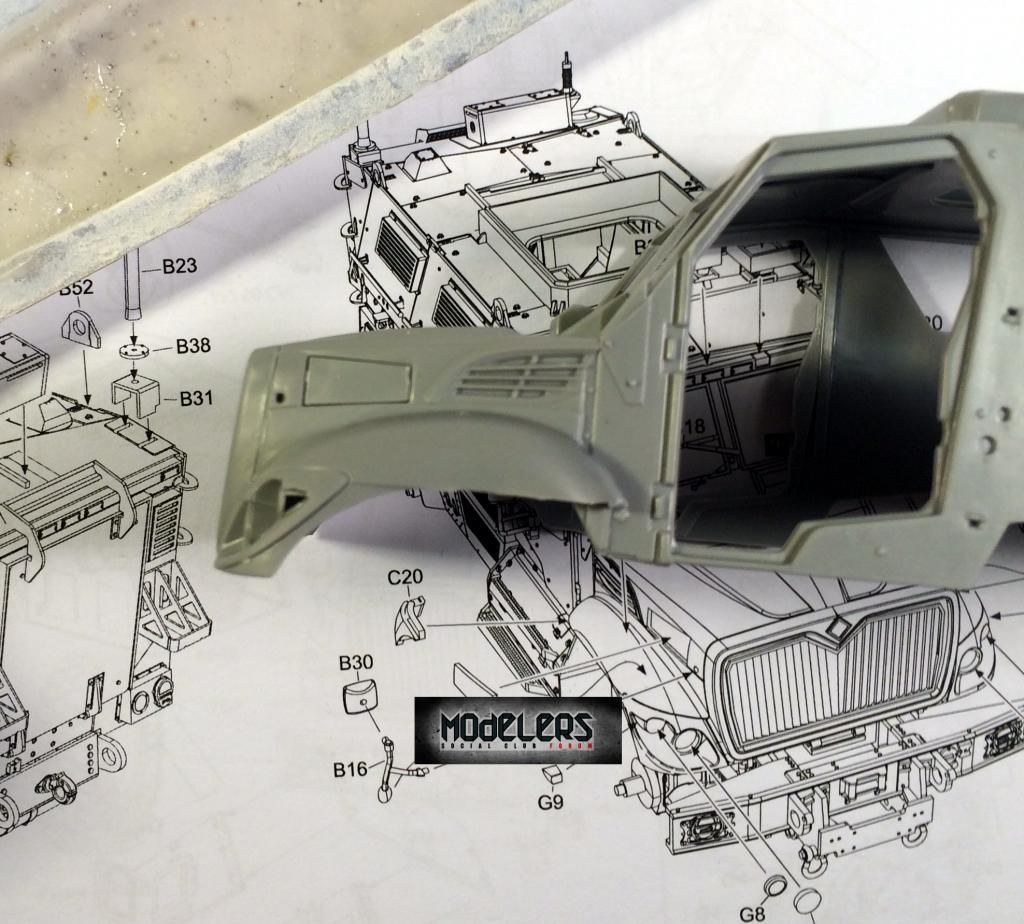 After some CA glue and a bit of primer to make sure it was smooth... 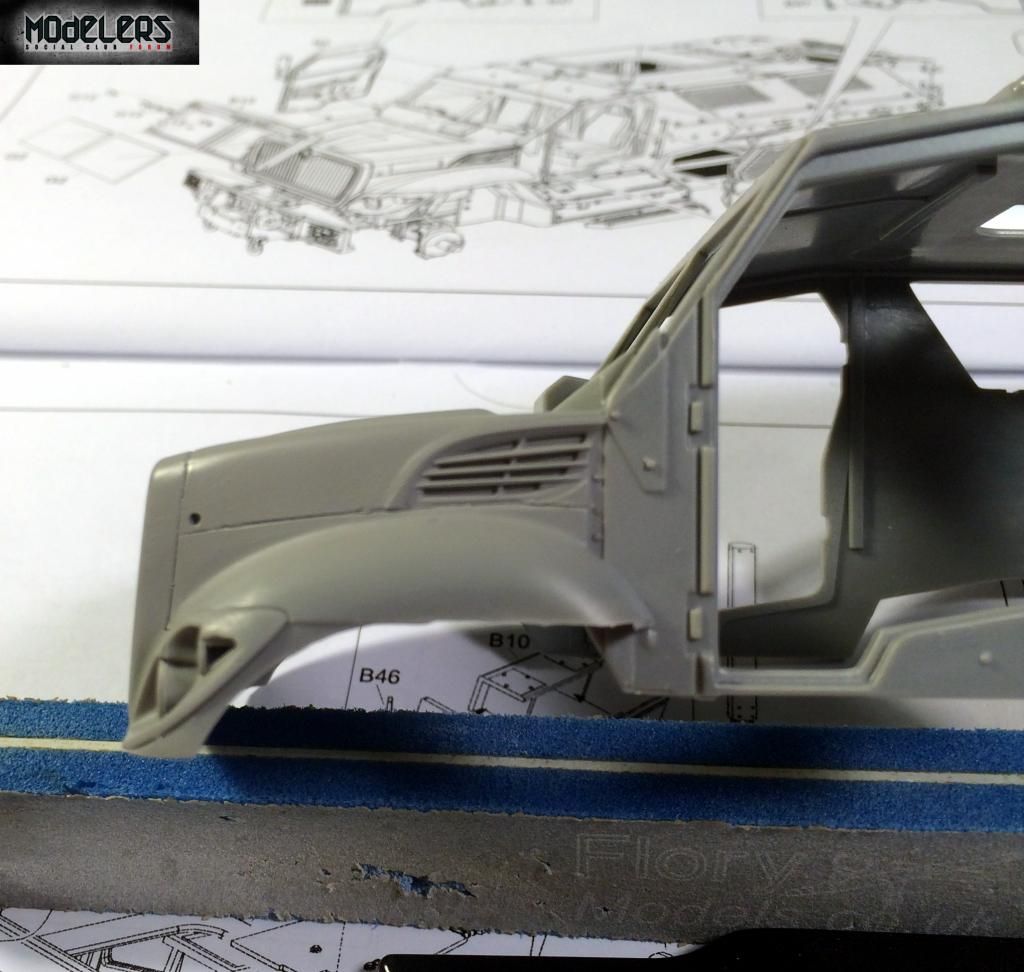 After that was squared away I got a start on the interior. 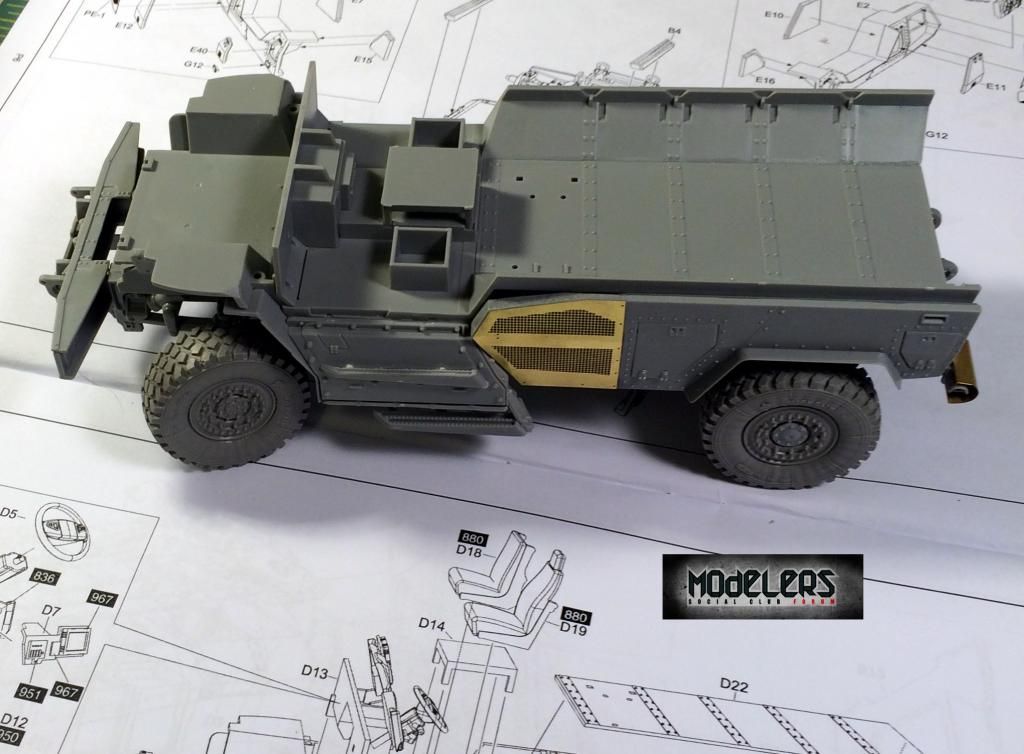 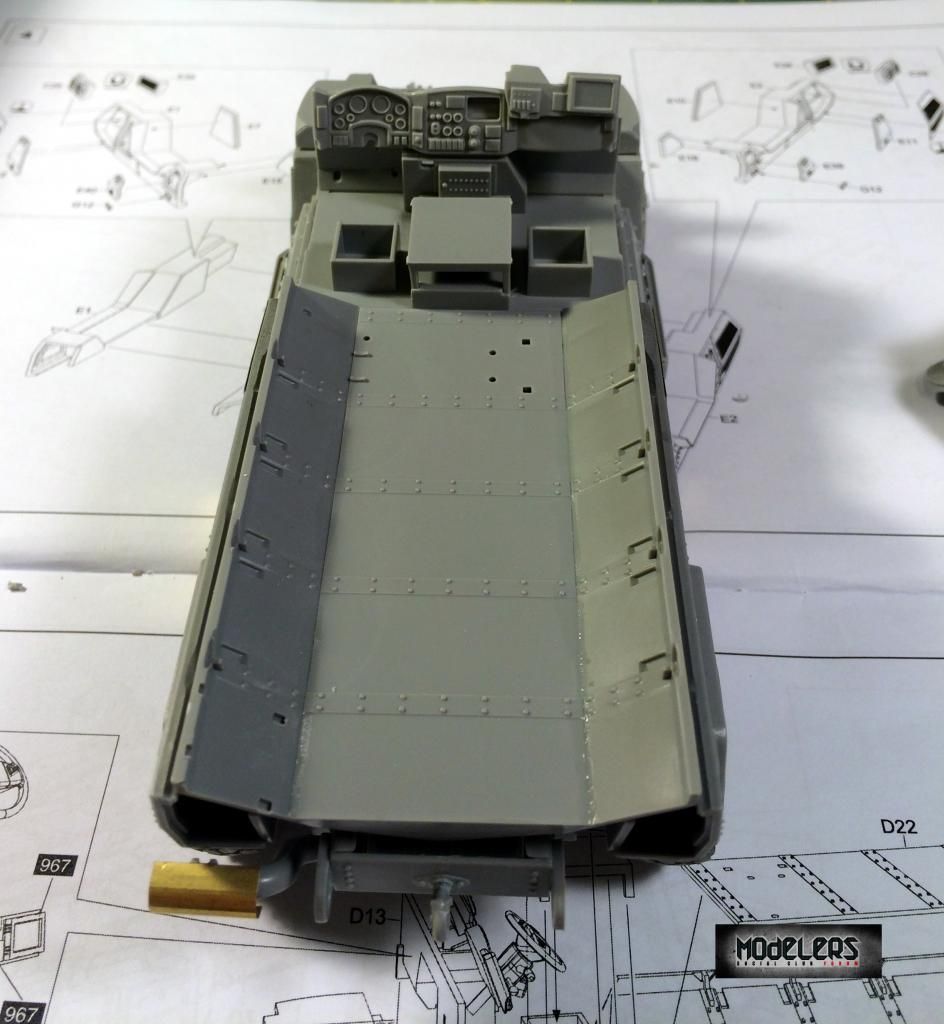  Then up came trying to decide if I was going to mess around with the Photo Etch. Well, Todd certainly won this argument. The PE looks much better.  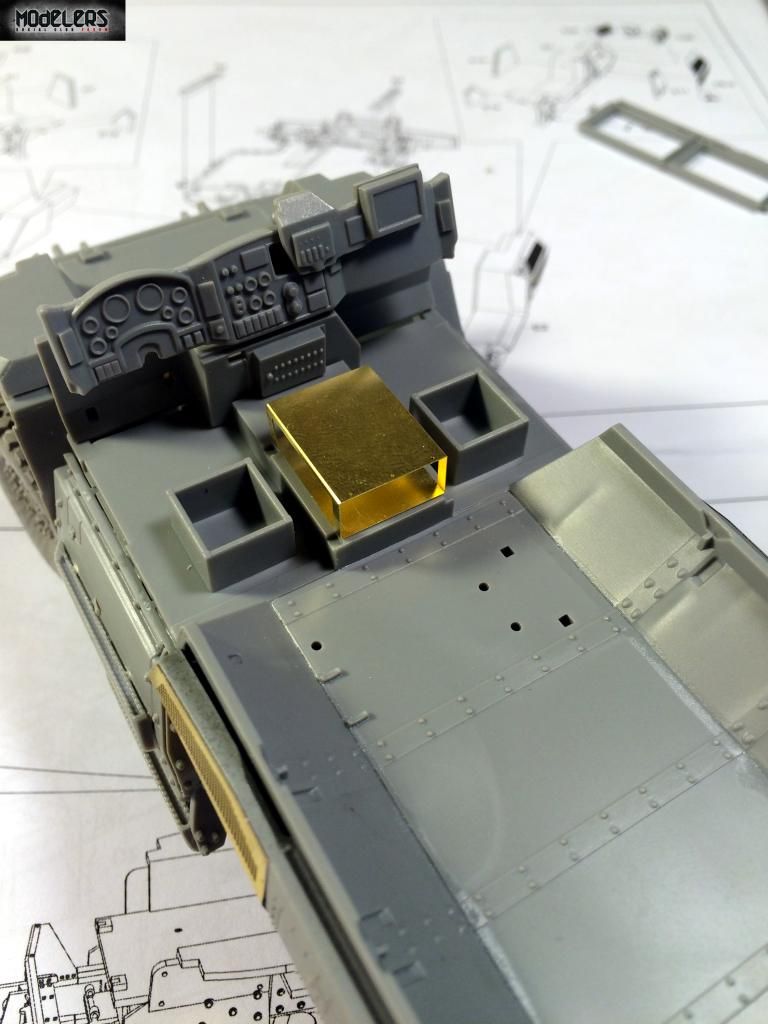 Because of the rather large attachment points for the legs on the plastic part, there would be some larger gaps. I decided to use those legs and CA to fill and smooth them out. 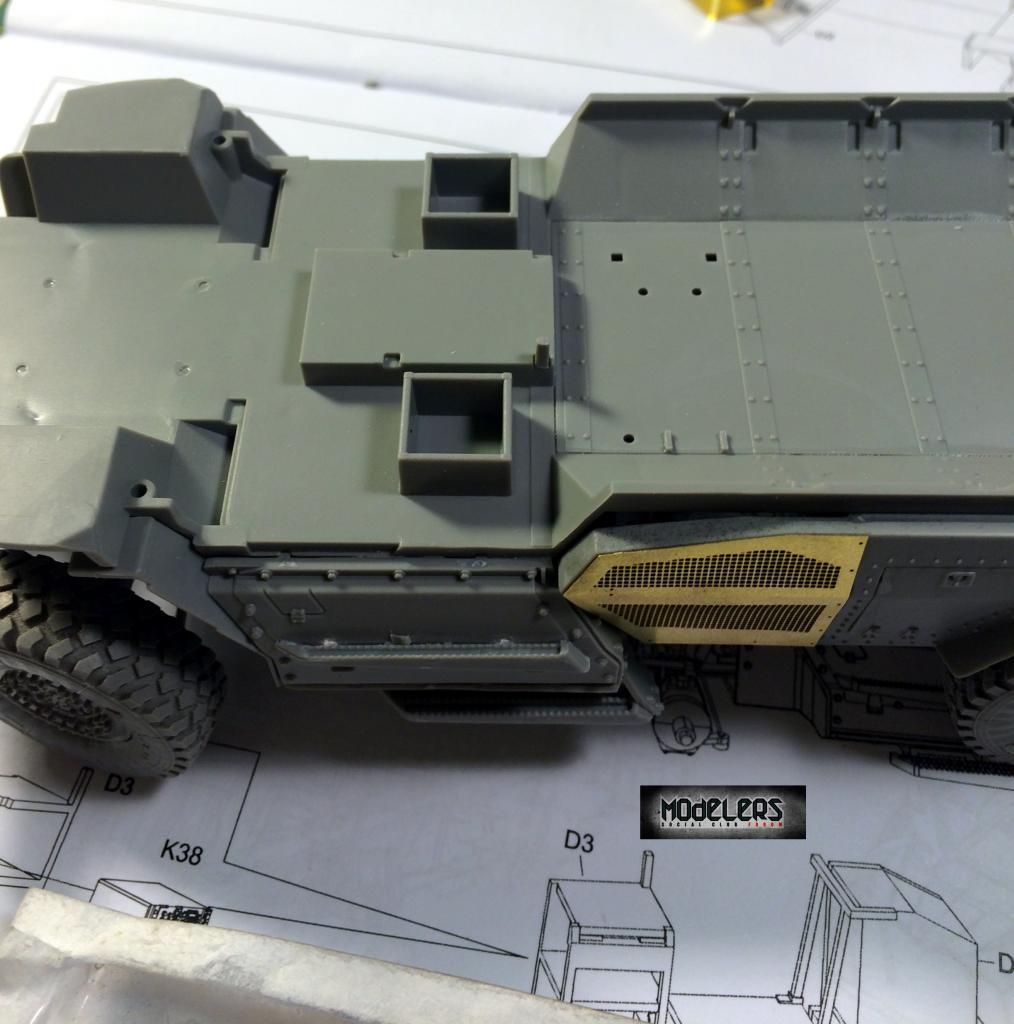 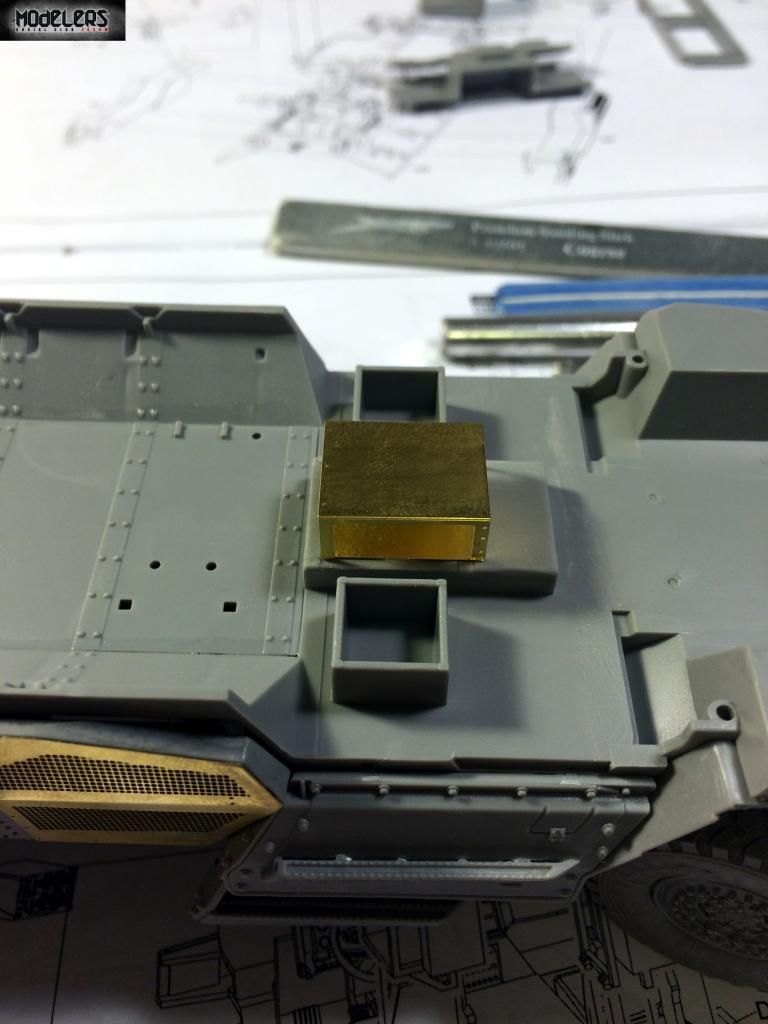 While in the process of locating and using PE I noticed Voyager had included replacements for the kit parts. The best part, the Voyager parts have the fold line!!! 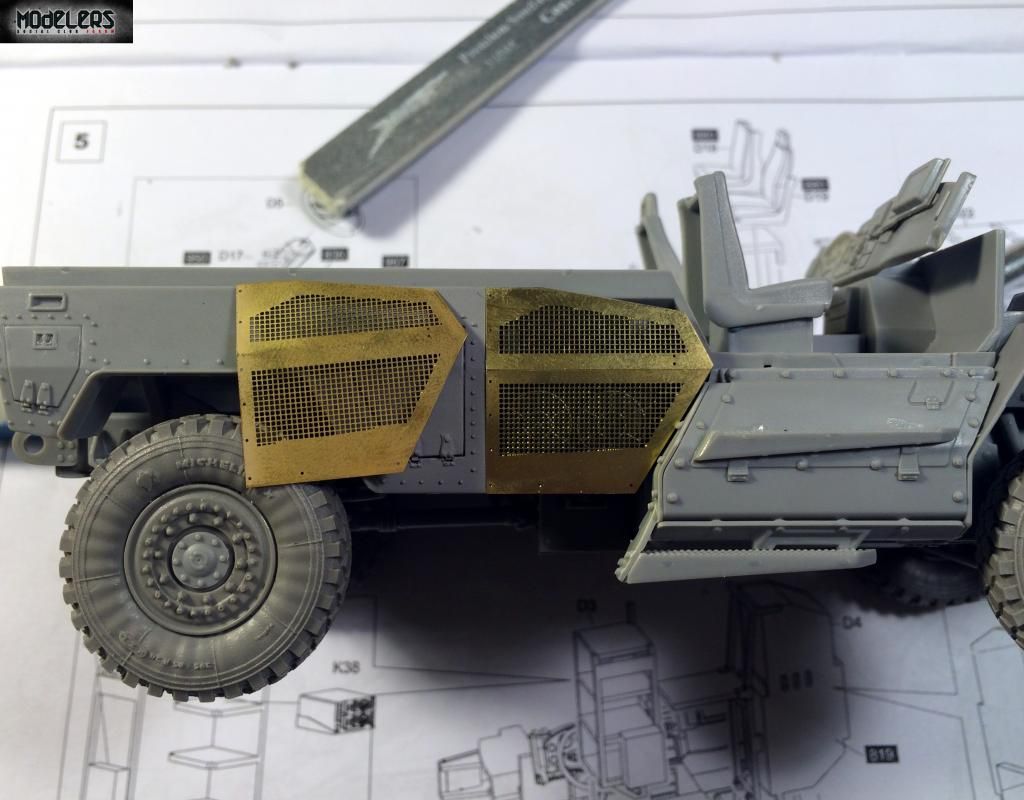 And then, the reason why I bought the voyager set, the seat belts... 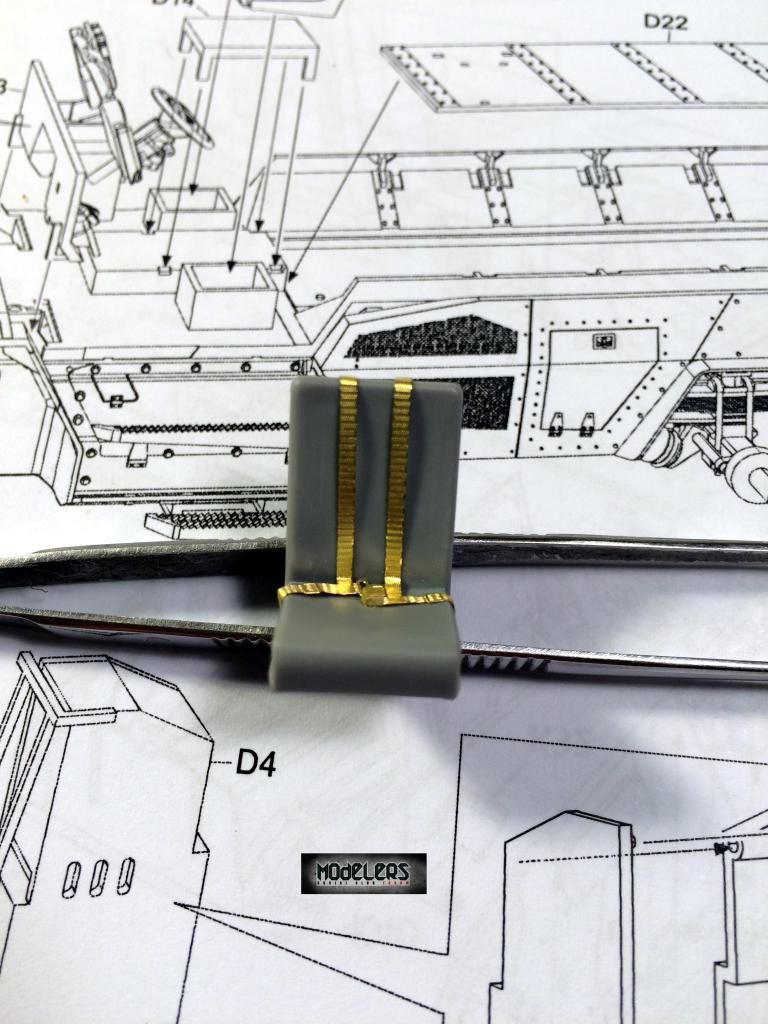 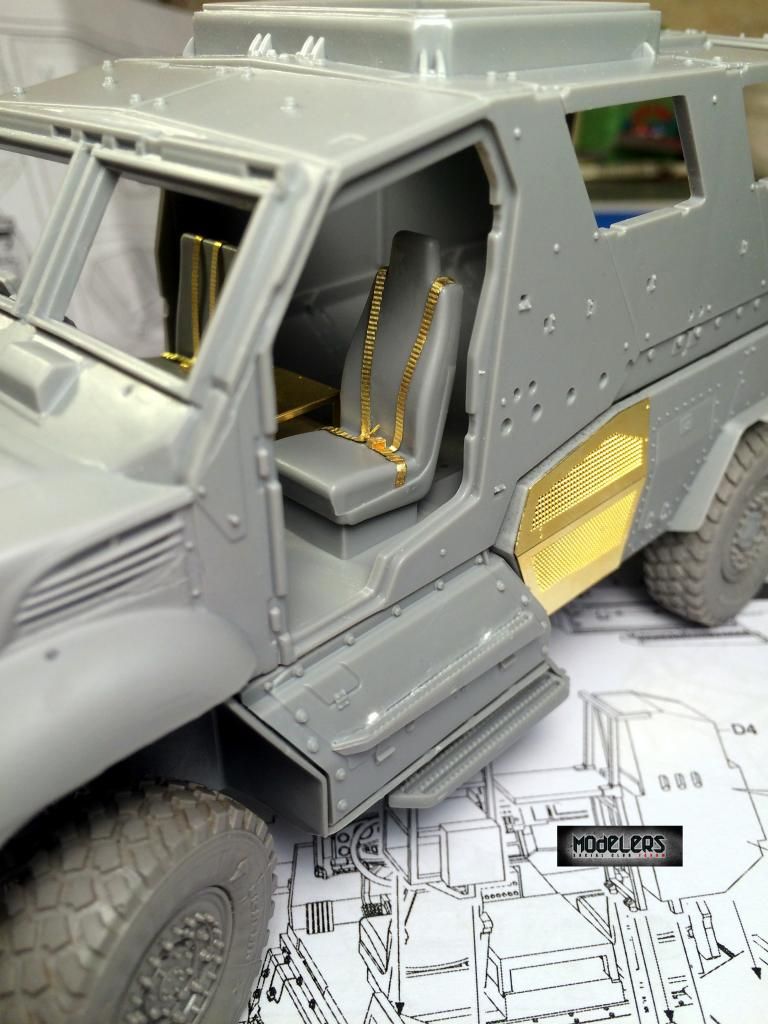 last but not least, a quick little profile picture! 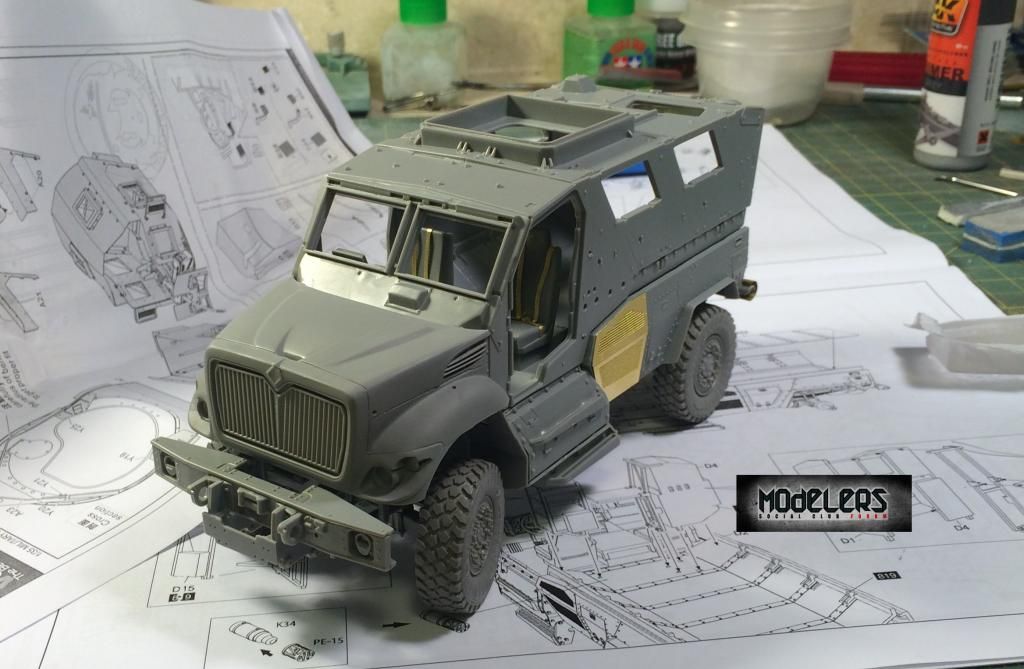 Thanks again for following along! |
|
|
|
Post by TRM on Sept 22, 2014 18:41:34 GMT -5
Well done Adam!! Not the big boo boo of course... from having to deal with the PE!! You put a nice dent in the kit brotha!! Looking froward to you beating this one up some more!! Go easy on splitting the wood in the back yard buddy!!  |
|
|
|
Post by Leon on Sept 22, 2014 18:51:02 GMT -5
Awesome work on the PE Adam ,defo a big improvement.Good to see your wound isn't any worse.  |
|
adampolo13
Reviews member
Member since: April 2012
Posts: 275
Apr 29, 2012 23:17:52 GMT -5
Apr 29, 2012 23:17:52 GMT -5
|
Post by adampolo13 on Sept 23, 2014 7:48:33 GMT -5
Thanks T! Thanks Leon! I got a little bit more bench time last night. Spent the whole time trying to get voyagers PE radio rack installed. After two hours I gave up. The voyager stuff is very nicely detailed but it doesn't want to fit. I would have had to cut legs to make it shorter or glue it in the wrong spot. So, I went for the plastic kit part. It's the interior so no biggie.
|
|
adampolo13
Reviews member
Member since: April 2012
Posts: 275
Apr 29, 2012 23:17:52 GMT -5
Apr 29, 2012 23:17:52 GMT -5
|
Post by adampolo13 on Sept 24, 2014 20:07:38 GMT -5
Hey all, another update for you. Following up on my post above, after more than two hours of trying to get the Voyager PE rack installed I called it quits. As you can see from the voyager instructions, which in my opinion are more helpful that Kinetic's, there were a number of piece to bend and glue together. 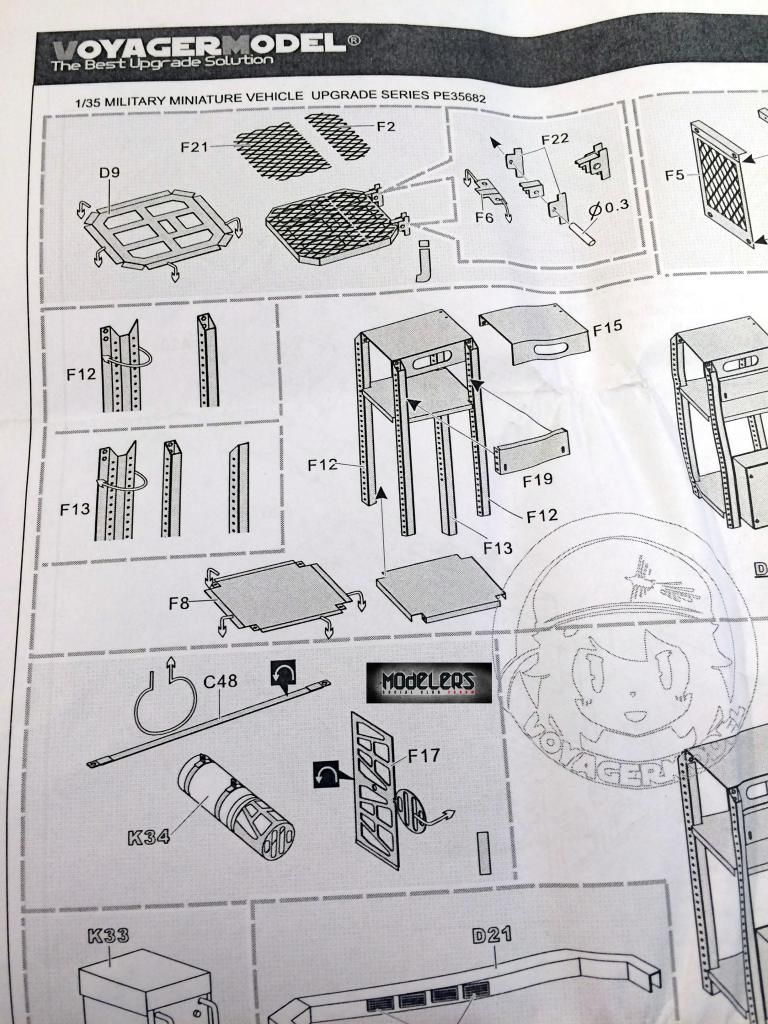 In the end though, I went for the kit parts and ended up with this: 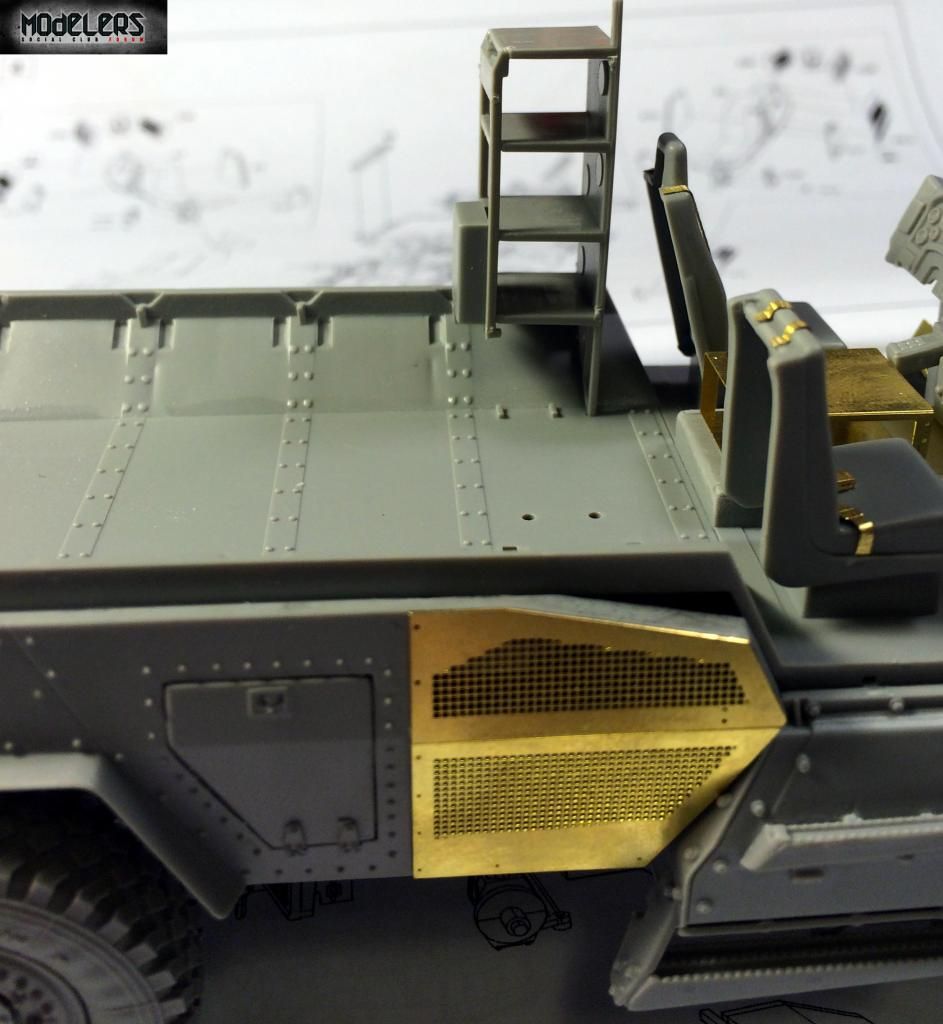 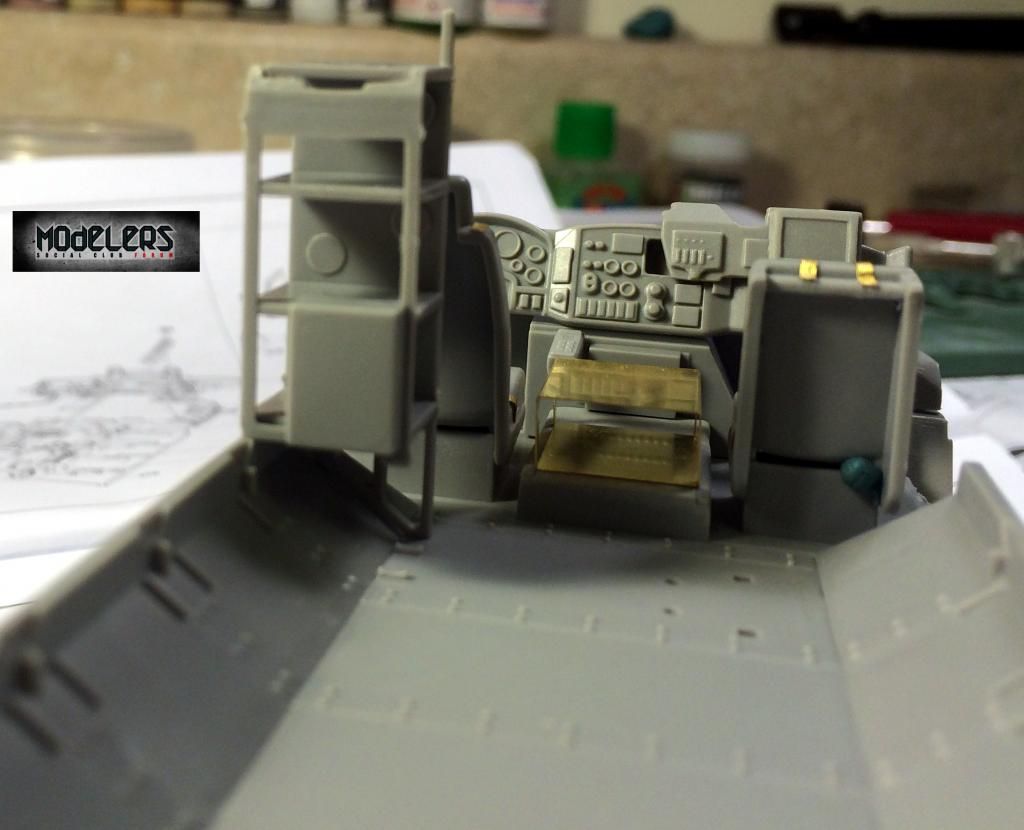 Not overly awful, so I'll take it. As a note, I did not forget about those giant ugly extruding pin marks. They were removed and sanded flush. Next up was the gunner's platform, not sure if that's what it's really called, but I'm going for it. 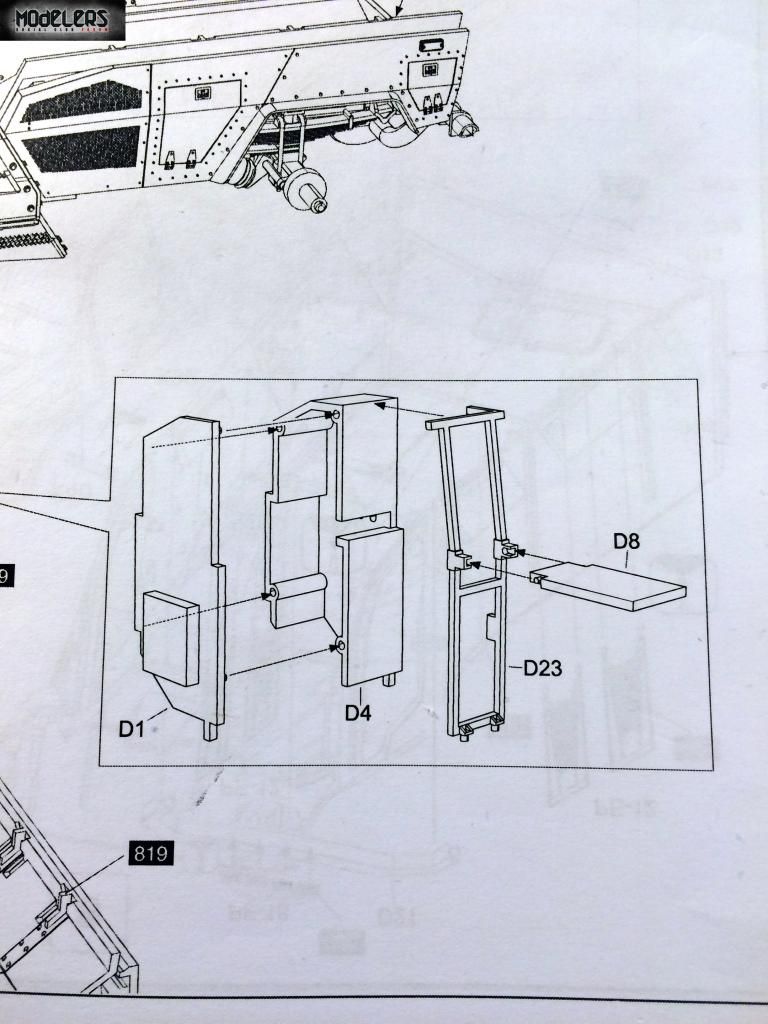 Here is the parts D1 & D4. You can see there would have been a HUGE gaping seam line running down the side. But, I filled it with CA glue, sanded smooth and moved on. 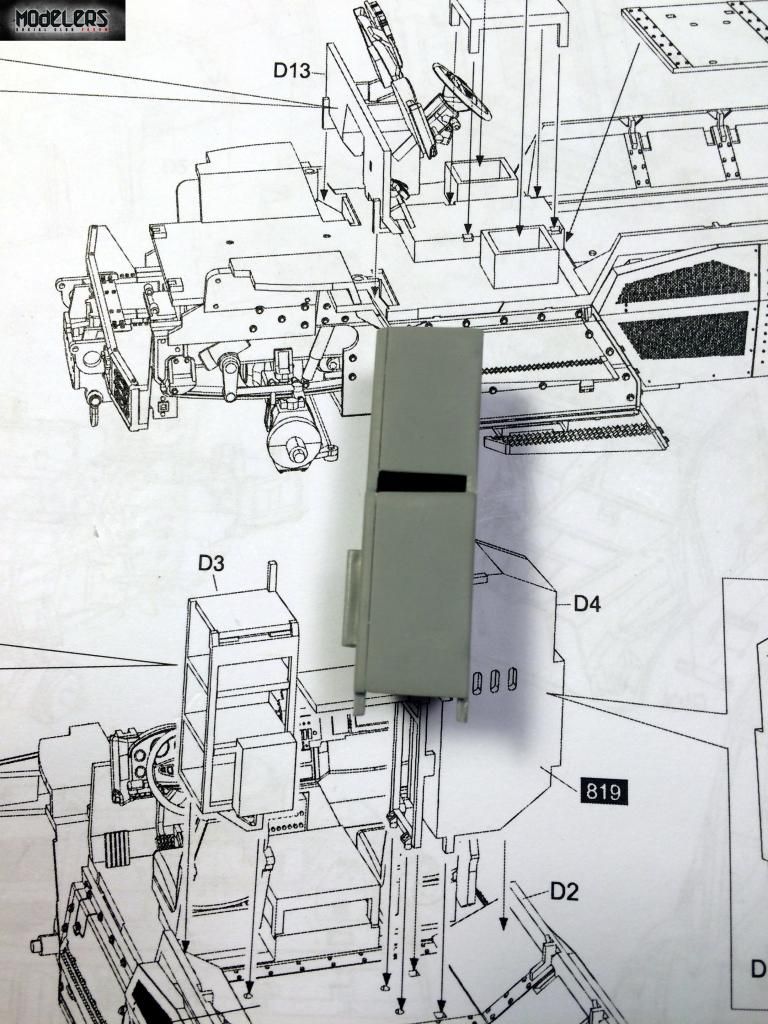 Now, here's part D8. 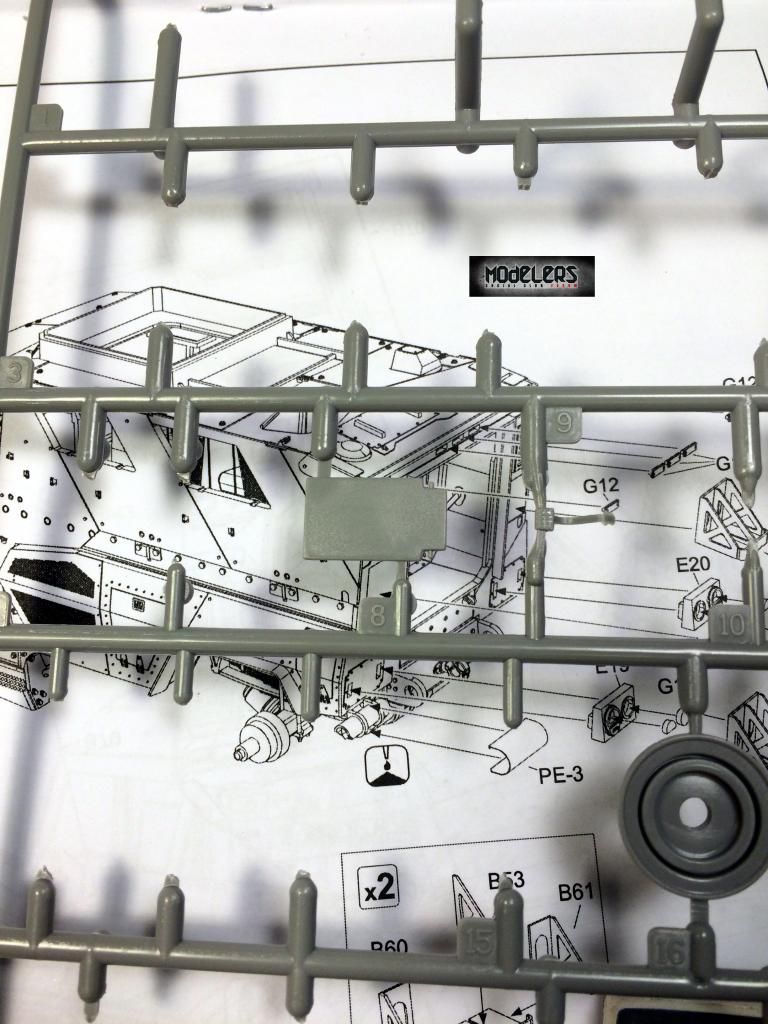 And here's what Voyager has to say about that!!! Much improved right! 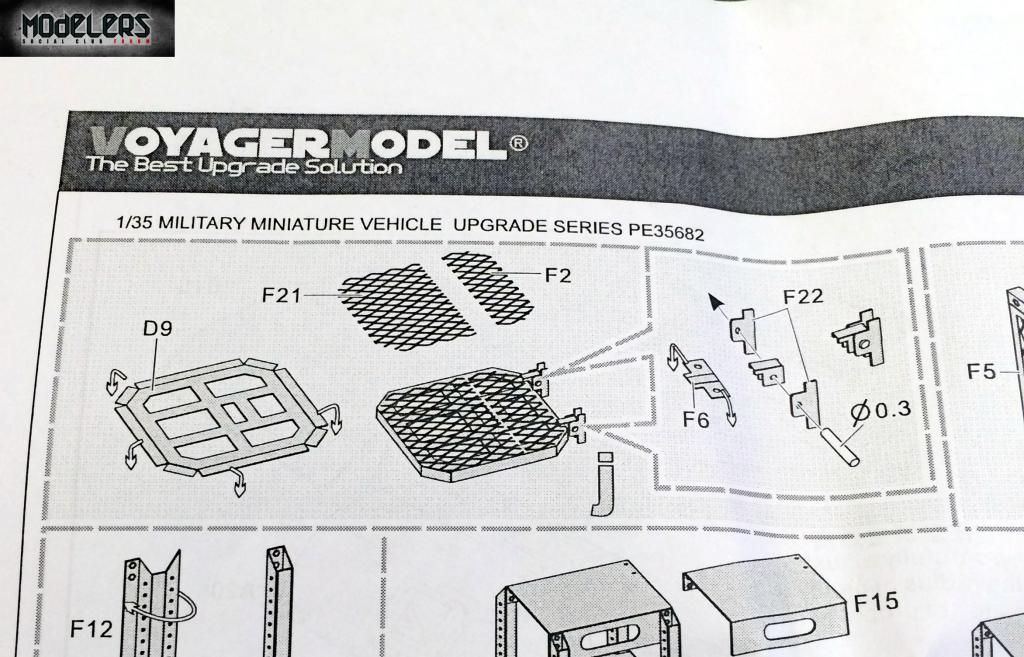 So, with a little bit of help from my PE bending tools, some CA glue, and a little bit of patience, this is what I ended up with: 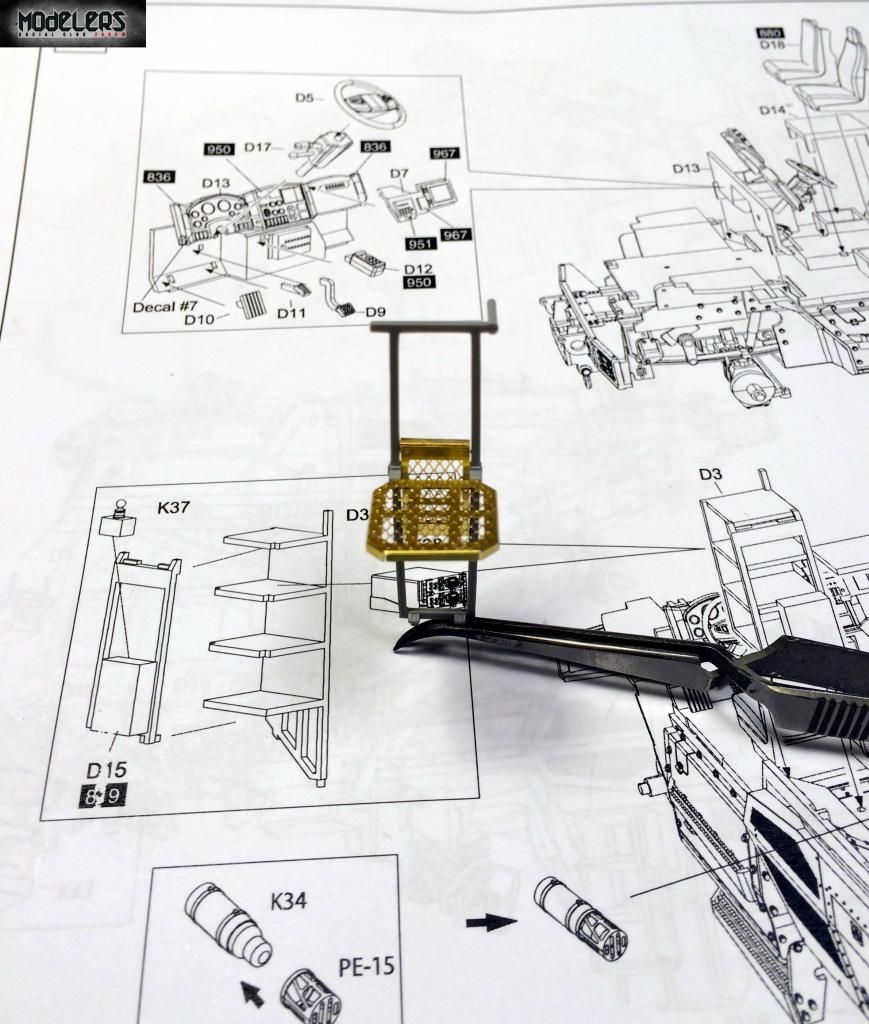 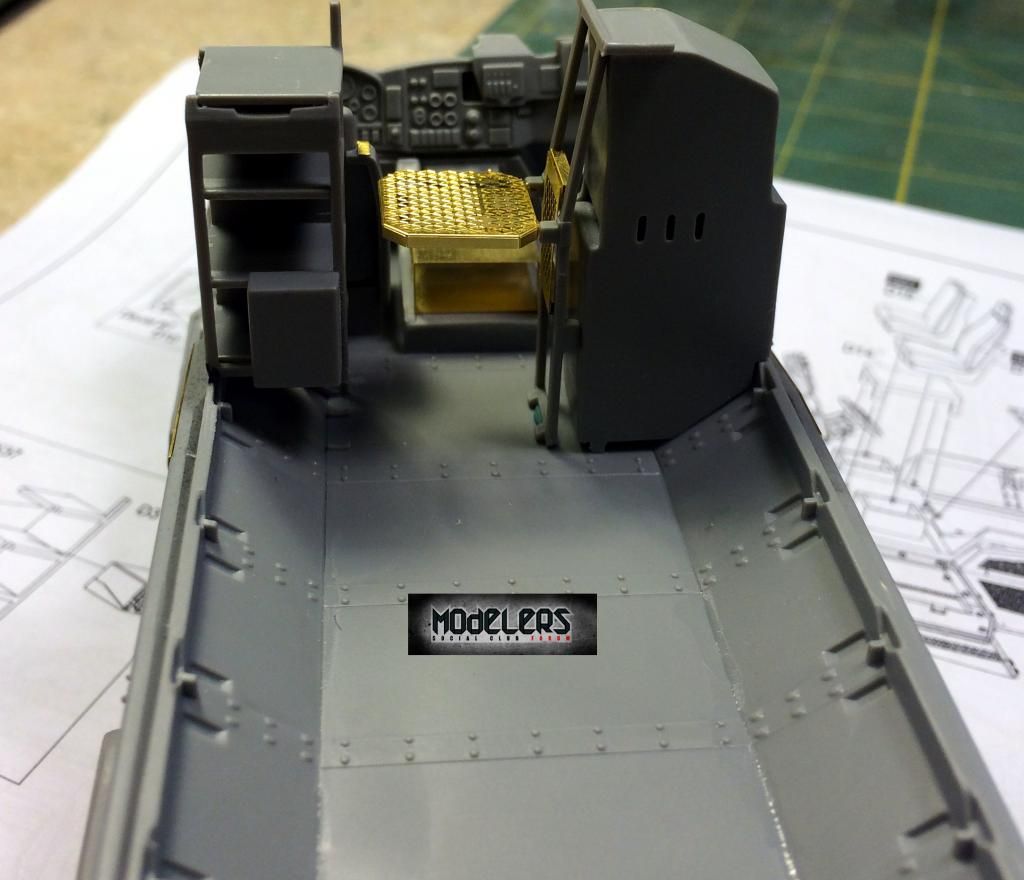 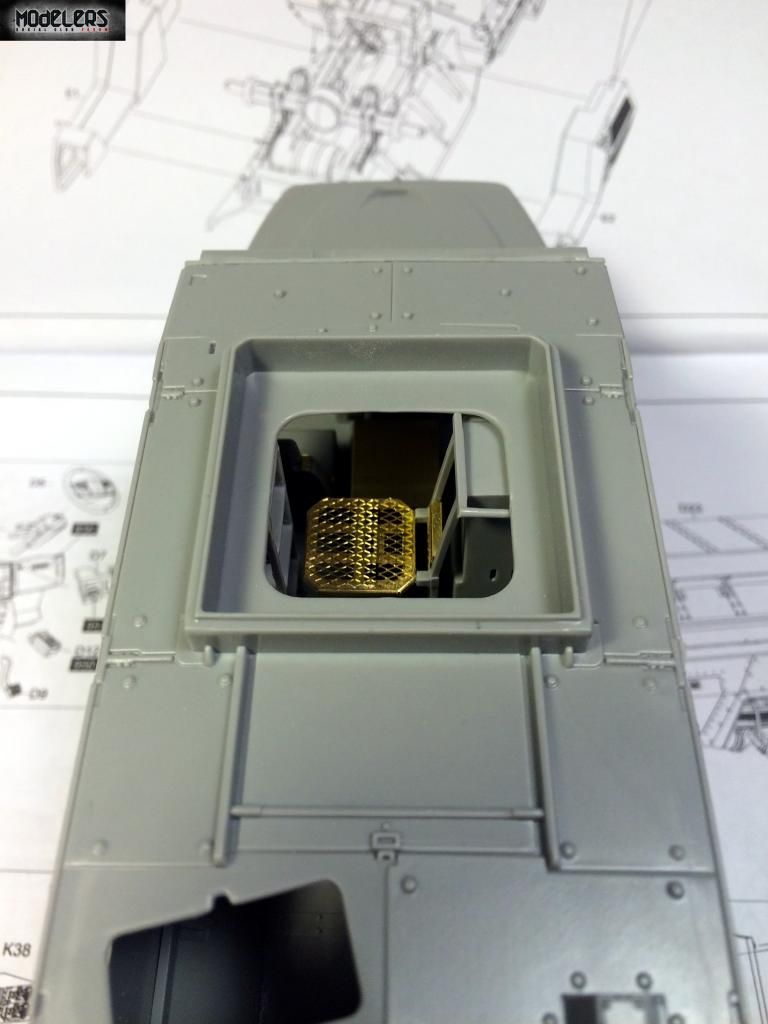 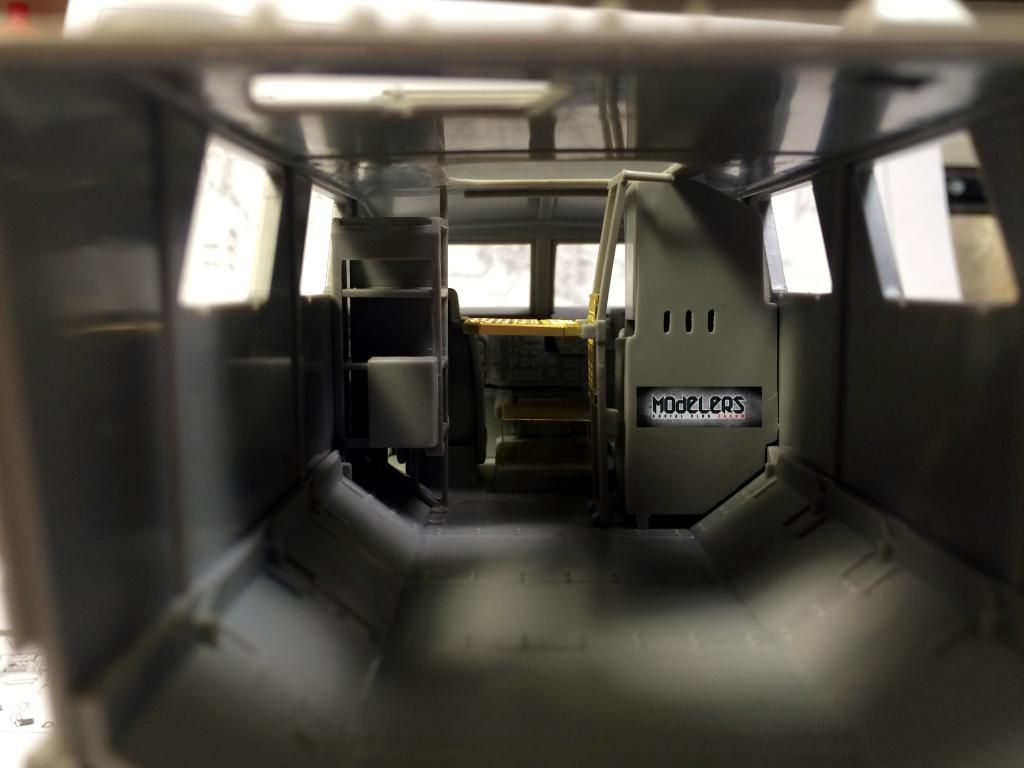 Not too bad right? Then it was on to the crew area and their seats, mainly sanding and adding seat belts... 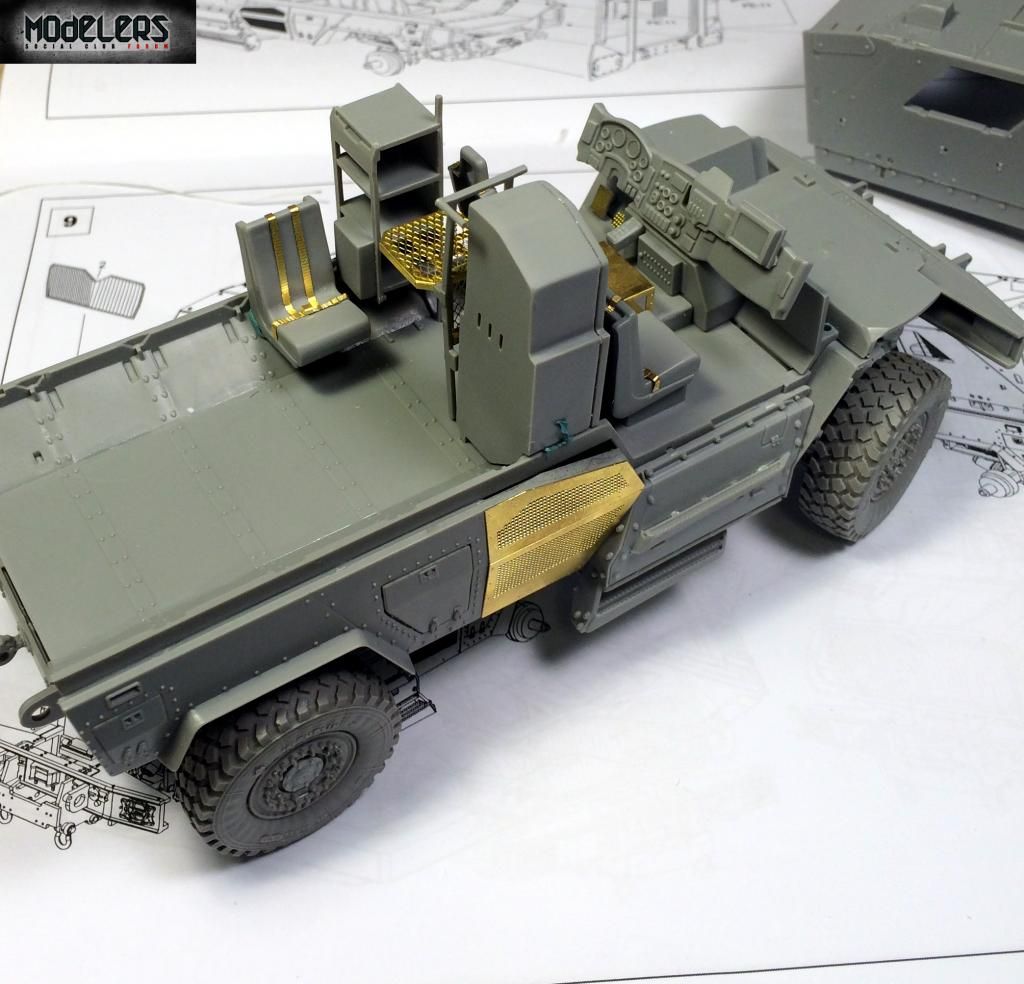 One of the things i tried to do, in an effort to give more realism, was have the belts resting differently on each seat.  (Pardon the blue tac) 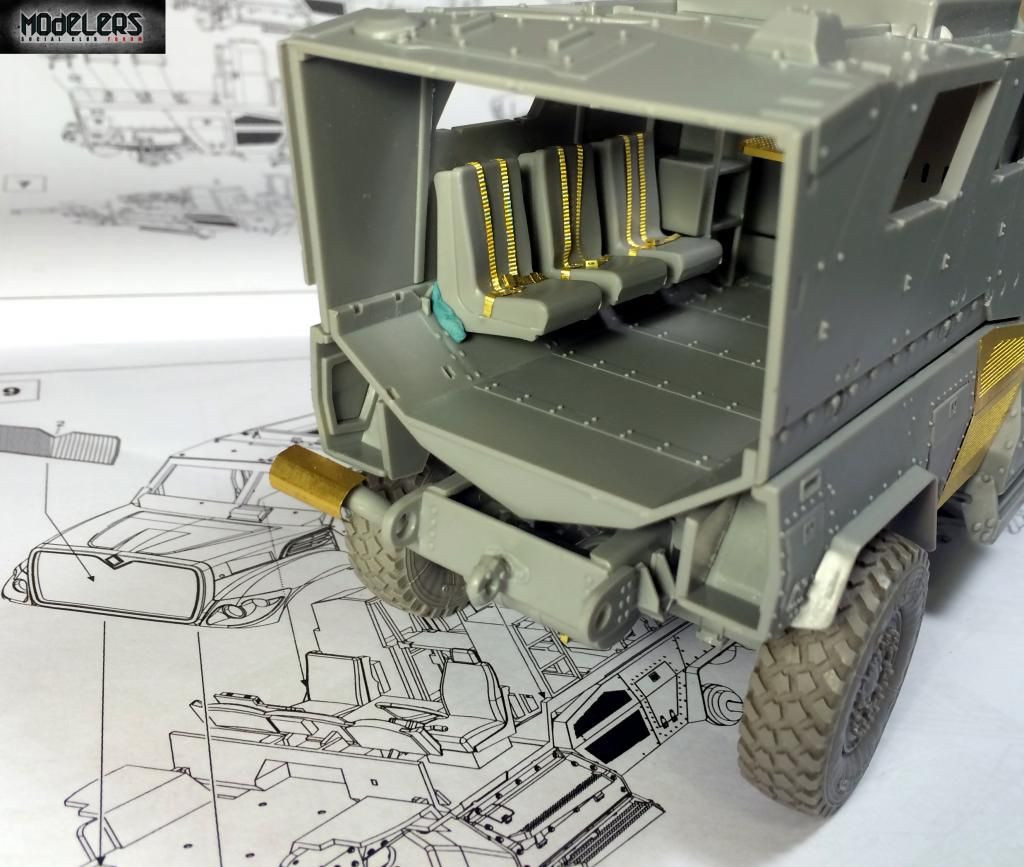 Oh yeah, can't forget to show you the pin marks on the interior ceiling... Those took a bit of elbow grease and some skinny sanding sticks to get removed. 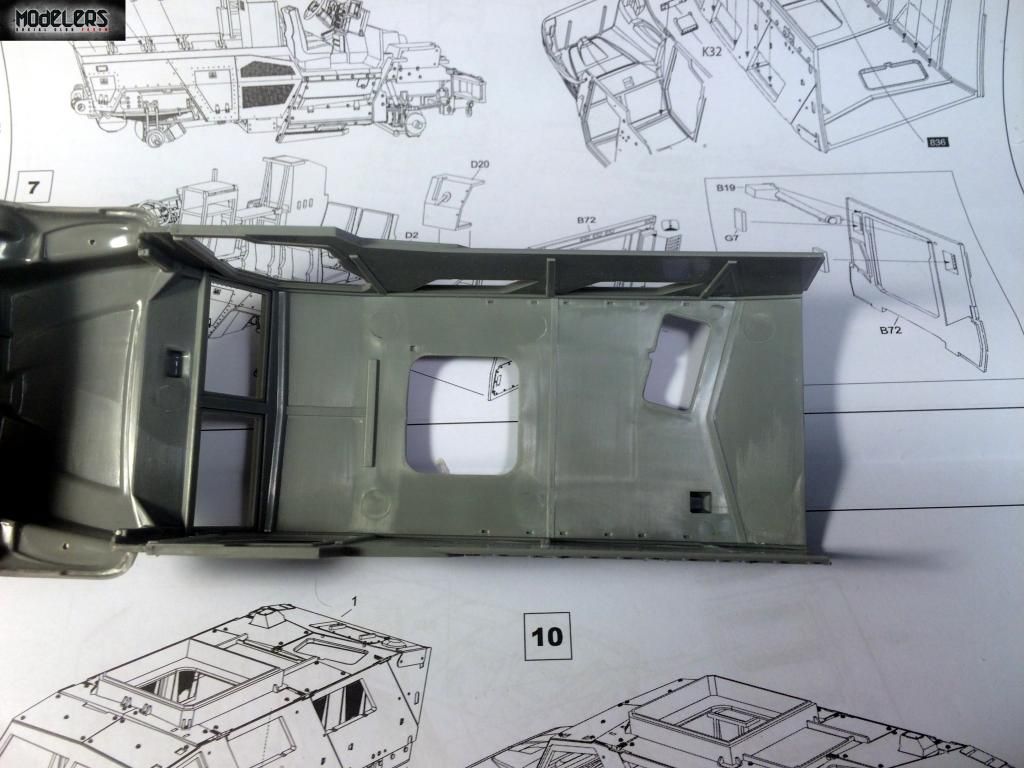 Going back to the radio for a second, I took a look at K38 which is the kit provided radio system thingy. Which, does have a lot of dials and bobs and what nots on the front but a gaping hole in the back... 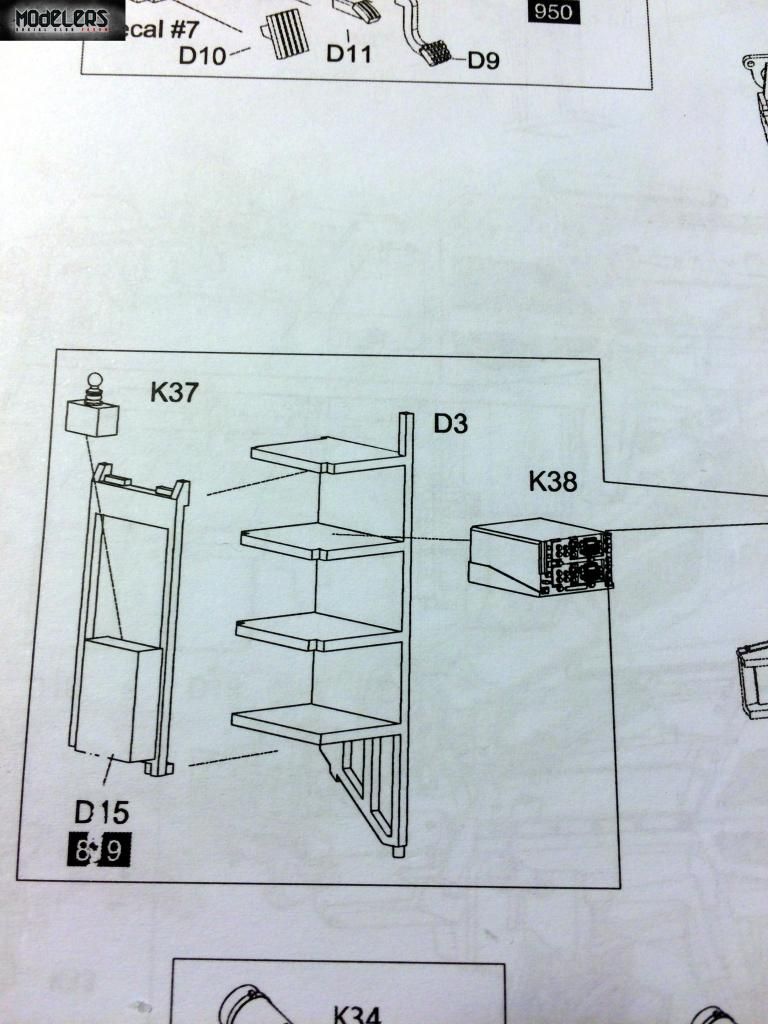 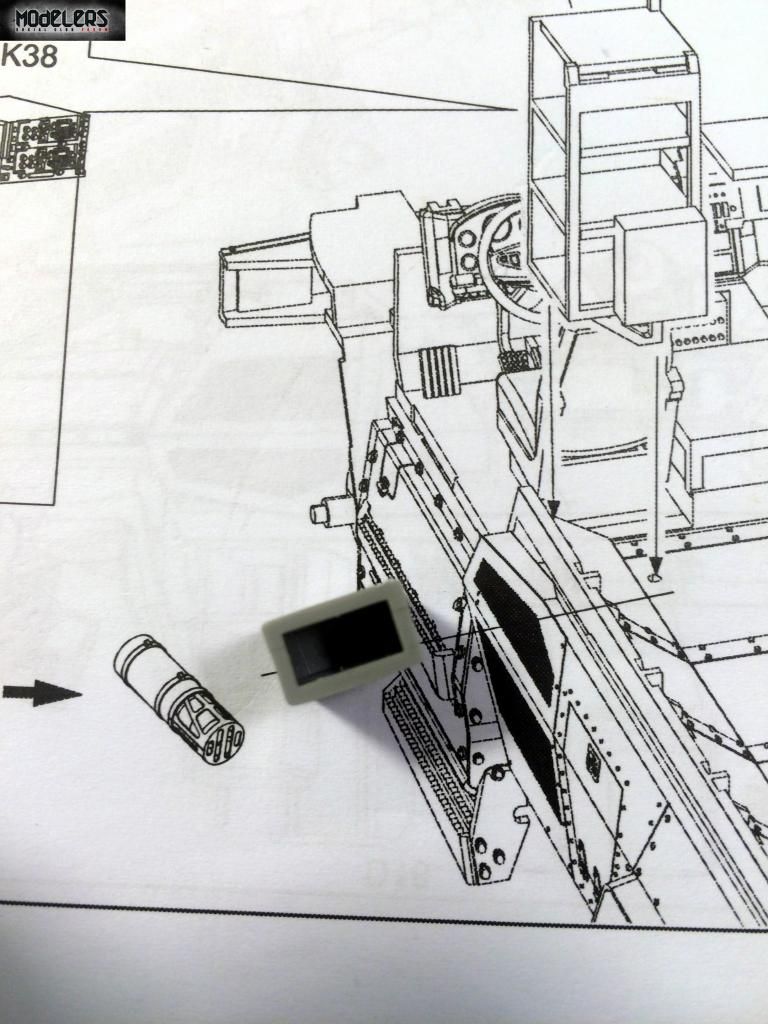 Now, one could argue that once the glass goes in and the PE protective shield thingy, that the back of the radio system wouldn't get seen, I just could risk it. Look at how bad this looks! 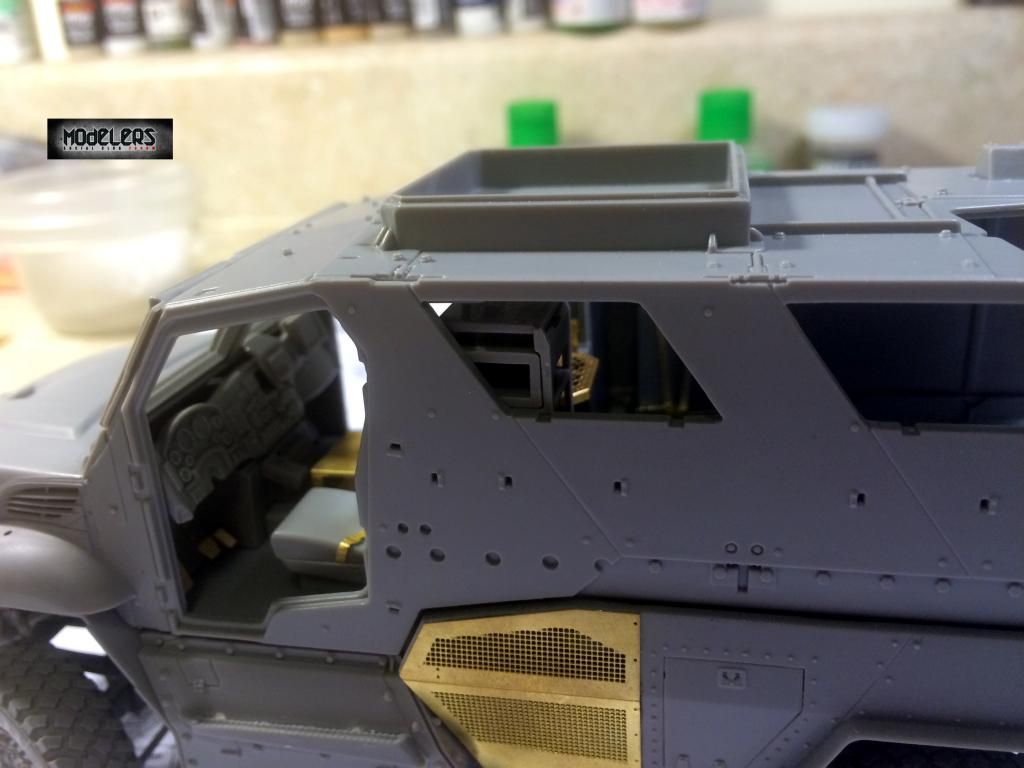 So, what did I do? I took some scrape card stock and CA and filled it in. 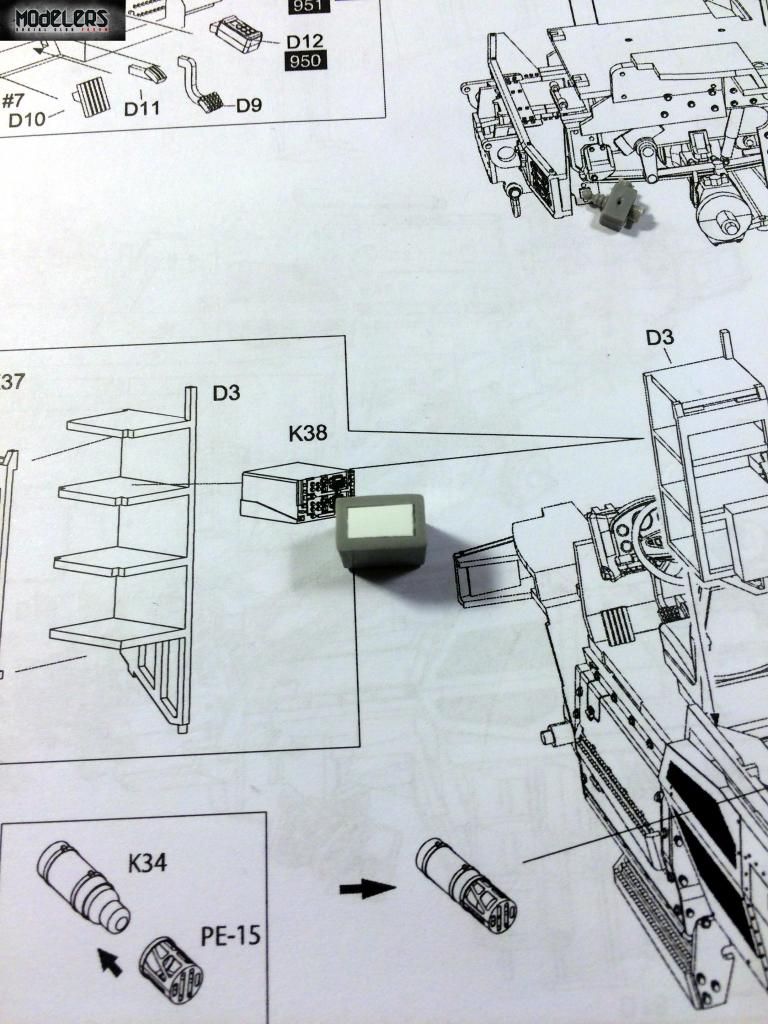 Then I looked at that very softly molded detail, which looks like it's supposed to be some sort of tray, and I thought I could do better. 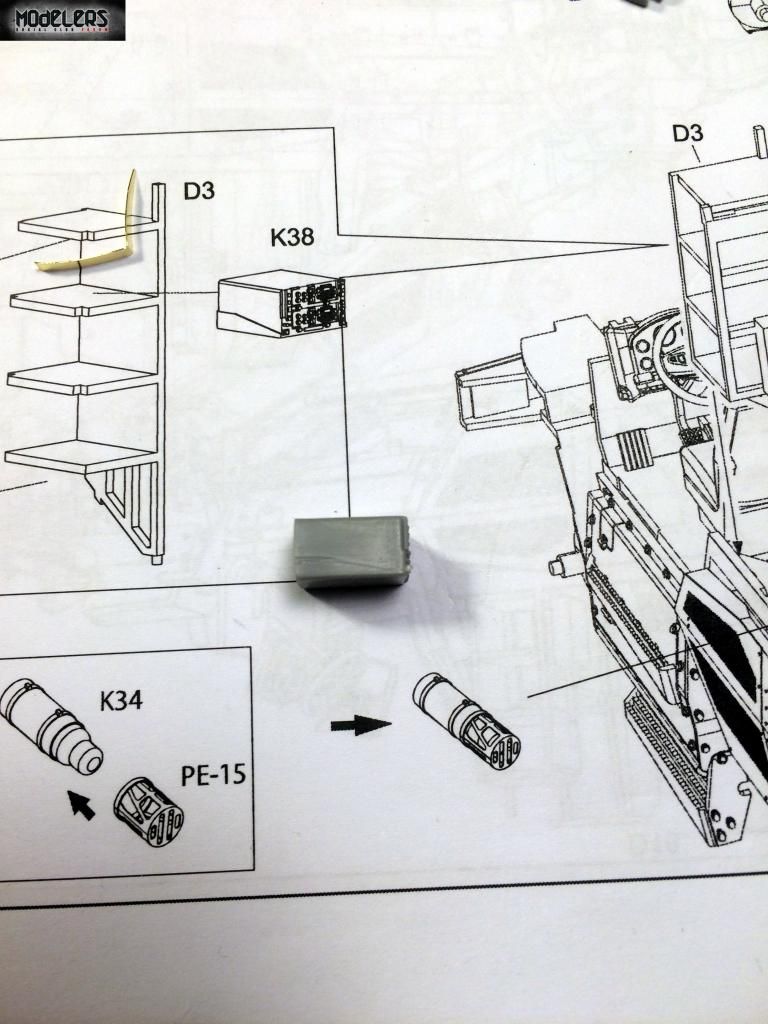 So, I cut up some scrape photo etch and made it myself. Hooray scratch building!!! 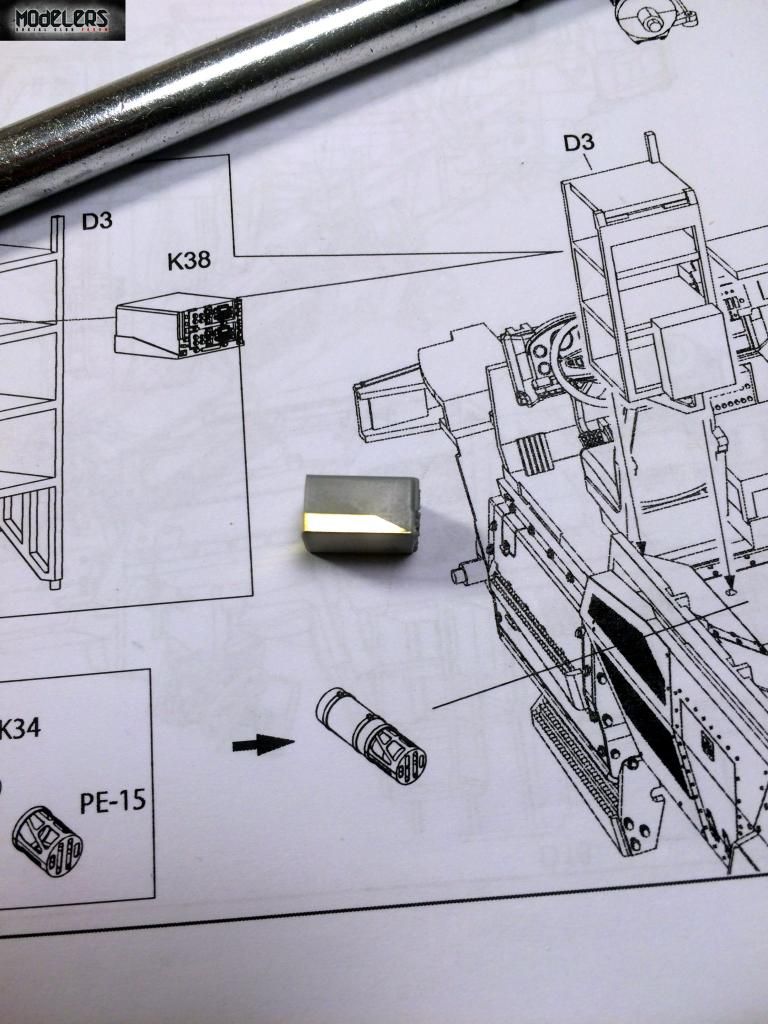 Even though the white backing is a little odd to look at, once she is all painted up, it'll look a lot better than it would have strait out of the box.  And then, well, my wife called me into the living room for home made apple pie, (yes we picked the apples this weekend) along with a healthy helping of vanilla ice cream and whipped cream! Thanks for following along guys! |
|
|
|
Post by deafpanzer on Sept 24, 2014 20:25:59 GMT -5
Looking fantastic! Looks like you will be able to finish it before the show. Be sure to bring some apple pie to the show too! LOL
|
|
|
|
Post by TRM on Sept 24, 2014 21:33:27 GMT -5
Looking great Adam!! Nice radio fabrication!! Are you diggin the PE work yet? Looks fantastic form here!!
|
|
|
|
Post by eastrock on Sept 25, 2014 20:42:35 GMT -5
Adam, I think its too late, kit will be probably arrived by tomorrow and ordered the Voyager PE sets. for one in fact I know kinetic had a flop in their MATV MRAP kit, which need a lot of modifying compared to the Panda which until now I'm still in progress but planing to complete it. with your reviews and walkthrough this would be very helpful.
Most probably will use the kit wheels, if DEF or ET models has not issued resin wheels for MAXXPro.
Cheers!!!
|
|
adampolo13
Reviews member
Member since: April 2012
Posts: 275
Apr 29, 2012 23:17:52 GMT -5
Apr 29, 2012 23:17:52 GMT -5
|
Post by adampolo13 on Sept 26, 2014 8:41:56 GMT -5
Eastrock - I'm glad you are finding my thread helpful! When I first opened the box to this thing I was disapointed to say the least, it's just not the quality I'm used to seeing from new kits. It is a big improvement over the M-ATV, but still, it ain't no Meng kit. All that being said, with a little love and some shiney metal PE, this is starting to become something halfway decent.
|
|
|
|
Post by eastrock on Sept 26, 2014 9:59:06 GMT -5
Adam, Thank you for your inputs on the MaxxPro, will be going full use of the voyager as well some minor modification. will post the kit and WIP in few days probably start cleaning, puttying and sanding the parts while waiting for the replacement to arrive.
Btw will get DEF Models wheels for the replacement tires.
Cheers!!!
|
|
adampolo13
Reviews member
Member since: April 2012
Posts: 275
Apr 29, 2012 23:17:52 GMT -5
Apr 29, 2012 23:17:52 GMT -5
|
Post by adampolo13 on Sept 26, 2014 11:58:59 GMT -5
Eastrock, I'll be interested to see how the Def Model wheels look in comparison to the Real Model ones on mine. Looking forward to seeing your build as well!
|
|
|
|
Post by mrt51 on Sept 26, 2014 13:03:51 GMT -5
Cool looking model so far.
Terry
|
|
|
|
Post by Leon on Sept 28, 2014 19:27:54 GMT -5
Nice work on the PE and interior Adam.Looking really good.
|
|
adampolo13
Reviews member
Member since: April 2012
Posts: 275
Apr 29, 2012 23:17:52 GMT -5
Apr 29, 2012 23:17:52 GMT -5
|
Post by adampolo13 on Sept 30, 2014 21:24:12 GMT -5
Hey guys, again it was great seeing you at the show on Saturday, tons of fun for sure. But now we must return to our regularly schedule broadcast... As some of you may have seen, I've been jacked up on figures lately so I decide I was going to try my hand at a dio/vignette type of thing. Who knows, maybe my figures will have something to look at Todd! Ah hem! Anyways, here's a general layout of what I'm thinking. 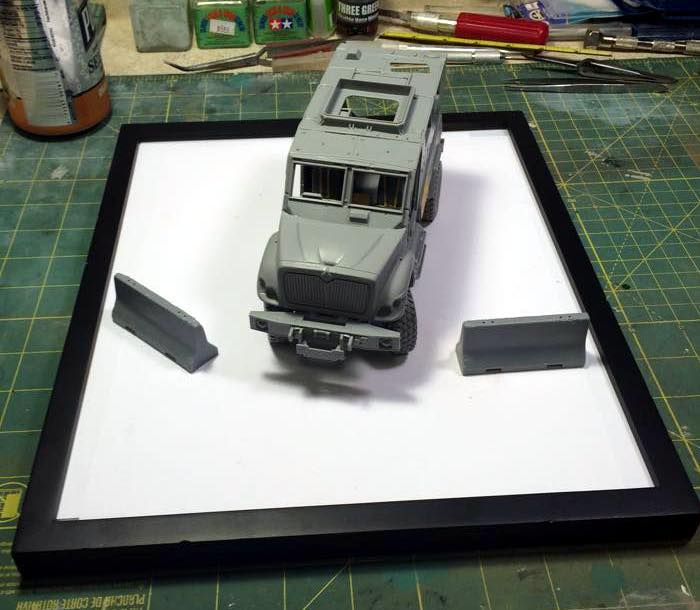 I'm probably going to have the doors on the truck open and the front of the truck with have the Rhino IED flag looking thing. After that it was figure time. Here the 1st of 4 guys from the Master Box US Checkpoint in Iraq. 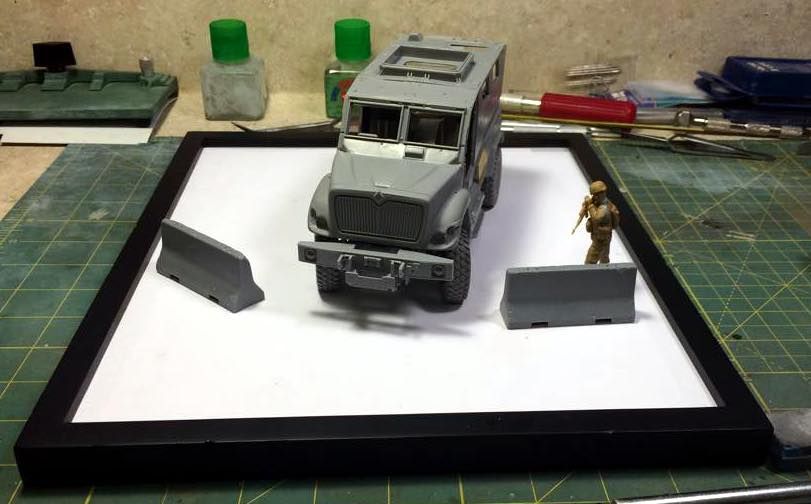 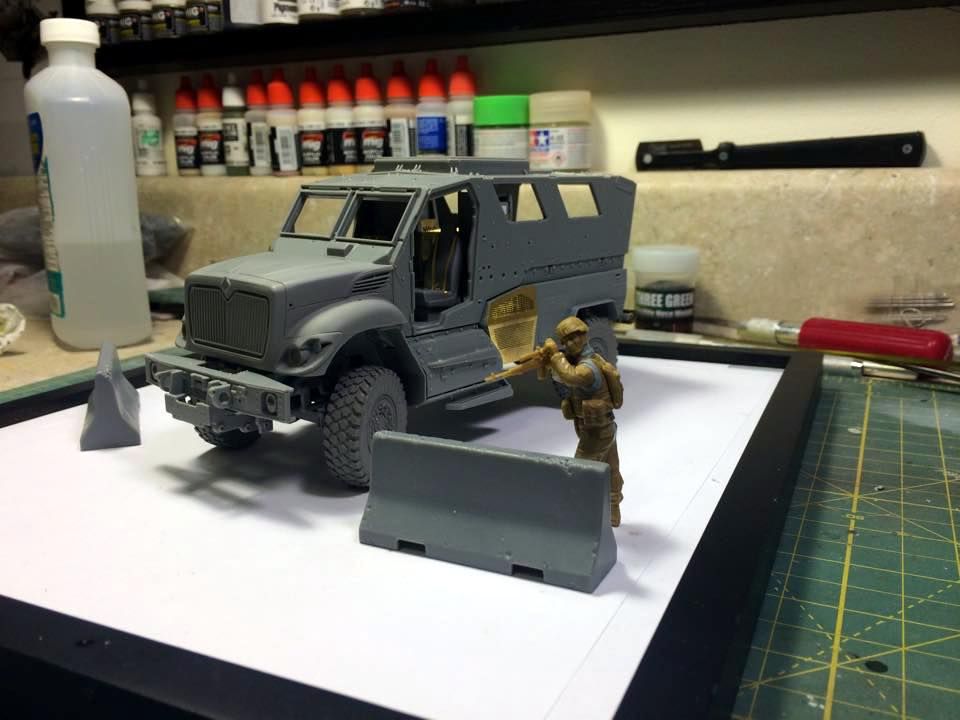 It took me a while to build him, simply because I wanted to get his arms and hands lined up well with the sniper riffle. Which brings me to my next point. I scratch build the sling... 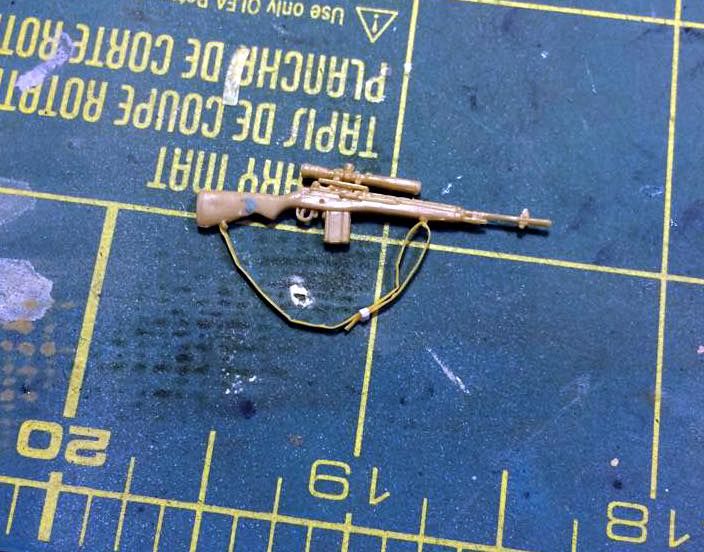 And here's how he looks with a quick coat of primer on him... 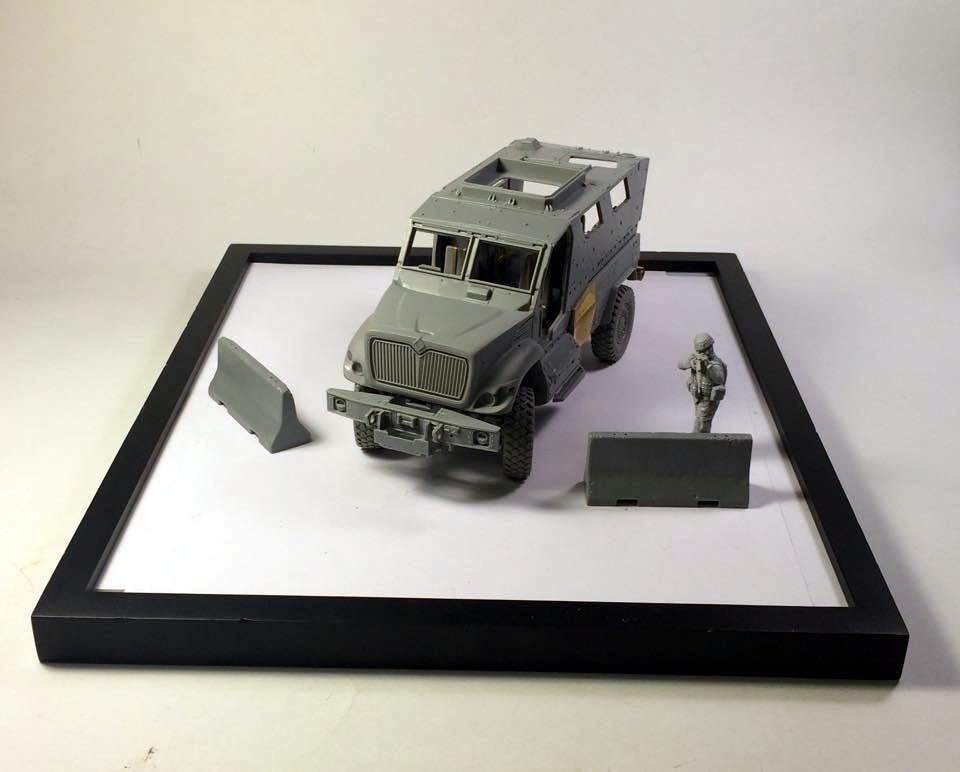 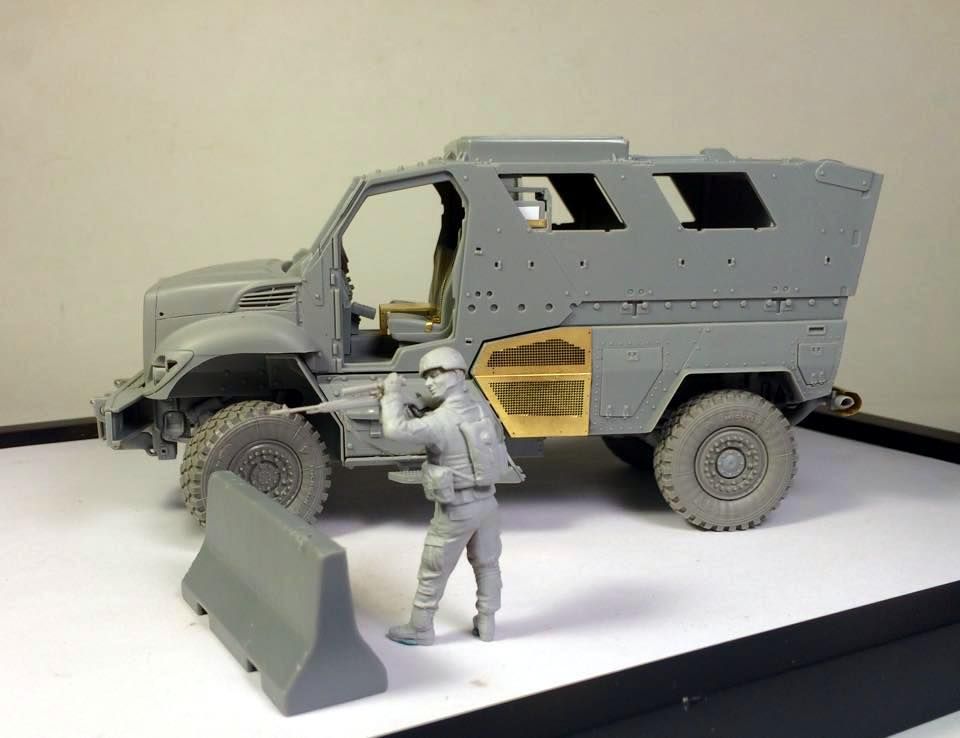 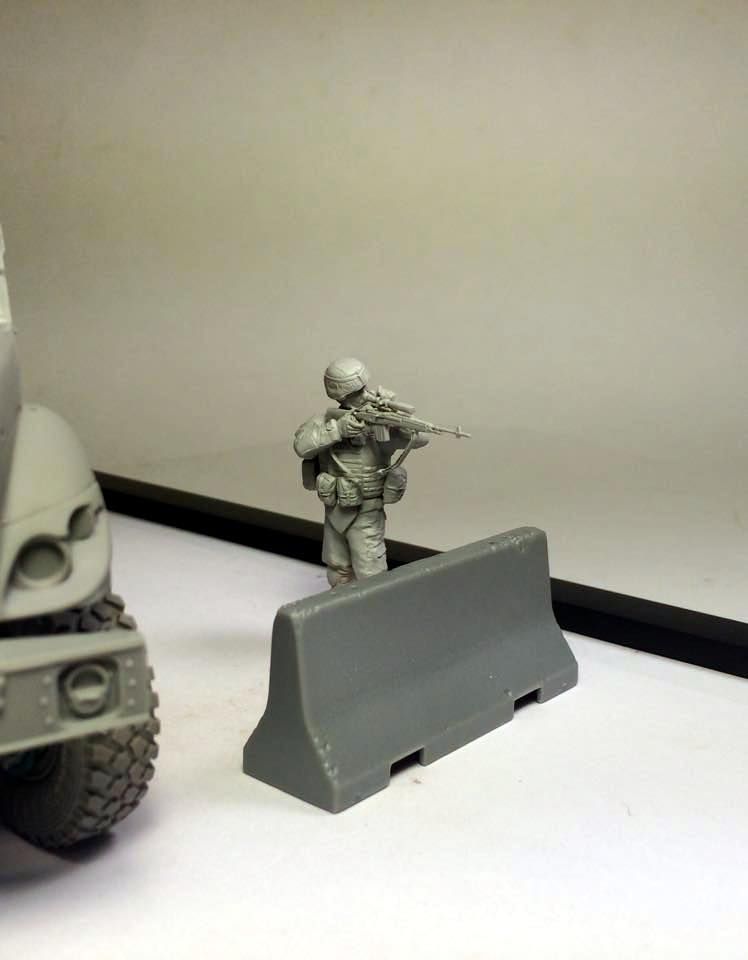 Hope you guys like the look of things so far! |
|
|
|
Post by eastrock on Sept 30, 2014 22:12:19 GMT -5
Looks Great, Adam!!!
Cheers!
|
|
|
|
Post by deafpanzer on Oct 1, 2014 10:32:39 GMT -5
Man, love the soldier!!! Killer work on the M-14!
|
|
|
|
Post by eastrock on Oct 21, 2014 0:09:47 GMT -5
Hi Adam,
Can you post another pic on the turret gunner's rack? you mention that on D1 and D4 should that be a solid block?
Thanks!!!
|
|
adampolo13
Reviews member
Member since: April 2012
Posts: 275
Apr 29, 2012 23:17:52 GMT -5
Apr 29, 2012 23:17:52 GMT -5
|
Post by adampolo13 on Oct 21, 2014 7:20:13 GMT -5
Hi ER, Im pretty sure that when you glue those two parts together there is a huge seam line. I'm thinking that is an AC unit or some other piece of equipment that wouldn't have that seam, and certainly not one that large.
|
|
|
|
Post by dupes on Oct 21, 2014 8:57:58 GMT -5
Like the look of that Masterbox fig. How's the rest of the set?
|
|