lunaiko
Junior Member

Member since: March 2015
Posts: 98 
|
Post by lunaiko on Mar 19, 2015 4:23:19 GMT -5
Hi there, it began with an idea of a lighthouse kit. I bought one in the internet. Domus Kit Faro1. Didn't know, what I expected but what I got was really bad. The lighthouse should be built with bricks but the most of them weren't useful. At the end it was only the papermodel of the lighthouse I used for my work. But let you show a few pictures  This is the picture of the model I used for my ordering. 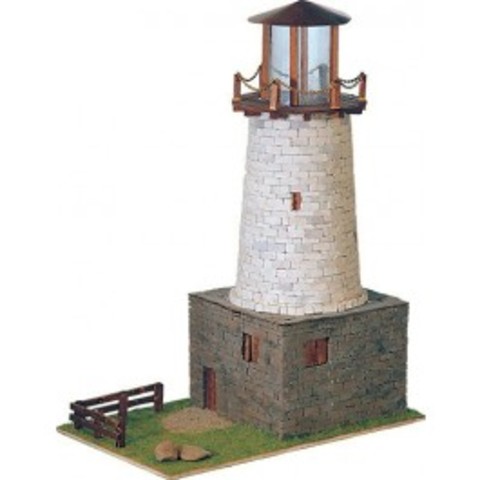 You can see that the included bricks are really bad... 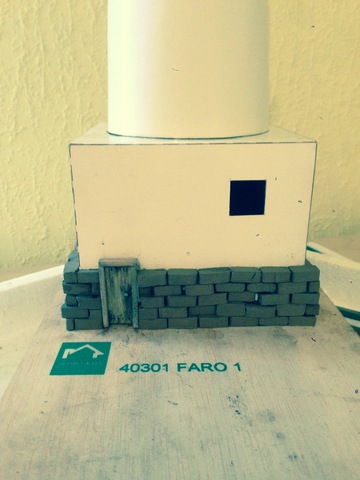 So I ordered a bulldozer to remove the work on the lighthouse 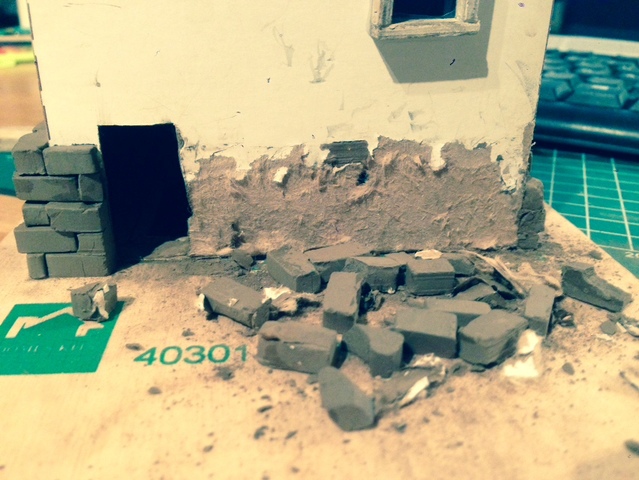 I started creating my own bricks with selfmade silicon molds an built the walls again. It were hundreds of bricks I used for the ground floor. The view on another hundreds of bricks was not really nice so I decided that the tower should be from steel. I created the rivets by usind a plastic sheet and a nail, sticked it on the tower and covered it with paint. 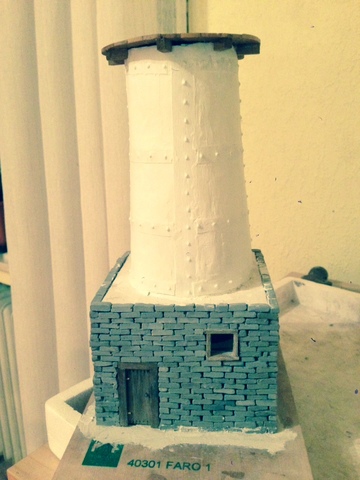
Then I weathered it with real rust an gave a new platform to the lighthouse. 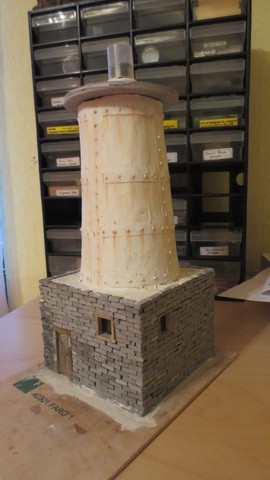 The lightroom of the kit was not handsome anymore and me and the guys in the board thaught over a new design. Last one of the guys had the idea to take the same structure I used at the tower. The work on the new lightroom began. Look at the old lightroom: 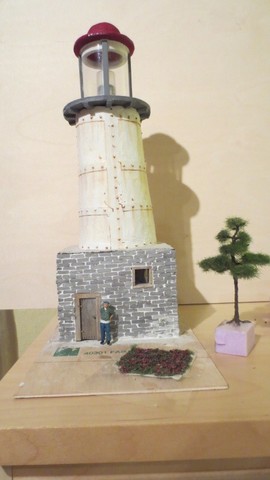 And now the work at the new one: 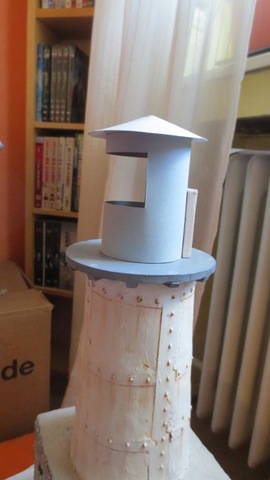 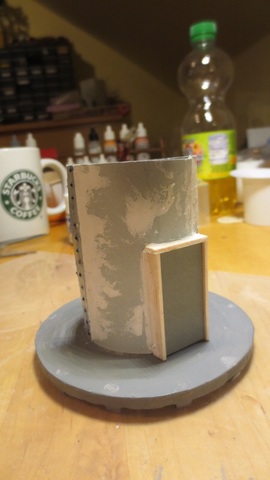 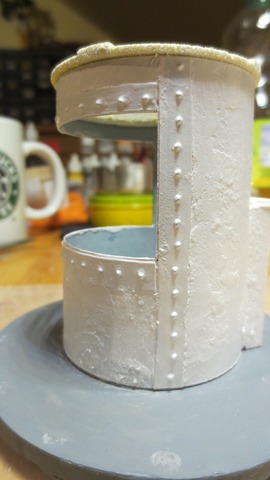 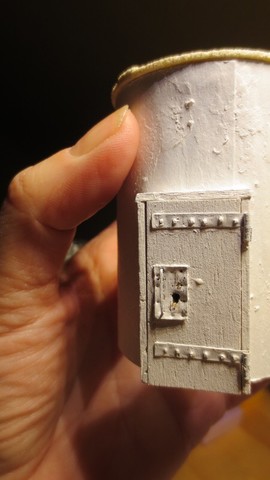 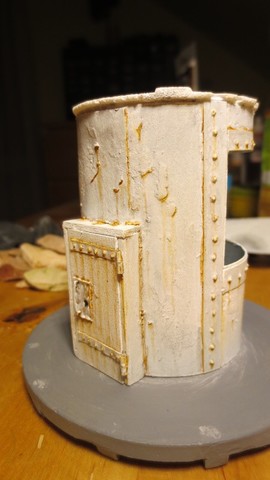 The roof and the light is not finished. My lighthouse will get an "Orientierungsfeuer". That means that the flash only will be seen at the seaside. We discussed how to build it and I decided to use a solarmotor that will rotate a mirror and a fixed LED for the light. Hope I can finish it soon with a little held of one of my nephews This is how the lighthouse looks now: 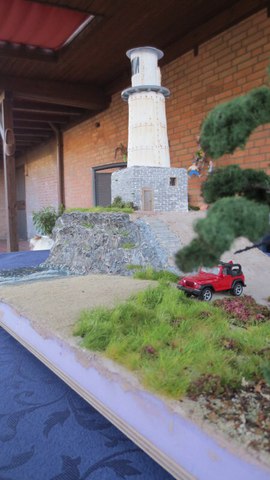
Ok, that's it for now. I have to build a 1:1 hedgehog-preserve in my garden today. One of these guys ist just sleeping in our glasshouse and I think he will wake up soon. So I will bring him outside and feed him till he's fit for living without help Angi |
|
|
|
Post by TRM on Mar 19, 2015 5:48:57 GMT -5
Well done so far Angi! Nice modifications to the lighthouse! The stonework and steel plating look great! Good luck raising the hedgehog!! |
|
|
|
Post by Deano on Mar 19, 2015 7:16:13 GMT -5
This looks great , much better than the original ... nice work Angi !
|
|
coro69
Full Member

Member since: January 2015
Posts: 351 
|
Post by coro69 on Mar 19, 2015 7:47:12 GMT -5
steel plating the lighthouse was your best idea... much better than with bricks...
|
|
|
|
Post by JimD on Mar 19, 2015 9:57:39 GMT -5
Great improvements there. Never thought to use real rust...but it looks great...maybe I should update my tetanus  Lighthouses are my wifes "thing" she'll get a kick out of this. |
|
johnt
Full Member
Feb 2012 MoM and 2012 Model of the Year Winner
Member since: November 2011
Posts: 1,174
Nov 15, 2011 5:38:32 GMT -5
Nov 15, 2011 5:38:32 GMT -5
|
Post by johnt on Mar 19, 2015 10:28:35 GMT -5
Very nice work! A great subject for a model too!
Cheers
JT
|
|
|
|
Post by mrt51 on Mar 19, 2015 10:38:06 GMT -5
Outstanding diorama!
Terry
|
|
|
|
Post by deafpanzer on Mar 19, 2015 11:47:28 GMT -5
Your build is beautiful! My wife and I are big fan of the lighthouses that we managed to visit most lighthouses when we lived in NC for 8 years.
|
|
lunaiko
Junior Member
Member since: March 2015
Posts: 98
|
Post by lunaiko on Mar 19, 2015 13:36:49 GMT -5
Thanks a lot to you all. I like lighthouses too. The most beautiful german lighthouse is IMO the "Roter Sand". It was finishes 1885 and the first they built on the ground of the sea. The name translated means "red sand". That ist because they built it on a red shell bank. Their first try to build the foundation in 1881 failed and it took 2 more years to start again and finish with success. In the 1970th the stopped the use of this lighthouse and weather and sea started to destroy it. The government decided to demolish it. But there were lots of people who liked that lighthouse too much. They saved and restored the building and until last they organized visiting trips. Enough german history Here's a picture 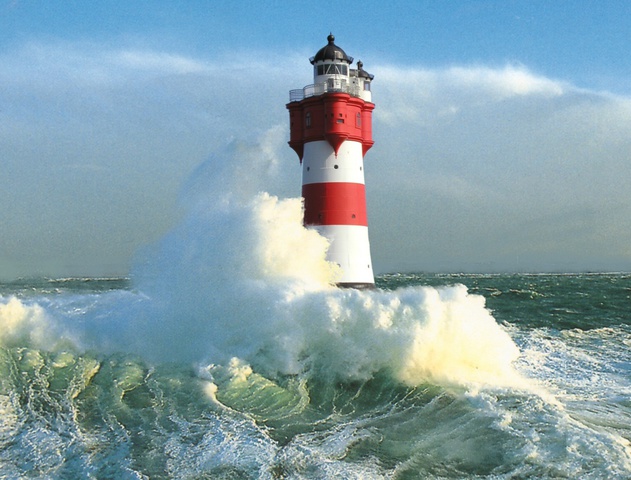 |
|
|
|
Post by kaytermarram on Mar 19, 2015 14:00:36 GMT -5
After reading the last novel (a horror novel that means) from Rupert Mattgey makes me shiver when seeing or even thinking about Lighthouses. Your building reminds me EXACTLY on the thing in the book, shudder! But the work is great! You did a complete new build and hell, those given bricks look horrible! It shows that one can come up with a scratchbuild which looks a real lot better than a kit. Maybe a bit more weathering??
Frank
|
|
legend
Full Member
Member since: November 2011
Posts: 577
Nov 30, 2011 13:49:32 GMT -5
Nov 30, 2011 13:49:32 GMT -5
|
Post by legend on Mar 19, 2015 14:18:44 GMT -5
What an excellent job you have made of this.
bill
|
|
lunaiko
Junior Member
Member since: March 2015
Posts: 98
|
Post by lunaiko on Mar 19, 2015 14:26:05 GMT -5
I don't plan more weathering. That's a lighthouse in use an every one or two years painters come to cover it with more paint |
|
|
|
Post by Leon on Mar 19, 2015 15:36:48 GMT -5
Fantastic re work on the lighthouse Angi! You have a great diorama.
|
|
|
|
Post by wbill76 on Mar 19, 2015 17:06:34 GMT -5
Impressive re-work Angi not just on the bricks but on the tower and light room structures as well. Very nice!
|
|
|
|
Post by dierk on Mar 20, 2015 7:05:57 GMT -5
Vast improvement on the original kit!
|
|
lunaiko
Junior Member
Member since: March 2015
Posts: 98
|
Post by lunaiko on Mar 20, 2015 13:44:10 GMT -5
I am going to build a diorama with lighthouse and a little bit of the sea and beach. With heath and trees at the edge of the wood. And i want to fill it up with nice details. I decided that there should be a rowing boat someone is working at. Well, I have never built a boat before and no plan how to do this. I asked google and many websites and I learned about boats with frames. Hmmm... so what... I started First I made a keel and frames 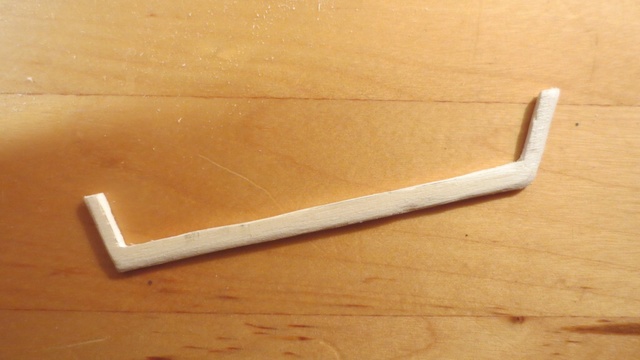 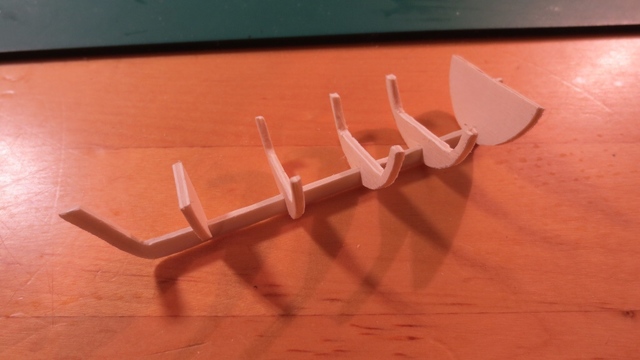 In the next step I took a wooden tape and prepaired it with stain and wood glue. Then put it on the frames an fixed it. 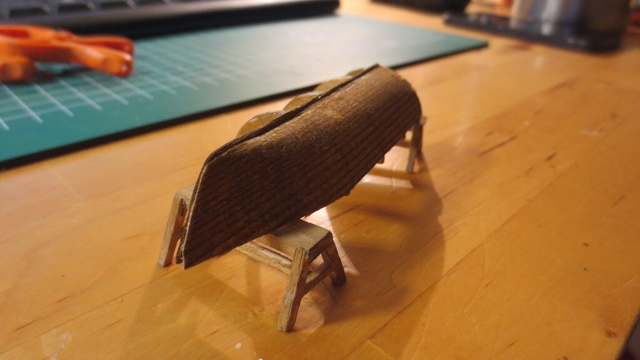 After finishing that, I sanded amd polished the hull. There was no need to do more, my boat will be placed for work. But it has to be saved against weather of course and I spent a tarp. It was made with a wet tissue covered with wood glue. After drying I painted it with green paint and weathered it the next day. 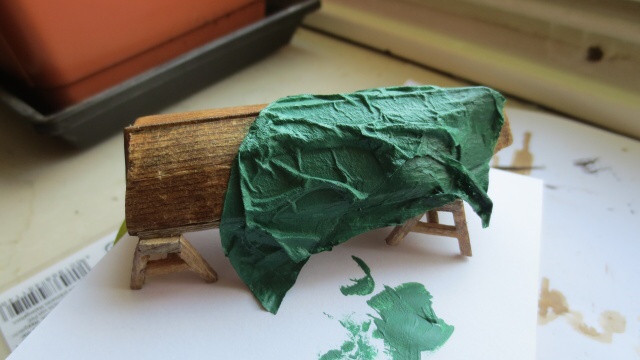  Well, I think it isn't easy to find civil figures and I had to look for a likely one by searching military figures. I found very nice verlinden figures and ordered them.  Nobody is going to work the whole day and so I gave gave a first kiteboard, two more will follow 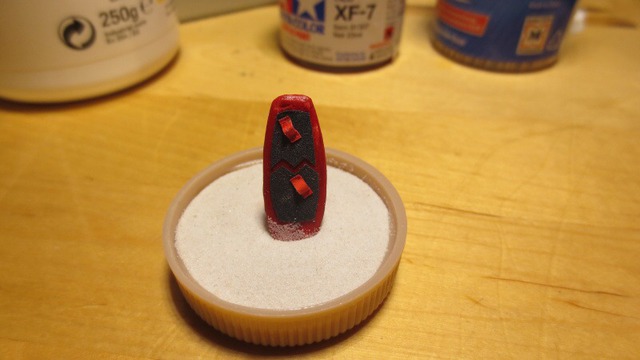 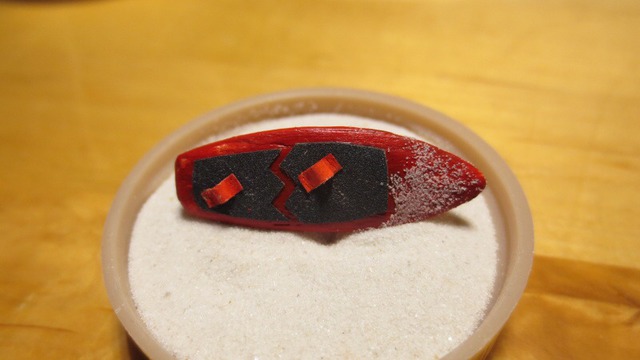 Enough pictures for a day Hope you like them. Angi |
|
|
|
Post by kaytermarram on Mar 20, 2015 13:56:24 GMT -5
The Boat looks really top, Angi! Love the weathered tarp, really great! And a deinite NO to "enough pics for a day"! With this quality I have to say, more please!
Frank
|
|
lunaiko
Junior Member
Member since: March 2015
Posts: 98
|
Post by lunaiko on Mar 21, 2015 5:17:53 GMT -5
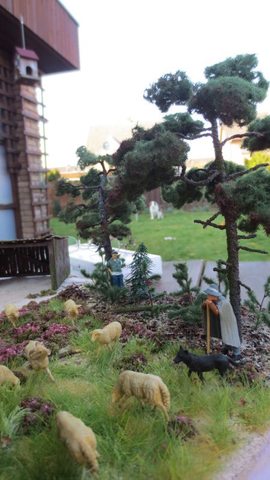
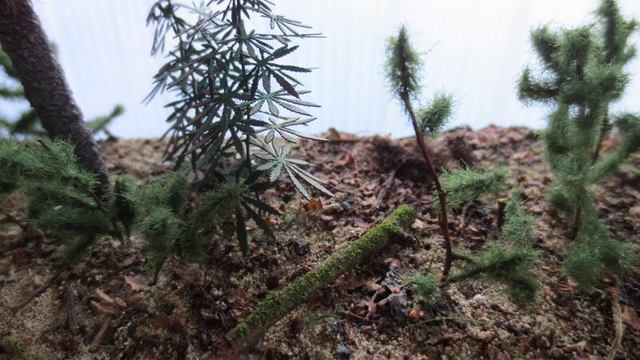
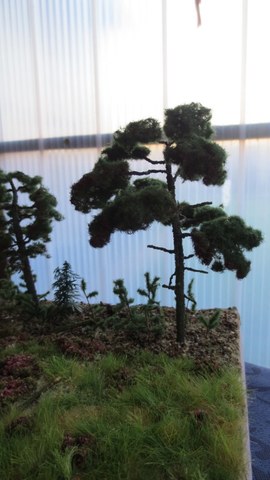
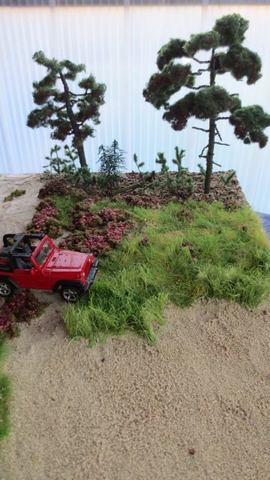
Next Pics... Treetime I just started in modeling and I didn't know how to build realistic looking trees. I knew that I didn't want to buy some. I like the internet. There are so much informations to find. I read lots of tutorials and I thought that it would be best to use wire for my trees. My first few tries failed but then I had my first tree I like. At the coastline you will find more evergreens than other trees. It were pines I had to build. I covered the wire with wood glue and sawdust and painted it 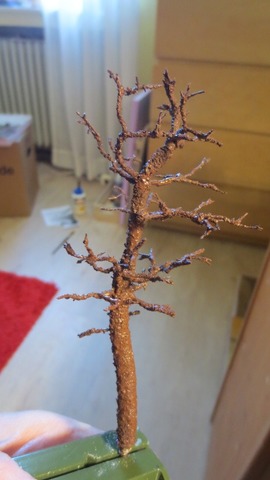 After drying I took a small peace of a plastic web (normally used to style long hair) and put it on the end of the branches. 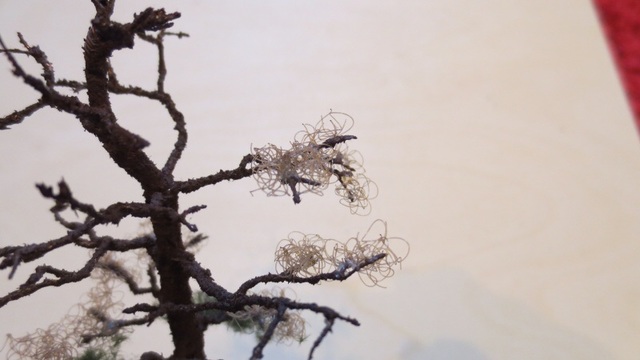 Then I used a lot of glue and NOCH static grass (bog soil, 2.5mm) to fill the web with needles. 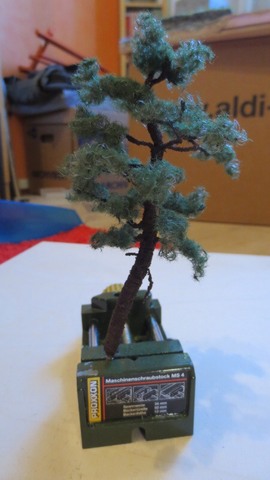 I built two pines this way and placed them at my small wood area. I used a mix of many things I found in a real forrest for the ground. Added very small pines and a few peaces of dead branches. And a small gimmick too 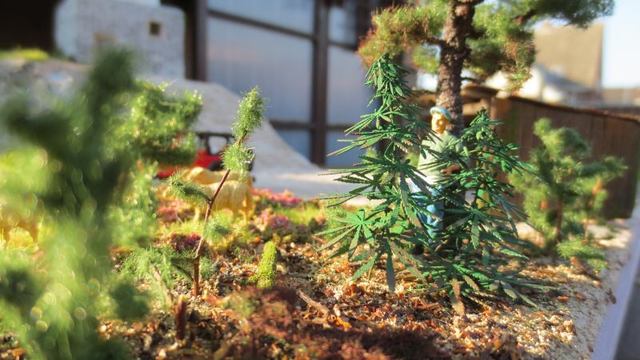
    Angi |
|
|
|
Post by TRM on Mar 21, 2015 6:54:01 GMT -5
Great job on the continuation of this project Angi!! Nice work on that boat and the tree!! Really making this piece come alive!!
|
|
|
|
Post by Leon on Mar 21, 2015 7:06:29 GMT -5
WOW!!! Great work on the all the additional pieces Angi!The boat and tree look fantastic.
|
|
lunaiko
Junior Member
Member since: March 2015
Posts: 98
|
Post by lunaiko on Mar 21, 2015 7:27:08 GMT -5
Thank you. I will Do my very best I like my scratch work and diorama because there are so many different techniques. Most difficult is the realistic look of water and waves at the beach. To learn more about that I spent a lot of time on the terrainscape YT-channel. And tried different ways with different material. |
|
|
|
Post by deafpanzer on Mar 21, 2015 13:33:42 GMT -5
Those trees look SUPERB!!!
|
|
Ray Dunakin
Full Member
Member since: February 2013
Posts: 408
|
Post by Ray Dunakin on Mar 21, 2015 13:46:14 GMT -5
Nice work!
|
|
lunaiko
Junior Member
Member since: March 2015
Posts: 98
|
Post by lunaiko on Mar 21, 2015 14:00:53 GMT -5
Thanks Maybe I can shoot a few closeups to show you more details Acutally I have to wait for plaster to dry after I demolished the first stairs I build up to the lighthouse. I did't like them and made new stairs from wood and in the middle of that small hill. So I take my time for a few details. Try to build a bench (love the one, Coro made). Working at a kite one of the beach guys intends to use... |
|
coro69
Full Member
Member since: January 2015
Posts: 351
|
Post by coro69 on Mar 21, 2015 18:52:55 GMT -5
hey angi, keep up your nice work here... and a bench like mine isn't difficult to build... like nike says, just do it... ;-)
|
|
|
|
Post by wbill76 on Mar 21, 2015 19:48:26 GMT -5
Nice progress with the boat and ground work!
|
|
kiwibelg
Full Member
Member since: December 2014
Posts: 613
|
Post by kiwibelg on Mar 22, 2015 15:57:38 GMT -5
Great scene you have going on Angi! It's great to see you are posting here, Oli pointed you in the right direction!!
What did you use to make the outside of the boat? I have a figure that needs finishing and want to put him in a sinking boat...the problem being I can't justify spending 10-20€ on a resin boat that will only be partly visible!!
|
|
lunaiko
Junior Member
Member since: March 2015
Posts: 98
|
Post by lunaiko on Mar 22, 2015 16:29:40 GMT -5
With outside you mean the hull? I used a small wooden tape I found in a shop for creative hobbies. You also can use it for plaid baskets. I show you a picture: 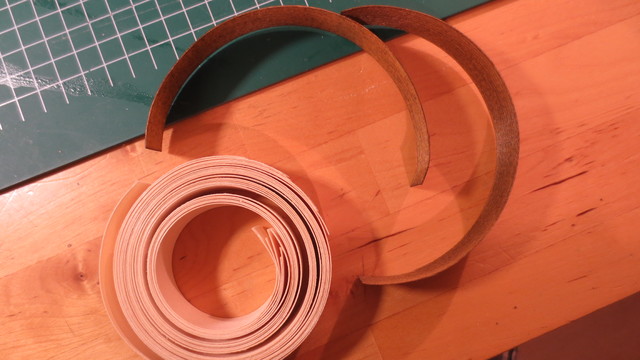
That ribbon has a wide of 20mm an a lenght of a meter each. It's 0.5mm thick. I started with stain. After drying I covered it with a mix from water and wood glue to stabalize it. Before I started to use it at the hull I watered it about 2 or 3 minutes. It's easier to curve it when it's wet. Here's a pic from the inside: 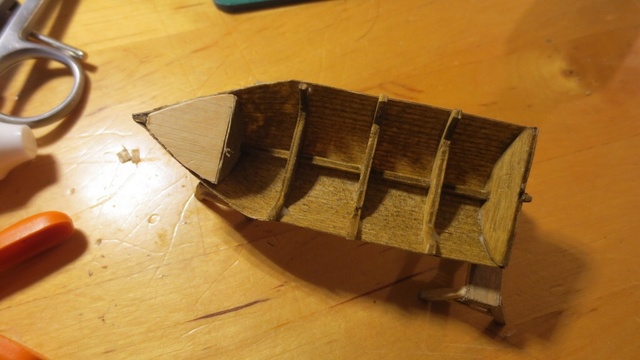 And the pieces I made. I put them in one pic. I planned them in photoshop. 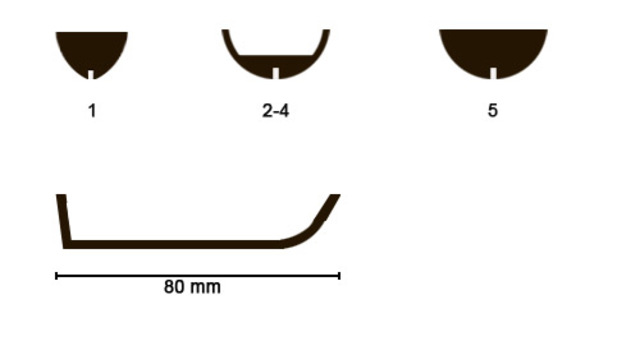 Angi |
|
lunaiko
Junior Member
Member since: March 2015
Posts: 98
|
Post by lunaiko on Mar 22, 2015 16:33:10 GMT -5
A little correction... I think, the 2nd former can be a little bit smaller. You can see it in the inside pic. The plank is not really rounded.
|
|
kiwibelg
Full Member
Member since: December 2014
Posts: 613
|
Post by kiwibelg on Mar 22, 2015 16:50:25 GMT -5
Thanks for the explanation Angi, neat idea!
|
|