|
|
Post by Leon on Mar 7, 2016 12:19:38 GMT -5
Making really good progress Charley!
|
|
|
|
Post by panzerjager2 on Mar 7, 2016 12:32:16 GMT -5
Looking good......
This baby is a time machine...... when I saw your pic of the skirt I remember as kid asking myself that very question. Boy this brings back memories....
|
|
afvfan
Senior Member
   
Member since: December 2012
Bob
Posts: 1,772
Dec 10, 2012 17:32:38 GMT -5
Dec 10, 2012 17:32:38 GMT -5
|
Post by afvfan on Mar 7, 2016 13:44:57 GMT -5
Looking good. I remember those battle damaged parts. I always wondered what the heck made such large holes, but didn't hurt the side of the tank... Fantasy back story ... this tank lost 2 of it's original panels (happened all the time). They salvaged the 2 damaged panels from a knocked out tank, feeling the 90% coverage offered by them was better than nothing. You could even mismatch the paint on them to show they aren't original equipment.  |
|
|
|
Post by wbill76 on Mar 7, 2016 19:39:06 GMT -5
Looking good Charley, I can't help but smile at John's comment...but then I remember what 'battle damaged' meant as a kid building models and that's tame by comparison!  |
|
charleygnarlyp290
Full Member
  
Member since: October 2014
Posts: 143 
|
Post by charleygnarlyp290 on Mar 17, 2016 12:58:10 GMT -5
On to step 6: Main gun assembly. 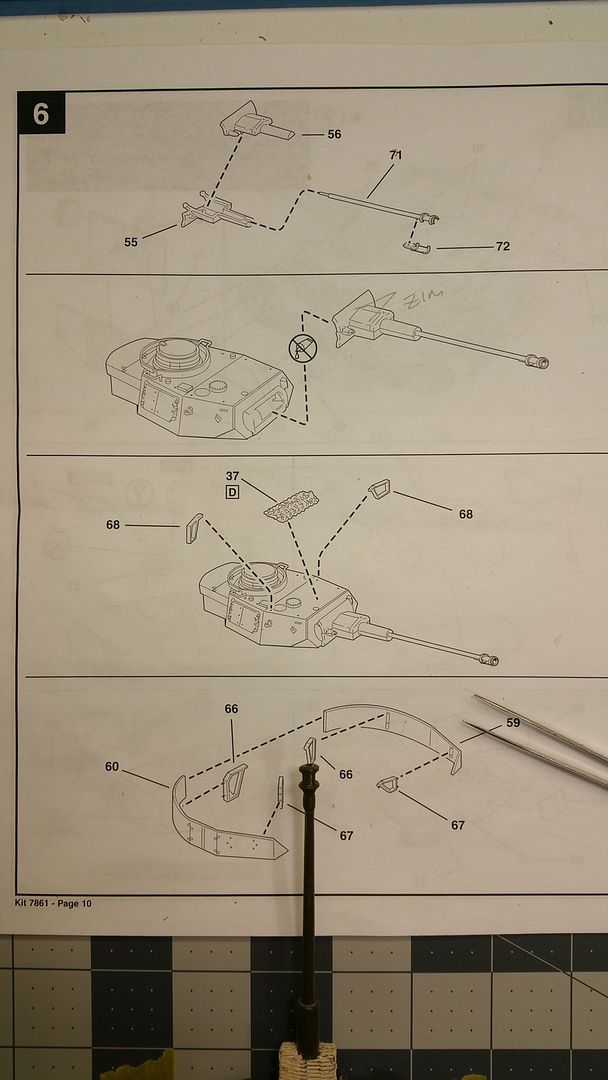 The main gun was pretty straightforward. Assemble it and snap it into the front of the turret. The turret schurzen (skirts) are a little trickier. I wanted to assemble the skirt halves and brackets first, but leave them off for initial primer/paint. So, I used some tape, sticky-side up, and stuck the turret to it so it wouldn't slide around. Then I used a couple of sanding sticks as lifts to get the skirts to the proper level in relation to the mounting points on the turret. After I cemented the two halves together, I started cementing the brackets to the skirt, but not the turret. That way they would be in place for painting, and then it would just be a matter of super gluing them to the turret later. 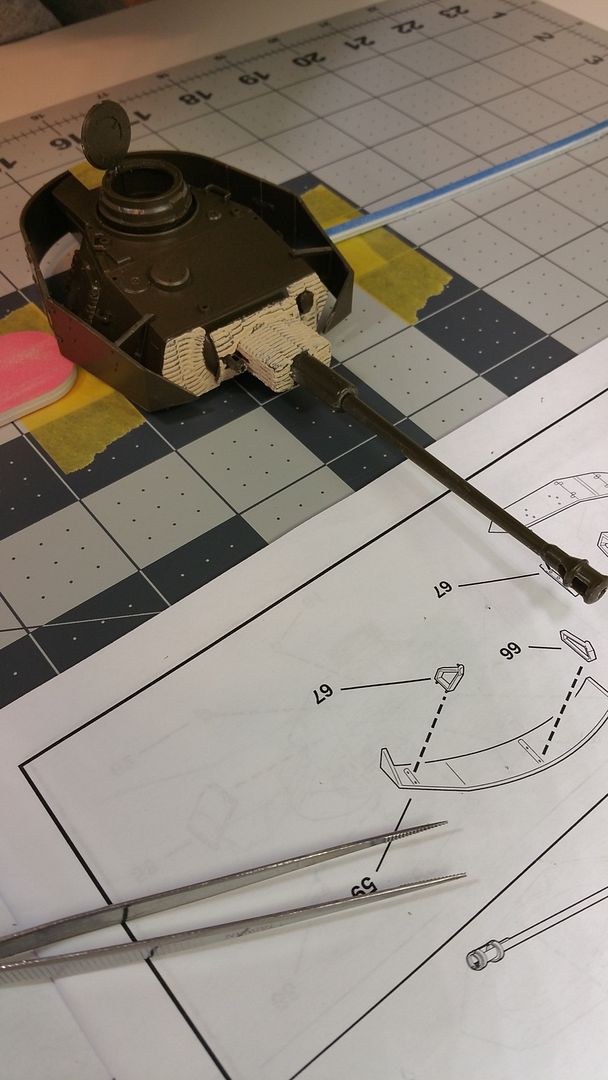 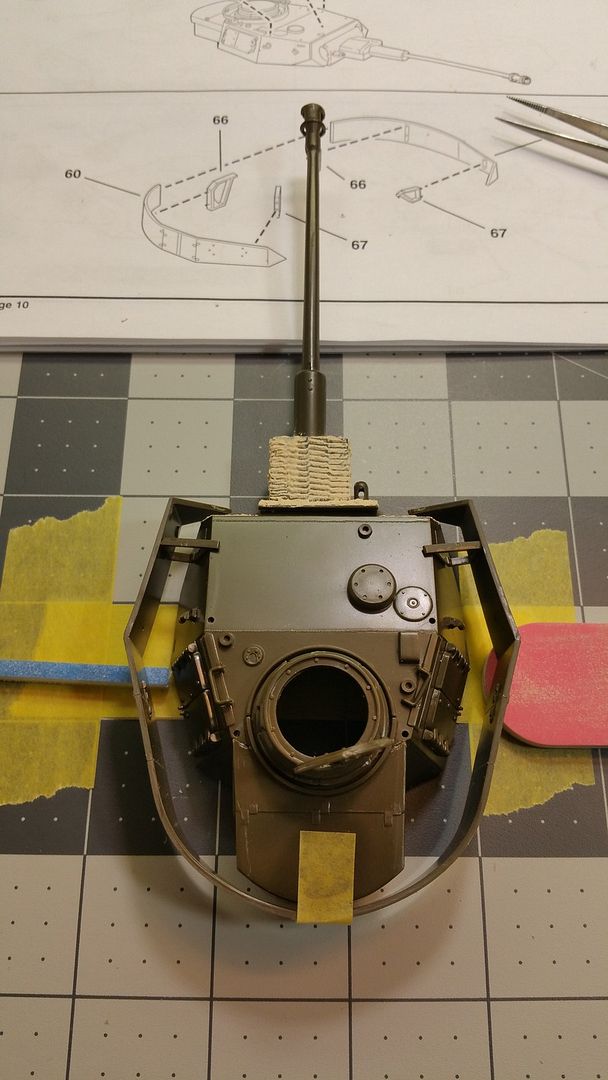 One thing I like to do when I am going to paint sub-assemblies before I put them together, is apply masks to the mating surfaces. This keeps the plastic bare, and negates the need to scrape off paint later. Some people like to paint it all, then let the cement eat through the paint to create a bond. I have not had much luck in that respect. In this photo, you can see where I have applied masks to the side skirts and mounting points on the hull. 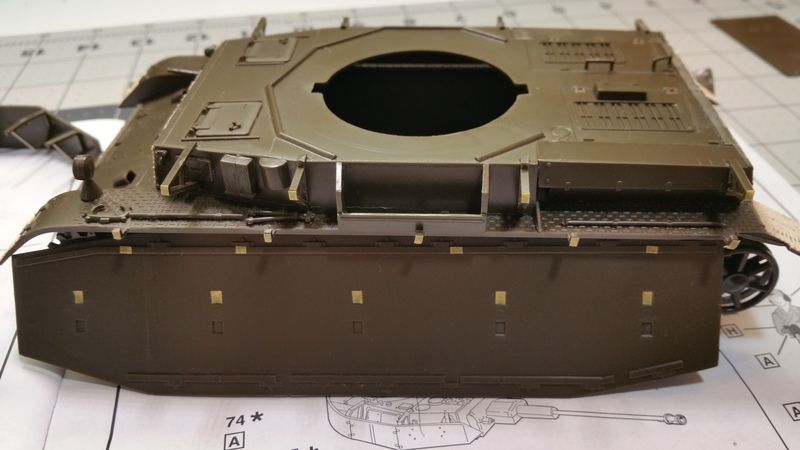 Next stop... primer/paint! 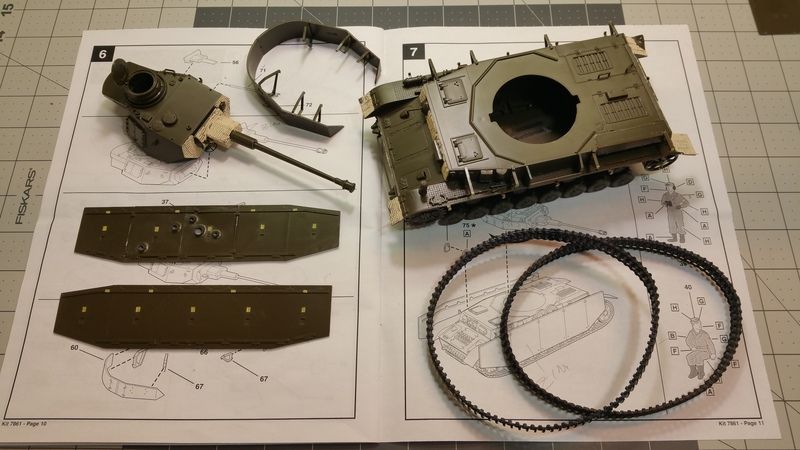 |
|
Deleted
Member since: January 1970
Posts: 0
Dec 14, 2024 14:54:36 GMT -5
Dec 14, 2024 14:54:36 GMT -5
|
Post by Deleted on Mar 17, 2016 14:16:40 GMT -5
Lookin good! 
|
|
|
|
Post by panzerjager2 on Mar 17, 2016 14:23:07 GMT -5
GREAT WORK, I really believe it's a testament to abilities. When a modeler can take a old sub-par kit and make it viable....
Again NICE WORK
|
|
charleygnarlyp290
Full Member
  
Member since: October 2014
Posts: 143 
|
Post by charleygnarlyp290 on Mar 17, 2016 18:11:25 GMT -5
Thanks. This has been a fun kit to build. Really brings on the flashbacks.
|
|
|
|
Post by deafpanzer on Mar 17, 2016 21:02:48 GMT -5
Looking good... looking forward to smell the fumes from primer and paint next!
|
|
|
|
Post by dierk on Mar 18, 2016 11:27:45 GMT -5
Nice result on this old 'un!
|
|
adt70hk
Forum Moderator      November '24 Showcased Model Awarded
Member since: November 2015
Currently attempting to build something decent!!! ;)
Posts: 2,856 
MSC Staff
|
Post by adt70hk on Mar 19, 2016 2:13:50 GMT -5
Charley
Looking very nice so far!! Realling looking for forward to seeing the finished article!!
Andrew
|
|
charleygnarlyp290
Full Member
  
Member since: October 2014
Posts: 143 
|
Post by charleygnarlyp290 on Mar 21, 2016 20:06:32 GMT -5
Primer and paint... check. And a lesson. For the primer and paint, I used Vallejo's Dunkelgelb Surface Primer. The color looked a bit green at first, and I had heard others say the same, but after I got it mixed (not shaken!) thoroughly, the color looked fine. Zero problems spraying it with my Paasche, single-action, siphon-feed airbrush. I really like this airbrush for spraying primer and base coats due to the volume I can get. 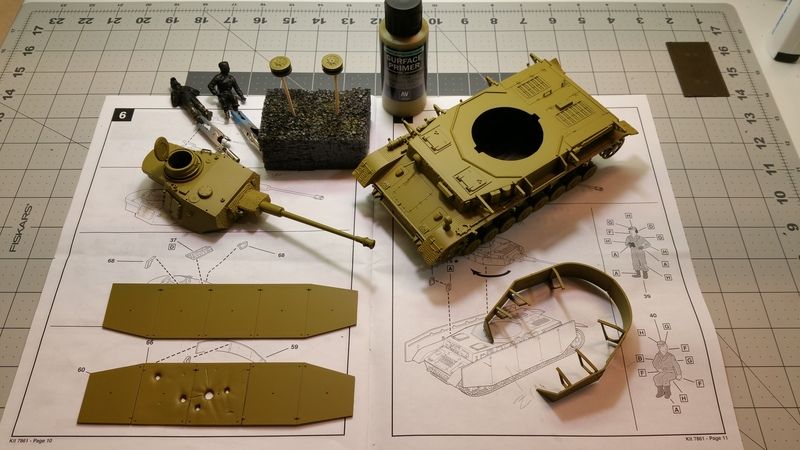 Next, I sprayed the camo pattern, again, using Vallejo paints. Suffered a bit of clogging with the brown, but that was because the brown was a little thicker than the green even though they are both from the same Model Air Panzer Colors set. Then a future coat to protect the paint and give an even surface for decals, washes and weathering. 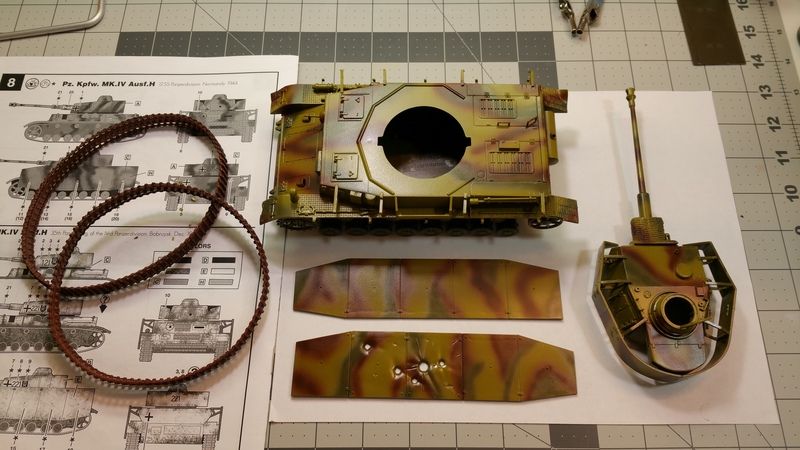 After the camo, I did a wash on the inside of the skirts, and the lower hull. I did this so I could attach the side skirts before finishing the rest. For the wash I used Testor's Enamel CreatFX black wash. I used this brand because I can get it locally and I have been wanting to try a pre-made wash instead of homemade. It turned out pretty good, but I am really doubting that I will use it again. I have become too accustomed to acrylics and the lack of fumes. Anything enamel these days really stinks to me. And, it seems every time I used an enamel wash, whether it be this product, or homemade with oils thinned with turpentine or mineral spirits, I have a problem with smaller parts coming loose. 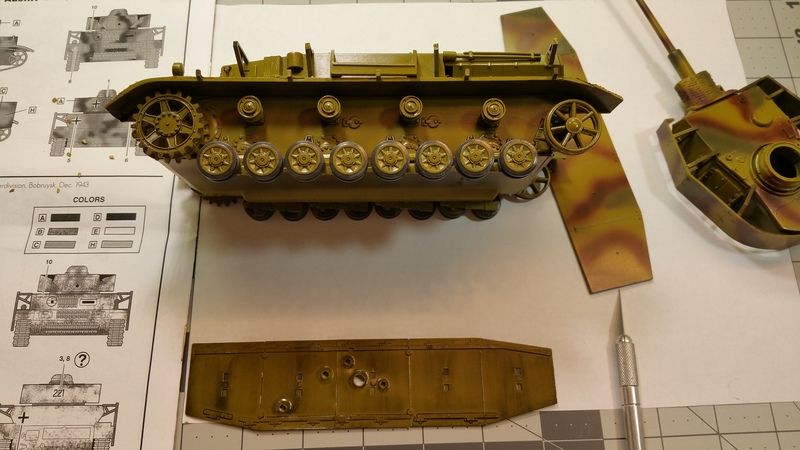 Next, I cemented the side skirts in place. And this brings up today's lesson. In my Youtube videos aimed at beginners, I stress the need to plan ahead. Build sub-assemblies, paint what needs to be painted before assembly, etc. Keep this in mind. So, here are the side skirts in place, with tape to hold them while I cement them. Installation went without a hitch. Everything lined up, cemented solidly to the fenders and hull. 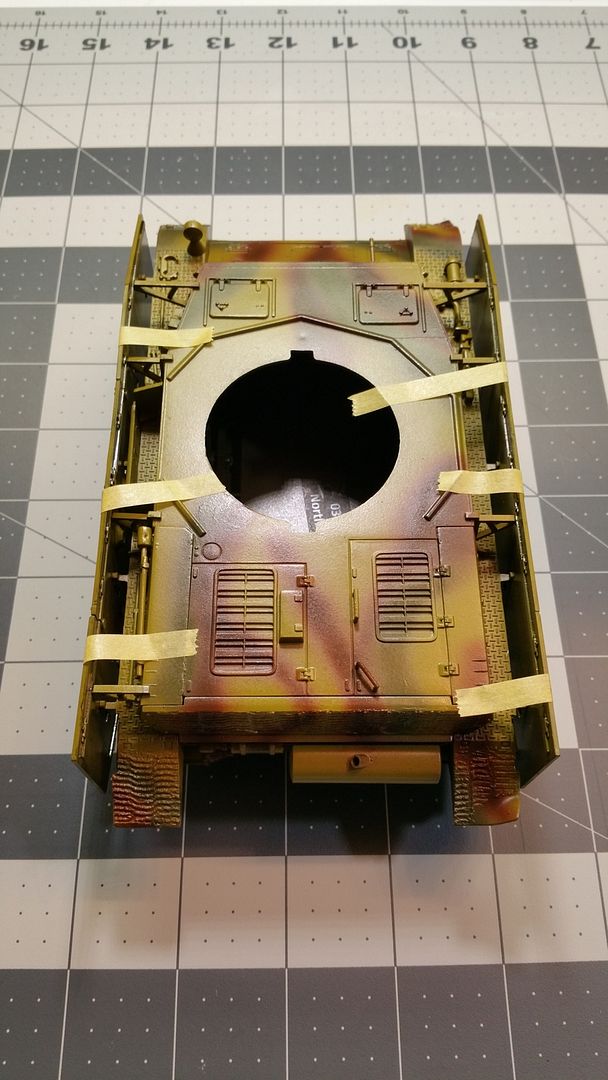 Here is another view... 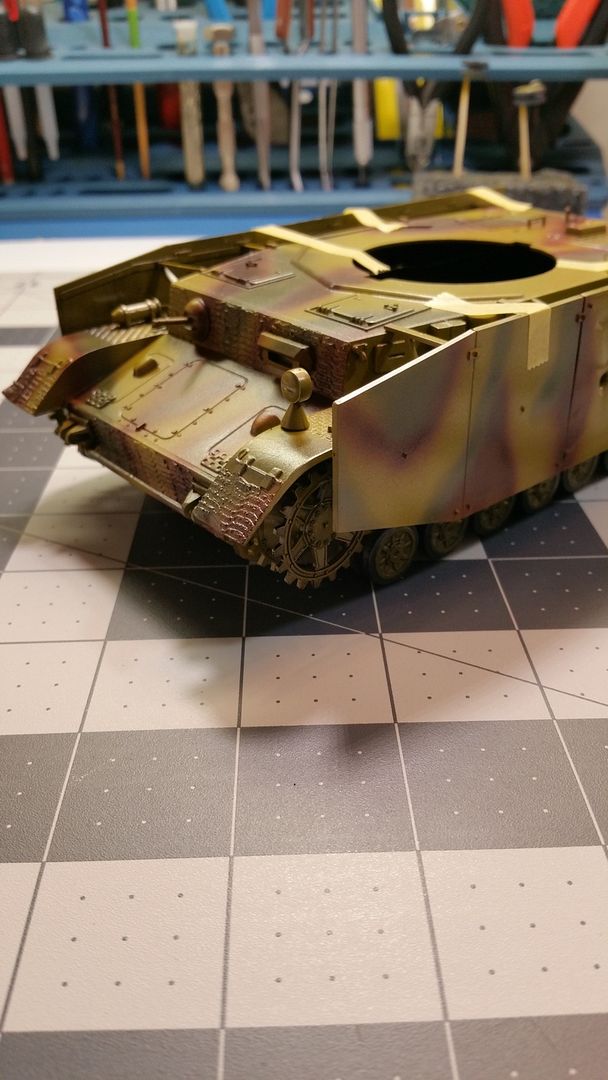 But wait! What's this!? I forgot to install the tracks before I attached the skirts! Imbecile! Pre-planning? HA! Actually, it wasn't that big of a deal, but it would have been a lot easier if I had installed them before the skirts. For track painting, I first prime them with Vallejo black primer, then I used Model Master Acryl Rust, then do the wear points with a mixture of Vallejo Panzer grey and Vallejo Aluminum. After that cured, I used Testors CreateFX Acrylic Black wash. Worked great, and no fumes. After the tracks sat for 24 hours, I installed them under the skirts with a bit of manual dexterity, tweezers and a small bit of non-offensive swearing and gnashing of teeth. Next time, decals and detail paint. |
|
afvfan
Senior Member
   
Member since: December 2012
Bob
Posts: 1,772
Dec 10, 2012 17:32:38 GMT -5
Dec 10, 2012 17:32:38 GMT -5
|
Post by afvfan on Mar 22, 2016 1:16:29 GMT -5
You and I do things a bit differently. Had it been mine there would have been quite a bit of highly offensive swearing going on as soon as I realized I had left the tracks off.  She's looking good. Nice work. |
|
|
|
Post by dierk on Mar 22, 2016 6:01:17 GMT -5
Looking good Charley! Although, I have to ask: what's the point of 'non-offensive swearing'? I find swearing only to be beneficial when I really let rip - 'shoot', 'fiddlesticks' etc just doesn't do it for me  |
|
|
|
Post by Leon on Mar 22, 2016 7:11:32 GMT -5
Been there,done that Charley! Looking really good.
|
|
charleygnarlyp290
Full Member
  
Member since: October 2014
Posts: 143 
|
Post by charleygnarlyp290 on Mar 22, 2016 7:33:38 GMT -5
Thanks, guys.
As for the "non-offensive swearing" I have mellowed through the years... that, and I don't want to scare the cats.
|
|
charleygnarlyp290
Full Member
  
Member since: October 2014
Posts: 143 
|
Post by charleygnarlyp290 on Mar 22, 2016 7:34:22 GMT -5
|
|
jsteinman
Full Member
  
Member since: March 2013
Posts: 735
Mar 24, 2013 9:29:10 GMT -5
Mar 24, 2013 9:29:10 GMT -5
|
Post by jsteinman on Mar 22, 2016 7:40:20 GMT -5
|
|
Deleted
Member since: January 1970
Posts: 0
Dec 14, 2024 14:54:36 GMT -5
Dec 14, 2024 14:54:36 GMT -5
|
Post by Deleted on Mar 22, 2016 8:44:47 GMT -5
Lookin really good from here also! 
|
|
|
|
Post by wbill76 on Mar 22, 2016 13:25:41 GMT -5
I think we've all been there once or twice Charley!  I'm sure with a little creativity and some narrow tweezers you'll be able to feed those tracks through...just don't try it with the turret on!  |
|
charleygnarlyp290
Full Member
  
Member since: October 2014
Posts: 143 
|
Post by charleygnarlyp290 on Mar 22, 2016 14:41:08 GMT -5
I think we've all been there once or twice Charley!  I'm sure with a little creativity and some narrow tweezers you'll be able to feed those tracks through...just don't try it with the turret on!  I was able to get them on... much more easily than I first thought, but will pay a little closer attention in the future. No repeat performances for me, thank you very much! |
|
adt70hk
Forum Moderator      November '24 Showcased Model Awarded
Member since: November 2015
Currently attempting to build something decent!!! ;)
Posts: 2,856 
MSC Staff
|
Post by adt70hk on Mar 22, 2016 17:22:47 GMT -5
Very nice job on the camo Charley!
|
|
charleygnarlyp290
Full Member
  
Member since: October 2014
Posts: 143 
|
Post by charleygnarlyp290 on Mar 24, 2016 16:36:23 GMT -5
Ok, chaps and chapettes, here is the final update. I applied the decals for the 12th SS HitlerJugend whilst fighting in Normandy, 1944. The kit supplied decals are unique in that two full sets of decals are supplied for the four different schemes one can use. The difference between the two sets is one set is "factory fresh," and the other is scarred and scuffed. Since I was going with a somewhat battle damaged vehicle, I opted for the latter. In the photo below you can see what I am talking about. Also in the photo are the items I use for decal application. This is the same combo I have always used for applying decals and it has rarely failed me, and that due to extremely thick decals. (see my Stuart Honey review here agapemodels.com/forums/index.php?topic=18403.msg251417#msg251417 ) 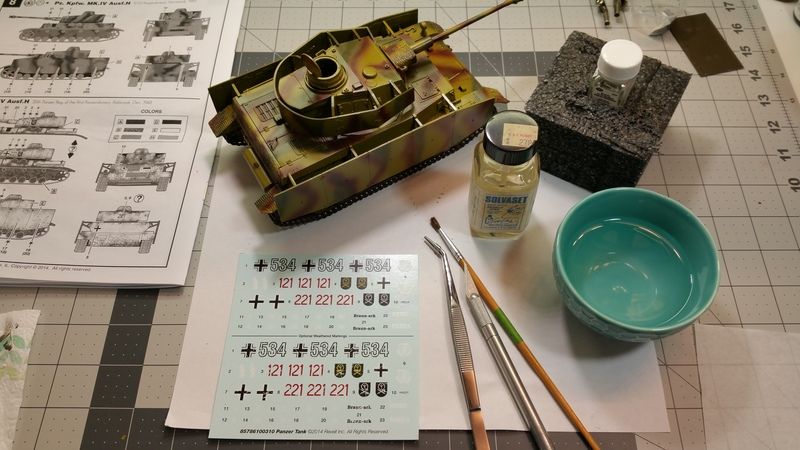 And here is a sample of the results. After two applications of Solvaset the decals have conformed completely to the zimmerit detail. Solvaset is some great stuff! 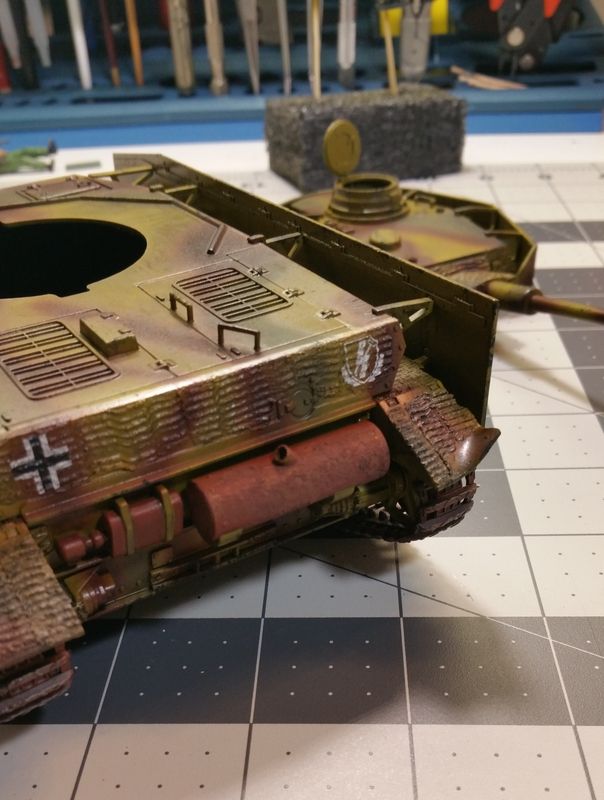 In the above photo you can also see the result of my rust texture added to the muffler. I used Model Master Acryl Rust and talcum powder to make a thin past. I brushed and dabbed it on and then roughed it up with a stiff brush. Below are the ingredients I used. 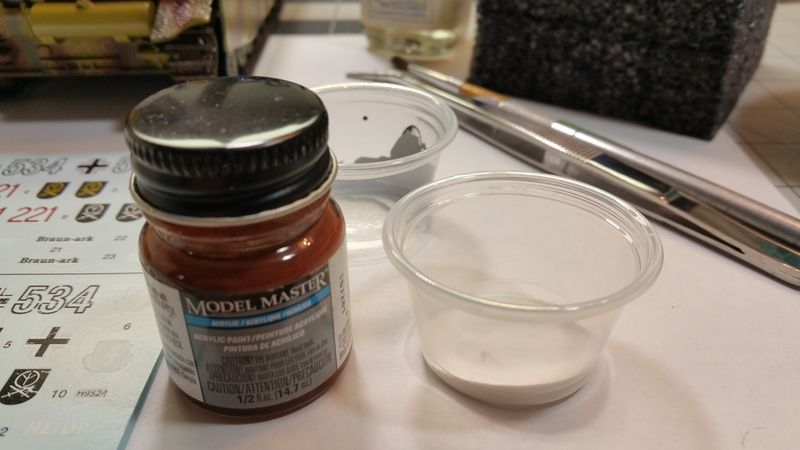 After I got the decals on, I did some weathering. I did a black wash with Model Master Acrylic CreateFX Black Wash. I used a bit of sponge and applied some chips on exposed edges, and a brush to add chips around engine crew access hatches. After that was dry, I sprayed a very light layer of dust using Vallejo Model Color Pale Sand and Light Earth, thinned heavily with Vallejo airbrush thinner. Then I added some highlights on rivets, bolts and other raised detail to add further contrast. Then I used the rust paint to add a few streaks here and there. The last thing I did was to use a metal color to highlight the shell holes and battle damage on the side skirts. 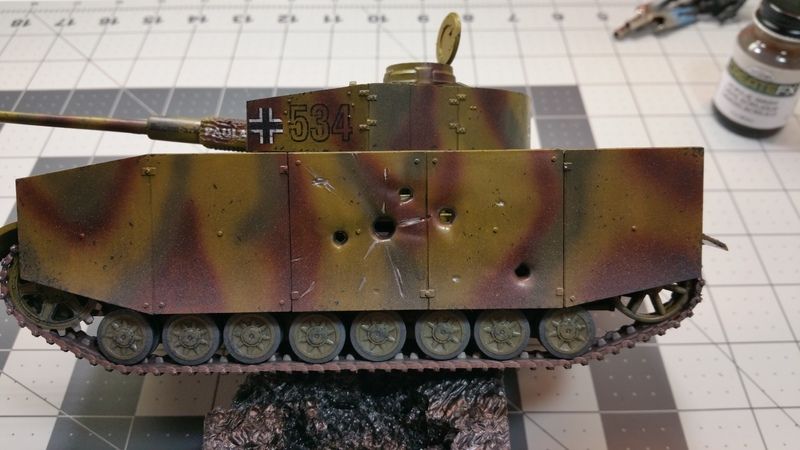 Then it was off to the paint booth outside to apply Testors Flat Lacquer. Next time... The finished project. |
|
Deleted
Member since: January 1970
Posts: 0
Dec 14, 2024 14:54:36 GMT -5
Dec 14, 2024 14:54:36 GMT -5
|
Post by Deleted on Mar 24, 2016 17:14:28 GMT -5
Very nice work Charlie! 
|
|
|
|
Post by deafpanzer on Mar 24, 2016 20:59:03 GMT -5
Pretty cool with the battle damages!
|
|
|
|
Post by wbill76 on Mar 25, 2016 1:08:31 GMT -5
Solvaset is great stuff, it's what I use on all my decals as well. Looking forward to the final shots.
|
|
jsteinman
Full Member
  
Member since: March 2013
Posts: 735
Mar 24, 2013 9:29:10 GMT -5
Mar 24, 2013 9:29:10 GMT -5
|
Post by jsteinman on Mar 30, 2016 13:16:55 GMT -5
Found this thought you would like it! 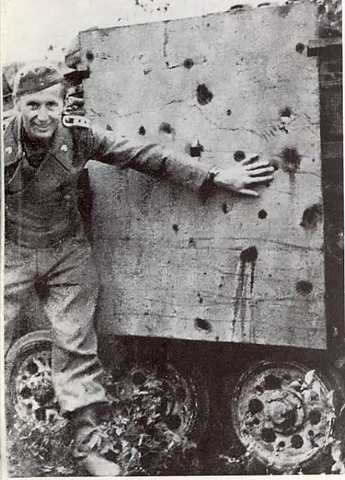 |
|
charleygnarlyp290
Full Member
  
Member since: October 2014
Posts: 143 
|
Post by charleygnarlyp290 on Mar 30, 2016 21:07:03 GMT -5
jsteinman, that is a great photo! I've never seen that one. Thanks for posting it.
|
|
charleygnarlyp290
Full Member
  
Member since: October 2014
Posts: 143 
|
Post by charleygnarlyp290 on Mar 30, 2016 21:07:14 GMT -5
The Panzer IV is complete. This kit was an exercise in nostalgia for me. In the mid-'70s a friend introduced me to the Monogram Armor Series. My first tank kit was the Sherman Calliope "Screamin' Mimi." After that, I built (in no particular order) the Wirbelwind, a few StuGs, US Halftrack with twin .50 MGs in an anti-aircraft mount, German 8 wheeled armored car (Sdkfz 232, I think) the US Jeep towing a 37mm anti-tank gun, the US Halftrack personnel carrier with troops... I could go on. I instantly became enthralled with armor, and that is what I have built primarily since. This particular kit built up exactly as the ones I built back then. This was a re-release of the original which was first molded in 1970. For such an old kit, it actually wasn't that bad to build. Everything fit like it was supposed to, and cleanup wasn't too bad. Detail was pretty good for an old kit and there are not many parts. I would definitely recommend this kit for a beginner. Easy to follow instructions, and no surprises. One improvement on this re-release in comparison to the original is track fit. On the original Panzer IV based Monogram kits, the tracks were slightly short, creating some serious tension on the running gear. On all of my kits the idlers ended up angled out due to excess tension. The newer release has corrected this. The tracks fit snug, but nowhere near tight, so the idlers don't get tweaked. A few of the really nice things about this kit are the addition of optional battle damaged schurzen, pre-weathered/damaged decal option and the figures. The battle damage was covered in an earlier post, but I like the way it looks. The decals are nice as well because it gives a person the option to apply some scratched up decals or factory fresh. But, the most surprising thing about this kit is the quality of the figures. First off, they look closer to 1/35 scale (considering the vehicle is 1/32) so they could be used for other kits. Next, is the detail of the figures. I have some tamiya figures from the same time frame and newer, and these figures are much better in detail and molding. There was a mold seam to deal with, but it was easy to deal with. So, in short, for a kit of this age, I have absolutely no complaints. It was a fun build and could easily be knocked out in a few days... paint, weathering and all. And, without further adieu, here is the Monogram Panzer IV. 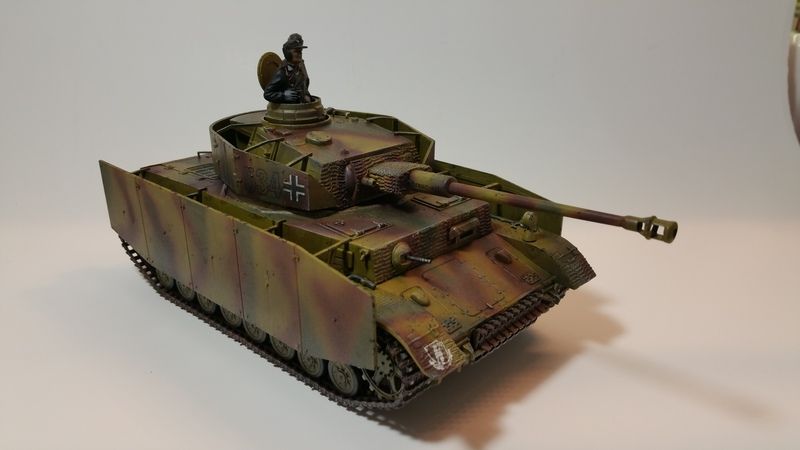 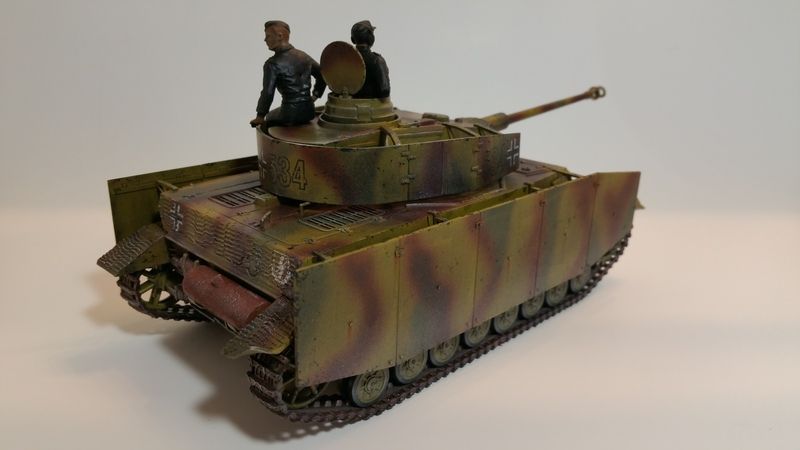 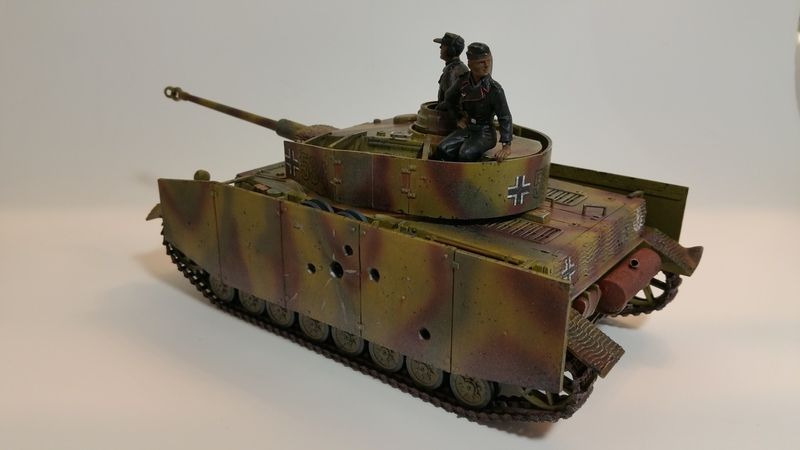 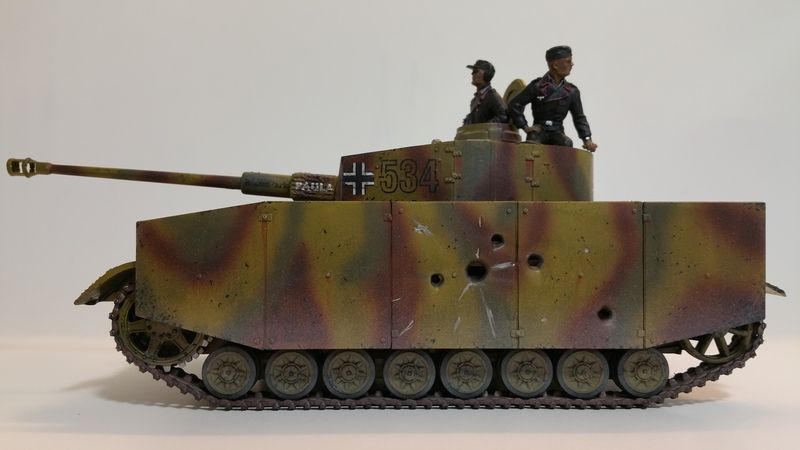 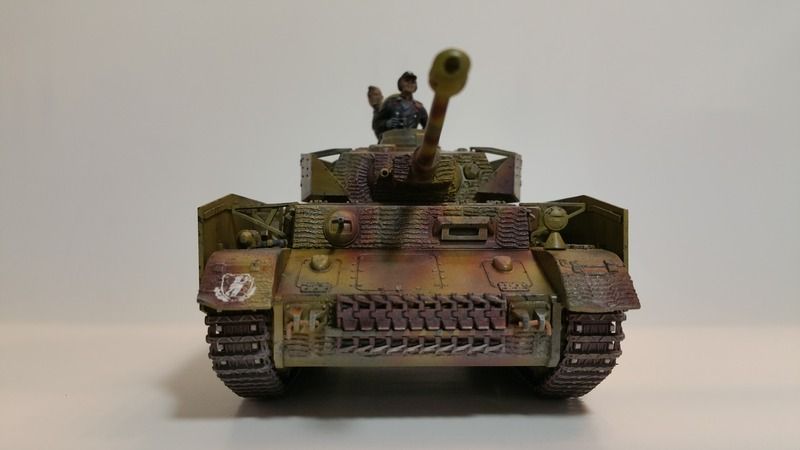 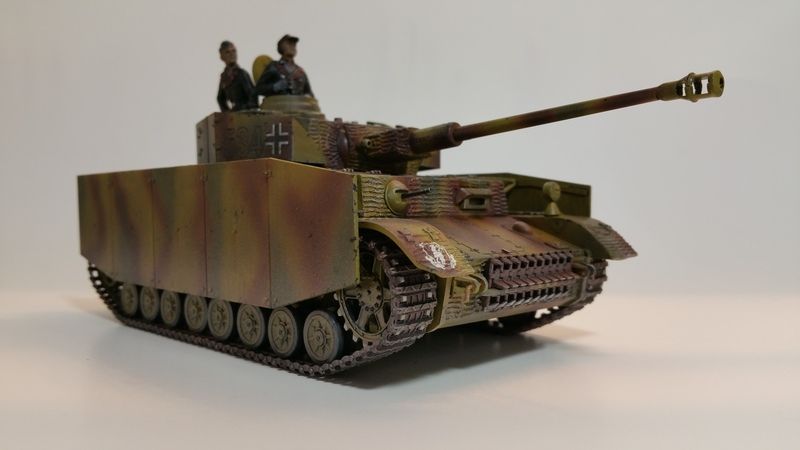 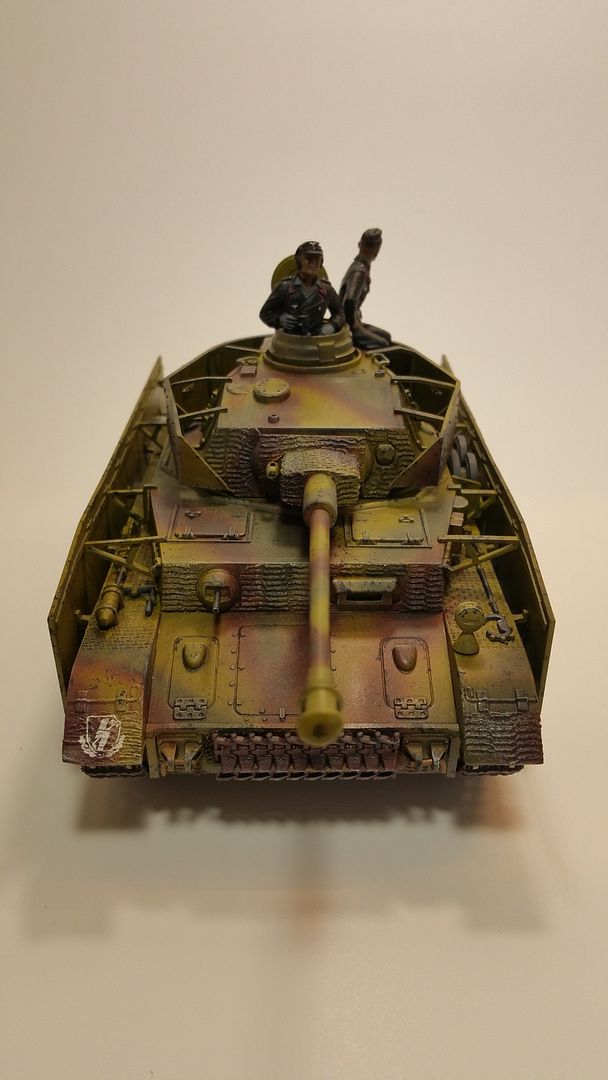 |
|
|
|
Post by deafpanzer on Mar 30, 2016 22:48:21 GMT -5
Great build... thanks for reminding me why I LOVE zimmerit on those panzers!
|
|