|
|
Post by chromdome35 on Dec 2, 2016 22:19:51 GMT -5
Tamiya Kit number 35250 - M4A3 w 75mm gun. 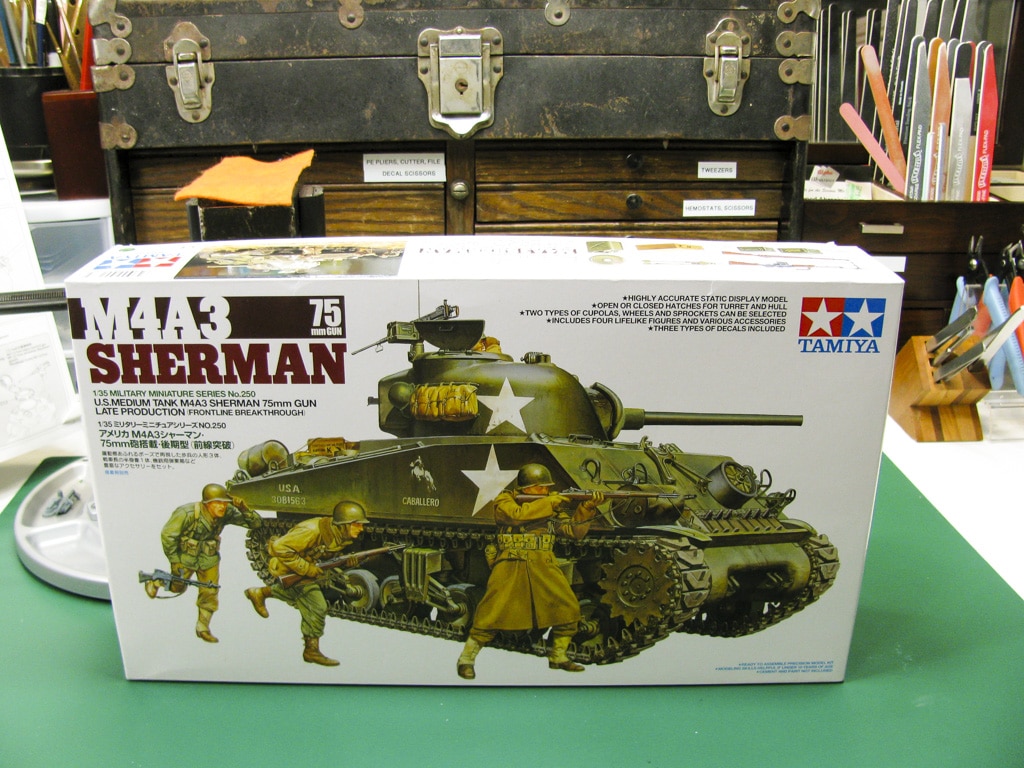 I've had to put down modeling almost 4 years ago but now I'm back. I have a sweet Academy M18 Hellcat with a ton of AM that I was in the process of building when life took me away from the bench. Before I restart that build, I thought I'd do something a bit easier first to clear the cobwebs out. I had this M4A3 in my stash that is just the ticket for a refresher. I've seen several build threads on the forums related to this tank and I don't even begin to pretend that I can match the quality of them. This kit is certainly not the pinnacle of Sherman kits, there are many problems with it. I think trying to fix some of those issues will be a good warm up. The first challenge is the fitment of the front hull onto the body pan. The front hull piece sticks forward about 1mm beyond the driver covers. The drive covers themselves have a weird ear sticking off of them that looks like it's intended to cover one of the gaping holes. I'm in the process of filling in the holes, smoothing down the overlap and generally making the front presentable. 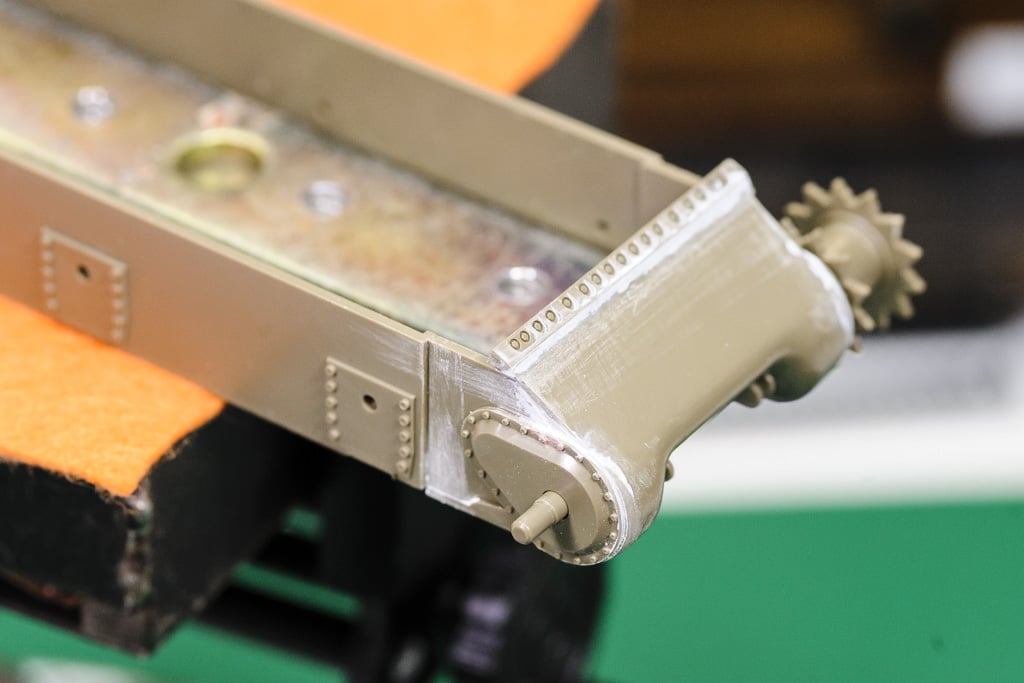 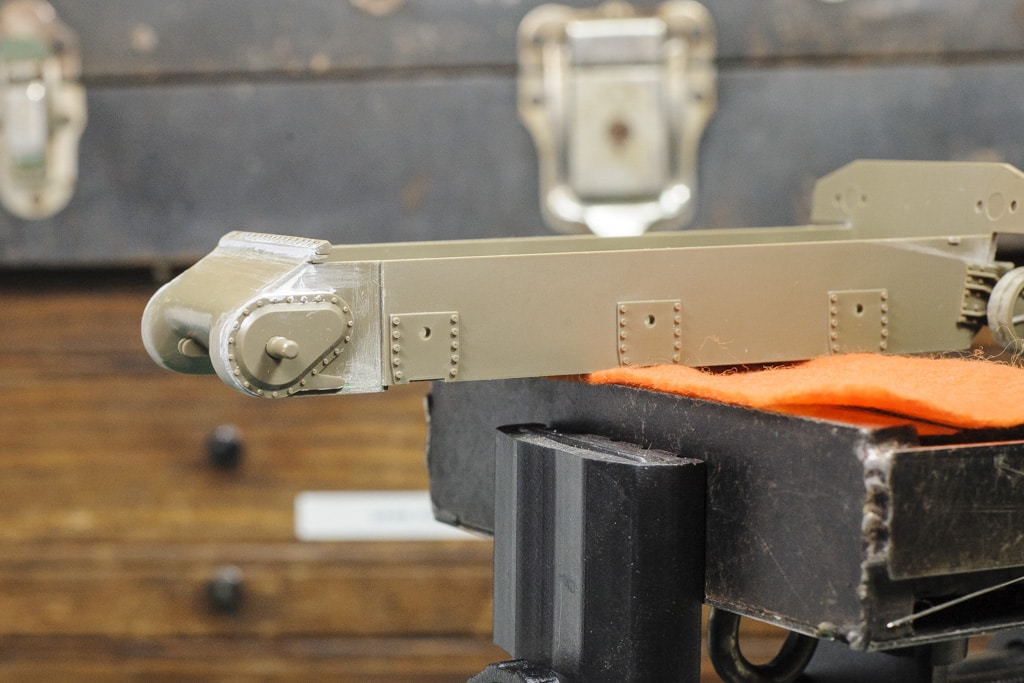 The front fenders on the body are too long and pronounced to join together correctly with the lower hull and have to be sanded down to get a good fit. 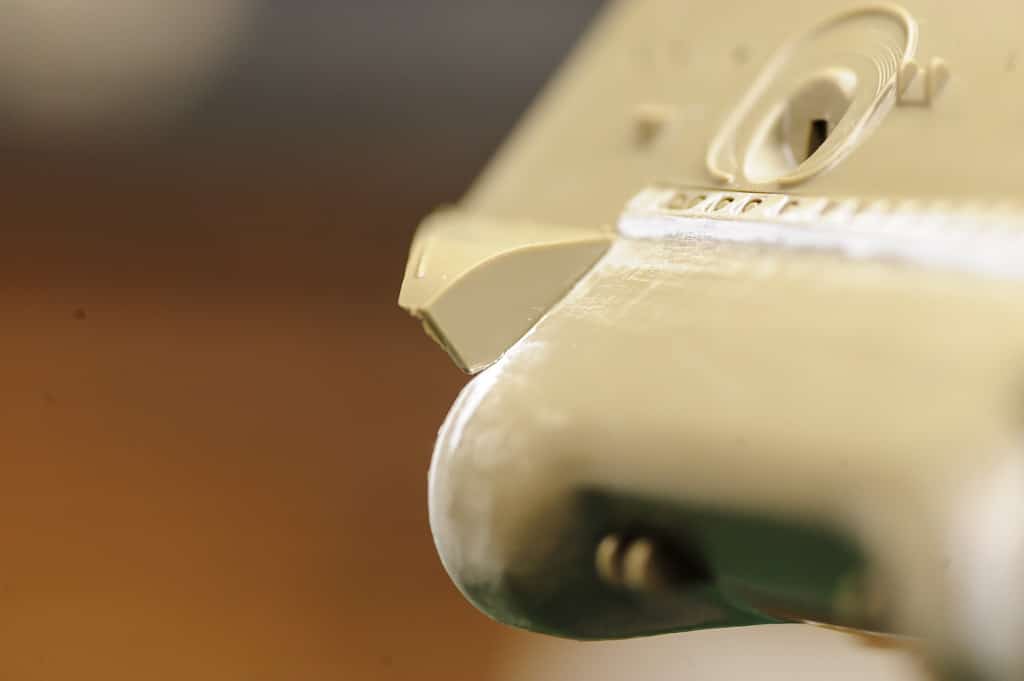 Probably the biggest issue with the kit are the open sides. You can look down through the turret and into the suspension. I'll be filling those in with sheet styrene. 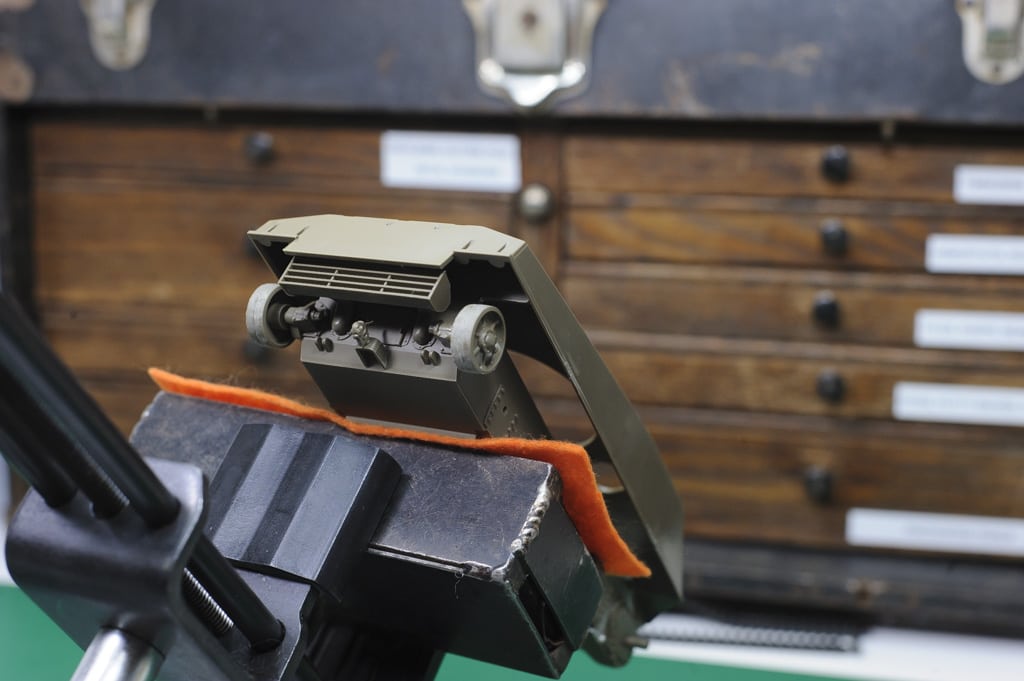 The metal you see in body pan in the 1st picture is a thin piece of scrap I had laying around. I epoxy'd it to the base which gives the model some heft, it also servers the purpose of allowing me to mount a magnet in my panavise and providing a solid hold on the model so I can get it up off the work bench and make it easier to work on. |
|
|
|
Post by dierk on Dec 3, 2016 5:44:24 GMT -5
Plastic surgery - my favourite!  Nothing quite like butchering a styrene pig's ear and turning it into a silk purse. |
|
|
|
Post by Leon on Dec 3, 2016 6:37:18 GMT -5
Nice start CD! The rework on the front end looks good.  |
|
|
|
Post by TRM on Dec 3, 2016 7:10:02 GMT -5
Way to get back to the bench! Off to a great start as well! Looking forward to seeing this unfold!
|
|
joelsmith
Full Member

Member since: July 2012
There no winners in war, only survivors.
Posts: 1,404
Jul 5, 2012 22:33:58 GMT -5
Jul 5, 2012 22:33:58 GMT -5
|
Post by joelsmith on Dec 3, 2016 16:11:32 GMT -5
CD, you might stipple the transmission cover with Mr. Surfacer or a stiff, short bristled brush with liquid glue to give the cast piece a little more texture. HTH, Joel.
|
|
|
|
Post by chromdome35 on Dec 3, 2016 17:47:35 GMT -5
CD, you might stipple the transmission cover with Mr. Surfacer or a stiff, short bristled brush with liquid glue to give the cast piece a little more texture. HTH, Joel. Good idea Joel. Would you use Mr Surfacer 500 or 1000? |
|
joelsmith
Full Member
Member since: July 2012
There no winners in war, only survivors.
Posts: 1,404
Jul 5, 2012 22:33:58 GMT -5
Jul 5, 2012 22:33:58 GMT -5
|
Post by joelsmith on Dec 3, 2016 21:22:04 GMT -5
I use Mr. Surfacer 500 on my builds. It also works well in hiding the seam between the turret halves, and helps the casting texture on the turret. On another point, if you have Steve Zaloga's book on building 75mm armed Shermans, there are templates for the sponson filler plates. Keep up the good work, Joel.
|
|
|
|
Post by chromdome35 on Dec 3, 2016 23:09:20 GMT -5
Thanks for the tip, I don't have that book, what is the title?
|
|
joelsmith
Full Member
Member since: July 2012
There no winners in war, only survivors.
Posts: 1,404
Jul 5, 2012 22:33:58 GMT -5
Jul 5, 2012 22:33:58 GMT -5
|
Post by joelsmith on Dec 4, 2016 10:14:14 GMT -5
CD, I inadvertently fibbed to you  . The template is for the Tamiya M4 not the M4A3. If you still want to look at the book, the title is; Modelling the US Army M4 (75mm) Sherman Medium Tank, it is published by Osprey, #35 in their Modelling series. Sorry again for the confusion, Joel. PS, that's a fine looking young man in your photo. |
|
|
|
Post by chromdome35 on Dec 4, 2016 11:45:33 GMT -5
CD, I inadvertently fibbed to you . The template is for the Tamiya M4 not the M4A3. If you still want to look at the book, the title is; Modelling the US Army M4 (75mm) Sherman Medium Tank, it is published by Osprey, #35 in their Modelling series. Sorry again for the confusion, Joel. PS, that's a fine looking young man in your photo. Thank you for the info. Sounds like a book I need on my bookshelves. The little guy is my 20 month old grandson. He was about 11 months old when that picture was taken. Here is my daughter with him and her two 8 month old twins. Thats right, she has a 20 month old and two 8 month olds...she has her hands full. Their father is an officer in the 101st and is currently deployed to Afghanistan.  I just took this one of them at Thanksgiving. My granddaughter doesn't look to thrilled with her big brother at the moment.  Sorry for the non modelling related pictures, NEVER ask a grandfather about his grandkids if you don't want to see pictures!!!  Grandkids are awesome!!! |
|
|
|
Post by Leon on Dec 4, 2016 12:00:14 GMT -5
Your daughter sure does have her hands full with those great looking grand kids! |
|
joelsmith
Full Member
Member since: July 2012
There no winners in war, only survivors.
Posts: 1,404
Jul 5, 2012 22:33:58 GMT -5
Jul 5, 2012 22:33:58 GMT -5
|
Post by joelsmith on Dec 4, 2016 14:16:32 GMT -5
I've got 5 grandkids and 1 great-grandkid, and if I had known how much fun they were, I'da figured out a way to have them first. Talk more soon, Joel.
|
|
|
|
Post by chromdome35 on Dec 4, 2016 17:58:22 GMT -5
A little bit more progress Filled in the open sides with .040 styrene. 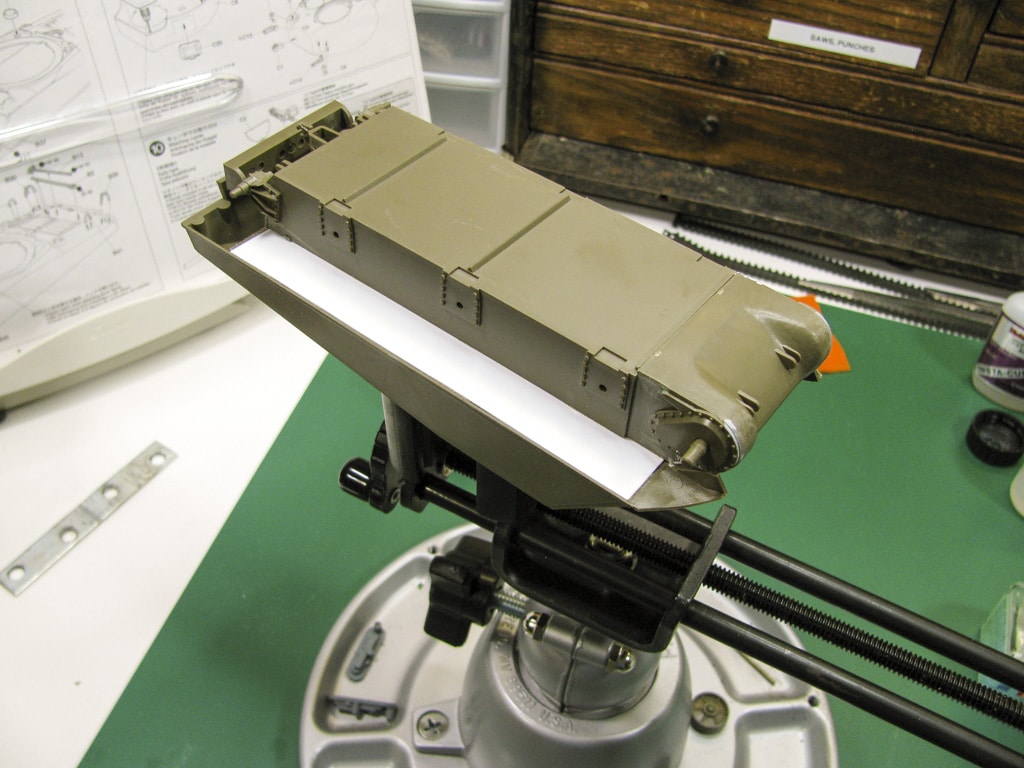 I felt it was fairly flimsy so I added some internal bracing which you can see through the turret opening. 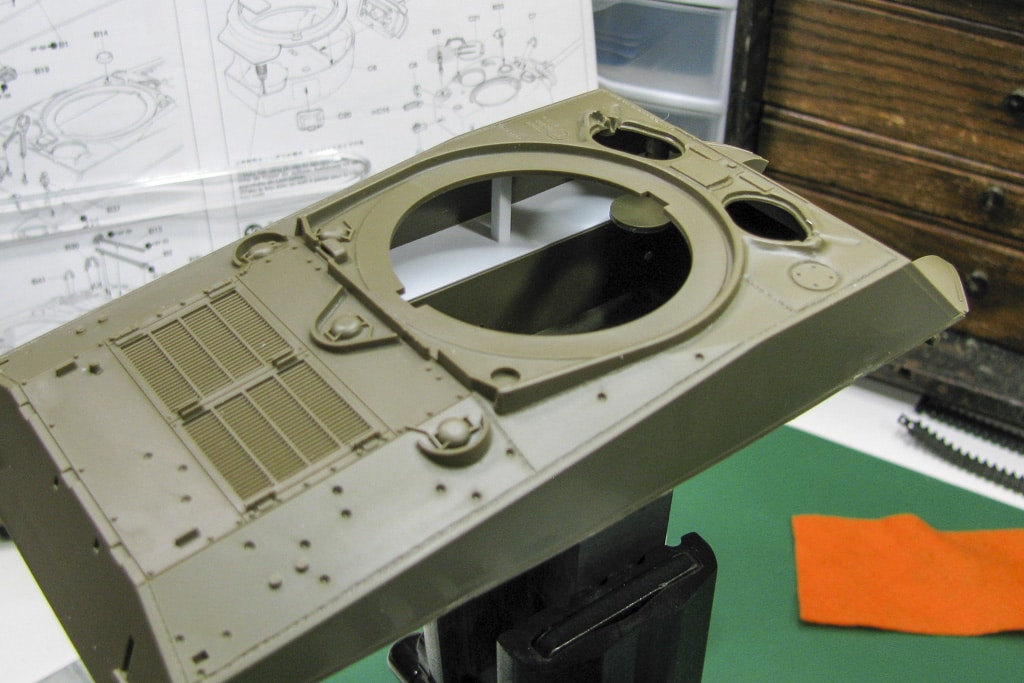 Based on Joel's comment about using Mr. Surfacer to give the front hull a cast texture finish, I decided to give it a try. I've never done this before so I pretty much have no idea what I'm doing, but that's never stopped me before. Hold my beer, hey y'all watch this! My bottle of Mr Surfacer 500 is a few years old so it went on a bit thicker than I liked, so I followed it up by dipping my brush in acetone and smoothing out the Mr. Surfacer a little bit. Does this look anywhere close to ok??? 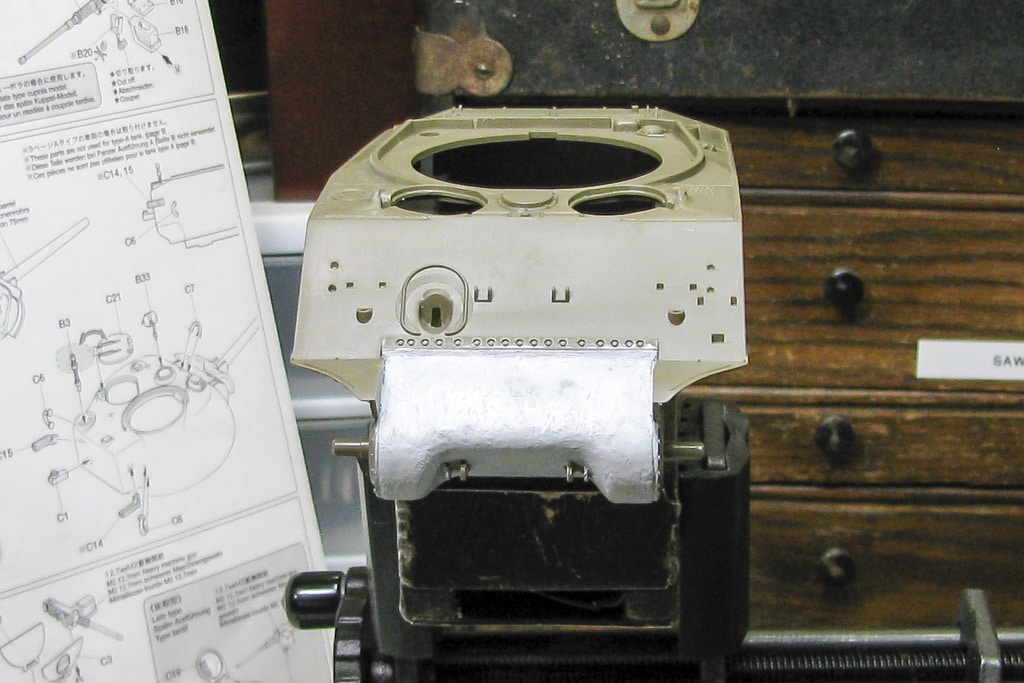 |
|
|
|
Post by TRM on Dec 4, 2016 18:07:20 GMT -5
Fine work moving forward on the Shermie!! Great pics of the family!! Certainly a handful there!! Best wishes sent to your son-in law, and many thanks for his service! |
|
|
|
Post by deafpanzer on Dec 5, 2016 10:51:50 GMT -5
I like it! Texture looks good.
|
|
joelsmith
Full Member
Member since: July 2012
There no winners in war, only survivors.
Posts: 1,404
Jul 5, 2012 22:33:58 GMT -5
Jul 5, 2012 22:33:58 GMT -5
|
Post by joelsmith on Dec 5, 2016 11:02:28 GMT -5
Yes, indeed! I will second what deafpanzer said, it's looking really good.
|
|
|
|
Post by Leon on Dec 5, 2016 12:21:48 GMT -5
Texture looks good!
|
|
adt70hk
Forum Moderator 
Member since: November 2015
Currently attempting to build something decent!!! ;)
Posts: 2,476 
MSC Staff
|
Post by adt70hk on Dec 6, 2016 17:26:50 GMT -5
Nice start so far!
I can't believe the open hull above the tracks!! I kind of expect with the quickbuild kits I deal in (it's a long story) but in a kit like this no excuse!!
Keep up the good work.
Andrew
PS your daughter really must have her hands ful!! I hope your son-in-law makes it back ok. I've known a few people go over there on the civilian side working with the govenrment to try and improve things and they've come back with some 'interesting' stories.
|
|
captfue
Full Member
Member since: October 2012
Posts: 311
Oct 1, 2012 22:25:19 GMT -5
Oct 1, 2012 22:25:19 GMT -5
|
Post by captfue on Dec 6, 2016 18:21:15 GMT -5
Looks good so far..Always hated the open space on Tamiya kits Great looking grandkids
|
|
joelsmith
Full Member
Member since: July 2012
There no winners in war, only survivors.
Posts: 1,404
Jul 5, 2012 22:33:58 GMT -5
Jul 5, 2012 22:33:58 GMT -5
|
Post by joelsmith on Dec 6, 2016 20:59:09 GMT -5
Even though the kit has a later stock number, the kit was first released in the mid 1980's as stock number 35122. My version of the kit even came with Japanese instructions. Tamiya kits of that era came with "open sponsons", motorization holes, and other short cuts usually found in kits of that era. They are still basically good kits, just needing some model building skills. Hope this explains things, Joel.
|
|
joelsmith
Full Member
Member since: July 2012
There no winners in war, only survivors.
Posts: 1,404
Jul 5, 2012 22:33:58 GMT -5
Jul 5, 2012 22:33:58 GMT -5
|
Post by joelsmith on Dec 8, 2016 8:31:28 GMT -5
CD, the bracing is a very good idea! What I have done in the past is glue a strip of square styrene to the side of the upper hull below the edge the thickness of the sponson filler I am using. also if there is clearance, I will widen the sponson filler to rest on the upper edge of the lower hull. I hope my explanation is clear enough. Talk soon, Joel.
|
|
|
|
Post by chromdome35 on Dec 8, 2016 16:30:29 GMT -5
I think I understand.
I did exactly as you described with extending the sponson cover over the inner hull edge.
I just got home from a business trip, looking forward to working on the build!!
|
|
|
|
Post by chromdome35 on Dec 10, 2016 1:10:02 GMT -5
Made a bit more progress tonight. I decided I would attempt to do better weld beads along the hull. I've never done these before, so I read a few articles around the net and decided on the following method. I laid down a thin line of Tamiya Extra Thin, then cut plastruct .010 round stock to fit lengthwise of the seam. I then put down another coat of Tamiya Extra Thin on top of the plastruct. I let it soften for a while, then took an exacto knife and using the tip, pressed down to create a weld pattern. Looking at it, I'm wondering if I should have used a slightly thicker plastruct round. It seems almost too small to me. What do you guys think? 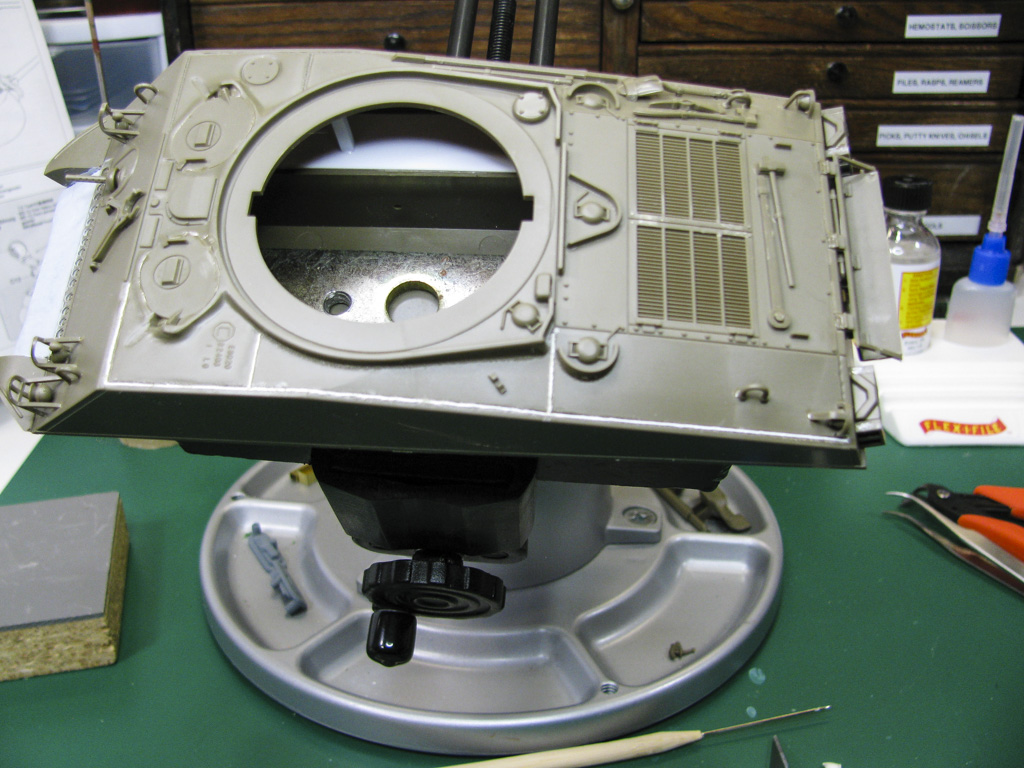   Also, looking at the other Sherman build that mrt51 has underway, I decided to trim off the grab handles and replace with wire like he's doing. Again, something I've never tried before. I haven't gotten beyond the trimming off of the molded on ones yet. |
|
joelsmith
Full Member
Member since: July 2012
There no winners in war, only survivors.
Posts: 1,404
Jul 5, 2012 22:33:58 GMT -5
Jul 5, 2012 22:33:58 GMT -5
|
Post by joelsmith on Dec 10, 2016 4:10:29 GMT -5
CD, replacing the "handles" with wire is a simple way to improve this kit. What I do is cut a block of styrene to use a form for the handles. Then, bend the handle legs a bit longer than necessary, then use the form block as a drilling jig, insert the handle, use super glue on the back side, trim to length, and you are done. Talk more soon, Joel.
|
|
|
|
Post by TRM on Dec 10, 2016 5:27:44 GMT -5
Looking like you're certainly heading in the right direction! |
|
|
|
Post by chromdome35 on Dec 10, 2016 14:12:11 GMT -5
Joel,
Any recommendation on the size of block to create, the correct space between the vertical legs of the handles and the gauge of the wire?
I don't have access to the inside of the model to cut off or glue the handles from the inside. I was planning on just putting a drop of CA on each leg of the handles.
|
|
joelsmith
Full Member
Member since: July 2012
There no winners in war, only survivors.
Posts: 1,404
Jul 5, 2012 22:33:58 GMT -5
Jul 5, 2012 22:33:58 GMT -5
|
Post by joelsmith on Dec 10, 2016 16:17:18 GMT -5
CD, what I use is 0.3 mm wire. The hull, drivers, and split hatch handles are 3.5 mm center to center. The forming block is 3.2 mm edge to edge. The handle in the all-around vision cupola hatch is 3.8 mm center to center, and the forming block is 3.5 mm. Hope this helps you, Joel. PS, the welds look good.
|
|
|
|
Post by chromdome35 on Dec 10, 2016 16:19:35 GMT -5
Joel, thanks for the info!
How do you gain such esoteric knowledge?
|
|
|
|
Post by Leon on Dec 10, 2016 16:26:32 GMT -5
Nice work on those welds beads!
|
|
joelsmith
Full Member
Member since: July 2012
There no winners in war, only survivors.
Posts: 1,404
Jul 5, 2012 22:33:58 GMT -5
Jul 5, 2012 22:33:58 GMT -5
|
Post by joelsmith on Dec 10, 2016 17:16:24 GMT -5
It is very simple CD, I cheat. The 0.3mm wire size may be "wrong", but, I think it gives the best appearance. As for the spacing, I measured the width of the "fin" that is supposed to be the handle, subtracted 0.3mm from the measurement to get my center to center measurement. As for the forming block, double the wire diameter, subtract that measurement from the "fin" measurement to get the size of the block. Calculating these measurements comes easy because of my machinist training. I hope this this is clear to you, Joel.
|
|


 Nothing quite like butchering a styrene pig's ear and turning it into a silk purse.


 . The template is for the Tamiya M4 not the M4A3. If you still want to look at the book, the title is; Modelling the US Army M4 (75mm) Sherman Medium Tank, it is published by Osprey, #35 in their Modelling series. Sorry again for the confusion, Joel. PS, that's a fine looking young man in your photo.


