|
|
Post by fightnjoe on Mar 6, 2017 23:58:20 GMT -5
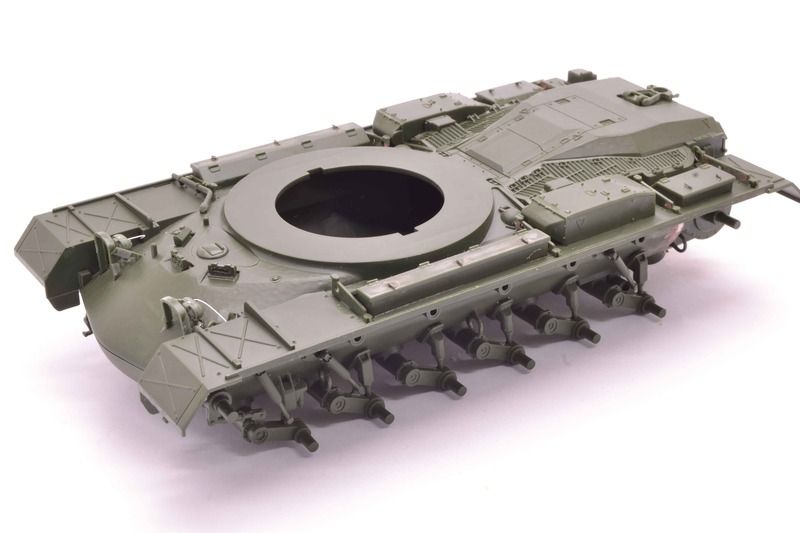
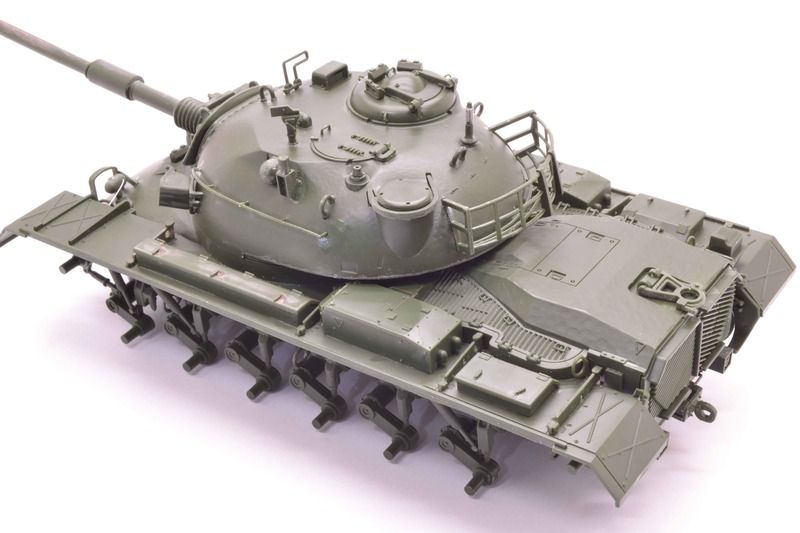
Well folks how about an aircraft guy changing direction just a tad and including armor in his build list. I know I have built a few armor kits but I have been presented an opportunity and I am going to wander that way. First up is this, The Panzer Page on Facebook is hosting The Dan Jayne Memorial Tribute Build 2017 edition. I have entered with this... 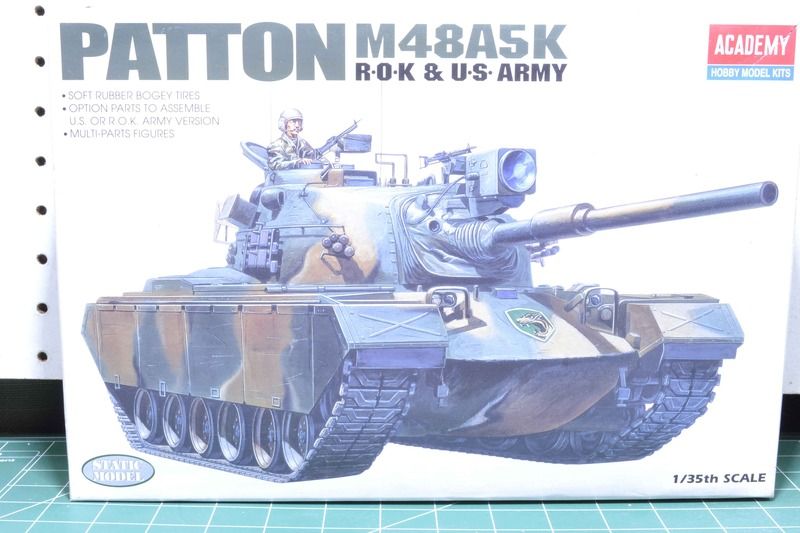 First up is a quick shot of whats in the box.... 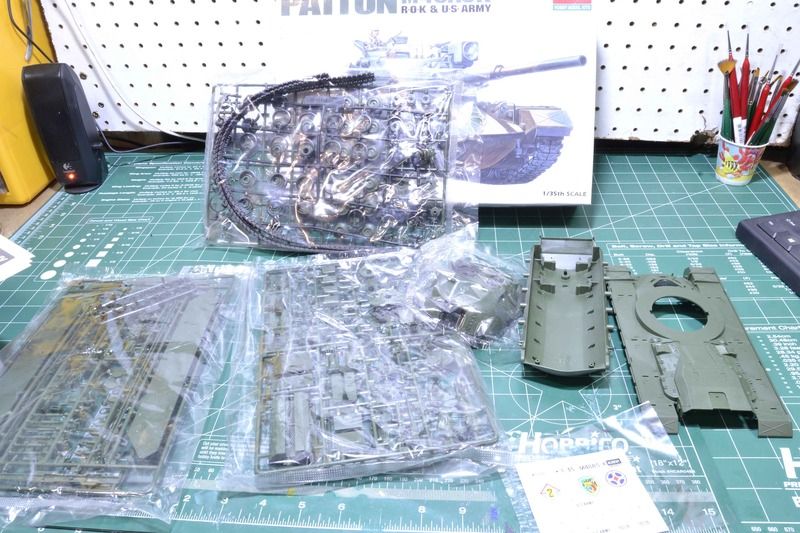 Didn't take long at all to start it up. First step, road wheels. Cleaned up and now done. Second step, begin to detail the lower hull. 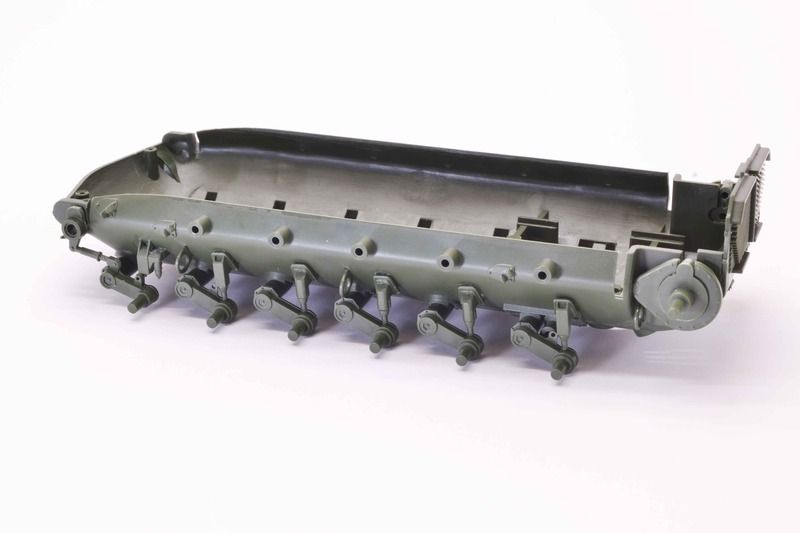 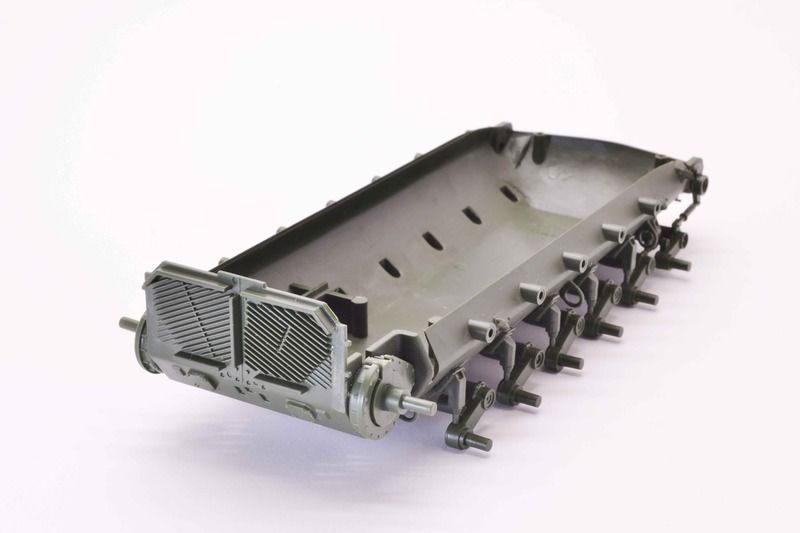 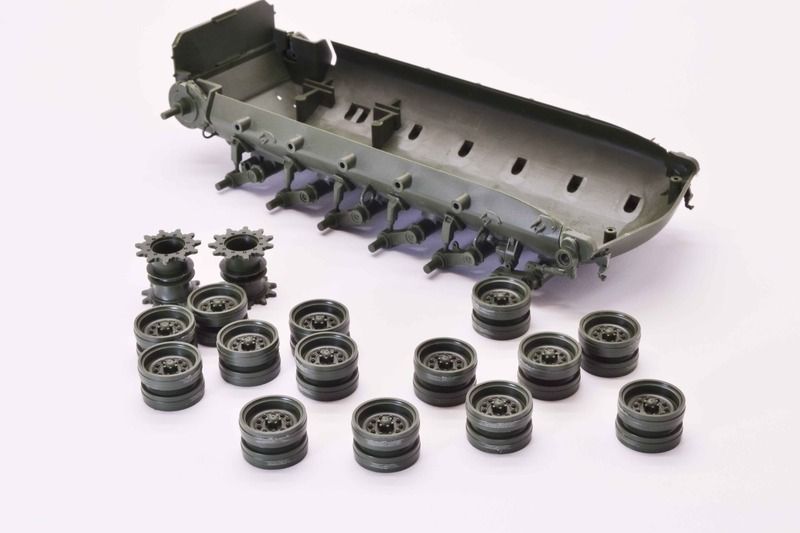 Next up is more for the lower hull and hopefully soon. I have not given up on aircraft but cannot pass up an opportunity. All comments, critique, and criticism are encouraged. Joe |
|
|
|
Post by Leon on Mar 7, 2017 5:53:41 GMT -5
Always nice to have a change of genre Joe!  Your off to a good start getting the road wheels out of the way.  |
|
joelsmith
Full Member

Member since: July 2012
There no winners in war, only survivors.
Posts: 1,404
Jul 5, 2012 22:33:58 GMT -5
Jul 5, 2012 22:33:58 GMT -5
|
Post by joelsmith on Mar 7, 2017 8:36:30 GMT -5
Don't forget to fill the slot in front of the final drive.
|
|
|
|
Post by fightnjoe on Mar 9, 2017 14:37:06 GMT -5
Many thanks for looking in. Joel thanks for the reminder. I have a serious lack of experience when it comes to these tracked things.
Joe
|
|
joelsmith
Full Member
Member since: July 2012
There no winners in war, only survivors.
Posts: 1,404
Jul 5, 2012 22:33:58 GMT -5
Jul 5, 2012 22:33:58 GMT -5
|
Post by joelsmith on Mar 9, 2017 16:18:44 GMT -5
The one thing that I forgot to mention is that the hull is a copy of the Tamiya M48, and the 1/1 scale vehicle that they measured was gutted. No power pack or other inside parts so it sits on "tippy toes". There has been a bunch of discussion over on Armorama and Missing Lynx. If your suspension arms are already glued, let it go. Tamiya Model Magazine had a two part article on detailing the outside of the vehicle. The article was in the Dec. 16 and Jan. 17 issues. I hope this helps you out, Joel.
|
|
deafpanzer
Administrator 
Member since: June 2012
"Never tell your story to a deaf man"
Posts: 21,089
Member is Online
MSC Staff
|
Post by deafpanzer on Mar 10, 2017 11:39:40 GMT -5
Count me in too!!!
|
|
|
|
Post by fightnjoe on Mar 10, 2017 22:53:33 GMT -5
Many thanks to all for looking in.
Joel thank you for the info. I really do appreciate it. For this one I am going to stick to OOB and clean construction then the painting.
Joe
|
|
|
|
Post by fightnjoe on Mar 10, 2017 22:54:01 GMT -5
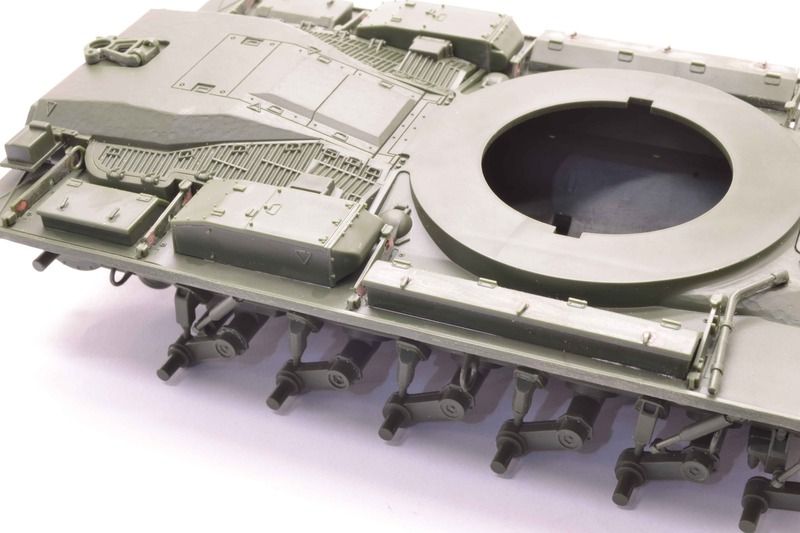
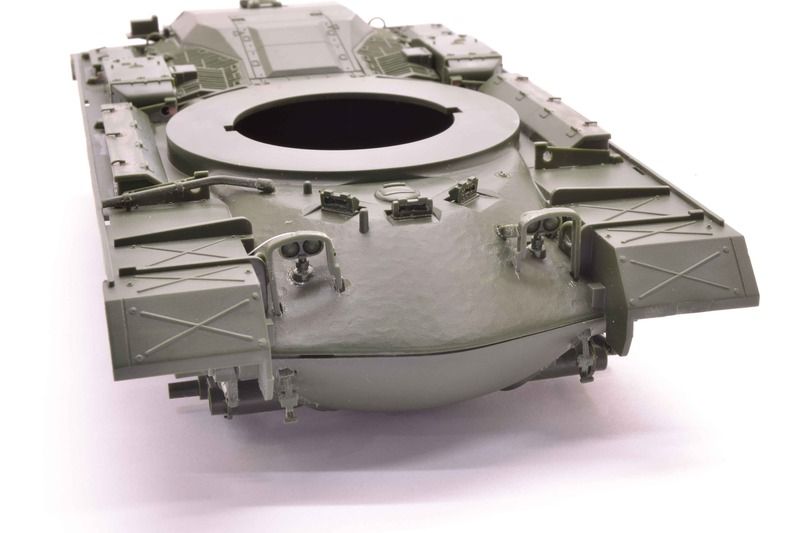
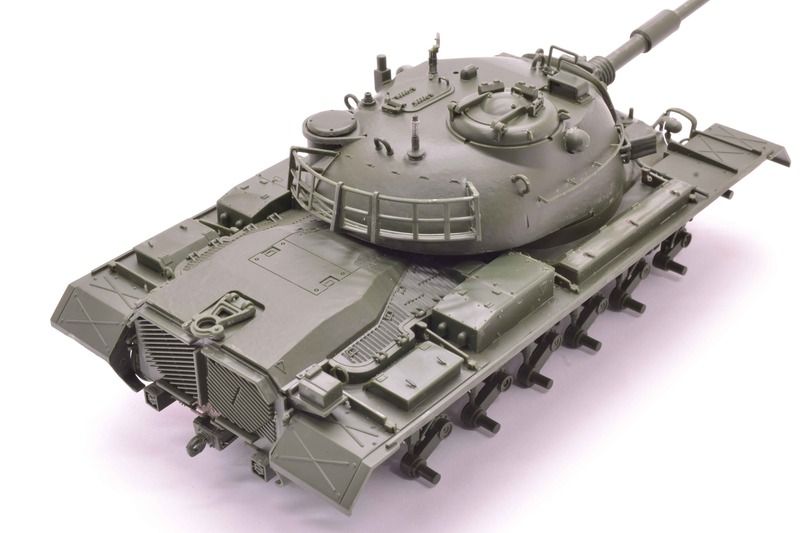
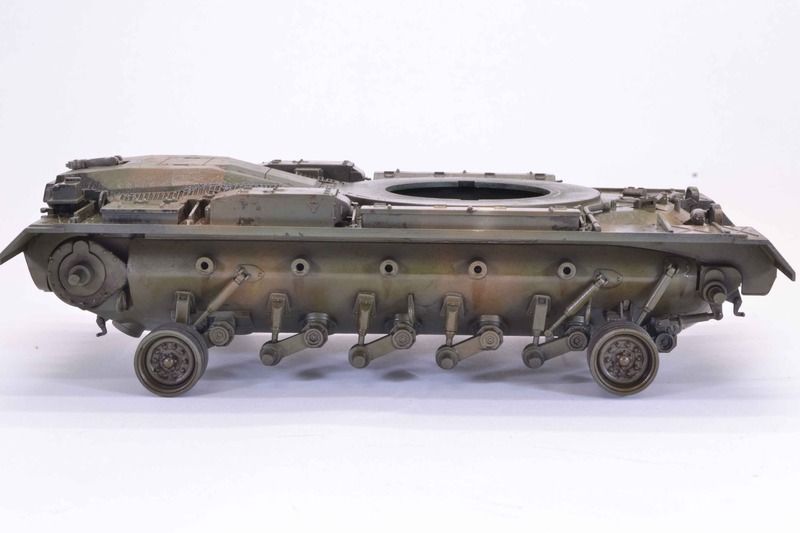
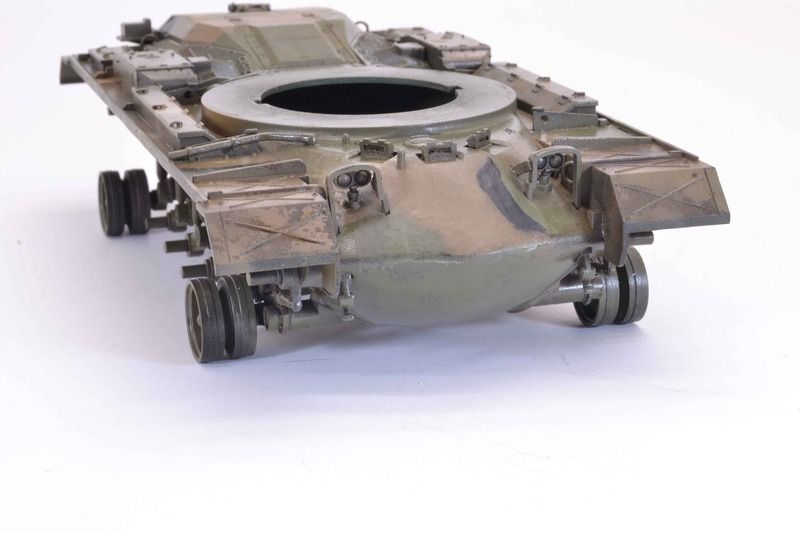
Time to update. Time was spent working the details to the lower hull. So far so good. The wheels and the return rollers are ready to go but left off the hull to accommodate painting. This puts me through step four in the instructions. 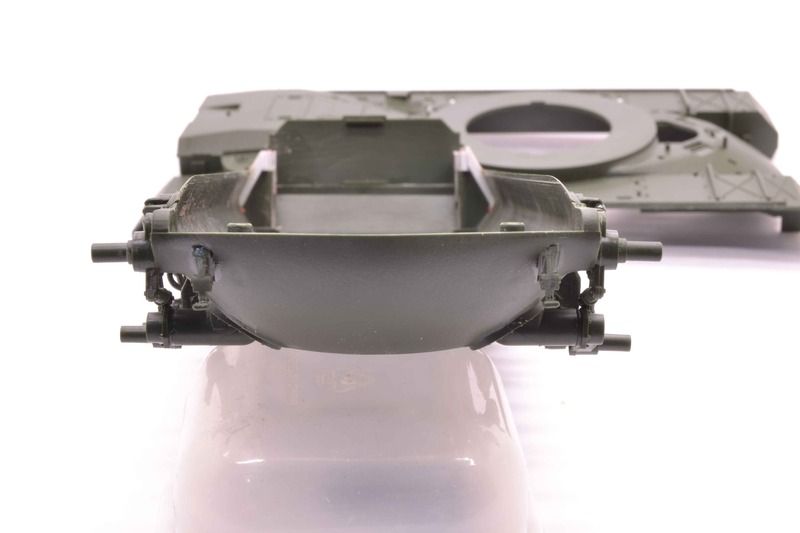 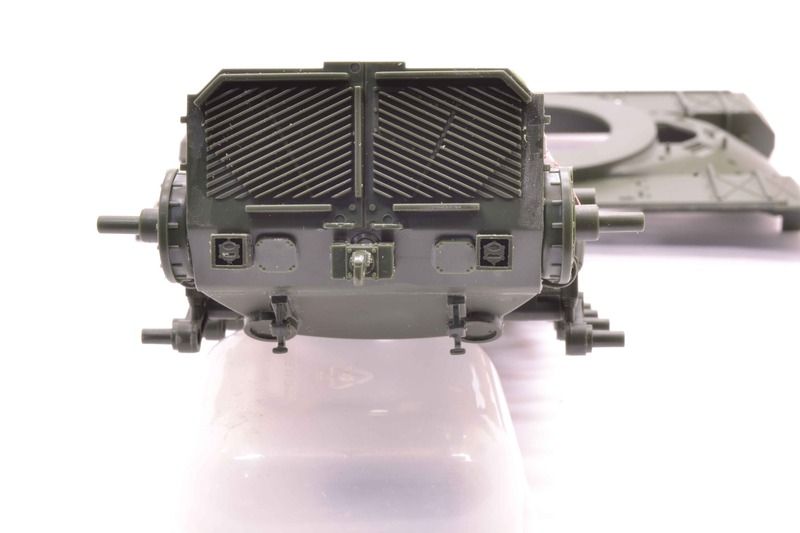 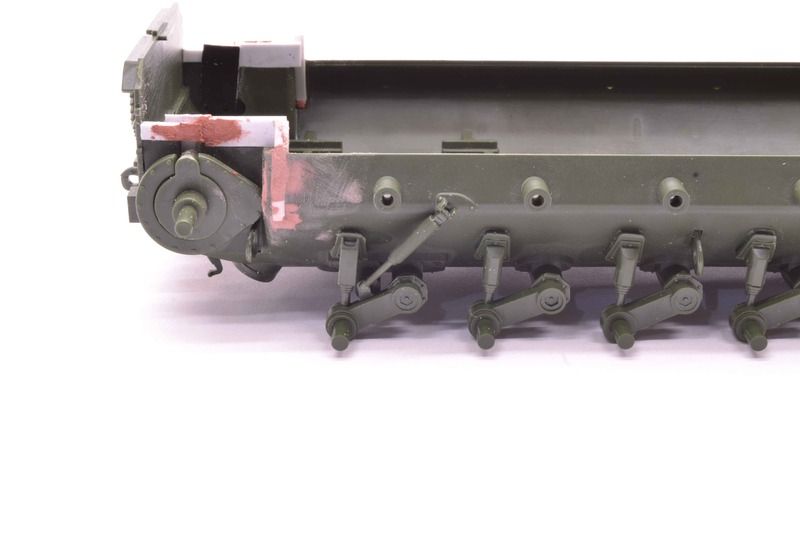 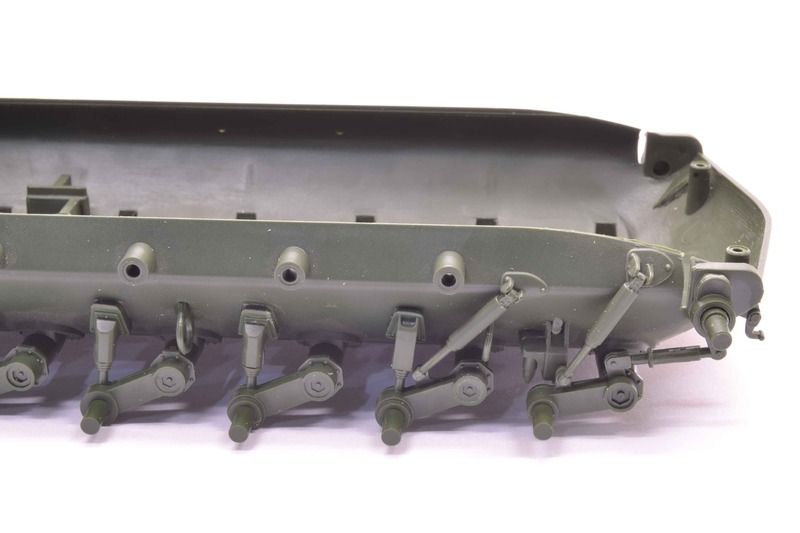 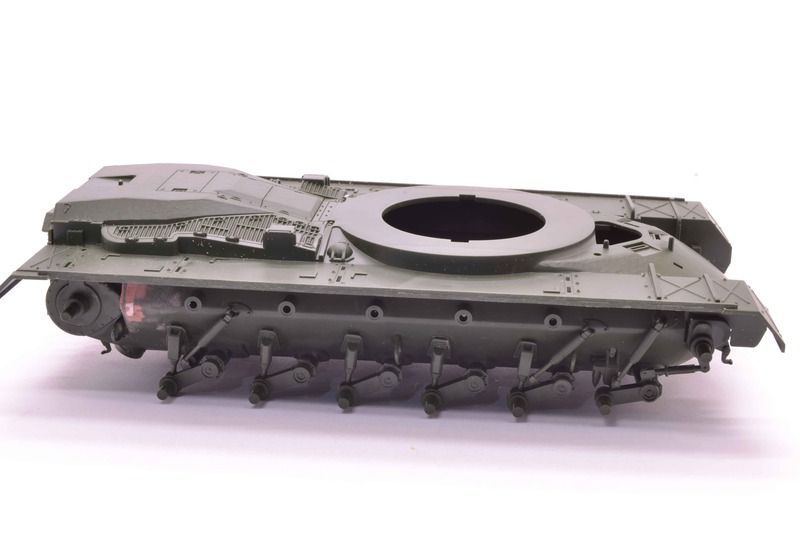 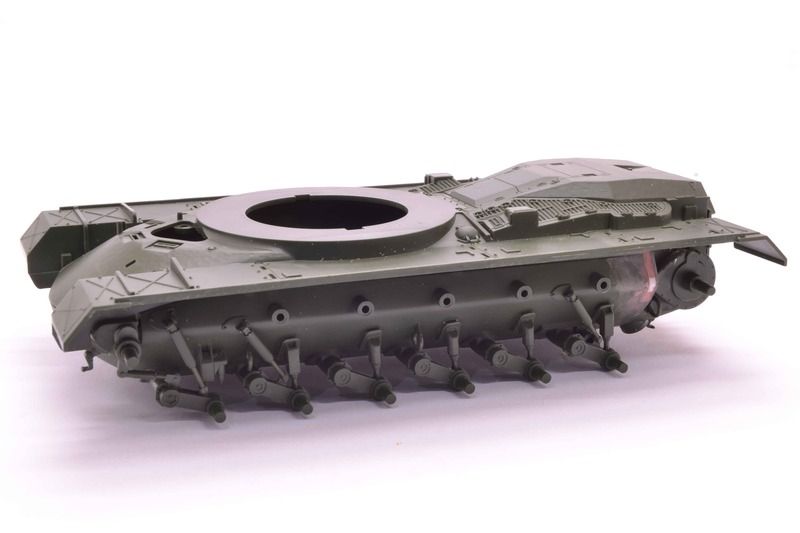 Next up is the upper hull. All comments, critique, and criticism are encouraged. Joe |
|
joelsmith
Full Member
Member since: July 2012
There no winners in war, only survivors.
Posts: 1,404
Jul 5, 2012 22:33:58 GMT -5
Jul 5, 2012 22:33:58 GMT -5
|
Post by joelsmith on Mar 11, 2017 15:45:51 GMT -5
Good work sir. PS don't forget to fill the slots by the Idler wheel mount.
|
|
|
|
Post by fightnjoe on Mar 12, 2017 22:37:01 GMT -5
Joel lets not talk about that one. I missed it and really no way to get to it now.
Joe
|
|
|
|
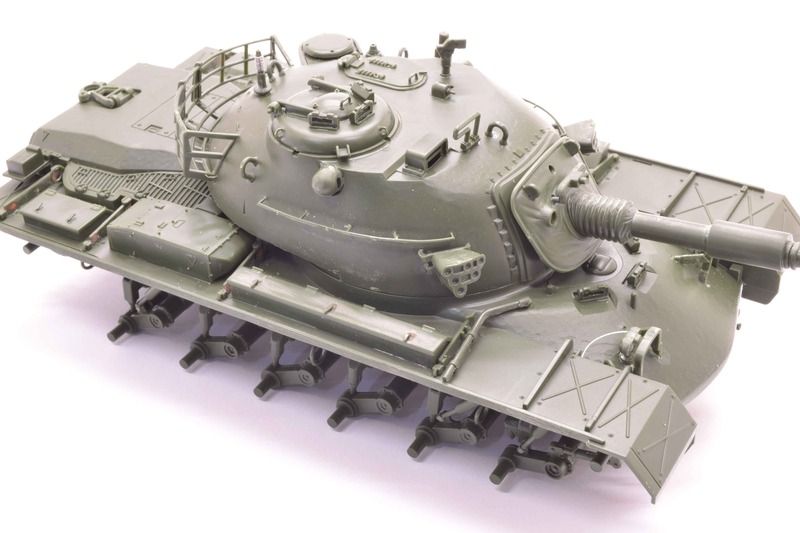
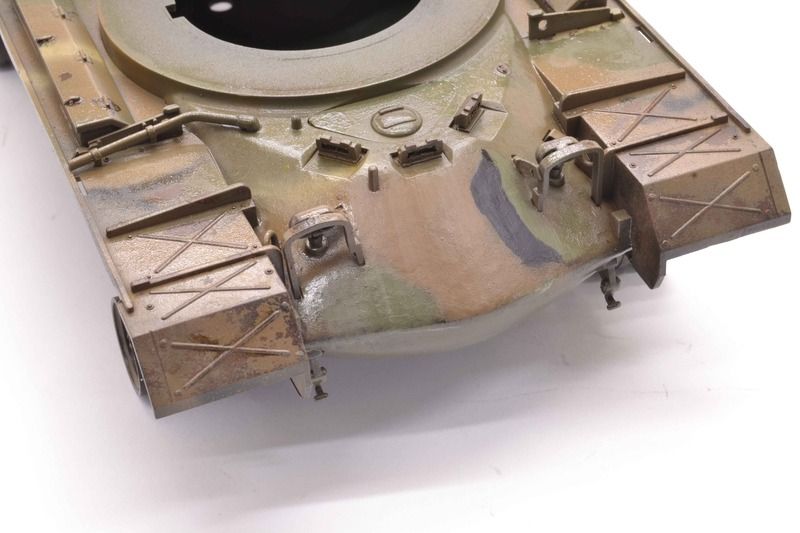
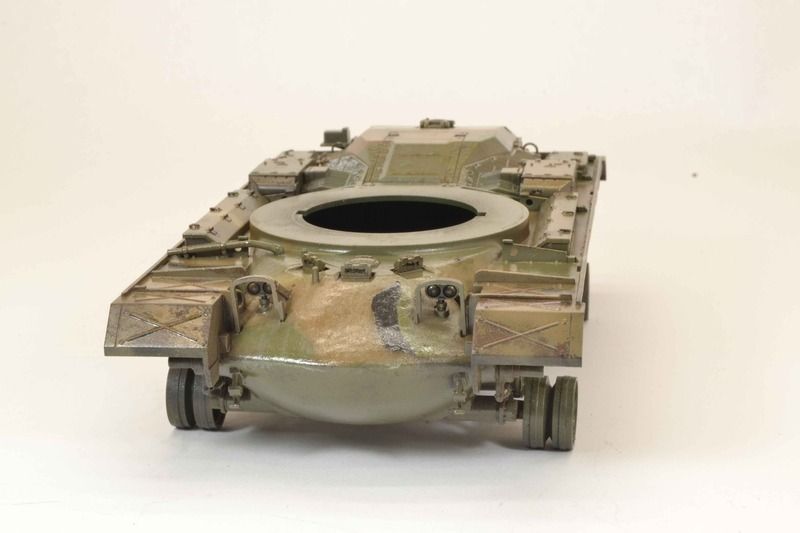
Post by fightnjoe on Mar 12, 2017 22:44:36 GMT -5
|
|
|
|
Post by Leon on Mar 13, 2017 4:30:39 GMT -5
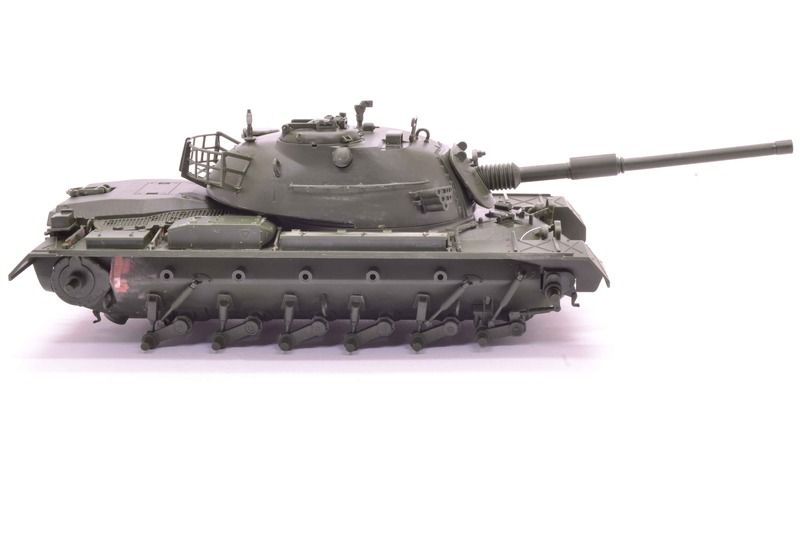
Nice work on the construction Joe! Looking good. |
|
jsteinman
Full Member
Member since: March 2013
Posts: 735
Mar 24, 2013 9:29:10 GMT -5
Mar 24, 2013 9:29:10 GMT -5
|
Post by jsteinman on Mar 13, 2017 8:49:59 GMT -5
Good n clean!
|
|
deafpanzer
Administrator
Member since: June 2012
"Never tell your story to a deaf man"
Posts: 21,089
Member is Online
MSC Staff
|
Post by deafpanzer on Mar 13, 2017 14:09:52 GMT -5
Now it is starting to look like a tank. Do you realize it doesn't have wings, right?
|
|
|
|
Post by fightnjoe on Mar 14, 2017 7:37:13 GMT -5
Many many thanks for looking in.
Andy I pondered that for a while and did consider adding them as the instructions do not show them. However after much thought and careful consideration I could not find a decent way to attach them. I shall go with what the box art shows. Just cannot understand how they omitted the wings.
Joe
|
|
joelsmith
Full Member
Member since: July 2012
There no winners in war, only survivors.
Posts: 1,404
Jul 5, 2012 22:33:58 GMT -5
Jul 5, 2012 22:33:58 GMT -5
|
Post by joelsmith on Mar 14, 2017 12:33:14 GMT -5
DP, it doesn't need wings to fly over obstacles. With a 105mm main gun, it can blow them out of the way!
|
|
|
|
Post by fightnjoe on Mar 18, 2017 13:55:24 GMT -5
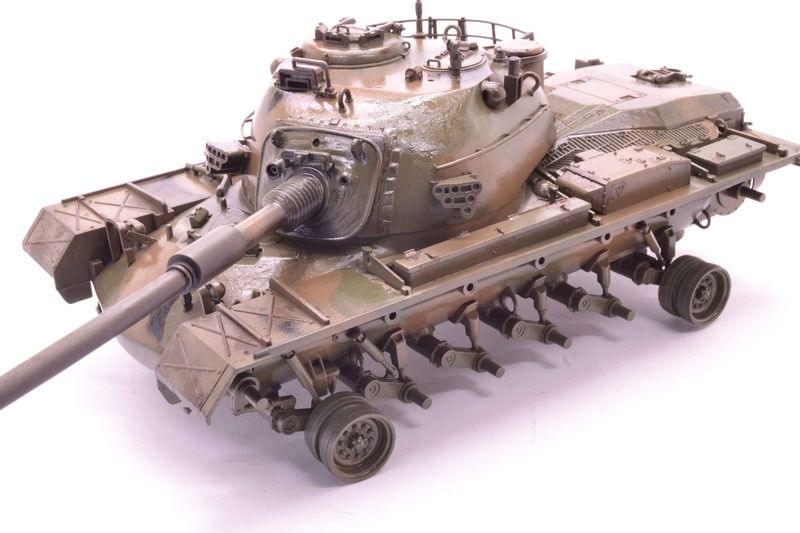
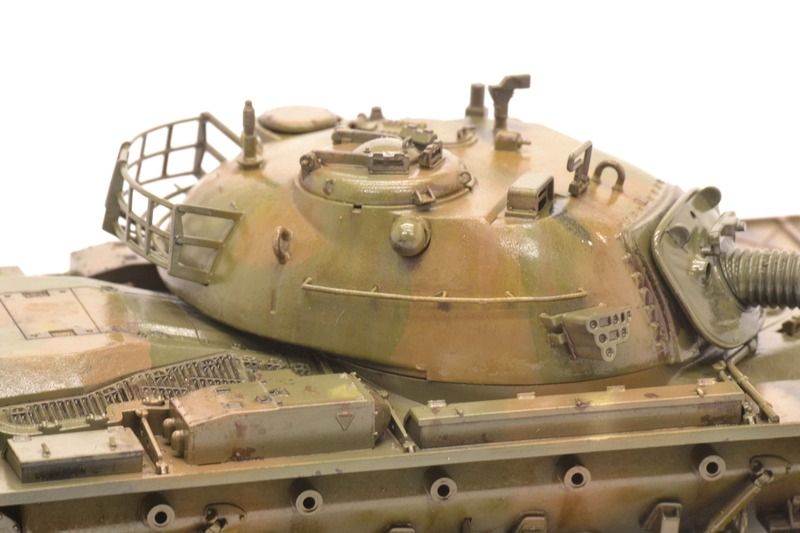
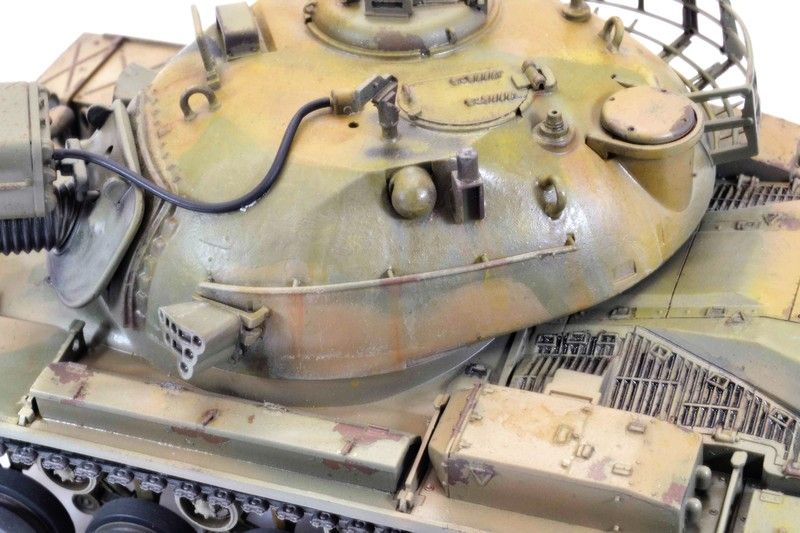
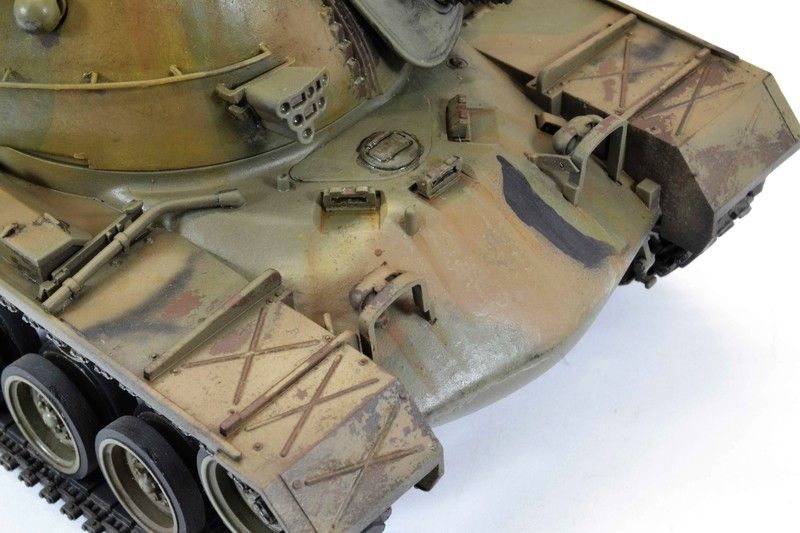
Moving right along on this it is time for painting. Up to this point not much was for sure on this build. I knew I wanted to build it so I could tackle the cammo. As I feel that is one of the major weaknesses I have in this hobby I wanted to challenge myself. Once the construction was finished some choices were needed. Just how did I want to portray this subject. It did not take long for the thought process to hone onto the choice. Something like a gate guard. Weathered but not too much. Still standing proudly as a reminder of its service. I just had to go for it. First was to present in that fashion I needed to try to get a handle on something I had failed with multiple times. Paint chipping. My other attempts ended with failure to get it right and substituting some other technique to get a worn look. First is the rust, how? I sprayed Rustoleum Rusty Metal Primer and then mixed in Testor Light Tan to highlight. 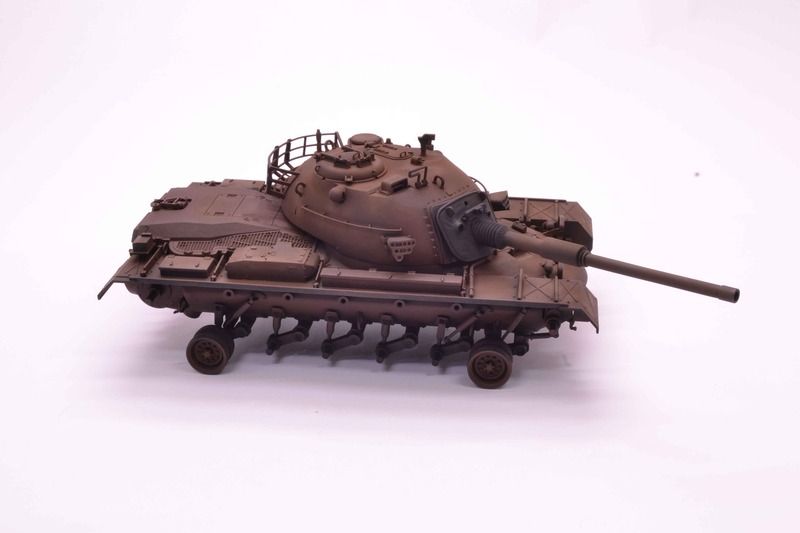  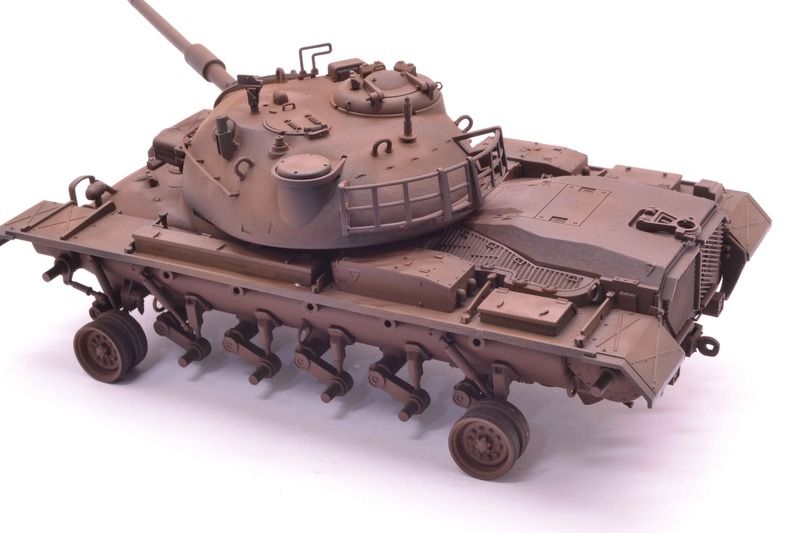 I let this dry overnight. Now is the tricky part. This is where the failures of the past haunted me. I applied hairspray over the entire surface, or so I thought. I let this dry and then began the cammo pattern. The overall coat of Vallejo Olive Drab Primer was first. The instructions called for Khaki but the only one I had in the paint supply was badly neglected and had dried to a point of unusable. I went with the second choice. Gunze Sanyo Dark Earth provided the brown. Tamiya Buff and Apple Barrel (Walmart craft water based Acrylic) were used as well. Once each dried to the touch I began the next. Everything I had seen on this method said to work on the chipping before the paint fully cured. With that in mind I waited until all the paints were dry to the touch and then out came the water and brushes for the chipping. 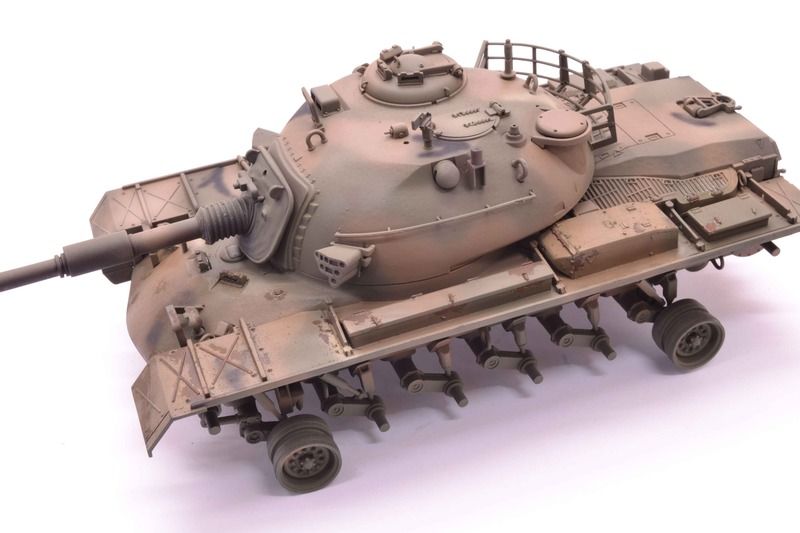 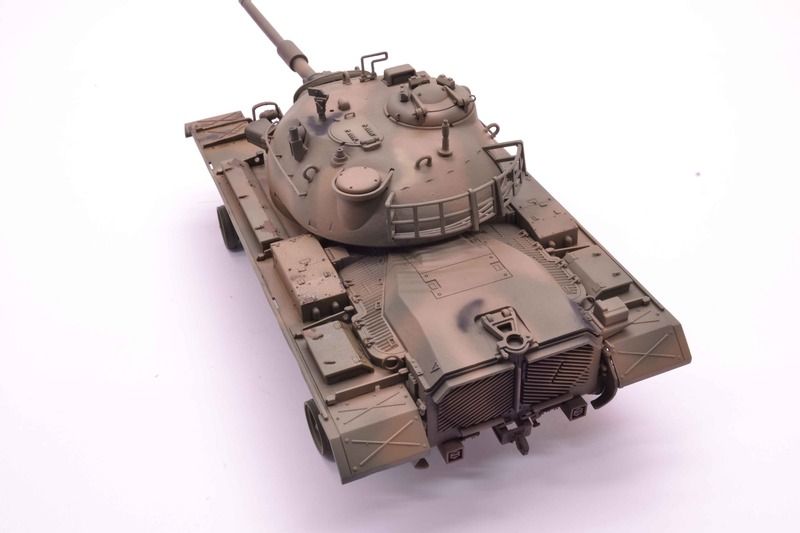 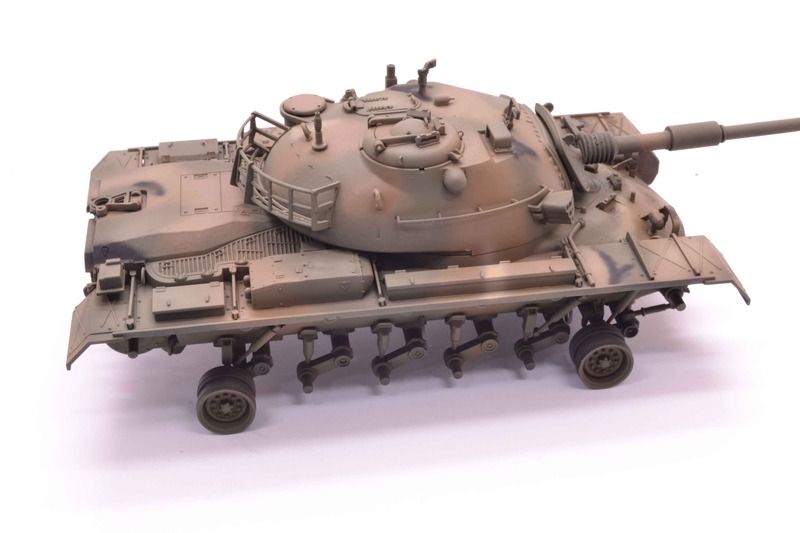 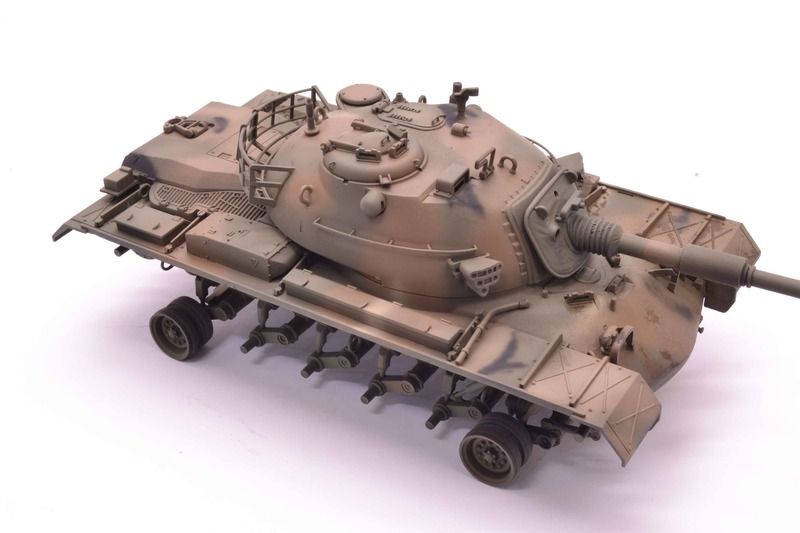 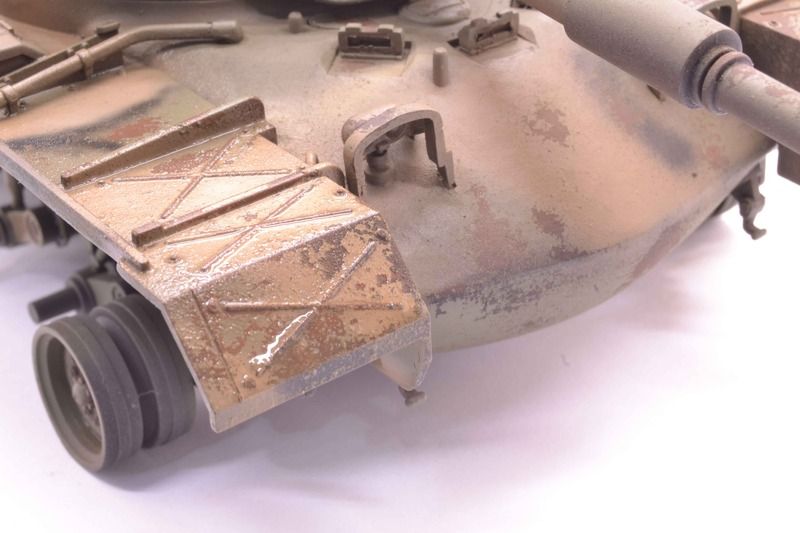 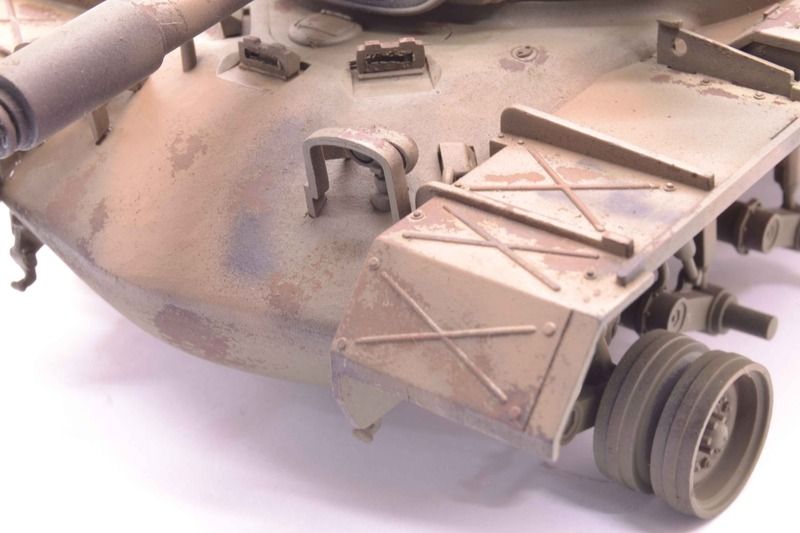 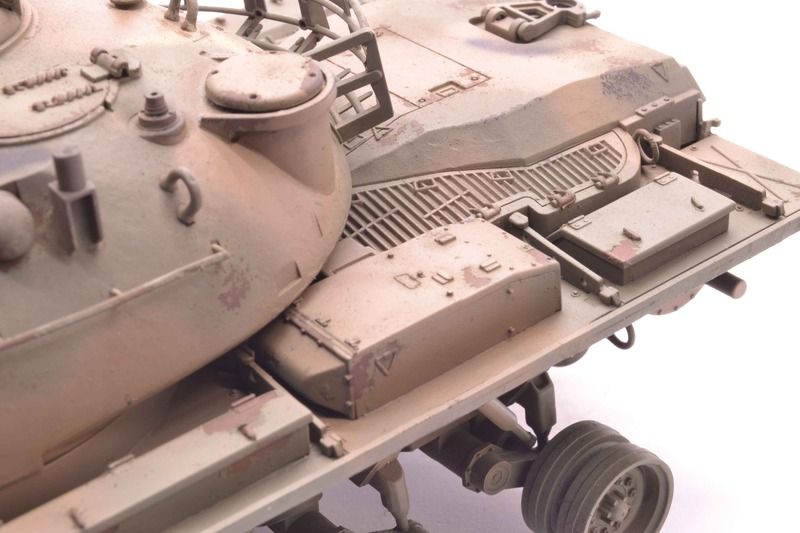 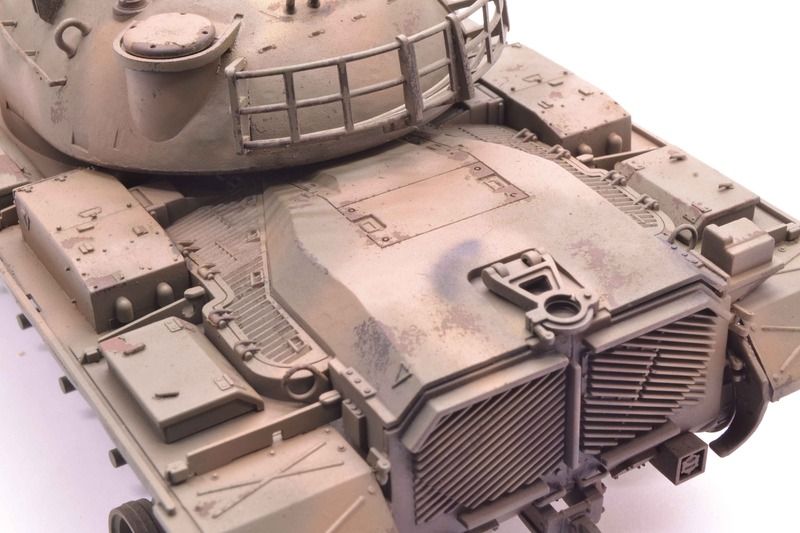 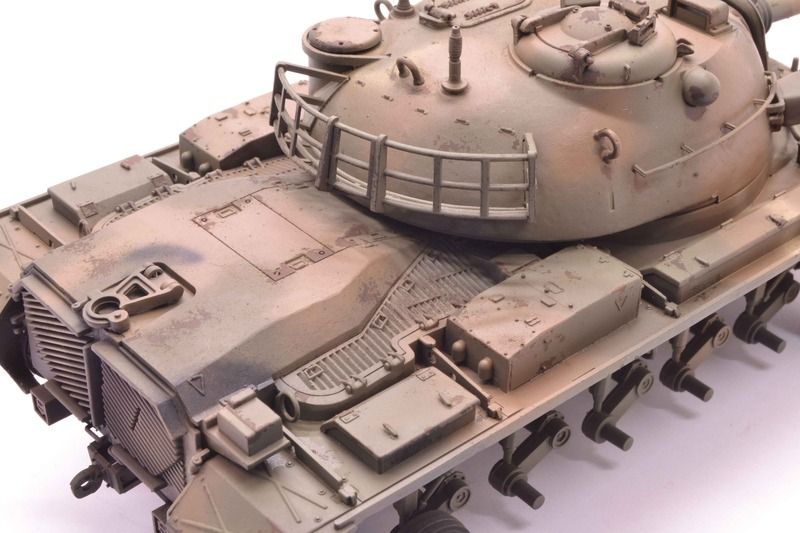 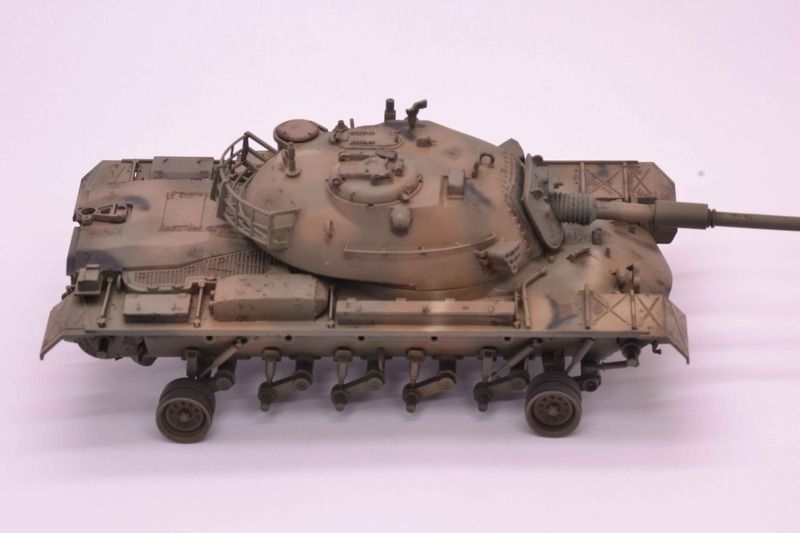 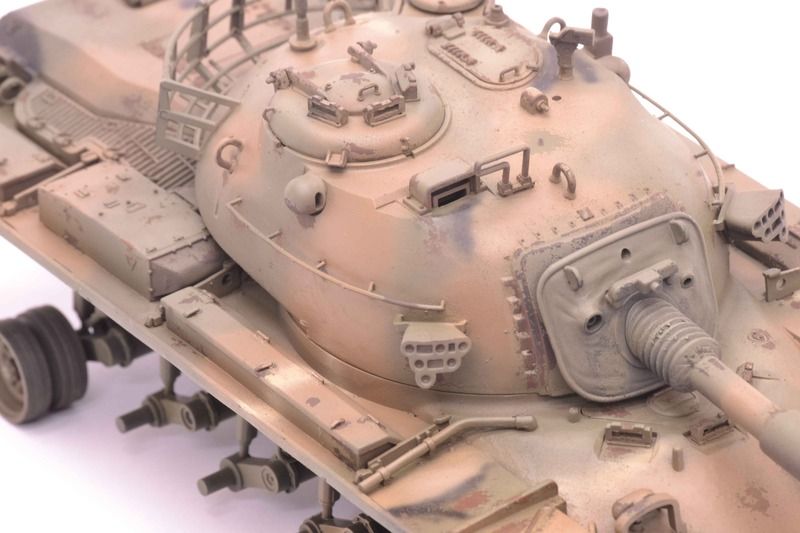 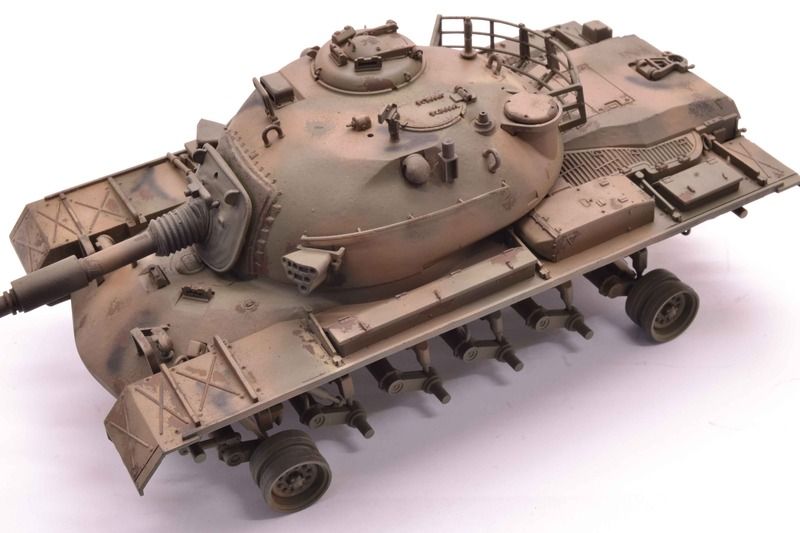 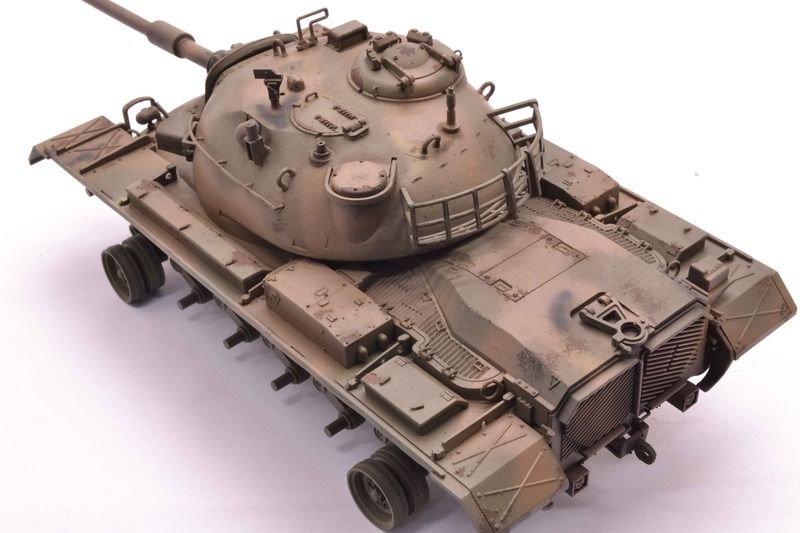 Currently she sits drying from the gloss coat. I plan to begin oil work once that dries. Now lets critique a bit. I do not like the paint work. I rushed through the steps and did a poor job with it. I went freehand with the cammo and to be honest it only resembles the instruction call outs vaguely. I am pretty happy with the chipping though. I tried to keep a light approach and kept the chips and paint peeling to areas that would have seen wear and tear and where rust would naturally occur. All comments, critiques, and criticism are requested. Joe |
|
joelsmith
Full Member
Member since: July 2012
There no winners in war, only survivors.
Posts: 1,404
Jul 5, 2012 22:33:58 GMT -5
Jul 5, 2012 22:33:58 GMT -5
|
Post by joelsmith on Mar 18, 2017 14:14:16 GMT -5
Looking good Joe! Keep it up.
|
|
deafpanzer
Administrator
Member since: June 2012
"Never tell your story to a deaf man"
Posts: 21,089
Member is Online
MSC Staff
|
Post by deafpanzer on Mar 18, 2017 21:03:48 GMT -5
Fantastic paint job!
|
|
jpc1968
Full Member
Member since: May 2015
May '17 Co-Mom Winner, October '17 MoM Winner
Posts: 504 
|
Post by jpc1968 on Mar 20, 2017 7:24:17 GMT -5
it looks good but sometimes I don't like to do the hairspray chipping because it leaves gobs of paint like on the base of the barrel covering. To scale that would be a huge chunk of paint setting there
|
|
|
|
Post by Leon on Mar 20, 2017 8:20:55 GMT -5
I think you did a fine job on the camo Joe!
|
|
jsteinman
Full Member
Member since: March 2013
Posts: 735
Mar 24, 2013 9:29:10 GMT -5
Mar 24, 2013 9:29:10 GMT -5
|
Post by jsteinman on Mar 20, 2017 8:43:46 GMT -5
Looks good to me!
|
|
|
|
Post by fightnjoe on Mar 20, 2017 10:46:52 GMT -5
Many thanks all for looking in.
Joe
|
|
|
|
Post by wing_nut on Mar 20, 2017 10:50:48 GMT -5
That looks great. There is a static displayed tank on the old Kilmer base that closed down here a while back. I can’t look at a tank and tell ya what it is but I think it’s one of those. Every now and then there someone there and the gate is open and I want to get in there and take some photos but the timing has been bad so far.
|
|
|
|
Post by fightnjoe on Mar 25, 2017 9:36:40 GMT -5
There are times I miss living in an area with a larger population. The local VFW has a small piece of field artillery. It is in fantastic shape and looks very new.
Many thanks for looking in.
Joe
|
|
|
|
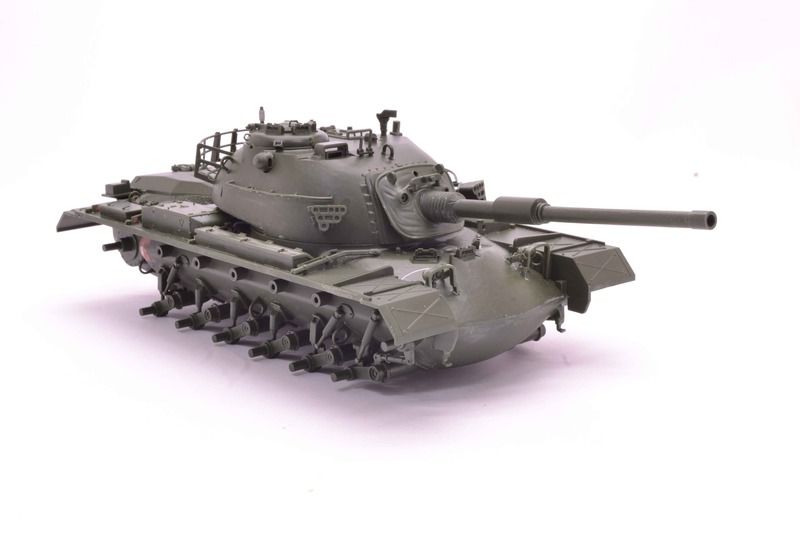
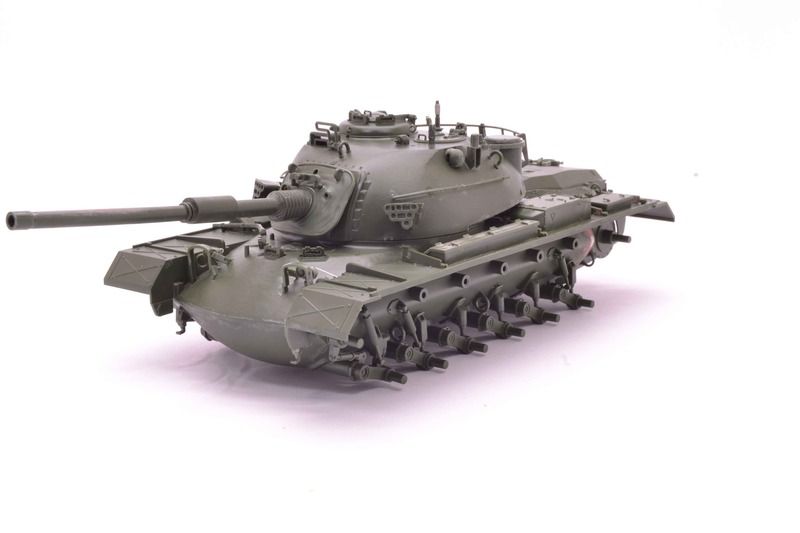
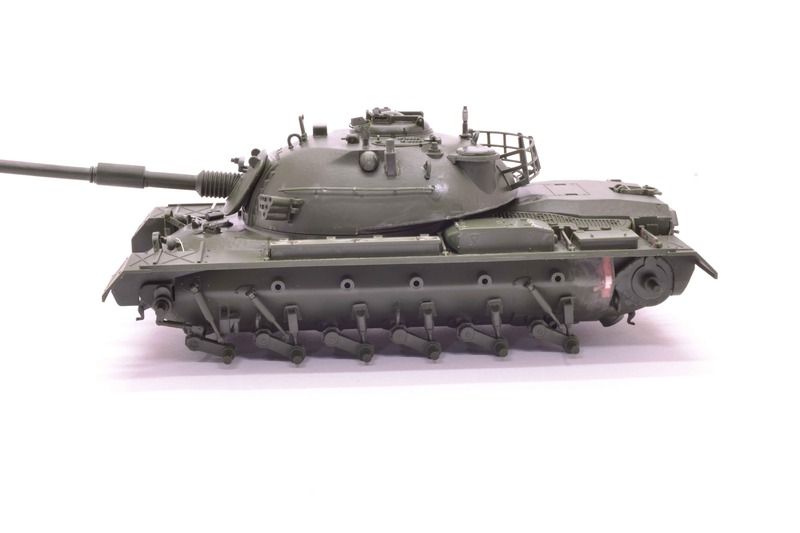
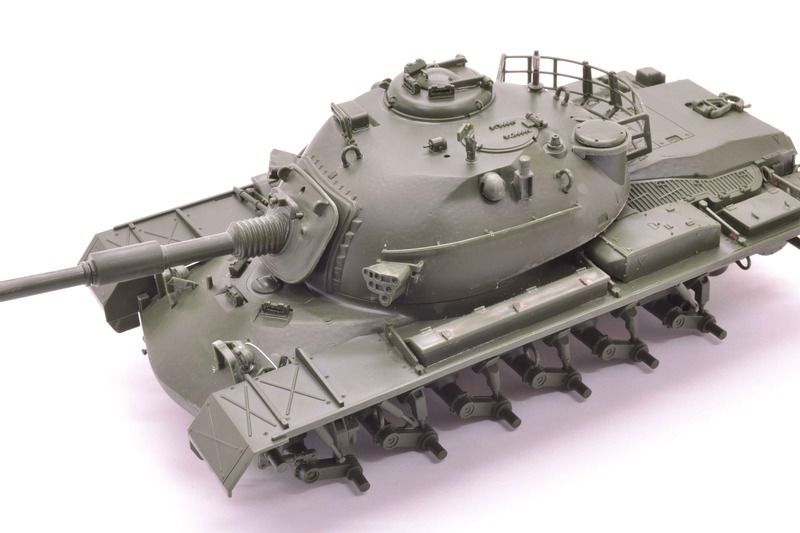
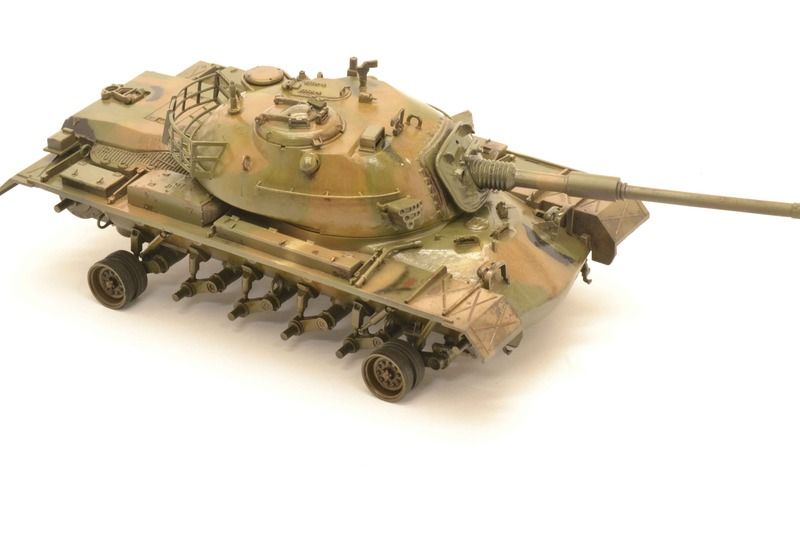
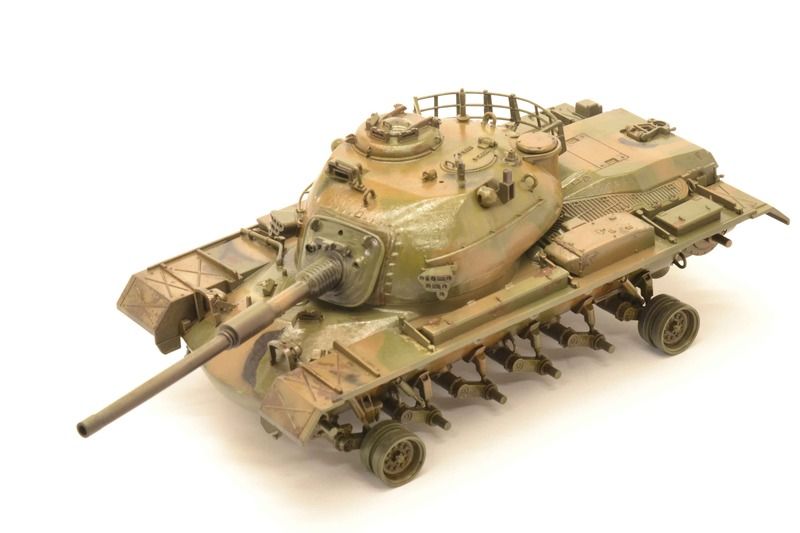
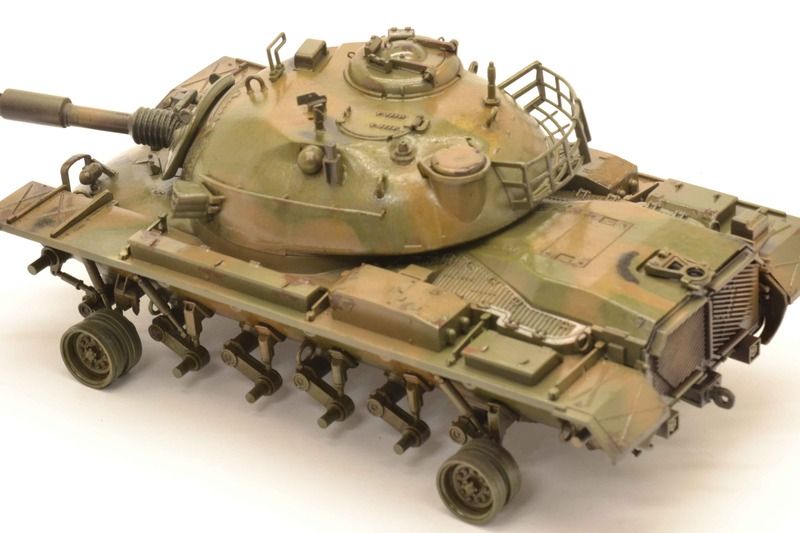
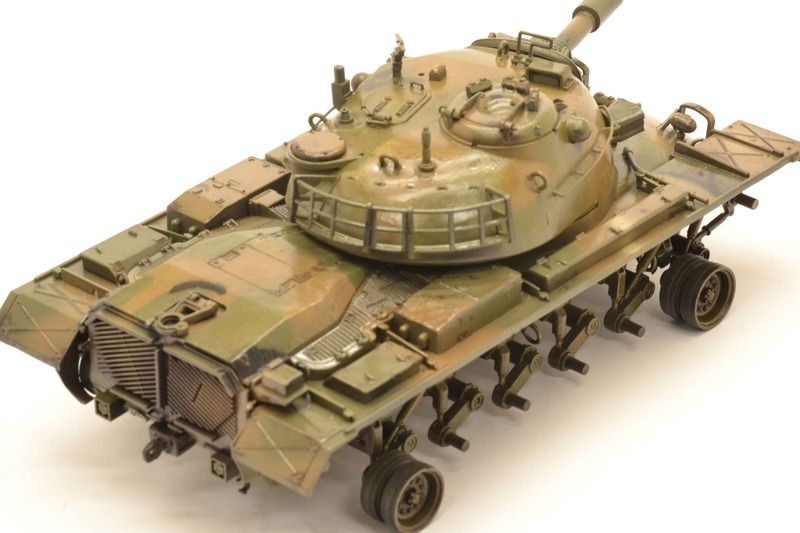
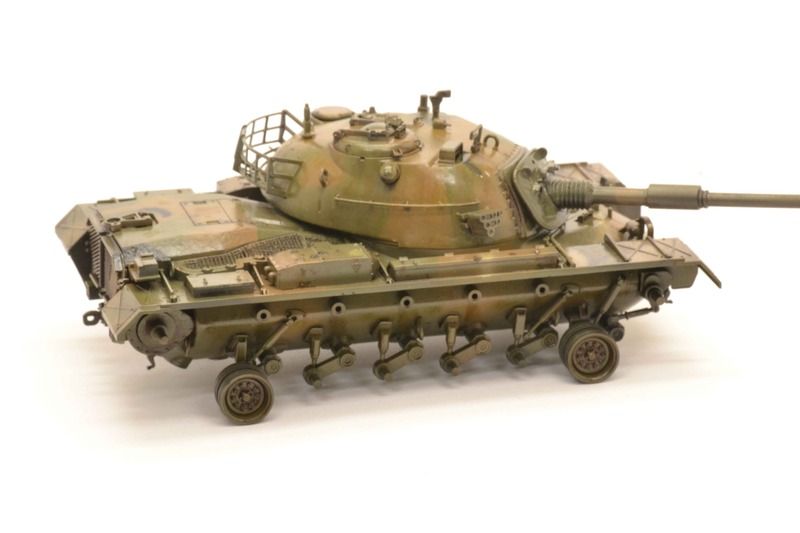
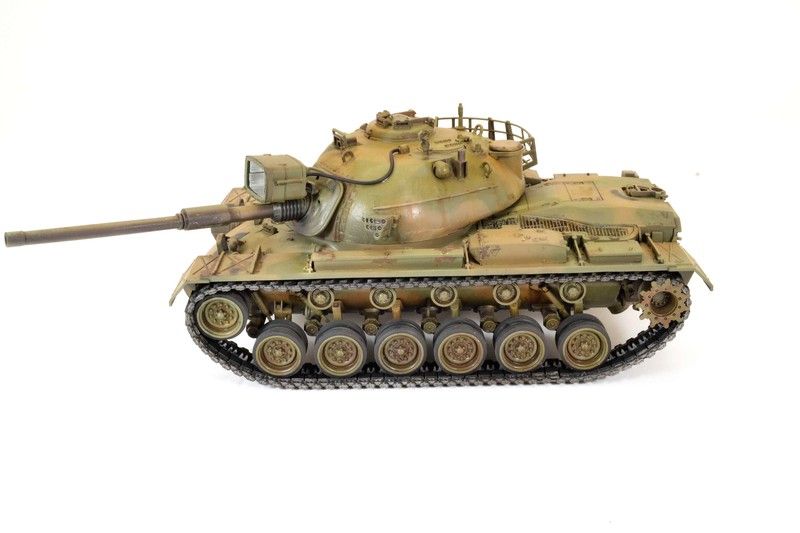
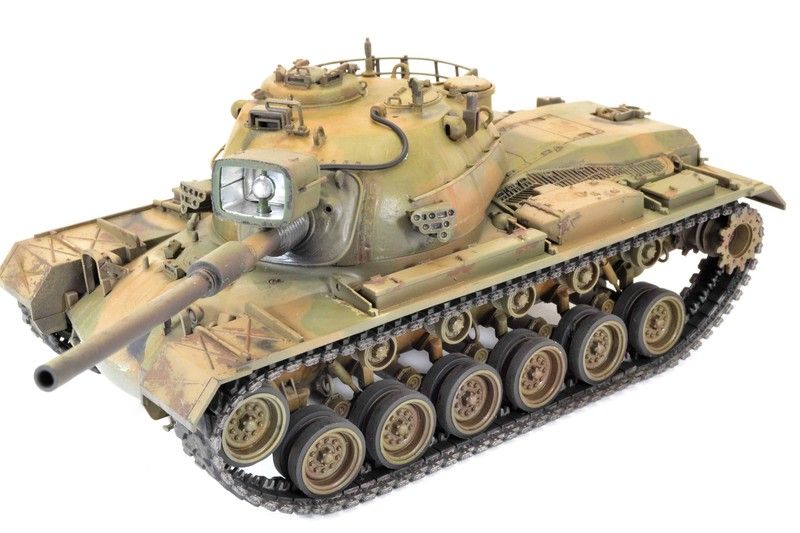
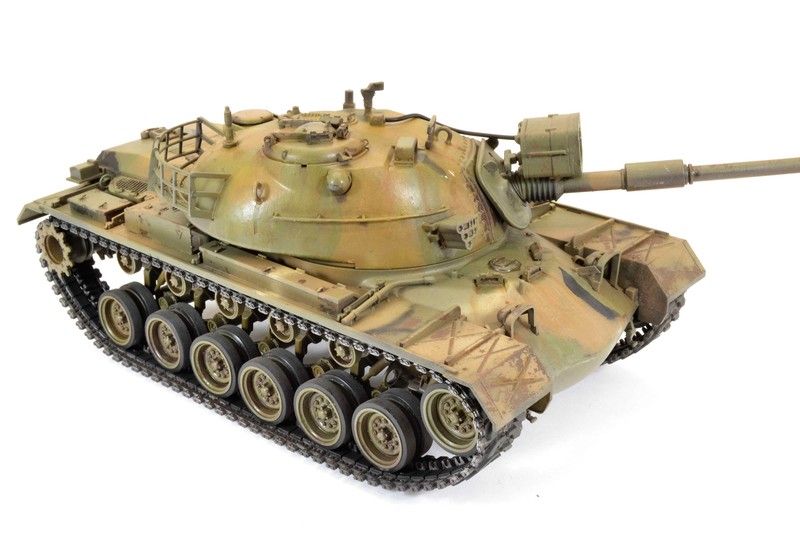
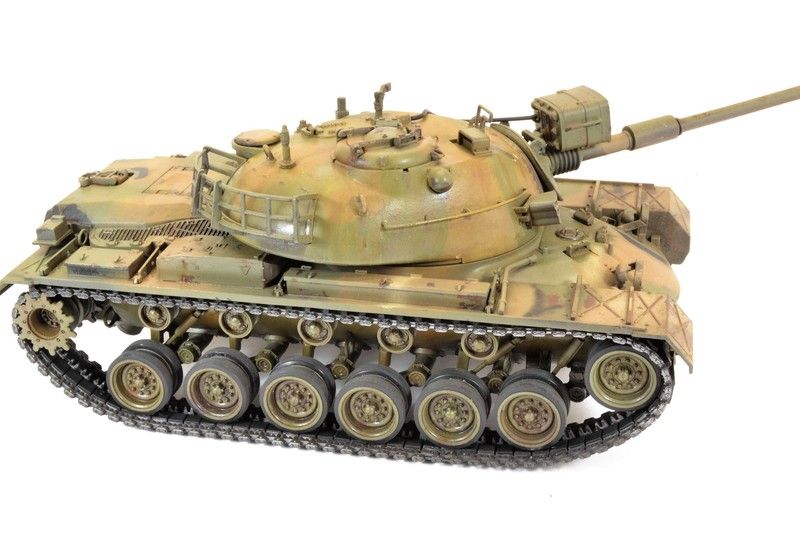
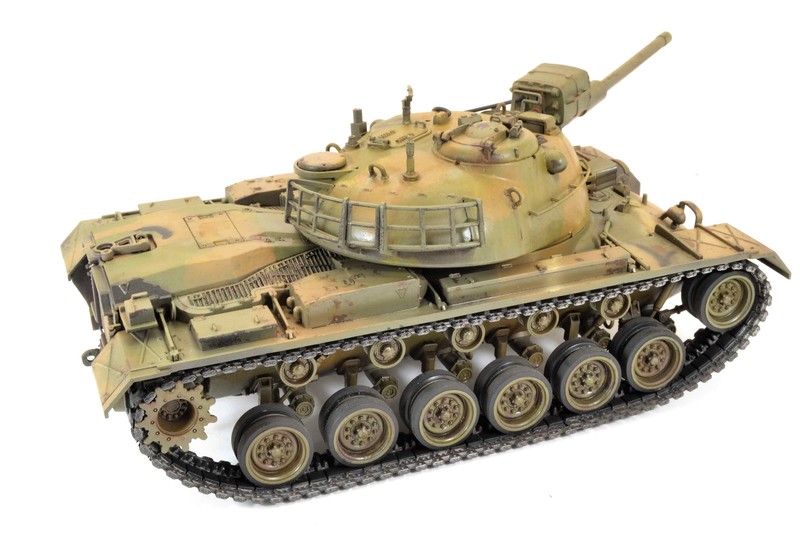
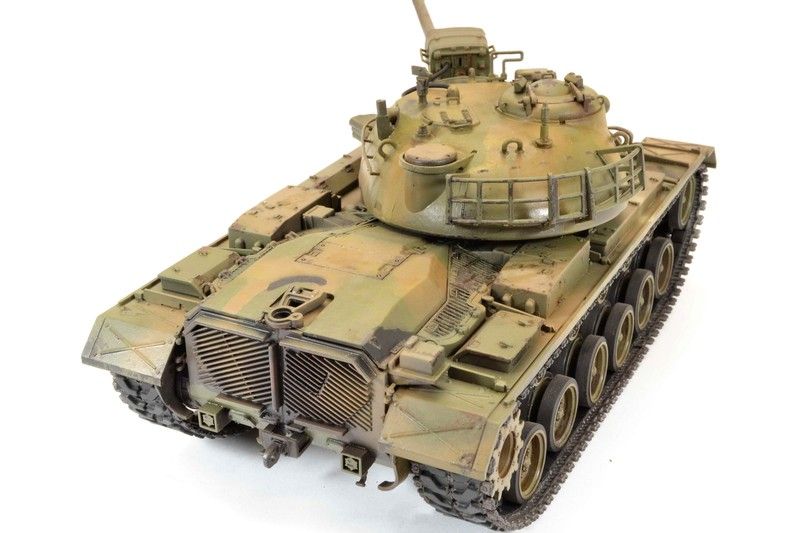
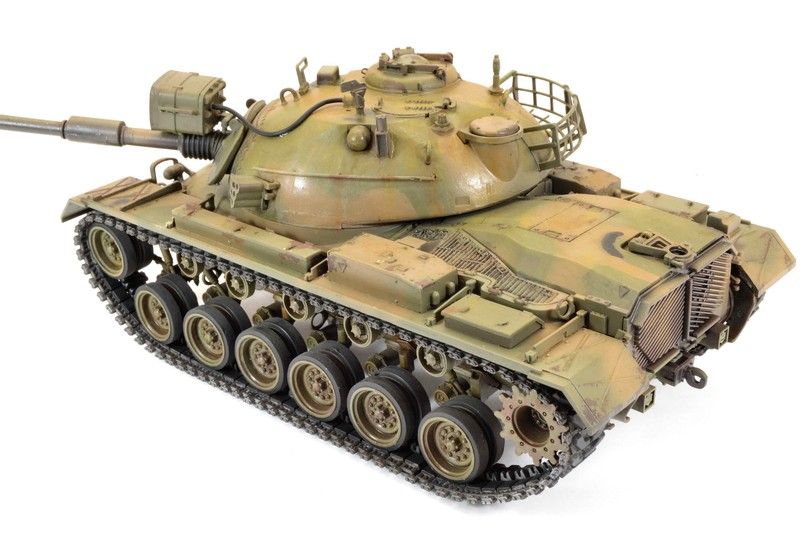
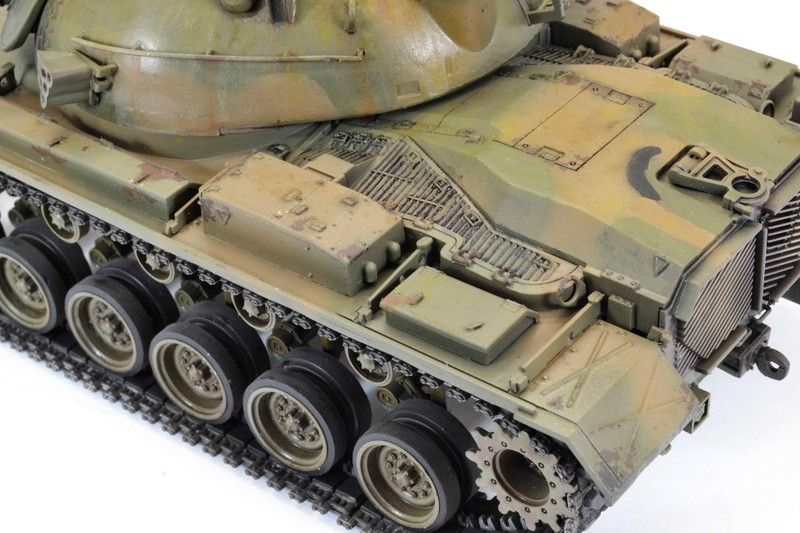
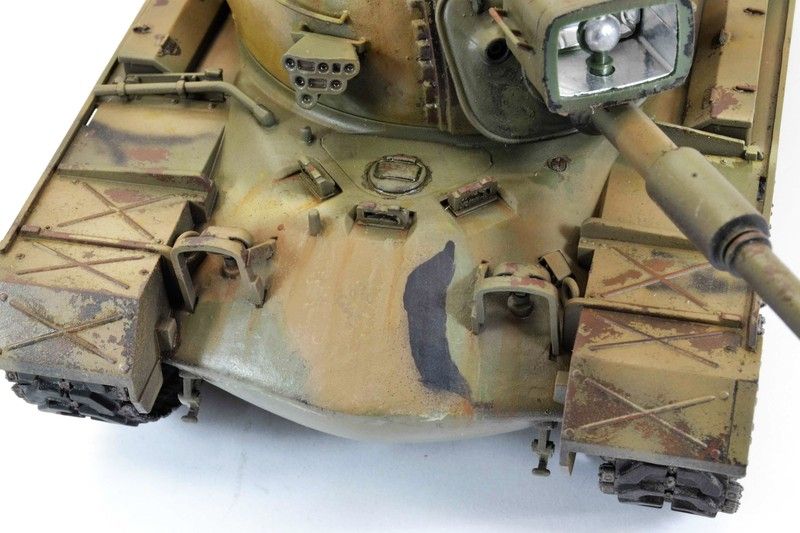
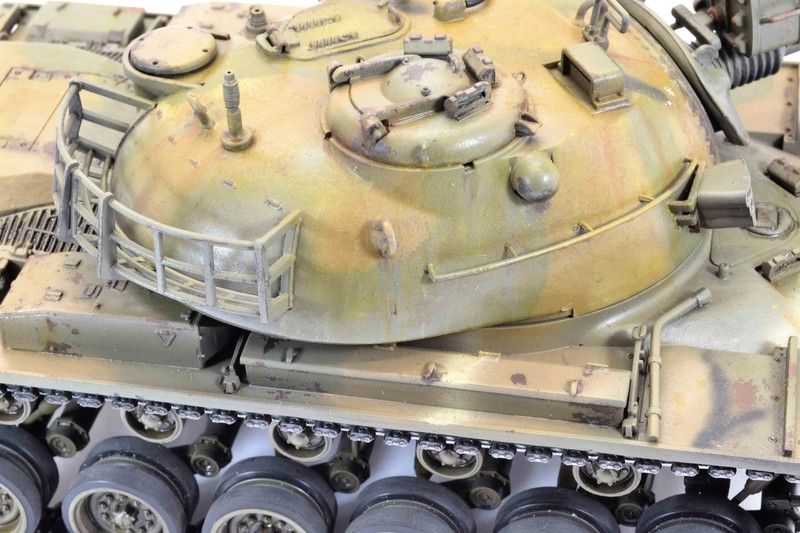
Post by fightnjoe on Mar 30, 2017 23:05:31 GMT -5
|
|
|
|
Post by Leon on Mar 31, 2017 4:32:44 GMT -5
Looking good Joe!
|
|
mz3
Full Member
Member since: October 2012
Posts: 484
Member is Online
Oct 14, 2012 21:09:43 GMT -5
Oct 14, 2012 21:09:43 GMT -5
|
Post by mz3 on Apr 2, 2017 12:00:31 GMT -5
Oil paint doesn't streak well on a gloss surface. There's nothing for the paint to bite on to. A flat/matte or satin surface works much better.
|
|
|
|
Post by fightnjoe on Apr 3, 2017 23:53:34 GMT -5
Many thanks for looking in. Oils on a flat coat may be the way to do it but I do like the way this turned out.
Joe
|
|
|
|
Post by fightnjoe on Apr 3, 2017 23:54:10 GMT -5
|
|


 Your off to a good start getting the road wheels out of the way.