adt70hk
Forum Moderator 
Member since: November 2015
Currently attempting to build something decent!!! ;)
Posts: 2,481 
MSC Staff
|
Post by adt70hk on Mar 27, 2017 7:25:25 GMT -5
I will endeavour to no longer 'poomouth' or 'protest FAR too much' again. Glad to hear it!! I also expect to see this entered into the Model of the Month competition once complete......and 'No', I'm not joking..... |
|
k1w1
Full Member

Member since: February 2015
Posts: 873
Feb 18, 2015 8:07:41 GMT -5
Feb 18, 2015 8:07:41 GMT -5
|
Post by k1w1 on Mar 27, 2017 7:47:14 GMT -5
I have a few questions. I plan to use compressed foam sheet for shaping the landscape. 1. What is a good filler/undercoat for this foam? 2. After painting the foam for ground colour, what is an easy way to add grass to it? Hi. Interesting project. I have recently used Das air dry clay on a base. Guessing your Australian ? Air dry clay available from Spotlight and probably Bunnings for about $7 or $8 a packet. Really easy to work with and you end up with a nice ground like surface texture. Should be able to spread PVA glue over your foam sheet and apply the clay directly. If you see this tutorial you can see it being applied over foam. Also may get a few ground work tips from it. www.youtube.com/watch?v=gyVNwsStK9AI just used an acrylic undercoat on the clay once it was dry. Note : Some of the solvent based paints will melt your foam. Water based acrylic would be safe. Grass. Best to have a look in a model shop. Model train grasses mostly should be 1/76 to 1/87 scale OO = 1/76 HO = 1/87 so close to your requirements. In that scale the Noch brand grasses look good. Grass Tuffs are nice and easy to work with. Some of the grass matts don't look so real. Hope this helps. |
|
jpc1968
Full Member
Member since: May 2015
May '17 Co-Mom Winner, October '17 MoM Winner
Posts: 504
|
Post by jpc1968 on Mar 27, 2017 7:59:19 GMT -5
GREAT WORK
|
|
joelsmith
Full Member
Member since: July 2012
There no winners in war, only survivors.
Posts: 1,404
Jul 5, 2012 22:33:58 GMT -5
Jul 5, 2012 22:33:58 GMT -5
|
Post by joelsmith on Mar 27, 2017 12:37:25 GMT -5
NP, it's not that we minded you "poormouthing" your work, we are all our own worst critic. It is just that the bridge with its own working features, combines with the working vessel, your project is a creation that anyone would be proud of! And, we are proud of you having the courage to share it with us, Joel.
|
|
adt70hk
Forum Moderator
Member since: November 2015
Currently attempting to build something decent!!! ;)
Posts: 2,481
MSC Staff
|
Post by adt70hk on Mar 27, 2017 14:54:52 GMT -5
NP, it's not that we minded you "poormouthing" your work, we are all our own worst critic. It is just that the bridge with its own working features, combines with the working vessel, your project is a creation that anyone would be proud of! And, we are proud of you having the courage to share it with us, Joel. Joel I couldn't have said it better!!! |
|
Neo Phyte
Full Member
Member since: March 2017
Posts: 188
|
Post by Neo Phyte on Mar 28, 2017 2:21:16 GMT -5
Thank you adt70hk, k1w1, jpc1968, and joel. I am happy to be here, and privileged, to gets such great support. k1w1, I watched that YouTube clip. Very interesting, though I did like some of the earlier steps than his last one (each to there own). But I did learn a few things. Oh, I have some DAS at home, but never used it as shown in the clip. I also have about 20 kg of plaster. Perhaps I'll us a combination, using the plaster first and the Das for the more prominent features. As you said, I won't paint on the foam. Acrylic undercoat should okay on the dried plaster and clay. After which oil-based colours can be applied. About the grass. I ordered some 2 mm and 4 mm grass in 100g bags. I think the 2 mm is browner looking. At 1/72 scale that works out the be 6" and 12" long blades of grass. Also order some shrubs and trees. I am going to experiment with using static on the grass. I came across this YouTube clip showing how to get a real cheap static charger. I ordered the USB ionizer (with free delivery) for $5. My girlfriend found an old hand sieve at the secondhand shop, to sieve the grass through. The only thing that comes to mind, in terms of possible problems, is that the glue will need to be wet enough for the vertical grass blades to penetrate it. What are your thoughts on this approach? www.youtube.com/watch?v=P5za9sa4-qk |
|
k1w1
Full Member
Member since: February 2015
Posts: 873
Feb 18, 2015 8:07:41 GMT -5
Feb 18, 2015 8:07:41 GMT -5
|
Post by k1w1 on Mar 28, 2017 18:59:52 GMT -5
About the grass - most manufacturers supply grass in the 4 seasons colours so you can usually buy in green brown and yellow.
You Tube and Google Images - The answer to most things. I built a Static Grass Applicator out of one of those cheap bug zappers. Lots of tutorials on you tube on how to make one. Think it may be more straight forward than with the ionizer ?. Search : Static Grass Applicator. if you want to have a look. There are professional ones there then quite a few videos using a cheap bug zapper to make one from.
|
|
M1Carbine
Senior Member

Member since: November 2012
Posts: 1,630
Nov 16, 2012 2:49:11 GMT -5
Nov 16, 2012 2:49:11 GMT -5
|
Post by M1Carbine on Mar 28, 2017 20:46:54 GMT -5
Awesome work bud
Bob
|
|
Neo Phyte
Full Member
Member since: March 2017
Posts: 188
|
Post by Neo Phyte on Apr 2, 2017 4:30:18 GMT -5
Thanks for the tip k1w1. And thanks for your response M1Carbine. There has been a fair bit of drama here at north coast of NSW, Australia. Cyclone Debbie just went through. Flooding everywhere. No time for modelling making since my last post (28th March). Will get back into it soon. Though I did some modelling this afternoon. I made my first trees from wire (no leaves yet). Soldered along the twisted wire as a filler, then painted them brown. It was very interest, and worked out a few tricks along the way.  |
|
|
|
Post by Leon on Apr 2, 2017 5:24:48 GMT -5
I hope your safe and not to much damage Neo!  The trees are looking good.  |
|
|
|
Post by dierk on Apr 2, 2017 7:01:45 GMT -5
|
|
tsweeney
Full Member
Member since: June 2012
Posts: 109
Jun 22, 2012 11:43:14 GMT -5
Jun 22, 2012 11:43:14 GMT -5
|
Post by tsweeney on Apr 2, 2017 8:07:07 GMT -5
What a great and ambitious project Good work
Tom
|
|
Neo Phyte
Full Member
Member since: March 2017
Posts: 188
|
Post by Neo Phyte on Apr 2, 2017 23:21:13 GMT -5
Thanks k1w1 for the thumbs up.
Thank you Leon and dierk for well wishes, and dierk for the link - lots of good info there.
Leon, the trees are getting to look better from tree to tree. Must be the practice.
Thanks Tom for your kind words.
|
|
Neo Phyte
Full Member
Member since: March 2017
Posts: 188
|
Post by Neo Phyte on Apr 7, 2017 1:19:42 GMT -5
Finally got the bridge railings painted. 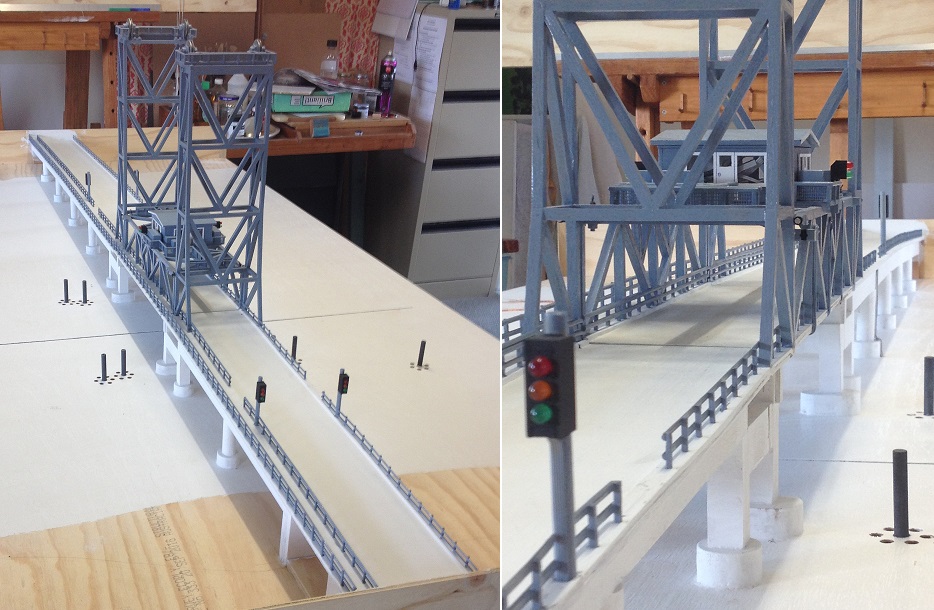 |
|
k1w1
Full Member
Member since: February 2015
Posts: 873
Feb 18, 2015 8:07:41 GMT -5
Feb 18, 2015 8:07:41 GMT -5
|
Post by k1w1 on Apr 7, 2017 1:44:12 GMT -5
Impressed !
|
|
|
|
Post by Leon on Apr 7, 2017 4:33:28 GMT -5
That is looking really impressive with some paint on.  |
|
Neo Phyte
Full Member
Member since: March 2017
Posts: 188
|
Post by Neo Phyte on Apr 8, 2017 20:45:07 GMT -5
Thank you k1w1 and Leon.
I am currently painting the rest of the bridge a cement colour. It's enamel white undercoat with some matt black and a touch of matt brown. Even so, it just looks light grey.
At least two coats are needed to cover the white Undercoat. Currently I am in between coats.
I am a bit apprehensive about splatter painting the road surface with some darker grays to make it look like concrete (with gravel).
|
|
|
|
Post by TRM on Apr 8, 2017 21:34:21 GMT -5
WOW! Very cool! Certainly a challenging paint job! Best of luck moving forward!
|
|
Neo Phyte
Full Member
Member since: March 2017
Posts: 188
|
Post by Neo Phyte on Apr 9, 2017 1:59:55 GMT -5
Thank you T for kind words. Just finished painting the cement bits. The road is not cement but concrete (cement + gravel). This will be done next. I will not be weathering the cement. This bridge is not for me, but for the museum, which the shire council owns. Their ideal is a pristine looking bridge. So be it. 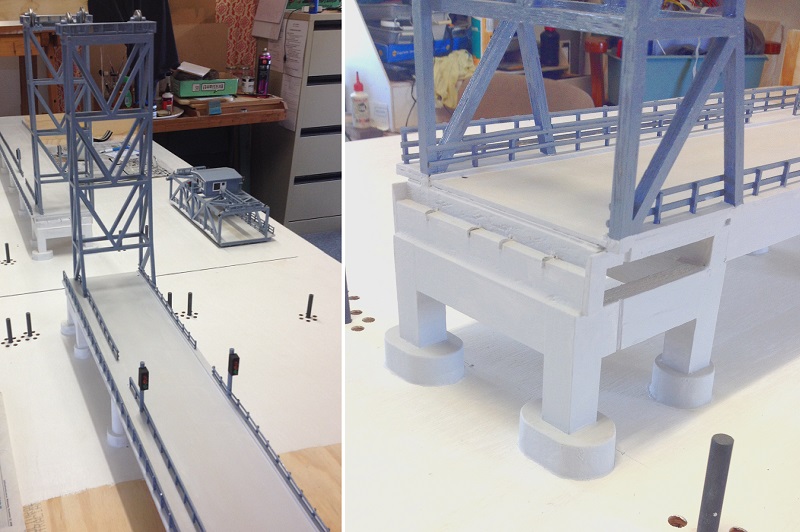 |
|
|
|
Post by Leon on Apr 9, 2017 5:20:40 GMT -5
This is looking better and better Neo! |
|
joelsmith
Full Member
Member since: July 2012
There no winners in war, only survivors.
Posts: 1,404
Jul 5, 2012 22:33:58 GMT -5
Jul 5, 2012 22:33:58 GMT -5
|
Post by joelsmith on Apr 9, 2017 6:50:54 GMT -5
If this project gets much better, the shire will start charging you for having so much fun.
|
|
|
|
Post by TRM on Apr 10, 2017 5:57:49 GMT -5
Outside the "pristine" part, this is outstanding! LOL...I get it, they want it, that is what they get!  I'm really enjoying seeing this one come together! Keep up the excellent work! |
|
Deleted
Member since: January 1970
Posts: 0
Apr 23, 2024 14:52:53 GMT -5
Apr 23, 2024 14:52:53 GMT -5
|
Post by Deleted on Apr 12, 2017 13:12:11 GMT -5
Oh my goodness...................
Speechless.
G
|
|
Neo Phyte
Full Member
Member since: March 2017
Posts: 188
|
Post by Neo Phyte on Apr 13, 2017 6:54:10 GMT -5
Thank you Leon, joelsmith, T, and G, for your show of compliments. I finished painting the concrete part on the road surface. It was a headache at first because the splattering job got blotched. Instead of redoing the job I decided to try and fix it up. First I (not so dry) dry-brushed the darker areas with the cement grey colour. Then the lighter areas with more dark grey. This evened it out but very blotchy. So I pointillised the patches with dark on light and visa versa. Then stepped back and went over the surface again to blend it even more. I think it looks more like concrete now. 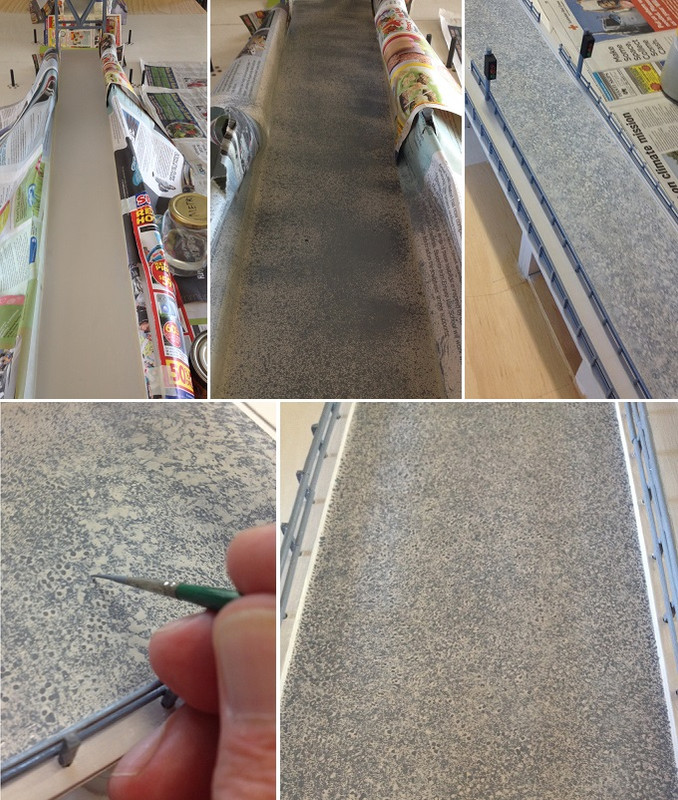 |
|
joelsmith
Full Member
Member since: July 2012
There no winners in war, only survivors.
Posts: 1,404
Jul 5, 2012 22:33:58 GMT -5
Jul 5, 2012 22:33:58 GMT -5
|
Post by joelsmith on Apr 13, 2017 9:21:10 GMT -5
Better you than me friend. If I tried that, my eyes would be crossed! Very nice job though!
|
|
|
|
Post by Leon on Apr 13, 2017 11:16:58 GMT -5
Nice work on the concrete! Looks good.
|
|
Neo Phyte
Full Member
Member since: March 2017
Posts: 188
|
Post by Neo Phyte on Apr 16, 2017 19:11:46 GMT -5
Thanks joelsmith and Leon for compliments. Finally finished the road within the span. It was very confined and tricky. Then I masked off the road and painted the road-markings. Also put in reflectors. Bottom photos is a show of playing with the 1/72 scale cars... to be installed later. 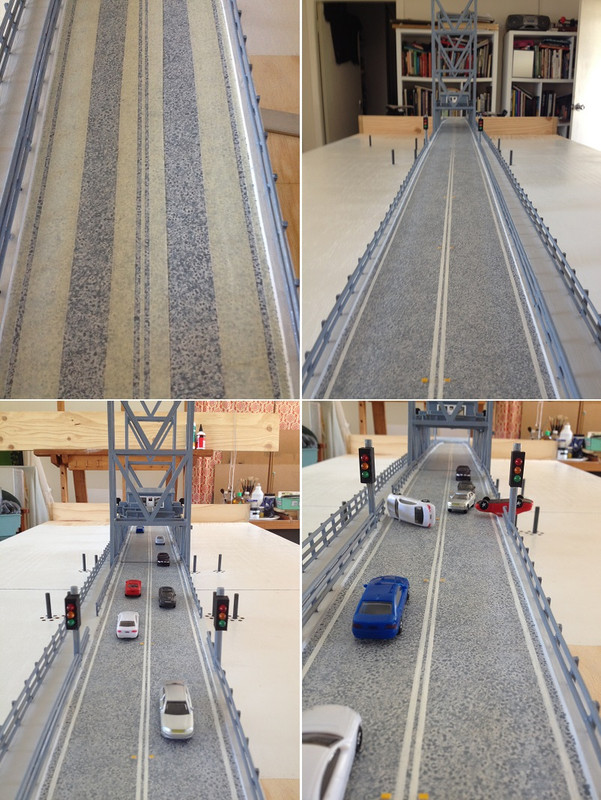 |
|
|
|
Post by Leon on Apr 16, 2017 20:09:08 GMT -5
Road look great Neo!
|
|
Neo Phyte
Full Member
Member since: March 2017
Posts: 188
|
Post by Neo Phyte on Apr 16, 2017 21:54:40 GMT -5
Thanks Leon. (sorry about mistaking you for someone else. I edited the previous post).
|
|
|
|
Post by Leon on Apr 17, 2017 4:32:35 GMT -5
No worries Neo! I do the same thing. Must be the old age creaping up. LOL |
|


 The trees are looking good.


 I'm really enjoying seeing this one come together! Keep up the excellent work!