adt70hk
Forum Moderator 
Member since: November 2015
Currently attempting to build something decent!!! ;)
Posts: 2,482 
MSC Staff
|
Post by adt70hk on Apr 10, 2018 7:56:33 GMT -5
Hi all I need some help with my son's latest school project, if you don't mind contributing your collective wisdom...... So he comes home yesterday to say that the current class project is on the Anglo Saxons. They can do anything they like - leaflet, blog or model - anything. To his credit (and my pride  ) he says he'd like to a model and then proceeds to describe what it would like and how it should be done - including several techniques we used on the earthworks we've previously made. Honestly it WAS all his own idea!!!! We're going to use this version shown here as the template for the build. We've already worked out how do the walls and frames and have started cutting the wood we'll be using as the frame and end walls. I made sure he did most of the cutting too - it is his project after all!! However, we're stuck on how to do the thatching...... I could do straw or brush bristles or something similar placed on a backing material but the brush bristles could take for ever to get down and the straw might be too messy. I did then think of using small sections of cheap doormat like this, albeit toning the colour down a bit....... Anyway all thoughts, ideas, suggestions and comments welcome. Thanks for stopping by and watch out for build pics along the way. Andrew (and his son) |
|
k1w1
Full Member

Member since: February 2015
Posts: 873
Feb 18, 2015 8:07:41 GMT -5
Feb 18, 2015 8:07:41 GMT -5
|
Post by k1w1 on Apr 10, 2018 20:39:03 GMT -5
Thatching. Would need to be to scale. Not sure what scale you are thinking of. And .... I know nothing of thatching. But what immediately came to mind for me was Woodlands Scenics grass. Lengths are several inches. Comes in at least 4 different colours and can easily be dyed. Not very expensive. Hornby do a much coarser one but probably too coarse for your needs. Nylon bristles would be hard to dye ? and not as easy to work with.  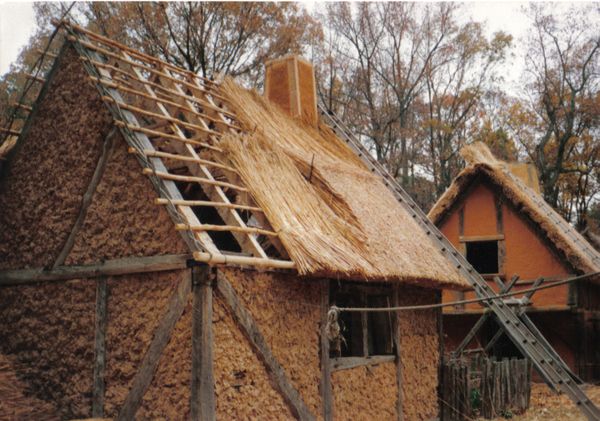 I guess too late but wood - round poles I would use skewers available cheap in packets at the supper market. Boards - Starbucks wooden stirrers that we get here are great. Thinner than most and not coated with waxy stuff. I grab a handful every visit. Hope this helps. |
|
adt70hk
Forum Moderator
Member since: November 2015
Currently attempting to build something decent!!! ;)
Posts: 2,482
MSC Staff
|
Post by adt70hk on Apr 11, 2018 2:38:08 GMT -5
Thatching. Would need to be to scale. Not sure what scale you are thinking of. And .... I know nothing of thatching. But what immediately came to mind for me was Woodlands Scenics grass. Lengths are several inches. Comes in at least 4 different colours and can easily be dyed. Not very expensive. Hornby do a much coarser one but probably too coarse for your needs. Nylon bristles would be hard to dye ? and not as easy to work with. I guess too late but wood - round poles I would use skewers available cheap in packets at the supper market. Boards - Starbucks wooden stirrers that we get here are great. Thinner than most and not coated with waxy stuff. I grab a handful every visit. Hope this helps. Hi Peter Thanks for dropping by. Dierk and someone else has suggested plumbers hemp which looks like it will do a good job. It comes in longer lengths so makes it quicker to cover the roof, plus the colour is good match and it's very cheap - this is a school project after all!! That said the grass does solve another problem I had been grappling with, so thanks for the tip. Skewers and stirrers - already on it. I used them to great effect on my groundworks a few years ago and I was impressed with how they work. Matchsticks also do a good job as roughly hewn posts. We've also got a hobby store a few minutes walk away and although their main thing is RC aircraft, they do have a good range of modelling dimension sized pre-cut wood that I've picked up a few pieces of over the years. ATB Andrew |
|
moramarth
Full Member
Member since: March 2014
Posts: 455
|
Post by moramarth on Apr 11, 2018 4:51:58 GMT -5
Any chance of a bit more information? What scale are you going for, and any idea of the date/period of the building (i.e. earlier or later in the Saxon period)?
Regards,
M
|
|
adt70hk
Forum Moderator
Member since: November 2015
Currently attempting to build something decent!!! ;)
Posts: 2,482
MSC Staff
|
Post by adt70hk on Apr 11, 2018 5:04:23 GMT -5
Any chance of a bit more information? What scale are you going for, and any idea of the date/period of the building (i.e. earlier or later in the Saxon period)? Regards, M Thanks for stopping by just realised the embedded link to what we're going for wasn't highlighted very well... hubpages.com/education/SunkenfeaturedbuildingATB Andrew |
|
adt70hk
Forum Moderator
Member since: November 2015
Currently attempting to build something decent!!! ;)
Posts: 2,482
MSC Staff
|
Post by adt70hk on Apr 11, 2018 8:03:45 GMT -5
Any chance of a bit more information? What scale are you going for, and any idea of the date/period of the building (i.e. earlier or later in the Saxon period)? Regards, M Meant to say in terms of scale very, very roughly 1/72ish......but that's only based on the size of the door - about 20mm...... As for period. Not a clue. I've jsut been looking things on the internet. I know next to nothing on the period. |
|
moramarth
Full Member
Member since: March 2014
Posts: 455
|
Post by moramarth on Apr 11, 2018 13:14:56 GMT -5
Thanks for your response. A Grubenhaus would (if my dodgy memory is working) be more indicative of the earlier part of the Saxon period, or even the later years of the Western Roman Empire. It shouldn't be too difficult to lay hands on some generic "Dark Age"/Early Medieval fellows if you want populate your scene.* Given the alternative reconstructions in the source you posted, it might be worth doing two or three huts as a diorama if time permits. From the lack of evidence as to how these buildings would have looked (except saga type sources which suggest chieftain's halls were quite fancy) you need not restrict yourselves to plain grey wood; it's often underestimated how much colour was available to ancient societies and how freely it was used (Roman artillery should be as gaudy as a fairground ride, most classical statues,etc., had all the subtlety of Garden Gnomes...). Regards, M *These chaps are more 1:56th scale but probably worth a look: store.warlordgames.com/products/saxon-fyrd-warriors-frames |
|
adt70hk
Forum Moderator
Member since: November 2015
Currently attempting to build something decent!!! ;)
Posts: 2,482
MSC Staff
|
Post by adt70hk on Apr 11, 2018 16:43:38 GMT -5
Thanks for your response. A Grubenhaus would (if my dodgy memory is working) be more indicative of the earlier part of the Saxon period, or even the later years of the Western Roman Empire. It shouldn't be too difficult to lay hands on some generic "Dark Age"/Early Medieval fellows if you want populate your scene.* Given the alternative reconstructions in the source you posted, it might be worth doing two or three huts as a diorama if time permits. From the lack of evidence as to how these buildings would have looked (except saga type sources which suggest chieftain's halls were quite fancy) you need not restrict yourselves to plain grey wood; it's often underestimated how much colour was available to ancient societies and how freely it was used (Roman artillery should be as gaudy as a fairground ride, most classical statues,etc., had all the subtlety of Garden Gnomes...). Regards, M *These chaps are more 1:56th scale but probably worth a look: store.warlordgames.com/products/saxon-fyrd-warriors-framesThx yet again. And yes a Grubenhaus type is what we're after. Dierk has anyway provided a lot of info and links to additional sites. My son and I had a brief planning meeting before his bedtime and I think we're more or less settled on the basic design now. I'll mention the figures and colour idea and see what he says. That said, as I mentioned to Dierk, I want it to be his build and not mine so ultimately it will be up to him. Thx again and keep an eye out for the pictures. ATB Andrew |
|
adt70hk
Forum Moderator
Member since: November 2015
Currently attempting to build something decent!!! ;)
Posts: 2,482
MSC Staff
|
Post by adt70hk on Apr 13, 2018 7:45:04 GMT -5
Hi all Firstly thanks for the input from Peter and Moramarth. Below are a couple of pics of the two end walls. As you can see one is complete and the other just needs trimming (we were waiting for the glue to dry). The base is going to be about 6" by about 8". As for scale.......who knows.....maybe 1/72nd-ish? My main problem with this idea though is being aware of the dreaded DTOS (aka Dad Take Over Syndrome). As I've already said to Dierk by PM I don't want it to end up looking like another parent job the child had no involvement in - it was completely his idea after all. So most of the measuring, maths, cutting, sawing gluing and assembly work you'll see below and going forward will be his - if necessary I show how to do something once or twice and he does the rest. The only time I deliberately stepped in was when it needed my Stanley knife to cut out the door aperture - I don't think my wife would forgive me if he lost a finger!!  Thanks for stopping by. ACW Andrew 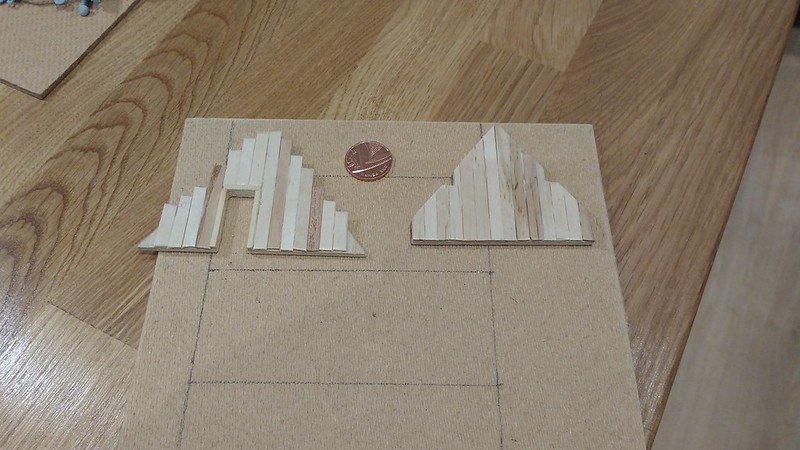 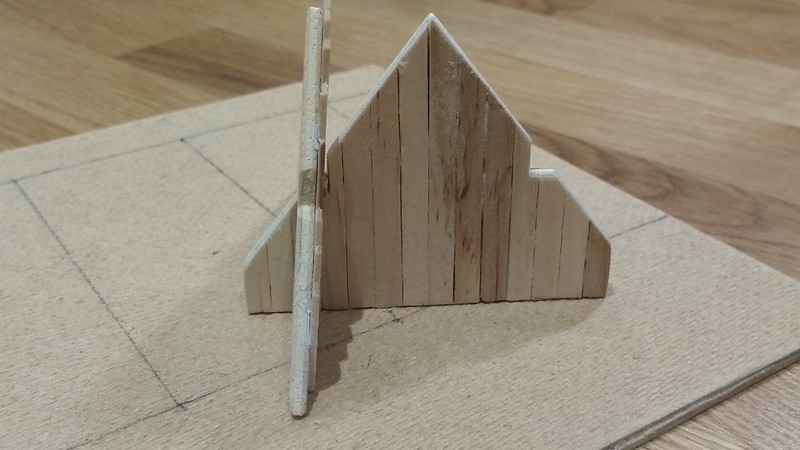 |
|
k1w1
Full Member
Member since: February 2015
Posts: 873
Feb 18, 2015 8:07:41 GMT -5
Feb 18, 2015 8:07:41 GMT -5
|
Post by k1w1 on Apr 13, 2018 8:43:21 GMT -5
I am looking forward to seeing this come together. He could add some woodgrain by running a fine tooth model saw or hobby saw down the lengths of wood which gives a lot of parallel line scratches. A firm wire brush should also work. A wash over it and you have some weathered wood. Wood back then probably wasn't finished too neatly.
However best advice I can give is to discourage him from gluing the project to the kitchen table.
|
|
adt70hk
Forum Moderator
Member since: November 2015
Currently attempting to build something decent!!! ;)
Posts: 2,482
MSC Staff
|
Post by adt70hk on Apr 13, 2018 10:26:06 GMT -5
I am looking forward to seeing this come together. He could add some woodgrain by running a fine tooth model saw or hobby saw down the lengths of wood which gives a lot of parallel line scratches. A firm wire brush should also work. A wash over it and you have some weathered wood. Wood back then probably wasn't finished too neatly. However best advice I can give is to discourage him from gluing the project to the kitchen table. Thanks for the idea Peter. I have just the saw, so I'll see what my son says but ultimately it will be up to him - it is his build after all. As for the table - too right!  We spent a small fortune on the kitchen last November and that would not go down well!!!  |
|
kostas
Junior Member

Member since: April 2013
Posts: 87
|
Post by kostas on Apr 14, 2018 9:04:02 GMT -5
A couple of years back I wanted to built a dio about the Viking life at 9-10th century with houses and a ship. N scale as always and the structures were made with cardboard and wood putty on top to imitate the walls. The roofs were made with fine turf on cardboard. Hope that helps.  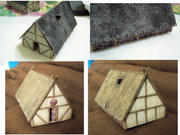 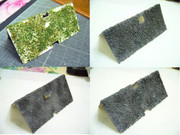 |
|
adt70hk
Forum Moderator
Member since: November 2015
Currently attempting to build something decent!!! ;)
Posts: 2,482
MSC Staff
|
Post by adt70hk on Apr 14, 2018 17:30:59 GMT -5
A couple of years back I wanted to built a dio about the Viking life at 9-10th century with houses and a ship. N sc hiale as always and the structures were made with cardboard and wood putty on top to imitate the walls. The roofs were made with fine turf on cardboard. Hope that helps. Kostas Thanks for stopping by and the tip. On this case I'm going with plumbers hemp and have already ordered it. But I'll bear in mind your tip for future projects. Thanks. Andrew |
|
Neo Phyte
Full Member
Member since: March 2017
Posts: 188
|
Post by Neo Phyte on Apr 15, 2018 1:13:10 GMT -5
This is for Andrew's son, whatever his name is.  |
|
adt70hk
Forum Moderator
Member since: November 2015
Currently attempting to build something decent!!! ;)
Posts: 2,482
MSC Staff
|
Post by adt70hk on Apr 17, 2018 14:34:11 GMT -5
Hi all Thanks for all the input on this one so far. As you can see the walls are now up!! To help keep them up we put four matchsticks in each inside corner and ones on the outside in strategic places so they are effectively sandwiched between the two but hopefully done in such a way as to make them look like part of the structure. We used one of the those small drills you get with engraving kits to make the holes, which meant my son was able to do the drilling!! Next up is the external ground!! ACW as usual. ATB Andrew Peter - sorry but you idea of of using the saw wasn't taken on but I will definitely be squirreling it away for the future!! 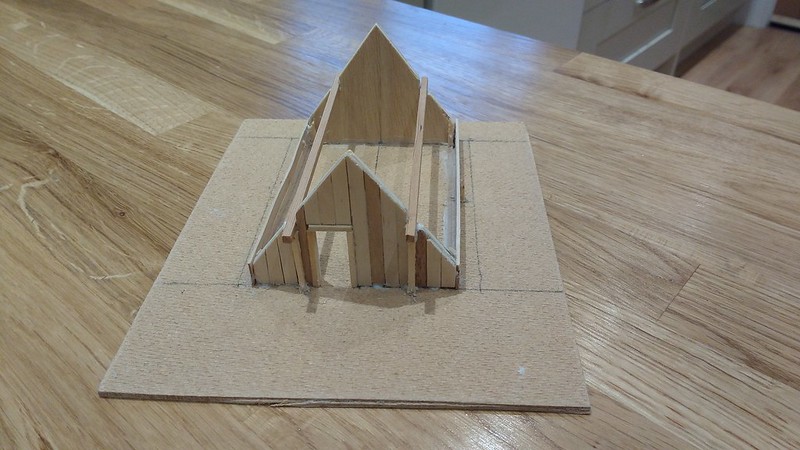 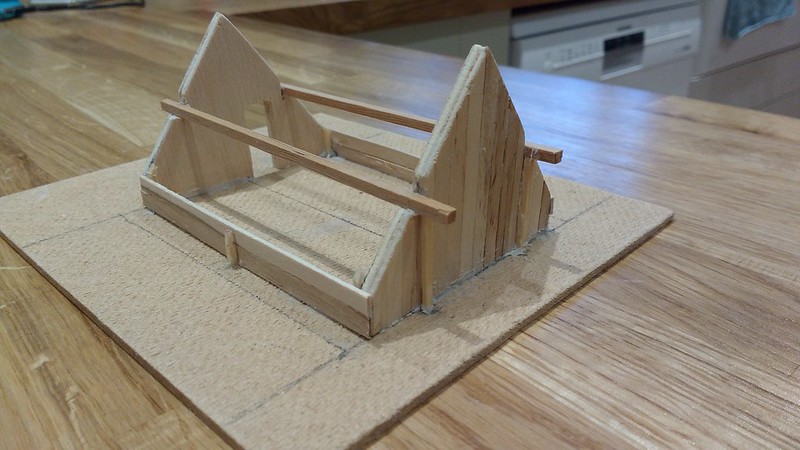 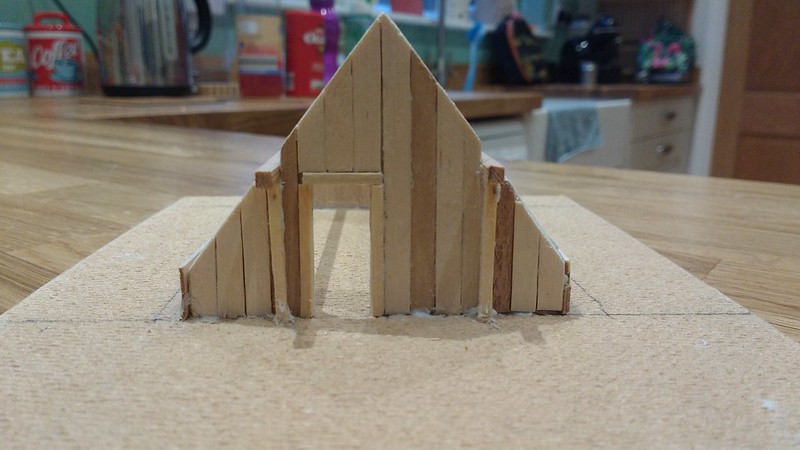 |
|
Neo Phyte
Full Member
Member since: March 2017
Posts: 188
|
Post by Neo Phyte on Apr 17, 2018 15:15:48 GMT -5
This is for Andrew's son, whatever his name is.
"It's looking good!"
|
|
|
|
Post by Leon on Apr 17, 2018 15:16:13 GMT -5
Looking really good Andrew! Tell your son to keep up the good work. |
|
k1w1
Full Member
Member since: February 2015
Posts: 873
Feb 18, 2015 8:07:41 GMT -5
Feb 18, 2015 8:07:41 GMT -5
|
Post by k1w1 on Apr 17, 2018 18:34:48 GMT -5
This is for Andrew's son, whatever his name is. "It's looking good!"From here forth - Whatever his name is shall be known as Junior. |
|
k1w1
Full Member
Member since: February 2015
Posts: 873
Feb 18, 2015 8:07:41 GMT -5
Feb 18, 2015 8:07:41 GMT -5
|
Post by k1w1 on Apr 17, 2018 18:36:52 GMT -5
Peter - sorry but you idea of of using the saw wasn't taken on but I will definitely be squirreling it away for the future!! No problem. One must respect the wishes of the Project Manager. Still looking good. |
|
adt70hk
Forum Moderator
Member since: November 2015
Currently attempting to build something decent!!! ;)
Posts: 2,482
MSC Staff
|
Post by adt70hk on Apr 18, 2018 7:16:13 GMT -5
This is for Andrew's son, whatever his name is. "It's looking good!"Neo Thanks for stopping by yet again. I'll let him know you approve!! Now that Todd has managed to resolve the picture issue i can show him images of the the stunning bridge that you're working on. ATB Andrew Looking really good Andrew! Tell your son to keep up the good work. Leon - thanks and I will do!! This is for Andrew's son, whatever his name is. "It's looking good!"From here forth - Whatever his name is shall be known as Junior. Peter Junior it is!! Also thanks for taking the rejection so well. He is one of those children that knows their own mind surprisingly well for one so young. ATB. Andrew |
|
adt70hk
Forum Moderator
Member since: November 2015
Currently attempting to build something decent!!! ;)
Posts: 2,482
MSC Staff
|
Post by adt70hk on Apr 20, 2018 8:00:37 GMT -5
Hi all Thanks again for the input so far. We've started to get down the ground down. One thing I am totally lacking is all that proper modelling terrain stuff and don't have the time to get any. Plus, as you know, I want this to be about Junior doing as much as he can from things we have at home. He therefore used a simple technique I've used in the past, a mixture of slightly thinned PVA glue and shredded pet wood shavings mixed into a paste that he 'painted' onto the base. It's still a bit thin in places, so we need to touch it up a bit. Thanks for stopping by. Andrew 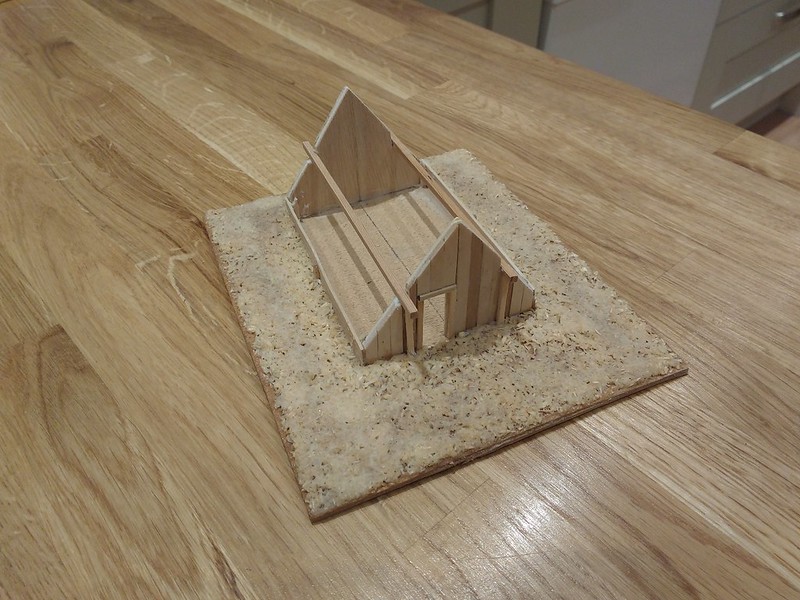 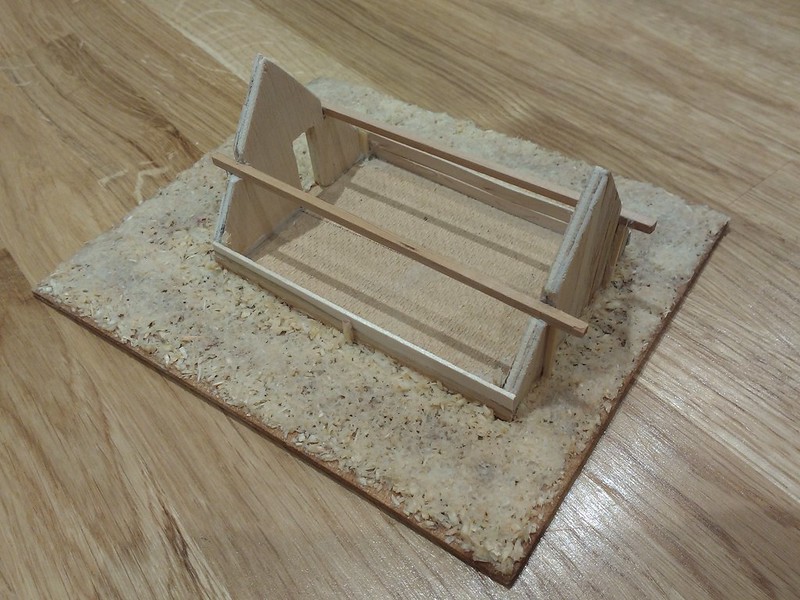 |
|
adt70hk
Forum Moderator
Member since: November 2015
Currently attempting to build something decent!!! ;)
Posts: 2,482
MSC Staff
|
Post by adt70hk on Apr 21, 2018 1:29:52 GMT -5
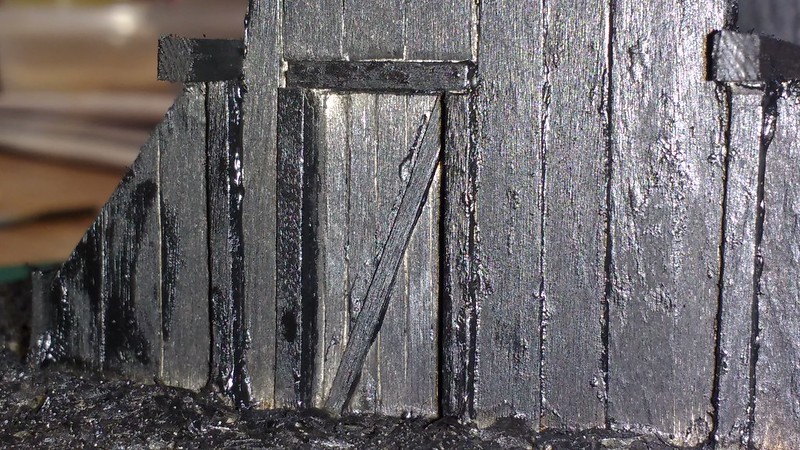
Hi all So a bit more work last night after school/work. My son aka 'Junior' aka 'The Project Manager' decided he wanted a door on but also wanted it left very slightly ajar although it's not very obvious from the pics. He came up with the idea of splitting the coffee stirrer sticks down the middle to make thinner and rougher 'planks'. It was also his idea to put the diagonal cross beam on the front of the door. Priming was done using a rattle can, again for simplicity's sake so it was easy for him to do. As we're in the middle of a spring heatwave in the UK we took simply took a cardboard box out into the garden to spray into. I realise the black looks a bit harsh but there is a logic, which will become clear when it comes to painting Thanks. ACW Andrew 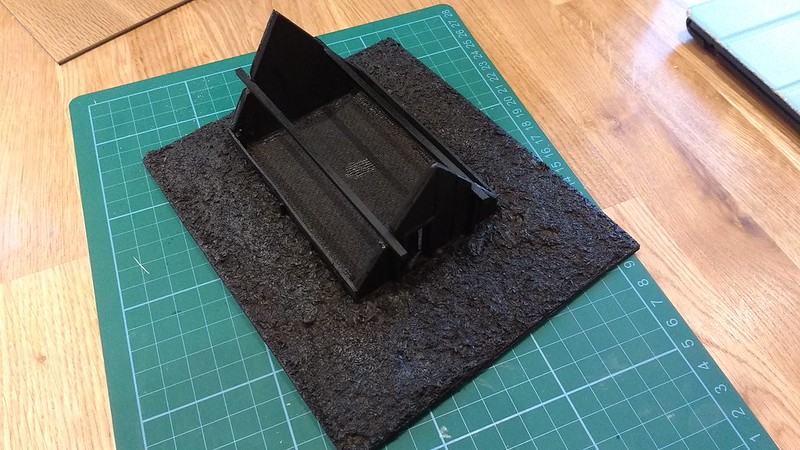

 |
|
Neo Phyte
Full Member
Member since: March 2017
Posts: 188
|
Post by Neo Phyte on Apr 21, 2018 3:18:39 GMT -5
... I realise the black looks a bit harsh but there is a logic, which will become clear when it comes to painting... Hope it's clear to Junior too. After all he is following his father's shadow. Junior, great ideas about the door. Keep up the good work. It's looking better and better. |
|
adt70hk
Forum Moderator
Member since: November 2015
Currently attempting to build something decent!!! ;)
Posts: 2,482
MSC Staff
|
Post by adt70hk on Apr 21, 2018 3:44:38 GMT -5
... I realise the black looks a bit harsh but there is a logic, which will become clear when it comes to painting... Hope it's clear to Junior too. After all he is following his father's shadow. Junior, great ideas about the door. Keep up the good work. It's looking better and better. Indeed it is!! 😁 A few years ago I came across a very simple technique for doing that very weathered wood effect you get were I looks more grey than brown. Right at the outset it was his idea to use the same technique. To work it requires a black primer coat. ATB Andrew PS I have passed your comments on. |
|
|
|
Post by Leon on Apr 21, 2018 5:12:03 GMT -5
Nice idea with the door! I like it. |
|
k1w1
Full Member
Member since: February 2015
Posts: 873
Feb 18, 2015 8:07:41 GMT -5
Feb 18, 2015 8:07:41 GMT -5
|
Post by k1w1 on Apr 21, 2018 9:39:01 GMT -5
Yes - we down here at the bottom of the world approve of all of Juniors refinements so far.
Terrain stuff - I have used the contents of used tea bags before. Dry them out and cut the bag open. The herbal and green teas look better than the black teas. Drying could be done quickly in a microwave I guess. I used them to simulate fallen leaves. Just an idea using things around the home.
We await further progress.
|
|
adt70hk
Forum Moderator
Member since: November 2015
Currently attempting to build something decent!!! ;)
Posts: 2,482
MSC Staff
|
Post by adt70hk on Apr 21, 2018 14:40:16 GMT -5
Leon, Peter Firstly, thank you very much for the supportive comments for Junior. I let him read them this afternoon and he was clearly touched. So today saw some paint go on. I got the idea for the wood from a blogger in Sth Africa who does wargaming stuff. Dip the brush in a paint of Humbrol thinner, clean the excess off and then dip it in a tin of Humbrol 110 (Natural wood), clean the excess off and paint the target! It obviously goes on very thin and so the black shows through a lot. You then add as many layers as you want until you get the desired level of aging. Because it goes on so thin it also has the effect of the wood grain still showing through. Junior went for a bit thicker/browner than I would have but it is his project! The ground got a coating of Humbrol 29 (dark earth). We deliberately didn't go into every nook and cranny so it hopefully gives a bit of depth to it. I did suggest dryish/damp brushing with some lighter colours to break it up a bit but he was happy with what he'd achieved. We also prepped some 'grass' ahead of the next step but that can wait 'til next time. ACW as usual. ATB Andrew PS in case you hadn't guessed by now the roof is being glued on. 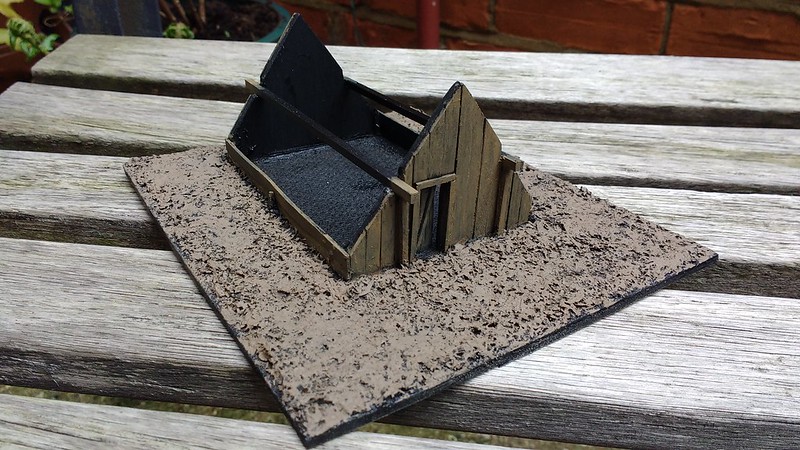 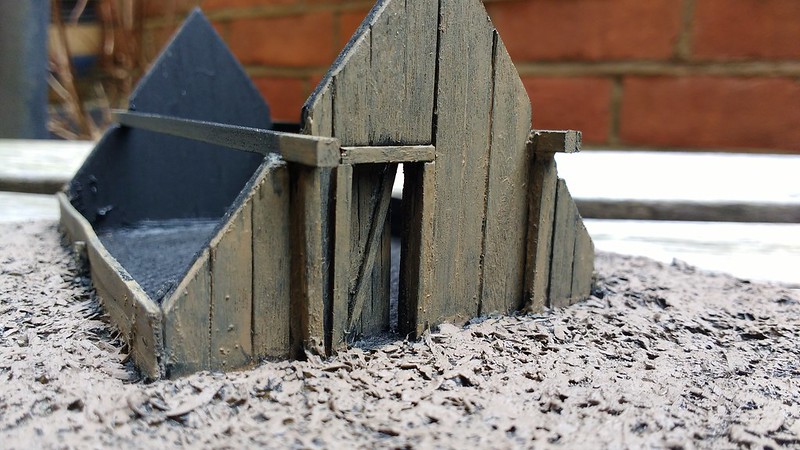 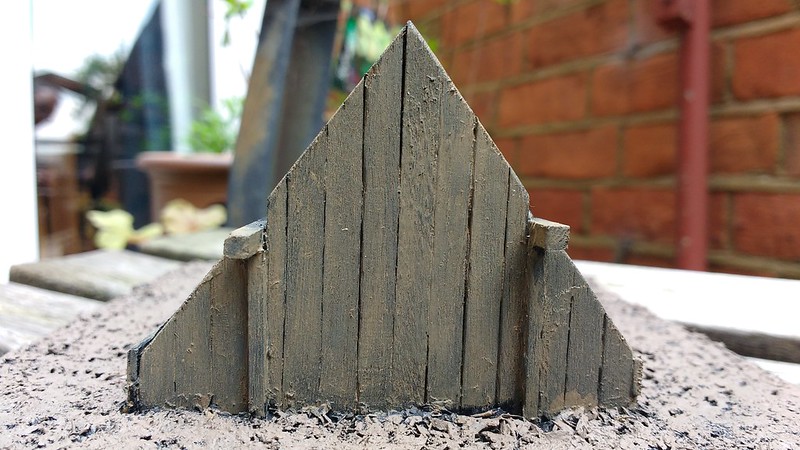 |
|
Neo Phyte
Full Member
Member since: March 2017
Posts: 188
|
Post by Neo Phyte on Apr 21, 2018 16:22:36 GMT -5
Great job.
Just for future experimentation: I did similar with a Humdrol enamel dark grey, thinned down with lots of turps, washed it over the wood grain with a brush. The pigments settle into the grain trenches. Also slightly watered down black ink works well to, then when dry, spray with picture (matt) varnish to seal it. Prefer to use very thin mixes, in that way if it is too faint I can always give it extra coats.
For wood debris, and even mulch, add fine dry kindling (up to 3-4 mm thick) into a blender. Blend to your perceived size. Use a colander and a sieve to sort sizes.
|
|
|
|
Post by Leon on Apr 21, 2018 18:10:24 GMT -5
The wood is looking good! |
|
k1w1
Full Member
Member since: February 2015
Posts: 873
Feb 18, 2015 8:07:41 GMT -5
Feb 18, 2015 8:07:41 GMT -5
|
Post by k1w1 on Apr 22, 2018 9:05:41 GMT -5
Progressing well. I am really looking forward to see how you go about making the roof.
|
|


 ) he says he'd like to a model and then proceeds to describe what it would like and how it should be done - including several techniques we used on the earthworks we've previously made. Honestly it WAS all his own idea!!!!


 We spent a small fortune on the kitchen last November and that would not go down well!!!


