|
|
Post by Steve Zuleski on Oct 21, 2020 18:11:56 GMT -5
RM1601 Resin, 4 figures plus groundwork. www.reedeesminiatures.co.uk/products/1-16-120mm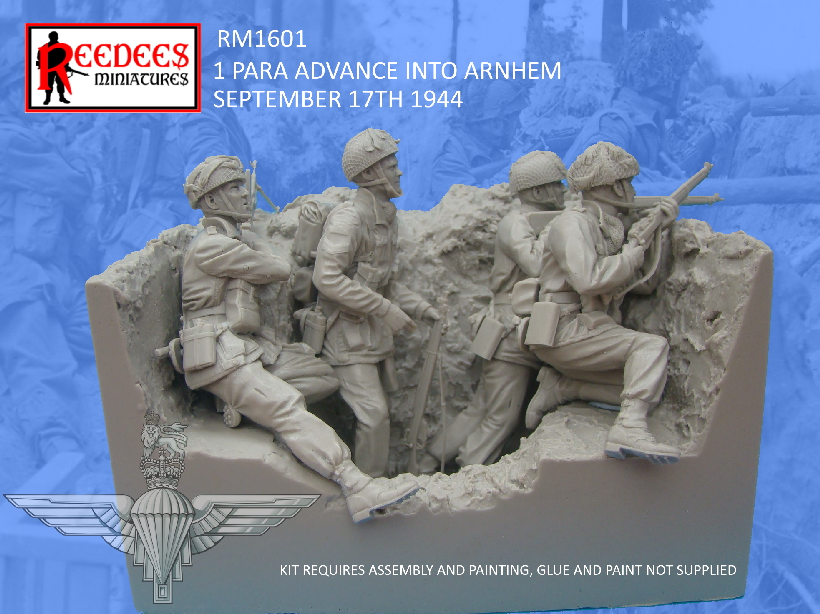 This excellent vignette, first in a series, was recently sculpted by Steve Reedees and is now available through his website. The historical photo below was used as his guide in creating this scene. It's not too often you find vignettes in 1/16 scale that are directly related to an actual photo and I think Steve pulled this one off superbly. 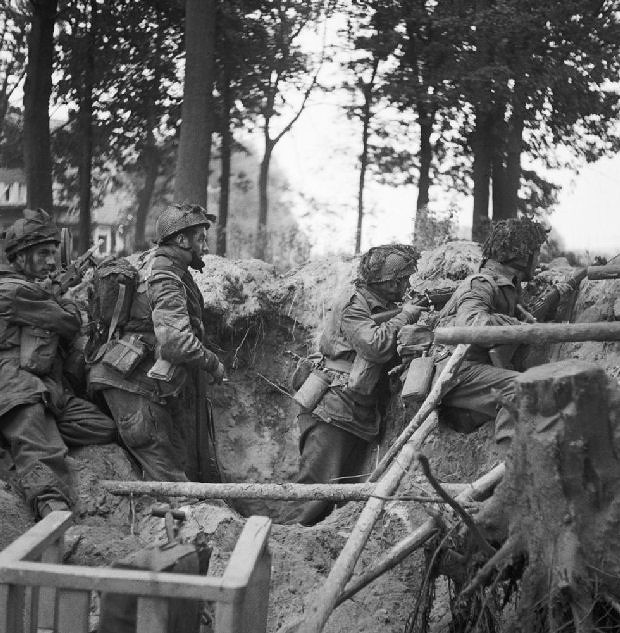 Using Steve's own words to describe the scene: " The first release is RM1601 which is taken from a photo taken 17 September 1944 during Operation Market Garden at Wolfheze Village. It shows a Bren gun section of R Company 1 Para taking cover in a Bomb crater during their advance along Amsterdamseweg (Leopard Route)." "Corporal Alfred Reynolds, second from left, who commanded the Bren gun section was seriously wounded a few hours after the photo was taken, he fell into German hands a died from his injuries a day or two later." The fate of the other three is unknown. More historical data on this scene and the unit involved was posted on Planetfigure.com by Martin Rohmann, a "fixture" over at Planet Figure, known for his incredible ability to dig up historical information on battles and campaigns. Martin has found a Grave Registration Report Form and a photo of Corporal Reynolds' grave marker. 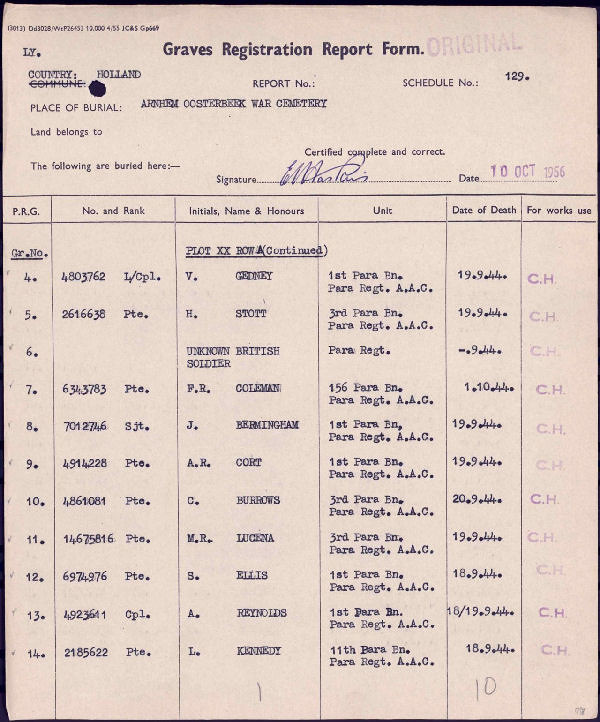 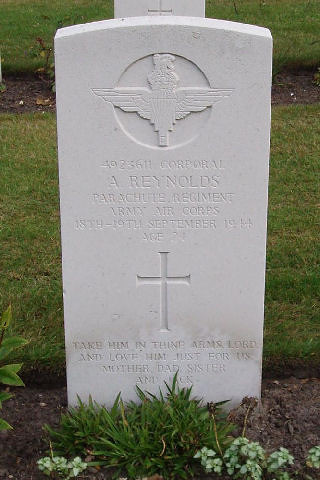 Personally, I think Steve did an incredible job honoring the memory of these Chaps and the unit involved with this vignette. Now I will attempt to do the same with this SBS and get to "sniffin paint and gluin my fingers together" in the process. This is my first go at British uniforms or camo patterns, so I'll be going through the learning curve as we go along. Buckle up, here we go........... What's in the kit?Here's what comes in the kit, four superbly sculpted figures in gray resin, and an excellent rendition of the crater seen in the historical photograph. 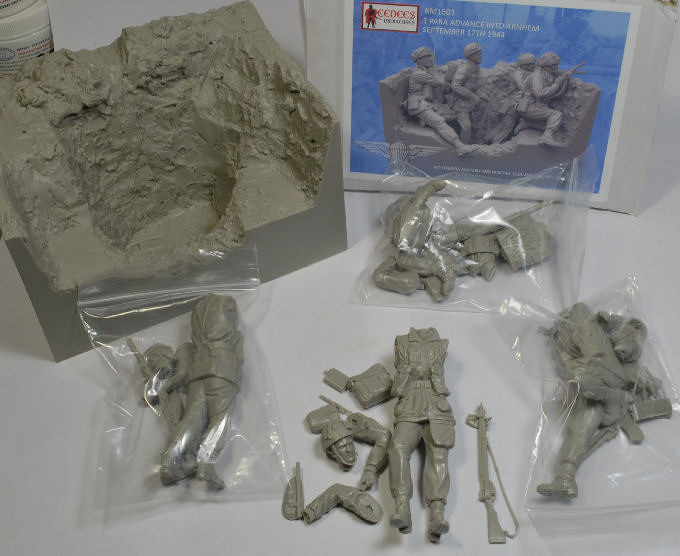 What I noticed right off was the clean mold work and the sparse amount of seams that requiring filing. These figures were molded with care and it shows. There's even "locking lugs/ keyways" on all the arms and torsos, as well as a lot of the equipment, which makes for some real easy assembly. Another note of importance is where the arms meet the torso, the uniform folds actually overlap areas of the torso. There really isn't much putty work to do when you have resin that locks together so cleanly. Pretty impressive. First figure up, Corporal Reynolds!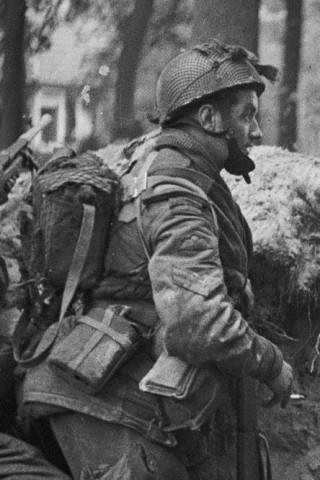 Here we have the "Corporal Reynolds" figure completed. There wasn't much clean up to be had, really. There will always be some kind of mold lines visible in some locations, but very minor in this case. About the only real clean up for me was scrutinizing every little nook and cranny for any left over resin bits from the molding process. I used a dull dental pick to get any tiny bits that were found, but it wasn't much. 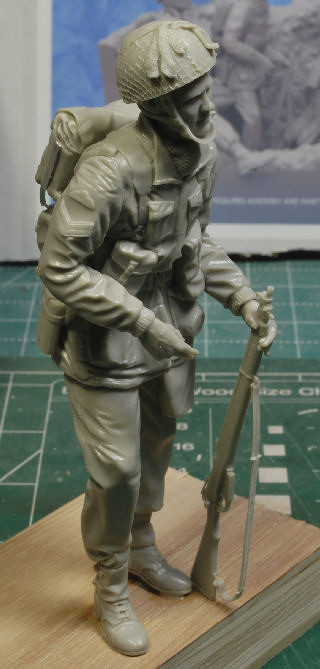 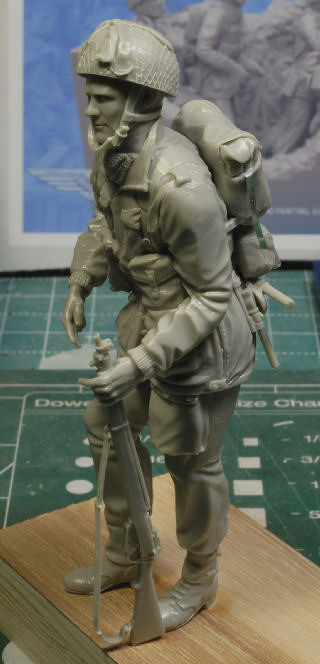 The rifle mold was incredibly clean as well, but you still need to be super careful around the rifle strap so you don't end up breaking it. It's a delicate area and I did have a small amount of slag to remove, but mostly it was just little "feathers" of resin reside. I did bore out each and every rifle muzzle like I always do. Take your time when doing this, it's a delicate area as well. I added a strap for the Corporal's back pack as seen in the historical photo. I used a strip of pewter for this because it's just much easier to mold and shape than other materials. I dug out a bit of the resin on the pack for the strap ends and super glued them in place. Once the glue was set I formed the strap to a more natural appearance. I'll be readjusting that strap after the paint process, but for now, it's good to go. 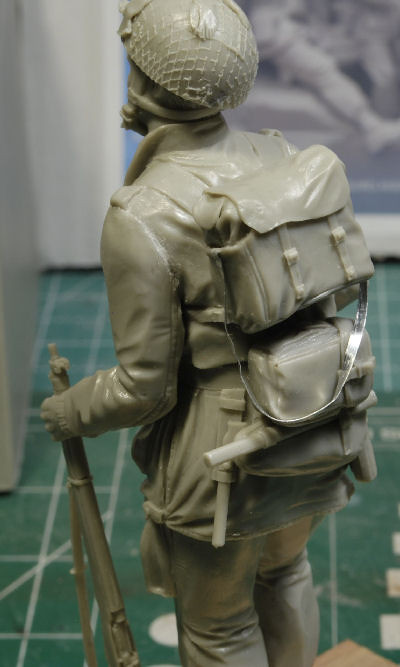 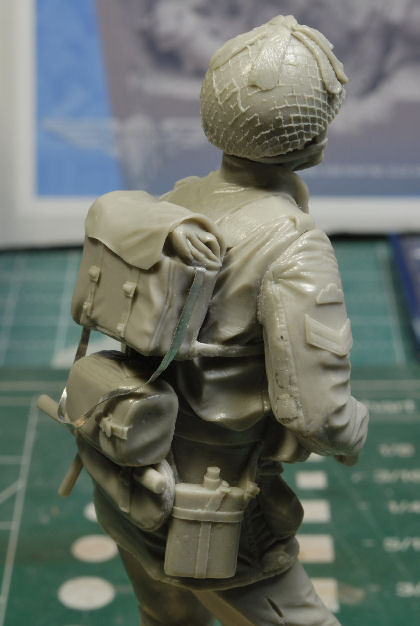 And lastly, each figure will be mounted on scrap plywood for ease of handling during the painting process. I always drill deep into the boots and install a sewing pin which will remain for final mounting into the crater when we're all done. Corporal Reynolds is now ready for primer and paint. One last note for all the figures in this vignette. I used Elmer's wood glue to attach the heads for easy removal after the initial priming. I always like to paint the heads separate from the figures and a lot of times any flesh areas as well, if they can be kept separate without much difficulty. Nothing worse than trying to twist a brush into a tight spot, right? More to follow soon, Ma Brothas. Cheers, Ski.
|
|
|
|
Post by Tobi on Oct 22, 2020 3:16:56 GMT -5
Thumbs up! The good thing about the Denison smock: as far as I know they were handpainted.  |
|
|
|
Post by Steve Zuleski on Oct 22, 2020 13:30:07 GMT -5
Wow, didn't know that, but the patterns are sporadic for sure.
Thanks for watchin Tobi.
|
|
|
|
Post by Leon on Oct 22, 2020 16:27:44 GMT -5
Looks like a nice kit overall Steve!
|
|
|
|
Post by Steve Zuleski on Oct 22, 2020 16:37:00 GMT -5
Yes, I'm impressed with the resin work Steve has done. All his figures seem to be pretty clean, love it!
|
|
|
|
Post by Steve Zuleski on Oct 23, 2020 6:42:00 GMT -5
The Second FigureAs mentioned in the intro, we don't know the names of the remaining paratroopers, so we'll number them as we go along. 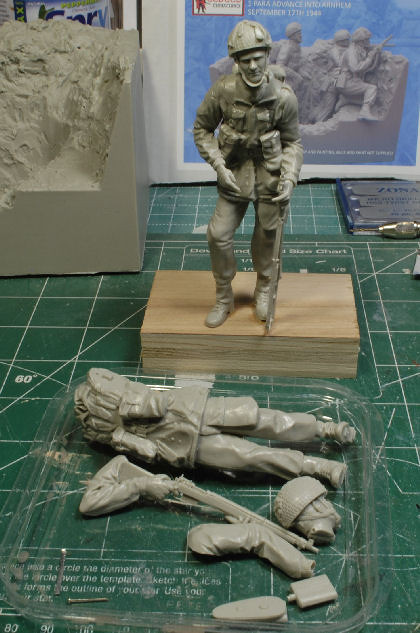 Figure two was a straight forward build with minor clean-up. I like to keep the parts in this plastic tub lid so I don't have them flying all over the bench when I'm working. I really am tired of the carpet monster eating my resin parts, so this lid works wonders, lol. Once the figure was cleaned and assembled I mounted him on the plywood. He is now ready for priming and painting. 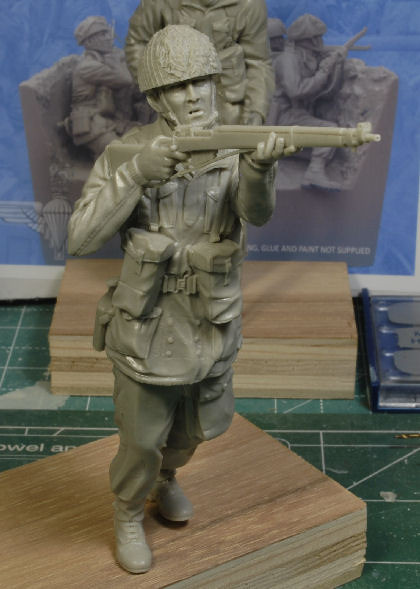  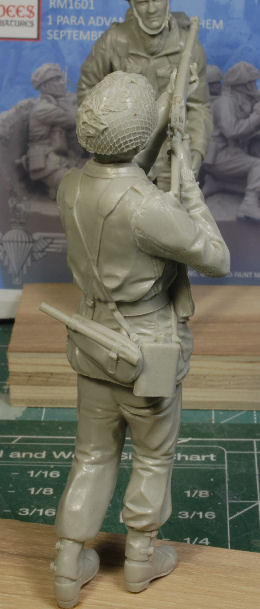 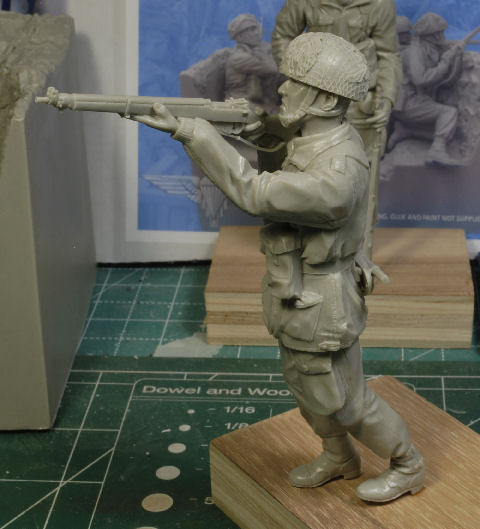 More to follow and thanks for watchin. Cheers, Ski.
|
|
|
|
Post by Steve Zuleski on Oct 24, 2020 13:43:31 GMT -5
Third Figure in the Line-upThe third figure has been cleaned and is ready for assembly. As you can see, the " locking lugs/keyways " are visible on most any part needing to be attached. This really does make for ease of assembly. Steve says it doesn't take much more time to add these in the molding process and feels this little added bit makes a difference. I agree with that and I'm glad he's making the extra effort to add them into the process.  What I did not mention earlier is the use of Testors Grey Contour Putty. Why am I using this you ask? Experimenting with this I found that just a "very small" dab near the edges of the arms and gear will ooze out at any visible joint location. An example would be where the shoulders and arms meet. Such a small amount comes out and makes for easy, clean, joints without having to try to putty up any troubled areas. This also makes for a really solid firm adhesion of the joints and torsos. I used this for most of the gear attached to the figures and this also makes the transitions of straps easier to complete. 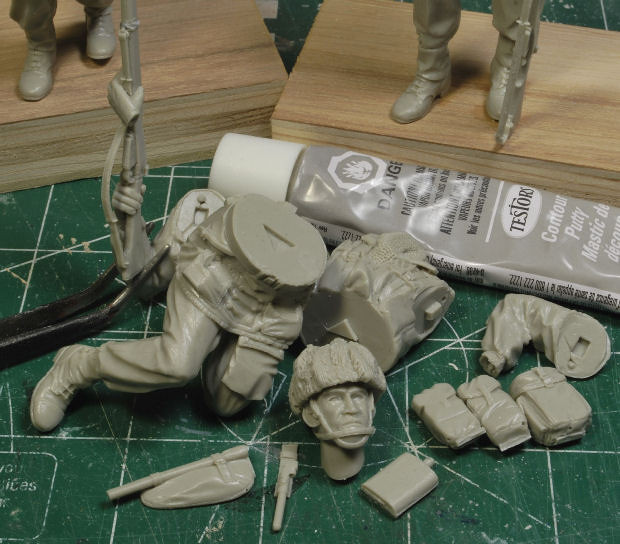 The molds are so clean on this set that there wasn't much putty work to be had, but this Testors Putty did the trick for me. "A little dab'll do ya", as they say, lol. The first pic shows just how the uniform folds actually overlap the torso, right there above the armpit area, beauty! Also, this is how I add the Testors putty to the arms, third photo. 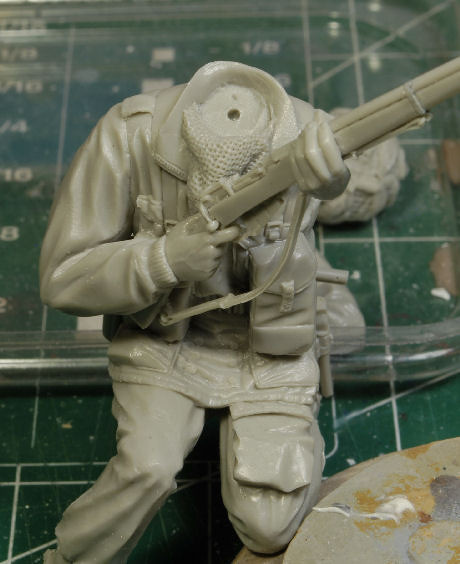 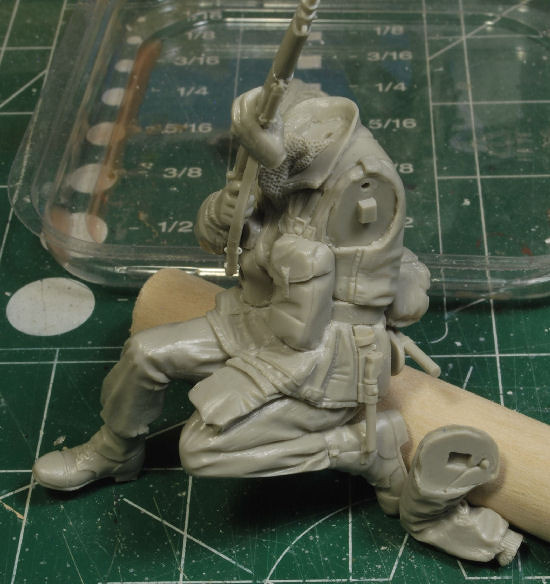 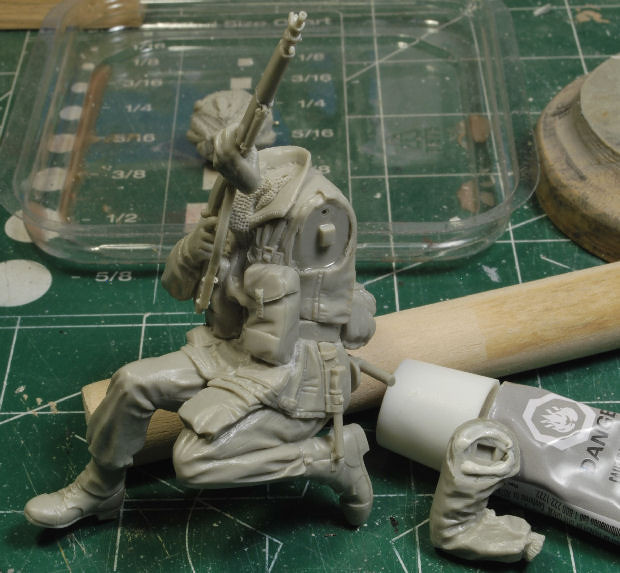 Notice the slight bit of oozing out of the putty in small areas like the shoulder and wrist. Once this stuff sets up it easy to wipe or scrape off leaving a smooth transition. So, why haven't I done this before, seems to work quite well. 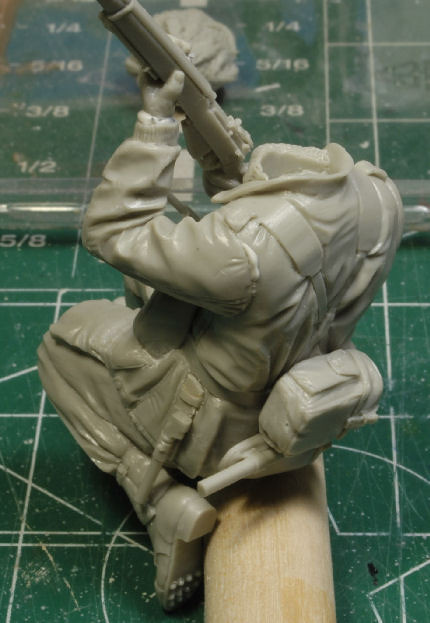 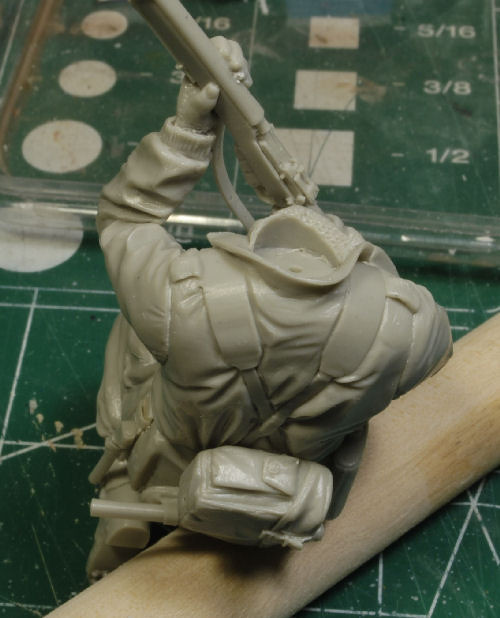 Ok, figure numero tres es finito! He is now ready for a primer coat as well.   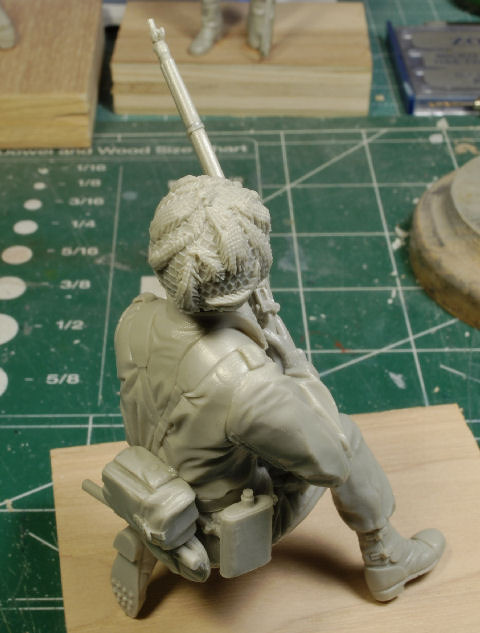  Here's the trio so far. One more figure to go, the Bren gunner. 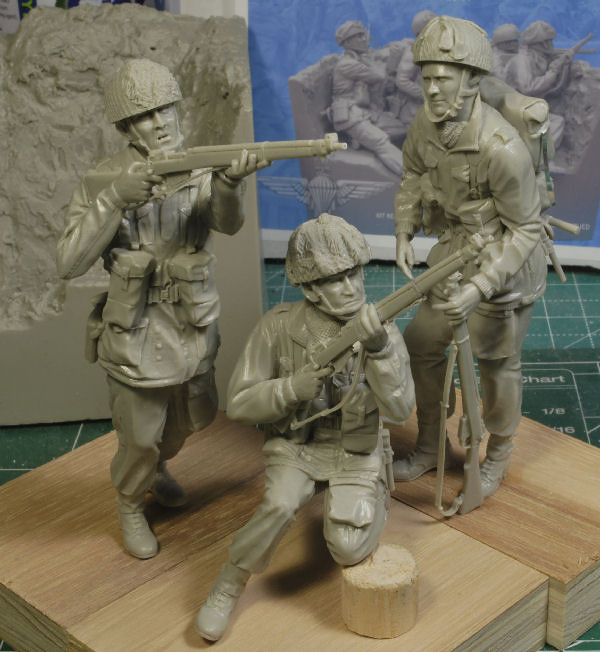 More to follow and thanks for watchin. Cheers, Ski.
|
|
|
|
Post by Steve Zuleski on Oct 28, 2020 4:41:20 GMT -5
Bren GunnerOk, the Bren Gunner is ready for clean-up and assembly. Like the last three figures, clean-up is minimal. The gun bi-pod and carry handle are on a separate sprue. The only issue I had was making sure the Bren actually fit into it's logical position as intended. 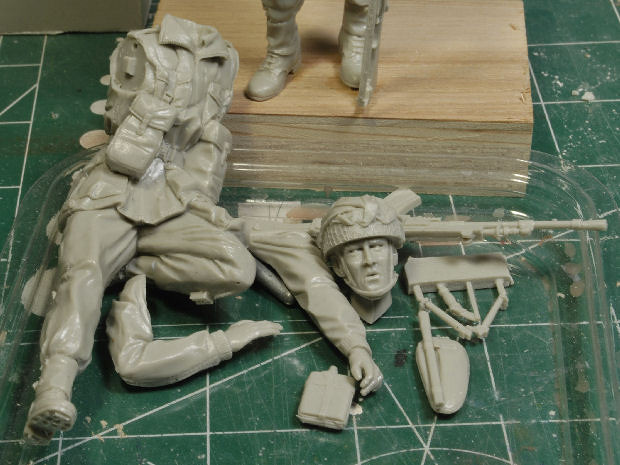 Here's the Lad, all assembled and ready for duty. I followed the same process as the last three crew members. This one assembles in the same straight forward manner, just like the rest. The pose may look a bit odd right now, but once he's in the crater it all makes sense. And no, he's not doing the side stroke, in case you were wondering, lol. 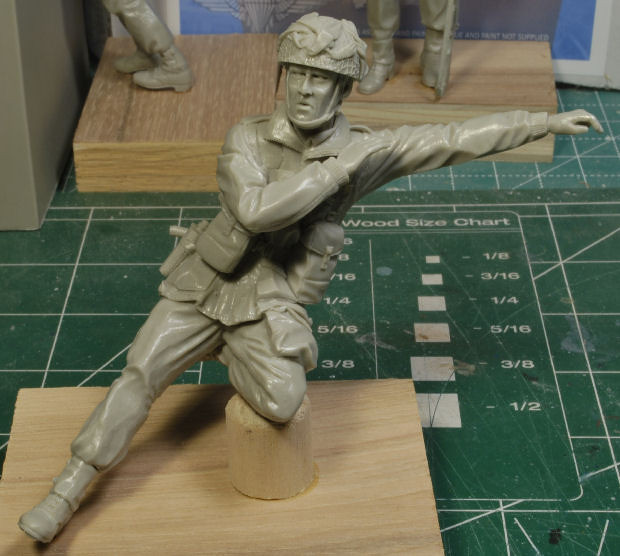 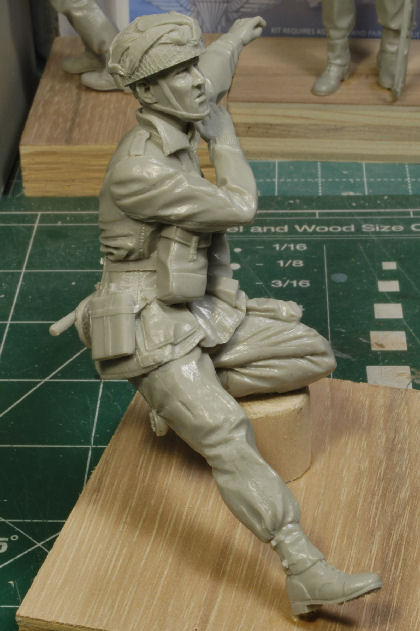 In the crater he goes and the fit is perfect. Each figure sits within the crater nicely, naturally. There weren't any odd angles to play with and there wasn't any need to adjust any figure poses. The hard work was already done.  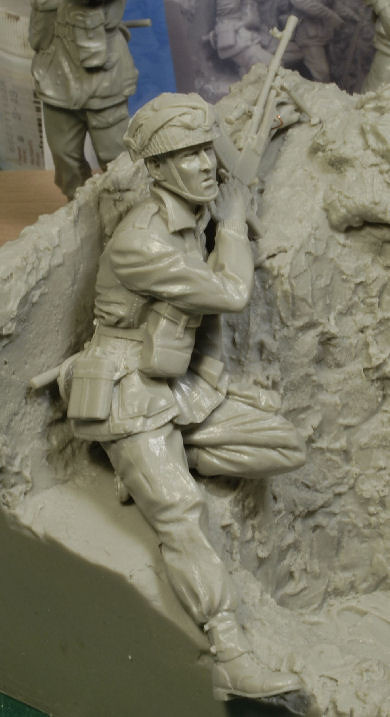 Fitting the Bren was a bit like playing with fiddly bits. My sausage fingers were getting in the way every time I tried to adjust the weapon to the figure. Unfortunately I broke the left blade for the front sight in the process and the trigger guard. Nothing that can't be fixed in a jiffy. I just used the scrap resin from the kit and whittled out new ones. This Bren is pretty dang accurate, like as in, spot on. It's a beauty. Steve has one heck of a line-up of weapons available in several scales on his site and they are all top notch. This one is no exception. So, this wraps up the assembly portion of the vignette and now it's time for some paint. Tanks for watchin. Cheers, Ski.
|
|
|
|
Post by Steve Zuleski on Oct 28, 2020 13:07:24 GMT -5
Flingin Paint! Steady ar she goes mate, slow speed ahead!Boy, it's only been nineteen months since I've done any figure painting. Missing a bunker season of "sniffin paint and gluin them fingers together" can get to ya, if ya know what I mean. But, whether it's been six months or nineteen months I pretty much have to relearn my prior techniques every season. Call it a warm up before the workout. No worries, this will be a crash course of sorts. Remember, I have my trusty can of "Easy Off" oven cleaner just in case. I always try to incorporate new techniques with each new set of figures. There's a heck of a lot of incredible talent out there to learn from, all having their own way of flingin paint, so I study their work and try to learn from "them". Worth mentioningI'll be starting back up where I left off at the end of my last bunker session. I've mentioned this before in my Sub Gun Deck SBS; During the Fall/Winter of 2018-19 I started working a new technique I picked up from a canvas oil painter. Strange, I know, but the concept is the same, just in an incredibly smaller scale. The lessons I've learned from watching the oil painter "Daria Callie" seem to work well so far, at least for me. The only difference is the blending, or not blending, of the oils in the process. One key noticeable difference in how she paints on canvas and how most of us paint faces on resin. Most of us oilers use an acrylic color base before we apply the oils. Daria uses a grey base tone to keep the neutrality of the colors more readily visible during the painting process. I see her point. Note: I do not use this technique for uniforms or gear, only on faces and flesh tones. This is my weakest link, so this is my focal point needing of much more improvement. I've worked this technique several times now and it seems to work well for me, as long as I remember to use an acrylic primer for the flesh tones or seal the oil based primer before working the oils. Why? I use thinner quite often when I work the oils and the primer can disappear on you quick if you neglect to seal it. The oils will have nothing to cling to and off it goes with each stroke of the brush, yikes! I gotta remember that,.......... Palette and the line-up So, here's the palette for the flesh tones with numerous blended tones to choose from. Taking notes from Daria's videos I start with the five basic colors; Cadmium Yellow, Cadmium Red, Burnt Umber, Ultra Marine Blue, and Titanium White. Yes, even on this little palette I used a small palette knife to mix the tones, works just fine. My palette is just a piece of thick poster board covered with wax paper. After each session I place the palette in a cheap plastic sealable container and into the freezer or refer it goes. This keeps the oils workable for an extended period of time. As you can see I have "'Ol One Eye" in the background for moral support. He was my first attempt, trial run if you will, at using this technique. I was impressed with the results and also how quickly he began to take shape. Sweeeet!   The Sub Gun Deck Captain head was done using Daria's technique as well. So, if you can get past the visible brush marks, lol, you can see the flesh tones look acceptable for a serious first run. Still more work to be done, of course.   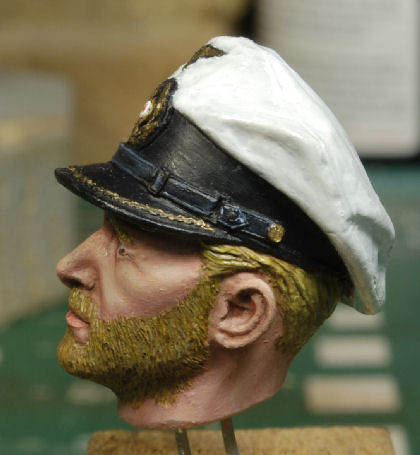 First up to bat are the faces, always. Painting the faces first gives me the confidence right up front. Large scale figures will show you all your mistakes and will shout at you quickly, lol. I'm not afraid to start over to correct a blatant and obvious boof. I'm still learning and I've got a long way to go to get to where I'd like to be in this Sport. Corporal Reynolds was my first choice, he has a great expression on his face, IMHO. I got a ways into the process of oiling and realized I had not sealed the oil based primer, doeee....................... I tried to fix the mistake, but you can't get oil to stick to resin worth a hoot without that primer under it. Heck, I already jacked it up, so why not keep going, get the bugs worked out and see how much I've lost over the past nineteen months. I might add that I acquired a set of number six reading glasses. They're dang near as thick as Coke bottles, but boy howdy, I can now see the fine point of my brush up close without having that Optivisor hanging off my head. Working into the eye sockets is much easier now, so I just might see some improvement in my weakest area. I'm optimistic. Looking closer at the top and sides of the nose, temple areas, and under the eyes you will notice the small spec areas of missing primer. It looks horrendous up close, lesson learned, once again. But, over all, the tones are looking decent and the blending appears to be working ok. I think I'm getting warmed up. I still have brush strokes to clean up, but I see progress in a positive direction. Good practice run, wouldn'tcha say? 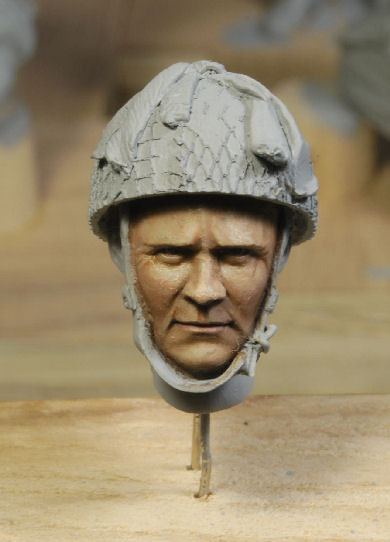 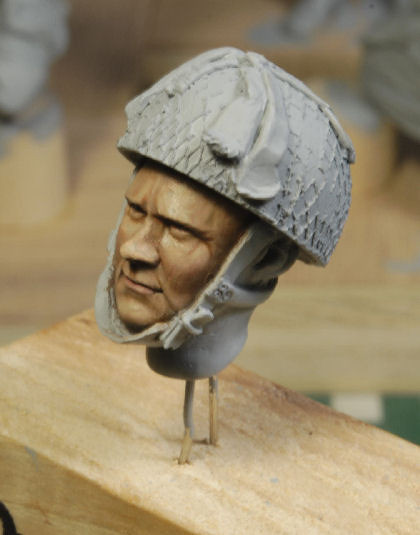 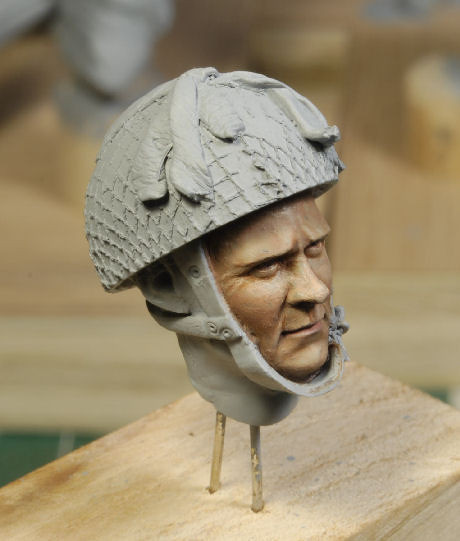 Ok, off to the shower you go buddy! Well, I toldja, it's only been nineteen months.......... Ah, no worries, we're still having fun and that's what it's all about. If you've never used oven cleaner before it's an easy process. I don't wait long before I scrub off a coat of paint. Just make sure you try to get all the paint out of the crevasses and eye sockets, under the nose, etc. Try to get right back down to the resin, you don't want any paint build up to deal with later. 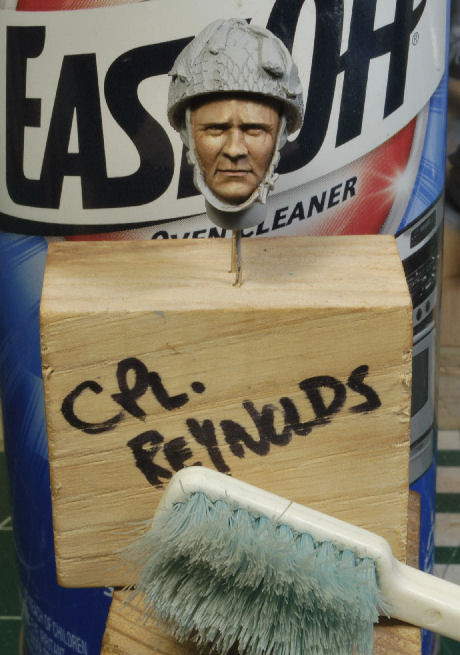 Ok, Cpl. Reynolds is all cleaned up and ready for a serious run at putting down some paint. 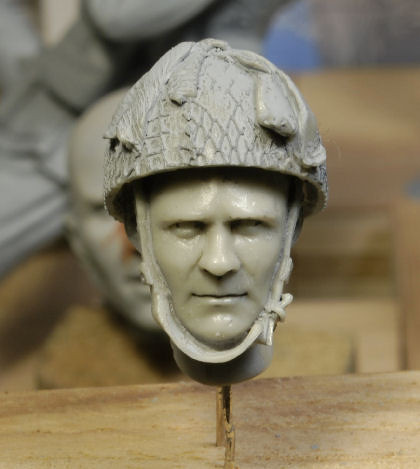 Let's see if I can bring the Cpl to life. Remember now, faces are my weak point. I intend to make them my strong point. Isn't that how practice works? Yep, here we go............................... More updates to follow once the paint starts flyin again, and thanks for watchin. Cheers, Ski.
|
|
|
|
Post by Steve Zuleski on Oct 30, 2020 16:37:40 GMT -5
Five Runs, we're on!You'd think after three oven cleaner baths I'd get this dang technique figured out, but no, I had to go for a fourth bath, sheeeesh! I was gettin a little worried there for a bit,........................... Actually it's been an issue of my thinner working against my primer, not the oil painting technique. I have to clarify that. I'm having a lot of fun working Daria's methods. Be advised this technique is a bit more difficult working in smaller scales below 200mm. I ain't giving up yet, no by a long shot. Trying to keep in step with the technique I'm learning I ran an acrylic undercoat of Tamiya XF-20 Medium Gray instead of relying on my Floquil primer to "hold until relieved". Sorry, been watchin "The Longest Day" and "A Bridge Too Far", HA! My old method was a desert yellow or tan color acrylic undercoat, but I do like the gray undercoat much better, for obvious reasons, clarity of the tones applied.  Now, since the eyes have always been my sticking point I attacked that issue first. I picked up some #6 reading glasses, as mentioned before, and they are working very well, and they're cheap. I could even get #7's, but we're good for now. Using a salmon and white acrylic mix I covered the eye socket and then placed a very thin dark toned line across top and bottom of the eye sockets. Then I placed a super dark brown mix for the eyeball outline, followed by a tinted blue iris, etc. After the eye ball was acceptable I ran a light red and salmon color across the base of the eyes for a slight flesh tone. In between each application I hit the face with an old hair dryer to completely dry the prior paint layer. Uh, don't forget the glint in the eye! 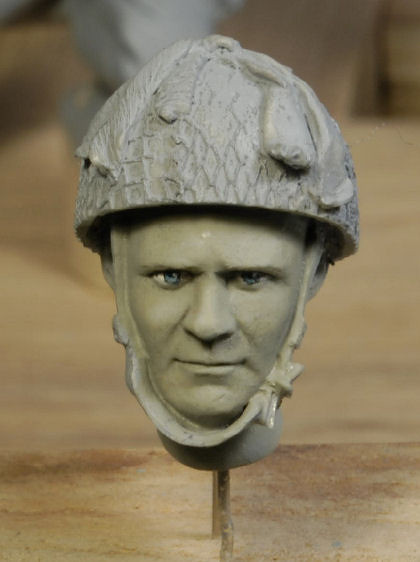 Ok, the eyes have it, so we're off and running. It's still a bit of a dark flesh tone in these pics, but we'll take care of that right quick. As you may notice, I really didn't take a whole lot of "in progress" pics, but the blending process is just like any other oiler work, smooth transitions. 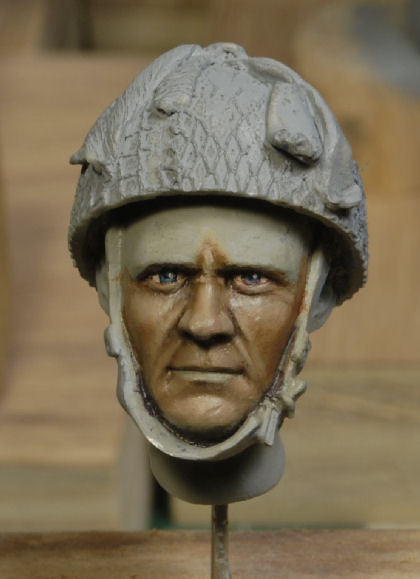 Once I had my tonal base set it was just a matter of lightening up specific areas and highlighting others. I'll let this face sit for a few days while I work the neck and back of the head, etc. The other three heads will follow the same process until they all have had a good 3-5 days rest from the final oiling. Then I'll go back and detail any crows eyes, wrinkles, lips, or 5 'o clock shadows, etc.. 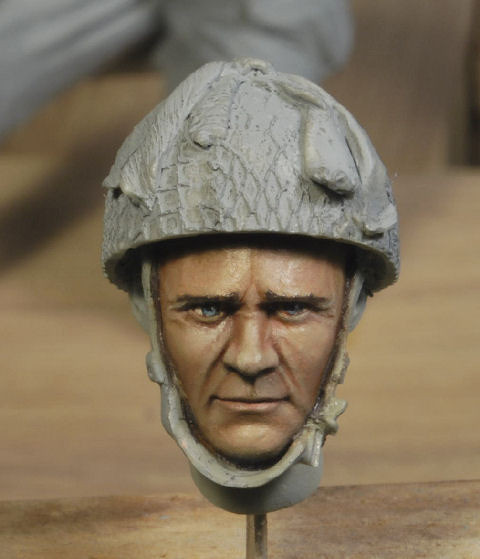 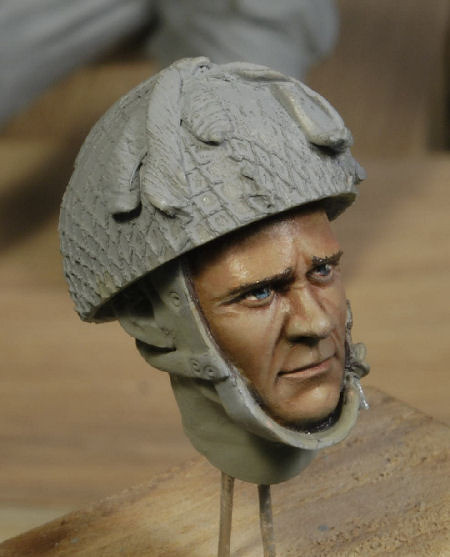 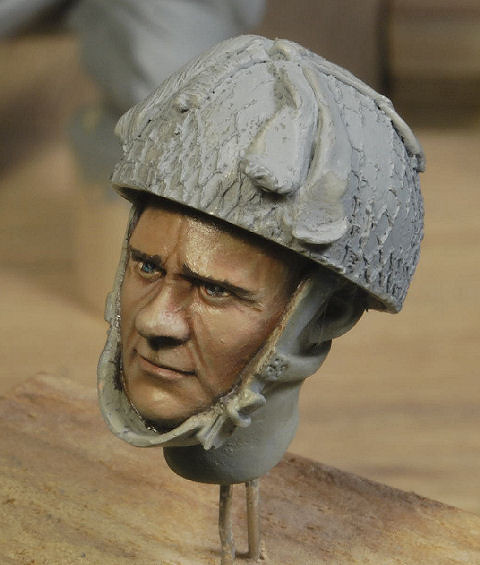 So far, I pretty happy with my results and it feels good to be back in the "saddle" again, if ya know what I mean. Hmmmmm, ..........hey, he's kinda got that "Mel Gibson", thing goin on, eh? Ok, maybe not that good, but there is a resemblance, wouldn'tcha say? lol. There's still a long way to go, but we just got started on the meat and tatters of this build, so more to follow. Tanks for watchin! Cheers, Ski.
|
|
|
|
Post by Leon on Oct 30, 2020 17:38:18 GMT -5
WOW.. They are starting to look good Steve!
|
|
|
|
Post by Steve Zuleski on Oct 30, 2020 19:29:52 GMT -5
Thx Leon!
|
|
|
|
Post by Steve Zuleski on Nov 2, 2020 18:25:24 GMT -5
Bren GunnerOk, so he getting closer, the Bren gunner, but after a few hours I'm calling him good to go till the final touch ups. I do need to tend to his hair, though. "Oh no,........not the hair!", from the movie "Four Feathers", remember anyone? Ok, never mind............ 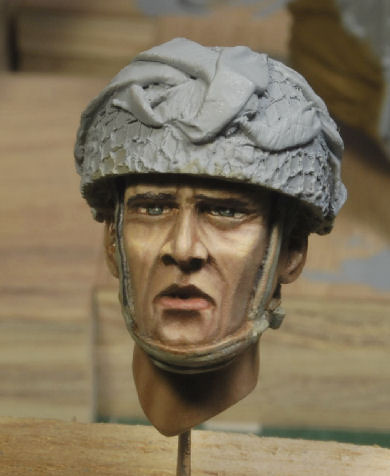 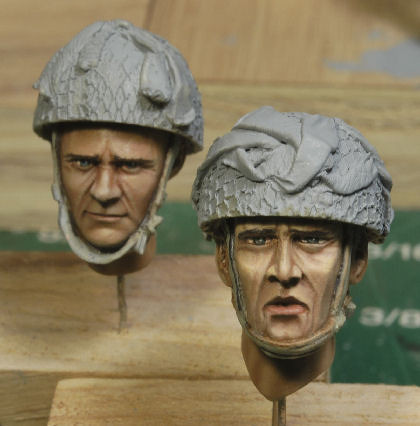 I went ahead and continued on with flesh tones for the Cpl and the Bren gunner to close them out for right now. The other two will be worked right away. I'm in that face painting mode, so they all get done now, while I have the momentum going, so to speak. Tones a slightly different, but so are yours and mine, right?  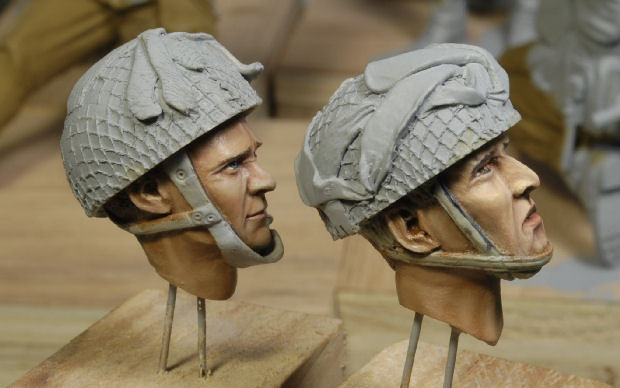 I'm not particularly satisfied with the Bren gunner's face, but he's going along for the ride, unless I get the gumption to work him a bit more. He's messin with my head, no pun intended. HA! This happens at times, yall know what I'm trying to say here, it happens to everyone from time to time, if we've been "sniffin paint and gluin our fingers together" for any length of time. His side profile is ok, but his facial features are still requiring attention. Ok, that's it for the short update, I'll post more as I go along and thanks for watchin. Feel free to add constructive criticism, I'm all ears. Cheers, Ski.
|
|
|
|
Post by Steve Zuleski on Nov 11, 2020 6:27:05 GMT -5
Team Member #2Back at it again, finally. Unfortunately there were a few winter chores that kept me from the bench, snow being just one of them, so taking off from my last stop did mess with my momentum. I had to wash this mate's face twice already. Ain't nothin but a thang, right? Working with the same method as the other two I was able to get the main facial features taken care of. The punch list will be the same for this face, just like the last two, and will be done when it is fully dried. I went ahead and gave the chin strap a base leather tone for facial clarity. There's still plenty to do here, but we have the major work completed. So far so good, I'm liking it ok. I'll be going over this face closely to see if any more details are needed before closing him out.   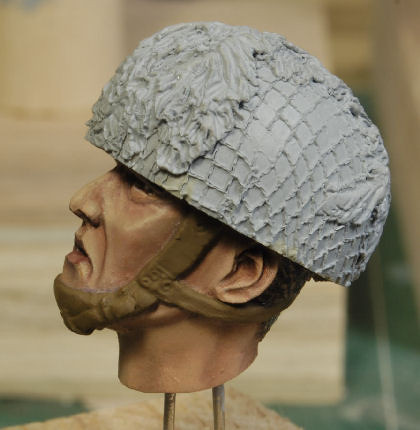 Here's a few shot of the trio. I'm going to leave these guys alone until the last face is done. We're making progress. I might add that I am enjoying working with this painting technique. What I'm finding is that after a period of time I'm not having to revert back to my notes or videos. If I feel I'm starting to lose focus I quickly look up at my photo references and examples and they bring me right back in line. I'm still not out of the woods yet, but I do see the clearing up ahead, HA! 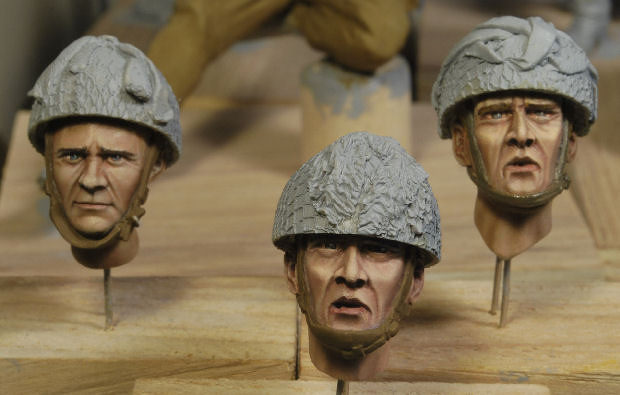 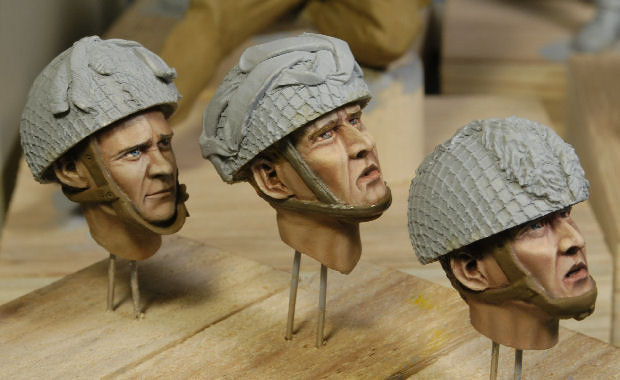 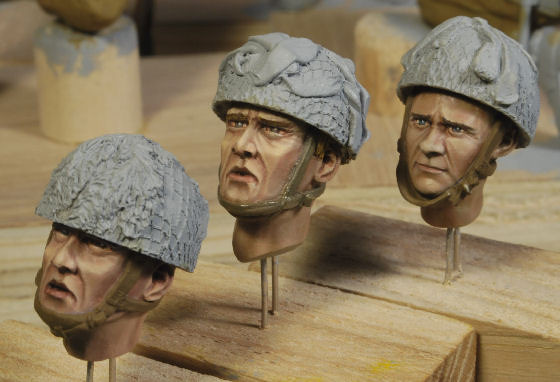 Ok, off to finish team Mate number 4, so more to follow soon. Lastly, if you see any obvious discrepancies or areas requiring attention, please holler, I appreciate the constructive criticism. Thanks for watchin. Cheers, Ski.
|
|
|
|
Post by Steve Zuleski on Nov 21, 2020 13:25:09 GMT -5
Team Member #3A bit late on this update, but finally all the faces are complete. They say we are our own worst critique, this is no exception. I've scrubbed every one of these heads at least twice and some four times. So, time to move on and get to the figures and that camo pattern. Of course I'll go back later before I attach the heads and do any final touch ups. Ruck On from here. I will add that using #6 readers has helped out quit a lot when doing the eyes, my weakest point. I'm pretty happy with the results so far, but obviously I've still got a bit more to learn. Ah, it's just practice, practice, and more practice,...................and more practice, lol. 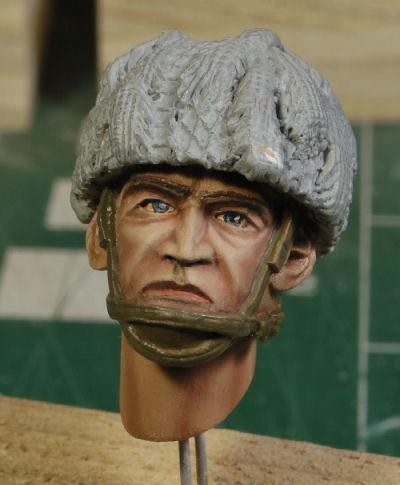 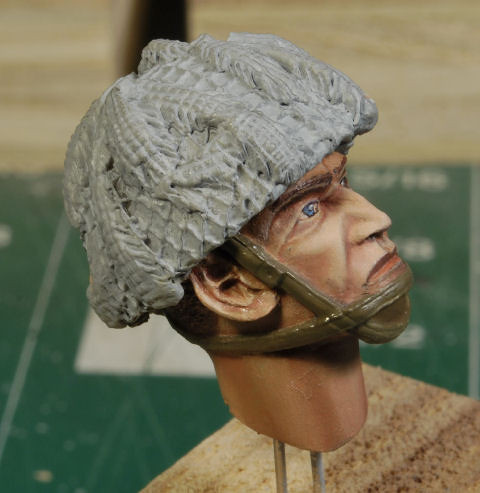 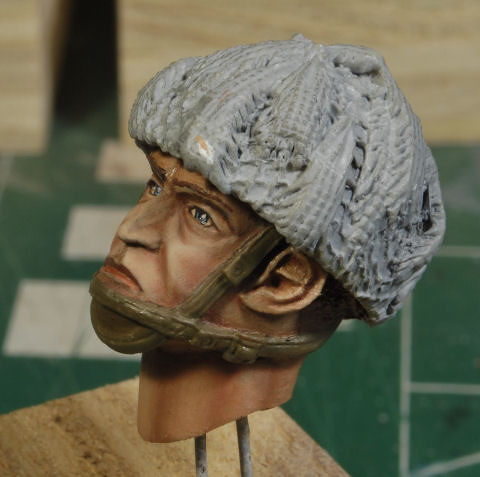 The team is finally together and on stand-by until all the figures are completed. 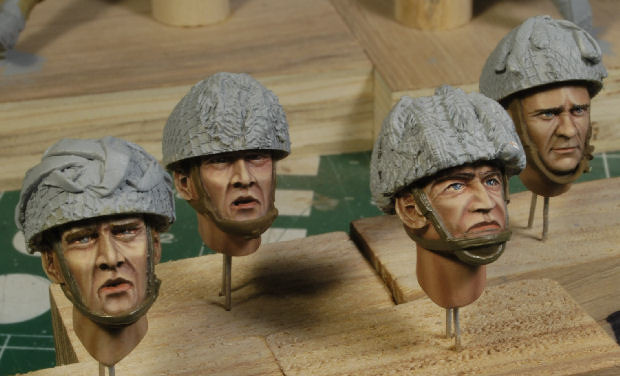 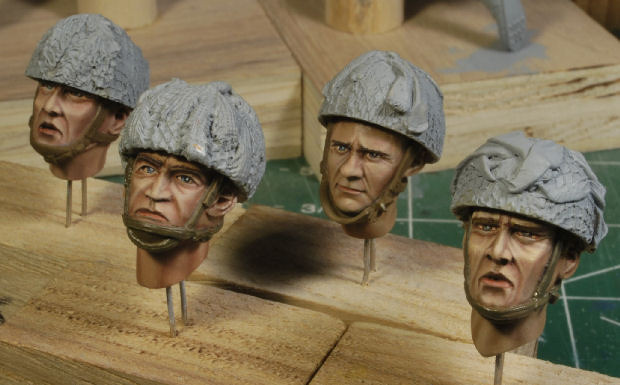 Thanks for watchin, more to follow soon. Cheers, Ski.
|
|
|
|
Post by Steve Zuleski on Nov 26, 2020 13:38:03 GMT -5
Camo Pattern, Para Smock and Web GearFinally it's time to get to work on the smocks and web gear. This particular camo pattern was not as difficult as some I've done in the past, but it has unique brush marks on all the examples I've seen. I was able to duplicate this by doing just as they did, swipe the brush across the area. Now, I did give this figure a bath after my first attempt, but now the pattern is more in line with the examples. I had the pattern a too bit tight for the actual pattern, it was not going to work. Like I said, don't be afraid to wash it all and go for it again. The first pic is a bit blurry, but you get the idea. The web gear and pack were given an acrylic base tone using Tamiya FX-49, Khaki. The mid pouch on the back was blend of a Khaki and light greenish tan. 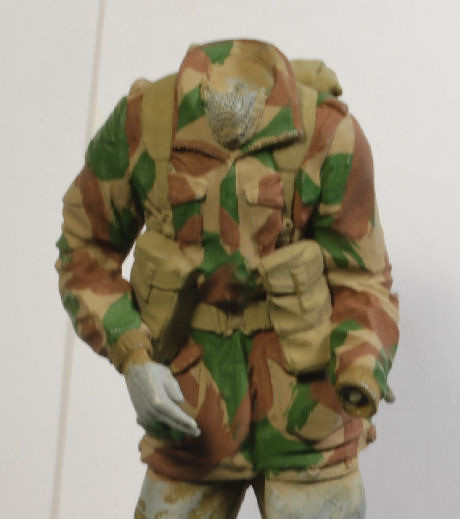 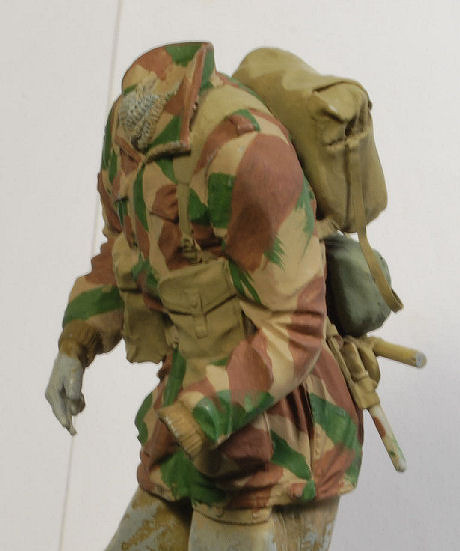 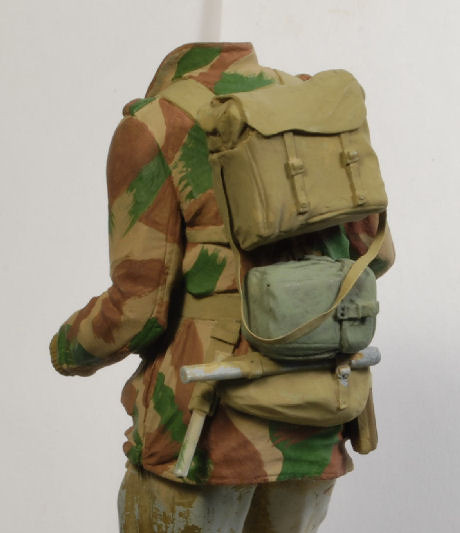 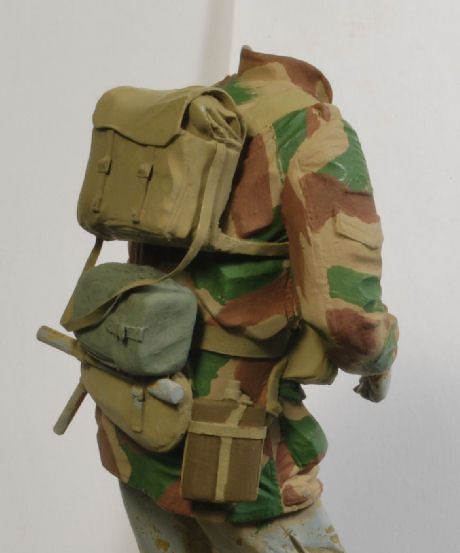 Time to work the camo pattern on the other three figures and slightly alter the tones of the web gear for each one. My Official Advisor has reminded me that the veteran's uniforms will be slightly faded, whereas the green horns will have a more crisp appearance to them. I will work to make that happen as best I can. Once these smocks are patterned it will be time for oils, the fun part. More to follow soon. Thanks for watchin. Cheers, Ski.
|
|
|
|
Post by mustang1989 on Nov 29, 2020 10:32:07 GMT -5
This is incredible work Steve. Really good work!!!!
|
|
|
|
Post by Steve Zuleski on Nov 30, 2020 10:32:48 GMT -5
Thanks Joe!
|
|
|
|
Post by Steve Zuleski on Dec 3, 2020 8:43:58 GMT -5
Adding Camo Pattern DetailsLooking closely at many smock examples there is actually four colors visible. In places where the red tones were brushed across the green tones there is actually a darker green tone that appears. Trying to duplicate this with a simple swipe of the red tone over the green won't get it done. I'm using acrylics for this portion, not oils. So, I added a darker green tone in those areas, including the brush marks that are visible in some examples. The real trick here is to make sure no area is left undone, so combing over these areas slowly and carefully is a must. Looking at these pics I see a few areas that I missed during my last inspection, oops. I'll focus on those areas mue pronto! Here's the first three pretty much done, but they will have another go-over before the oils flow. Also, light Olive Drab has been used on the web gear. It's a decent tone that is not too tan or too green. 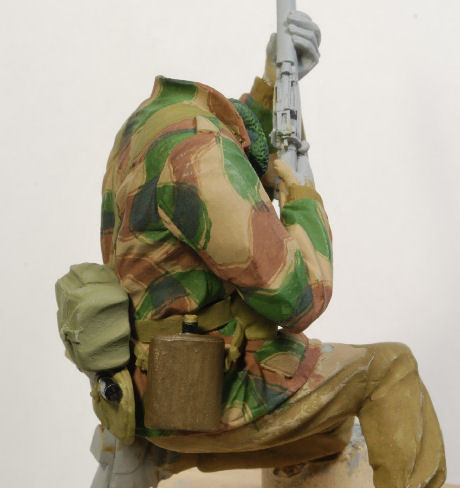  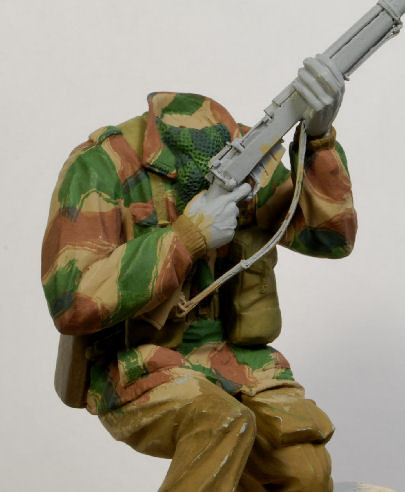  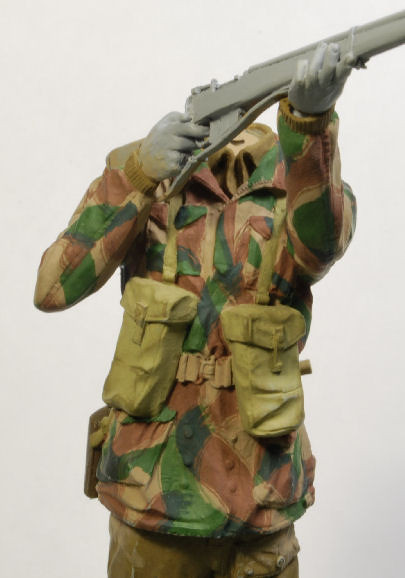 The Bren gunner is in the first stage of the camo pattern and will be completed soon.  More to follow and thanks for watchin. Cheers, Ski.
|
|
|
|
Post by mustang1989 on Dec 3, 2020 16:24:42 GMT -5
Man you're good at this.
|
|
|
|
Post by Steve Zuleski on Dec 4, 2020 14:12:12 GMT -5
Hey Joe, I'm having too much fun! Colors UsedI neglected to mention the colors used, here's the line-up. I did not use AK's Intermediate Green, AK3058. I was way too light for my taste and really isn't representative of the actual uniform color. You can see all the colors I used below. 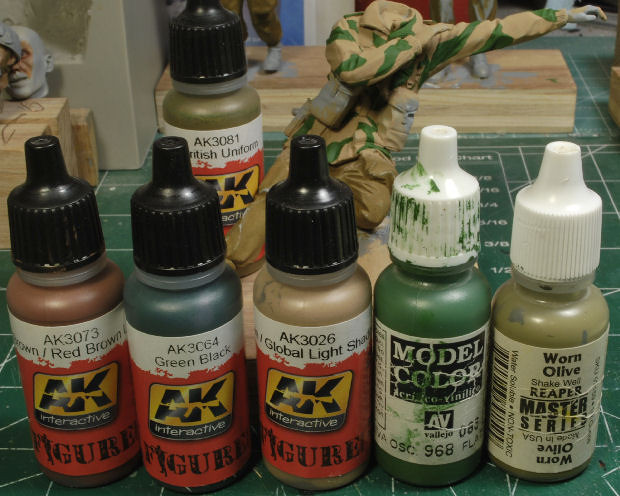 More to follow soon. |
|
|
|
Post by Leon on Dec 6, 2020 8:25:37 GMT -5
WOW...Your doing a great job Ski!
|
|
|
|
Post by Steve Zuleski on Dec 6, 2020 14:43:56 GMT -5
Tanks Leon, good to see ya!
|
|
|
|
Post by Steve Zuleski on Dec 8, 2020 13:27:03 GMT -5
Oil er up!Now the fun part begins, the oils. I decided to do a test run on shading and highlighting to figure out how to go about this particular camo pattern. What I'm finding is there is no easy way about it. Each area is being treated like a separate canvas and I am having to switch colors on the spot while transitioning through a particular area. It's really not that big of a deal, but tone matching for realism is my concern. I don't want to end up with a white wash look after covering a large area to realize I have to go back and tone it down. But, it is a test run. In this session I have done the front chest area, right arm, and upper portion of the left arm only. Initially I ran a light wash of Windsor Oxide Chromium, which is almost an exact match for my light green tone, mixed with a spot of Ivory Black over the entire figure to seep into the creases and crevasses. Then I went back and wiped off that tone from all the tan and reddish areas. Pin lines have not been added to the seems, etc., not yet. That will be the last detail to add before the brass buttons, clips, and zipper. Sorry about the pics, they aren't the greatest. 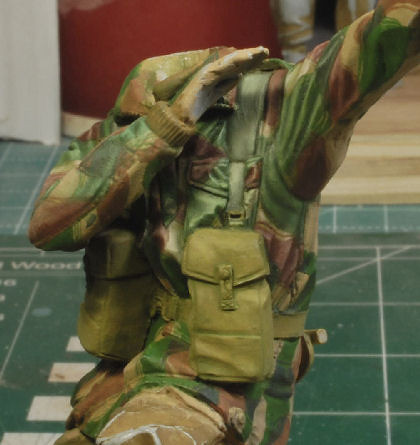 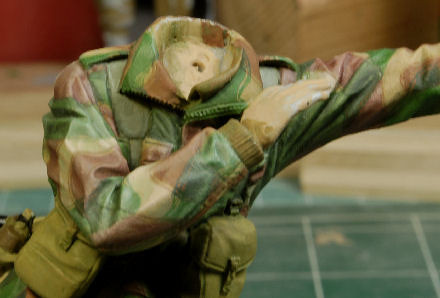 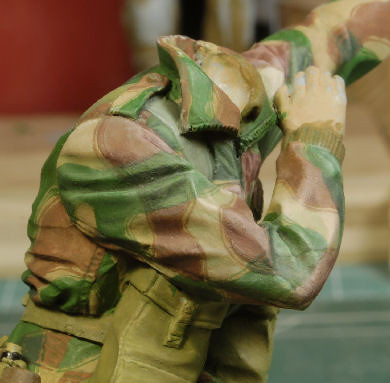 Also, the web gear shoulder straps will be returned to a more tan-ish appearance closer to the ammo pouches. I got carried away with the excitement of finally painting in oils I forgot to bring it back home to a more realistic tone, lol. The paint is still a bit wet and shinny, but it's the overall appearance I'm looking at right now. So, some serious thoughts or suggestions would be greatly appreciated at this point, especially from my fellow oilers, if you please. More to follow. Cheers, Ski.
|
|
|
|
Post by Steve Zuleski on Dec 10, 2020 9:39:23 GMT -5
Tweaking the TonesNot being happy with the prior test results I cleaned up the appearance of the "white-wash" and added darker tones to the reddish and green areas as well as a very light green shading tone to the tan areas. The over all green tone is becoming more visible and gives the smock a more blended appearance. I'm calling this test run a success. 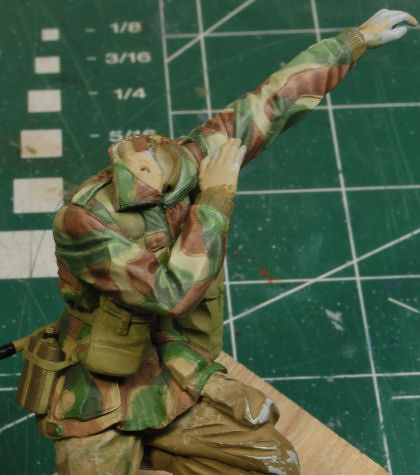 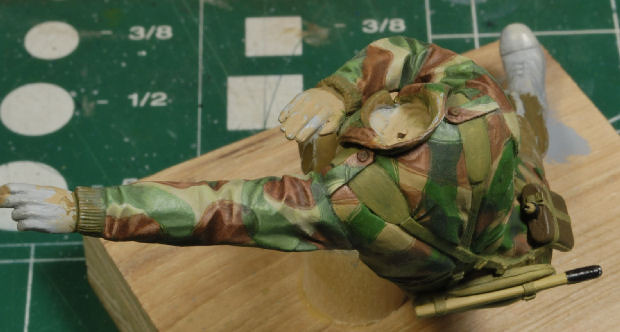 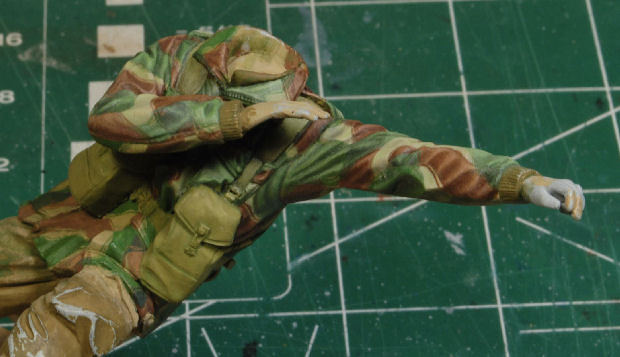 This camo pattern is naturally slow going, but I'm liking the results so far and I'm having a hootin ditty of a time at it! More to follow, comments welcome. Cheers, Ski.
|
|
|
|
Post by mustang1989 on Dec 17, 2020 22:40:51 GMT -5
I'd call that a success as well. Lookin' great so far Steve.
|
|
|
|
Post by Leon on Dec 19, 2020 10:42:50 GMT -5
Looking good Steve!
|
|
|
|
Post by Steve Zuleski on Dec 20, 2020 14:59:34 GMT -5
Thanks Joe and Leon!!
|
|
|
|
Post by Steve Zuleski on Dec 20, 2020 14:59:49 GMT -5
Steady ProgressJust a minor update for now. I've been working this camo pattern all week, it's been plugging along at a reasonable rate. As you can see, each and every section must be painted separately, so there really are no shortcuts. I have been able to duplicate my oil tones when they become unworkable, or at least so close you'd never be able to notice. That was one of my concerns when starting the camo pattern, consistent tones on each individual smock, not the four separate smocks as a whole. They all need slight variations from each other for realism. So far I have gotten a bit of rhythm going and the pace has picked up slightly, but there won't be any way to speed this up much more than my current pace. This certainly isn't the toughest camo pattern out there, but it does take time to work it.  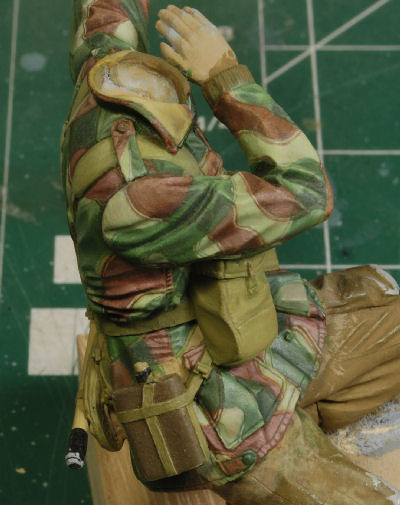 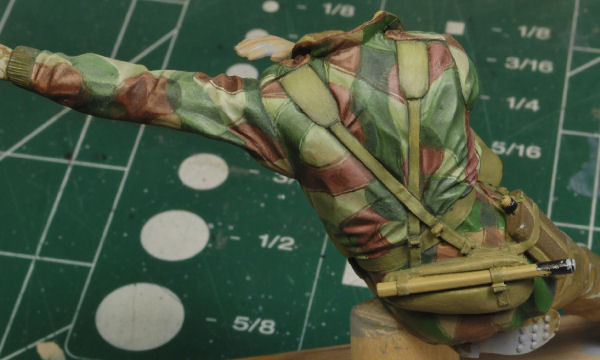 I will continue along the lower back portion of the smock and then knock out the ammo pouches and gear in the rear before I go on to the next three figures. I'm pretty happy with the palette set up right now, the tones seem to be working well. I'm a bit anxious to complete this figure alone, but I'll stick with the smocks until all four figures are done. I hate going back to relearn formulas I may have forgotten just a few days or even a week back. Steady ar she goes! More on the way and thanks for watchin. Cheers, Ski.
|
|
|
|
Post by mustang1989 on Dec 28, 2020 9:01:37 GMT -5
Thanks for all the detailed updates. It is my hope that I'll be able to tackle adding figures to some of my military builds. Watching really good and detailed threads like this helps in the encouragement department.
|
|