Whiterook
Full Member

Member since: March 2013
Posts: 837
Mar 13, 2013 15:29:19 GMT -5
Mar 13, 2013 15:29:19 GMT -5
|
Post by Whiterook on Mar 9, 2023 18:19:49 GMT -5
This is a build of 28mm “ Jaffa” warriors I purchased and painted back in 2009 for my Stargate SG-1 Miniatures Game. I’ve been working on all the major characters from the television series, except for the Azguard… it was hard to find “Grays” aliens back then, but with 3D printing being such a thing, I’ve noted a few hitting the market so, I may add those in to the mix! I also have a bunch of village folk to add to the background. I have a ruleset I wrote, but it was just a prelude to a larger rules system that will ultimately go with this project. Totally a system for self, and perhaps to host games at conventions and game clubs. Made by Phoenix Miniatures in the UK, these miniatures are no longer made, and scarcely available on the secondary markets, which makes them highly sought after and extremely valuable, both acquisition and money-wise. The few that I've seen have run about $50 for one miniature figure each! I paid probably around $10 each blister pack, and I believe I got them from Cold War Miniatures. I got a couple packs of the Jaffa Warriors with Skullcaps... 
A First Prime, which is a leader of a Jaffa Squad...  And one Jaffa Warrior with Heavy Cannon...  There are a lot of people that want to game SG-1, but there just aren't any figures out there to do it with, though I am sure 3D printing has the potential to change that if users can get by the licensing issue. Made of pewter, they are all marvelous sculpts that depict the characters in the television series with accurately. I have several minis of this type (maybe I'll count them later and edit this). In the picture below, an couple of the Serpent Head figures snuck in at the top  , who are typically Guards, but the regular Jaffa warrior foot soldiers that we are talking about are shown on the bottom, and include a First Prime (commander, pictured with his arm outstretched and pointing) is pictured at the far right... 
Pewter, as many of you know, is a very soft metal for miniatures and long objects, like the Staff weapon seen below, bend easily in shipping, and even in too-aggressive manipulation in gaming...  ...bending the metal back into place is always tricky, requiring a soft grip and gentle pressure. These minis actually didn't have much in the way of mold lines, so there wan't a lot of work on that front, but those that were visible were cleaned up with a craft knife. Note the base... they go into slotted, round plastic bases. Note the slotted bases, which are very popular in the UK, from what I've heard. Many people don't care for them, but I've actually found them easier to afix in plastic bases... more on that later! |
|
Whiterook
Full Member
Member since: March 2013
Posts: 837
Mar 13, 2013 15:29:19 GMT -5
Mar 13, 2013 15:29:19 GMT -5
|
Post by Whiterook on Mar 9, 2023 18:27:52 GMT -5
First to come after washing, as with any miniatures is an undercoat. I generally use gray acrylics, but in miniatures I'll tend to use black, which allows dark folds in uniforms. Nothing fancy here...just black Folk Art Acrylic Paint straight out of the bottle. You can thin the paint to not cover too thick, but most craft paints are pretty thin in viscosity. Note I don't paint the slotted base bits, since these are going to be glued and anchored in the bases.   Next is color! Again, Folk Art Acrylics are used for all the painting on my Stargate series miniature figures you'll see (these, Jaffa Warriors, Serpent Guards, and SG-1). I drybrushed gold and silver onto applicable weapons and uniform elements, including chainmail, skull caps, helmets, Staff weapons, and other uniform accessories. A flat artist brush works best for drybrushing, where you load the brush with paint; remove some on a dry paper towel so there's not much paint left; and then stroke the paint in a sideways stroke in one direction only very lightly. 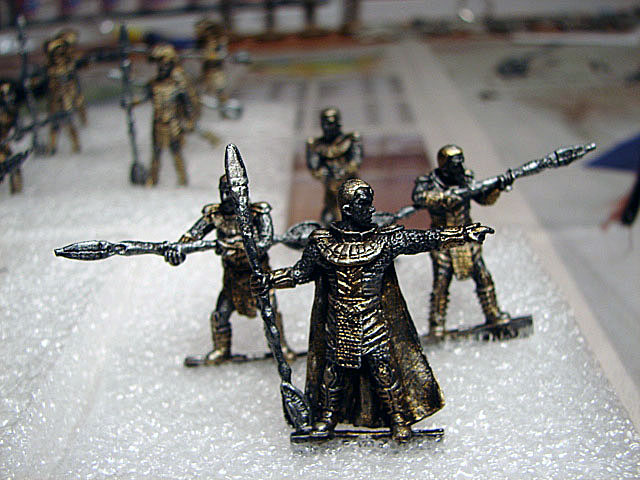 ...I love that First Prime leader!  It's easier to start with silver paint, and then add in the gold to the figures that require it. The parts that need gold are a little more rich in hue with having silver underneath, and it also helps vary the effect the black was doing in the nooks and crannies.   The gold really makes them pop!!!   It's a pretty simple and straightforward process, where some figures will need a little more work than others. The important thing is not to apply the paint too thick, as you don't want to loose sculpt detail or the black undercoat, which in the case of these figures is also serving as a basecoat; that being a basecoat as well, because with the drybrushing of color, black being the first layer of color serves to darken the hue of lighter colors. They make an impressive force! 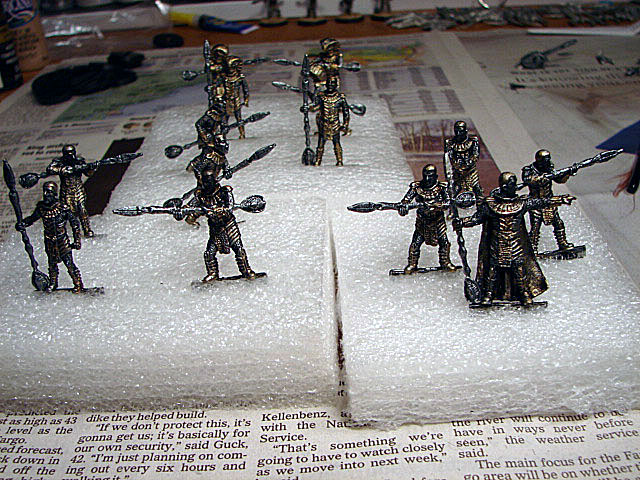 |
|
Whiterook
Full Member
Member since: March 2013
Posts: 837
Mar 13, 2013 15:29:19 GMT -5
Mar 13, 2013 15:29:19 GMT -5
|
Post by Whiterook on Mar 9, 2023 18:35:07 GMT -5
The third step is to add fleshtones to skin (faces and hands). For these miniatures I went with a straight color of desert sand mixed with white and a smidge of red to get a good fleshtone. Of course, there are paints that are fleshtone straight out of the bottle, but I don't mind mixing... taps into my artist and old art school training   The slotted base makes these type miniatures easy to temporarily mount in packaging foam. Note how the black under/basecoat comes into play bigtime here, especially in the face! ...it does all the hard work for you. Again, we're drybrushing here.   ...this guy is Berserker Fearsome!!!   ...the First Prime leader is amazing in detail, and looks very Commanderly! The fellow in the picture below is the Goa'uld Heavy Cannon Jaffa warrior...  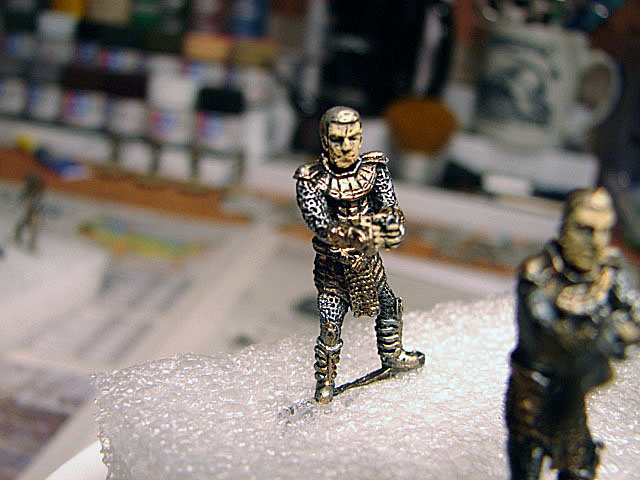
Now, I could have gone a couple ways at this juncture: I could have added in some red acrylic wash (water thinned to an ink-like consistancy, dabbed onto the skin, which makes skin look more human-like, but even at 28mm, I wasn't convinced it was necessary...it can always be added later in time. The other way I could have gone was to add more colors to the battle uniforms, like browns, but I kinda like this look! When you watch the television series, you see the underdress of the Jaffa was black tunics, pants, and capes... so, I think this captures the effect perfectly! That would be it for painting. |
|
Whiterook
Full Member
Member since: March 2013
Posts: 837
Mar 13, 2013 15:29:19 GMT -5
Mar 13, 2013 15:29:19 GMT -5
|
Post by Whiterook on Mar 9, 2023 18:40:37 GMT -5
The fourth and final step is basing. These Phoenix ICONS miniatures come with the slots already cut into the top of the circular bases.   This is done in two steps: The first being to glue and then anchor the figure's slot tab into the circular base stand. To do this, I first used CA glue (cyanoacrylate), also called "Crazy", "Gorilla", or "Super Glue) spread onto the tab, and then inserted int the base stand... let cure for a few hours, but I always let them cure overnight (I'm anal, what can I say!). But I don't trust (OK, I'm paranoid, too!) that bond to hold in repeated handling so, I use an artist mixing spatula to "butter spread" in Spackle (a compound used to fill cracks in plaster and produce a smooth surface) underneath the base!   This not only adds extra bonding anchor to the slotted tab held in place with CA glue, but by totally filing in the hollow underside of the base stand, creates a flat base thaty sits on the table. Once dried, a coat of acrylic, or better yet, gluing on felt makes the perfect protection on diorama table surfaces. I'll be doing the latter, but haven't got around to it yet. Then, I spread spackle on top of the base stand, making "ground" stood upon. In this case, I wanted a simple desert terrain effect, since the diorama I plan to game on is a desert scene. To do this, I make a small mound of "sand"; and then add texture, in the application of actual granulated sand (from the craft store, as it's cleaner), sprinkled on and pressed into the spackle with my surgical gloved hands' index finger (we don't want body oils on the surface when we paint it!).  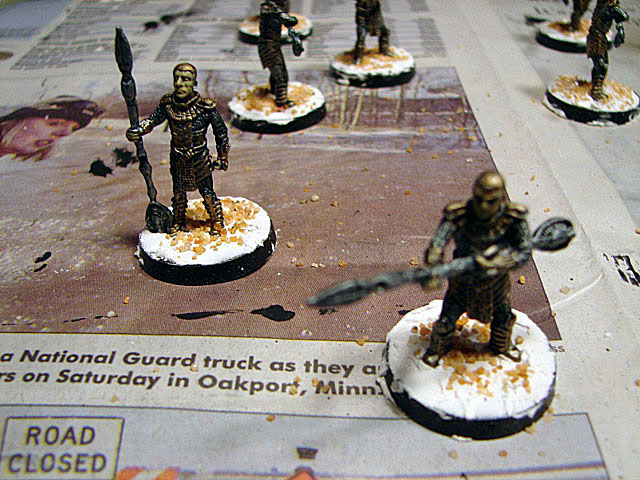   The bases walls can be cleaned up easily with scraping excess off with a plastic knife or paint spatula and a little water.  The second step is to paint the base. Again, I want a desert scape terrain effect so, I use desert sand color craft paint (same as use in the mixture for the figures' skin).      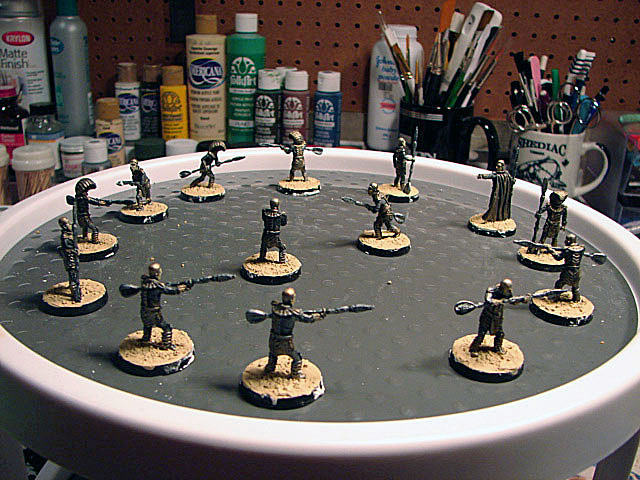  Once again, I could have added more sub-colors and highlights, but I like the look of just the sand color. I may apply dirt washes (Citadel Washes) later if I don't like the look over time, but for now it's just fine. There's kind of a natural shadow thing going on, anyway, so that's cool with me! |
|
Whiterook
Full Member
Member since: March 2013
Posts: 837
Mar 13, 2013 15:29:19 GMT -5
Mar 13, 2013 15:29:19 GMT -5
|
Post by Whiterook on Mar 9, 2023 18:45:44 GMT -5
|
|
|
|
Post by mustang1989 on Mar 9, 2023 19:59:29 GMT -5
I've been waiting to be able to view this thread all day long. Ya know, this is some really neat stuff with a ton of detail work being put into it. Having as many different figures as it looks like it has it seems like you would be on this project for quite the time. All of this is not only very interesting but it shows the level of skill that you've got as well.
|
|
Whiterook
Full Member
Member since: March 2013
Posts: 837
Mar 13, 2013 15:29:19 GMT -5
Mar 13, 2013 15:29:19 GMT -5
|
Post by Whiterook on Mar 9, 2023 21:52:13 GMT -5
I've been waiting to be able to view this thread all day long. Ya know, this is some really neat stuff with a ton of detail work being put into it. Having as many different figures as it looks like it has it seems like you would be on this project for quite the time. All of this is not only very interesting but it shows the level of skill that you've got as well. Thanks for the kind words… much appreciated! This project started in 2009, and the miniatures were probably 20 hours of combined work of prep and build of the miniatures, painting, and basing, along with making a pedestal base for the Stargate from air dry clay. I’d not done miniature figures before, so it was a learn as I go type gig. Knowing what I know now, I’m kinda shocked these turned out so well, but they have been durable and tough. They reside in foam trays in a miniatures carrier bag. The first rules set I wrote took a long time… better part of a year to develop from scratch; I knew what I wanted to do game-wise, but everything had to be playtested to make sure it *worked*. Those rules are for a somewhat easy game… complexity ratings for games run 1 to 10 (think Chutes & Ladders to a advanced Squad Leader’s 3” binder of rules that take a lifetime to learn)… the rules I wrote are probably a 4; the rules for the final, bigger game will probably be an 8. Somewhere around 2010, work stopped on the game entirely, except for a playtest of two. My work life in the Federal government was all consuming and wrought with stress, so I simply had no spare energy whatsoever for this game development, modeling, and, well, life. Now that I’m retired, I am returning to all the fun stuff that makes life a joy! I’ve git a TON more miniatures and diorama accessories of this game to work on so, this is gonna be a busy section of the forum from my side, lol. I can hear the masses now: “ENOUGH with the friggin’ Stargate stuff, already!!!” TEASER… and I haven’t even started posting my Battlestar Galactica miniatures game project yet! |
|


 , who are typically Guards, but the regular Jaffa warrior foot soldiers that we are talking about are shown on the bottom, and include a First Prime (commander, pictured with his arm outstretched and pointing) is pictured at the far right...