DennisM
Full Member

Member since: January 2012
Posts: 201
Jan 24, 2012 8:18:54 GMT -5
Jan 24, 2012 8:18:54 GMT -5
|
Post by DennisM on Apr 10, 2023 11:03:04 GMT -5
Another tiny project. Actually I have several that will be coming soon to be done concurrently when they get to the same stage. Very cool little kit that goes together in a few hours. Seam lines on this kit are almost non-existent. Only hiccup is the ejector pin marks on the sides of the hull. They will be noticeable and should be addressed. I chose to just fill them with superglue to take the edge off them. I think it will look okay. The tracks were kind of a pain. They are link and length but when I wrapped them around I came up about a half link short. I had to pull on the glued links to get a little more length out of the built sections. Just a couple more steps and the build will be finished.       |
|
DennisM
Full Member
Member since: January 2012
Posts: 201
Jan 24, 2012 8:18:54 GMT -5
Jan 24, 2012 8:18:54 GMT -5
|
Post by DennisM on Apr 10, 2023 13:50:04 GMT -5
The 50 cal was a little clunky. Made it less so   |
|
|
|
Post by chromdome35 on Apr 10, 2023 13:52:42 GMT -5
You are off to a great start! Your work on the .50 cal is excellent!
I admire anyone who can work in the small scales.
|
|
garydavis
Full Member
Member since: March 2023
RIP- September 2023
Posts: 440 
|
Post by garydavis on Apr 10, 2023 15:48:49 GMT -5
Great job on that .50 cal
|
|
|
|
Post by robbo on Apr 10, 2023 15:57:00 GMT -5
I like the look of this, never done a 1/48 vehicle but never say never
|
|
DennisM
Full Member
Member since: January 2012
Posts: 201
Jan 24, 2012 8:18:54 GMT -5
Jan 24, 2012 8:18:54 GMT -5
|
Post by DennisM on Apr 11, 2023 6:56:12 GMT -5
I like the look of this, never done a 1/48 vehicle but never say never 1/48 armor kits are great. They are generally Tamiya kits so you know the quality is going to be up there. They go together very quickly and are great kits if you want to try out some techniques. The problems start when you get to the tracks. they are link and length and very small. If you try to leave the tracks off for painting and weathering you are going to suffer. The connection points are very small and the tracks will come apart with even minor handling. When you try to use any weathering products with mineral spirits they will come apart. The solution is to glue the tracks to the running gear. Glue the individual parts of the tracks to the drive sprocket and the idler wheel. I did this on the Panzer II and the build was quite enjoyable. I left them off the M8 for reasons and I am sure I will pay. The tracks are a little beefier so I may be okay |
|
|
|
Post by mustang1989 on Apr 11, 2023 19:35:04 GMT -5
I saw this kit on the back cover of this months FSM magazine. I've got a couple of 1/48 kits in the stash and the information on the track links is very useful information Dennis. Hopefully you don't have too tough of a time with the tracks on this one.
|
|
ogrejohn
Full Member
Member since: June 2012
Go away or I shall taunt you a second time!
Posts: 1,259
Jun 1, 2012 17:33:59 GMT -5
Jun 1, 2012 17:33:59 GMT -5
|
Post by ogrejohn on Apr 12, 2023 16:22:43 GMT -5
Looking good Dennis!
|
|
DennisM
Full Member
Member since: January 2012
Posts: 201
Jan 24, 2012 8:18:54 GMT -5
Jan 24, 2012 8:18:54 GMT -5
|
Post by DennisM on Apr 13, 2023 8:36:27 GMT -5
|
|
DennisM
Full Member
Member since: January 2012
Posts: 201
Jan 24, 2012 8:18:54 GMT -5
Jan 24, 2012 8:18:54 GMT -5
|
Post by DennisM on Apr 28, 2023 7:17:51 GMT -5
|
|
|
|
Post by chromdome35 on Apr 28, 2023 7:52:38 GMT -5
Looks great! I think the results justify the preshading work
|
|
|
|
Post by Tojo72 on Apr 28, 2023 9:25:12 GMT -5
Very nice it's not always easy to get the mud effects right on the small scale.
|
|
|
|
Post by 406 Silverado on Apr 29, 2023 9:35:55 GMT -5
Jeez.....I have to keep reminding myself that this is a 1/48 scale build Dennis. The results of your pre-shading and layering up after that are just amazing. I only hope that I can do this much justice to the 1/48 scale Panther that I've got in the stash!! Very nice work indeed buddy.
|
|
DennisM
Full Member
Member since: January 2012
Posts: 201
Jan 24, 2012 8:18:54 GMT -5
Jan 24, 2012 8:18:54 GMT -5
|
Post by DennisM on Apr 29, 2023 15:05:35 GMT -5
Thanks everyone! Got the running gear and tracks mostly weathered up. I am going to hit them with some enamels and oils to blend some of the harshness and pastellness of the plaster out. This is just a mixture of real dirt, plaster and burnt umber craft paint. Takes a lot more paint than you think. The plaster really whitens it up. The bottle of Vallejo really gives a good idea of the size of the kit   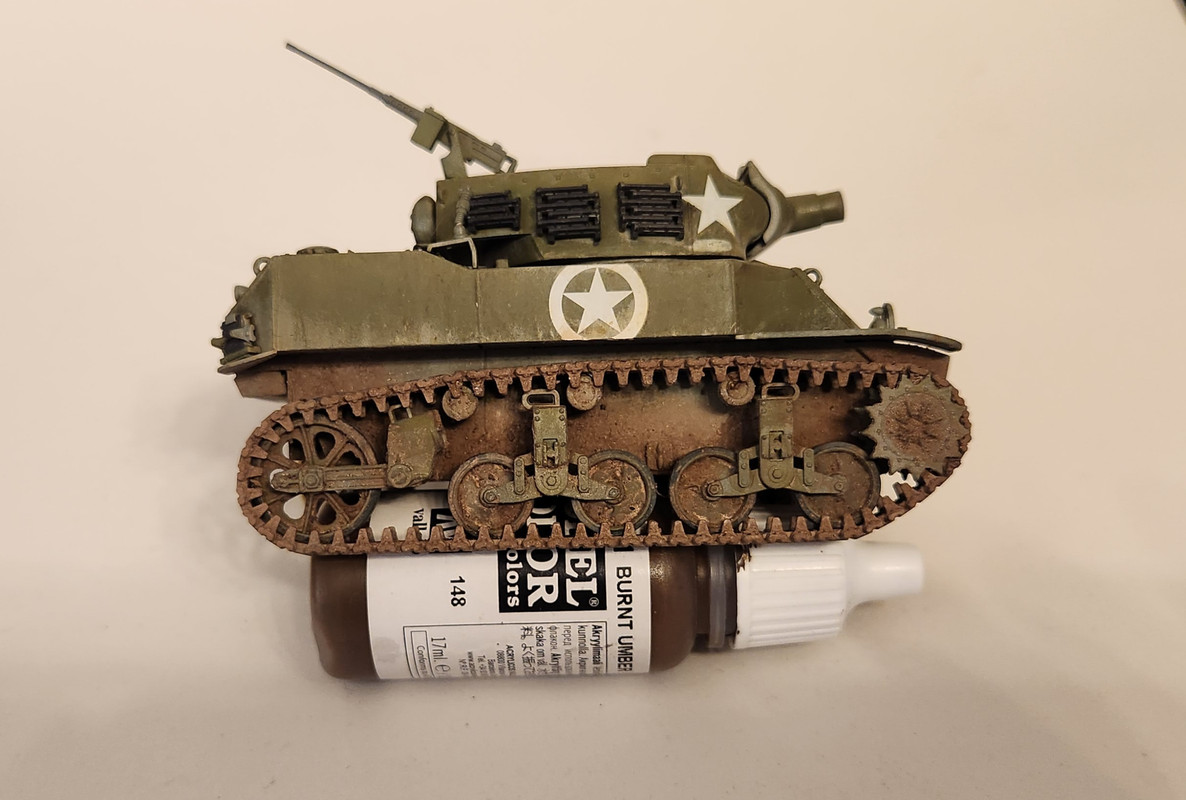 |
|
|
|
Post by 406 Silverado on Apr 29, 2023 15:26:45 GMT -5
It's really amazing just how small these 1/48 kits really are. The you couple that with all the detail work and paint/ weathering that you're putting into this one and it just throws it into a whole 'nuther category of modeling. Beautiful work and great techniques on display here Dennis.
|
|
|
|
Post by `Boots` on Apr 29, 2023 15:43:15 GMT -5
Excellent.  |
|
|
|
Post by 406 Silverado on May 2, 2023 21:38:12 GMT -5
Any updates on this one Dennis?
|
|
|
|
Post by robbo on May 3, 2023 10:14:45 GMT -5
This has moved on nicely since my last visit
|
|
reserve
Senior Member

Member since: July 2012
Si vis pacem para bellum
Posts: 2,348
Jul 11, 2012 9:11:45 GMT -5
Jul 11, 2012 9:11:45 GMT -5
|
Post by reserve on May 6, 2023 12:03:25 GMT -5
Sweet job sir
|
|
DennisM
Full Member
Member since: January 2012
Posts: 201
Jan 24, 2012 8:18:54 GMT -5
Jan 24, 2012 8:18:54 GMT -5
|
Post by DennisM on May 9, 2023 7:19:24 GMT -5
Any updates on this one Dennis? It is getting close to being finished. April and May are my busiest months of the year and haven't had time lately I did have a mildly failed experiment though. I used plaster mixed with acrylics for the weathering on the tracks and hull and Initially I thought it looked great. Then I messed it up thinking some enamel earth washes would make it look better on one side (this is how I usually ruin kits). When I put them on it got darker when it got wet with the enamels. It never lightened and left harsh dark stains and I had to use earth colored acrylics to fix it. I figured my problem was how absorbent the plaster was, so I put some pigment fixer on the other side and that seemed to solve my problem Just trying to find my style and I am getting closer Pics soon.. |
|
|
|
Post by 406 Silverado on May 9, 2023 7:47:24 GMT -5
Any updates on this one Dennis? It is getting close to being finished. April and May are my busiest months of the year and haven't had time lately I did have a mildly failed experiment though. I used plaster mixed with acrylics for the weathering on the tracks and hull and Initially I thought it looked great. Then I messed it up thinking some enamel earth washes would make it look better on one side (this is how I usually ruin kits). When I put them on it got darker when it got wet with the enamels. It never lightened and left harsh dark stains and I had to use earth colored acrylics to fix it. I figured my problem was how absorbent the plaster was, so I put some pigment fixer on the other side and that seemed to solve my problem Just trying to find my style and I am getting closer Pics soon.. Trial and error are usually how it works for me and it usually bites me right in the tail on one of any given builds most crucial stages. For instance,I found out the hard way NOT to use lacquer gloss coat over an enamel color coat. BIG mistake. Had the perfect paint job go completely south in one coat of lacquer. Enamel over lacquer=  .....lacquer over enamel=  But hey, if we never mess up...we never learn.  Glad you found a fix for your issue Dennis and I'm looking forward to those pics. |
|
|
|
Post by chromdome35 on May 9, 2023 14:21:53 GMT -5
It is getting close to being finished. April and May are my busiest months of the year and haven't had time lately I did have a mildly failed experiment though. I used plaster mixed with acrylics for the weathering on the tracks and hull and Initially I thought it looked great. Then I messed it up thinking some enamel earth washes would make it look better on one side (this is how I usually ruin kits). When I put them on it got darker when it got wet with the enamels. It never lightened and left harsh dark stains and I had to use earth colored acrylics to fix it. I figured my problem was how absorbent the plaster was, so I put some pigment fixer on the other side and that seemed to solve my problem Just trying to find my style and I am getting closer Pics soon.. Trial and error are usually how it works for me and it usually bites me right in the tail on one of any given builds most crucial stages. For instance,I found out the hard way NOT to use lacquer gloss coat over an enamel color coat. BIG mistake. Had the perfect paint job go completely south in one coat of lacquer. Enamel over lacquer= .....lacquer over enamel= But hey, if we never mess up...we never learn. Glad you found a fix for your issue Dennis and I'm looking forward to those pics. Joe, that reminds me of the old drinking adage...Beer on Whiskey, pretty risky. Whiskey on beer, never fear. |
|
|
|
Post by 406 Silverado on May 9, 2023 14:25:30 GMT -5
Trial and error are usually how it works for me and it usually bites me right in the tail on one of any given builds most crucial stages. For instance,I found out the hard way NOT to use lacquer gloss coat over an enamel color coat. BIG mistake. Had the perfect paint job go completely south in one coat of lacquer. Enamel over lacquer= .....lacquer over enamel= But hey, if we never mess up...we never learn. Glad you found a fix for your issue Dennis and I'm looking forward to those pics. Joe, that reminds me of the old drinking adage...Beer on Whiskey, pretty risky. Whiskey on beer, never fear. Yessiree! Been there and done that!! |
|
adt70hk
Forum Moderator 
Member since: November 2015
Currently attempting to build something decent!!! ;)
Posts: 2,482
MSC Staff
|
Post by adt70hk on May 9, 2023 14:36:39 GMT -5
Coming on nicely Dennis.
Sorry I am very late to the party!
ATB.
Andrew
|
|
Joe Rix
Forum Moderator
Member since: January 2023
Posts: 1,453
MSC Staff
|
Post by Joe Rix on May 9, 2023 21:57:16 GMT -5
Sweet build Dennis. Really excellent painting and weathering. You've achieved a very realistic appearance.
Thank You for the tip on assembling and painting the link and length tracks on these. I am currently working on a 1/48 Tamiya Sherman Firefly and have been continuously wondering how to paint them. I am no armor builder by any stretch and this was just kind of a nice casual build for something different. I am very much enjoying the 1/48 armor. Good stuff.
|
|
|
|
Post by Tojo72 on May 10, 2023 6:56:30 GMT -5
I knew it was small,but thats small,really looking good.
|
|
|
|
Post by hasenpfeffer on May 16, 2023 20:38:14 GMT -5
Looking good! For sure if I ever get to a kit that requires OD, I will definitely try some of that pre-shading that you did. I'm certain I wouldn't have thought of that on my own.
|
|
buddho
Forum Moderator
Member since: February 2019
Posts: 1,067
MSC Staff
|
Post by buddho on May 16, 2023 21:05:39 GMT -5
Excellent build here...the painting and weathering is off the charts!
|
|