

1/60 Timber Wolf Mech Updated 5/4/24 Test Fitting
Apr 15, 2024 1:23:55 GMT -5
deafpanzer, mz3, and 3 more like this
Post by chromdome35 on Apr 15, 2024 1:23:55 GMT -5
This is a bit of a long-winded intro, skip down to the kit if you want the TLDR version.
I bought an FDM (Filament) 3D printer over a week ago and have been melting filament almost non-stop. This is my first exposure to 3D printing, and I'm blown away by what's possible. I have been reading and watching everything I can get my hands on about 3d Printing, and I've learned a lot in just a week.
Things I didn't understand about 3D printing until I bought a printer:
3D Printing is comprised of three parts:
1) Modeling software where you design/draw the thing you want to print. An example being Fusion360 by AutoDesk (same company behind AutoCad). There are many 3D Design tools on the market, some free, some paid. The modeling software produces a .stl file that would be analogous to a blueprint of the part.
2) Slicer software: The Slicer software takes the .stl file containing the model and converts it into code (GCode) that is interpreted by the hardware of the 3D printer. The GCode tells the printer head where to move, how much filament to extrude, etc... There are several Slicers on the market, and some excellent free versions. You configure the slicer by setting various parameters such as print speed, temperature, wall thickness, infil type, etc... The slicer reads the .stl file and based on the parameters given it, it produces a file containing the GCode. The file goes to the printer and off you go.
3) 3d Printer: Since this is my first printer and I've only had it a week, my real world experience is pretty limited. Think of a 3D Printer as a temperamental girlfriend or a stubborn mule. Each brand and model is different and you have to learn your machine. For example, what temperature should the build plate be for good PLA filament adhesion? Some of the newer printers on the market take the guesswork out of this and provide proven printing profiles you can use. This is one of the reasons I bought the Bambu X1C.
There are a lot of 3D models on the internet for free. If you don't care to design your own models, you don't have to. You can download more stuff to print than you can afford to print...forever. Not designing your owns stuff frees you from having to learn modeling software. You can focus on the slicer and your printer.
Detailed, quality models are usually monetized. You must pay for the model if you want to print it.
One of the model websites I came across was Gambody.com I was really impressed by their kits.
The kits consist of a number of parts that you print and then assemble. You can sand, putty, prime, paint, and weather just like any other kit. The only difference is that instead of cutting the parts from the sprue, you print them on your 3D printer.
Looking around their site, they have a LOT of impressive kits; the problem is that many of them are far too big to be practical. After being printed, the 1/34 scale Millenium Falcon kit will stand 281 mm tall, 716 mm wide, and 1006 mm deep. That's the size of a large coffee table.
TLDR skip to here
I opted for a more mundane kit, The 1/60 Timberwolf from Mechwarrior Online. After being printed will stand 267 mm tall, 191 mm wide, 147 mm deep.
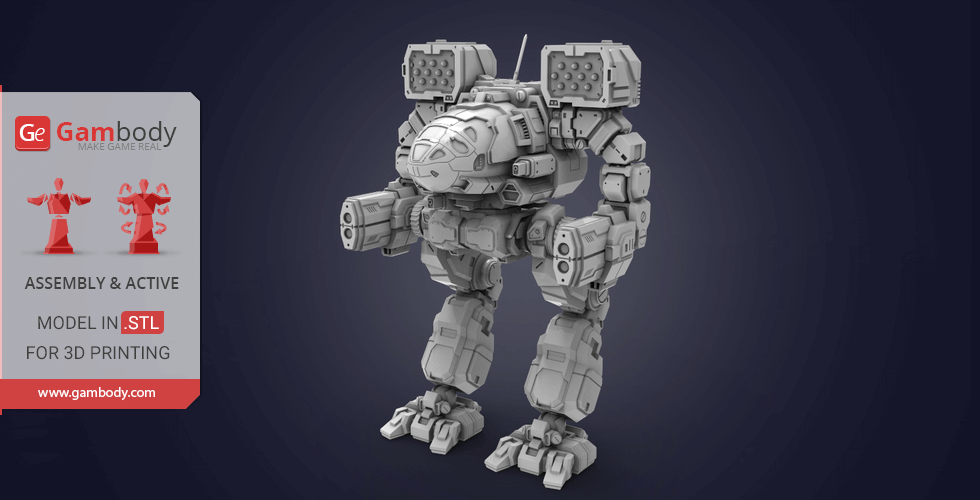
This is what the completed kit will look like
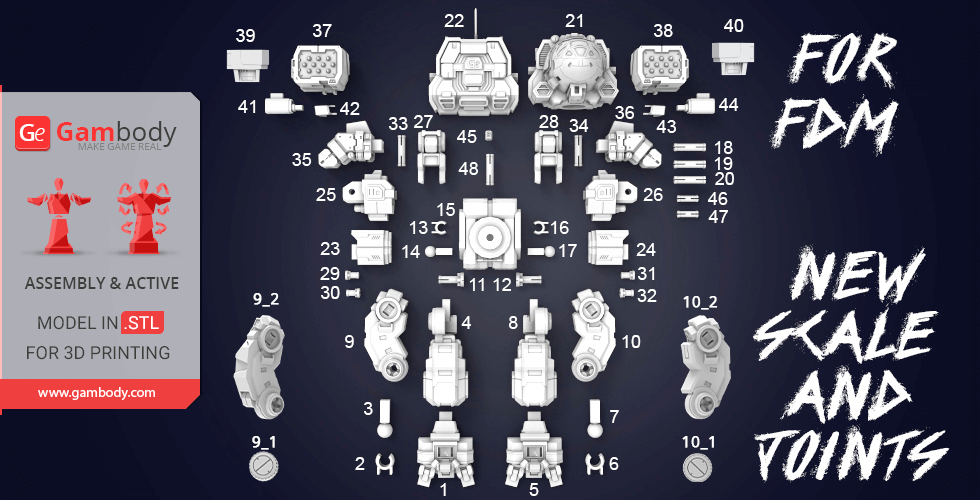
Parts
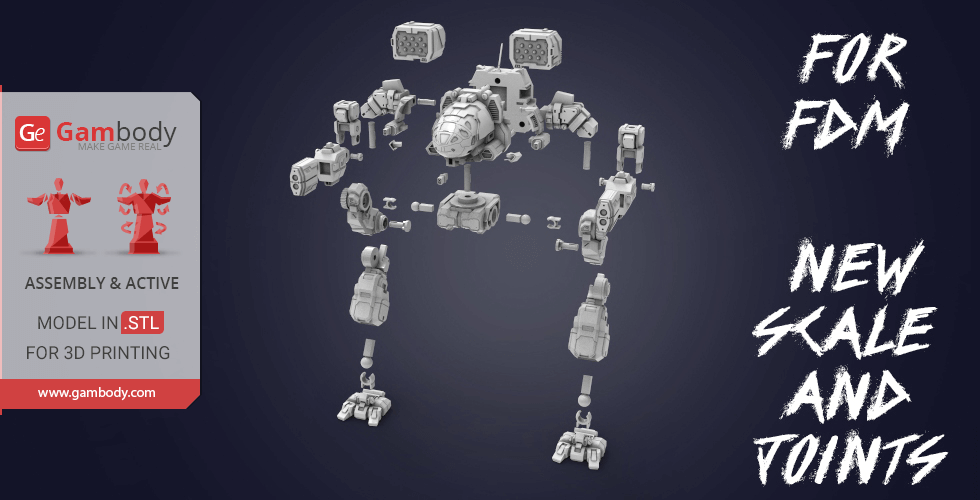
Assembly
Youtube Video of Assembly
So I've started the printing process, I am going from the ground up, I've printed up to the pelvis section; however, I have a couple of parts I need to reprint because I'm a noob and didn't do something right.
What I've printed so far with a TET bottle for scale

When zoomed in, You can see the layers, but they are very fine; I printed this at a .12 mm layer height.


The printed connectors, they remind me of Lego Technics

Once printing is complete, I will prime this with Mr Surfacer 1500 and start painting it.
I bought an FDM (Filament) 3D printer over a week ago and have been melting filament almost non-stop. This is my first exposure to 3D printing, and I'm blown away by what's possible. I have been reading and watching everything I can get my hands on about 3d Printing, and I've learned a lot in just a week.
Things I didn't understand about 3D printing until I bought a printer:
3D Printing is comprised of three parts:
1) Modeling software where you design/draw the thing you want to print. An example being Fusion360 by AutoDesk (same company behind AutoCad). There are many 3D Design tools on the market, some free, some paid. The modeling software produces a .stl file that would be analogous to a blueprint of the part.
2) Slicer software: The Slicer software takes the .stl file containing the model and converts it into code (GCode) that is interpreted by the hardware of the 3D printer. The GCode tells the printer head where to move, how much filament to extrude, etc... There are several Slicers on the market, and some excellent free versions. You configure the slicer by setting various parameters such as print speed, temperature, wall thickness, infil type, etc... The slicer reads the .stl file and based on the parameters given it, it produces a file containing the GCode. The file goes to the printer and off you go.
3) 3d Printer: Since this is my first printer and I've only had it a week, my real world experience is pretty limited. Think of a 3D Printer as a temperamental girlfriend or a stubborn mule. Each brand and model is different and you have to learn your machine. For example, what temperature should the build plate be for good PLA filament adhesion? Some of the newer printers on the market take the guesswork out of this and provide proven printing profiles you can use. This is one of the reasons I bought the Bambu X1C.
There are a lot of 3D models on the internet for free. If you don't care to design your own models, you don't have to. You can download more stuff to print than you can afford to print...forever. Not designing your owns stuff frees you from having to learn modeling software. You can focus on the slicer and your printer.
Detailed, quality models are usually monetized. You must pay for the model if you want to print it.
One of the model websites I came across was Gambody.com I was really impressed by their kits.
The kits consist of a number of parts that you print and then assemble. You can sand, putty, prime, paint, and weather just like any other kit. The only difference is that instead of cutting the parts from the sprue, you print them on your 3D printer.
Looking around their site, they have a LOT of impressive kits; the problem is that many of them are far too big to be practical. After being printed, the 1/34 scale Millenium Falcon kit will stand 281 mm tall, 716 mm wide, and 1006 mm deep. That's the size of a large coffee table.
TLDR skip to here
I opted for a more mundane kit, The 1/60 Timberwolf from Mechwarrior Online. After being printed will stand 267 mm tall, 191 mm wide, 147 mm deep.
This is what the completed kit will look like
Parts
Assembly
Youtube Video of Assembly
So I've started the printing process, I am going from the ground up, I've printed up to the pelvis section; however, I have a couple of parts I need to reprint because I'm a noob and didn't do something right.
What I've printed so far with a TET bottle for scale
When zoomed in, You can see the layers, but they are very fine; I printed this at a .12 mm layer height.
The printed connectors, they remind me of Lego Technics
Once printing is complete, I will prime this with Mr Surfacer 1500 and start painting it.


