TJ
Full Member

Member since: May 2023
Posts: 1,304
May 14, 2023 18:18:36 GMT -5
May 14, 2023 18:18:36 GMT -5
|
Post by TJ on Mar 1, 2024 4:42:49 GMT -5
Looking through what I could this is an absolute beauty in the making
|
|
|
|
Post by Steve Zuleski on Mar 1, 2024 9:31:21 GMT -5
Thanks, Carlos and TJ. Sometimes ya get lucky and find enough figures to tell a story and not have too many alterations to do. Ya, TJ, sorry about the blank pics, that PB issue messed a lot of guys up and there was no recourse but to never use them again, oh well  |
|
|
|
Post by Steve Zuleski on Mar 1, 2024 9:32:09 GMT -5
MG34 and MountThe MG34 that comes with this kit is rather crude compared to the MG34 that is produced by Reedees Miniatures. There really is no comparison. Before I had received Steve’s kit, I had already drilled out the barrel and was having no fun with the kit gun mount, it was very weak. As you can see from the box photo there’s quite a bit of gear that Steve has included in this accessory kit and I will be using much of it. Since this R75 crew is very close to home I won’t be using the gas can or chow jugs, but I will use the rest of it. Steve also provided the ammo cans and potato mashers. Inside that plastic box are several belts of MG ammo. They are very well molded, but even so, it’s a very delicate operation to clean up. Resin is not as tough as styrene, so I’m really taking my time with these belts. 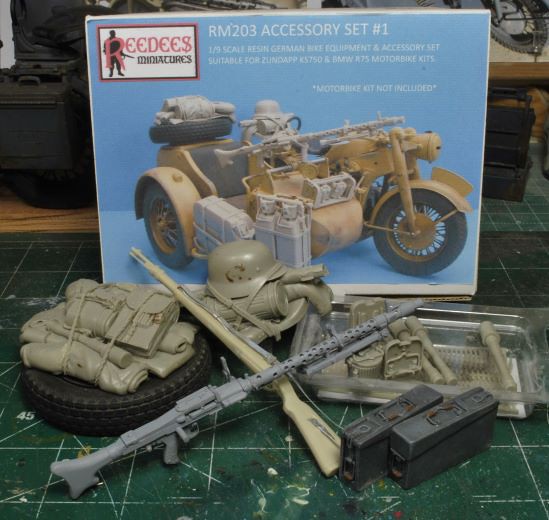 Below you can see how I drilled out the barrel of the MG and inserted plastic rod. The details on this MG34 are very accurate as are all of Steve’s gun parts and kits. I don’t know how he does it, but I’m likin it.  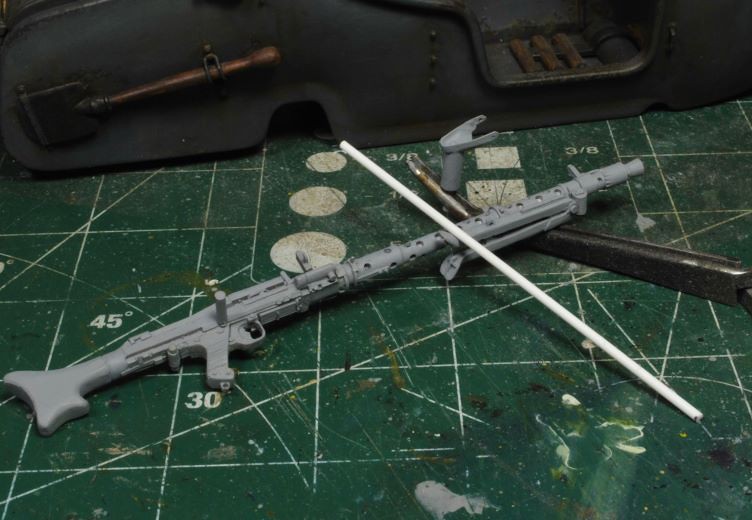 I had to refabricate another gun mount using brass which was cut, bent, and attached to the base of the kit mount. With some careful and delicate filing and shaping I was able to get this mount into shape to take the MG without too much difficulty and still be very close to accurate. I’ll give this MG and mount some paint and set it aside while I clean and paint the rest of the gear. Momentum is rolling along nicely, so we’ll keep at it until the base work. Hopefully I will have figured out my plans for the Ranger’s hidey-hole. Whatever I come up with I want a lot of veggies, vines, and grass. More to follow soon and thanks for watchin. Cheers, Ski.
|
|
handiabled
Community Relations Moderator 
Member since: February 2023
Posts: 2,313 
MSC Staff
|
Post by handiabled on Mar 1, 2024 9:55:32 GMT -5
This is an amazing thread Ski. I love the details on the Harley! I'm tuned into this one for sure!
|
|
TOWGunner
Full Member
Member since: January 2024
Slowly building down my stash...only 600 more to go!
Posts: 181
Jan 29, 2024 17:15:24 GMT -5
Jan 29, 2024 17:15:24 GMT -5
|
Post by TOWGunner on Mar 1, 2024 11:01:56 GMT -5
On board for the finish Ski! That Harley's a masterpiece! Wondering where you're going from here but I know it's going to be spectacular.
|
|
|
|
Post by Steve Zuleski on Mar 1, 2024 17:53:06 GMT -5
This is an amazing thread Ski. I love the details on the Harley! I'm tuned into this one for sure! Thanks, Brent. That was a ton of work, but I really had fun doing it. On board for the finish Ski! That Harley's a masterpiece! Wondering where you're going from here but I know it's going to be spectacular. Thanks, Matt. One thing is certain, we are going to finish this, HA! |
|
|
|
Post by Steve Zuleski on Mar 10, 2024 12:03:12 GMT -5
Time for the DetailsWhen getting back into working this R75 I realized just how much I had to do to get it in shape for the finish. I had to redo the unit decals, because I never paid attention to which unit was portrayed in the kit set. I needed to mount the MG34 gun plus the ammo belt, add the ammo drum rack, and pin and mount the storage boxes. The ammo belt took a bit of careful work, but Steve has made working the belts easier by how they were cast. They are still very delicate, and you will break them. I think everyone does break a few, but with a little care you can make them work as needed. 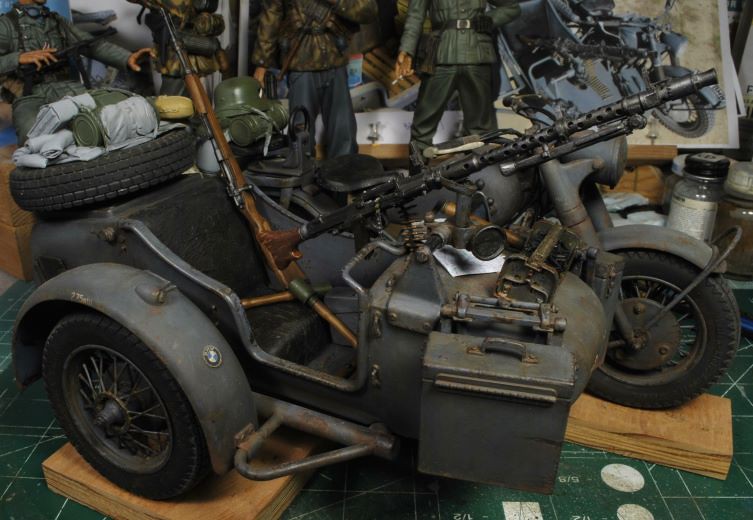 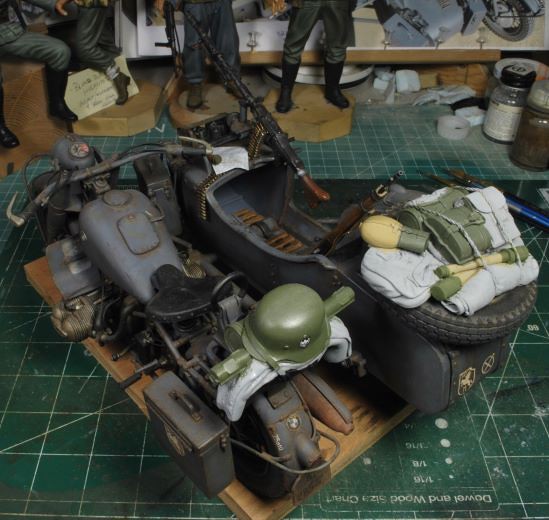 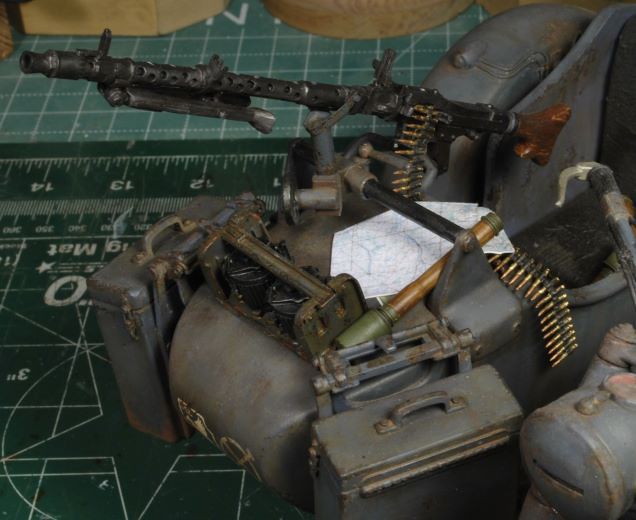 In between working the R75 I also prepped the 98K rifle. For that I added a light wood grain pattern and used Raw Umber oils for the stock color tone. For the metal I did and experiment that seems to be working well so far. With a layer of Tamiya Flat Black in place I used standard carpenter’s pencil lead applied with a mascara applicator to all the high points. I then gave the metal a wash mix of Ivory Black and Brunt Umber oils to set in all the recesses. Once this was completely dry, I then used the applicator again but this time I used tube graphite that had been crushed fine. This last step seems to give a more silver tone to the barrel on the top high points. It may not look like much yet, but the MG34 is a better example of how well this worked. 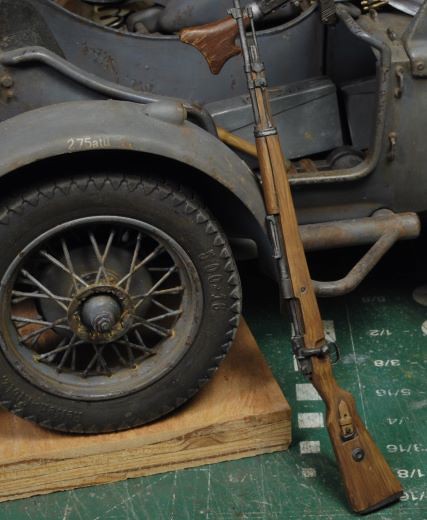 I’m now in the process of painting the stowage gear, and I still need to fling on some dirt and mud splatter onto the R75, plus get the tires in order. Once the R75 is up to speed I will finish any punch list items for each figure, there are quite a few, and get ready for the base. Just a quick note; the difference in my figure painting quality from ten plus years ago to today is glaring me in the face. I’m almost embarrassed to put some of these guys into this dio, but I’m going to let it ride and get this beast of a project finished. No, I am not going to redo any of the older figures, other than add a glint to the eyes and adjust some minor issues. Wow, I never really gave that “glint” a thought way back then, HA! What a trip, lol. Ahhh, we’ll call this dio a time capsule, Ya? More to follow soon and thanks for watching. Cheers, Ski.
|
|
stikpusher
Forum Moderator 
Member since: April 2023
Living The Dream
Posts: 3,389
MSC Staff
|
Post by stikpusher on Mar 10, 2024 15:29:51 GMT -5
Man that looks good!
|
|
kyledehart5
Forum Moderator
Member since: July 2023
Posts: 4,103
Member is Online
MSC Staff
|
Post by kyledehart5 on Mar 10, 2024 17:50:48 GMT -5
Really incredible work
|
|
|
|
Post by Steve Zuleski on Mar 10, 2024 20:04:42 GMT -5
Tanks, Gents. The fun really kicks in when the veggies start to grow, HA!
|
|
|
|
Post by Steve Zuleski on Mar 18, 2024 9:08:52 GMT -5
R75 Almost CompleteThe R75 and sidecar are nearly completed. I just have a few more items to deal with such as toning down the rusty tail pipe, clean up some overzealous scratches and rust marks, splatter some euro dirt, and dust up a few locations up from the underside. All the gear has been painted and installed including some paperwork and maps, a few stick grenades, ammo cans, and the aftermarket accessory set from Reedees Miniatures. I wanted the sidecar to look somewhat messy with papers and gear in disarray. I understand many of the motorcycle units pretty much lived in their rigs, but these guys are local to the Normandy area, so I couldn’t get too carried away. I just love the passenger’s smirk on his face indicating he’s not really sure where he is, lol. He doesn’t appear to be the most organized fellow anyway. More on him later as we get closer to the figure placement. 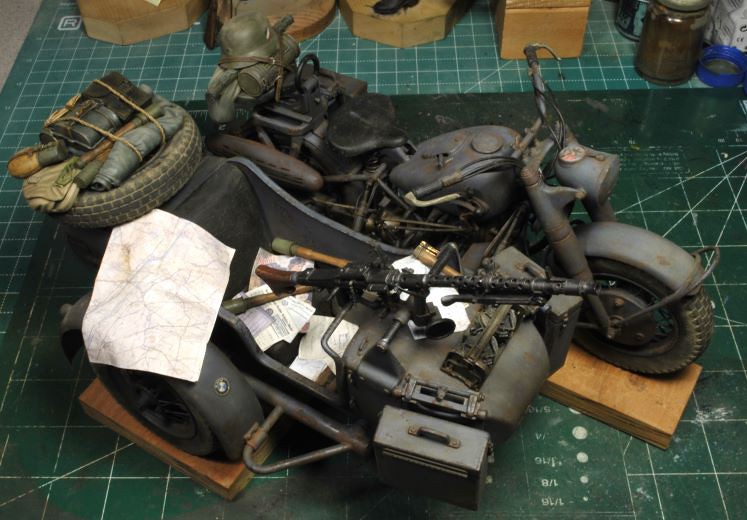 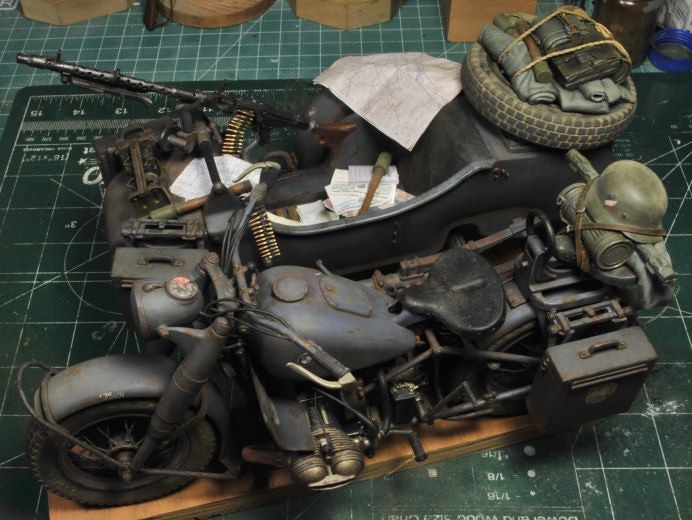 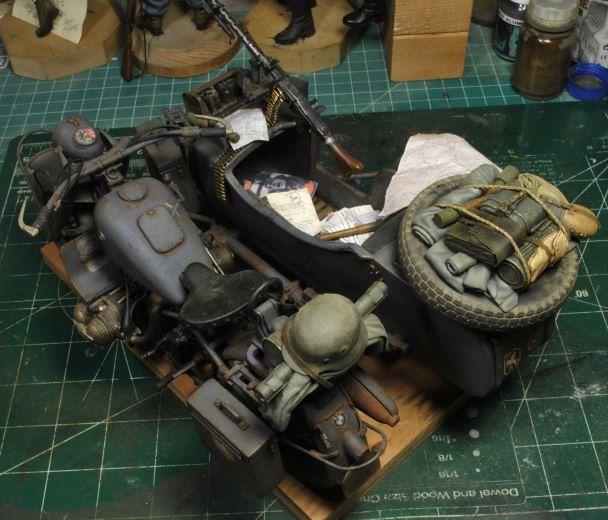 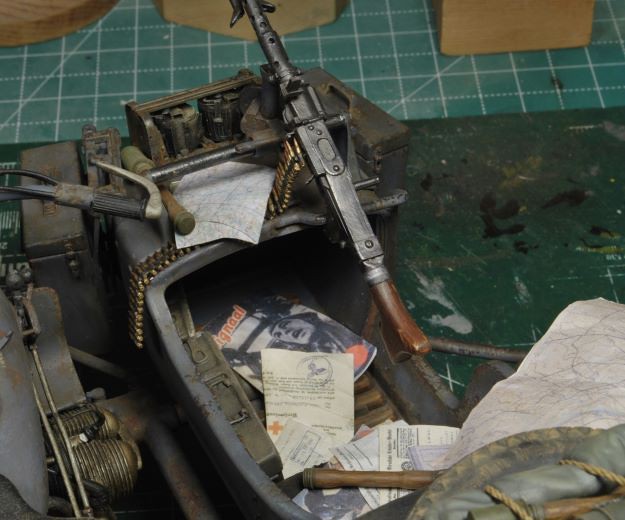 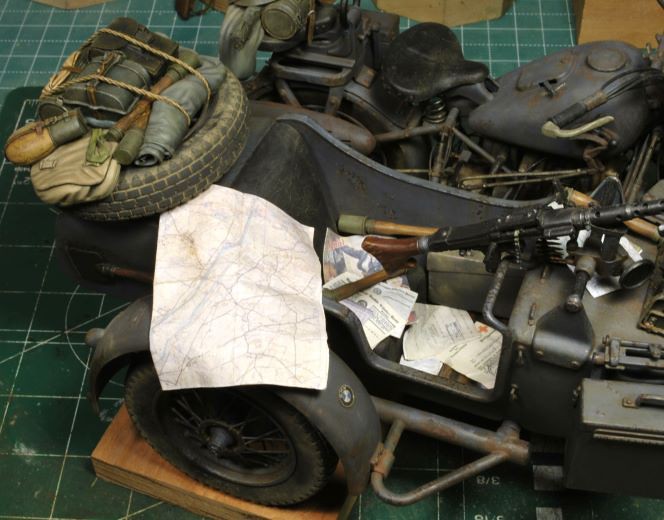 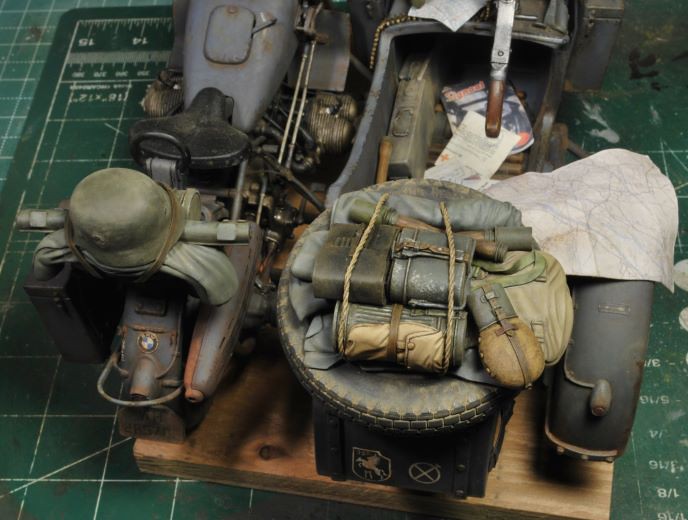 Here’s a few full rig shots. The tires have been dusted as well as the spare on the rack. I used an odd mixture of pine sap and bees wax to clean off the Mig Pigments dusting on the tire treads. I know this is a very odd thing to use, but the wet sponge just wasn’t “cuttin the mustard” and the pine salve just happened to be handy, lol. It actually worked very well and without a sheen, excellent! 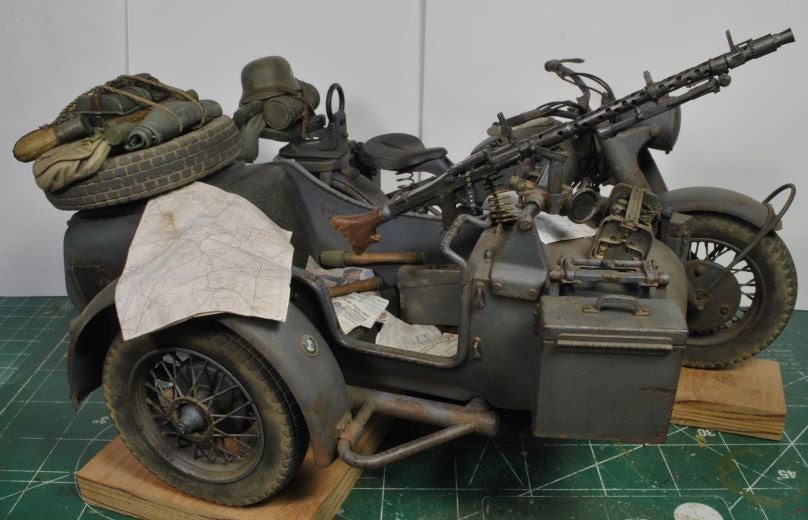 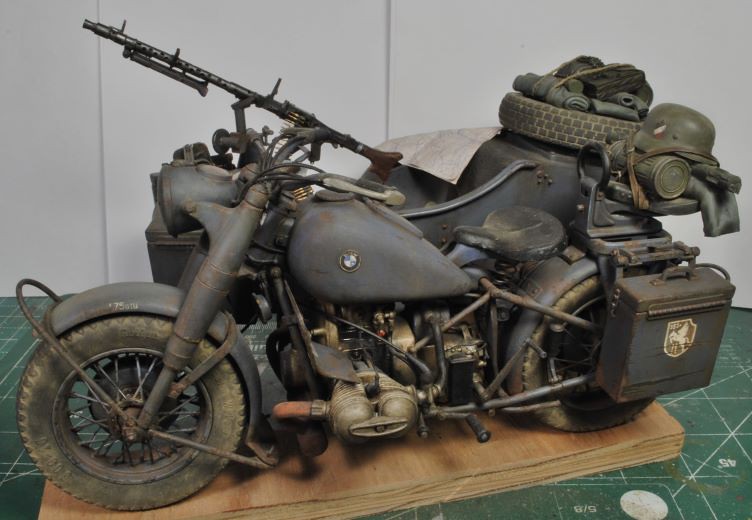 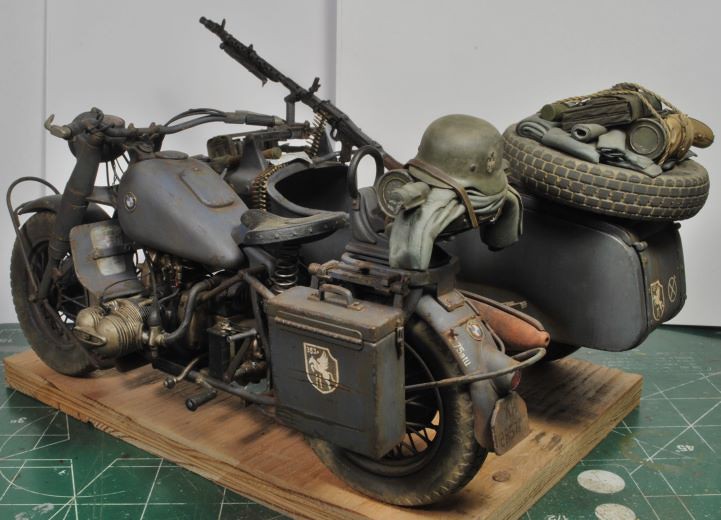  Now you can see the unit decal on the front of the sidecar. I had to play with the patch in “MS Paint” before printing on clear decal paper. There was a learning curve. Then, not being satisfied with the results, I hand painted each decal over the printed pattern. It wasn't too difficult, I used a very tiny brush and painted over the yellow printed color. I may need to touch up the decal on the R75 saddle box, it’s looking a bit odd from these photos. 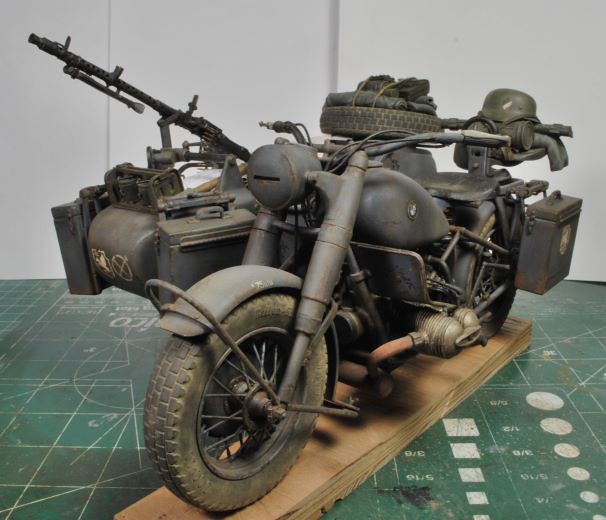 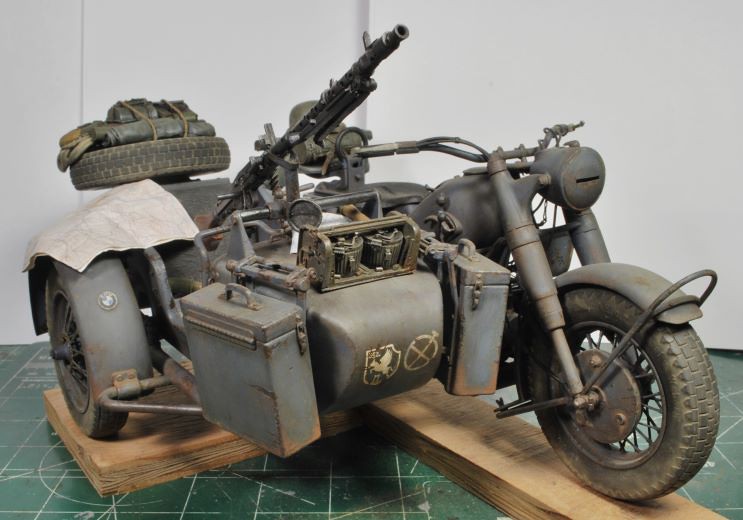 The R75 is in the cabinet until the figures have been addressed. Once the figures are set, I will figure out how the layout will work best and begin the base work. The final stages are in motion and the veggies will follow very soon. Thanks for watchin. Cheers, Ski.
|
|
|
|
Post by Leon on Mar 18, 2024 9:18:35 GMT -5
This is looking fantastic Ski! I love the cluttered look in the sidecar.
|
|
handiabled
Community Relations Moderator
Member since: February 2023
Posts: 2,313
MSC Staff
|
Post by handiabled on Mar 18, 2024 9:21:34 GMT -5
I could spend forever just looking at the sidecar detail. Wow Steve this is a masterpiece  |
|
|
|
Post by deafpanzer on Mar 18, 2024 10:09:42 GMT -5
WOW! Just wow! If you can place it outside you would have easily fooled us as a real thing. Amazing work as usual!
|
|
kyledehart5
Forum Moderator
Member since: July 2023
Posts: 4,103
Member is Online
MSC Staff
|
Post by kyledehart5 on Mar 18, 2024 14:54:49 GMT -5
Really incredible Steve. I have no words.
|
|
vw8243
Full Member
Member since: May 2013
Posts: 109
|
Post by vw8243 on Mar 18, 2024 17:00:43 GMT -5
Hi Steve That is one very lived in looking combo very nice! All s Great  . |
|
|
|
Post by Steve Zuleski on Mar 19, 2024 14:51:45 GMT -5
This is looking fantastic Ski! I love the cluttered look in the sidecar. Tansk, Leon! I could spend forever just looking at the sidecar detail. Wow Steve this is a masterpiece Hey, Brent, if your gonna post those two clowns ya better have their beer and dognuts ready ta go with em, eh?   Bahahahaa! Tanks, Bro! WOW! Just wow! If you can place it outside you would have easily fooled us as a real thing. Amazing work as usual! That might not be a bad idea, Andy, didn't think about that. Thanks, Andy! Really incredible Steve. I have no words. Thanks, Kyle, you are too kind, Brother. Hi Steve That is one very lived in looking combo very nice! All s Great . Thanks, Amigo!! |
|
cheyenne
Full Member
Member since: January 2024
Posts: 117
Jan 17, 2024 5:29:21 GMT -5
Jan 17, 2024 5:29:21 GMT -5
|
Post by cheyenne on Mar 20, 2024 7:12:07 GMT -5
Beautiful work as always BroSki !!!!
Love your bikes !!!
|
|
Golikell
Full Member
Member since: January 2024
Posts: 185
Jan 17, 2024 4:28:06 GMT -5
Jan 17, 2024 4:28:06 GMT -5
|
Post by Golikell on Mar 20, 2024 11:31:04 GMT -5
Great work Steve! Nice to see this golden oldie being revived after all your wandering about on other projects... The results are too good to let it this lie about...
|
|
|
|
Post by Steve Zuleski on Mar 20, 2024 21:14:00 GMT -5
Beautiful work as always BroSki !!!! Love your bikes !!! Tanks, Ma Brotha, from anotha Polish Motha!  Great work Steve! Nice to see this golden oldie being revived after all your wandering about on other projects... The results are too good to let it this lie about... Thanks, Erwin. Ya, this had to be finish, now that there is display room, lol. I'm gonna PM you both and Matt, get yalz input on the structure layout within the next few days just to make sure I'm not losing it. I think I got it, but yall always have good pointers. |
|
Golikell
Full Member
Member since: January 2024
Posts: 185
Jan 17, 2024 4:28:06 GMT -5
Jan 17, 2024 4:28:06 GMT -5
|
Post by Golikell on Mar 21, 2024 2:06:13 GMT -5
You are welcome... I am always willing to think with you... Don't forget Glenn. He also has a keen eye for this sort of stuff... :-)
|
|
cheyenne
Full Member
Member since: January 2024
Posts: 117
Jan 17, 2024 5:29:21 GMT -5
Jan 17, 2024 5:29:21 GMT -5
|
Post by cheyenne on Mar 21, 2024 5:31:18 GMT -5
Any of us BBQer's have the smarts to do a Skype thingie reunion to discuss what yer gonna do ?
Heck we should try and recruit guys here to start that back up ? ....... yes/no ?
|
|
|
|
Post by Steve Zuleski on Mar 21, 2024 8:39:18 GMT -5
Tanks, Erwin, and yes, Glenn is part of the "you both", HA! I know you both and Matt more than well enough for you guys to see where I'm going with this set-up, so I''ll get some pics taken later today.
Ya, Glenn, let's PM on that, sounds like a good idea. Keep the time frame within Erwin's schedule, should work fine like before.
Tanks, Gents.
|
|
Golikell
Full Member
Member since: January 2024
Posts: 185
Jan 17, 2024 4:28:06 GMT -5
Jan 17, 2024 4:28:06 GMT -5
|
Post by Golikell on Mar 21, 2024 9:17:30 GMT -5
I already thought you called me "both" as a kind of majestic plural courtesy...  I don't know enough people overhere to say who might add up... |
|
|
|
Post by Steve Zuleski on Mar 23, 2024 11:30:40 GMT -5
Building the Woodshed/Out-BuildingAfter serious consideration on how to lay out this scenario I’ve decided to build a woodshed/out-building. Since most of the barns in Normandy back in WWII were made mostly of stone with wood roofs and trusses, and I wanted to make an out-building, no stone work will be done. The lumber material has a rough sawn texture and would be typical of what would have been used for such a secondary structure. 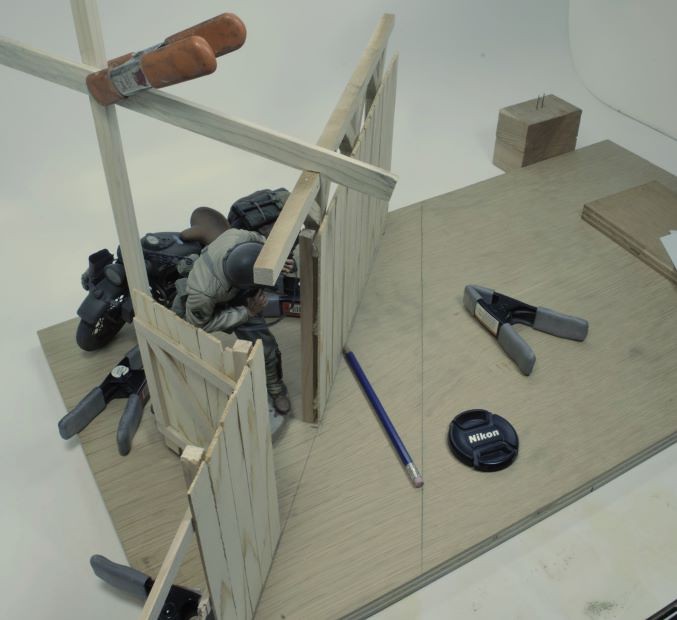 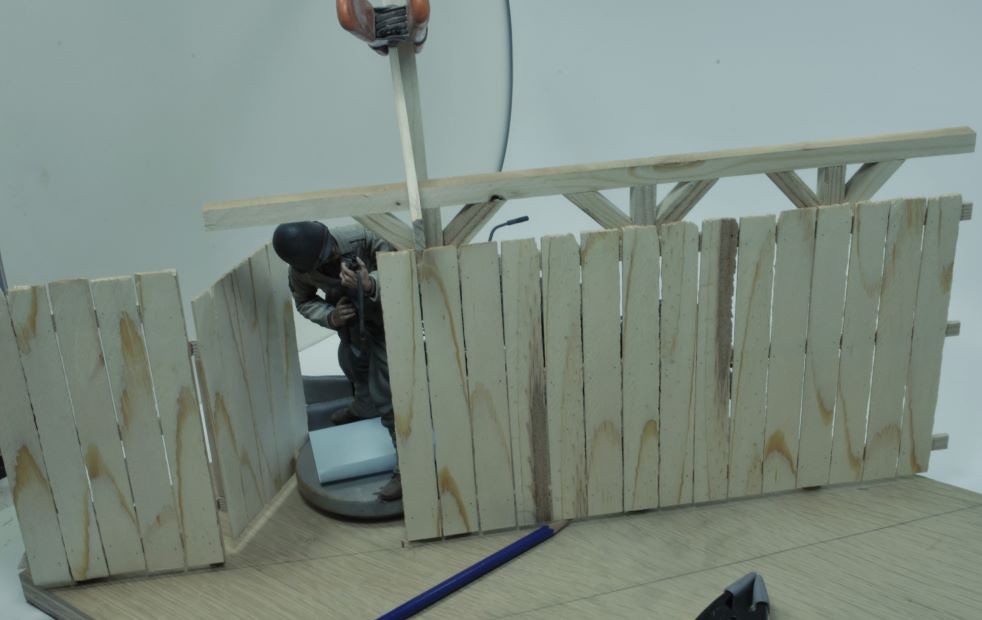 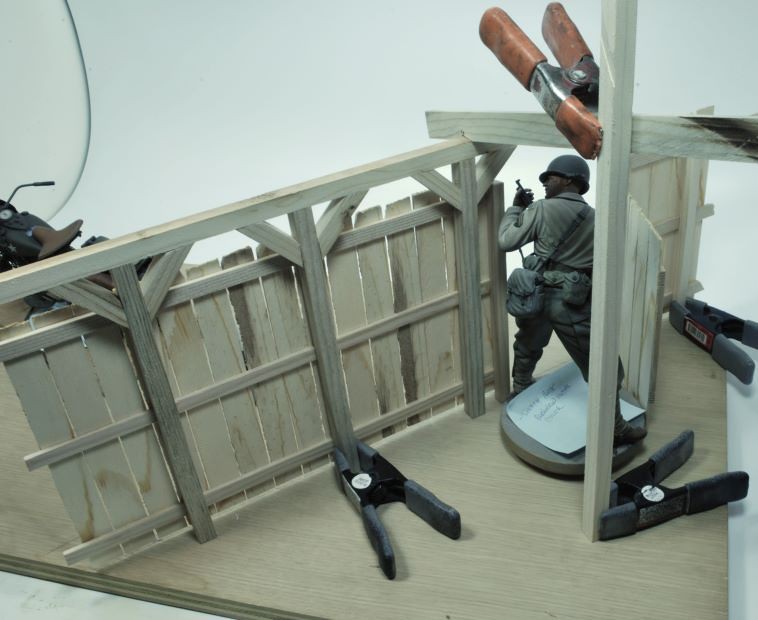 The scenario will work the same and I’ll be able to keep the scene open enough for the action to be visible without losing sight of the Ranger, he won’t be hidden. And of course there will be plenty of climbing ivy and bushes to cover and climb the old wooden structure. I will be using several shades fo dark brown and black to give the old wood appearance, so this should work just fine. I cut all the material on the table saw using weathered 1”x10” pine board scraps. I left an area open for some weather damage as well. The shake shingles were cut from a board that had not been planed, so the width would wider and be close to scale. I’m going to be busy for some time placing all those shingles, but the effect will be worth it. 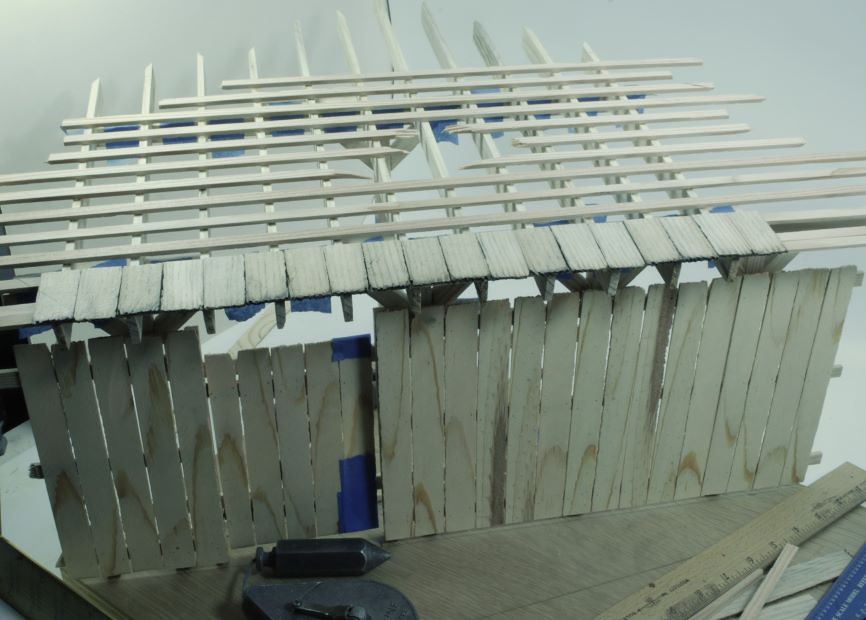 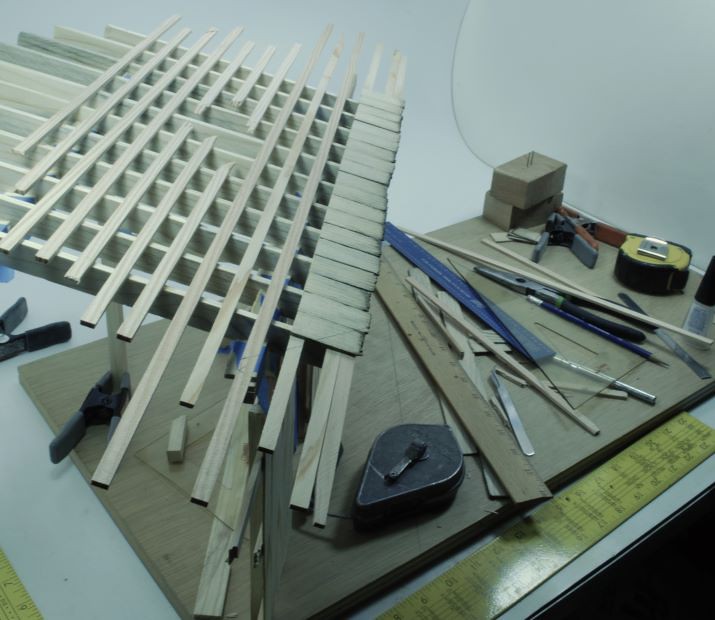 The posts all have heavy metal pins and the base and have been drilled for each location making for a stable set up. Right now, I’m debating what kind of equipment might need to be built to fill in some spaces as well as a few oil drums and maybe some tractor equipment as well. If I could find some 1/9th scale aftermarket equipment that would be great, but I’m thinking I will have to build all of it from scratch. No worries, that’s another fun part of this Sport, the imagination and creation, right? 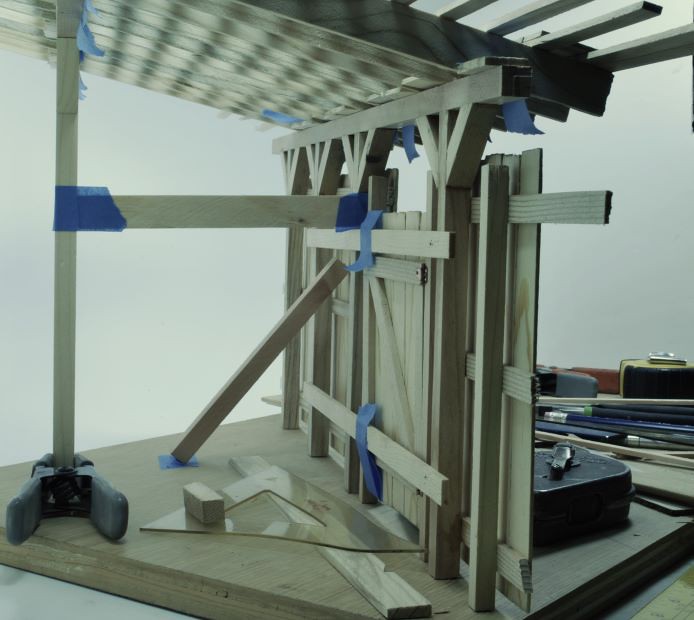 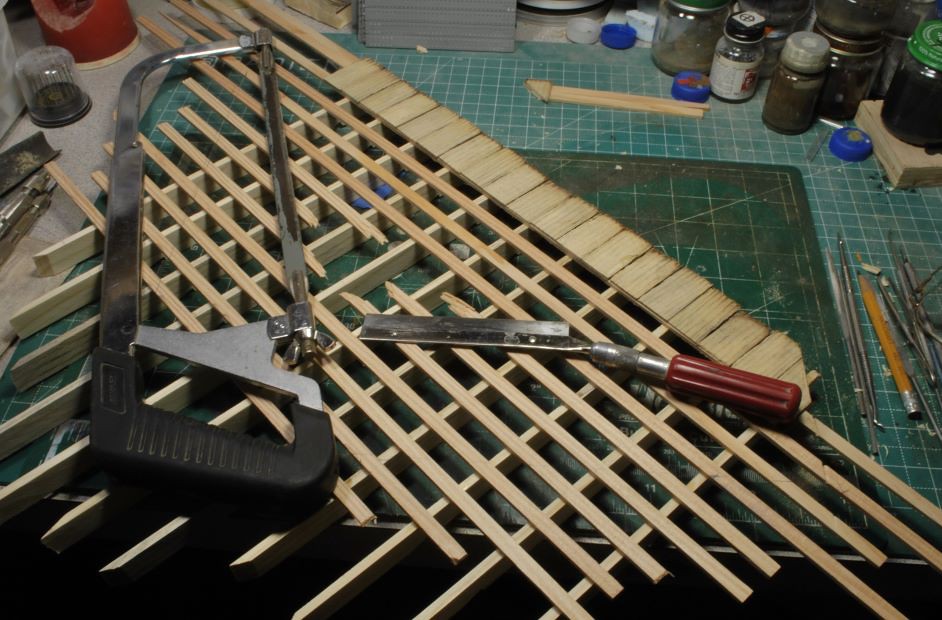 More to follow soon, but right now I’ve got my work cut out for the next few days. Thanks for watchin. Cheers, Ski.
|
|
vw8243
Full Member
Member since: May 2013
Posts: 109
|
Post by vw8243 on Mar 23, 2024 13:30:41 GMT -5
Hey Steve I do hope ya have all your planning application s in order for this building as the French are sticklers for this kind a thing,   , This is looking great already and should be good fun weathering and kitting out , you might find some bits in dolls house toys that could be tweaked . Leo. |
|
cheyenne
Full Member
Member since: January 2024
Posts: 117
Jan 17, 2024 5:29:21 GMT -5
Jan 17, 2024 5:29:21 GMT -5
|
Post by cheyenne on Mar 24, 2024 6:15:46 GMT -5
Working on a wooden structure , ......... you have your work cut out for yourself for the next few days .................. you funny ............. not funny peculiar , funny ha , ha .......
This is great BroSki , and as you told me in your pm , your work with scrap pine is beautiful .
You gonna use stain [ oh please do ] or thinned oils/enamels , or maybe even inks on the wood ?
|
|
|
|
Post by Steve Zuleski on Mar 24, 2024 7:11:37 GMT -5
Hey Steve I do hope ya have all your planning application s in order for this building as the French are sticklers for this kind a thing, , This is looking great already and should be good fun weathering and kitting out , you might find some bits in dolls house toys that could be tweaked . Leo. Lol, I am well aware of such dangerous waters, my friend, for my mother's side of the family is from a French heritage, HA! Great idea on the doll house cursory items, I didn't think about that. This is one of those situations that will take some time to ponder and dig, (research), for unique items. Working on a wooden structure , ......... you have your work cut out for yourself for the next few days .................. you funny ............. not funny peculiar , funny ha , ha ....... This is great BroSki , and as you told me in your pm , your work with scrap pine is beautiful . You gonna use stain [ oh please do ] or thinned oils/enamels , or maybe even inks on the wood ? Tanks, Glenn. I recon the best approach is to get this wood tone down to a very weathered, dull greyish brown tone, closer to black in some of the more exposed wet decaying areas, post bases, rafter tips, etc. I've had lumber weathering outside for years that has the very tone I'm looking for and there are countless old barns everywhere in my neck of the woods to use as examples. I'm lowering my gears a bit and slowing down on this process, way too much detail needs to be added to try and get this across the finish line too soon. |
|
|
|
Post by Steve Zuleski on Apr 4, 2024 8:59:22 GMT -5
Slow Going.Bunker time has been shortened a bit, but I’m still able to get a little time in daily. With Spring kicking in high gear that time will only get shorter, so I need to keep the momentum going without rushing the results. I’ve finished the roof system with the weather damage in the mid-section. The evidence of neglect over time will add a bit of character to the structure and will be weathered accordingly. Man, that was a lot of shingles to make and ruff up. 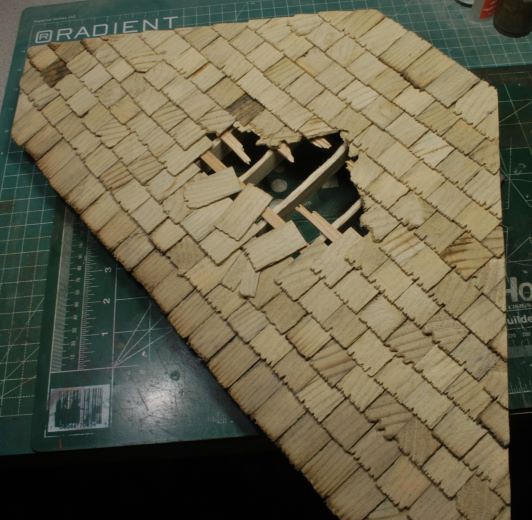 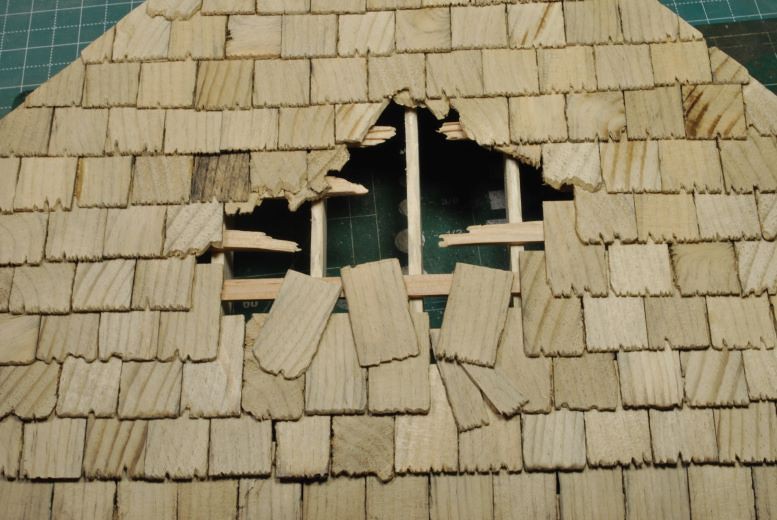 After the structure was built, I moved on to making the veggies. Trying to make bushes in this larger scale takes a bit of pre-planning as there really isn’t any decent foliage on the market. But you can, however, always scratch build your veggies using whatever is on hand. As you can see from the photo below, I save a few tomato roots and other garden plants each fall. They dry over the winter in the green house and are always ready in the spring. Ya just never know when you’ll need them and it’s always a good idea to plan ahead.  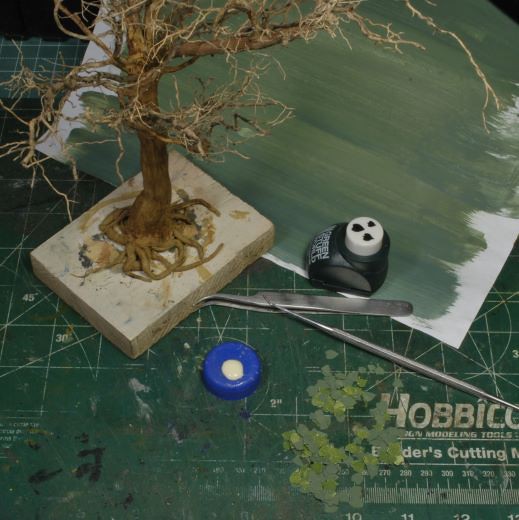  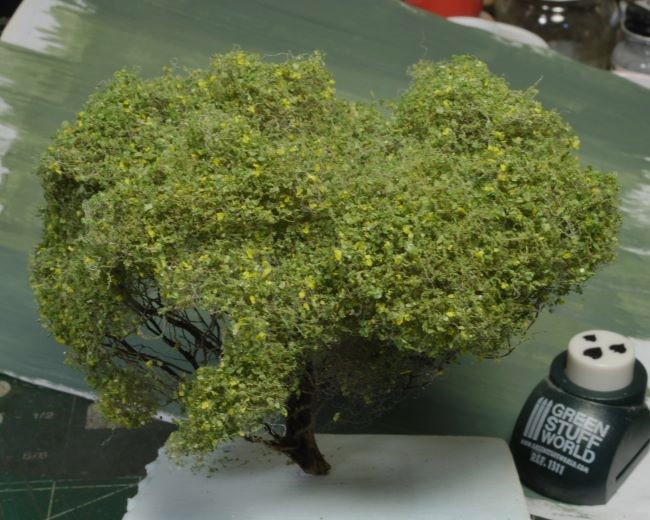 I started by taking apart the root system and separating usable sections for my bushes and set aside the longer strands for ivy or crawling plants. Many times, I couldn’t find exactly what I would consider a decent clump, so I had to combine several portions to fabricate the plant bases and structures needed. There are quite a few YT vids on how to make realistic bushes that are very helpful. I watched more than a few of them before starting the veggie work and that saved me a lot of time. I used fine and course flock and Super Leaf from Scenic Express on the bushes after applying small amounts of poly fiber, or pillow stuffing, on the branches. This really is too small for the scale I need, but I used it anyway. I won’t go over the process, but this video gives a good run down of the process. www.youtube.com/watch?v=K0wps1_K--MWhen it comes to making veggies, I prefer to find as much foliage as possible from the hillsides and mountains in my area. The realism, imho, can’t be beat and the material is very cheap, just pick it. Once the bushes were done, I started on the roof color tones and weathering. I added some moss on the shingles and a little bit on the top and bottom of the fence and gate. Ivy will be crawling all over this structure, so the wet and decaying wood needs this prep work to add realism to the effect. 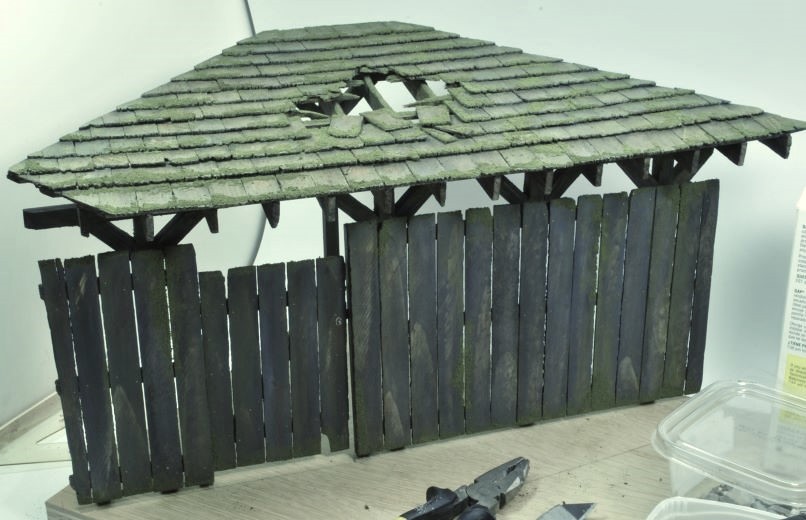 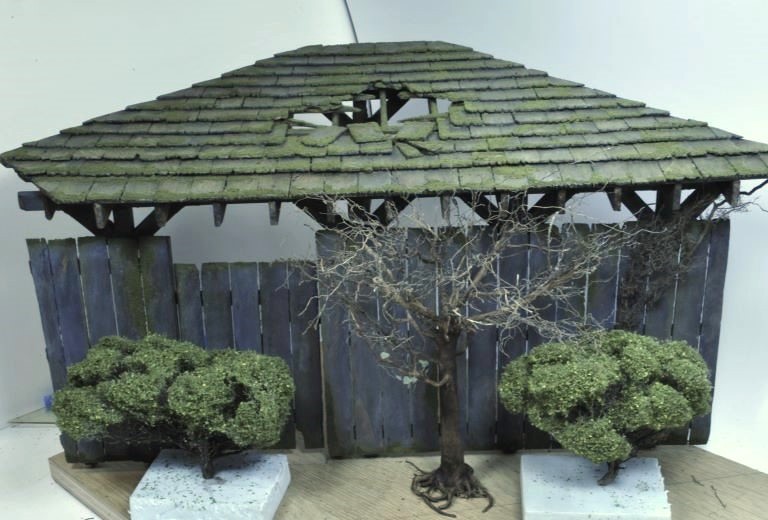 There is still a lot to do before I can start the ground work, but progress is moving forward. Feel free to add suggestions or comments and thanks for watchin. Cheers, Ski.
|
|
buddho
Forum Moderator
Member since: February 2019
Posts: 1,066
MSC Staff
|
Post by buddho on Apr 4, 2024 9:06:11 GMT -5
Just amazing!!!!!!  |
|


 Bahahahaa! Tanks, Bro!


