paulh
Senior Member

Member since: November 2011
build, fail, learn, succeed - ENJOY
Posts: 2,389
Nov 15, 2011 15:54:51 GMT -5
Nov 15, 2011 15:54:51 GMT -5
|
Post by paulh on Mar 15, 2012 14:32:44 GMT -5
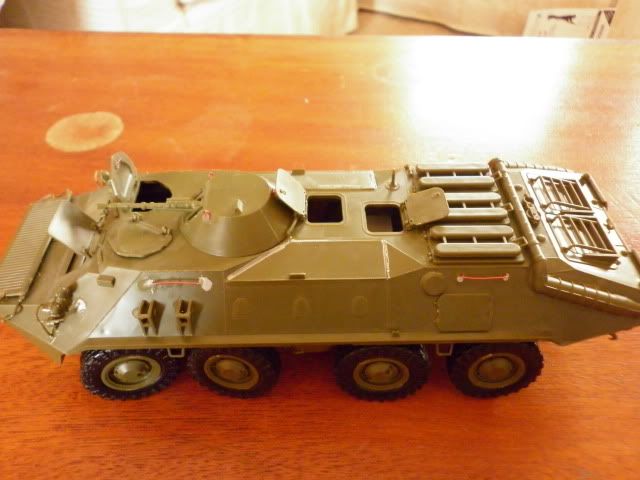
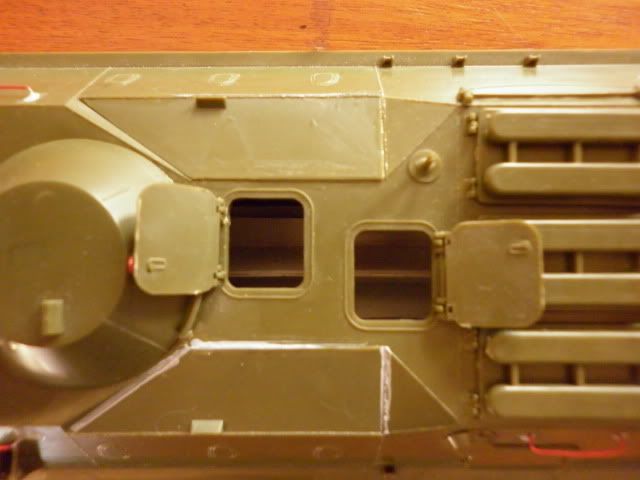
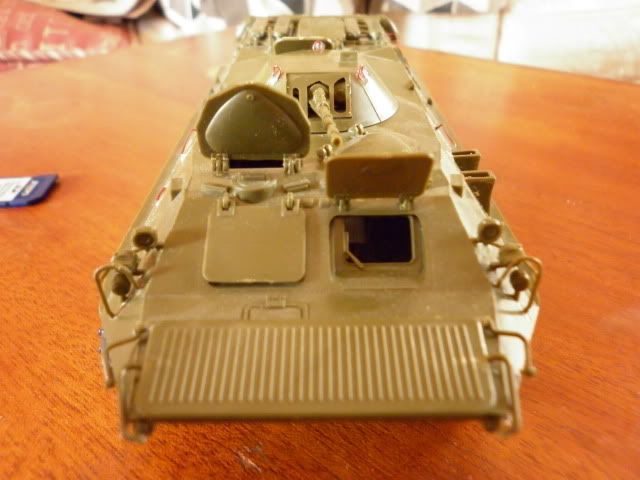
One of the reasons I like Tamiya kits so much -this is the result of about 4 or so hours work 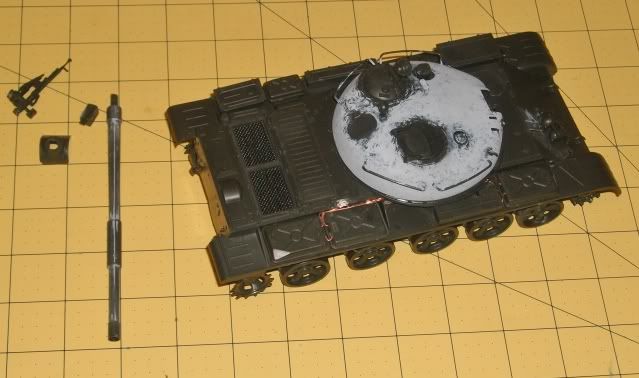  The fuel lines are made from the copper wire that came with the copper sheet I've previously posted about. I think I've finally found the right stuff - particularly scale wise. The turret has had a coat of Mr Surfacer for texture and will need another coat or two. Updates soon (I hope  ) |
|
|
|
Post by spud on Mar 15, 2012 17:33:56 GMT -5
did you sit on an F1 engine and get it stuck?? ;D
|
|
paulh
Senior Member
Member since: November 2011
build, fail, learn, succeed - ENJOY
Posts: 2,389
Nov 15, 2011 15:54:51 GMT -5
Nov 15, 2011 15:54:51 GMT -5
|
Post by paulh on Mar 18, 2012 16:31:26 GMT -5
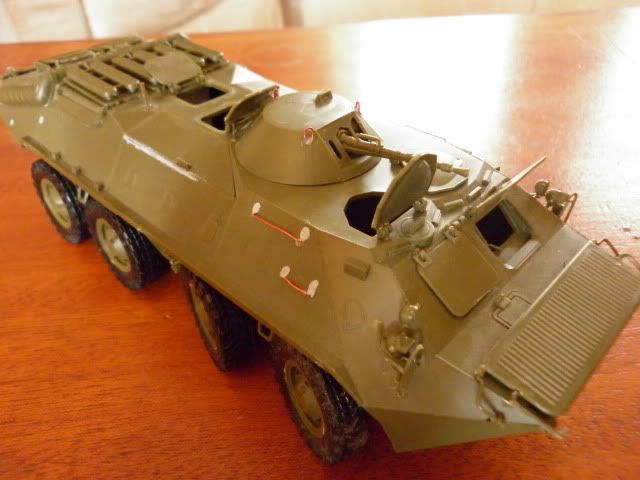
Well an update is due: all major sub-assemblies completed and dry fitted 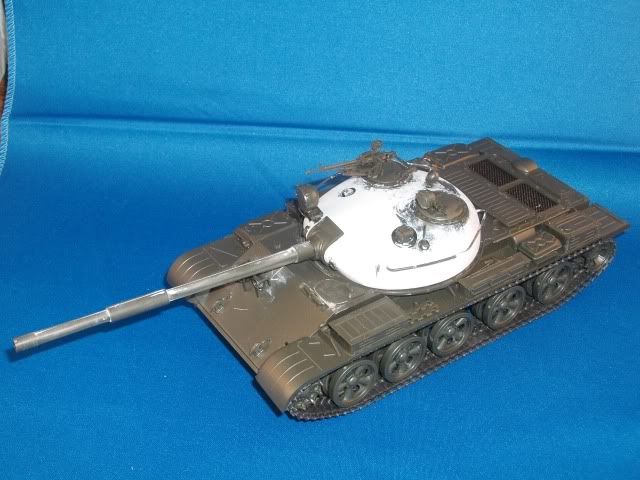 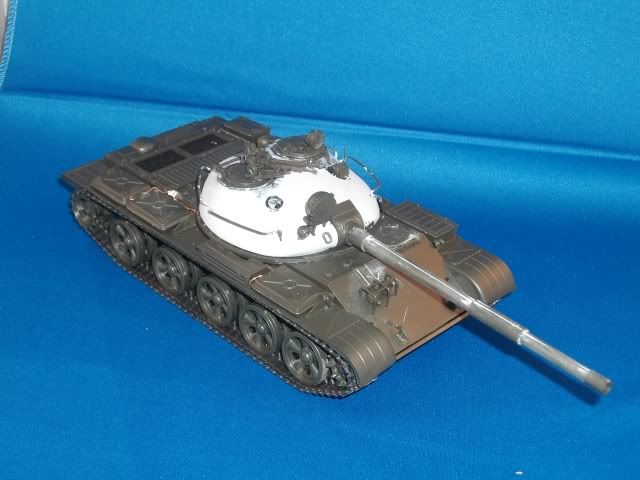 Unfortunately, its about as far as things are going to go for a while cause my AB has died  I suppose I can crack on with some builds until a new one arrives  |
|
|
|
Post by robbo on Mar 18, 2012 16:40:50 GMT -5
Thats looking good Paul
|
|
paulh
Senior Member
Member since: November 2011
build, fail, learn, succeed - ENJOY
Posts: 2,389
Nov 15, 2011 15:54:51 GMT -5
Nov 15, 2011 15:54:51 GMT -5
|
Post by paulh on Mar 18, 2012 16:51:20 GMT -5
Cheers Ian, -I ave to say I'm happy with how she's turned out so far.
|
|
|
|
Post by 406 Silverado on Mar 29, 2012 7:40:23 GMT -5
Looks good Paul. I'm going to pull my Trump T-62 down off the shelf and get the hull finished. Will be fun seeing a couple of T-62's in the GB getting painted.
|
|
paulh
Senior Member
Member since: November 2011
build, fail, learn, succeed - ENJOY
Posts: 2,389
Nov 15, 2011 15:54:51 GMT -5
Nov 15, 2011 15:54:51 GMT -5
|
Post by paulh on Mar 29, 2012 12:42:17 GMT -5
Ordered myself my first Iwata AB,  , so while I'm waiting, I decided to get some primer on- good ol' Halfords grey. Hull top and tub just dry fitted at the moment but taking shape nicely (I think)  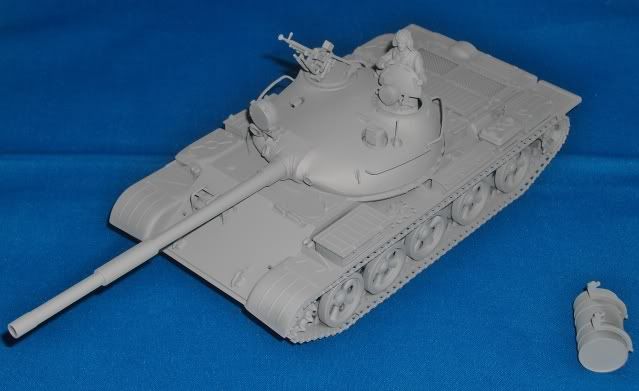 While waiting for it to dry I decided to tidy up my box of bits and empty the bin when I decided the Trumpy '55 should be given a second chance... 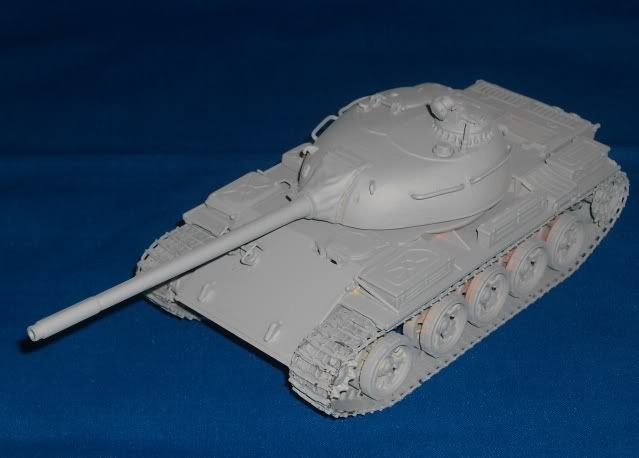 (tells you how often I empty the bin  It will need quite a bit of work to get where I want it,but its not going to beat me.. Finally, a group shot; 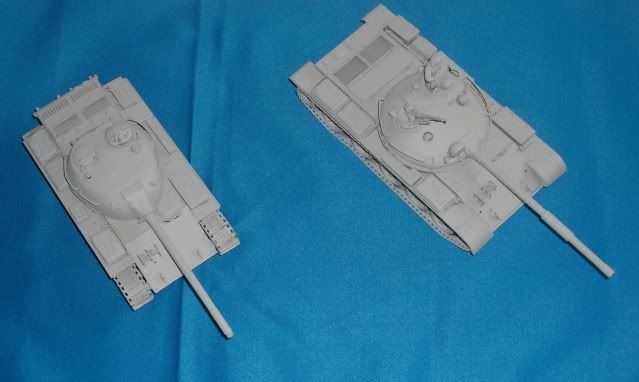 laters peeps |
|
|
|
|
|
Post by 406 Silverado on Apr 3, 2012 10:26:16 GMT -5
Paul, a bit late but at least you have them now. Will have to get back to my T-62 soon seeing how you have primer going on your builds. Need to get caught up with that and other builds.....after the JT of course.
|
|
paulh
Senior Member
Member since: November 2011
build, fail, learn, succeed - ENJOY
Posts: 2,389
Nov 15, 2011 15:54:51 GMT -5
Nov 15, 2011 15:54:51 GMT -5
|
Post by paulh on Apr 13, 2012 2:36:35 GMT -5
Time for Paint! The '55 from Hell or How I stopped worrying and just went for it.  [with apologies to Mr Kubrick ]. This kit cost me about £12 a couple of years ago and was one of a few that were bought solely fro the purpose of trying things out to build and develop my skills without the fear of ruining a £40 or more kit. I'm afraid I was too wrapped up in the doing to take progress shots on this, but anyway... Following the Halfords primer I applied a base coat of a mix of Tamiya flat brown with a touch of hull red, which once nicely dry received a liberal coating of hairspray. This was then followed with a couple of passes of Model Air Russian Green with a bit of Dark Tank Yellow added (approx (very) 70/30). I then took of most of this layer until i was left with a mostly brown hull with some faded green. At this point I wanted to try something different so I applied an all-over filter yellow ochre (oil & spirit) Once this was dry, the entire model was liberally salted with good ol' SAXA, in a mix of a heavy sludge- for the bigger areas and "free-grains" -for the spots. This was left overnight to allow it to dry onto the model and minimise fly-off during the next phase of painting. The following day it was given a couple of relatively light coats of thinned LC Weathered OD (about 50/50), and the salt then removed with a cheap bristle brush. Next up was some spot filtering using Cadmium Orange, Raw Sienna, Black and Yellow Ochre and Ab502 Green Grass oils , and then once dry, followed with an overall wash made up of Raw Sienna with a touch of Black. This was layed a bit more heavily onto the hull and excess wiped off. Some additional spots of orange were added to the turret for rust streaks , -but this still needs to be toned down in places as can be seen below(- hopefully with some more filters/washes) A couple of all-over filter were then added with SIN industries Brown for Dark Yellow. Finally (so far) a fairly heavy wash of Humbrol cream (as per my Leo1A4) to start building up dust layers, particularly within the various corners and indentations and this is what she now looks like ![]() [/img] Having some problems with pics at the mo- sorry- will try to sort this out later (now on company time  ) Some more filters- possibly something a bit more yellow to help with a washed-out look particularly on the hull and turret, then I'll focus on the running gear & tracks over next week when the ankle biters are away As always gents All comments (VERY graciously ) welcomed P |
|
martyncrowther
Full Member

Member since: December 2011
Not Jaymes
Posts: 699
Dec 27, 2011 14:40:09 GMT -5
Dec 27, 2011 14:40:09 GMT -5
|
Post by martyncrowther on Apr 13, 2012 9:50:42 GMT -5
I have not neglected the group build as I have made progress so therefore I will upload my progress after work  |
|
paulh
Senior Member
Member since: November 2011
build, fail, learn, succeed - ENJOY
Posts: 2,389
Nov 15, 2011 15:54:51 GMT -5
Nov 15, 2011 15:54:51 GMT -5
|
Post by paulh on Apr 13, 2012 16:22:04 GMT -5
Here's hopin I've sorted it now... 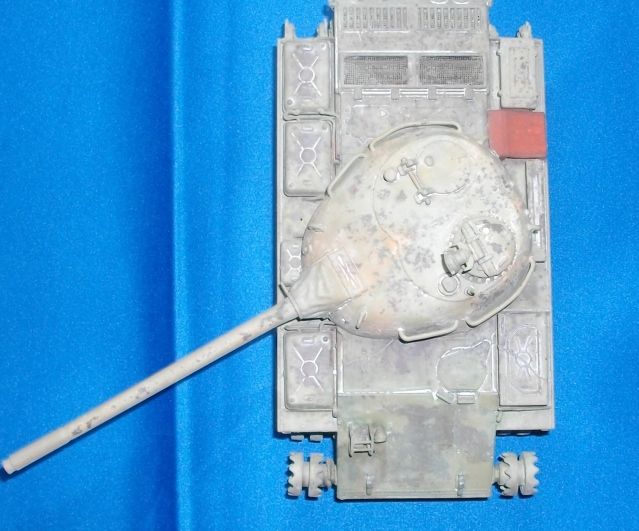 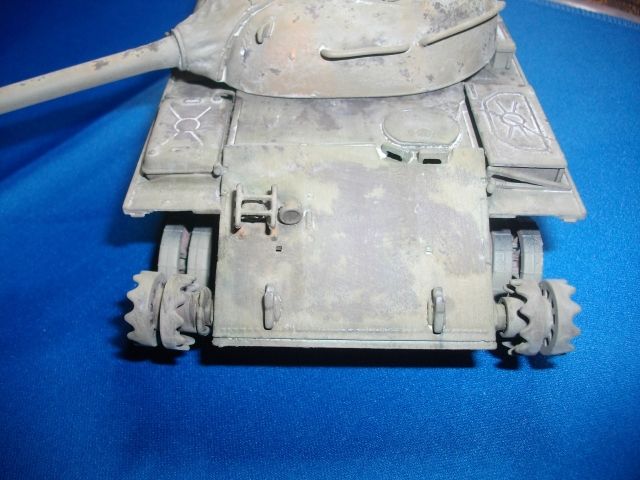 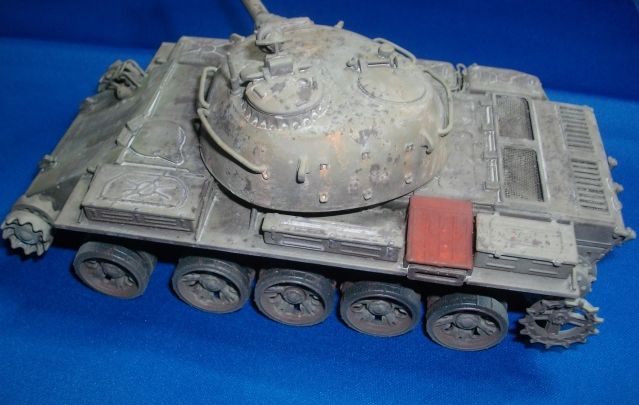 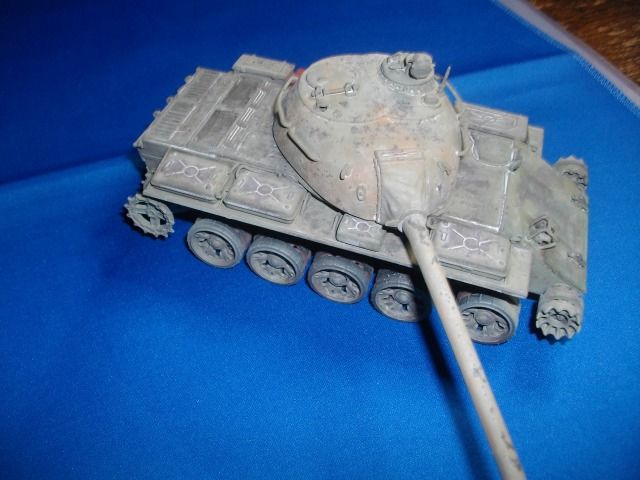 ACW P |
|
paulh
Senior Member
Member since: November 2011
build, fail, learn, succeed - ENJOY
Posts: 2,389
Nov 15, 2011 15:54:51 GMT -5
Nov 15, 2011 15:54:51 GMT -5
|
Post by paulh on Apr 13, 2012 16:53:11 GMT -5
Thank you very much jackwagon ;D Still quite a bit to do with this one, but quite pleased with how she is turning out -especially for something hauled out of the bin- even if I say so myself Need to start getting some colour on the '62 soon P |
|
Deleted
Member since: January 1970
Posts: 0
Apr 25, 2024 11:44:15 GMT -5
Apr 25, 2024 11:44:15 GMT -5
|
Post by Deleted on Apr 13, 2012 17:03:02 GMT -5
Nice one Mr H.....that certainly looks like one 'Ole warhorse' matey.....(Note to self....really ought to try this 'knock the c**p out of it',style of painting.....looks like fun!!!)
|
|
martyncrowther
Full Member
Member since: December 2011
Not Jaymes
Posts: 699
Dec 27, 2011 14:40:09 GMT -5
Dec 27, 2011 14:40:09 GMT -5
|
Post by martyncrowther on Apr 13, 2012 17:08:39 GMT -5
|
|
paulh
Senior Member
Member since: November 2011
build, fail, learn, succeed - ENJOY
Posts: 2,389
Nov 15, 2011 15:54:51 GMT -5
Nov 15, 2011 15:54:51 GMT -5
|
Post by paulh on Apr 13, 2012 17:27:14 GMT -5
Chris- thank you sir Martyn- nice lookin' war horse you got going there P |
|
paulh
Senior Member
Member since: November 2011
build, fail, learn, succeed - ENJOY
Posts: 2,389
Nov 15, 2011 15:54:51 GMT -5
Nov 15, 2011 15:54:51 GMT -5
|
Post by paulh on Apr 14, 2012 13:33:49 GMT -5
Photo for discussion purposes only (and I know it's a '62 ), but this is the kind of thing I'm hoping for; weathered, battered and rather dustyover-watch position on a rocky crag 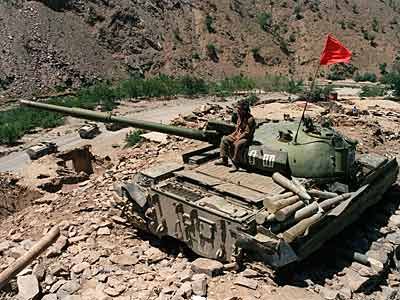 We'll see soon enough if my ability matches my imagination... Got some MiniArt 100mm ammo in transit as we speak and hope to get started on some of the groundwork tomorrow if I can sneak off out to the shed so time to pray for some rain ;D |
|
paulh
Senior Member
Member since: November 2011
build, fail, learn, succeed - ENJOY
Posts: 2,389
Nov 15, 2011 15:54:51 GMT -5
Nov 15, 2011 15:54:51 GMT -5
|
Post by paulh on Apr 15, 2012 10:22:35 GMT -5
Well no ground work but I did manage to get a good base coat on the T-62, courtesy of Tamiya TS-5 Olive drab; 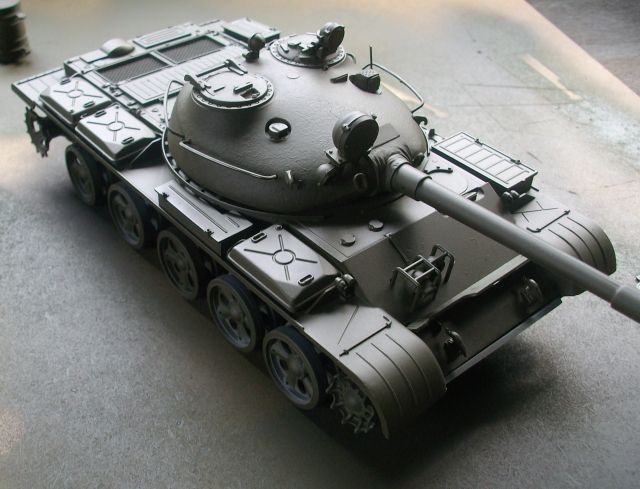 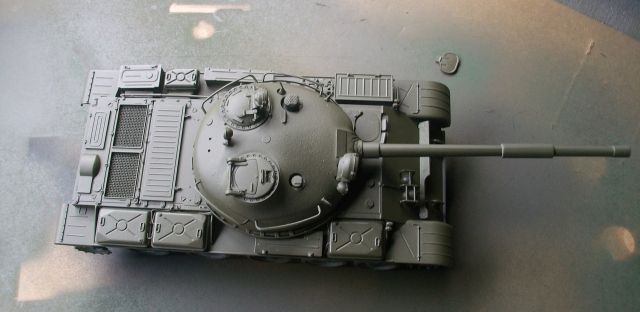 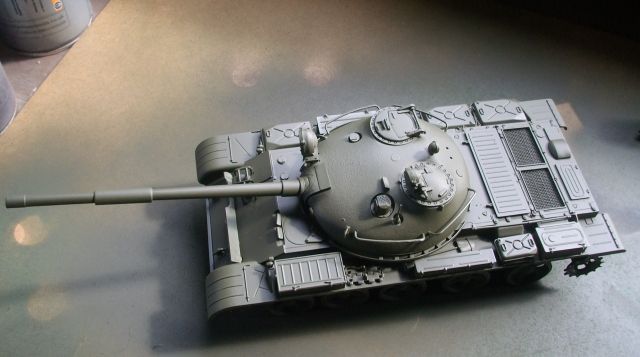 As I'm planning a parade style finish for this all I'm planning paint wise is a light filter or 2 and the appropriate parade white piping and minimal (if any) chipping Just for comparrison , how it looks alongside the Trumpy '55; Tracks are now on but not yet secured into the ubiquitous sag and in their as yet un-weathered state; 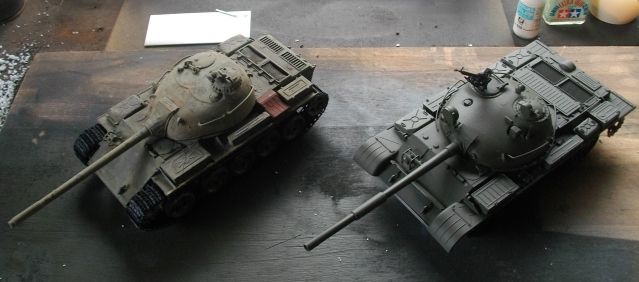 TTFN P |
|
paulh
Senior Member
Member since: November 2011
build, fail, learn, succeed - ENJOY
Posts: 2,389
Nov 15, 2011 15:54:51 GMT -5
Nov 15, 2011 15:54:51 GMT -5
|
Post by paulh on Apr 15, 2012 11:50:14 GMT -5
I like tamiya sray cans the finsih is alwas nice and I'm happy that it hasn't smothered the texture I managed to get into the turret- though may not be very obviuos in these pics. On the linkage- Well spotted Its simply to stop me from snapping it off before things are finished. I'm currently working of the kitchen table so things get moved quite a bit and at times I have 8 thumbs and 2 fingers P |
|
|
|
Post by 406 Silverado on Apr 23, 2012 7:21:43 GMT -5
Nice work fellas. I'll have to get back to my T-62 once the big show is over.
|
|
|
|
Post by 406 Silverado on Jun 5, 2012 19:36:35 GMT -5
Thought since I'm finishing off some queens, might as well do my T-62 as well. Stuck right now as how to paint her. Might go with an old green with rust and chipping, OR base green with very heavy chipping of the desert tan paint.
Finishing the last bits then pics.
|
|
|
|
Post by 406 Silverado on Jun 5, 2012 23:17:21 GMT -5
|
|
paulh
Senior Member
Member since: November 2011
build, fail, learn, succeed - ENJOY
Posts: 2,389
Nov 15, 2011 15:54:51 GMT -5
Nov 15, 2011 15:54:51 GMT -5
|
Post by paulh on Jun 6, 2012 7:08:35 GMT -5
Gawd- nearly forgot about this one- Your Trumpy looks georgus Rob -as always!
My Tamiya-62 is nearly done - only needs the running gear to be sorted i.e. tracks still need to be painted, a bit of light weathering and a decal of two and she's done!
Should be finsihed before this build closes- I hope.
P
|
|
|
|
Post by 406 Silverado on Jun 6, 2012 7:20:45 GMT -5
I too had forgotten about this GB. I'll try to get mine done as well. The painting is going to be the fun part...once I get the color thing sorted.
|
|
paulh
Senior Member
Member since: November 2011
build, fail, learn, succeed - ENJOY
Posts: 2,389
Nov 15, 2011 15:54:51 GMT -5
Nov 15, 2011 15:54:51 GMT -5
|
Post by paulh on Jun 6, 2012 7:53:12 GMT -5
Rob- i noticd there's fuel"spouts" attched to the fender tanks, but no fuel lines- are we going to have a 'scratchmod-lite' finish on this perhaps P |
|
|
|
Post by 406 Silverado on Jun 6, 2012 8:01:16 GMT -5
Yep, museum piece minus some boxes, fuel lines etc. museum or rotting some place, still undecided.
|
|
paulh
Senior Member
Member since: November 2011
build, fail, learn, succeed - ENJOY
Posts: 2,389
Nov 15, 2011 15:54:51 GMT -5
Nov 15, 2011 15:54:51 GMT -5
|
Post by paulh on Jun 6, 2012 10:06:30 GMT -5
Looking forward to this one.
|
|
|
|
Post by 406 Silverado on Jun 7, 2012 22:41:14 GMT -5
Well it won't be all muddy, but may have several colors and one might be rust ;D ;D ;D ;D ;D
|
|
paulh
Senior Member
Member since: November 2011
build, fail, learn, succeed - ENJOY
Posts: 2,389
Nov 15, 2011 15:54:51 GMT -5
Nov 15, 2011 15:54:51 GMT -5
|
Post by paulh on Jun 26, 2012 15:33:37 GMT -5
Nearly finished... still a few bits to add- fuel barrels, unditching log and mantlet/search light linkage, then a little bit of light weathering and she'll be done -and hopefully in time for the end of the month. 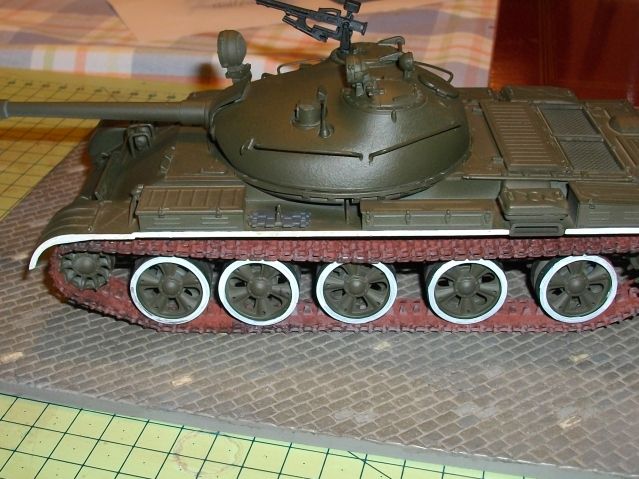 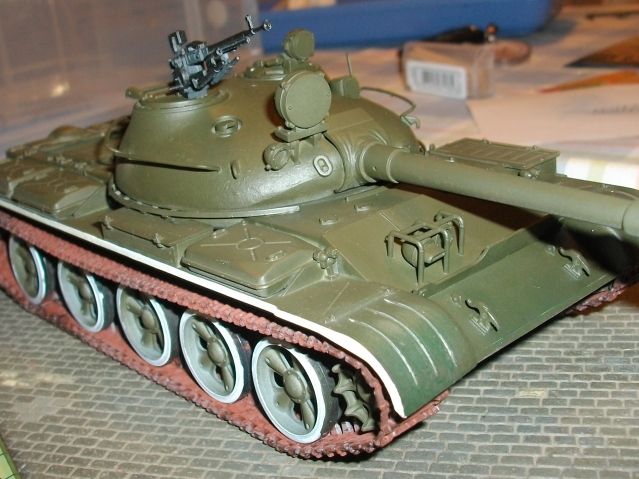 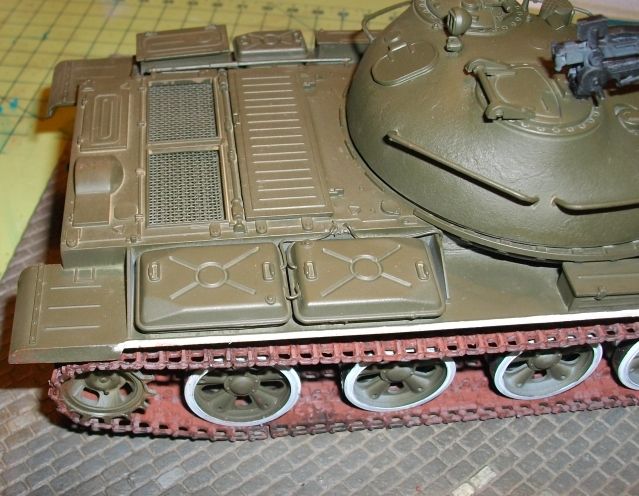 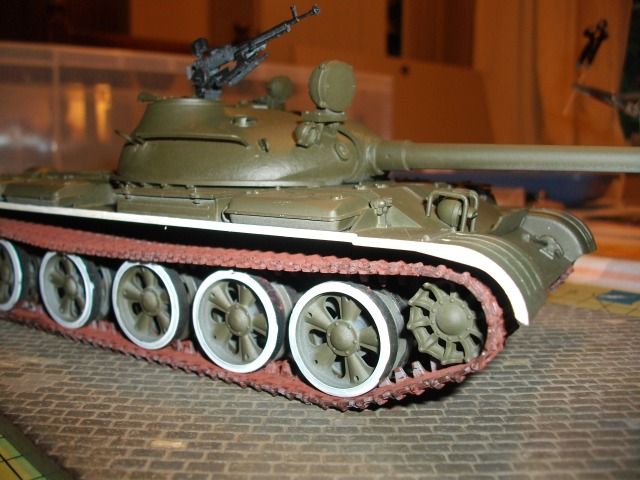 oh yeah- and a couple of decals P |
|
paulh
Senior Member
Member since: November 2011
build, fail, learn, succeed - ENJOY
Posts: 2,389
Nov 15, 2011 15:54:51 GMT -5
Nov 15, 2011 15:54:51 GMT -5
|
Post by paulh on Jun 26, 2012 15:55:58 GMT -5
Cheers jackwagon.
P
|
|


 )
)


 , so while I'm waiting, I decided to get some primer on- good ol' Halfords grey.


 )
)