sturmbird
Full Member
  
Member since: June 2012
Posts: 1,406
Jun 21, 2012 13:51:45 GMT -5
Jun 21, 2012 13:51:45 GMT -5
|
Post by sturmbird on Jun 25, 2013 11:18:42 GMT -5
Mike, the howitzer looks gorgeous, splendid job. Gary, thanks for sharing. I'm not a vet, I'll never understand what you've been through. All I know about vets are the tales my two grandfathers told me when I was younger. One was in Africa fighting along Rommel's Afrika Korps and was wounded at El Alamein, the other one was one of the few ARMIR survivors (ARMIR was the name of the combat corps sent to Russia to fight to capture Stalingrad. We all know who won...). All they told me is a part of what I am, they really inspired me and the way I see life. As the others said, thank you and all the others who served. Combat is just an adventure, but the loosers of course often die. It's not always as bad as some people think, and othertimes far worse. I didn't have it all that bad most of the time. When I do think it was bad, I think about folks that operated in the Ashau Valley, or ontop the Hiep Duc Ridge line. This comming weekend, I'm going to meet a couple guys that were on LZ Ripcord. This should prove quite interesting! A very tough and small patch of ground. My AO was tough, and nobody's gotta tell me that. I learned first hand. But I'll be the first to tell you right upfront that Gator was a picnic. Only thing it lacked was flush toilets and women. Being there we all got lulled into thinking it was all going to be like that. Lurch was kinda tough at the time, but later it we found out that it wasn't the nightmare we first thought it would be. Melon (whatever you wanta call it) was the makings of something real bad. But we got outta there with about thirty minutes to spare. My best friend was German, and from Frankfort. Fred was tough! Older than I am, and he remembered the Russians quite well. He had a different outlook on combat than most of the rest of us did. I've had the crap beat out of me too many times to seriously remember, and I've also administered the samething. I have zero medical records thanks to some two dollar clerks and a fire, but have scars and one hole in my leg. Don't mean anything, cause I'm not asking for anything. I got so cold once up on LZ West that they actually flew out wool long john tops, and wool blankets. Yet I can't even concieve Stalengrad! My platoon sargent (the very first one) was a Ranger. Did the rope ladders on the Normandy Beachhead at the ripe old age of 17 years. He was tough! No way in the world I could run with those men! I have a good friend who was with SOG. Did nothing but Brightlight missions in Laos and points north of the 17th parallel that are still quite classified. He's a big guy, and looks like he's maybe fifty years old. But he's actually 63 years old. He's tough as nails, and one of the best men I've ever known. When somebody slaps a challange coin on the table, and he responds with that SOG coin everybody looks up. I can't run with Steve, but cheerish the idea of knowing him (read about him in John Plaster's book). I'm a piker compaired to these guys! By the way, order Plaster's book "SOG" in at your library. It'll make the hair stand up on the back of your neck. I guess I'm a lucky kinda guy, and thank God for keeping his eyes on me. gary |
|
sturmbird
Full Member
  
Member since: June 2012
Posts: 1,406
Jun 21, 2012 13:51:45 GMT -5
Jun 21, 2012 13:51:45 GMT -5
|
Post by sturmbird on Jun 25, 2013 11:24:23 GMT -5
for all you guys wanting to build this pig, remember how badly the paint fades in that bright sun. And put than silly loading tray in your spares box! Real men picked that "jo" up and loaded it. (no place for 100lb. weaklings). Make up some homemade towls to hang on the stuff somebody will touch in the daytime. Otherwise he'll get blisters on his fingers. Always cover the scope with either a plastic bag or a towl. Leave the breech door cracked open to help keep that area dry.
gary
|
|
redleg12
Full Member
  
Member since: August 2012
www.redleg2scale.com
Posts: 401
Aug 28, 2012 18:59:10 GMT -5
Aug 28, 2012 18:59:10 GMT -5
|
Post by redleg12 on Jun 26, 2013 21:52:36 GMT -5
Joe - What did you say!! .... thanks
BBD - The "pig" is a mean looking weapon. Thanks for the peek
Gary - Well went a bit artistic on the barrel but it gets the point across. As for the breech, that's why it will display open. Nothing like a stinky swab, it is amazing what "wolfs pussy" will do! Thanks
Tobi - Thanks, dirt and dust will be coming. As for the paint, I am out of town for work. Once I get back to my bunker I will get you the XF number
Luigi - Thanks as always
Gary....again....fade will be coming also... That chalky fade look
Dicky - thanks and glad all the guys are enjoying the build along with the technical details and Gary's historical look.
Rounds Complete!!
|
|
sturmbird
Full Member
  
Member since: June 2012
Posts: 1,406
Jun 21, 2012 13:51:45 GMT -5
Jun 21, 2012 13:51:45 GMT -5
|
Post by sturmbird on Jun 27, 2013 12:03:16 GMT -5
I don't do Photo bucket, but if anybody wants real deal photos, I have a few stashed here and there. I even found a few of the blown parapet, that we busted up during the monsoon of late 68. Also found a couple nice ones of the base piece on Gator registering in very early 1968. May even set one of the ones of the base piece up as an avatar to sorta parallel Redleg's, but with vintage arty.
The swab! The swab as issued didn't last long, and by the end of two long months was stripped of the cloth end. We simply tied on two or three sand bags. The shaft was never more than four feet long, and often about three feet long. (one meter). The bucket was usually a 50 cal ammo can (the large one). But we used a bomb fuse canister as they are much bigger. The rammer staff as issued is way too long for ease of use (probably OHSA supplied). Ours was about six or seven feet long (two meters). We also had a very short one for high angle fire (which we loathed!). The guy with the rammer staff was usually the newby (we had other adjectives for him). This helped him to learn how critical timing was in the loading process, plus he couldn't do too much damage except break the loaders hand. I seen more than one fist fight break out after a fire mission, and the guy with the swab and rammer staff was usually on the loosing end! The Army wants two guys on the ramming staff, and there wasn't two other guys. So the loader would grab the end of the staff closest to him while positioning the end bell on the base of the round(keeps your fingers happy). Then pull the staff while the other guy pushed. As soon as he heard the thunk, he turns to the Section Chief for the powder charge (about the only thing a shake & bake is good for). As soon as he steps back, and the AG sees his hands on his ears the lanyard is pulled. The AG and the loader work as one person, and the gunner will raise his right hand when he's set. In a good crew this takes about eight seconds, or nine rounds out in about sixty to seventy five seconds.
The section chief thinks he's the boss, but is really just there to catch hell. The real boss is the gunner and the loader. The AG is in command as soon as he hears the round seat in the rifling. Then you start the process all over again (no fat boys allowed). It's not so funny when things get out of sequence. I remember once breaking in a new kid during H&I's, and he forgot to load the round, but loaded the charge seven. Looked like a fifty foot diameter flash bulb. Blinding all of us at two in the morning. Phone went nuts asking what happened? The radio guy say's "I don't know, I can't see a thing wrong!" That's why you teach them during H&I's instead of a fire mission. We all laughed it off till we realized we were stuck with an extra HE round. I hid the extra round till a zone sweep showed up, and we fired ten rounds instead of nine. Nobody knew except us and the First Sargent (how did that old man know that?). He comes around the next morning and told us that he was glad we got rid of that extra round! Then went into our bunker to get a Budwiser out of the little fridge. He was a good man.
gary
|
|
redleg12
Full Member
  
Member since: August 2012
www.redleg2scale.com
Posts: 401
Aug 28, 2012 18:59:10 GMT -5
Aug 28, 2012 18:59:10 GMT -5
|
Post by redleg12 on Jun 30, 2013 20:53:46 GMT -5
So in order to make things look like wood I used…..wood. Under the base plate are 6 scale size projectile base crates stacked to elevate the carriage made with 3/32 plywood. The blocks behind the spades are also made from 3/32 inch plywood. The same plywood was also used to make the communication table on the trail. The table was then clear coated and painted the same color as the howitzer. 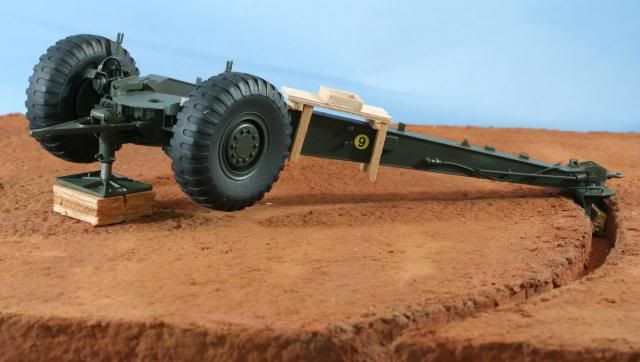 As you can see in the last photo, I added the bridge marker disc to the trail. While in the decal work, I made a custom Viet Nam map for the AG shield. It is a copy from a photo and scaled to size. 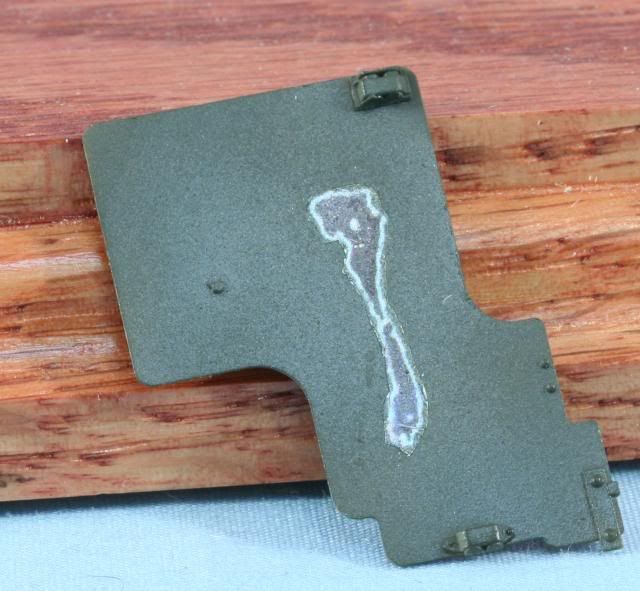 Next up was to complete the brake lines. The kit has the brake lines along the trails but has no lines from the wheels to the hydraulic brake unit and also has no lines from the trails to the brake unit. Using the Aber hydraulic line fittings kit and 32 gauge wire wound into a spring for the strain relief for the lines. Then the lines were painted with the same color as the howitzer. 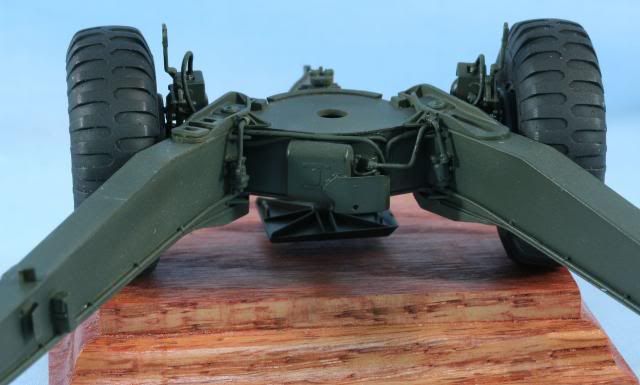 Completed the final assembly of the lower and upper carriages and the shields. Still need some touch up to go and the panoramic telescope head I will put on once I build a collimeter and put it on top of the ammunition storage and line them up. 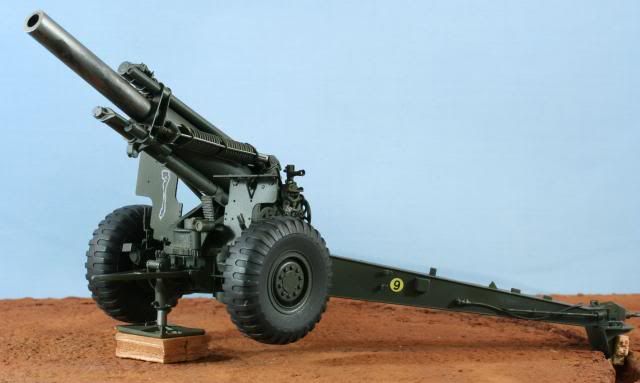 Hopefully I can get most of my casting done over the coming holiday. Now it is time for all the little details! As always if you have any comments, please feel free to drop in. Rounds Complete!! |
|
redleg12
Full Member
  
Member since: August 2012
www.redleg2scale.com
Posts: 401
Aug 28, 2012 18:59:10 GMT -5
Aug 28, 2012 18:59:10 GMT -5
|
Post by redleg12 on Jun 30, 2013 21:04:17 GMT -5
Tobi - I did not forget....the paint I used is XF-74 JSDF OD
Rounds Complete!!
|
|
|
|
Post by Leon on Jun 30, 2013 22:58:00 GMT -5
Mike,that is looking aces.Great work on the base.
|
|
redleg12
Full Member
  
Member since: August 2012
www.redleg2scale.com
Posts: 401
Aug 28, 2012 18:59:10 GMT -5
Aug 28, 2012 18:59:10 GMT -5
|
Post by redleg12 on Jul 1, 2013 5:26:34 GMT -5
Leon - Thanks, for the peek and for the comment.
Rounds Complete!!
|
|
Deleted
Member since: January 1970
Posts: 0
Dec 3, 2024 14:50:34 GMT -5
Dec 3, 2024 14:50:34 GMT -5
|
Post by Deleted on Jul 1, 2013 6:06:31 GMT -5
looking very nice indeed
|
|
|
|
Post by Tobi on Jul 1, 2013 11:06:45 GMT -5
Tobi - I did not forget....the paint I used is XF-74 JSDF OD Rounds Complete!! Thank U for the info Mike. The model is looking better and better! Cheers, Tobi |
|
sturmbird
Full Member
  
Member since: June 2012
Posts: 1,406
Jun 21, 2012 13:51:45 GMT -5
Jun 21, 2012 13:51:45 GMT -5
|
Post by sturmbird on Jul 1, 2013 11:42:05 GMT -5
So in order to make things look like wood I used…..wood. Under the base plate are 6 scale size projectile base crates stacked to elevate the carriage made with 3/32 plywood. The blocks behind the spades are also made from 3/32 inch plywood. The same plywood was also used to make the communication table on the trail. The table was then clear coated and painted the same color as the howitzer.  As you can see in the last photo, I added the bridge marker disc to the trail. While in the decal work, I made a custom Viet Nam map for the AG shield. It is a copy from a photo and scaled to size.  Next up was to complete the brake lines. The kit has the brake lines along the trails but has no lines from the wheels to the hydraulic brake unit and also has no lines from the trails to the brake unit. Using the Aber hydraulic line fittings kit and 32 gauge wire wound into a spring for the strain relief for the lines. Then the lines were painted with the same color as the howitzer.  Completed the final assembly of the lower and upper carriages and the shields. Still need some touch up to go and the panoramic telescope head I will put on once I build a collimeter and put it on top of the ammunition storage and line them up.  Hopefully I can get most of my casting done over the coming holiday. Now it is time for all the little details! As always if you have any comments, please feel free to drop in. Rounds Complete!! Did Bronco include the "jack stand"? We would shift the gun on it. They would never leave the bottom of the carriage once in place. Also a small critique (if it matters much here). With the barrel looking like it's had at least a zone sweep ran thru it, there would be a small amount of soote on the face of the mushroom head on the breech. And the crud would leave a line about a foot past the end of the barrel showing where the barrel maxed out in recoil (60" by the way). That part will show much dirtier than the otherside of the line (or band). When the gun is resting on the jack stand, it will usually lean to one side or another. If memory is right they welded a ring on the bottom side of the carriage to keep the jack stand in place while shifting the trails. The wood platform you built is about right. I think we used two layers of wood from shipping pallots that would come to about four inches. But have shot with as much as a foot under the jack plate before. The two bars for the jack were always kept in the jack. That's one thing you don't wanta misplace! Liked the seat you made for the gunner! We made ours set on bare steel or maybe a towl or sandbag under his butt. gary |
|
redleg12
Full Member
  
Member since: August 2012
www.redleg2scale.com
Posts: 401
Aug 28, 2012 18:59:10 GMT -5
Aug 28, 2012 18:59:10 GMT -5
|
Post by redleg12 on Jul 1, 2013 18:49:20 GMT -5
Sniper - Thanks for stopping by and the comment
Tobi - Thanks and you are welcome
Gary - Yep, the jack stand comes with the kit. Of interest, the kit does lean to the gunners side. I have seen photos with any number between 1 to 5 pallets under the stand. I thought 3 looked good. I still have to put the bars up front in the jack stand, have not forgotten. More little details to come. As for the barrel marks, I will play with it some more when I get to weathering.
Thanks for the comments
Dickey - Thanks from stopping by the firing point. Your comments are always welcome.
Rounds Complete!!
|
|
|
|
Post by wbill76 on Jul 1, 2013 20:18:48 GMT -5
Up to your usual standards in the detail department Mike! Hope you can make the most of the 4th of July in terms of casting up your own supply of 'fireworks' for this project.  |
|
sturmbird
Full Member
  
Member since: June 2012
Posts: 1,406
Jun 21, 2012 13:51:45 GMT -5
Jun 21, 2012 13:51:45 GMT -5
|
Post by sturmbird on Jul 1, 2013 21:36:24 GMT -5
Sniper - Thanks for stopping by and the comment Tobi - Thanks and you are welcome Gary - Yep, the jack stand comes with the kit. Of interest, the kit does lean to the gunners side. I have seen photos with any number between 1 to 5 pallets under the stand. I thought 3 looked good. I still have to put the bars up front in the jack stand, have not forgotten. More little details to come. As for the barrel marks, I will play with it some more when I get to weathering. Thanks for the comments Dickey - Thanks from stopping by the firing point. Your comments are always welcome. Rounds Complete!! your doing quite well; if I may say so. The amount of wood under the jack plate often varied by where you were at and of course the construction of the parapet. I shot three or four mission at high angle fire (not for the weak knee'd). The wheels alone were probably 18" off the ground minimum. The loader is good for about five or six rounds before you gotta relieve him. Takes two others on that three foot long rammer staff. Last time I shot high angle was 12 minutes past midnight on December 26th, 1968. Two guns shooting HE and one gun shooting WP on the backside of the Hiep Duc Ridge line. There were secondaries for five or six minutes! No KIA's recorded! Flew out at about ten in the morning, and we didn't come back home for twenty nine days. Google LZ West. There are a lot of photos from up there. Hawk Hill has a lot of 155 photos, but you got to remember that those guys never went anywhere. The bars for the jack are nothing but plain jane mild steel bars. Nothing special about them. I would kinda rub off the paint of the breech handle as it was almost always bare metal where the AG grabbed it. gary |
|
|
|
Post by fightnjoe on Jul 1, 2013 23:29:01 GMT -5
mike i will just say that i really enjoy your build ups. the info provided is second to none. when/if i get to the point i do one of the "disappearing" guns, the one from hawaii, i will definitely be looking forward to your comments.
joe
|
|
redleg12
Full Member
  
Member since: August 2012
www.redleg2scale.com
Posts: 401
Aug 28, 2012 18:59:10 GMT -5
Aug 28, 2012 18:59:10 GMT -5
|
Post by redleg12 on Jul 2, 2013 5:45:58 GMT -5
Bill - Thanks....warming up my resin now!!
Gary - Thanks, yep...HA is a PITA....as always thanks for the info and the memories.
Joe - Thanks, I always try not just to show, but try to teach. I like to think I have helped other modelers. Thanks again
Eth - Thanks for stopping by and for the comments.
Rounds Complete!!
|
|
|
|
Post by bullardino on Jul 2, 2013 9:05:14 GMT -5
That's fantastic. I really love the way it looks, what a masterpiece Mike  |
|
redleg12
Full Member
  
Member since: August 2012
www.redleg2scale.com
Posts: 401
Aug 28, 2012 18:59:10 GMT -5
Aug 28, 2012 18:59:10 GMT -5
|
Post by redleg12 on Jul 2, 2013 21:01:01 GMT -5
Luigi - Always a pleasure to have you stop by and thanks for the comments.
Rounds Complete!!
|
|
|
|
Post by deafpanzer on Jul 2, 2013 21:05:55 GMT -5
Looking great my friend especially the decal!
|
|
redleg12
Full Member
  
Member since: August 2012
www.redleg2scale.com
Posts: 401
Aug 28, 2012 18:59:10 GMT -5
Aug 28, 2012 18:59:10 GMT -5
|
Post by redleg12 on Jul 3, 2013 6:21:27 GMT -5
Andy - Thanks for the peek and for the comment. Be well my friend.
Rounds Complete!!
|
|
sturmbird
Full Member
  
Member since: June 2012
Posts: 1,406
Jun 21, 2012 13:51:45 GMT -5
Jun 21, 2012 13:51:45 GMT -5
|
Post by sturmbird on Jul 3, 2013 10:43:12 GMT -5
a few posts back you made the comment that you were going to be doing some resin casting. How about giving us all a good tutorial on the process and how to avoid the pitfalls at the same time. Perhaps you could set it up in a separate thread, that many of us could use as a reference for future projects (like casting three hundred HE rounds or a few dozen illumination rounds).
gary
|
|
redleg12
Full Member
  
Member since: August 2012
www.redleg2scale.com
Posts: 401
Aug 28, 2012 18:59:10 GMT -5
Aug 28, 2012 18:59:10 GMT -5
|
Post by redleg12 on Jul 3, 2013 20:03:15 GMT -5
Gary - You mean not enough coffee!!! LOL. Making some molds now. I will post some basic information shortly.
Rounds Complete!!
|
|
sturmbird
Full Member
  
Member since: June 2012
Posts: 1,406
Jun 21, 2012 13:51:45 GMT -5
Jun 21, 2012 13:51:45 GMT -5
|
Post by sturmbird on Jul 4, 2013 9:50:53 GMT -5
Gary - You mean not enough coffee!!! LOL. Making some molds now. I will post some basic information shortly. Rounds Complete!! I find the black art of resin casting to be similar to learning to swing a golf club, or cast a fly rod. gary |
|
sturmbird
Full Member
  
Member since: June 2012
Posts: 1,406
Jun 21, 2012 13:51:45 GMT -5
Jun 21, 2012 13:51:45 GMT -5
|
Post by sturmbird on Jul 4, 2013 9:56:54 GMT -5
well it's the fourth day of July, and this was the day I actually got my first short timer's calendar! Course I was laughed off the planet being as I had a minimum of five months and three days left (I added 71 days to my tour). Over the next six or seven months, I must have had a half dozen calendars. Still have the original one, and miss the one of Dee Dee Lind dearly!
gary
|
|
redleg12
Full Member
  
Member since: August 2012
www.redleg2scale.com
Posts: 401
Aug 28, 2012 18:59:10 GMT -5
Aug 28, 2012 18:59:10 GMT -5
|
Post by redleg12 on Jul 7, 2013 19:13:42 GMT -5
This week is a little bit of everything. First working on the ammunition storage bunker, I created the back wall, which will not be visible except looking through the front. I used some stock ammunition crates for the base and a bunch of Tamiya drums. The drums are painted with Tamiya Flat Black and the center bands are Flat Red. The crates are painted with Tamiya Buff. 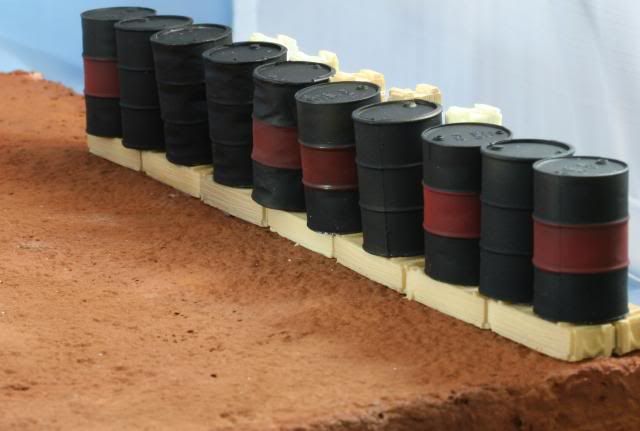 Next is the communication table. The TA-312 and AN/GRA-39B are from stock parts along with the hand set. The commo equipment are painted with Poly Scale US Dark Green and the handset with Vallejo black. The wire is coiled from 32 gauge stainless wire also painted black. The DA 4513 to record is a copy of the actual form filled out partially. A filled out form is folded and on the side of the GRA-39 and the pad for recording upcoming missions on the table. 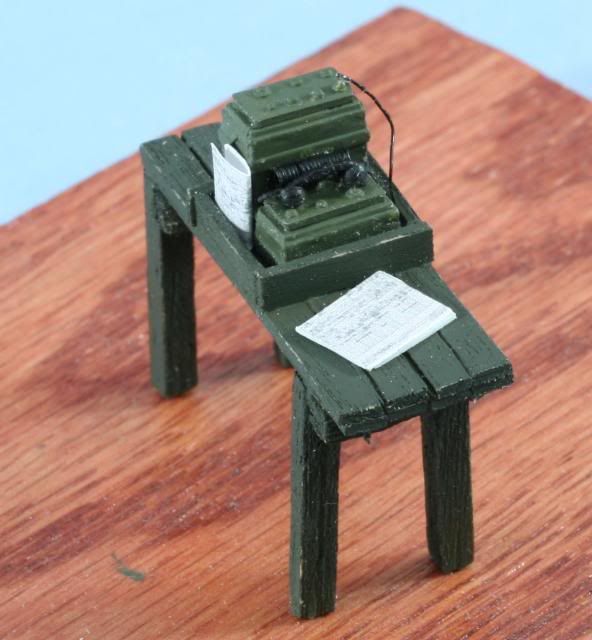 I plan on having some helmets around the position. Using Bravo 6 Vietnam Helmets. The paint is Vallejo US Uniform Green (light green), US Dark Green, US OD for the band and 50/50 mix of Beige and Rust for the reddish beige color. The insides are painted Saddle Brown. On two helmets the bug container is painted with Poly Scale Dark Green. The one helmet I used a decal of a pack of Marlboro and the Zippo painted with Tamiya Metallic Grey. 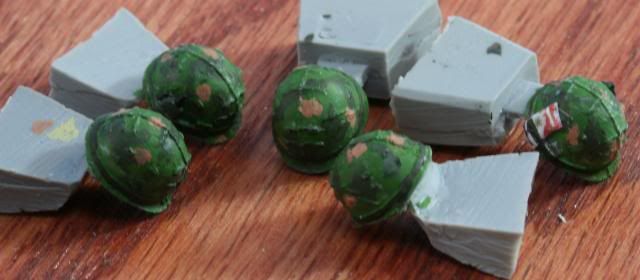 On the resin side, started with the kit ammunition and powder container glued to some scrap resin for a pour bar 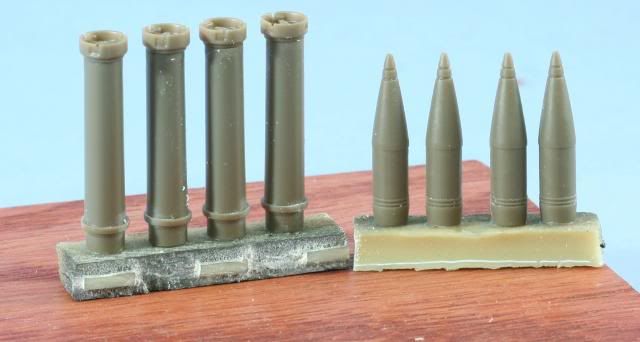 Next, get out your Legos… and create mold boxes around the items to be molded. 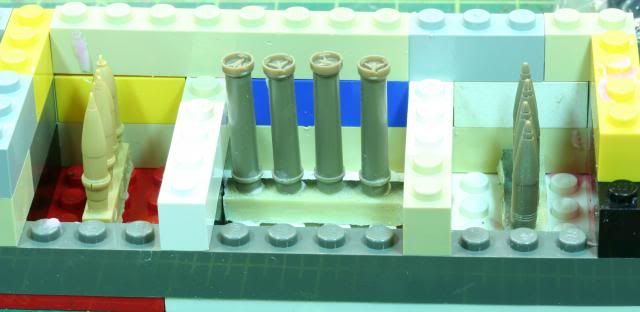 Then mix up rubber mold compound, I use Smooth Cast Mold Max 30, pour the molding compound into the mold boxes. Then it is off to the pressure pot and let the molds cure overnight under 30 psi of pressure. 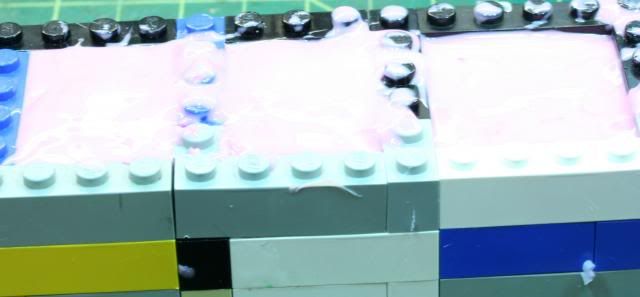 That’s it for now. I will start casting as soon as the molds clear curing. Also lots more details to create. As always if you have any comments, please feel free to drop in. Rounds Complete!! |
|
|
|
Post by Leon on Jul 7, 2013 19:52:45 GMT -5
Great update Mike.Looks like all your detail work is coming a long smoothly.  |
|
|
|
Post by fightnjoe on Jul 7, 2013 20:40:13 GMT -5
lots of little stuff. mike it all looks to be coming together now.
looking at how you do your casting with great interest. my casting is beginner level.
joe
|
|
redleg12
Full Member
  
Member since: August 2012
www.redleg2scale.com
Posts: 401
Aug 28, 2012 18:59:10 GMT -5
Aug 28, 2012 18:59:10 GMT -5
|
Post by redleg12 on Jul 7, 2013 20:53:40 GMT -5
Leon - Details are always fun. Thanks for the peek and the comment
Joe - Thanks, hope the casting info helps going forward.
Rounds Complete!!
|
|
|
|
Post by deafpanzer on Jul 7, 2013 21:16:32 GMT -5
Boys love Lego. I admit I loved playing with those too. Glad I am not alone. Great work especially the helmet and drums.
|
|
sturmbird
Full Member
  
Member since: June 2012
Posts: 1,406
Jun 21, 2012 13:51:45 GMT -5
Jun 21, 2012 13:51:45 GMT -5
|
Post by sturmbird on Jul 8, 2013 2:02:50 GMT -5
In October 68 we blew about 120 degrees of the parapit shooting in the rain. The soil wasn't typical red clay, and was somewhat soft when dry. We did a quick rebuild, and promptly smoked it again in about six rounds. We were faced with a new fix or else building a brand new parapet in the rain! This was looking bad to worse, and just had that ugly buzzard hanging over it! They had to call the gun out, and battalion and division arty were going nuts. They'd either have to bring in Little Bird (his real name) with his dozer to level out a lot of ground or maybe never shoot from there again! (this also violated the lazy W formula) The Army actually sent in a couple engineers (real ones) to give us some help. The next day the came up with the idea of rebuilding the blown parts of the pit with the usual 12x12" oak timbers and 55 gallon Mogas drums behind them, and 8x8" longs on the outside of the gas drums. Later in the day a CH46 brings out two landing nets full of 55 gallon drums, and another brought out the logs. I was tasked with the job of removing the tops from the drums, and did it with two wraps of detcord and a blasting cap tied in the knot. Lids went fifty feet up in the air with a similar flash of unburnt gasoline!! Rest of the drums were perfect (I was taught well). Inside the drums we placed greenbag powder canisters filled with sand and gravel (about eight of them), and then filled the area around the canisters with sand. All this of course was done after the gas drums were set in place. So we have to dig a trench in the rain! 24/7 at that! The trench filled up with water as fast as you removed the dirt, and the guy digging had to have help to get out of it. Took us about four days to rebuild it, and worked perfect. Two weeks later we blew the otherside! Leastwise the rain had slowed down a little bit. The guys on gun three laughed at us working in the rain, and they indeed did blow up half their pit in early November. (was really raining in November) I loaned them a pick and a shovel!
gary
|
|


