Whiterook
Full Member

Member since: March 2013
Posts: 837
Mar 13, 2013 15:29:19 GMT -5
Mar 13, 2013 15:29:19 GMT -5
|
Post by Whiterook on Mar 18, 2013 19:13:23 GMT -5
Bedford QL Gun Portee, 1/35 Scale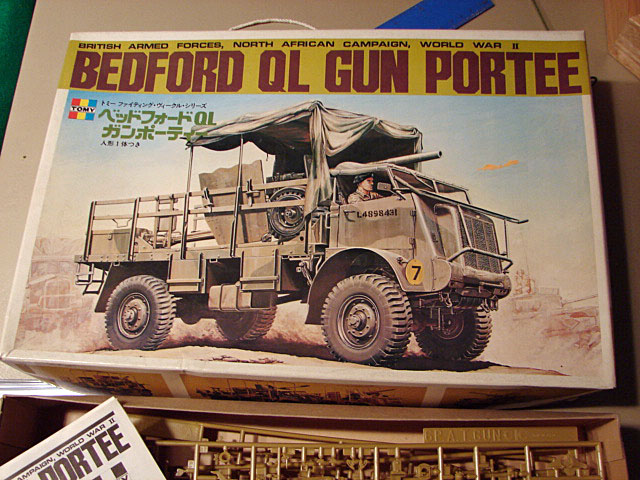 This is my Bedford QL Gun Portee, 1/35 Scale TOMY model depicting a British Armed Forces vehicle in the North African Campaign of WWII. It was built January 25, 2009 - February 22, 2009, for a Build contest. The model was also entered in a local IPMS show in West Springfield, Massachusetts, USA, at the Wings & Wheels of Western Massachusetts annual model show, in which it won an Honorable Mention ribbon (my first ever modeling award). 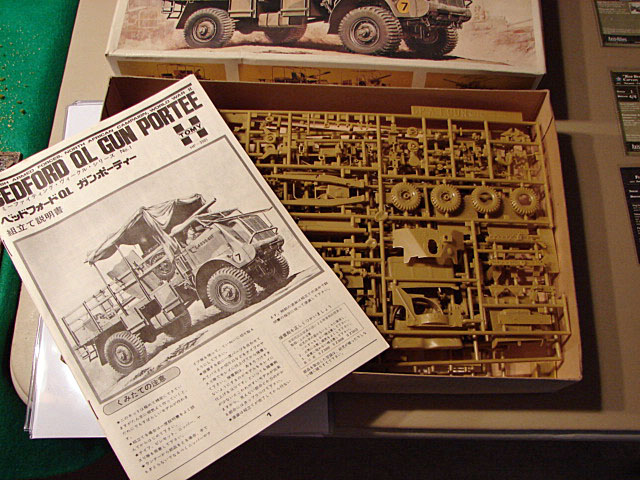 Of note on the kit: It was bought at an estate sale of this little old dude who'd passed away, and had model kit boxes piled high in every room and basement of his house, of which I walked out with the purchase of 2 lawn and leaf bag's worth of kits! This kits' box was open, but all parts still on sprue. The only thing missing were the decals....hence, all insignia and symbols were hand painted as best as possible. The kit was quite old, but a lot of fun to build. Scratchbuilt were: - The medical and gear bags, out of clay and tape (not the best result but, it was a decent enough first try);
- The tow chain made from some trinket jewelry lids bracelet;
- The camo netting, made of white glue infused cheese cloth, hand-painted;
- The windshield was missing, so I made one out of scrap clear plastic laying around the homestead;
- and the gun ramps were drilled out with a pin vice.
The kit tested my skills in many ways, and was completely hand-painted (I wasn't using airbrushes yet, at that time) This was my first real attempt at weathering. The driver ended up being taken out of the kit, as it was just horribly cast, but the rest of the kit was pretty well made. It was bought at an estate sale many years back and was missing the decals (and IIRC, the windshield, which I scratch built) so the *decals* are hand painted. a cool part that came with this kit was the artillery piece. The camo netting was done with cheesecloth and whiteglue; the chain on the front was added from buying a cheap piece of jewelry at a department store. I made an attempt at scratchbuilding Medic Bags, with limited success. Additionally, I drilled holes in the gun piece ramps to give them a bit more of an authentic feel. |
|
|
|
Post by tonylee on Mar 18, 2013 19:17:06 GMT -5
My brother built one of those awhile back,not the same brand though. Pretty cool when finished.  GOoooooooooooooooooooooo Tony lee |
|
Whiterook
Full Member
Member since: March 2013
Posts: 837
Mar 13, 2013 15:29:19 GMT -5
Mar 13, 2013 15:29:19 GMT -5
|
Post by Whiterook on Mar 18, 2013 19:20:36 GMT -5
My brother built one of those awhile back,not the same brand though. Pretty cool when finished. GOoooooooooooooooooooooo Tony lee It's a great subject....I wanted something that would look somewhat desert beaten!!! |
|
|
|
Post by deafpanzer on Mar 18, 2013 19:48:11 GMT -5
I think I know you now... you are a building machine!!! Another interesting build... count me in too!
|
|
Whiterook
Full Member
Member since: March 2013
Posts: 837
Mar 13, 2013 15:29:19 GMT -5
Mar 13, 2013 15:29:19 GMT -5
|
Post by Whiterook on Mar 18, 2013 19:51:52 GMT -5
I think I know you now... you are a building machine!!! Another interesting build... count me in too! Ha haaa....I always did a mean robot dance!!! Hey, my browser froze on me and when it popped the forum back up, it tripled a post above. Any Mod available, please delete the two duplicate (in a row) posts. |
|
|
|
Post by Leon on Mar 18, 2013 20:00:42 GMT -5
LOL, WR looks like a sweet build.Keep posting.  |
|
|
|
Post by deafpanzer on Mar 18, 2013 20:04:13 GMT -5
No need to worry... I removed two duplicated posts. Maybe your computer was trying to tell you to slow down? LOL Only kidding buddy! Keep it coming...
|
|
|
|
Post by bbd468 on Mar 19, 2013 0:38:33 GMT -5
WOW Rook, you dont mess about! You jump right on the next huh. Or is this a recent build? Anyways, it a dandy and looking forward to see ti come together.  Gary |
|
Whiterook
Full Member
Member since: March 2013
Posts: 837
Mar 13, 2013 15:29:19 GMT -5
Mar 13, 2013 15:29:19 GMT -5
|
Post by Whiterook on Mar 19, 2013 9:27:23 GMT -5
WOW Rook, you dont mess about! You jump right on the next huh. Or is this a recent build? Anyways, it a dandy and looking forward to see ti come together. Gary Thanks guys....nah, this one was built several years ago. I figured I'd post up a few of my past builds along with my build journal entries. ...hope y'all don't mind the walk-through-the-past... and length, but I like to write. The only thing I have on the workbench right now is the WWII ZIS-42 Russian Snow Coach, which went on hold since I sliced my palm last weekend (not modeling, but a plain 'ol household mishap). I also have a WWII Italian Carro Armato on deck. Both kits are older than Moses and show their age! |
|
|
|
Post by bullardino on Mar 19, 2013 9:40:52 GMT -5
Interesting build, keep on posting the build log images. I'm curious to see how it turned out |
|
|
|
Post by bbd468 on Mar 19, 2013 9:59:29 GMT -5
Hey Rook...POST AWAY Fella!!!! We want to see your work. We also love to see peoples tips and techniques so we all can learn from each other and improve our own skills. Bring it on man!!! |
|
Whiterook
Full Member
Member since: March 2013
Posts: 837
Mar 13, 2013 15:29:19 GMT -5
Mar 13, 2013 15:29:19 GMT -5
|
Post by Whiterook on Mar 19, 2013 13:28:13 GMT -5
Thanks guys! Forgive some of the pics not being terribly crisp....I've only since learned how to use photoshop to brighten up the yellowish tinge on a lot of these photos; some of the others have had a bit of help  |
|
Whiterook
Full Member
Member since: March 2013
Posts: 837
Mar 13, 2013 15:29:19 GMT -5
Mar 13, 2013 15:29:19 GMT -5
|
Post by Whiterook on Mar 19, 2013 13:33:55 GMT -5
OK...upward and onward! It's a good time to point out that this kit was the first n whick I tried my hand at extensive weathering. It was the last kit in which it was all handpainted I believe, using Folk Art Acrylic paint from the craft store. Some work on the tires brought some of my first real practice in weathering techniques....the first time I had tried weathering to this degree, anyway....     |
|
Whiterook
Full Member
Member since: March 2013
Posts: 837
Mar 13, 2013 15:29:19 GMT -5
Mar 13, 2013 15:29:19 GMT -5
|
Post by Whiterook on Mar 19, 2013 13:36:21 GMT -5
Wow...for some reason.....I get triple posts popping up at times. Never had this happen before. Would any Mod available please delete the duplicates. Sorry for the added work.
|
|
Whiterook
Full Member
Member since: March 2013
Posts: 837
Mar 13, 2013 15:29:19 GMT -5
Mar 13, 2013 15:29:19 GMT -5
|
Post by Whiterook on Mar 19, 2013 13:55:43 GMT -5
As just mentioned, acrylic paints can be bought in department stores and craft centers can be good alternatives t the much thinner modelling brands such as Tamiya and Valejo. There's a chain of craft stores called "Michael's" that sell such crafting items as beading materials, floral arrangement supplies, scrapbooking supplies, decorations, art supplies, has a frame shop, and a bunch of other things. This place is a modeller's dream! A lot of what you find at very high-priced specialty hobby stores that cater specifically to kit modelers and model train enthusiasts, can be found in a craft store like Michael's. Plus, being a frugal New Englander, I use the 40% off coupon in the Sunday paper!!! ....I actually bought a secondary airbrush with a 40% off coupon. It's what my wife refers to is having the ability to "Think outside of the box"! Folk Art acrylics are a perfectly usable grade of acrylic paint that comes in small squirt bottles, yet you get about four times the amount of paint than you do in just one glass bottle of Tamiya acrylic paint, for instance. Now granted, I've moved away from using it on 100% of my kits, but it still finds it's way in certain areas more suited to it. The price is very much lower too, as a bottle will typically run a little over 80 cents....and when on sale, can be as low as around 50 cents! That's a bargain! Americana acrylics is another good alternative, also sold at Michael's. Other craft stores, such as A/C. Moore's, have similar acrylic paints too! What's great about these acrylics is, there's a phenomenal range of colors to choose from. And most of these colors work great straight out of the bottle without any mixing, unlike paints like Tamiya, which in my opinion look horrible for brush painting right out of the bottle. I have used these craft store acrylics straight out of the bottle, as in the sand-colored hue you see above; and I've mixed just about any color I desire. The paints mix extremely well, and have a nice painterly feel to them (unlike the wet/watery feel and consistency of Tamiya). Coverage is outstanding, and hold up very well, I have come to find. Before the airbrushers descend on me like a pack of wolves...please remember that I am talking in reference to a model that is totally brush painted. I know a lot of modellers that still refuse to use (or can't afford to buy) an airbrush. I thought an airbrush was out of my league....operation-wise....until my older sister mentioned she used on in a nail salon! Well, sheeeeeeeeat!!! Bought oe and I never looked back. They are very user friendly, once you've done a little reading up on the mechanics of spraying, and of course...help from guys like you! All that said, I believe there are times these craft store acrylics are the only option for a specific pupose. To mix the paints, you can use most any type of container or vessel, but I recycle old cat food plastic containers. Meow Mix is my preference.  ..... a purrfect plastic container. Meow Mix, being plastic, cleans out easy, and I actually reuse them over and over again. I have used these for my diorama building processes too, as glue baths; and I use them in my gaming as draw cups for cardboard counters. Another great modeling use for them is as props for drying pieces and freshly painted pieces, as well as trash receptacles for small bits I want to throw away later. Also of use is for armature material for building gaming and modeling dioramas. They make good filler for hills beneath clay or felt. And you can use them to glue small bits too, like model kit parts you want to paint, or gaming miniatures. Need to mix some washes? No problem! ....so the uses are endless! ....yeah, I know....I need to get a life! |
|
Whiterook
Full Member
Member since: March 2013
Posts: 837
Mar 13, 2013 15:29:19 GMT -5
Mar 13, 2013 15:29:19 GMT -5
|
Post by Whiterook on Mar 19, 2013 14:07:25 GMT -5
|
|
Whiterook
Full Member
Member since: March 2013
Posts: 837
Mar 13, 2013 15:29:19 GMT -5
Mar 13, 2013 15:29:19 GMT -5
|
Post by Whiterook on Mar 19, 2013 14:12:13 GMT -5
|
|
Whiterook
Full Member
Member since: March 2013
Posts: 837
Mar 13, 2013 15:29:19 GMT -5
Mar 13, 2013 15:29:19 GMT -5
|
Post by Whiterook on Mar 19, 2013 14:20:33 GMT -5
As you can see, the Folk Art acrylic paint covers smooth and opaque, and to a nice flat finish. It also has a little bit of a mottled look, because of the coarse pigments used in their production. And again, this color was used straight from the bottle with no mixing required! The other cool thing about this paint is, you can water it down to thin it a bit, and at times I have found that necessary, but usually no need for thinning is required! Also, drying time is a lot more flexible than with Tamiya acrylics, which dry on the brush very quickly, and gunks up the bottle neck if you paint straight out of the Tamiya bottle....in this regard, Folk Art is far superior. Railings up next, with more storage...and a good shot at the winch system and gun ramps.....    |
|
Whiterook
Full Member
Member since: March 2013
Posts: 837
Mar 13, 2013 15:29:19 GMT -5
Mar 13, 2013 15:29:19 GMT -5
|
Post by Whiterook on Mar 19, 2013 14:23:54 GMT -5
|
|
|
|
Post by bbd468 on Mar 19, 2013 14:26:24 GMT -5
Great work Rook! Dirty on the wheels and tires looks very nice...as does the engine. Gary |
|
Whiterook
Full Member
Member since: March 2013
Posts: 837
Mar 13, 2013 15:29:19 GMT -5
Mar 13, 2013 15:29:19 GMT -5
|
Post by Whiterook on Mar 19, 2013 14:30:04 GMT -5
The gun shields went on, held in place by hook and pegs. Also, the kit came with a canvas (molded plastic, really) roof and system, but I opted out from putting it in place...I like that you can see the inside of the cab. The kit pictures on the side of the box shows the model with and without the roof, so either scheme apparently works.  Notice, that Driver (in place to make sure the steering wheel is in proper position)is really hauling on the wheel! That would be fixed later by moving it into a more natural position. Also put on next were the canvas covering loop-thingys...yeah, that's the actual term! The kit doesn't come with the canvas tarp, but is pictured on the box art with it.....I decided to make it myself!    |
|
Whiterook
Full Member
Member since: March 2013
Posts: 837
Mar 13, 2013 15:29:19 GMT -5
Mar 13, 2013 15:29:19 GMT -5
|
Post by Whiterook on Mar 19, 2013 14:33:51 GMT -5
Great work Rook! Dirty on the wheels and tires looks very nice...as does the engine. Gary Thanks Gary...feel free to call me Em, BTW. Like drawing hands in a sketch, tires are surprisingly hard to get right, I find. On this kit, I wanted that dusty desert look. On the engine, I've relied on layers of paint and mixtures to achieve that grimy look. Perusing this forum, I came across AK Interactive references, and the stuff looks great! |
|
Whiterook
Full Member
Member since: March 2013
Posts: 837
Mar 13, 2013 15:29:19 GMT -5
Mar 13, 2013 15:29:19 GMT -5
|
Post by Whiterook on Mar 19, 2013 14:44:32 GMT -5
Next up on the Portee.... camouflage netting! The box art has a nice picture of camouflage netting, and I knew I wanted to incorporate it into the kit. There was no molded part for it, and just as well. The kit has a cab roof to simulate a canvas roof, and though somewhat passable, it really isn't that great looking...hence my leaving it out of the build. My guess would be that a larger piece would have looked even less appealing, hence it not being included in the kit? My solution was going for a netting approach using common household cheesecloth.....the kind you buy in the supermarket or household department in most any department store. It costs just a couple dollars for a package, and the stuff goes a really long ways. It is awesome for use as netting in modeling, but I also use it for netting in gaming gear! I have had the same package for awhile now, and have used it in this model and several miniatures gaming diorama accessories, and it will be used for many more.  I cut a section of cheese cloth....which I then brushed down with a craft brush, and mixture of equal parts water and Elmer's White Glue (the elementary school staple!). The glue was mixed with water in the aforementioned Meow Mix container....I brushed it on in a few layers, with the cheesecloth over some newspaper. I then rolled up the two sides to simulate the canvas netting being "rolled" up onto the overhead truck-bed frame. I then placed it onto the frame....the glue having started to firm up enough to let me "sculpt" it a little. |
|
|
|
Post by bbd468 on Mar 19, 2013 14:45:17 GMT -5
Well EM it is then! The AK products are simply fantastic! Im trying to get my hands on more my self. I use 3 kinds now but there are soooo many more awesome goodies to be had. Later EM, Gary |
|
Whiterook
Full Member
Member since: March 2013
Posts: 837
Mar 13, 2013 15:29:19 GMT -5
Mar 13, 2013 15:29:19 GMT -5
|
Post by Whiterook on Mar 19, 2013 14:53:47 GMT -5
Well EM it is then! The AK products are simply fantastic! Im trying to get my hands on more my self. I use 3 kinds now but there are soooo many more awesome goodies to be had. Later EM, Gary I brought up the AK Interactive page but haven't really looked at it yet. I am hoping it's not an overseas product that will be difficult to get your hands on....I've never seen it anywhere around her, in the model shops. BTW....Em is short for my first name, Emery, if anyone is wondering. Canadian. I asked my dad once, how in heck did they came up with that name (my mom passed when I was 14 so, I never got to ask her). My dad said he wanted to name me "Daniel", but my mom said kids would make fun of the name...you know, like Dan the Man, Danny Boy, etc. So they went with Emery (I have an uncle by the same name). Yeah, kids here in the States never made fun of "Emery"!!!! Sheesh. Every cloud has a silver lining, however. By the time I made it to high school and college, I found the girls really dug the name big time. Hmmmmm? Thanks Mom!!!!!! |
|
|
|
Post by Teabone on Mar 19, 2013 15:16:31 GMT -5
Whiterook
Your statement about "Craft Paints" here is interesting.
"Folk Art acrylics are a perfectly usable grade of acrylic paint that comes in small squirt bottles, yet you get about four times the amount of paint than
you do in just one glass bottle of Tamiya acrylic paint, for instance. Now granted, I've moved away from using it on 100% of my kits, but it still finds it's way in certain areas more suited to it. The price is very much lower too, as a bottle will typically run a little over 80 cents....and when on sale, can be as low as around 50 cents! That's a bargain!"
When I started building the price of Tamiya paints bothered me and with little or no experience building and painting 1/35 models I tended to buy more paint than I really needed. I like you found the craft paints super cheap and the range of colors is great. The first problem I encountered with the Craft Paints was in the thinner department. I was getting a lot of suggestions to use things like Windex, isopropyl alcohol, water, Tamiya thinner, and mix in some Ox Gaul or Calgon. And I did experiment around with the different things and I discovered that my paints were setting up funny in the bottles after mixing and I never found a combo that worked well with an airbrush. So I ended up using craft paints for certain things where brushing is the rule such as figures and military supplies. I only use distilled water for thinner, the OxGaul or Calgon are ok as its function is dispersion or releasing surface tension. I have since gone to all model maker paints primarily Tamiya and Tamiya thinner as it has been pretty much bullet proof.
I have not written this as a critical comment of your experiences at all but as informational to those just learning about Craft Paints and may have been experiencing some of the same things I found, that there are limitations.
Really like your build of the old model, I think they can be a lot of fun making them better than what you started out with.
|
|
|
|
Post by Leon on Mar 19, 2013 15:23:58 GMT -5
EM this is coming along great.Like your idea of the cheese cloth. |
|
Whiterook
Full Member
Member since: March 2013
Posts: 837
Mar 13, 2013 15:29:19 GMT -5
Mar 13, 2013 15:29:19 GMT -5
|
Post by Whiterook on Mar 19, 2013 15:38:55 GMT -5
Phew....just shoveled out of the LATEST storm. Is it really Spring, tomorrow??? man, this was the heavy wet stuff...dang!
|
|
Whiterook
Full Member
Member since: March 2013
Posts: 837
Mar 13, 2013 15:29:19 GMT -5
Mar 13, 2013 15:29:19 GMT -5
|
Post by Whiterook on Mar 19, 2013 15:49:09 GMT -5
EM this is coming along great.Like your idea of the cheese cloth. Not taken as critical at all, my friend. In fact, I'm very glad to see your comments and are all valid made. I also think it very important thing for folks to understand the difference between a craft paint in model painting, and paints made especially for models, so your comments are timely and correct. Craft paints (e.g., Folk Art, Americana, Apple Barrel, etc.) are manufactured with very coarse pigments, compared to brands for models like Tamiya and Vallejo. After all, the craft paints are for just that....crafts; like painting on wood mostly. A less coarse pigment would next be used in Artist grade acrylics....and then in model grade acrylics being the finest that I know of. I find your experiences with thinning your craft paints interesting. To be honest: I've always used them pretty much straight out of the squeeze bottle; and if I thin, it is with tap water, a droplet on the end o a brush being just fine. Now for myself, I would personally never spray the stuff through an airbrush; if I'm going to airbrush, I'll use model acrylics, as the finer pigments aren't going to cause near as much hell with your AB. Thanks for adding to the discussion on craft paints, mate...well done! |
|
Whiterook
Full Member
Member since: March 2013
Posts: 837
Mar 13, 2013 15:29:19 GMT -5
Mar 13, 2013 15:29:19 GMT -5
|
Post by Whiterook on Mar 19, 2013 15:50:23 GMT -5
EM this is coming along great.Like your idea of the cheese cloth. Thanks Leon! I've had a lot of uses for the stuff, but more for my wargaming dioramas, to be honest. |
|


 ..... a purrfect plastic container. Meow Mix, being plastic, cleans out easy, and I actually reuse them over and over again. I have used these for my diorama building processes too, as glue baths; and I use them in my gaming as draw cups for cardboard counters. Another great modeling use for them is as props for drying pieces and freshly painted pieces, as well as trash receptacles for small bits I want to throw away later.


