iking
Full Member

Member since: November 2012
Posts: 244
Nov 22, 2012 3:24:55 GMT -5
Nov 22, 2012 3:24:55 GMT -5
|
Post by iking on Apr 1, 2013 22:36:05 GMT -5
Hi guys, As it was a long holiday here in the Philippines last week, I managed to start a new kit from my stash. While waiting for the weathering mediums to cure on my BM-21 project, I ripped open a T-62 kit from the pile. I love T-62s so I hope you won't get tired of seeing my WIPs hahaha (I still have 2 more in my stash a '62 and an MV model). This is the T-62 model 1972. Ill build this without major conversions and will retain its usual layout except for some battle damage and field mods that I'll be doing. I started from the base kit:  Based on the bare kit above, I detailed it using wires, vinyl tubes, aluminum foils and strip styrene. First to be detailed are the non-conductive supports for the fuel cells. Support guards were also added for each of the fuel cell compartments. It is the small pointed metal thing in the middle of each compartment that supports the fuel cells. 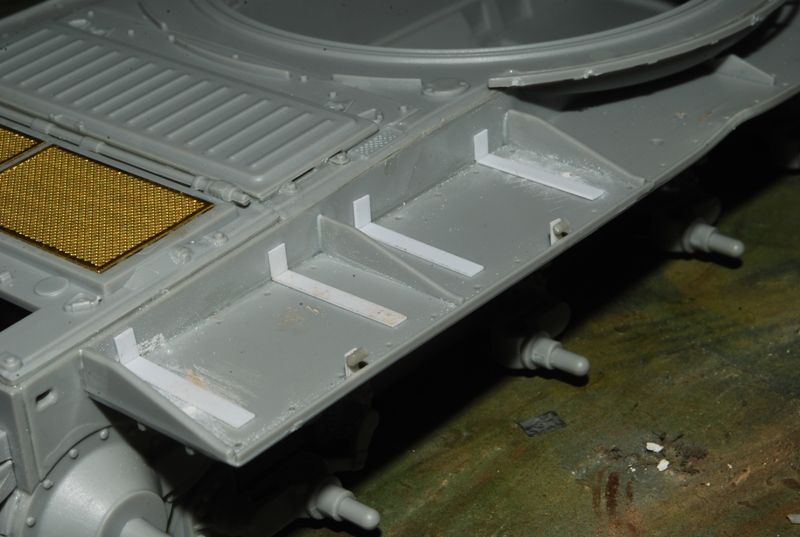 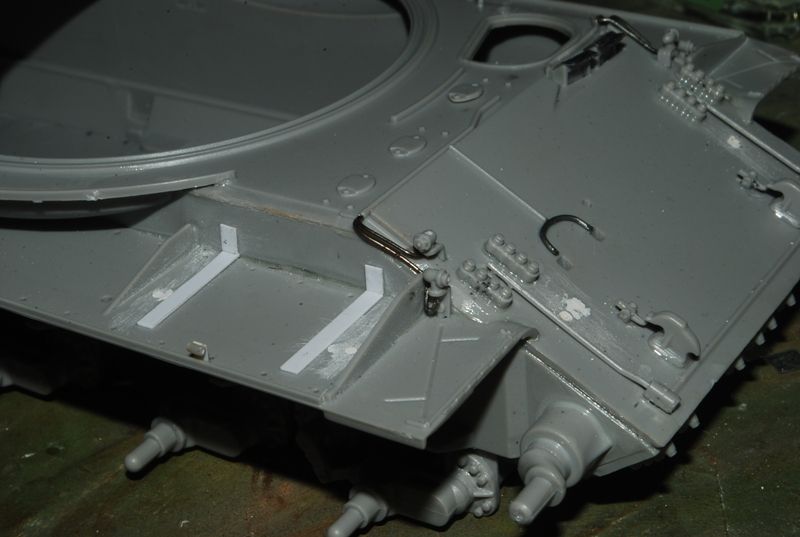 I think this works as to prevent electrical ground from shooting up to the fuel tanks, Next to be detailed are the wires for the position marker lights. With here, I used brass wires to serve as connection wires to the main lines. Headlamp wiriings were also added.  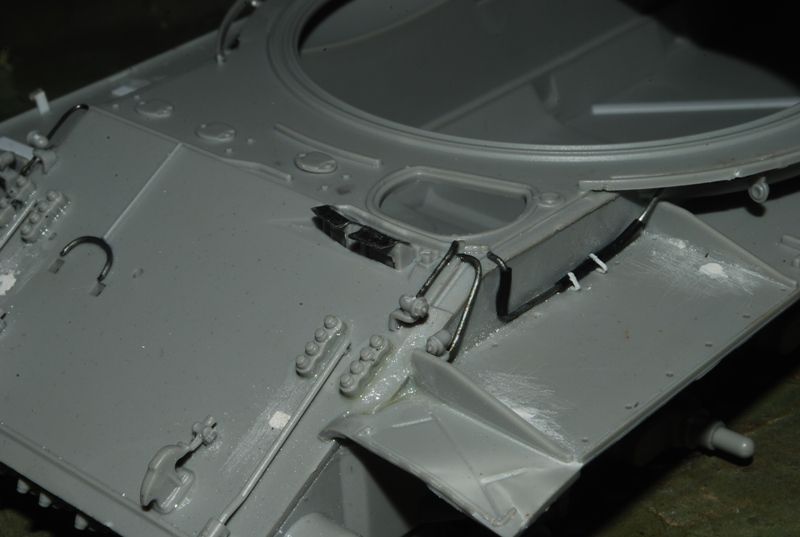 The horn details were also enhanced by providing some electrical connections. 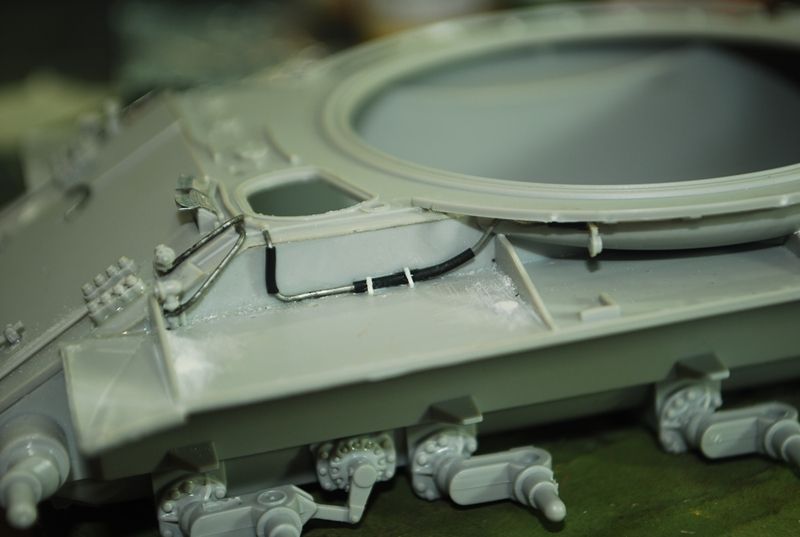 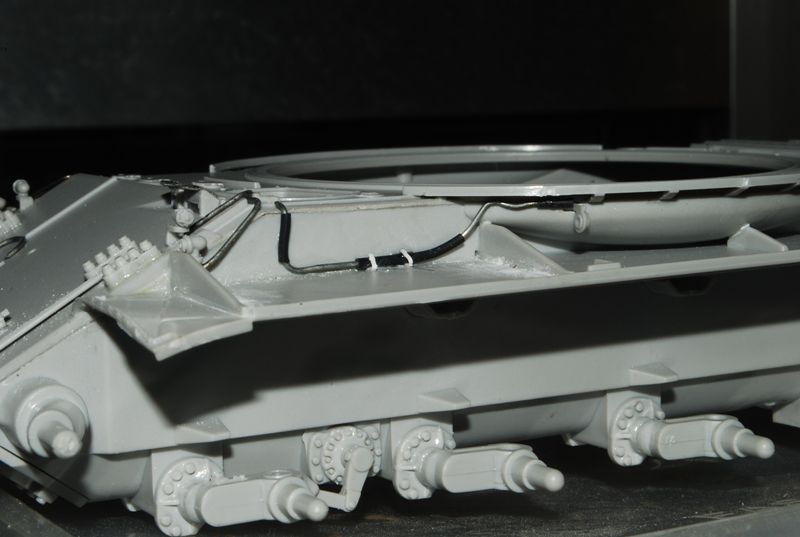 I also did a rework on the driver's periscopes by adding the hood on each scopes. The hood were made from laminated aluminum foil, cut to the right size then glued on each sopes. 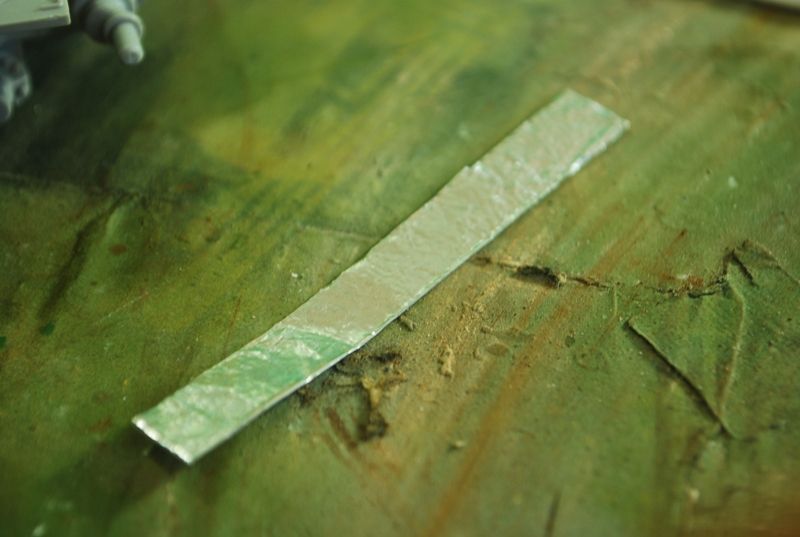 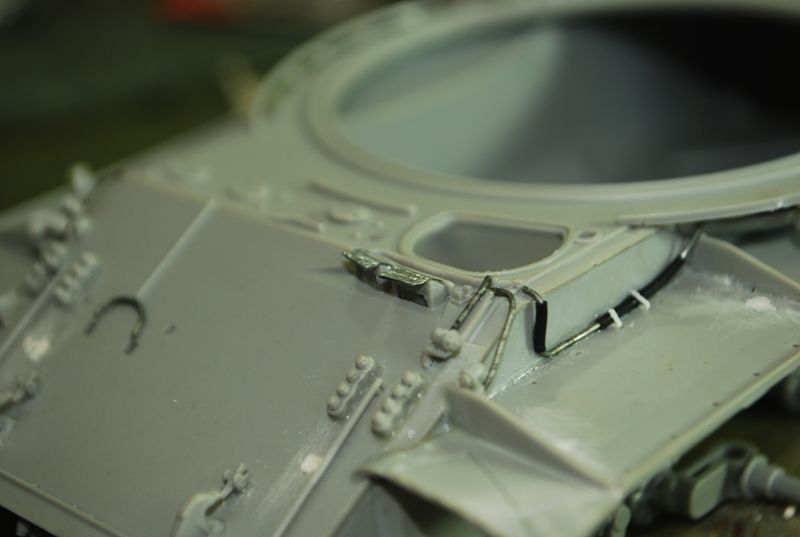 Fuel plumbings were also added and were made from brass wires. I plan to use only one fuel cell and Ill not use the last 2 on the rear end of the skirt. 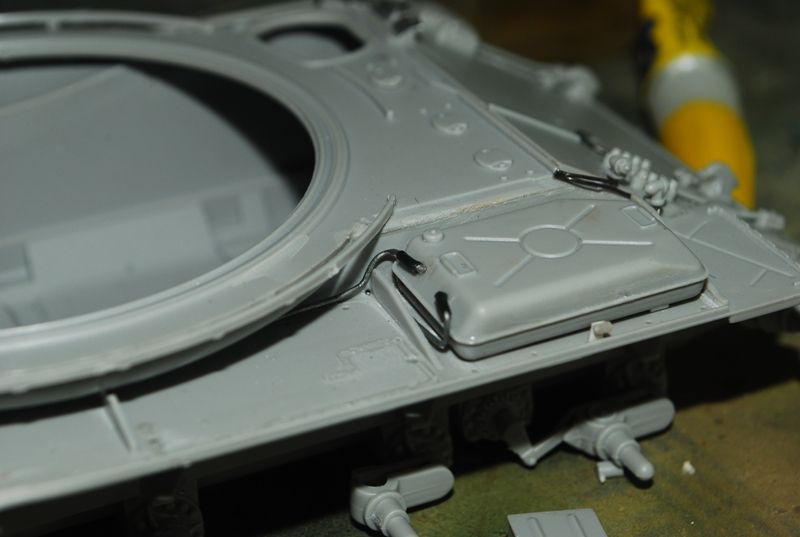  Last to be done for now are the road wheels. I did some battle damage and wear on the rubber tires by 'touching' it with a grinder to make it look a bit uneven and with some parts chopped-off. This was done after polishing the tires with sandpapers grit 120. 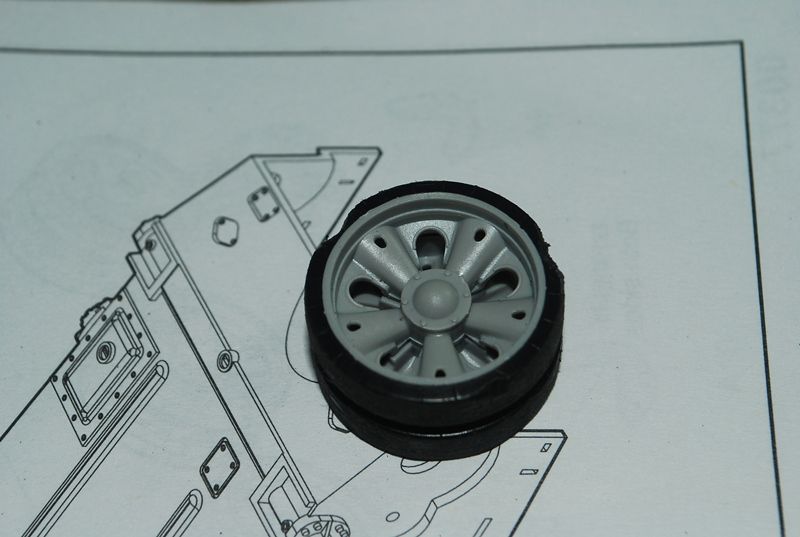 Well, here it goes for now.  happy modeling! Cheers! Iking |
|
|
|
Post by bbd468 on Apr 1, 2013 23:53:13 GMT -5
Hiya Iking, Another T-62....I love it!!! Man the extra scratch work looks great....Bookmarked!  |
|
|
|
Post by dupes on Apr 2, 2013 8:58:06 GMT -5
Can't wait to see what happens with this one.  |
|
|
|
Post by eastrock on Apr 2, 2013 10:02:40 GMT -5
Good thing you started with the hull, I could make it as reference for the wiring and details  |
|
|
|
Post by Leon on Apr 2, 2013 17:22:16 GMT -5
Nice start Iking.Got to add this to my stash. |
|
|
|
Post by wbill76 on Apr 2, 2013 20:04:33 GMT -5
Always love to see the time and attention paid to the details like the wiring and fuel lines, very nice! Looks like another fun project in the works.
|
|
|
|
Post by eastrock on Apr 2, 2013 22:56:22 GMT -5
Yes the guys are right, so no bugging in the wee hours lol
|
|
|
|
Post by Tojo72 on Apr 3, 2013 6:46:01 GMT -5
You have added some very nice details,looks very good.
|
|
iking
Full Member
Member since: November 2012
Posts: 244
Nov 22, 2012 3:24:55 GMT -5
Nov 22, 2012 3:24:55 GMT -5
|
Post by iking on Apr 6, 2013 1:20:15 GMT -5
thanks guys for the support! Yup Dicky, this is a good kit with lots of options to do! This is one of trumpy kits that im always eager to build X times:D Cheers! iking |
|
Deleted
Member since: January 1970
Posts: 0
Apr 18, 2024 19:03:37 GMT -5
Apr 18, 2024 19:03:37 GMT -5
|
Post by Deleted on Apr 6, 2013 19:00:48 GMT -5
Nice, nice, nice!
One point if I may. The nonmetallic mounts serve as vibration dampners. It keeps the seams of the tanks intact so no leaks develop. The tanks themselves are actually "grounded" if you will, by the tubing, the fastners etc. A grounded item is safer as no sparks can develop on the part itself, but sparks can happen around the vehicle and crew due to weather and static charges. That's why you touch your vehicle after you exit and before filling up. Anyway diesel is safer in this realm than gasoline due to the differences in volitility.
G
|
|
iking
Full Member
Member since: November 2012
Posts: 244
Nov 22, 2012 3:24:55 GMT -5
Nov 22, 2012 3:24:55 GMT -5
|
Post by iking on Apr 16, 2013 8:57:39 GMT -5
Nice, nice, nice! One point if I may. The nonmetallic mounts serve as vibration dampners. It keeps the seams of the tanks intact so no leaks develop. The tanks themselves are actually "grounded" if you will, by the tubing, the fastners etc. A grounded item is safer as no sparks can develop on the part itself, but sparks can happen around the vehicle and crew due to weather and static charges. That's why you touch your vehicle after you exit and before filling up. Anyway diesel is safer in this realm than gasoline due to the differences in volitility. G wow thank you agentg for the new learnings! and thanks for liking my subject! Id love to learn more details on the T-62 and T-55 series! Anyway, I am back on the workbench after a week or two hiatus due to some errands and busy work schedule. Here are some updates that I made on the T-62. 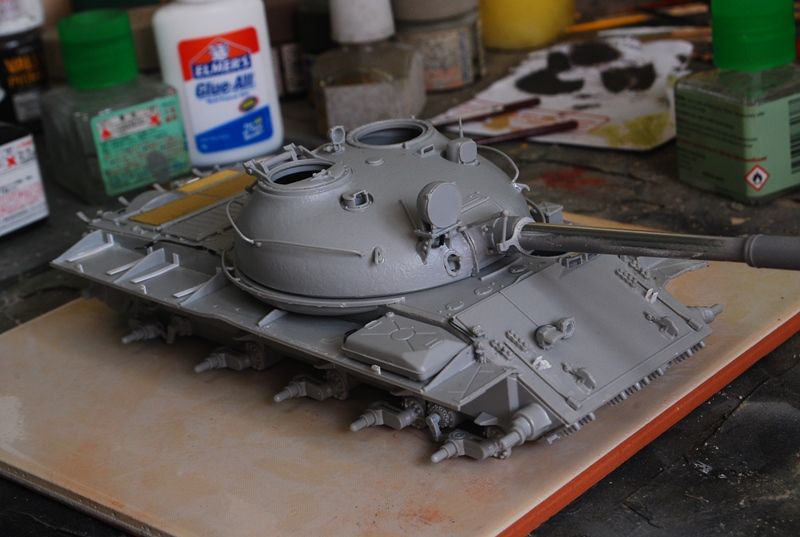 I added another detail on the turret rear. I dunno what is this for but I kept seeing this on reference photos. Its like a handle or a cable for some wirings: 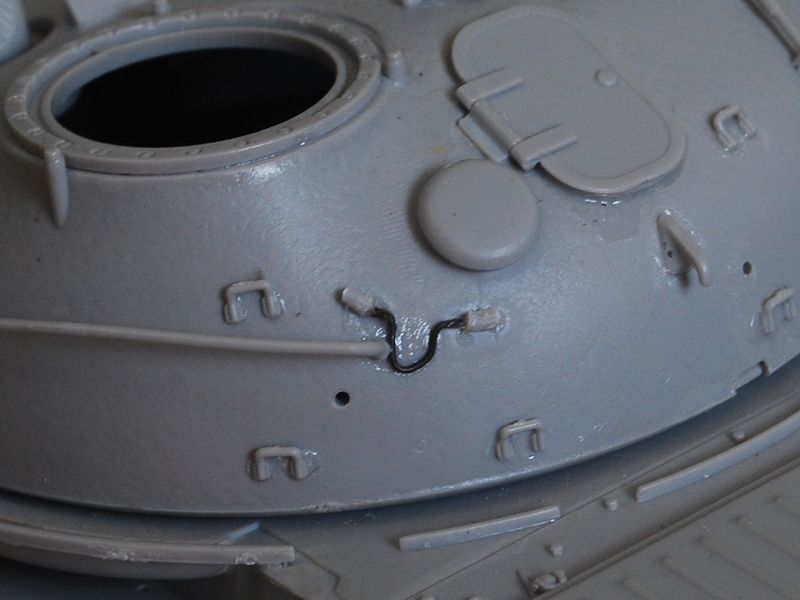 The Luna IR searchlight is also spiced-up with the power cable on its underside. 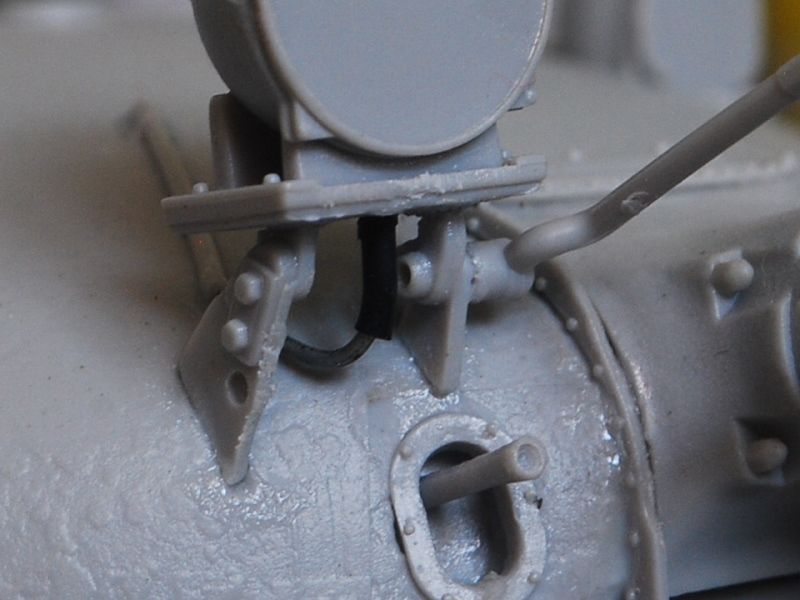 Weldmarks are also being prepared from stretched sprues. 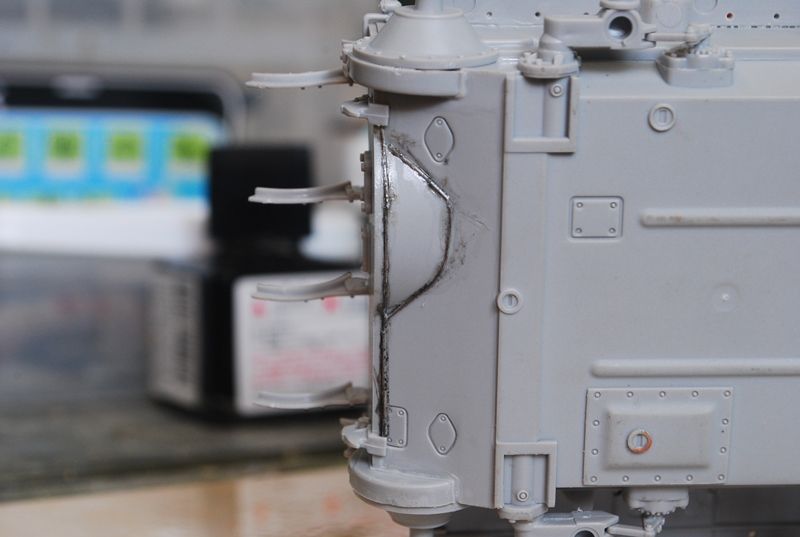 There is also a small detail on one of the engine exhaust panels: 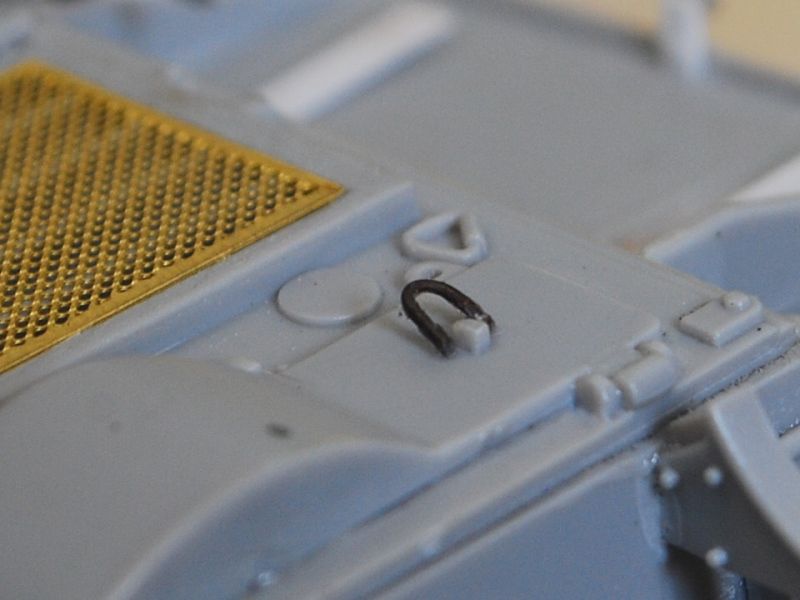 I made a simple hook as based on the reference photos from dishmodels. The splashboards will not be attached so I just fashioned the handles from sprue strips. 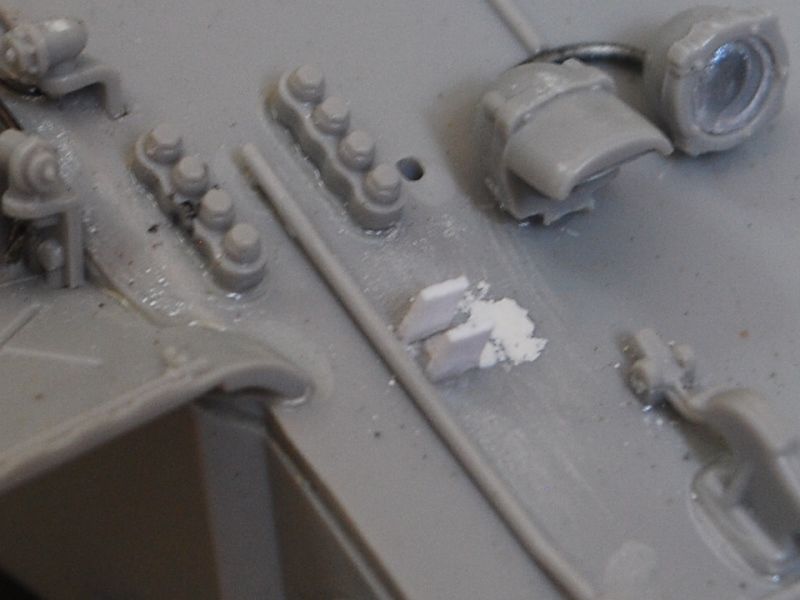 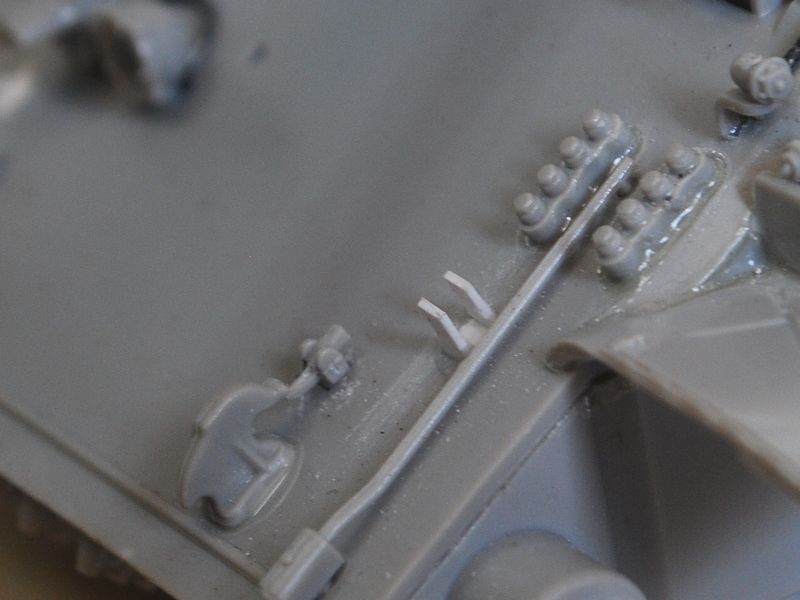 Last is the wiring for the small IR lamp on the turret roof. 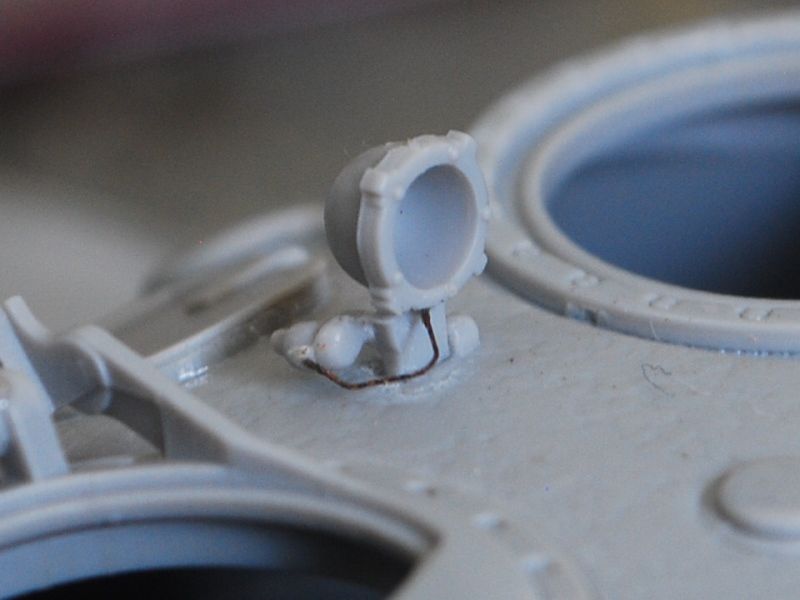 I made it from cable wires and I just reused the main copper wires. I hope to paint this already with primer and a base coat. Cheers guys! Iking |
|
|
|
Post by bbd468 on Apr 16, 2013 11:02:23 GMT -5
Shes lookin' awesome my man! Great modifications and scratchwork. Gary |
|
|
|
Post by bullardino on Apr 16, 2013 13:42:56 GMT -5
What an interesting build, count me in comrade |
|
|
|
Post by rbaer on Apr 16, 2013 14:09:39 GMT -5
Watching here too. Very interesting.
|
|
|
|
Post by wbill76 on Apr 16, 2013 19:51:05 GMT -5
Nice additions in the detail department IK, it's good to see this one moving again. |
|
|
|
Post by Leon on Apr 16, 2013 20:00:27 GMT -5
Nice detailing IK.Waiting to see what it looks like in paint. |
|
|
|
Post by dupes on Apr 16, 2013 22:14:13 GMT -5
Can't wait for paaaaaint! |
|
iking
Full Member
Member since: November 2012
Posts: 244
Nov 22, 2012 3:24:55 GMT -5
Nov 22, 2012 3:24:55 GMT -5
|
Post by iking on Apr 17, 2013 11:00:06 GMT -5
thanks a lot guys! yup I was looking forward on updating this again! the 2 weeks is quite long to have a hiatus (talk about modeling addiction eh) hahaha! kidding aside,ill kick this one again to jumpstart the momentum again I have attached the tracks but haven't took pics yet. It feels great as it looks like a tank now hahaha! cheers! Iking |
|
iking
Full Member
Member since: November 2012
Posts: 244
Nov 22, 2012 3:24:55 GMT -5
Nov 22, 2012 3:24:55 GMT -5
|
Post by iking on Apr 22, 2013 9:13:36 GMT -5
Hi guys! here are some updates. The T-62 kit looks like a tank now: The tractors are assembled and attached but not yet permanently mated as I will weather the hull sides after the painting has started. 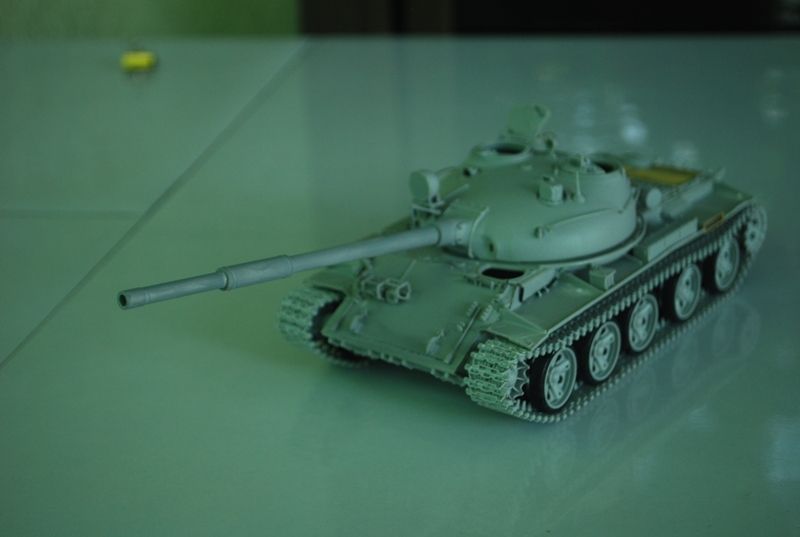 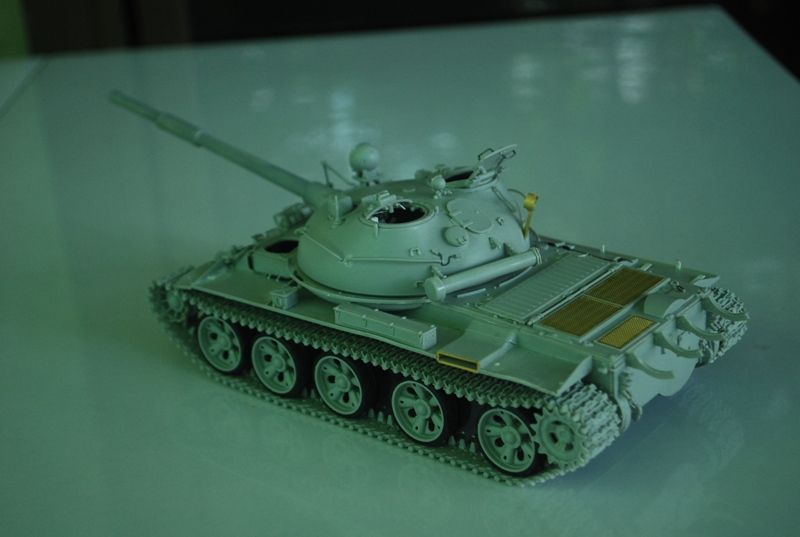 hatch details: The details are made from strip styrene, tube styrene plus brass wires of different gauges. The periscopes were mainly enhanced and detailed as this will be seen when the hatch is in the open position.  Commanders hatch was also enhanced as I have added the internal rimming on the hatch edges plus some latches and the periscope brackets as well. 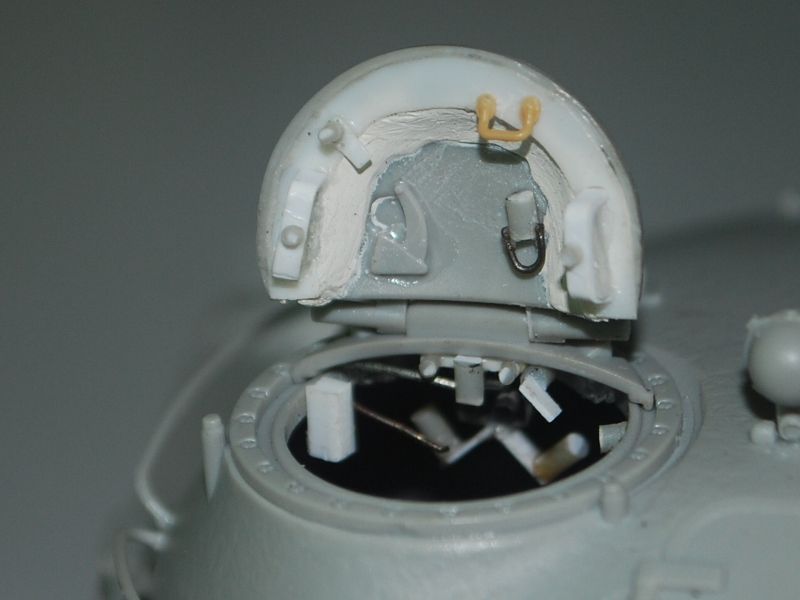 I added the grab handles on the loaders hatch . The handles are made from brass wires: 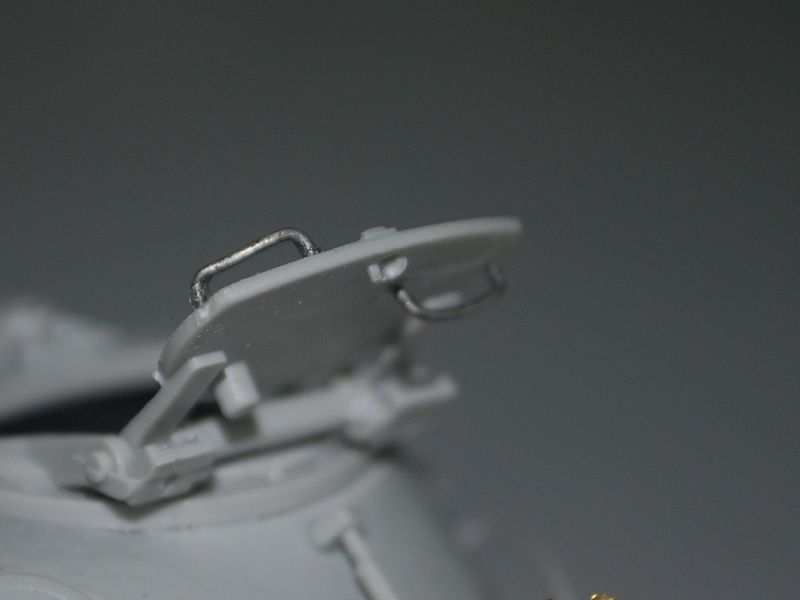 cheers guys! iking |
|
Deleted
Member since: January 1970
Posts: 0
Apr 18, 2024 19:03:37 GMT -5
Apr 18, 2024 19:03:37 GMT -5
|
Post by Deleted on Apr 22, 2013 9:22:55 GMT -5
Supa Dupa details there!
When painted this will be a stunner.
G
|
|
|
|
Post by bullardino on Apr 22, 2013 9:53:08 GMT -5
Great detailing there, ER Why does it look all so green? |
|
|
|
Post by bbd468 on Apr 22, 2013 9:56:37 GMT -5
Lookin awesome Iking! Great job with the detail work buddy. Gary |
|
danb
Reviews member  March 2013 MoM Winner
Member since: November 2011
Posts: 2,808
Nov 17, 2011 9:22:52 GMT -5
Nov 17, 2011 9:22:52 GMT -5
|
Post by danb on Apr 22, 2013 14:51:44 GMT -5
Great work buddy loving this 62 the added details set this model apart from the others keep up the good work
Dan B
|
|
|
|
Post by Leon on Apr 22, 2013 15:19:31 GMT -5
Awesome detail work Iking. |
|
|
|
Post by robbo on Apr 22, 2013 16:10:14 GMT -5
This looks a bit tasty, going to have to stay tunned
|
|
|
|
Post by wbill76 on Apr 22, 2013 19:35:35 GMT -5
Nice work dressing up that hatch.
|
|
|
|
Post by eastrock on Apr 23, 2013 13:34:10 GMT -5
Great detailing there, ER Why does it look all so green? Hey Luigi I think this is Iking T-62 not mine lol well with the swarm of T-62 in MSC |
|
iking
Full Member
Member since: November 2012
Posts: 244
Nov 22, 2012 3:24:55 GMT -5
Nov 22, 2012 3:24:55 GMT -5
|
Post by iking on Apr 23, 2013 14:42:26 GMT -5
Thank you Thank you thank you guys! Your appreciation and warm words are very inspiring! thanks! Some updates: I painted the hull and turret already with light sand over a base of Tamiya Dark Iron. Light sand color was mixed from Tamiya XF-2 Flat White and XF-60 Dark Yellow. Ratio is dependent on the tank that is being used as reference as Arab/Iranian tanks of 1980s did not sport a standard shade of sand colors at that time. After the painting was applied and dried, I then proceeded to use one of my new weathering materials, the AK heavy chipping fluid. The AK heavy chipping fluid is easy to use and less messy than the sponge technique that I use. The paint was already applied and partially weathered.  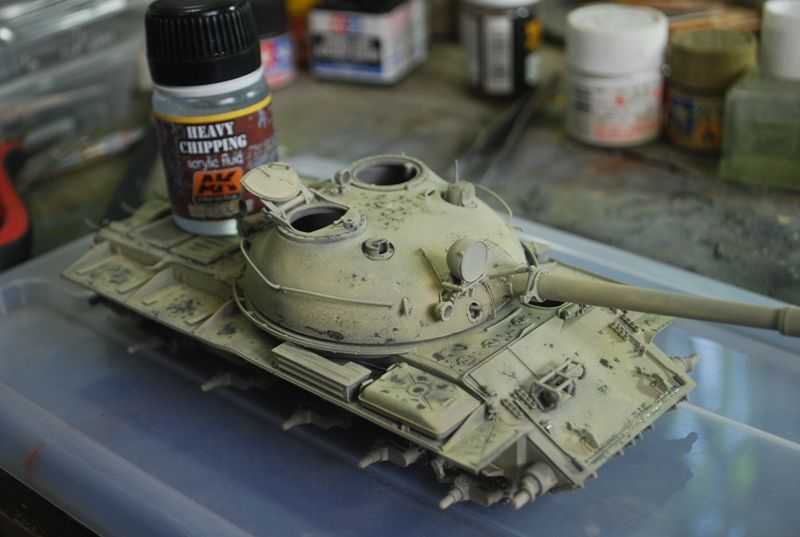 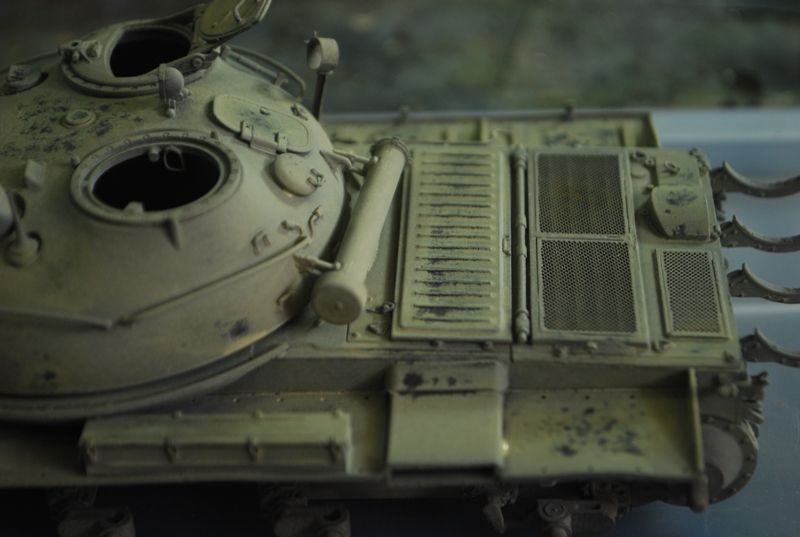 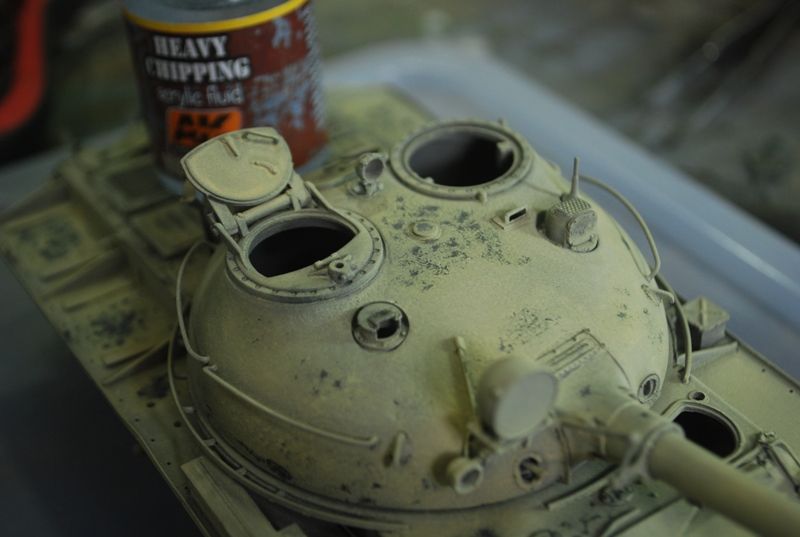 The rest of the tank will be sprayed with clear dull coat and the chipping procedure will be repeated for the green camouflage. Thanks for looking! Cheers! Iking |
|
|
|
Post by deafpanzer on Apr 23, 2013 17:10:59 GMT -5
Great chipping job there!!! Love that AK product...
|
|
|
|
Post by wbill76 on Apr 23, 2013 19:39:26 GMT -5
Some nice progress to show here, looking forward to the next round.
|
|


