paulh.
Senior Member
   
Member since: November 2011
build, fail, learn, succeed - ENJOY
Posts: 2,389
Nov 15, 2011 15:54:51 GMT -5
Nov 15, 2011 15:54:51 GMT -5
|
Post by paulh. on Jun 13, 2013 14:30:30 GMT -5
I think this is the right place for this one... The scale i think is 1/32 but I wouldn't be willing to bet on it  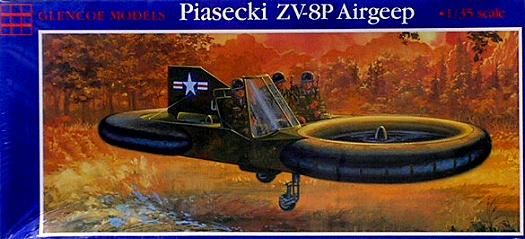 And the contents: 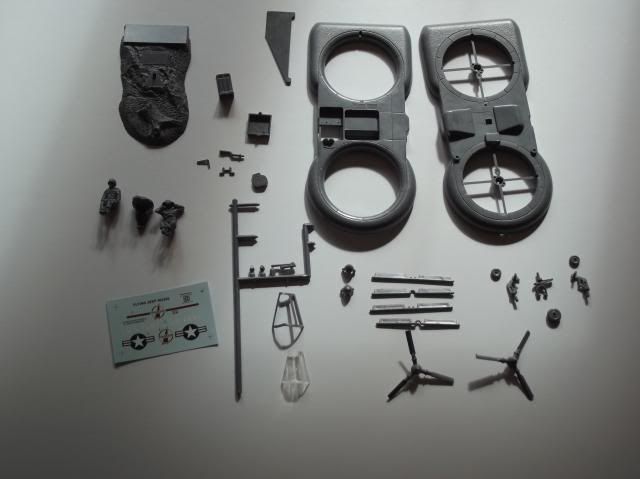 The box carries a date from 2006, but these contents are soooo obviuosly much older than that. Given the chunkyness of some of thee bits I think Im going to try to rework some of these. With this parts count it shouldn't take too long to build even for me!  i.e should be done by Christmas Planning a start in a couple of days |
|
|
|
Post by wbill76 on Jun 13, 2013 19:20:03 GMT -5
Flying donuts! Yaaay! Now all you need is to scratchbuild a matching set of coffee mugs to go with it! Looking forward to seeing this oddball come to life.
|
|
paulh.
Senior Member
   
Member since: November 2011
build, fail, learn, succeed - ENJOY
Posts: 2,389
Nov 15, 2011 15:54:51 GMT -5
Nov 15, 2011 15:54:51 GMT -5
|
Post by paulh. on Jun 17, 2013 7:00:12 GMT -5
I' ve actually managed to pre-arrange some bench time this week with SWMBO, so I'm hoping to get this started (rather than finish some others  ) in the next day or two. Even If I end up re-working some of the parts it should be fairly straight forward and quick, so watch this space folks... P |
|
paulh.
Senior Member
   
Member since: November 2011
build, fail, learn, succeed - ENJOY
Posts: 2,389
Nov 15, 2011 15:54:51 GMT -5
Nov 15, 2011 15:54:51 GMT -5
|
Post by paulh. on Jun 25, 2013 15:32:41 GMT -5
And we’re off… well kinda …  First thing needing action was a number of small knock out marks on the fin and the vanes in the engine ducts- a quick swipe with some plastic filler and sanding stick quickly sorted that.  Earlier I highlighted there was a lack (i.e. absence) of images with the fin- suggesting perhaps a degree of artistic licence on the part of Glencoe. However, the instruction sheet includes an image of the vehicle with this fin (accredited to the Army Transportation Museum @ Ft Eustice). Without meaningful references , I guestimated the location for the stay attachment points and made a hole to fit 30 gauge florist wire, which should ensure a scale size and “tautness” to the final result. 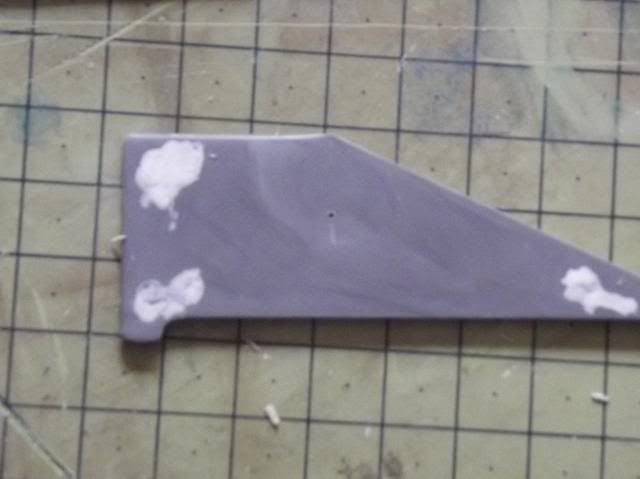 What I presume to be a collective control lever (its on the left- standard position for these things in choppers) is rather chunky, so I decided to try to finesse it somewhat with some undercutting and re-shaping . Not quite finished yet as you can see from this: 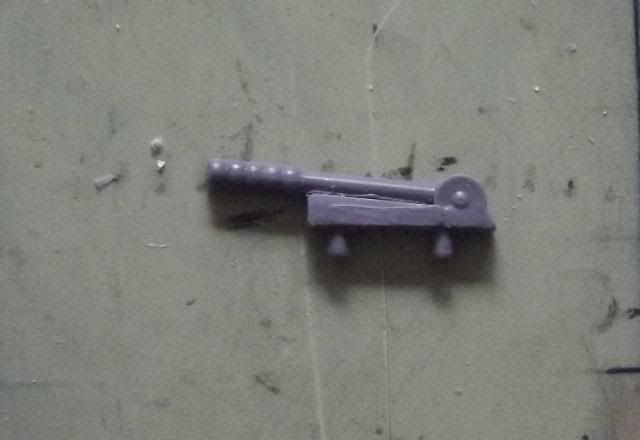 The general break down of parts and construction sequence will mean some painting as I go along, so that's all for now but hopefully something again tomorrow TTFN P |
|
paulh.
Senior Member
   
Member since: November 2011
build, fail, learn, succeed - ENJOY
Posts: 2,389
Nov 15, 2011 15:54:51 GMT -5
Nov 15, 2011 15:54:51 GMT -5
|
Post by paulh. on Jun 25, 2013 15:41:38 GMT -5
Lookin' forward to seein this one move on  there ya go with the pressure again  I did say it would be a before crimbo finish- and that it will be  just not sure what crimbo.... |
|
|
|
Post by TRM on Jun 25, 2013 16:23:34 GMT -5
Off to a great start there Paul!!
|
|
paulh.
Senior Member
   
Member since: November 2011
build, fail, learn, succeed - ENJOY
Posts: 2,389
Nov 15, 2011 15:54:51 GMT -5
Nov 15, 2011 15:54:51 GMT -5
|
Post by paulh. on Jun 25, 2013 16:29:37 GMT -5
only cause there hasn't actually been any construction as such   |
|
|
|
Post by wbill76 on Jun 25, 2013 17:53:44 GMT -5
Nice to see some progress on this one Paul. No pressure whatsoever...just know that Dicky likes donuts, so just toss up one or two of those from time to time to keep him at bay.  |
|
paulh.
Senior Member
   
Member since: November 2011
build, fail, learn, succeed - ENJOY
Posts: 2,389
Nov 15, 2011 15:54:51 GMT -5
Nov 15, 2011 15:54:51 GMT -5
|
Post by paulh. on Jun 26, 2013 1:32:14 GMT -5
OOOOHH look at you Dicky- quoting Von Moltke no less   You're right though- and my enemy is called "starting"   Bill- thank you kindly sir (I'm off to place a bulk order at Krispy Cremes to keep him happy) |
|
paulh.
Senior Member
   
Member since: November 2011
build, fail, learn, succeed - ENJOY
Posts: 2,389
Nov 15, 2011 15:54:51 GMT -5
Nov 15, 2011 15:54:51 GMT -5
|
Post by paulh. on Jul 8, 2013 13:01:22 GMT -5
Just to try and make a little more of this: Only really getting 15-20 minutes in a sitting at the moment, so not much progress just yet. I removed the molded on detail of the vents behind the passanger seat and repalced with some mesh I had lying around-didn't quite turn out as i hoped, but not too bad . Also, to add some interest to the cockpit I added some trunking out of Evergreen rod. Finally, the pasanger seat as supplied is little more than a plain moulded in shelf. This got a covering of tissue & pva to give it a bit of texture. 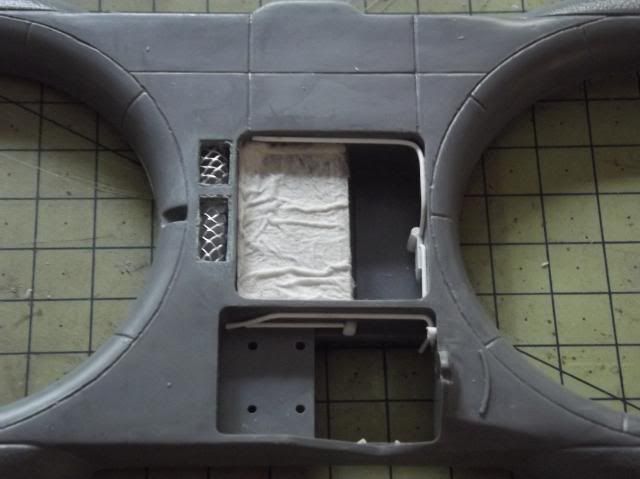 ACW P |
|
paulh.
Senior Member
   
Member since: November 2011
build, fail, learn, succeed - ENJOY
Posts: 2,389
Nov 15, 2011 15:54:51 GMT -5
Nov 15, 2011 15:54:51 GMT -5
|
Post by paulh. on Jul 8, 2013 16:00:06 GMT -5
Well tonight I just tried to tart up the landing gear a bit with some detail- bolt from 0.030 evergreen rod and the suggestion of some hydraulics with some fine copper wire. Here's as far as I got before it was time to tidy things away- springs still need to be sharpened up a bit and some work on seams.  At this speed- might be finished before Halloween  TTFN P |
|
|
|
Post by TRM on Jul 8, 2013 16:05:29 GMT -5
Nothing wrong with the speed! Lovely work on the plumbing!! Will add a lot once the color flies!! Seat will be looking the part as well!! Keep at it!!
|
|
|
|
Post by wbill76 on Jul 8, 2013 19:37:11 GMT -5
Any progress is good progress Paul, nice rework on the seat and other little details.
|
|
|
|
Post by deafpanzer on Jul 8, 2013 20:40:24 GMT -5
Looking good... I don't think I never seen this before so I am definitely interested.
|
|
|
|
Post by bbd468 on Jul 8, 2013 21:02:47 GMT -5
Hiya Paul, WOW...this is all new to me too. Looks very interesting though and fun! Nice start too fella.  |
|
paulh.
Senior Member
   
Member since: November 2011
build, fail, learn, succeed - ENJOY
Posts: 2,389
Nov 15, 2011 15:54:51 GMT -5
Nov 15, 2011 15:54:51 GMT -5
|
Post by paulh. on Jul 25, 2013 14:57:15 GMT -5
Time for a bit of an update: Main colours blocked in (fin just dry fitted). I wanted to add a bit of additional colour so opted for some on the fan blades. No attempt at historical accuracy    (Sorry pics are not the best) Once I've tidied up the edges around the cockpit Im going to add so variation to the tone probably with some filters. ACW P |
|
Deleted
Member since: January 1970
Posts: 0
Nov 23, 2024 7:25:20 GMT -5
Nov 23, 2024 7:25:20 GMT -5
|
Post by Deleted on Jul 25, 2013 15:25:12 GMT -5
Looks pretty darn cool from where I'm sitting fella  .....Must be pretty small tho,if that's your wallet in the piccie!!!!   |
|
paulh.
Senior Member
   
Member since: November 2011
build, fail, learn, succeed - ENJOY
Posts: 2,389
Nov 15, 2011 15:54:51 GMT -5
Nov 15, 2011 15:54:51 GMT -5
|
Post by paulh. on Jul 25, 2013 15:32:20 GMT -5
Cheers C- about 9 inches in old money en d to end.
|
|
|
|
Post by wbill76 on Jul 25, 2013 19:35:00 GMT -5
Nice touch with the blades, definitely wouldn't want to come into contact with them while in operation!
|
|
DeafStuG
Full Member
  
Member since: May 2013
..
Posts: 1,283 
|
Post by DeafStuG on Aug 13, 2013 17:59:40 GMT -5
Great work and very nice.
|
|
venom1
Full Member
  
Member since: October 2012
Posts: 1,369
Oct 10, 2012 2:40:03 GMT -5
Oct 10, 2012 2:40:03 GMT -5
|
Post by venom1 on Aug 13, 2013 23:51:35 GMT -5
Lookin' sweet Paul!  Historical accuracy be damned, I like the coloured blades!!  Cheers, Sam  |
|
paulh.
Senior Member
   
Member since: November 2011
build, fail, learn, succeed - ENJOY
Posts: 2,389
Nov 15, 2011 15:54:51 GMT -5
Nov 15, 2011 15:54:51 GMT -5
|
Post by paulh. on Aug 14, 2013 1:41:28 GMT -5
Jeremy, Sam-; thank you both very much.
I've been doin' some furtlin' around the passanger tub- hope to have update pics soon.
P
|
|
paulh.
Senior Member
   
Member since: November 2011
build, fail, learn, succeed - ENJOY
Posts: 2,389
Nov 15, 2011 15:54:51 GMT -5
Nov 15, 2011 15:54:51 GMT -5
|
Post by paulh. on Nov 14, 2013 15:19:33 GMT -5
Does anyone know what the "airframe" of this was made of? I've not been able to determine from the info available on the web.
Would it be reasonable to assume aluminium or some such light-weight and non-rusting material?
TIA
P
|
|
Deleted
Member since: January 1970
Posts: 0
Nov 23, 2024 7:25:20 GMT -5
Nov 23, 2024 7:25:20 GMT -5
|
Post by Deleted on Nov 14, 2013 16:04:51 GMT -5
Paul,given the era this was experimented with,I would think it's safe to assume aluminium(aluminum)was the primary metal,with maybe some sort of basic 'spaceframe' skeleton of steel tube?
|
|
paulh.
Senior Member
   
Member since: November 2011
build, fail, learn, succeed - ENJOY
Posts: 2,389
Nov 15, 2011 15:54:51 GMT -5
Nov 15, 2011 15:54:51 GMT -5
|
Post by paulh. on Nov 14, 2013 17:10:54 GMT -5
Cheers both -very helpful.
P
|
|
paulh.
Senior Member
   
Member since: November 2011
build, fail, learn, succeed - ENJOY
Posts: 2,389
Nov 15, 2011 15:54:51 GMT -5
Nov 15, 2011 15:54:51 GMT -5
|
Post by paulh. on Nov 14, 2013 17:30:04 GMT -5
|
|
paulh.
Senior Member
   
Member since: November 2011
build, fail, learn, succeed - ENJOY
Posts: 2,389
Nov 15, 2011 15:54:51 GMT -5
Nov 15, 2011 15:54:51 GMT -5
|
Post by paulh. on Nov 15, 2013 6:29:47 GMT -5
I've done some light chipping using a bark green and plan to follow that up with some non-rusting metalic highlighting in appropariate places following confirmation from CB and Nemo.
The only meaningful decals in the form of the Starn'n Bars and "US Army" have been applied to the fin. I've decided I'm not going to apply the Piasecki corporate stuff
The props also have had some light metalic chipping on the leading edges to give it am ore "lived in" look.
Still not sure what to do with the underside- - probably a heavier dusting than topside- but outside of that lost for ideas- so any and all will be graciously considered.
Once this is done it will get a matt coat and a light dusting.
Base will be something very simple- still to be decided.
Sorry no pics at the mo- postin' instead of doing what I should be - so I'll sort that out later.
P
|
|
|
|
Post by bullardino on Nov 15, 2013 7:07:38 GMT -5
I just caught up, fine job there  That's a weird thang, Paul... |
|
paulh.
Senior Member
   
Member since: November 2011
build, fail, learn, succeed - ENJOY
Posts: 2,389
Nov 15, 2011 15:54:51 GMT -5
Nov 15, 2011 15:54:51 GMT -5
|
Post by paulh. on Nov 20, 2013 9:53:41 GMT -5
Cheers Luigi! Well some pics as promised. Nearly there, cockpit/windscreen to be glazed and added. A bit more to do with weathering though- not happy with the look of things on top -just too bloody streaky. I'll figure that one out- eventually. Simple base- some 400 grade alu-oxide paper, cut and stuck down to some 5mm MDF with "expansion gaps", over-sprayed in a random manner with some Tamiya sand spray and finally,some Noch clumps added for interst. 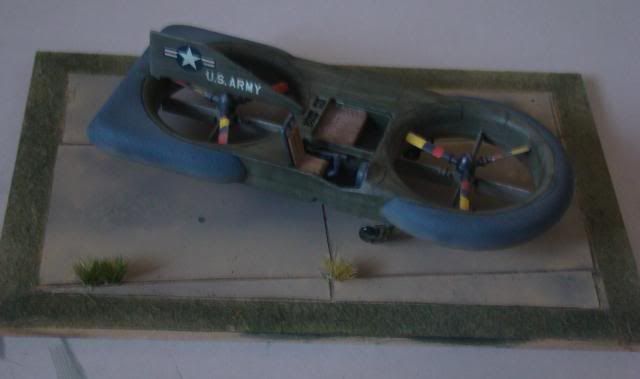 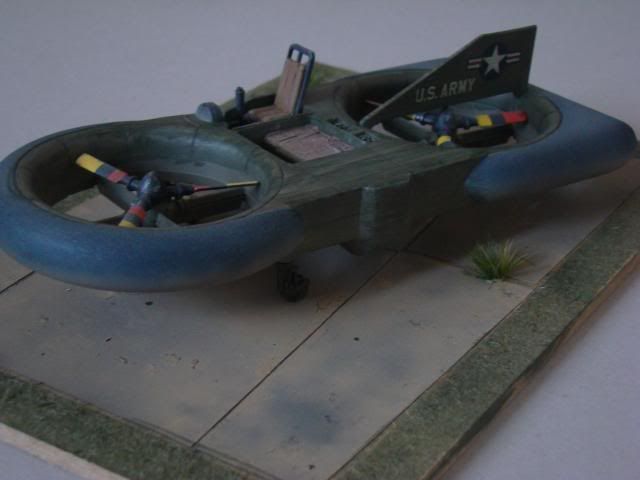 As always ACW P |
|
|
|
Post by bullardino on Nov 20, 2013 11:40:25 GMT -5
I like the base, it's really convincing  |
|