|
|
Post by TRM on Aug 31, 2013 15:59:59 GMT -5
Sounds like a good plan...shows are perfect opportunities to expand the stash!  Not when you have Dupes living within range it isn't!! LOL!!!!! |
|
|
|
Post by wbill76 on Aug 31, 2013 19:46:24 GMT -5
Very true T! Had a very close call today...my lighted magnifier which serves as the light source over my bench decided that it didn't want to stand up any more and collapsed onto the bench. Fortunately I had just moved the hull and all the parts I was working on to a safe spot and was just bending some PE. The light fell at an angle and took out a bottle of liquid cement which promptly spilled all over the now empty work area. Needless to say it was a heart-stopper for a moment, now I just have to clear out all the fumes!  |
|
vlpbruce
Full Member
  
Member since: March 2013
Posts: 1,463 
|
Post by vlpbruce on Aug 31, 2013 20:15:32 GMT -5
Sorry to hear about the disaster (the same has happened to me). I am glad there was no damage. The paint looks great. I look forward to more.
|
|
|
|
Post by wbill76 on Aug 31, 2013 20:39:10 GMT -5
Thanks bruce! No big deal, I keep multiple bottles on hand so it won't stop things for very long...besides it's a perfect excuse to go watch a movie with my wife in the living room while the vapors clear out!  |
|
|
|
Post by TRM on Aug 31, 2013 20:52:56 GMT -5
Dodged that bullet!! Fortunate you are!!! We will discuss how I might enjoy the fumes at a later time!!  |
|
|
|
Post by wbill76 on Sept 1, 2013 8:58:19 GMT -5
Dodged that bullet!! Fortunate you are!!! We will discuss how I might enjoy the fumes at a later time!!  I can only imagine T!  |
|
|
|
Post by wbill76 on Sept 1, 2013 20:25:56 GMT -5
Latest round of progress dives head first into the details of this kit. Dragon's not kidding when they say it has over 650 parts...there are lots of them and they are tiny! I headed over to Step 1 in the instructions and assembled the main guns as well as numerous (40!) life rafts. Each one of them is molded separately and requires a little bit of clean-up on their edges, so that had to be done using the Optivisor. The Eduard detail set includes nice PE lattice floor inserts for each of the rafts, but since most of them are stacked, I only added the inserts for those that were on the top of the stacks. An interesting little note here, for the single-gun turrets, the 'racks' for the rafts don't have a bottom, so to ensure they are placed correctly and the rafts are at the right height, you need to test the fit with the turrets in their respective deck mounts to avoid any issues down the road. I also assembled the torpedo launchers called for in Step 2. The life rafts that didn't go on the guns or launchers were secured to a strip of masking tape to prevent them from wandering off after this photo was taken.  I decided to work on the aft gun deck next, this is covered in Steps 11 and 12 of the instructions. The base superstructure has a lot of nice molded-on detail including 19 square windows that each require its own separate cover. Dragon wants you to install these all open but the little ridge of the window is tiny as are the little hinges on the covers, so I just installed them all closed after fighting with a couple for several minutes and deciding it wasn't worth the little extra detail given that the gun deck overhangs it anyhow and the squares themselves are solid. Adding another little typical Dragon instruction boo-boo, the diagram shows 19 port covers to go with the 19 molded on windows but Dragon only provides 18 on the sprues. The 19th unlucky window was simply removed with a #11 blade tip and sanded into oblivion. This area also marked my first foray into the railings from Eduard. I'm very happy so far with this set, definitely adds a lot to the look. Railings were added to the gun deck as well as the Flakvierling tower using Gator Grip glue to provide some flexibility to get them positioned just right. Ladders were added courtesy of the Eduard set as well. One other little caution, the tower is home to the aft mast and it has to slide down through the tower into the deck...but the hole is the diameter of the portion of the mast that sticks out above it, now the diameter of the base, so it has to be opened up slightly for this to go correctly. The tower was dry-fit only to ensure the mast alignment was correct and to allow easier painting of the railings. 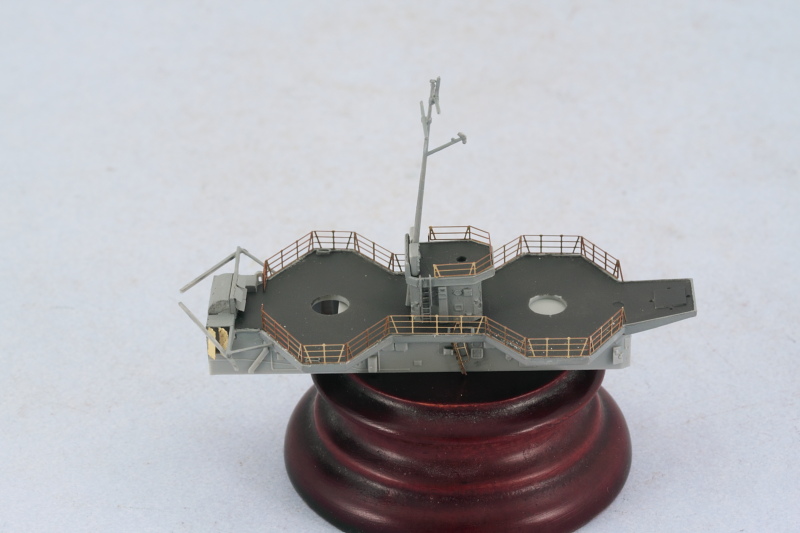 Speaking of the Flakvierling...it's a little beauty of an item but requires a lot of patience to get it together. It consists of 14 parts including PE and separate barrels with hollow muzzles for the guns. The PE shield has no bend lines so that's a bit of a chore to get it bent correctly as the fit tolerances on the tower platform have to be exact. To aid in assembly, I left the base of the gun, H24, attached to the sprue point to provide a better handle for the assembly of the gun and only removed it when it was time to install it onto the platform. 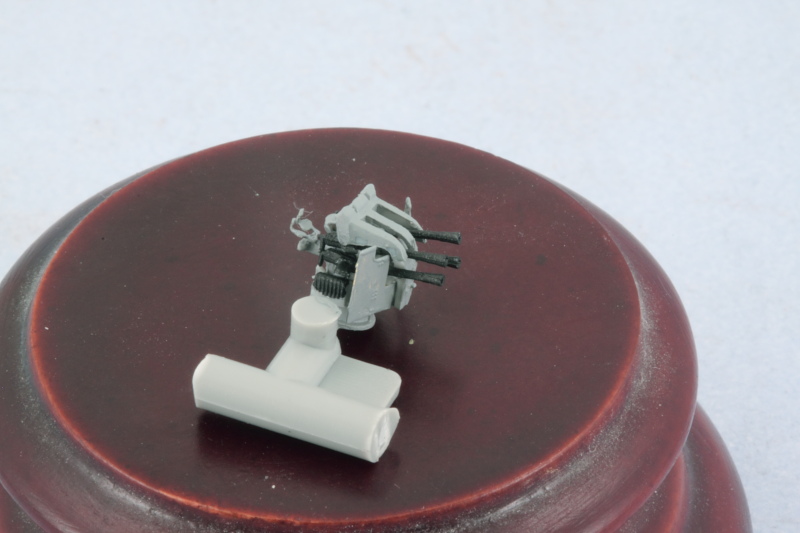 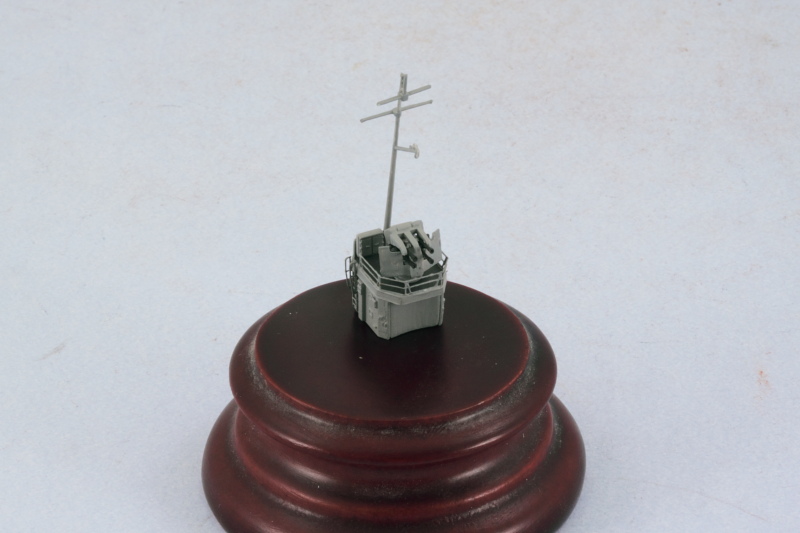 After painting the railings on the gun deck and adding in the turret protection half-rings, the Flakvierling tower and mast were permanently installed in position. I also added the four-raft stack and retainer rods to the ski ramp to round things out. All that's left is a single-mount 20mm gun between the raft stack and the turret ring to complete this portion of the deck. I'll add that after I've painted the underside of the structure along with the turrets tomorrow as it's a pretty delicate thing and I'm running out of ways to safely handle this little module! 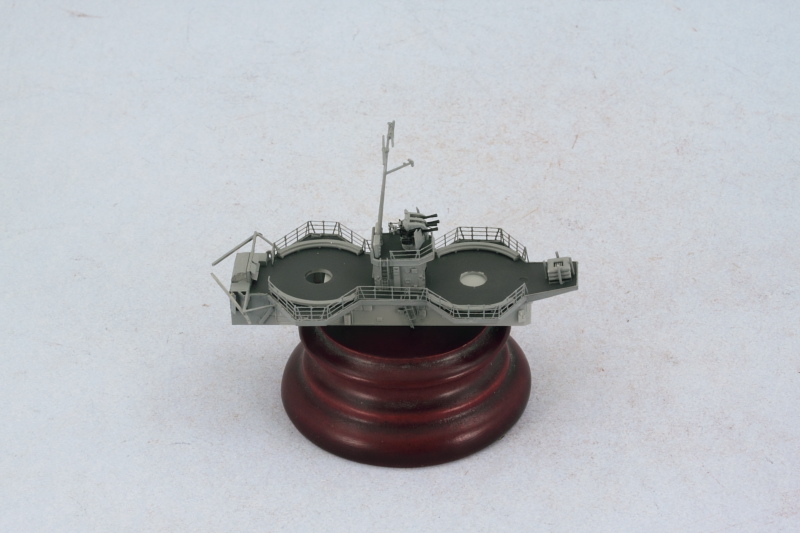 More to come in the details department as I work my way forward. |
|
|
|
Post by Leon on Sept 1, 2013 20:52:48 GMT -5
Really making good progress Bill.A lot of nice detail and the PE railings look great.   |
|
|
|
Post by deafpanzer on Sept 1, 2013 20:58:44 GMT -5
Looking awesome already especially the PE rail! How easy was it for you to do them? Were they in one long piece of rail for each side or individual rail?
|
|
|
|
Post by TRM on Sept 1, 2013 21:58:33 GMT -5
Beautifully done there Bill!! Really nice detail to the Flak! The railing make the whole thing just Pop!!! Keep the fine floaty foolery flying forward!!!
|
|
bigjohn
Reviews member    
Member since: December 2011
John Hale
Posts: 3,438
Dec 21, 2011 2:17:45 GMT -5
Dec 21, 2011 2:17:45 GMT -5
|
Post by bigjohn on Sept 2, 2013 6:39:11 GMT -5
Very nice Bill. Lots of very small detail I see!
|
|
pantherf..-Email Not Valid
Full Member
  
Member since: July 2013
"Best Job I've Ever Had"
Posts: 1,253 
|
Post by pantherf..-Email Not Valid on Sept 2, 2013 6:52:19 GMT -5
I guess either armor is no longer a challenge for Bill, or he's already run through the entire catalog of Modelkasten tracks and there's nothing left to build?  Assembly of the railings made with PE (and no bend lines?) would have been enough for me to pop a bottle of the bubbly stuff but I imagine it's far from victory, huh? I like the progress pictures as it most certainly will keep most of us from buying the kit... WOW, I never thought it would be this detailed!  Looks good and also seems to be more than just a boat kit. Thanks for all the pics and keep 'em coming please! Jeff |
|
|
|
Post by wbill76 on Sept 2, 2013 10:10:34 GMT -5
Leon, thanks buddy! It's tough to decide when to take pictures...that little Flakvierling for example was about an hour's worth of work.  Andy Andy, I'm very happy with the Eduard railings. They come as one long section of railing for the area in question, so you don't have to trim/cut like you might with a generic type of railing. The Eduard rails do have bend lines to match with the Dragon parts so it's not too hard to bend them, the key is getting all the angles right on the different sections, so I did work on them very slowly so as not to over-bend them and cause a break. T and BJ, thanks as well! The flak is a very nice bit of detail...as are all the guns on this kit...even if they are tiny! Jeff, this is not a permanent change, just a small diversion that's Rob's fault. He made me do it!  Rest assured there are still plenty of armor kits and MK sets still sitting in the stash for when this one's done. This one section of the superstructure isn't the most challenging, that will be the bridge deck no question about it! But it's still a small victory to celebrate as it proved I could do it with what I had on hand. Dragon isn't kidding when they say the kit has over 650 parts...it is very highly detailed and you cannot assemble this without the aid of an Optivisor...just not possible IMHO. Will keep you updated as the progress moves along!
|
|
|
|
Post by bbd468 on Sept 2, 2013 11:26:45 GMT -5
OH MY....thats some wee fiddly PE Bill  But ya attached it perfectly....looks awesome!  |
|
|
|
Post by wbill76 on Sept 2, 2013 12:24:44 GMT -5
Thanks Gary! Slow but steady, that's the key. Although I have to say that attaching those PE gunner's seats to the Flakvierling was an exercise in extreme patience!  |
|
|
|
Post by 406 Silverado on Sept 2, 2013 12:39:59 GMT -5
hhhmmmmm, thought I posted my comment last night !!!
Anyhoo, the little details, pe, looks great Bill, especially with it painted. Just gets better with each update. Might have to make up a holiday for Friday or Monday t get another bonus update...lol
|
|
ogrejohn
Full Member
   Oct '23 Showcased Model Awarded
Member since: June 2012
Go away or I shall taunt you a second time!
Posts: 1,303
Jun 1, 2012 17:33:59 GMT -5
Jun 1, 2012 17:33:59 GMT -5
|
Post by ogrejohn on Sept 2, 2013 16:06:49 GMT -5
Dang fine looking etch work and painting Bill! Been looking over my Z-39 as you build yours and taking notes. A bit of difference in the two, the 39 has more of those teeny flak guns. Oh joy!
|
|
pantherf..-Email Not Valid
Full Member
  
Member since: July 2013
"Best Job I've Ever Had"
Posts: 1,253 
|
Post by pantherf..-Email Not Valid on Sept 2, 2013 16:35:55 GMT -5
Oh heck Bill, I know that. You have armor running through your veins as I have witnessed over the years.  Variety IS the spice of life and doing something different only strengthens our resolve.  You should see the 'other' stuff I am into building. Which reminds me, tonight I will start my Japanese kit since my Sherman won't be here 'till this weekend. I know, I know... it's about time right? I will finally show something here but I needed to take a little break.  Please keep up the nice work! Jeff |
|
Deleted
Member since: January 1970
Posts: 0
Nov 29, 2024 7:13:09 GMT -5
Nov 29, 2024 7:13:09 GMT -5
|
Post by Deleted on Sept 2, 2013 16:52:01 GMT -5
Awesome work!
|
|
|
|
Post by wbill76 on Sept 2, 2013 20:54:36 GMT -5
Rob, love your holiday idea!  Dicky Dicky, thank you sir! It's been a shift in mindset on how to approach this one. Feels strange but fun all the same.  OJ OJ, Z38 and Z39 share a lot of the same characteristics but some differences too in how Dragon kitted them in terms of their layouts/configuration. Z39 I think has the final beefed-up arrangement of AA guns but at the expense of one of the turret gun positions IIRC. Jeff, very true, always good to do something different occasionally. Looking forward to your Japanese adventure! Bruce, thanks for dropping in as well! The Labor Day special edition concludes today with more progress to report on the mid-deck that is covered in Steps 9 and 10 of the instructions. I began by working on the base of the deck and adding the Dragon-provided PE air vent flaps and screens for the aft funnel. The PE for these is one piece that folds over on itself and then to create the flaps, you flip up the flaps with the screen in place behind it. Pretty nifty and provides a very nice level of detail. 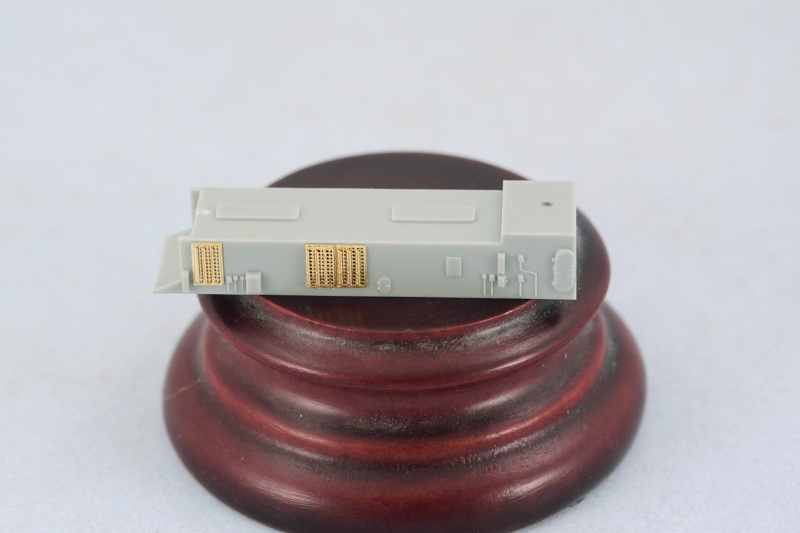 With that out of the way, the funnel was next. This is molded as a single piece via slide-molding with the funnel cap separate. There are 3 PE parts for the funnel cap/screen and they are, thankfully, provided already shaped with just the small 'feet' of the cross bar needing to be bent. The parts are extremely delicate and the contact points for gluing are tiny. I used extra thin CA with a pin-point applicator tip to secure them in place after tacking them temporarily using liquid glue to allow them to get a grip of sorts before the CA was applied. 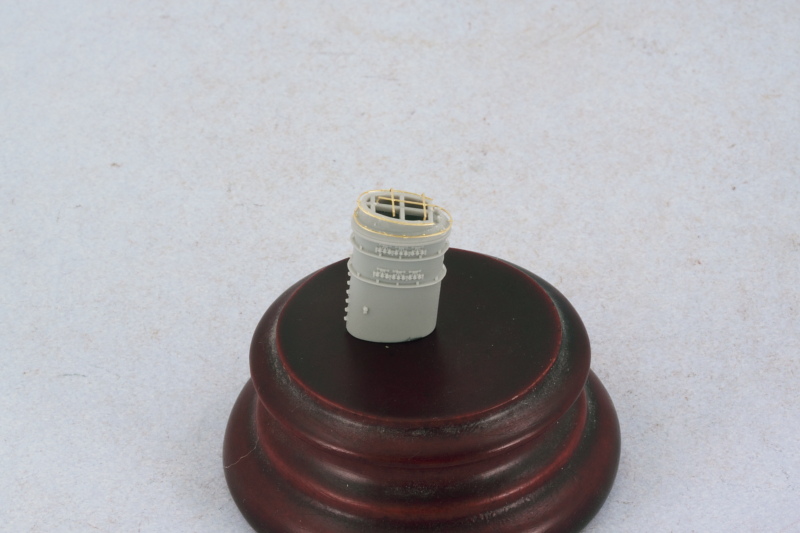 Then it was time to spend a lot of effort in the details department on this deck portion. The top portion of the deck had the steel plate surfaces airbrushed earlier and now I went back and hand-painted the raised elements and installed all the various support structure components and torpedo boom cranes to the front. I drilled a shallow hole in the deck to provide a little more structural support for the spotlight tower as the kit doesn't provide one and having it sit flat on the deck was a little too fragile for my liking. The PE provided for the tower's railings is a single piece, so annealing and very careful shaping is necessary to get it to the right arrangement. Spotlight itself will be added later. Last but not least, the range-finder was painted and installed and the life rafts and little storage box were added to the elevated wing platforms to round things out for the day. 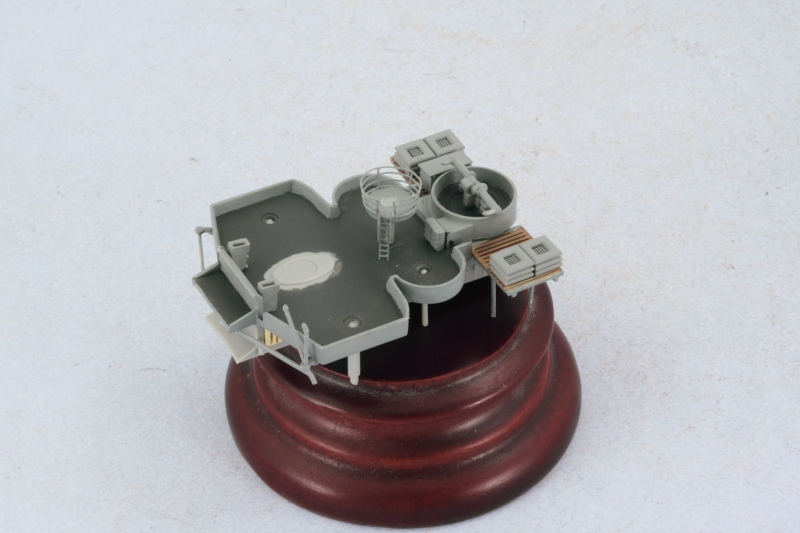 The mid-deck isn't quite done, still needs its AA guns and of course the stack needs to be airbrushed and installed before it's complete. Details, details, details!
|
|
|
|
Post by deafpanzer on Sept 2, 2013 23:58:22 GMT -5
Three updates in four days... somebody better call Guinness World Record office. Ship looking sharp... looks like you are enjoying it!
|
|
pantherf..-Email Not Valid
Full Member
  
Member since: July 2013
"Best Job I've Ever Had"
Posts: 1,253 
|
Post by pantherf..-Email Not Valid on Sept 3, 2013 0:02:35 GMT -5
That's cool Bill! More pictures to drool over!  I did go shopping/looking for ships today and learned something new. I didn't know there were "Waterline" kits available. That's good to know as I didn't!  Keep up the great work, especially on that PE. Jeff |
|
|
|
Post by wbill76 on Sept 3, 2013 10:33:42 GMT -5
Andy, definitely having fun with it, it really draws you in and before you know it the whole day's gone by and all you have done is these tiny little things!  Jeff Jeff, thanks for the support and encouragement! Yep, Waterline options are out there although that tends to be mostly in the 1/700 scale arena vs. 1/350...but 1/350 is starting to increasingly offer them given the demand from model builders who want to show them in a diorama but don't want to hack off half the hull (or bury it all in acrylic medium!) to achieve it. Sounds like Rob's influence is spreading! 
|
|
|
|
Post by TRM on Sept 3, 2013 11:43:42 GMT -5
LOL...I thought I heard you had another update!! Again...great work there Bill!!
|
|
|
|
Post by wbill76 on Sept 3, 2013 15:36:28 GMT -5
You heard correctly sir!  Thanks T, will be interesting to see how fast this one progresses in the next few weeks with the start of the NFL season. Always a tough choice for the weekends!  |
|
|
|
Post by Leon on Sept 3, 2013 20:12:45 GMT -5
Very nice progress Bill.The PE work looks awesome.  |
|
|
|
Post by wbill76 on Sept 3, 2013 20:29:43 GMT -5
Thanks Leon! I'm definitely glad I got the Eduard set. The railings make a huge difference visually.
|
|
AndyArgent.
Senior Member
    Aug 2013 MoM Winner
Member since: November 2011
Andy Bodge Argent - Aug 2013 MoM Winner
Posts: 1,746
Nov 17, 2011 17:09:43 GMT -5
Nov 17, 2011 17:09:43 GMT -5
|
Post by AndyArgent. on Sept 4, 2013 15:44:12 GMT -5
Crazy stuff Bill.
|
|
|
|
Post by wbill76 on Sept 4, 2013 19:47:33 GMT -5
Dicky, the problem with cloning is that they all are lazy gits who won't do any real work!  Am having fun with the details and my wife gets a kick out of seeing me wear the Optivisor. Every time she comes in the bench area and sees me look up she cracks up.  Andy Andy, thanks! Not as crazy as snails and wasps but close! 
|
|
modelfreak72
Full Member
  
Member since: January 2012
Why worry, each of us is wearing an unlicensed nuclear accelerator on his back.
Posts: 1,479
Jan 28, 2012 23:21:46 GMT -5
Jan 28, 2012 23:21:46 GMT -5
|
Post by modelfreak72 on Sept 4, 2013 23:36:47 GMT -5
Sweet paint work on the hull Bill! The PE is lookin mighty fine! And the AA guns are a nice little master piece! Lovin this build!
What's this about a 1/200 Missouri?!?!? That's ferkin HUGE! Be roughly 40in long give or take. What's next a carrier? Oh a 1/200 CV-6 USS Enterprise would look nice next to Big E.
|
|