Tony Thunder
Full Member
  
Member since: January 2012
Posts: 591
Jan 30, 2012 18:22:10 GMT -5
Jan 30, 2012 18:22:10 GMT -5
|
Post by Tony Thunder on Sept 1, 2013 15:41:20 GMT -5
Gents, Above kit should be with me some time this week. A few things to clear off the bench and then I'll get to it!  This is a vehicle I've always wanted to build and now I will.  The vehicle. The FV432 was designed to be the armoured personnel carrier in the FV430 series. Production started in 1962 by GKN Sankey and ended in 1971, after constructing approximately 3,000 vehicles. The FV432 is an all-steel construction. The FV432 chassis is a conventional tracked design with the engine at the front and the driving position to the right. Directly behind the driver position is the vehicle commander's hatch. There is a large round opening in the passenger compartment roof, which has a split hatch, and a side-hinged door in the rear for loading and unloading. As in many designs of its era, there are no firing ports for the troops carried - British Army doctrine has always been to dismount from vehicles to fight, unlike Russian infantry fighting vehicles that largely incorporate ports. The passenger compartment has five seats on either side - these fold up to provide a flat cargo space. An NBC system on the right side of the hull gives fresh air for the troops. Wading screens and a trim vane were fitted as standard and an extension went on the exhaust pipe. The vehicle has a water speed of about 6 km/h when converted for swimming and was propelled by its tracks. Most of these vehicles have had their amphibious capability removed. FV432s in service with infantry regiments are equipped with a pintle-mounted L7 GPMG. Vehicles with the Royal Artillery, Royal Engineers and Royal Signals were originally fitted with the L4A4 variant of the Bren light machine gun, but they now use the GPMG. When equipped with the GPMG, the vehicle carries 1,600 rounds of belted 7.62mm ammunition; when carrying the Bren LMG, the vehicle carried 1,400 rounds of 7.62mm ammunition (50 magazines, each holding 28 rounds). There are two three-barrel smoke dischargers at the front. 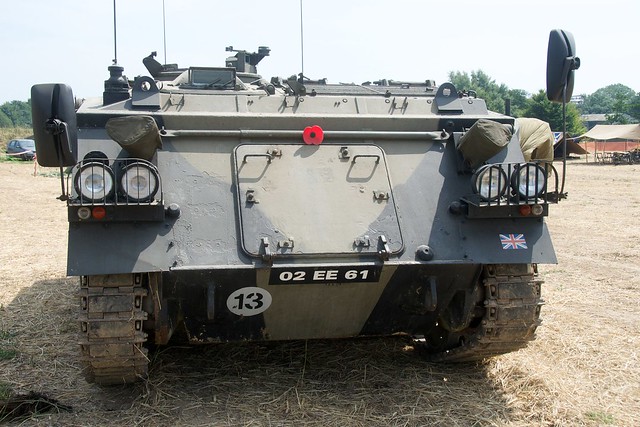 DSC_2836 DSC_2836 by TonyThunder, on Flickr 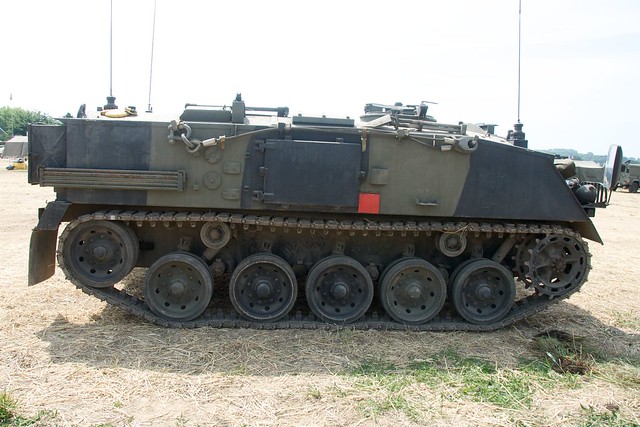 DSC_2833 DSC_2833 by TonyThunder, on Flickr  DSC_2858 DSC_2858 by TonyThunder, on Flickr The Kit. 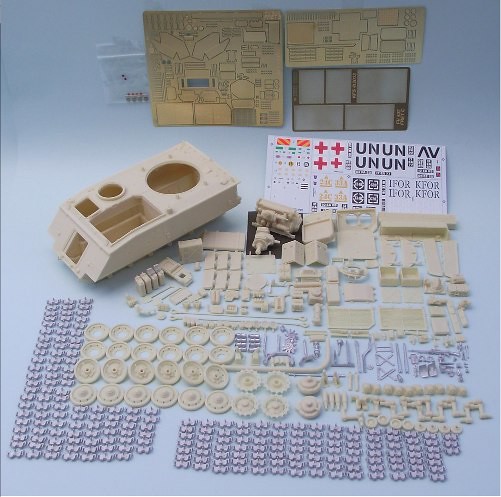 Untitled Untitled by TonyThunder, on Flickr Not long now. Tony |
|
Deleted
Member since: January 1970
Posts: 0
Nov 29, 2024 6:37:50 GMT -5
Nov 29, 2024 6:37:50 GMT -5
|
Post by Deleted on Sept 1, 2013 15:44:48 GMT -5
|
|
Tony Thunder
Full Member
  
Member since: January 2012
Posts: 591
Jan 30, 2012 18:22:10 GMT -5
Jan 30, 2012 18:22:10 GMT -5
|
Post by Tony Thunder on Sept 1, 2013 16:16:37 GMT -5
Dicky, That is a distinct possibility!  T |
|
|
|
Post by bullardino on Sept 1, 2013 16:26:34 GMT -5
Count me in...
|
|
Deleted
Member since: January 1970
Posts: 0
Nov 29, 2024 6:37:50 GMT -5
Nov 29, 2024 6:37:50 GMT -5
|
Post by Deleted on Sept 1, 2013 16:28:40 GMT -5
Ooooh I would give anything CB has to see that Tony  And I've got LOTS to give!!!!!   |
|
|
|
Post by TRM on Sept 1, 2013 16:29:00 GMT -5
I'm in! Looks like a fun one!!!
|
|
Deleted
Member since: January 1970
Posts: 0
Nov 29, 2024 6:37:50 GMT -5
Nov 29, 2024 6:37:50 GMT -5
|
Post by Deleted on Sept 1, 2013 16:32:59 GMT -5
T...This,and the Fitter version,the FV434,were my primary rides 35 years ago!....and versions of this are still in service now,cos they run where I live everyday,for driver training..
|
|
|
|
Post by Leon on Sept 1, 2013 18:50:38 GMT -5
Count me in Tony,looks like a fun project.
|
|
|
|
Post by wbill76 on Sept 1, 2013 20:49:23 GMT -5
Yay Tony's back! Looking forward to this one.
|
|
Tony Thunder
Full Member
  
Member since: January 2012
Posts: 591
Jan 30, 2012 18:22:10 GMT -5
Jan 30, 2012 18:22:10 GMT -5
|
Post by Tony Thunder on Sept 6, 2013 7:32:14 GMT -5
The kit has arrived, I just need to finish a couple of projects and then the build can commence!  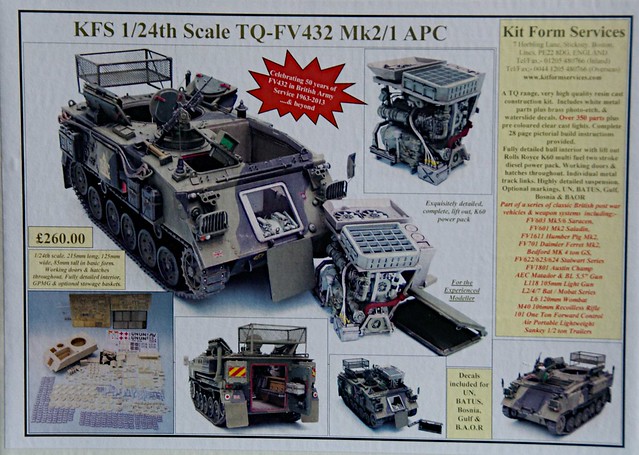 DSC_3448 DSC_3448 by TonyThunder, on Flickr |
|
|
|
Post by Leon on Sept 6, 2013 17:15:35 GMT -5
That is sweet Tony.Looking forward to you starting this.  |
|
Deleted
Member since: January 1970
Posts: 0
Nov 29, 2024 6:37:50 GMT -5
Nov 29, 2024 6:37:50 GMT -5
|
Post by Deleted on Sept 6, 2013 17:25:30 GMT -5
Tony,really glad you finally got this fella!!   ...I've just got to save up to get the '4' now.....   ...I did notice though,that there doesn't appear to be any side skirts in the kit?They were ALWAYS on the vehicles I saw,unless they'd been ripped off! |
|
Deleted
Member since: January 1970
Posts: 0
Nov 29, 2024 6:37:50 GMT -5
Nov 29, 2024 6:37:50 GMT -5
|
Post by Deleted on Sept 6, 2013 17:45:43 GMT -5
Wow! 1:24 Scale! You have my interest!
|
|
|
|
Post by bullardino on Sept 7, 2013 12:55:57 GMT -5
This is going to be hooge and really crowded with details. It's so promising...
|
|
pantherf..-Email Not Valid
Full Member
  
Member since: July 2013
"Best Job I've Ever Had"
Posts: 1,253 
|
Post by pantherf..-Email Not Valid on Sept 12, 2013 3:52:48 GMT -5
Nice line up of parts as it being 1/24 is really neat. I really do wish there were more in this scale. So the FV432 is a distant cousin of the M113... I'd love one in this scale! Can't wait to see the magic happen here!  EDIT EDITI just checked out the KFS website and these kits are not for the faint hearted... in the wallet or your patience either as these kits are very expensive and working in ALL resin is not easy at all. I looked to see what they had (and for an M113) and they have a lot to offer! Jeff |
|
Tony Thunder
Full Member
  
Member since: January 2012
Posts: 591
Jan 30, 2012 18:22:10 GMT -5
Jan 30, 2012 18:22:10 GMT -5
|
Post by Tony Thunder on Sept 12, 2013 12:40:25 GMT -5
Will be starting SOON!! Jeff - Resin kits are not as hard as you think, just a slightly different technique maybe but nothing too hard. KFS kits are very accommodating everything fits and there is next to no clean up! There are some pics of previous KFS builds in my gallery hereTony  |
|
|
|
Post by Mence on Sept 12, 2013 13:26:02 GMT -5
Wow, this will be excellent, I'm in...
|
|
Deleted
Member since: January 1970
Posts: 0
Nov 29, 2024 6:37:50 GMT -5
Nov 29, 2024 6:37:50 GMT -5
|
Post by Deleted on Sept 12, 2013 14:12:47 GMT -5
Tony,are the side skirts in the kit??  |
|
Tony Thunder
Full Member
  
Member since: January 2012
Posts: 591
Jan 30, 2012 18:22:10 GMT -5
Jan 30, 2012 18:22:10 GMT -5
|
Post by Tony Thunder on Sept 12, 2013 14:23:57 GMT -5
Chris, No they are not but taking on board what you said about them always being present I googled and got out my Tankograds which cover BAOR and $£@'s etc. I found that in MOST pics the side skirts are missing. It could be that its an age thing  , what I mean is that most pics on T'web are probably post 90's and there may have been instructions to take them off or its just a factor of Wear and Tear. When were you working on them 70/80's? They do look like an easy scratch to replace though. Of all the vehicle pics I've seen of Granby etc most 432 were without skirts. Tony |
|
Deleted
Member since: January 1970
Posts: 0
Nov 29, 2024 6:37:50 GMT -5
Nov 29, 2024 6:37:50 GMT -5
|
Post by Deleted on Sept 12, 2013 14:30:52 GMT -5
Tony,I thought that may be the case.I was on them from '74-80,and to my recollection,they were always fitted to our vehicles for certain.No digi cams in the 70's,so images will be scarcer.Like you say tho,no real biggie when I get mine,I'll get Nemo to knock them up for me  EDIT!!....Just looked through both my TG books,and the few pics with the skirts,are all pre '80..  ....SH one T!!!!....Makes I feel old!!!  |
|
Deleted
Member since: January 1970
Posts: 0
Nov 29, 2024 6:37:50 GMT -5
Nov 29, 2024 6:37:50 GMT -5
|
Post by Deleted on Sept 12, 2013 15:33:40 GMT -5
.Just looked through both my TG books,and the few pics with the skirts,are all pre '80..  ....SH one T!!!!....Makes I feel old!!!  Hey Cee Bee, nothing wrong with remembering working on per-80's kit.... I worked on a Cortina III, it weren't a 432 but it was a tank  Tony, always up for a classic british equipment build and this qualifies 100% !  |
|
Deleted
Member since: January 1970
Posts: 0
Nov 29, 2024 6:37:50 GMT -5
Nov 29, 2024 6:37:50 GMT -5
|
Post by Deleted on Sept 12, 2013 16:21:31 GMT -5
.Just looked through both my TG books,and the few pics with the skirts,are all pre '80..  ....SH one T!!!!....Makes I feel old!!!  Hey Cee Bee, nothing wrong with remembering working on per-80's kit.... I worked on a Cortina III, it weren't a 432 but it was a tank  Tony, always up for a classic british equipment build and this qualifies 100% !  I worked on HA Vivas,and Mk1 escorts etc.....First motor I ever worked on,was a Series 1 Landy!!   ...Now I feel even older!!!  |
|
Deleted
Member since: January 1970
Posts: 0
Nov 29, 2024 6:37:50 GMT -5
Nov 29, 2024 6:37:50 GMT -5
|
Post by Deleted on Sept 16, 2013 15:51:17 GMT -5
CeeBee - Yer worked on a Mark 1 Landy? Was that a Land Rover or LandShip? Haarr de Haaaarr Harr!!!    ....Ain't I teached you nuffin,since I started comin down your Gaffe?  ......'Course it were them ole 'Landships'!!!!  I taught Boudicca how to drive,before she got Charles Bronson driving for her!!!   |
|
Tony Thunder
Full Member
  
Member since: January 2012
Posts: 591
Jan 30, 2012 18:22:10 GMT -5
Jan 30, 2012 18:22:10 GMT -5
|
Post by Tony Thunder on Sept 18, 2013 5:34:41 GMT -5
Still not quite ready to start this but I have started to put the tracks together between other jobs. Its a labourous process and I'm tackling them 10 links at a time. Unlike Fruils these links need to drilled on both sides post cleanup but I'm fortunate to have a Dremel Fortiflex which has helped a lot. (still got sore fingers though!).  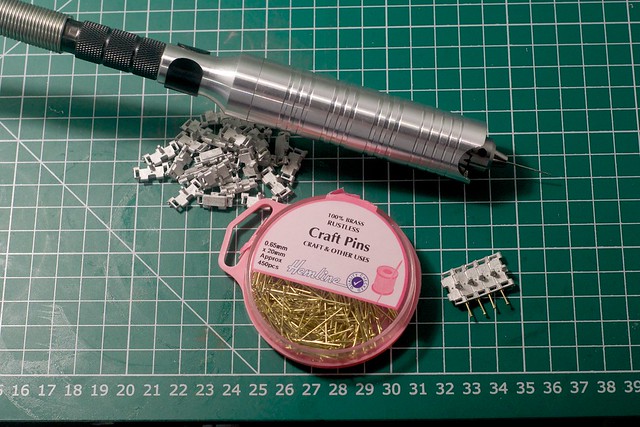 DSC_3577 DSC_3577 by TonyThunder, on Flickr I decided to go with brass craft pins rather than wire (thanks H), which at £3 for 450 is a good option. once the pins are glued and fixed I'll snip the ends off. The pins are .65mm so I drilled the links out with a .7mm drill.  DSC_3580 DSC_3580 by TonyThunder, on Flickr Once the pins are glued and fixed I'll snip the ends off.  ACW |
|
Deleted
Member since: January 1970
Posts: 0
Nov 29, 2024 6:37:50 GMT -5
Nov 29, 2024 6:37:50 GMT -5
|
Post by Deleted on Sept 18, 2013 10:11:47 GMT -5
|
|
Tony Thunder
Full Member
  
Member since: January 2012
Posts: 591
Jan 30, 2012 18:22:10 GMT -5
Jan 30, 2012 18:22:10 GMT -5
|
Post by Tony Thunder on Sept 18, 2013 11:36:21 GMT -5
Errrr........................No  |
|
Deleted
Member since: January 1970
Posts: 0
Nov 29, 2024 6:37:50 GMT -5
Nov 29, 2024 6:37:50 GMT -5
|
Post by Deleted on Sept 18, 2013 11:39:35 GMT -5
|
|
|
|
Post by wbill76 on Sept 18, 2013 14:31:21 GMT -5
I see there are certain limits to Tony's madness!  Nice work so far on the tracks. |
|
|
|
Post by bullardino on Sept 18, 2013 15:17:05 GMT -5
LOL, how are you going to cut them near the tracks? I'm asking as I've never had a friuls track set but I'm thinking of getting one... BTW, great job  |
|
Tony Thunder
Full Member
  
Member since: January 2012
Posts: 591
Jan 30, 2012 18:22:10 GMT -5
Jan 30, 2012 18:22:10 GMT -5
|
Post by Tony Thunder on Oct 1, 2013 15:56:17 GMT -5
Sorry there has not been an update with this. Still finishing up with my Matador build (will post a couple of pics tomorrow) and then its full steam ahead with this one. Luigi the pins are made of brass so once fitted and glued I cut them flush with a pair of Xuron track cutters.  More soon! |
|


 ....SH one T!!!!....Makes I feel old!!!


