|
|
Post by dupes on Jan 20, 2014 11:28:40 GMT -5
You aren't kidding...those damn Sherman suspensions are a pain!
How big is your Sherman parts box??
|
|
|
|
Post by rbaer on Jan 20, 2014 16:31:44 GMT -5
Big, thanks for the details on the cheek armor, appreciated.
Got a question: I see a lot of people drilling the holes on the front of the bogies for the un-used return roller mounts, and then applying normal weathering. I've even done it myself a time or two. But then I got to thinking, any dirt at all is going to cover and/or fill those relatively small holes in about 15 minutes of operation, Murphy dictates so. So I quit going to the trouble. I myself don't actually have any pics of in-operation Shermans in which they're visible...... Thoughts?
|
|
|
|
Post by wbill76 on Jan 20, 2014 17:55:28 GMT -5
Nice swap-out on the suspension elements John. I imagine your parts box would allow for the construction of several Frankenshermies were you so inclined.  |
|
totalize
Full Member

Member since: February 2013
Don't take yourself too seriously. It's just plastic.
Posts: 260 
|
Post by totalize on Jan 21, 2014 15:39:30 GMT -5
John,
Always nice to see you back at it with the Shermans. Looking forward to seeing how this one turns out.
Are you going to build it as a stateside Shermy or one that saw active duty near the end of war in Europe as a replacement for some of the armour losses in Battle of the Bulge?
Dave.
|
|
bigjohn
Reviews member 
Member since: December 2011
John Hale
Posts: 3,438
Dec 21, 2011 2:17:45 GMT -5
Dec 21, 2011 2:17:45 GMT -5
|
Post by bigjohn on Jan 25, 2014 21:46:00 GMT -5
Big, thanks for the details on the cheek armor, appreciated. Got a question: I see a lot of people drilling the holes on the front of the bogies for the un-used return roller mounts, and then applying normal weathering. I've even done it myself a time or two. But then I got to thinking, any dirt at all is going to cover and/or fill those relatively small holes in about 15 minutes of operation, Murphy dictates so. So I quit going to the trouble. I myself don't actually have any pics of in-operation Shermans in which they're visible...... Thoughts? I leave that up to the individual taste of the modeler. It's all in how far one wants to go with the detail, no harm, no foul. |
|
bigjohn
Reviews member
Member since: December 2011
John Hale
Posts: 3,438
Dec 21, 2011 2:17:45 GMT -5
Dec 21, 2011 2:17:45 GMT -5
|
Post by bigjohn on Jan 25, 2014 21:47:10 GMT -5
Nice swap-out on the suspension elements John. I imagine your parts box would allow for the construction of several Frankenshermies were you so inclined. Yeap, and I've had a few ideas concerning Frankenshermies  |
|
bigjohn
Reviews member
Member since: December 2011
John Hale
Posts: 3,438
Dec 21, 2011 2:17:45 GMT -5
Dec 21, 2011 2:17:45 GMT -5
|
Post by bigjohn on Jan 25, 2014 21:47:53 GMT -5
John, Always nice to see you back at it with the Shermans. Looking forward to seeing how this one turns out. Are you going to build it as a stateside Shermy or one that saw active duty near the end of war in Europe as a replacement for some of the armour losses in Battle of the Bulge? Dave. Hi dave, thinking state side training tank at the moment |
|
bigjohn
Reviews member
Member since: December 2011
John Hale
Posts: 3,438
Dec 21, 2011 2:17:45 GMT -5
Dec 21, 2011 2:17:45 GMT -5
|
Post by bigjohn on Feb 1, 2014 17:34:42 GMT -5
Trying to get back into this one, (my computer crashed last week end). I finished up most of the putty and filling areas that need done, added sand shield brackets from the parts box, and scratch built the filler cap and splash guard arrangement as seen on the Ford Built M4A3’s  |
|
|
|
Post by Leon on Feb 1, 2014 19:32:37 GMT -5
Making good progress John,looking really good.  |
|
|
|
Post by deafpanzer on Feb 1, 2014 23:39:05 GMT -5
I swear I never knew about sand shield... so much to learn about those Shermans. One day I have to come to your place so you can give me full history lesson, deal?
Fantastic work!
|
|
bigjohn
Reviews member
Member since: December 2011
John Hale
Posts: 3,438
Dec 21, 2011 2:17:45 GMT -5
Dec 21, 2011 2:17:45 GMT -5
|
Post by bigjohn on Feb 1, 2014 23:48:50 GMT -5
Thanks Sir Richard and Leon, Glad to have you two following along.
Sure thing Andy. Glad you stopped in for a peek.
|
|
|
|
Post by wbill76 on Feb 2, 2014 11:36:08 GMT -5
Good to see you recovering from the 'puter puking on you BJ, nice progress on this one.
|
|
bigjohn
Reviews member
Member since: December 2011
John Hale
Posts: 3,438
Dec 21, 2011 2:17:45 GMT -5
Dec 21, 2011 2:17:45 GMT -5
|
Post by bigjohn on Feb 2, 2014 11:56:11 GMT -5
Good to see you recovering from the 'puter puking on you BJ, nice progress on this one. Thanks Bill, fortunately I was able to save all my data. Got a nice new computer with Windows 7 and an HD wide screen monitor. The hard drive in my old one was only a couple of months old. Its now an external USB hard drive for the new one. |
|
|
|
Post by bbd468 on Feb 2, 2014 12:12:42 GMT -5
John got a new puter! Lookin awesome Big John, nice modifications. |
|
bigjohn
Reviews member
Member since: December 2011
John Hale
Posts: 3,438
Dec 21, 2011 2:17:45 GMT -5
Dec 21, 2011 2:17:45 GMT -5
|
Post by bigjohn on Feb 2, 2014 16:43:22 GMT -5
Another small update for the week end. It’s starting to look like a Sherman.  |
|
sturmbird
Full Member
Member since: June 2012
Posts: 1,406
Jun 21, 2012 13:51:45 GMT -5
Jun 21, 2012 13:51:45 GMT -5
|
Post by sturmbird on Feb 3, 2014 1:56:04 GMT -5
Nice weld progress and your cheek sculpting (admit it, you used a Bowflex!) looks tight. On a side note to the 'tommy cooker'/Ronson name, I recently read Steve Zaloga's 'Armored Thunderbolt' and he made a point of the fact that the dry ammo storage was the biggest factor in Shermans lighting up after a hit because the vehicle's fire suppression gear was ineffective due to the ammo propellant containing its own oxidizer. He also mentioned that once a Sherman started to burn, the crew had only about 30 seconds to make their escape. It's a great read for anyone interested in the Sherman's development without it diving too deep in the technical aspects. Speaking of Steve Zaloga and the M4 Sherman, I've recently been reading Steve's Ospry book on build the Sherman tank kits. Not totally upto date, but still covers the Tamiya and Dragon kits quite well. In the book he builds a couple Shermans that I have a desire to build. Reading his book and looking over a couple other books I've scrounged up, I've decided to add at least add two or three Shermans to my bucket list. Looking thru my stash, I found the later M4e8, and another one with the cast iron hull. Plus two Fire Flies. But over the weekend I snatched up a Korean War Sherman by Tasca. Not the one I wanted, but it was there waiting for me. gary |
|
|
|
Post by deafpanzer on Feb 3, 2014 13:05:53 GMT -5
Man, the tank is looking great and it is not even painted yet. Can't wait to see more...
|
|
|
|
Post by bullardino on Feb 4, 2014 9:28:19 GMT -5
As it always happens, your build gives me the itch to build a Sherman right now... What an awesome job, it's a real beauty
|
|
bigjohn
Reviews member
Member since: December 2011
John Hale
Posts: 3,438
Dec 21, 2011 2:17:45 GMT -5
Dec 21, 2011 2:17:45 GMT -5
|
Post by bigjohn on Feb 24, 2014 15:47:44 GMT -5
I primed it  |
|
|
|
Post by deafpanzer on Feb 24, 2014 15:49:10 GMT -5
Oh yeah your baby is looking gorgeous primed!!!
|
|
pantherf..-Email Not Valid
Full Member
Member since: July 2013
"Best Job I've Ever Had"
Posts: 1,253
|
Post by pantherf..-Email Not Valid on Feb 24, 2014 15:58:02 GMT -5
Nice John! Time for me to get going too. How do you paint the black part on the roadwheels this way?
I'm going Garys route so it may be fun!
Jeff
|
|
|
|
Post by rbaer on Feb 24, 2014 15:59:55 GMT -5
Yum, primer!
|
|
bigjohn
Reviews member
Member since: December 2011
John Hale
Posts: 3,438
Dec 21, 2011 2:17:45 GMT -5
Dec 21, 2011 2:17:45 GMT -5
|
Post by bigjohn on Feb 24, 2014 16:02:57 GMT -5
Thanks guys! Nice John! Time for me to get going too. How do you paint the black part on the roadwheels this way? I'm going Garys route so it may be fun! Jeff With a fine pointed brush and a lot of choice words Jeff |
|
beast
Full Member
Member since: August 2013
Posts: 410
|
Post by beast on Feb 24, 2014 16:06:51 GMT -5
Looking good John. Your attention to detail is inspiring as usual and much to be learned here.
Stuart.
|
|
|
|
Post by robbo on Feb 24, 2014 16:12:40 GMT -5
As it always happens, your build gives me the itch to build a Sherman right now... What an awesome job, it's a real beauty Same here mate, same here THE PRIMER SHOT, YEAH |
|
|
|
Post by ceresvesta. on Feb 24, 2014 17:16:25 GMT -5
NIIIICE! impecable build so far John. Btw I like the wooden surface of the bench, makes very sexy photoshots |
|
|
|
Post by Leon on Feb 24, 2014 18:05:23 GMT -5
Always nice to see primer on John,looking really good. |
|
pantherf..-Email Not Valid
Full Member
Member since: July 2013
"Best Job I've Ever Had"
Posts: 1,253
|
Post by pantherf..-Email Not Valid on Feb 25, 2014 10:00:23 GMT -5
I threw on my VVSS w/ roadwheels instead. Don't have time this week to run to the hobby store for supplies.  Guess I'll sweat it out with a very small paintbrush too. I do hope all the wheels still spin! LOL  I'll post some pics tonight at the Sherman Shop when I get home... looking forward to more of yours John! Jeff |
|
bigjohn
Reviews member
Member since: December 2011
John Hale
Posts: 3,438
Dec 21, 2011 2:17:45 GMT -5
Dec 21, 2011 2:17:45 GMT -5
|
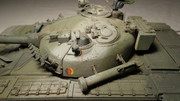
Post by bigjohn on Mar 1, 2014 17:34:18 GMT -5
Markings have been applied using Archer Dry Transfers Basic Sherman Markings sheet.  |
|
george
Full Member
Member since: February 2014
Posts: 276
|
Post by george on Mar 1, 2014 18:44:27 GMT -5
Nice painting job, John! What paints did you use? I like your Sherman.
|
|