losboz
Full Member

Member since: September 2013
Posts: 309 
|
Post by losboz on Jan 15, 2014 12:32:38 GMT -5
|
|
|
|
Post by wbill76 on Jan 15, 2014 18:46:41 GMT -5
Always interesting to see what prices these go for. I finally broke down and built mine a couple of months ago.
|
|
losboz
Full Member
Member since: September 2013
Posts: 309
|
Post by losboz on May 1, 2024 6:21:20 GMT -5
Holy thread resurrection Batman!
With the 80th D-Day anniversary just around the corner and just the one decade on since the kit's purchase, I finaly got round to popping the lid last week. 
 What can I say about this kit? Well after 19 years since its release it still looks to be the gold standard of Tiger I kits. Tiger guru David Byrden had a hand with technical advice with this one and his website Tiger 1 info is invaluable to anybody who likes to model these big cats. He even has a page dedicated to pointing out both errors and fixes for pretty much every Tiger 1 released to date Kit bugs and fixes Scrolling down to this particular kit Dragon 6253 and we still have a few small bugs to address. No big issues, but a few little anamolies that David advises how to solve. Looking at all the current big box Takom builds on the tinterweb, I notice even these brand new releases still have there issues. Some of which were not present on this kit 19 years ago  The one big bonus over this Dragon kit and one that the current crop of Tiger I late kits over the last decade have adopted, is the inclusion of moulded on zimmerit. Although some folks still prefer to make there own or use resin sets, I think the majority of modellers will see this as a huge advantage. There have been a few re-releases of this kit since, the first omitting allmost all of the PE goodies, metal barrel and even replaced the magic links with rubber band tracks  Further releases did eventually add moulded on zim but still excluded many of the original goodies. I notice the most recent re-release this year, does re-add the metal barrel, a few 3D printed items and a new figure, but its still not a patch on the original release IMO. These first boxings came with a huge host of additional multimedia parts. It’s not all doom and gloom if photo-etch is a turn off either, as there are styrene alternatives. So, let’s pop open the box and inspect what is reputed to be one of the very best of what this manufacturer produced back in the day. It’s a comprehensive 3 in 1 package in which you can build three different Ausf E variants. A late, a late command vehicle and the final version. There are a full five frets of PE including track guards and extensions, preformed exhaust surrounds, engine grills, command tank aerials and multipart tool clamps to name just a few. There is an additional turned metal barrel and seven different brass ammunition shell types, two types of metal shackles and pins, metal tow cables and yes, there is even a pre-formed metal bucket  You get two plastic ammo crates and a figure resembling the famous tank ace Michael Wittmann. You also get a working torsion bar suspension. There are plenty of options depicting the differences between late and final versions including two turret roof types and final type patterned steel wheels. TBH the box is packed with almost every conceivable extra and was considered back when released, everything you could possibly need. Well, almost everything  As already mentioned, unlike later releases with far less parts and rubber band tracks this kit does NOT have any moulded on zimmerit. Although the inclusion of anti magnetic paste ended in Sept 1944, production of the Tiger I ended in August, so all late and final builds would have received factory zimmerit. Why this kit didn’t come with any moulded on I couldn’t say. I don't possess any other Tiger I kits so I’m not qualified to say how successful their later moulded on zimmerit was. It was never a massive issue for me as aftermarket manufacturers released their own not long after the kits release. Although it is fairly tricky to track down these days, I’ve gone for a safe pair of hands with the ATAK specific set. This includes two resin mantlets, two pattern types for the turret (course and matching to the hull), with two equivale matching patterned escape hatches and resin vision ports. I also tracked down a set of Friul metal tracks back when I purchased the kit to add some track tension realism, not to mention a huge chunk of heft to the build.


Knowing very little about the production history of these big cats I’ve turned to the David Byrden website. As mentioned above, for this kit David adds a few pointers to solve a few instruction discrepancies, some recommendations to modify a few small parts, and advice on how to add a few small additions. Apart from adding the zimmerit, its pretty much all thats required.
With the choice of three variants the first logical step is to choose a subject. I’ve always been fascinated with the Normandy campaign, so I am going to research a worthy candidate. The Tigers that were operating in Normandy fought exclusively, as far as I know, in the British and Canadian sectors around Caen where the German armour was concentrated. Three German schwere Panzer Abteilung fought in Normandy and a few Tigers may (or may not) have been present in the Panzer Lehr Division.
s.SS-Pz.Abt. 101 had 45 Tiger I and reached Normandy on June 12, travelling from Beauvais near Paris. Michael Wittmann and the 1st and 2nd Companies famously fought in the well-known battle of Villers-Bocage on June 13.
s.Pz.Abt. 503 was transferred to Normandy with 33 Tiger I and 12 Tiger II in early July.
s.SS-Pz.Abt. 102 was transferred to Normandy with 45 Tiger I in early July. They were engaged in the bitter fighting for Hill 112.
Paintings and markings in the kit are for no less than twenty-four Ss.Pz.Abt 101 gun tank vehicles and command vehicle 009, as well as three vehicles from SS.Pz.Abt 508 that fought in Italy
     |
|
Tojo72
Forum Moderator 
Member since: November 2012
Posts: 4,939
Member is Online
MSC Staff
|
Post by Tojo72 on May 1, 2024 7:42:42 GMT -5
Yes sir,that's when Dragon Kits were king.Looking forward to it.
|
|
handiabled
Community Relations Moderator 
Member since: February 2023
Posts: 2,521
MSC Staff
|
Post by handiabled on May 1, 2024 8:26:44 GMT -5
Wonderful intro for this! Bookmarked and following with interest!
|
|
lyle
Forum Moderator
Member since: May 2013
On the sunny side of the dirt
Posts: 1,240
MSC Staff
|
Post by lyle on May 1, 2024 8:55:55 GMT -5
My goodness…git ‘er done!
|
|
losboz
Full Member
Member since: September 2013
Posts: 309
|
Post by losboz on May 1, 2024 9:50:18 GMT -5
Thanks guys 
The next step was to decipher the infamous Dragon instructions. Credit to them they do clearly break down the various differences for each of the three variants at each stage, but I still double checked that these were correctly picked out and made additional notes from the David Byrden website. The instructions are ahem....extremely busy, but TBH, apart from a few dubious indicators of parts placement the instructions are general pretty good. Having three variant options on many of the steps makes it look far worse than it actually is. I simply highlighted the parts required wherever a variant choice appeared to keep me on track. I believe there are a few parts mis-labelled, but these are often on mirrored parts that are easy to spot.
The first steps build up the running gear. The lower hull tub is a one-piece affair to which you first add the front tow hook extensions, torsion bars, wheels and rear plate. To take advantage of the adjustable torsion bar engineering you simply guide them through the hull and fix them into the curved grooved slots (simulating the real movement range) in small fixings added to the opposite side. This system allows the torsion bar axle ends to then compress and rebound as they would do on the real vehicle.
 
Although the instructions are not completely clear, the track pin return plates are to be positioned slightly differently if the smaller idler is used. It fixes angled down at the rear to operate effectively on the smaller idlers. Apparently even the German engineers took a while in figuring out and adopting this simple fix David Byrden also points out that the smaller idler wheel was introduced about a month before the thicker roof, so the larger idler is unlikely to have been present on any vehicle represented by this kit. I would recommend leaving the idler axle unfixed until the tracks are added to get the perfect track tension. There are two sets of middle and outer wheels, with one set representing those fitted to the final version. Two outer sprocket types are offered. The only difference is that one has concave and one convex spokes.
Test fitting the inner and middle sets of road wheels
Two lower hull rear plates are included with one having the different fixings used on the command variant. Before adding any of the components the ATAK Zimmerit was added to the back plate and any location holes it covered, opened up. I figured any battle damage was also best added to it at this stage. There is the option of one plastic or two types of metal tow shackles and pins. I understand the squarer shaped ones were fitted to the final version. David Byrne points out two small updates in step 5. Firstly, the exhaust muffler top guard is supported on pins (parts C3) and these are orientated incorrectly. These are easily repositioned using his guide image below. I drilled new holes for added strength but it would be just as easy to snip the location pips off the pins and reposition them.
 
Secondly, the adapter plate that is positioned between the two exhaust stacks sits on two small posts moulded to the rear hull plate. They are apperently 1mm too long so reducing their size allows the plate to sit as intended. The exhaust shields are offered in both plastic and pre-formed photo-etch. Whatever medium you choose the shields were actually mounted to small square spacers. This is not a detail this Dragon kit managed to add. Many new kits including the Takom big box kits do. Again, these are easy enough to scratchbuild out of plastic card if going for 100% accuracy. The jack brackets are also offered in both plastic and photo-etch.
I opted for the late/final gun tank rear plate option
I have read that Dragon deliberately moulded the hull with a slight warp in the hull tub as a design feature intended to allow for a snug fit with the hull roof and side plates. The rear plate is big enough and strong enough to force the hull sides into the proper alignment, but at the front it requires a little help to overcome the warp. Positioning a length of sprue or wood or brass etc, cut down to the necessary size, will brace the lower hull to allow the perfect fitment of the roof plate moulding. Images from David Bryden's website illustrate this below.
 
Skipping ahead of fitting the few interior engine components, I mulled over how best to approach adding the remaining hull zimmerit. The kit's separately moulded side armoured plates will first require fixing to the hull tub sides. Spacing is dictated by some very chunky holes in the hull tub moulding and so they fit precisely, butting up perfectly to the rear plate. Test fitting the zimmerit sheets against these side plates found that they also attach to the sides of the armoured front plate. This front plate is not added for a few more steps and is instructed to be attached to the top plate moulding. I didnt really want to add too many parts before having to handle the model getting the zimmerit down, but ideally I needed to add the armoured plate to the hull tub assembly. Checking over that fixing it to the hull tub would not disturb the build sequencing or impede any other parts placement, it was possible to add it to the hub as long as the glacis plate was fixed in place at the same time. Two glacis plates are offered. One with moulded on front track guards and one without, so you can add the PE ones if you wish. As the front armoured plate, glacis and bow plate also require zimmerit, I could now attach it all at the same time. The side zimmerit sheets have a myriad of small square holes to open up to fit around moulded on track guard mounting studs and cable fixings. Once opened up the zimmerit fitted really well. Likewise, both front and rear sheets also mated up nicely. There is the inevitable small amount of tidy up to do and a smidgen of putty will be required to mate all four sheets as they meet at each corner but overall, I'm happy with the way it looks.
 
The exhaust shields are offered in both plastic and PE. The PE parts are preformed and look really tasty. There really is no contest here as to which option was going to get used. If annealed first, some realistic damage can be made. These will not be fixed in place until later steps to allow for painting of the armoured covers and exhaust stacks.
The remaining rear plate zimmerit sheets added, and the PE shields test fitted to ensure no surprises come final fixing. I’m still in two minds as to whether to fit the rear mudguards. If left off, two shallow alignment grooves under the hinges will have to be filled. 3D convoy light and C-hook brackets will be added in later steps to avoid damage.
Top plate moulding dry fitted exposing the engine radiator, fans and ducts. There is a lot of nicely rendered detail here and it all fits extremely well.  |
|
handiabled
Community Relations Moderator
Member since: February 2023
Posts: 2,521
MSC Staff
|
Post by handiabled on May 1, 2024 10:40:34 GMT -5
I love Dragon's detail in their kits. The zimmerit looks fantastic! The the movement of the suspension of the road wheels is really impressive
|
|
dupes
Head Moderator  Jan '16 MoM Winner
Member since: March 2012
Need to build 80 kits per year until I'm 100 to deplete my stash. Maybe I should sell a couple.
Posts: 7,004
Member is Online
MSC Staff
|
Post by dupes on May 1, 2024 13:48:25 GMT -5
Holy thread resurrection Batman! Ten years. That might be a record!!  6252 and 6253 really cemented Dragon's status as a serious armor contender. Can't believe that was 18 years ago that this kit came out. Yikes. |
|
Tojo72
Forum Moderator
Member since: November 2012
Posts: 4,939
Member is Online
MSC Staff
|
Post by Tojo72 on May 1, 2024 14:36:08 GMT -5
Zimm looks great,as does the PE
|
|
|
|
Post by deafpanzer on May 6, 2024 8:31:51 GMT -5
Lovely work on the ZImm!!!
|
|
losboz
Full Member
Member since: September 2013
Posts: 309
|
Post by losboz on May 9, 2024 13:47:05 GMT -5
I love Dragon's detail in their kits. The zimmerit looks fantastic! The the movement of the suspension of the road wheels is really impressive Cheers man. The ATAK zim fits like a glove on this kit. The simple Dragon suspension design works really effectively. |
|
losboz
Full Member
Member since: September 2013
Posts: 309
|
Post by losboz on May 9, 2024 13:49:19 GMT -5
Holy thread resurrection Batman! Ten years. That might be a record!! 6252 and 6253 really cemented Dragon's status as a serious armor contender. Can't believe that was 18 years ago that this kit came out. Yikes. It's been too long, I know that much. It truly is a great kit. Fit so far has been exemplary and I see why it us so lauded |
|
losboz
Full Member
Member since: September 2013
Posts: 309
|
Post by losboz on May 9, 2024 13:49:39 GMT -5
Zimm looks great,as does the PE Thanks buddy |
|
losboz
Full Member
Member since: September 2013
Posts: 309
|
Post by losboz on May 9, 2024 13:50:01 GMT -5
Lovely work on the ZImm!!! Cheers buddy |
|
losboz
Full Member
Member since: September 2013
Posts: 309
|
Post by losboz on May 9, 2024 14:03:36 GMT -5
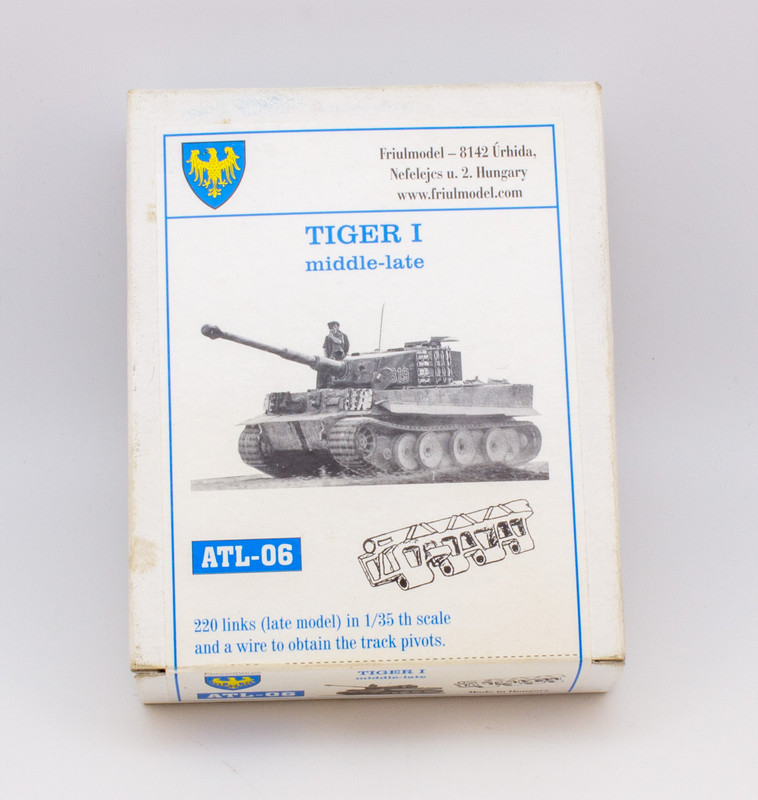
The kit tracks do look pretty good but unfortunately they do omit the open guide horns on all but the seperate links specifically made for rhe spares on the turret. Fortunately I purchased a set of Friuls when I purchased the kit. These have now been assembled. Black rubberised CA glue from Colle21 was employed to fix the wire pins inside the open ended side of the links    |
|
handiabled
Community Relations Moderator
Member since: February 2023
Posts: 2,521
MSC Staff
|
Post by handiabled on May 10, 2024 1:40:58 GMT -5
The Friul tracks look amazing! I've eyed a set of them for a future build of a M24 Chaffee. My Father was in one back in the the day.
|
|
scottrc
New Member
Member since: March 2024
Posts: 26
Mar 8, 2024 14:17:10 GMT -5
Mar 8, 2024 14:17:10 GMT -5
|
Post by scottrc on May 10, 2024 14:17:47 GMT -5
Those tracks are amazing. Your photography is too.
|
|


 You get two plastic ammo crates and a figure resembling the famous tank ace Michael Wittmann. You also get a working torsion bar suspension. There are plenty of options depicting the differences between late and final versions including two turret roof types and final type patterned steel wheels. TBH the box is packed with almost every conceivable extra and was considered back when released, everything you could possibly need. Well, almost everything


