kingpin141
Full Member

Member since: March 2013
Posts: 308 
|
Post by kingpin141 on Jan 26, 2014 16:24:21 GMT -5
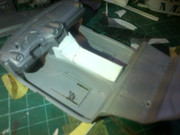
Hello and welcome to another new blog (hopefully i'll finish one soon). This is my first attempt at modding a car. I'll be adding aero to the front splitter. Changing the rear diffuser as the racing exhausts exit just behind the front wheel arches. A double layer rear wing, roll cage and stripped out interior with new centre console.  This be the kit 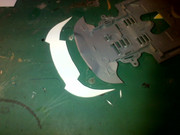 My first attempt at the front aero. The basic shape is about right but on the real thing the outsides if the splitter are lower then the middle  The front end. The great big swathe of plastic behind the front grill is coming out. thats just there to make it look neat for the road car.  This is the centre console extension MK2. I'm reasonably certain there'll be a MK3 coming soon.  There's lot of carbon fibre to be simulated. This is a quick test using fly screen net. With a finer mesh i'm reasonably hopeful it will work.  Me and Albert are in the process of making a vac former. I'm going to try and form the rear diffuser and the bonnet. Both need reworking so if my plan works i won't have to butcher the originals. The bonnet needs more vents and the diffuser doesn't have the exhausts to deal with so the fins now stretch across the rear of the car. |
|
|
|
Post by Mence on Jan 26, 2014 16:31:07 GMT -5
Oo oo, nice subject, I'm in...
|
|
Deleted
Member since: January 1970
Posts: 0
May 10, 2024 0:49:59 GMT -5
May 10, 2024 0:49:59 GMT -5
|
Post by Deleted on Jan 26, 2014 16:50:38 GMT -5
Great choice! I'll tag along for this one  I'm particularly interested to see your vac former, post up some pics and a bit of info please?  |
|
kingpin141
Full Member
Member since: March 2013
Posts: 308
|
Post by kingpin141 on Jan 26, 2014 17:14:36 GMT -5
Will do. I'll put up a pic tomorrow. It's just wood and hardboard. Nowt special.
|
|
kingpin141
Full Member
Member since: March 2013
Posts: 308
|
Post by kingpin141 on Jan 28, 2014 5:32:40 GMT -5
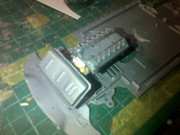
A little more work on the centre console. Lots of gubbins to add to it yet and theres a mesh screen covering the hole. 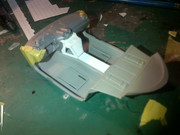  The engine vanity cover removed.  I forgot to take a pic of it but the bonnet is slightly warped so the front drivers side corner sits about 1mm proud. And finally the vac former. Hopefully tonight it will be up and running. As we only have limited materials this is not the most delicate thing you'll ever see. 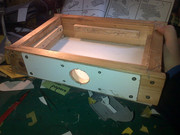 The top mid drilling. its the same stuff as the walls. we tried with some hardboard i've got but it didn't take kindly to the drill. All the holes were clogged. The frame for the plasticard will be made from hard board. Rather than sticking it in the oven I'm going to heat it over the top of me slow cooker. |
|
kingpin141
Full Member
Member since: March 2013
Posts: 308
|
Post by kingpin141 on Jan 28, 2014 5:33:26 GMT -5
 The missing pic. |
|
kingpin141
Full Member
Member since: March 2013
Posts: 308
|
Post by kingpin141 on Jan 28, 2014 15:29:32 GMT -5
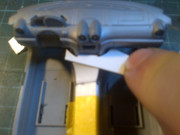
Hello from the happiest man in Notts. My first vac forming is done and it went way better than I expected. 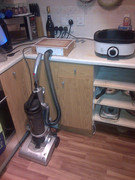 The final set up..I was doubtful it would work as the suction didn't feel much at all. 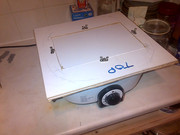 The hardboard jig for the plasticard. The retaining nuts go through the card to anchor it. And now the final result.    And the comparison shot. The new pieces look like soft focus versions of the originals.  |
|
|
|
Post by wbill76 on Jan 28, 2014 21:34:38 GMT -5
Congrats on the vacuform success KP! I'm sure you're 'chuffed' to borrow a Brit-ism. |
|
kingpin141
Full Member
Member since: March 2013
Posts: 308
|
Post by kingpin141 on Jan 29, 2014 3:59:18 GMT -5
Congrats on the vacuform success KP! I'm sure you're 'chuffed' to borrow a Brit-ism. . I'm absolutely chuffed to bits and it even makes up for the fact i sliced the tip of me thumb off cutting the hard board. |
|
|
|
Post by Mence on Jan 29, 2014 7:45:44 GMT -5
Wow, that's impressive, nice job!
|
|
kingpin141
Full Member
Member since: March 2013
Posts: 308
|
Post by kingpin141 on Jan 29, 2014 16:36:30 GMT -5
|
|
|
|
Post by Mence on Jan 29, 2014 17:01:14 GMT -5
Gonna look lovely all plumbed in.
|
|
kingpin141
Full Member
Member since: March 2013
Posts: 308
|
Post by kingpin141 on Jan 30, 2014 16:21:19 GMT -5
I wasn't happy with the kits engine strut brace. it had a crude block of plastic to represent the gubbins at the front of the engine so i made another one.  the pipework is coming on nicely. 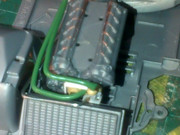 The cooling pipes from the radiator. The connectors are Chally 2 headlights.  And the combined pipes. 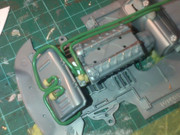 |
|
kingpin141
Full Member
Member since: March 2013
Posts: 308
|
Post by kingpin141 on Jan 31, 2014 12:45:47 GMT -5
Yay. the first lot of paint is on. The basic engine is done. 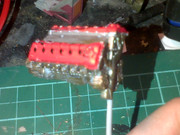 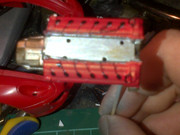 A couple of sink marks to fill on the airbox thingy. 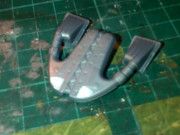 While perusing the interweb I found this work of art. www.automotiveforums.com/vbulletin/showthread.php?t=966018 . Being the honourable man that I am. I'm going to attempt to copy his work wholesale. I know it's a different car but i'm buggered if I can find any decent reference pics of the 599xx.   |
|
kingpin141
Full Member
Member since: March 2013
Posts: 308
|
Post by kingpin141 on Jan 31, 2014 16:26:45 GMT -5
The racing electronic gubbins for the passenger side. Aside from a few tiny warning decals that bits done.  The carbon fibre look on the seat back didn't quite work. This pic makes it look better than it actually is. But as i'm only using one seat now I have a spare to try again with. 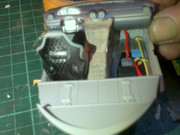 The stuff over the centre console and new dash bit came out of an old sat nav. It's got a nice technical looking texture to it. 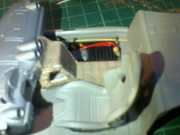 |
|
kingpin141
Full Member
Member since: March 2013
Posts: 308
|
Post by kingpin141 on Feb 1, 2014 7:18:20 GMT -5
That's the wheel arch air vents cut. Not something I want to do again in a hurry. Lots of smoothing to come.  Unfortunately while cutting i put too much wieght on the roof and snapped one of the B pillars.  |
|
kingpin141
Full Member
Member since: March 2013
Posts: 308
|
Post by kingpin141 on Feb 2, 2014 17:42:38 GMT -5
I've drilled out all of the air vents on the dash.  A testing job if ever there was one. The brakes painted up. The real discs are carbon ceramic. I mixed Vallejo natural steel and gloss black to try and simulate them. I made the calipers yellow just to add a splash of colour. 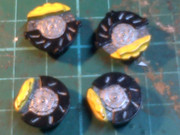 And behind a newly painted wheel.  The basic shape of the new vents are done and fitted. Then first, of what I suspect is many, lot of filler applied.  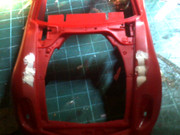 I went to a Christmas party last night (don't ask) the plastic plates there had a really nice texture so I grabbed a load of them and replaced the base of the gubbins in the passenger foot well, as well as covering the rear parcel shelf. I doubt race cars have luggage straps.   After many failed attempts at painting carbon fibre i've given up and ordered a decal sheet which should arrive by the end of the week. |
|
kingpin141
Full Member
Member since: March 2013
Posts: 308
|
Post by kingpin141 on Feb 3, 2014 16:40:37 GMT -5
|
|
kingpin141
Full Member
Member since: March 2013
Posts: 308
|
Post by kingpin141 on Feb 4, 2014 15:35:27 GMT -5
A bit more work on the arch vents.   |
|
kingpin141
Full Member
Member since: March 2013
Posts: 308
|
Post by kingpin141 on Feb 5, 2014 19:04:22 GMT -5
Only the one pic for this update, but it still took me all evening. The carbon fibre decal arrived today so i started on tarting up the interior. I thought it would be a hard job. I was right. You can't see it in the pic very well but theres a few creases. also I found some tiny metal stickers in me greebly box. They have become the mounts for the toggle switches on the centre console. 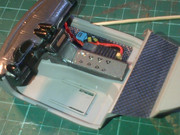 |
|
|
|
Post by deafpanzer on Feb 6, 2014 11:26:34 GMT -5
Admire your work... keep it coming!
|
|
|
|
Post by Mence on Feb 7, 2014 1:37:12 GMT -5
Fantastic work, a real master class.
|
|
kingpin141
Full Member
Member since: March 2013
Posts: 308
|
Post by kingpin141 on Feb 7, 2014 18:36:48 GMT -5
I've had a productive couple of days so a fair few pics in this post. First up the front , just cut and sanded plasticard. Now I need to warm then put a curve in them.  and then the front splitter. 4 attempts it took and im still not happy.  The airbox is done. Just decals to go.  The toggle switches. Not overly happy with them either. But I am learning loads doing this build  Dry fitting  Looking around me shed i found this. It's the rear spoiler of the Death Race Astra. The problem with it being it's covered in the same impenetrable layer of laquer as the car.  I gave it a blast of primer and it looked bloody awful. Something had to be done. The wing really fragile so I couldn't use any force on it. And then I had an idea.  one bit of plasticard and some blutac later a cradle is born. It let me use enough force to use a curved blade to scrape the paint etc off. Worked a treat. Then I drilled holes in the boot lid and ta da. I have a spoiler i'm happy with.  |
|
kingpin141
Full Member
Member since: March 2013
Posts: 308
|
Post by kingpin141 on Feb 8, 2014 17:41:37 GMT -5
Rummaging around the shed i found some really fine red blue and green wires so i added a couple to the footwell gubbins. 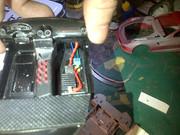 The carboned front splitter and rear wing. Theres still more to do on both 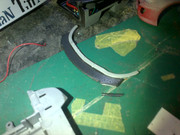  |
|
kingpin141
Full Member
Member since: March 2013
Posts: 308
|
Post by kingpin141 on Feb 13, 2014 12:14:56 GMT -5
After many failed attempts I accidently stumbled across a way of doing DIY carbon fibre. I sprayed the splitter black, then when it was dry I covered it tightly in a mesh to spray a dusting of silver over it. It turns out the paint wasn't as dry as I thought. I took the mesh off and it left this. 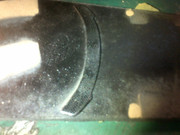 It doesn't look anywhere near as patchy as it looks in the pics. A finished wheel. I gave the wheels a coat of clear crimson but you can only really see it in the sun.  The dash is coming along nicely  Wheels on for the first time. I was gobsmacked. All four wheel sat perfectly level.  Red trim on the door cards  |
|
|
|
Post by Mence on Feb 13, 2014 12:23:47 GMT -5
Looking fantastic, your efforts are really paying off!
|
|
|
|
Post by deafpanzer on Feb 13, 2014 12:26:02 GMT -5
Looking superb!! The wheels look lovely...
|
|
kingpin141
Full Member
Member since: March 2013
Posts: 308
|
Post by kingpin141 on Feb 13, 2014 12:35:22 GMT -5
Thanks guys. I appreciate the positive comments. One thing i've learnt during this build is that..I have to be much much tidier. This is not something that comes naturally.
|
|
kingpin141
Full Member
Member since: March 2013
Posts: 308
|
Post by kingpin141 on Feb 13, 2014 16:16:48 GMT -5
Looking at the interior I suddenly realised...seatbelts. I used the tiny hanging straps in the shoulders of some of the wifes tops. One swift cut of the scissors and a generous application of vallejo red later and ta da  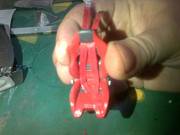 . I used some greeblie photo etch for the anchor points. The harness buckle is an upside down 1/72 rocket pod front piece.  Installed 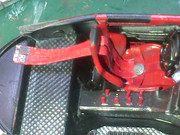  |
|
kingpin141
Full Member
Member since: March 2013
Posts: 308
|
Post by kingpin141 on Feb 14, 2014 16:40:43 GMT -5
After much wet and drying, on goes the paint. Engine surround first.  Then the colour.  It doesn't look anywhere near as light as in the flesh. This is the colour I'm going for. It looks much closer IRL  For the racing numbers i'm using these  So, racing number 22 and the little Union Jacks will go on each door too |
|