johnt
Full Member
 Feb 2012 MoM and 2012 Model of the Year Winner
Member since: November 2011
Posts: 1,174
Nov 15, 2011 5:38:32 GMT -5
Nov 15, 2011 5:38:32 GMT -5
|
Post by johnt on Jan 30, 2014 8:39:26 GMT -5
Hi folks Here is my latest build. The Meng kit is based on the first prototype P1 at Bovington. Mine will be P4 during trials 1948. Therefore a few alterations have been made as per the real vehicle, as far as I can tell from photos. The aftermarket stuff has arrived so now the assembly of this wee beast is finished. The Besa machine guns are from Passion Models; the round hatch on the side is from the AFV Magazine shop. The cast texture was made more random using Mr Surfacer 500. Extra welds were made from stretched sprue softened with liquid glue, plus various details were made from brass, aluminium sheet and copper wire.    See you again when there's some paint! Cheers JT |
|
|
|
Post by deafpanzer on Jan 30, 2014 9:24:19 GMT -5
Looking great already! Can't wait to see it painted next...
|
|
|
|
Post by wbill76 on Jan 30, 2014 21:26:20 GMT -5
Count me in! Can't wait to see what you do with this beast there JT!
|
|
johnt
Full Member
Feb 2012 MoM and 2012 Model of the Year Winner
Member since: November 2011
Posts: 1,174
Nov 15, 2011 5:38:32 GMT -5
Nov 15, 2011 5:38:32 GMT -5
|
Post by johnt on Jan 31, 2014 10:07:42 GMT -5
Many thanks guys, The challenge here will be to restrain myself with the weathering. Just a bit of dust and dirt from a day or two of trials rather than a battle weary appearance. Don't like my chances  Cheers JT |
|
|
|
Post by rbaer on Jan 31, 2014 14:28:33 GMT -5
What a beast! It's kind of fun to imaging this thing in actual service, had it become necessary.
Extra detail work looks very good.
|
|
bigjohn
Reviews member 
Member since: December 2011
John Hale
Posts: 3,438
Dec 21, 2011 2:17:45 GMT -5
Dec 21, 2011 2:17:45 GMT -5
|
Post by bigjohn on Jan 31, 2014 15:37:46 GMT -5
Looking good JT. Looking forward to your restrained weathering, LOL
|
|
Deleted
Member since: January 1970
Posts: 0
Apr 29, 2024 6:17:24 GMT -5
Apr 29, 2024 6:17:24 GMT -5
|
Post by Deleted on Feb 1, 2014 8:22:58 GMT -5
nice work looks great
|
|
|
|
Post by wbill76 on Feb 2, 2014 11:40:59 GMT -5
Many thanks guys, The challenge here will be to restrain myself with the weathering. Just a bit of dust and dirt from a day or two of trials rather than a battle weary appearance. Don't like my chances Cheers JT You'll do just fine...and it will be a nice change of pace for sure!  |
|
johnt
Full Member
Feb 2012 MoM and 2012 Model of the Year Winner
Member since: November 2011
Posts: 1,174
Nov 15, 2011 5:38:32 GMT -5
Nov 15, 2011 5:38:32 GMT -5
|
Post by johnt on Feb 3, 2014 8:52:59 GMT -5
Hi, many thanks guys! You crack me up Dicky, sorry to surprise you with my hurtling tortoise!! And if the restraining of the weathering thing don't work out and it gets way too dirty for a prototype, well it'll be a what if. As in what if JT Calls it a fictional subject to avoid criticism, at other less friendly forums.  Or what if I say ferk it and let them get in a frenzy over it.... Cheers JT |
|
losboz
Full Member
Member since: September 2013
Posts: 296 
|
Post by losboz on Feb 3, 2014 9:50:22 GMT -5
Superb build John
Looking forward to some paint
Los
|
|
johnt
Full Member
Feb 2012 MoM and 2012 Model of the Year Winner
Member since: November 2011
Posts: 1,174
Nov 15, 2011 5:38:32 GMT -5
Nov 15, 2011 5:38:32 GMT -5
|
Post by johnt on Feb 11, 2014 8:57:49 GMT -5
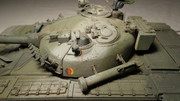
Hi Los, thanks! Here's an update folks. Before paint I washed everything with soap and warm water. Then the products as shown in the photos:  I'm trying to mix a color like SCC15 here.  If you try the following technique then a good coat of Dullcote is essential.  The first light layer of dust.  Then an even coat of hairspray, not too thick. Then airbrushed buff in a thin coat.  Next is a trick I just learnt by accident. I mixed equal parts of water and windex. After the last coat of paint had dried for 2 hours I took a large soft brush and doused the whole surface with the windex/water. Don't scrub. Wait 5 or 10 seconds then rinse it off with water, I used the shower. Let it dry, don't brush the surface or touch it while it's wet, unless you want streaks like the ones you can see here.  You end up with this cool random pattern like dust. And it's set when dry and does not come off. That's it so far, see you again soon! JT |
|
johnt
Full Member
Feb 2012 MoM and 2012 Model of the Year Winner
Member since: November 2011
Posts: 1,174
Nov 15, 2011 5:38:32 GMT -5
Nov 15, 2011 5:38:32 GMT -5
|
Post by johnt on Feb 11, 2014 9:02:26 GMT -5
I should also add that windex is a glass cleaner, it's main ingredients are:
Isopropanal, 2-Butoxethanol, Ethylene, Water, and Ammonia.
I think it's not available in Europe, but there's probably similar products you could try.
Cheers
JT
|
|
Gordon Ferguson
Junior Member
Member since: April 2012
Posts: 85
Apr 3, 2012 10:22:22 GMT -5
Apr 3, 2012 10:22:22 GMT -5
|
Post by Gordon Ferguson on Feb 11, 2014 10:09:46 GMT -5
Think I may be trying that technique this week , John. ...........Looking great
|
|
|
|
Post by deafpanzer on Feb 11, 2014 14:00:12 GMT -5
Once again thank you for sharing another great tip... I will try that one day. Dust streaks look pretty good and natural...
|
|
johnt
Full Member
Feb 2012 MoM and 2012 Model of the Year Winner
Member since: November 2011
Posts: 1,174
Nov 15, 2011 5:38:32 GMT -5
Nov 15, 2011 5:38:32 GMT -5
|
Post by johnt on Feb 12, 2014 9:03:34 GMT -5
Thanks guys! Yes Dickey, I'm not sure how it happened!! I'm so clumsy.  Okay confession time, the truth is I started out using the hairspray tech for adding a broken layer of dust. I didn't like the result so I tried to remove the HS layer and dust paint by windex. I went to rinse, but the model wouldn't fit in the sink (it's attached to a temporary base) so I used the shower. When it was dry, not all the 'dust' was gone, but what was left looked really cool! Here's a few more shots of the result so far. Still a bit to do yet.   The exhaust was first painted using washes of Vallejo dark rust, light rust and yellow rust, mixed together on the model while the washes were still wet. Then the hairspray technique was used to add the green. Cheers JT |
|
|
|
Post by ceresvesta on Feb 12, 2014 9:15:51 GMT -5
Woweee! John, this is eye candy mate! Thanks for sharing the shower technique...Taking your model with you in the shower, THAT, my friend is dedication! Following with great interrest. |
|
|
|
Post by Deano on Feb 12, 2014 9:56:21 GMT -5
Yes very nice technique John , great results there!
|
|
|
|
Post by bullardino on Feb 12, 2014 10:55:35 GMT -5
Fantastic job, I was really hoping you'd blog it here. The full explaination is really useful, nice technique BTW, here in Italy Windex should go under the commercial name of Glassex. Dunno if it's the same in other parts of Europe. |
|
|
|
Post by wbill76 on Feb 12, 2014 16:43:24 GMT -5
Very nice progress on the Tortoise there JT! As for showering with your builds, perhaps that raises more questions than should be asked...  |
|
|
|
Post by Leon on Feb 12, 2014 20:32:38 GMT -5
The tortoise is looking mighty fine John :)Thanks for sharing the great tip. |
|
Deleted
Member since: January 1970
Posts: 0
Apr 29, 2024 6:17:24 GMT -5
Apr 29, 2024 6:17:24 GMT -5
|
Post by Deleted on Feb 12, 2014 21:13:54 GMT -5
Now that's a Mutant Ninja Turtle!
Accident or not that looks superb.
If I wasn't afraid of MrsG I'd be showering with my kits too.........................
G
|
|
bigjohn
Reviews member
Member since: December 2011
John Hale
Posts: 3,438
Dec 21, 2011 2:17:45 GMT -5
Dec 21, 2011 2:17:45 GMT -5
|
Post by bigjohn on Feb 12, 2014 21:23:17 GMT -5
Looking really good John, You always have a good eye for mixing paint. Write this one up for an article and the next fad will be showering with your models |
|
Deleted
Member since: January 1970
Posts: 0
Apr 29, 2024 6:17:24 GMT -5
Apr 29, 2024 6:17:24 GMT -5
|
Post by Deleted on Feb 13, 2014 14:53:43 GMT -5
Looks very good indeed
|
|
|
|
Post by rbaer on Feb 13, 2014 18:06:44 GMT -5
If I start bringing models to the shower my wife won't let me play with you guys anymore.
Superb Tortoise, by the way....
|
|
danb
Reviews member
March 2013 MoM Winner
Member since: November 2011
Posts: 2,808
Nov 17, 2011 9:22:52 GMT -5
Nov 17, 2011 9:22:52 GMT -5
|
Post by danb on Feb 14, 2014 2:21:46 GMT -5
Another great build log JT what a monster :0 nice SBS on the dusting technique does this mean we gotta all start installing showers in our caves to recreate JT's special weathering dusting effect lol thanks for sharing buddy Dan B |
|
johnt
Full Member
Feb 2012 MoM and 2012 Model of the Year Winner
Member since: November 2011
Posts: 1,174
Nov 15, 2011 5:38:32 GMT -5
Nov 15, 2011 5:38:32 GMT -5
|
Post by johnt on Feb 14, 2014 9:03:17 GMT -5
 Aha...yeah, probably shouldn't have mentioned the shower...come to think of it Thanks for that info Luigi. Cheers Hi Dan, I have always thought a good man cave should have a shower and toilet, bar fridge, pool table, bar, Jacuzzi, secret door into adjoining club, for starters....
|
|
johnt
Full Member
Feb 2012 MoM and 2012 Model of the Year Winner
Member since: November 2011
Posts: 1,174
Nov 15, 2011 5:38:32 GMT -5
Nov 15, 2011 5:38:32 GMT -5
|
Post by johnt on Feb 17, 2014 8:53:13 GMT -5
Hi guys. I've been adding pin washes and some stains with Oils thinned with White Spirit. Colours were mainly Mig Productions black mixed with basic earth.   I can see from these photos the engine deck needs more contrast. See you again soon, cheers. JT |
|
|
|
Post by ceresvesta on Feb 17, 2014 8:55:30 GMT -5
Getting better and better JT!
|
|
|
|
Post by dupes on Feb 17, 2014 17:09:12 GMT -5
Sweet so far! I'd be a bit worried about incorporating windex and the shower into my builds...  |
|
|
|
Post by wbill76 on Feb 17, 2014 21:27:31 GMT -5
Coming along nicely JT!
|
|


 Aha...yeah, probably shouldn't have mentioned the shower...come to think of it


