Hinksy
Full Member
  
Member since: June 2012
THE ENGLISH LIONHEART - HINKSY!
Posts: 1,016
Jun 22, 2012 16:46:21 GMT -5
Jun 22, 2012 16:46:21 GMT -5
|
Post by Hinksy on Mar 25, 2014 16:19:42 GMT -5
Cheers Luis, I've just found a place here in the UK called Sylmaster - it's in Sussex. www.sylmasta.com/acatalog/Magic_Sculp.htmlAs you can see it's over £10 with VAT and postage for the small 250g or 8.8oz pack - is that about right or a bit OTT? Cheers, Ben  |
|
|
|
Post by bullardino on Mar 26, 2014 2:27:33 GMT -5
I think I paid it less than 10 euro without p&p, so the price looks reasonable to me.
And you will find out that there's no other putty like it, it doesn't stick to the fingers, it's easy to work and dries hard as rock. I have the small package, but next time I'll get the big one.
|
|
Hinksy
Full Member
  
Member since: June 2012
THE ENGLISH LIONHEART - HINKSY!
Posts: 1,016
Jun 22, 2012 16:46:21 GMT -5
Jun 22, 2012 16:46:21 GMT -5
|
Post by Hinksy on Mar 26, 2014 14:02:45 GMT -5
Cheers Luis and Rich  I glad you liked it I've made bedrolls etc. from Milliput (white) before but I found it a little 'unforgiving' working with it when it was really thin - it started to split when rolled. This was my fault no doubt but nevertheless I want to give a few of these other products a try. The Magic Sculp the guy uses in the videeo I put up a few posts back looks great as does Tamiya's Fast Epoxy Putty - I've ordered some of both to try them out. I'm going to get really 'stuck in' on this build tomorrow and get the basic painting and weathering finished. I'll have this putty for the weekend so I'll have a play about with the stowage and see what I can do and at least have a crack at painting the figure and she should be about ready to be called done - unless I decide to do a small base  Thanks guys, Ben  |
|
Hinksy
Full Member
  
Member since: June 2012
THE ENGLISH LIONHEART - HINKSY!
Posts: 1,016
Jun 22, 2012 16:46:21 GMT -5
Jun 22, 2012 16:46:21 GMT -5
|
Post by Hinksy on Mar 27, 2014 14:00:00 GMT -5
Hi fellas, Making kick-a$$ progress! Tracks have been painted and lightly weathered. I just touched up each end connector on the links with Chrome silver to give a metallic look and drybrushed the guide horns with the colour then added AK track wash to age it. I drybrushed Vallejo light rubber over the chevrons to pick them out a bit. The basic rubber is just German Grey out of a Tamiya rattlecan - I was too lazy to get Mr airbrush out and he did have a good bath last night - the grey worked well imo. Various streaking effects added, flicked brush bristles for spatter effect and used Mig Engine Oil stuff to add some effect around hatches. Normal HB pencil lightly rubbed on some of the rounded corners to suggest wear and a bit of pigments and AK Earth Effect slapped around the running gear and lower hull. Not finished of course - 'The Plan':I'm going to leave her as she is for the minute. I ordered some Magic Sculp yesterday so when that arrives (hopefully tomorrow) I'll get the stowage on the rear deck sorted under some tarp and get it tied down with a few bits up-front on the plank, too. Some dullcote and lightly brushed pigments should bring everything together nicely. I've still got the figure but I'm still not sure if it's a good idea to use it? The tank has painted up excellently and I have a feeling any figure painted by me may all but ruin it! As previously mentioned I left the Cupola hatch unfixed incase at this stage I decided to use the figure - unfortunatly I've inadvertantly painted it shut and it will need a good 'knock' from the inside to pop it open and I'm worried it might take some paint with it - maybe worse  Her she is so far - awaiting stowage and dullcote with the tank about complete: Her she is so far - awaiting stowage and dullcote with the tank about complete:         Looking good so far I think? A nice bit of stowage should finish her up nicely  STOWAGE QUESTION: STOWAGE QUESTION: Would the crew have deliberately attempted to keep the stowage towards the back of the engine deck to leave the engine access doors free (I'm thinking leaving the vented access doors covered would stop air getting to the engine and may cause overheating or something)? TRACK QUESTION: As they are the kit band tracks at present they 'float' over the top run. Should I be thinking about using a dab of cement to glue the undersides of the top runs onto the return rollers? Cheers guys, Ben  |
|
|
|
Post by bullardino on Mar 27, 2014 15:44:42 GMT -5
Ben, as far as I've seen the stowage didn't obstruct any of the service doors as overheating was a real risk. The back shelf was meant to hold stowage. I like the result so far  |
|
desertrat
Full Member
  
Member since: October 2013
Posts: 934 
|
Post by desertrat on Mar 27, 2014 15:55:38 GMT -5
looks real good, can't wait to see her loaded up!!
|
|
|
|
Post by deafpanzer on Mar 27, 2014 18:14:15 GMT -5
Love the weary WW look... you did great!
|
|
|
|
Post by bbd468 on Mar 27, 2014 20:41:29 GMT -5
Excellent job so far brother Ben, looking forward to tha stowage.  |
|
remarc777
Full Member
  
Member since: October 2013
May 2014 MoM winner
Posts: 142 
|
Post by remarc777 on Mar 28, 2014 6:50:38 GMT -5
Hi there Ben,
Nice fading you did here mate! Love the color and the worn out look. This Sherman has seen some action!
As you stated you haven't finished, yet I hesitated to write the following. just in case you had overseen this, it's nice someone gets your attention on it:
you painted the left tail light, but not the right. Also, on the front, the headlight and the machinegun could use some color.
Keeping up with your nice progress,
Richard. |
|
Hinksy
Full Member
  
Member since: June 2012
THE ENGLISH LIONHEART - HINKSY!
Posts: 1,016
Jun 22, 2012 16:46:21 GMT -5
Jun 22, 2012 16:46:21 GMT -5
|
Post by Hinksy on Mar 28, 2014 7:21:57 GMT -5
Hi there Ben,
Nice fading you did here mate! Love the color and the worn out look. This Sherman has seen some action!
As you stated you haven't finished, yet I hesitated to write the following. just in case you had overseen this, it's nice someone gets your attention on it:
you painted the left tail light, but not the right. Also, on the front, the headlight and the machinegun could use some color.
Keeping up with your nice progress,
Richard. Thanks Richard, You know what, I totally missed the other rear light - thanks for that! Everything else like you say; headlights, MG barrel and drive sprocket teeth need attention. I'll have her totally done for next weekend - the main job is the stowage, Cheers buddy, Ben  |
|
|
|
Post by Tojo72 on Mar 28, 2014 7:21:59 GMT -5
Came out real nice Ben,makes me want to do my Kelly's Heroes Sherman.as far as the tracks,that's what I do with DS tracks,not sure how those Tamiya tracks react to glue,the newer ones glue okay.
|
|
|
|
Post by rbaer on Mar 28, 2014 12:41:40 GMT -5
Looks good Ben. Tail lights only had one red lens, can't remember which one. Stowage was kept off the service doors as they were the radiator air intakes. As already said, the rear shelf was the primary stowage location, but US crews tended to pick up "extras", such as extra oil, water, fuel, ammo and food, probably since re-supply was iffy when you were moving as fast as they did in the later part of the war. I "fudge" the stowage on Shermans a lot by covering irregular plastic shapes with a tarp and then adding tie-downs. Seems like Sherman crews tried to keep everything as dry and dust-free as possible by covering it up when possible. These tracks are glue-able with regular cement, and as you say should be snug on the return rollers. One nice thing about these Tamiya Sherman tracks is that they will conform to the shape of the running gear in a short time, so that if you decide to take them off later to do some touch-up on the running gear, they can be re-installed in the same position and they'll still be snug. I may have a pic.....  Well, this is Tamiya's M4 "early" with AFV Club bogies, but it still has Tamiya's tracks. They're close to snug, and this pic is about a year old, taken within a few days of installing the tracks. This same model's tracks are now snug on the return rollers. It may get some Dragon T51 tracks in the near future, can't decide. Bottom line, if you're happy with the running gear and won't need to remove the tracks, glue 'em. |
|
Hinksy
Full Member
  
Member since: June 2012
THE ENGLISH LIONHEART - HINKSY!
Posts: 1,016
Jun 22, 2012 16:46:21 GMT -5
Jun 22, 2012 16:46:21 GMT -5
|
Post by Hinksy on Mar 28, 2014 13:46:34 GMT -5
Dammit - I've painted them both red now! Easily sorted so no problem  Looking at photos it is the upper lens on the rear LHS light that was red. As Luis said, it seems that I can't chuck stowage all over the back of this thing as obviously the vents on the engine bay doors would be rendered useless? I was going to put a bit of stowage on the rear shelf and on the very edge of the rear deck which is a solid piece and not ventilated. My Magic Sculp arrived today so I'm going to follow that you-tube clip that I posted a few posts back and see if I can make a decent cover with tie-downs and make a few Sand Bags to pile up front. I'll have a go with PVA glue and tissues to see what looks good. If anyone has any tips to offer I'd love to hear them! Cheers guys, Ben  |
|
thug626
Senior Member
   
Member since: January 2013
Posts: 2,035
Jan 15, 2013 13:05:28 GMT -5
Jan 15, 2013 13:05:28 GMT -5
|
Post by thug626 on Mar 30, 2014 22:49:13 GMT -5
Good evening Ben,
Your Sherman looks great! I'm looking forward to seeing it laden with stowage.
Dave
|
|
Hinksy
Full Member
  
Member since: June 2012
THE ENGLISH LIONHEART - HINKSY!
Posts: 1,016
Jun 22, 2012 16:46:21 GMT -5
Jun 22, 2012 16:46:21 GMT -5
|
Post by Hinksy on Mar 31, 2014 10:29:07 GMT -5
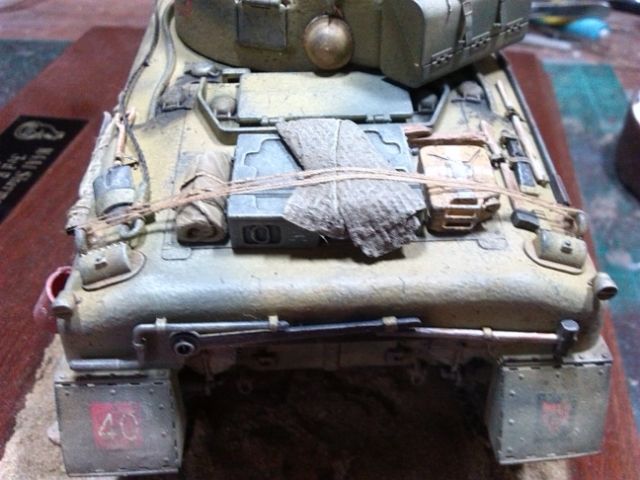
Thanks for the kind words guys! She is about as completed as she's going to get for the time being so I'm calling her DONE(ish)  I've got RB Models .50cal upgrade kit - someone is sending me a bdrand new Dragon .50cal with better detail around the action area so the MG will be swapped out and the same friend is sending me some scale netting and hessian to soak in PVA solution to drape over the stowage tarp. I did some seriously serious research into these 105mm howitzer Shermans with my Shermaholic buddy Alan from my club who showed me some excellent photos and links that described these as vehicles that would be called up from the rear to provide fire support when things got a little 'hot'. None of them had masses of stowage as seen on the front line sherman and all of them had covered up stowage tightly laced down. I know some of you fellas like to see actual bit's and bob's but I decided to take the easy option and drape and tape the canvas colour using three tones of brown going from flat earth up to sand drybrushed over a flat Khaki basecoat. There's some ammo and small boxes on the back deck and some cans and bigger crates near the back taking care to leave the engine louvres free. Sorry the pictures aren't up to much but I'm feeling pretty damn unwell and have done all weekend - it took all my concentration to make that canvas  Here she is guys - I'll get some better photos up when I feel better and the MG has been upgraded and the netting fixed. I've loved this build - you'll be seeing more shermans from the Hinks Bench this year!         I've just taken receipt of Dragons M4 Direct Vision kit - she's up next! I've just taken receipt of Dragons M4 Direct Vision kit - she's up next! Cheers fellas, Ben  |
|
|
|
Post by Tojo72 on Mar 31, 2014 11:01:35 GMT -5
Good finish up Ben,like your job on the tarp
|
|
Hinksy
Full Member
  
Member since: June 2012
THE ENGLISH LIONHEART - HINKSY!
Posts: 1,016
Jun 22, 2012 16:46:21 GMT -5
Jun 22, 2012 16:46:21 GMT -5
|
Post by Hinksy on Mar 31, 2014 11:12:20 GMT -5
Good finish up Ben,like your job on the tarp Thanks Tojo, I'll say she's about 95% complete - when I pimp the .50cal and get the Hessian Netting draped on the tarp she'll look a lot better but I've got to wait until my buddy sends them bits and I want to get a move on and build that M4 DV! I'm not sure if I like the tarp - next time I'm going to try some luxury tissues soaked in PVA and water - it's all a learning curve so I'm not going to tear my hair out over this one. Im really looking forward to the M4 DV  All the best, Ben  |
|
|
|
Post by deafpanzer on Mar 31, 2014 11:54:49 GMT -5
Fantastic finish! I never thought it would happen... a German armor fan building a great looking Sherman. Have to say its one of your best builds to date...
|
|
Hinksy
Full Member
  
Member since: June 2012
THE ENGLISH LIONHEART - HINKSY!
Posts: 1,016
Jun 22, 2012 16:46:21 GMT -5
Jun 22, 2012 16:46:21 GMT -5
|
Post by Hinksy on Mar 31, 2014 12:32:15 GMT -5
Fantastic finish! I never thought it would happen... a German armor fan building a great looking Sherman. Have to say its one of your best builds to date... Thanks guys, Wow Andy - "one of my best builds to date" eh? A VERY generous comment - much appreciated! I wish you could see it 'in the flesh' as it looks killer and my photos aren't doing it justice for some reason?  It's a shame I didn't get the RB Barrel (still on backorder) on time. I'm not going to change them now but no dount it will come in handy in the future. I do want to pimp the .50cal with the RB Upgrade kit. I'm not using the .50cal that's in place at present - instead I'm going to use a Dragon MG that a friend is sending me  I'm not mega thrilled with the tarp - it's ok but could do better  I'm going to make up some netting with Hessian to drape over the bulge of covered stowage. To be honest stowage is a real PITA in my opinion but I'd better get used to it if I'm planning more Shermans! I want to build my newly acquired M4 DV but at the same time I'm thinking that I should get a German build underway? I think I'll knock the M4 together then when I'm back after my 10-12 week 'holiday' (nervous) I'll get the late Panther G out along with the Griffon PE set and make that my BIG Summer build  All my other German kits have full interiors (Sig33 and StuG III G) and the other kits are quite involved so the M4 makes for the perfect solution as a 'gap-filler'! Thanks again buddy, Ben  |
|
desertrat
Full Member
  
Member since: October 2013
Posts: 934 
|
Post by desertrat on Mar 31, 2014 13:07:01 GMT -5
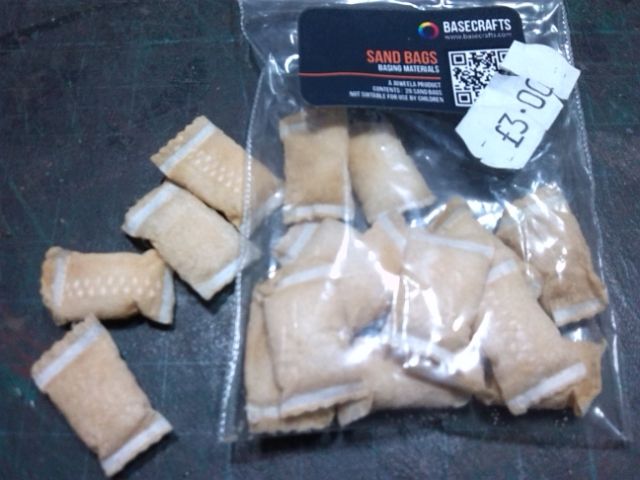
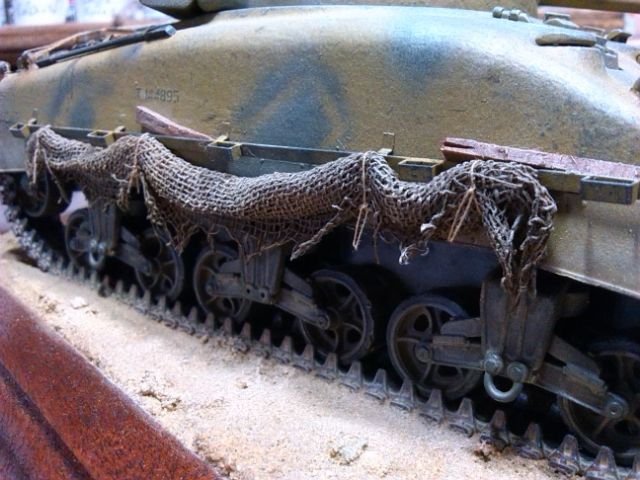
hi ben, realy nice finish on the sherman!!, i found these at a recent show, just add pva and water! i also use pva, water,and water based paint,ie vallejo, soak bandage for nets,and tissue for tarps, drybrush when hard. simples!!     |
|
Hinksy
Full Member
  
Member since: June 2012
THE ENGLISH LIONHEART - HINKSY!
Posts: 1,016
Jun 22, 2012 16:46:21 GMT -5
Jun 22, 2012 16:46:21 GMT -5
|
Post by Hinksy on Mar 31, 2014 13:19:04 GMT -5
Hey Somtec, I'm glad you like her dude! I love them sandbags! They look great for a lazy modeller like me!  The El-Alamein Sherman in the stash has the PE side runs with the square bits like in your photo - I'm going to do the same with some of the netting my buddy is sending me when I build that one. Im going to get to grips with the Dragon M4 (Direct Vision) which I'll be starting later this week. Thanks for them photos mate - they'll help me a lot when the time comes! Ben  |
|
desertrat
Full Member
  
Member since: October 2013
Posts: 934 
|
Post by desertrat on Mar 31, 2014 13:21:39 GMT -5
no probs, glad to help,
|
|
Deleted
Member since: January 1970
Posts: 0
Nov 29, 2024 4:24:19 GMT -5
Nov 29, 2024 4:24:19 GMT -5
|
Post by Deleted on Mar 31, 2014 13:53:23 GMT -5
nice finish there mate looks great
|
|
|
|
Post by rbaer on Mar 31, 2014 17:47:01 GMT -5
Very well done, Ben.
|
|
|
|
Post by Deano on Mar 31, 2014 20:36:39 GMT -5
Really like the weathering on this one Ben , top job mate!
|
|
george
Full Member
  
Member since: February 2014
Posts: 279 
|
Post by george on Mar 31, 2014 21:22:08 GMT -5
Hi, Ben! Really nice build!
|
|
Deleted
Member since: January 1970
Posts: 0
Nov 29, 2024 4:24:19 GMT -5
Nov 29, 2024 4:24:19 GMT -5
|
Post by Deleted on Apr 1, 2014 4:55:11 GMT -5
Excellent work Ben!
|
|
|
|
Post by bullardino on Apr 1, 2014 9:26:37 GMT -5
Very nice looking M4 Ben  Desertrat those sandbags are the best I've ever seen, gotta get me some... |
|
Hinksy
Full Member
  
Member since: June 2012
THE ENGLISH LIONHEART - HINKSY!
Posts: 1,016
Jun 22, 2012 16:46:21 GMT -5
Jun 22, 2012 16:46:21 GMT -5
|
Post by Hinksy on Apr 1, 2014 10:38:36 GMT -5
Very nice looking M4 Ben  Desertrat those sandbags are the best I've ever seen, gotta get me some... Ditto on them sandbags! My netting came today so I'm going to cut a small piece to see what I can do with a PVA soak and trying to drape it over the bundle. I'll let you know how it goes! Ben  |
|
Hinksy
Full Member
  
Member since: June 2012
THE ENGLISH LIONHEART - HINKSY!
Posts: 1,016
Jun 22, 2012 16:46:21 GMT -5
Jun 22, 2012 16:46:21 GMT -5
|
Post by Hinksy on Apr 1, 2014 13:04:57 GMT -5
Hey guys! It's official - THE SHERMAN IS COMPLETE! 100% COMPLETE!My Verlinden netting turned up this morning so I cut a nice piece to size, made a water/PVA mix, soaked the netting and draped it over the bundle being careful to tuck some parts of the areas under the stowage to make it look like the crew had done that simply to stop it blowing away and now it's set's rock hard - and looks downright killer!  I bought that PVA glue when I first started building models, nearly 5 years ago, but have never used it. I had no idea on ratios of PVA to water etc. so I put about a teaspoon full in the bottom of a cup and added twice as much water. If some one could tell me the correct recipe that would be great as I'm going to try some tissue next in place of putty when it comes to making tarp. I've decide not to 'waste' one of the two RB .50cal upgrades on this kit as I will use them on my next build (M4 DV) and on another future build - the Tasca Sherman Jumbo MG is awesome so I'll be leaving that. I might repaint the MG mount on this build along with the ammo tin as the decal is on the wrong side - not a pressing concern right now but if she graces a judges table at some point she'll be getting 'the treatment'! Some light drybrushing all over followed by mud and dust pigments around the running gear, on the stowage and on the sand bags tied them up and I'm amazed at the difference just a bit of netting can make! Yesterday I was unsure if I really liked the stowage and thought It looked a bit '  ' - today, after I did the netting, I decided it's definately got the best finish of any of my builds so far (imo) and I'm loving it! I really wanted to get this done last week so I could get it in the MoM for March so I'll have to ask Dicky if I can put it in Aprils MoM  Here we are - Tamiya's M4A3 Sherman (105mm Assault Support Tank): Here we are - Tamiya's M4A3 Sherman (105mm Assault Support Tank):   Sorry - I think the rear of the vehicle is slightly out-of-focus here: Sorry - I think the rear of the vehicle is slightly out-of-focus here:      I hope you like her fellas. I feel better now I can call her '100% done'! I hope you like her fellas. I feel better now I can call her '100% done'!
I've really appreciated all the help and guidance that you've given to this German Armour Modeller - this Sherman has made a great change and expect to see plenty more Allied builds coming from me now  I'll be starting my next build either tomorrow or Thursday - Dragon's 2009 M4 DV (Direct Vision) Kit #6579  Thanks again guys, Ben  |
|