A tip for camo nets with hessian strips
Mar 4, 2014 13:05:24 GMT -5
Smudge, deafpanzer, and 1 more like this
Post by 1721lancers on Mar 4, 2014 13:05:24 GMT -5
Hi there, I have always wondered how to create an accurate camo net on a vehicle, and after
a little thought I came up with this:
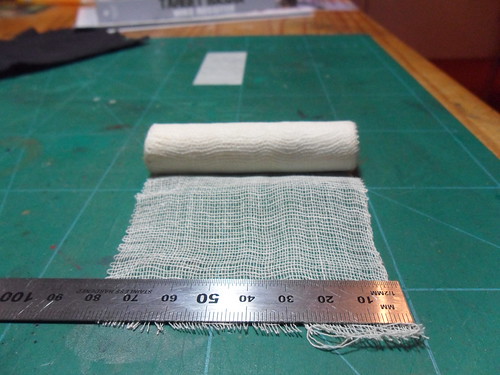
Step 1. Get some bandage material, the type you can see through without any probs.
Step 2. Cut this into smaller sections, for my Scimitar the largest I used were about 30mm x 50mm.
The reason for this is, that you can create a more realistic hang with lots of smaller bits
instead of using one large piece.
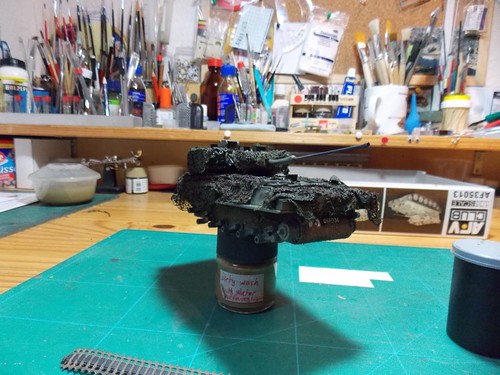
Step 3. Make a mix of PVA (white) glue, tamiya paint (your choice), and water. Not too thick
and not too thin.
Step 4. Dip the pieces of bandage into the mix and add to the vehicle, add as much as you need.
Step 5. Go to the kitchen and get new tea bag, open it and tip over the bandage while still wet.
You may need to add some of the glue mix per brush before you add the tea leaves.
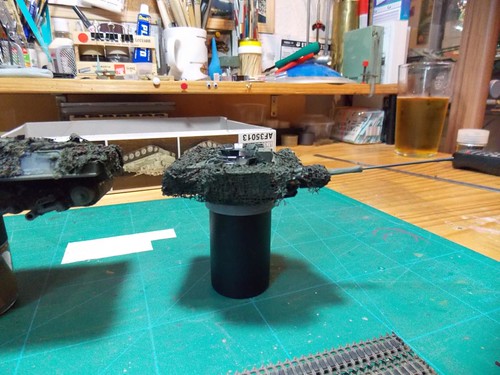
Step 6. Let this stuff dry thoroughly, best overnight.
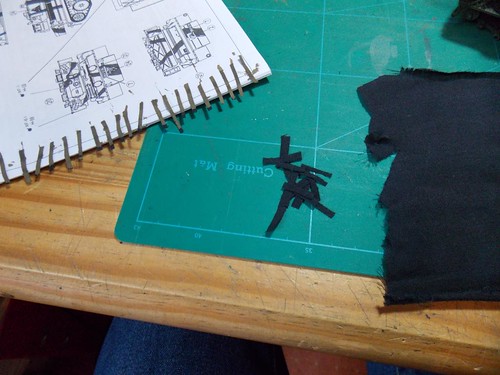
Step 7. Find yourself an old pair jeans where you can cut the pocket out of, this is going to be
the hessian strip. The colour doesn't matter as this will be dyed soon.
Step 8. Cut this cotton material into small stripes in varying sizes. I used between 2-3mm width
/ about 10-15mm length plus some wider ones with 5mm width and 20mm length. This
can of course be varied to suit.
Step 9. Using a no. 11 scalpel blade, cut small slits into the dry cammnet. Also gently ease the net
away from the vehicle. Only ease the net away so much that about 3-4mm of the hessian
net can fit into the slit. The slits should also be about the same width as the hessian strips
you have made.
Step 10. Using a pair of pointed tweezers dip the strips into Tamiya paint of your choice. These
should then be laid out to dry. Make sure you use something like the kits instructions
as with anything that is coated or plastic will produce a plastic like appearance.
Step 11. When half dry add to the slits, if the strips are to dry dampen them with paint or water
and press gently to the shape of the net/vehicle.
Step 12. Allow to dry and weather as needed.
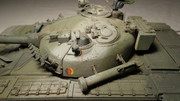
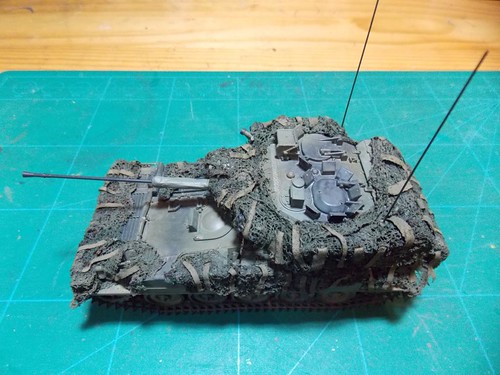
Here's a few pictures of how I did my Scimitar. Along with the description above I think you should
all manage to use and maybe improve this idea of mine.

Hope this helps many of you, if you have any questions then just ask, I'll do my best to answer them.
1721Lancers
a little thought I came up with this:
Step 1. Get some bandage material, the type you can see through without any probs.
Step 2. Cut this into smaller sections, for my Scimitar the largest I used were about 30mm x 50mm.
The reason for this is, that you can create a more realistic hang with lots of smaller bits
instead of using one large piece.
Step 3. Make a mix of PVA (white) glue, tamiya paint (your choice), and water. Not too thick
and not too thin.
Step 4. Dip the pieces of bandage into the mix and add to the vehicle, add as much as you need.
Step 5. Go to the kitchen and get new tea bag, open it and tip over the bandage while still wet.
You may need to add some of the glue mix per brush before you add the tea leaves.
Step 6. Let this stuff dry thoroughly, best overnight.
Step 7. Find yourself an old pair jeans where you can cut the pocket out of, this is going to be
the hessian strip. The colour doesn't matter as this will be dyed soon.
Step 8. Cut this cotton material into small stripes in varying sizes. I used between 2-3mm width
/ about 10-15mm length plus some wider ones with 5mm width and 20mm length. This
can of course be varied to suit.
Step 9. Using a no. 11 scalpel blade, cut small slits into the dry cammnet. Also gently ease the net
away from the vehicle. Only ease the net away so much that about 3-4mm of the hessian
net can fit into the slit. The slits should also be about the same width as the hessian strips
you have made.
Step 10. Using a pair of pointed tweezers dip the strips into Tamiya paint of your choice. These
should then be laid out to dry. Make sure you use something like the kits instructions
as with anything that is coated or plastic will produce a plastic like appearance.
Step 11. When half dry add to the slits, if the strips are to dry dampen them with paint or water
and press gently to the shape of the net/vehicle.
Step 12. Allow to dry and weather as needed.
Here's a few pictures of how I did my Scimitar. Along with the description above I think you should
all manage to use and maybe improve this idea of mine.
Hope this helps many of you, if you have any questions then just ask, I'll do my best to answer them.
1721Lancers