bbrowniii
Full Member

Member since: March 2012
If you are not part of the solution, you are part of the precipitate.
Posts: 1,228
Mar 25, 2012 22:08:04 GMT -5
Mar 25, 2012 22:08:04 GMT -5
|
Post by bbrowniii on Oct 27, 2014 19:09:01 GMT -5
T, "Whilst"  Step off with your bad self!! By the way, how the hell did I miss this one?? Holy cow!! |
|
|
|
Post by TRM on Oct 31, 2014 22:09:52 GMT -5
Thanks Leon!!! I can use all the luck I can get!!  Thanks Dupes!!! Still playing around!! Hi Boyd....LOL, I was feeling a bit nostalgic brotha!! While I wait for something I ordered for this, I move slowly along in the figure realm. Trying to stick somewhat with how AK lays out their instructions I have managed to get the skin part of a couple of the figs close.  I still need to work on the uniforms a little more but They should work out for now....    I still have a ways to go in figure painting in general but I believe the more I do, the better they might be...LOL!! These two figures are from Armor35. I reviewed these two figures earlier on Armorama: www.armorama.com/modules.php?op=modload&name=Reviews&file=index&req=showcontent&id=10186& www.armorama.com/modules.php?op=modload&name=Reviews&file=index&req=showcontent&id=10187The AK Flesh Paints is a decent set if you ask me. I am not the best at fig painting and these were easy to use and the colors are pretty nice. The paints are thicker than the normal paints offered from AK and of course are acrylic. Thinning these with water, the application was great both for full coverage as well as the filters from thinning them. Thanks again for having a LQQY!! |
|
|
|
Post by deafpanzer on Oct 31, 2014 23:41:13 GMT -5
Great start on those figures!!! Love the look of confused soldier's face...
|
|
dennis
Full Member
Member since: November 2012
Posts: 476
Nov 11, 2012 7:28:35 GMT -5
Nov 11, 2012 7:28:35 GMT -5
|
Post by dennis on Nov 1, 2014 1:38:46 GMT -5
I agree with Andy, you have made a great start on these figures. That driver knows he is going to get the blame! This is going to be a great dio when it is finished. Looking forward to popping in again soon.
Dennis
|
|
nicusi
Full Member
Member since: September 2013
Posts: 776 
|
Post by nicusi on Nov 1, 2014 3:27:34 GMT -5
|
|
|
|
Post by TRM on Nov 1, 2014 5:36:47 GMT -5
Andy - Thank you! These Armor35 figs are pretty decent if you ask me! You might have seen the German Soldier fig in my gallery...same Co. I should be seeing some German Motorcycle Riders at some point for review for the BiG A as well. Not that I have a 1/35 bike...LOL! They might be fun to paint! Dennis - Thank you sir!! LOL...It certainly looks that way! Part of me wanted to cut the whole thing in half and just keep the Russian soldiers and part of the Tram as a wedgie Vignette! These things can get out of hand when they get to big ya know?  Nicolae - Thank you my friend! I still am working on the clothes and was making an attempt to darken recesses and highlight areas but as I like as I mentioned above, when it comes to I am trying to get up to speed on things! Thanks for the links! Checked out the Massive VooDoo site already! The link you gave went to the site, but the page was blank; however I clicking on the home link opened everything just fine! Very informative! Looks like I have something to read with morning coffee for the next month!  I will check the videos out a bit later today! Thanks for the help!! Most appreciated!! EDIT - Nicolae...that first video is Dave Youngquist, owner of Last Cavalry...great guy and excellent painter! Been watching some of his other videos lately as well! I would have missed this one as it was listed under the Michigan Toy Factory, which Dave does not have an association with anymore. He gave me a great little SBS on face painting after the IPMS where he did a seminar. I will be adding this to the site somewhere as he wanted to share this with MSC! |
|
|
|
Post by Leon on Nov 1, 2014 6:55:21 GMT -5
Nice start on the figures Todd ,I need to take a lesson on face painting. |
|
|
|
Post by TRM on Nov 1, 2014 7:15:16 GMT -5
Thanks Leon!! You and me both my friend!! LOL!! What I have found it is a lot like weathering...all about the layers to create the colors and shading. Dave's SBS is a great start...I will try and get this one loaded soon, here on MSC. The Links Nic provided above are excellent as well to start! |
|
|
|
Post by Leon on Nov 1, 2014 7:50:15 GMT -5
Thanks for Daves SBS!I'll look at the links. |
|
|
|
Post by wbill76 on Nov 1, 2014 11:57:33 GMT -5
Looking good so far T! Got to love the 'who me? I'm in for it...' look on that one soldier's face.  |
|
nicusi
Full Member
Member since: September 2013
Posts: 776
|
Post by nicusi on Nov 1, 2014 16:25:44 GMT -5
Glad to be of help, I have no doubts that it will be a great diorama. Keep it on, my friend!
|
|
|
|
Post by petros on Nov 2, 2014 8:21:32 GMT -5
That looks like a decent start!
|
|
|
|
Post by Deano on Nov 11, 2014 17:34:41 GMT -5
Great figure selection T , fit just right .....also a good start on the painting too!
|
|
elco
Full Member
July & Oct 2014 MoM Winner
Member since: May 2013
MOY 2014 Winner
Posts: 660
|
Post by elco on Nov 14, 2014 4:11:39 GMT -5
Impressive scene and the AK book is very usefull to improve figure painting.
|
|
|
|
Post by TRM on Dec 9, 2014 6:53:22 GMT -5
Thank you guys, I appreciate you all following along with this one...even if it takes forever to get something done on this!! Trying to find a groove amidst the hectic holiday hustle and bustle I sneaked into the booth to lay some primer! I still have more rubble to lay down and some other stuff...but this was as good a time to have a go as any! I laid a little Black primer down followed with an ever-so-light dusting with USN Ghost Grey Primer. 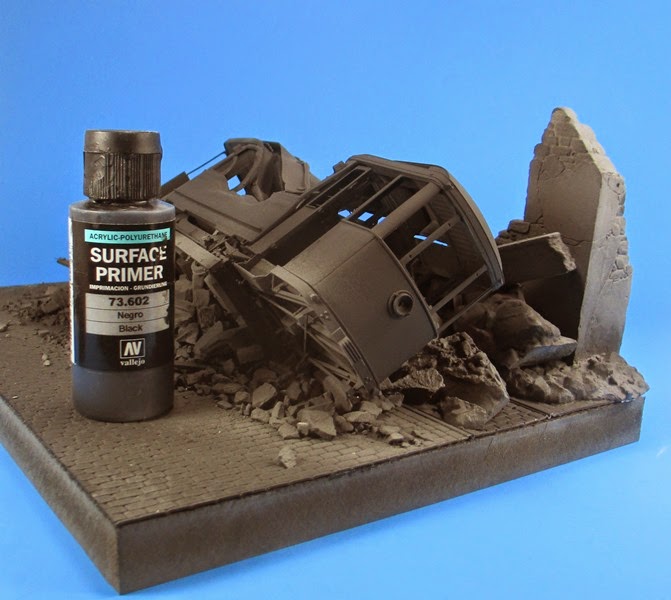 Thanks for dropping in!!! Hope to have more on this soon!! |
|
|
|
Post by deafpanzer on Dec 9, 2014 11:11:33 GMT -5
I think I have seen it before... LOL Very happy to see it primed... can't wait to see it painted next!
|
|
|
|
Post by TRM on Dec 9, 2014 12:53:56 GMT -5
Thanks Andy! I will keep plugging away at this one!!
|
|
noname
Full Member
March 2012 / April 2013 MoM Winner
Member since: January 2012
I like building models
Posts: 720
Jan 29, 2012 9:24:03 GMT -5
Jan 29, 2012 9:24:03 GMT -5
|
Post by noname on Dec 11, 2014 20:29:57 GMT -5
WOW! That is complicated. I would like to build one of these someday tho. Endless possibilities. Keep up the good work. The rubble looks spot on.
|
|
|
|
Post by TRM on Dec 11, 2014 22:10:45 GMT -5
Hey Matt! Yeah, the detail is in these Trams. This one has been discontinued but they do have the "German" version (think that is what it was called). Looking forward to this one being off the bench!! Sooner rather than later!! |
|
|
|
Post by armorguy on Dec 14, 2014 2:30:37 GMT -5
This reminds me of pics I've seen recently in a book on the V-bombs on Antwerp, stunning job T !
|
|
DeafStuG
Full Member
Member since: May 2013
..
Posts: 1,283
|
Post by DeafStuG on Dec 29, 2014 10:36:39 GMT -5
Nice work!
|
|
|
|
Post by TRM on Dec 29, 2014 12:14:41 GMT -5
Thank you Jeremy! For the kind words...and the dope slap!! I really need to get this one back to the bench and finish it!! LOL!!!
|
|
DeafStuG
Full Member
Member since: May 2013
..
Posts: 1,283
|
Post by DeafStuG on Dec 29, 2014 13:47:40 GMT -5
TRM,
You're brave man with the black primer. I have one at my workbench but no used it but used once time with grey primer via one old model sample - v.good Sometime problem paint primer layer may be come off. I haven't any idea. Guy told me - must be quickly work wet paint overall, don't be again as 2nd layer primer over on the 1st layer dry. I'm bit confusing .
|
|
|
|
Post by `Boots` on Dec 29, 2014 15:02:55 GMT -5
Great too see this one still ticking along fella........those figures do look very good indeed and the AK set looks pretty handy as well |
|
|
|
Post by TRM on Dec 29, 2014 16:49:17 GMT -5
Boots - Thanks buddy!! One of these days I will get this one to the end!! Jeremy - Couple things to remember that might help with application of Vallejo primer and paint: 1 - It is best to lay a couple thinner coats verse trying to cover the entire model at once. Often I end up two-coating the surface and the coats are usually thin enough to still see some of the models' base plastic coloring. The primer will bite to the surface and does it job just the same without over painting the surface which results in loss of details, extending of the cure time and yes, peeling. 2 - Always best to let the primer Cure. The paint/Primer dries extremely fats but is not actually cured for 12 to 24 hours depending on application rates and environmental conditions. Do I wait for the cure? Not always. It depends on how I handle the model. If I support a tank from the bottom with lets say a block or something, I don't handle the model at all really so there is no chance of the paint coming off. However, I will wait after the painting session the full curing time to ensure I do not have an issue. 3 - Air Pressure - Over and under pressurizing can result in a number of issues while painting. The set rate is a combination of equipment, paint and personal preference, but I found 12 to 15 psi is a great place to start. I found with a variety of gravity fed airbrushes, this pressure works fine. While the primers are designed to use straight out of the bottle without thinning, I will thin the darker colors, especially the black. The darker colors are heavier pigments to begin with and I have found that 1 drop of thinner to 4 to 5 drops of paint/primer works well. If the pressure is too low, spitting can occur...too high, clogging can happen. The spitting is the air struggling to get past the paint to come out; the clogging is not the fault of the paint as acrylics by nature dry fast...the more pressure you use, you effectively dry paint on the needle and the tip and each surface builds up to clog the tip. This is the number 1 reason for clogging and problems. While I do use thinner...Vallejo's, most of the time I thin with their Airbrush Cleaner. There is a surfactant in the cleaner that helps suspend the paint resulting in a smoother finish. I have both the thinner and the cleaner...I just switch their roles at the bench and clean with the thinner. There is a wild card with thinning....to far to either side of ideal will give you different results. If it is not thinned enough the AB might clog due to the thickness of the paint....too thin and the paint/primer ends up to be a wash or filter as well as possibly spitting from the brush. A process of dialing in what works best for you is needed. But, if your pressure is set to 12 to 15 psi and one drop of thinner to 4 to 5 drops of paint is a great place to start. Adjust the air up or down or add a drop of paint depending on the tools and conditions at the bench. 4 - Distance to the surface...I shoot about 4 to 6 inches from the surface typically. Too far away and the paint actually dries before it hits the surface and the "bite" is reduced. Too close and the paint builds up too quickly. I have been know to thin with 2 drops of thinner to 5 drops of paint but I turn the pressure down to about 6 psi and I can practically touch the needle to the surface for detailing. I know I ran on a bit here...but if you still have a problem, drop me a note and let me know what your setup is...AB, Pressure, Location and I can help dial in what issues you are having!! |
|
DeafStuG
Full Member
Member since: May 2013
..
Posts: 1,283
|
Post by DeafStuG on Dec 29, 2014 19:25:56 GMT -5
TRM - Thank you so much for explaining me about the primer. I copy from text to paste on my notepad in my computer.
|
|
|
|
Post by TRM on Dec 29, 2014 20:03:42 GMT -5
You're welcome Jeremy! Any questions, fire away! I will do my best to help if I can!! |
|
DeafStuG
Full Member
Member since: May 2013
..
Posts: 1,283
|
Post by DeafStuG on Dec 29, 2014 20:29:29 GMT -5
TRM - Ok, I will do. "Fire Way!" LOL
|
|
|
|
Post by TRM on Feb 19, 2015 22:16:56 GMT -5
Well, I suppose the push is on with this one! The ole tram seemed to be languishing exit bench left for a bit! I took some time to lay down several coats of paint...some chipped, some layered but all on! I still have a few things to tidy up then some weathering...I can see that light, albeit faint, it is there!! 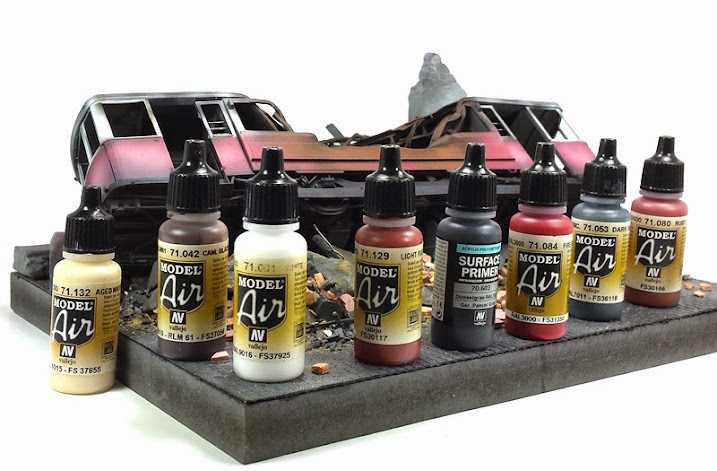  Mustering on with this, I should have more of this in order soon! Thanks for taking the time to swing by!! |
|
|
|
Post by JimD on Feb 19, 2015 22:54:41 GMT -5
Hey...what...wait...you actually working on things right now? Cool! See what happens when I leave you alone for MOST of the day Glad you brought this one back from the dead or I would have missed it...you guys and your skills with destruction always impress me. When I grow up I want to build models just like you! This is really cool...not keep the updates coming! |
|


 Step off with your bad self!!


 . The faces seems to me the best. For clothes, I will enforce a little the contrast between the lights and shadows, especially on the first figurine. And try to place every figurine, in a vertical position, under a source of light, to see where the lights are falling the most (this is so called painting with zenithal light, you can see here about it: