|
|
Post by Tobi on Jul 17, 2014 10:02:01 GMT -5
Got this lingering in my stash with lots of goodies: MIG wheels, RB gun and some brass...  Looking forward to starting this tomorrow! (This thread was moved from MHISC Forum) |
|
|
|
Post by Tobi on Jul 17, 2014 10:21:54 GMT -5
Cheers fellow members and welcome! I've dived deep into my stash and made a "few" additional orders at the internet hobby shop! Now, with the clear intention of watering your mouths, I'll show you what I was able to source for helping me along... The resin faction: 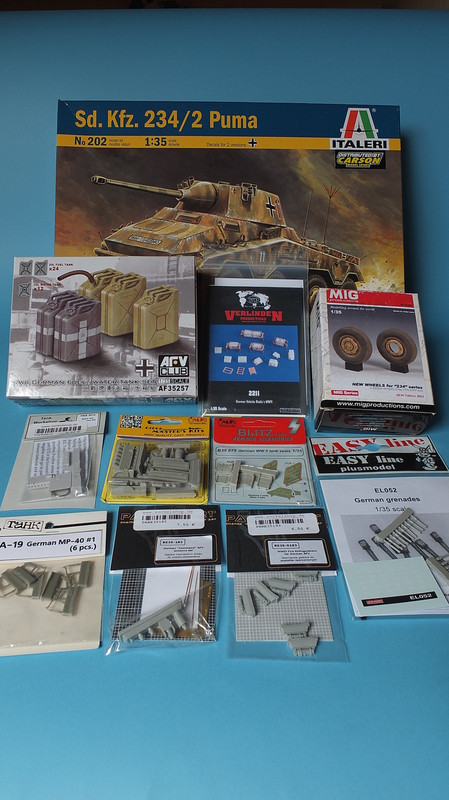 Brass mania: 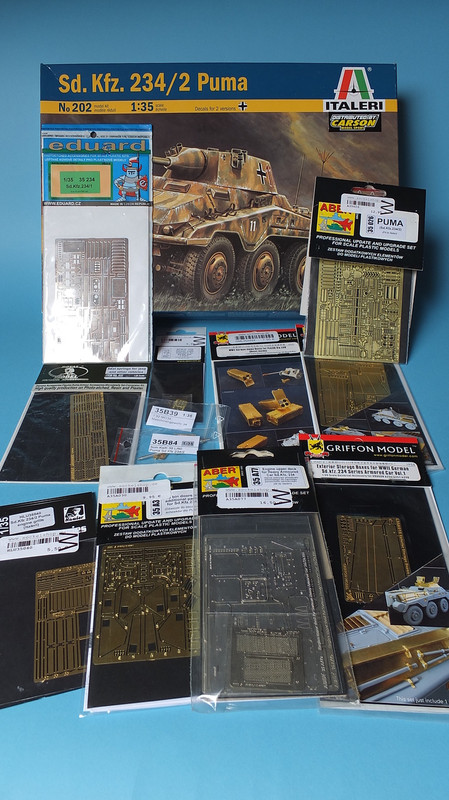 We'll see which parts will make it into the final model. I've spent considerable time with research, hence the build is only in its earliest stage, still! Regarding color scheme I had to learn that the vehicle from the Dragon boxart was one of the rarely cougars fitted out with the off-road wheels. So I might save that one for another model, as it won't allow me to use the MIG resin wheels. Instead there is "028", a Puma from the 1st SS Div. in Normandy, captured in film footage from the Wochenschau and possibly in a still picture from Falaise. The shape of the camo pattern on the front suggests just that. Coincidentally it was in my second choice finish, which is DY with large green blotches. The footage doesn't show a star antenna mounted, which is sad for me as I would like to include one in my build. Cougars operated in pairs, with only the lead vehicle having the full radio equipment including a FuG-12 in the hull. The other one only had a FuG f. (some sources say "a.") in the turret rear, with either a 1.4m or 2.0m antenna. I suppose the vehicles with the uneven turret numbers from that very recon company were the ones with the star antenna, but that is speculation. The Falaise picture furthermore is showing a clear license plate on the bow, which would be a shame to neglect... Comparing the Italeri with the Dragon kit I also found Dragon provides optional parts which is great, as this saves me from scratching a commander's persicope for example!  I've decided further to raid a Panzer III Ausf.L from Dragon for its gun breech. And this is where I am now. The first building stage from the Italeri instructions is complete. This took me three hours, because the suspension arms required considerable clean up time. One could be tempted to ignore the mold seams and try hiding everything under thick mud later, but for the mud to look in scale it's better to spend some time here and work thoroughly. Next step will be to add missing bolts and brake lines, then I will shoot some DY primer before mountig the leaf springs and steering levers. It will be easier this way to cover everything with paint I guess. 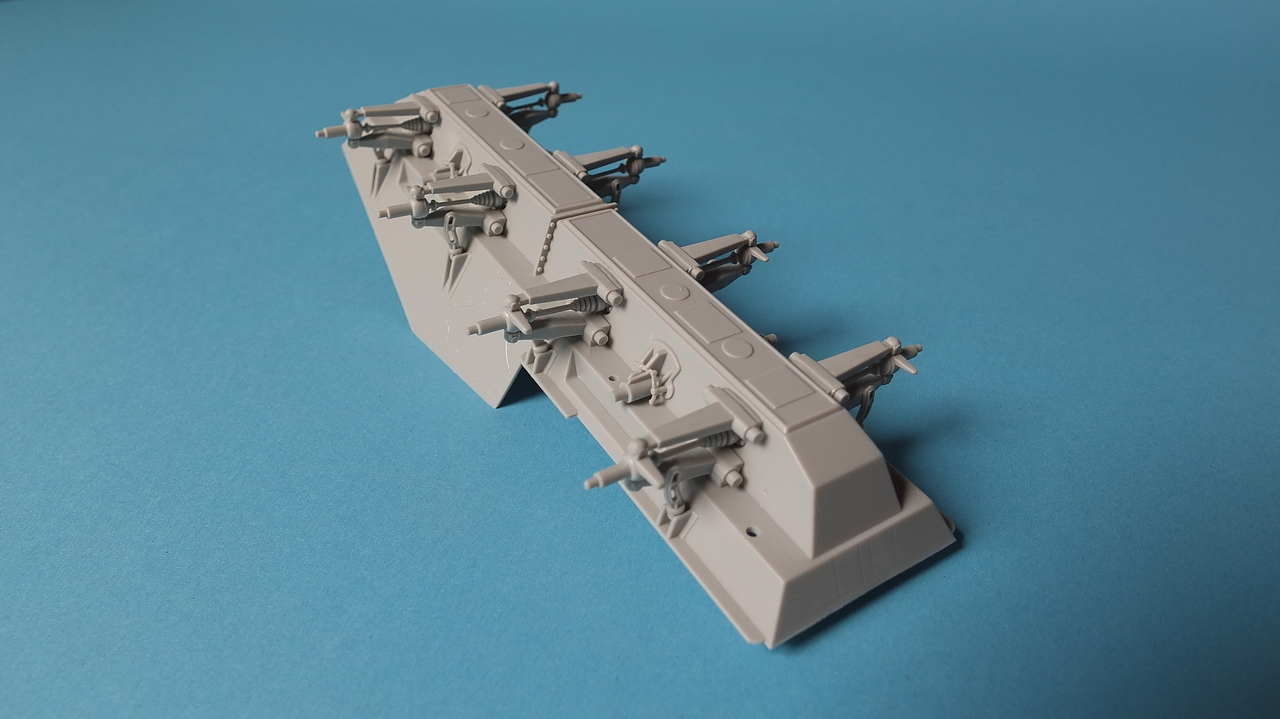 PS: I like the grey styrene! I was expecting the more familiar tan one on opening the box... |
|
|
|
Post by Tobi on Jul 17, 2014 10:24:49 GMT -5
Another 3 hours of work were spent super detailing the lower hull under step 1. On the banana shaped guide rods and along the horizontal flanges on the rear I added some bolt details made with my Punch&Die. 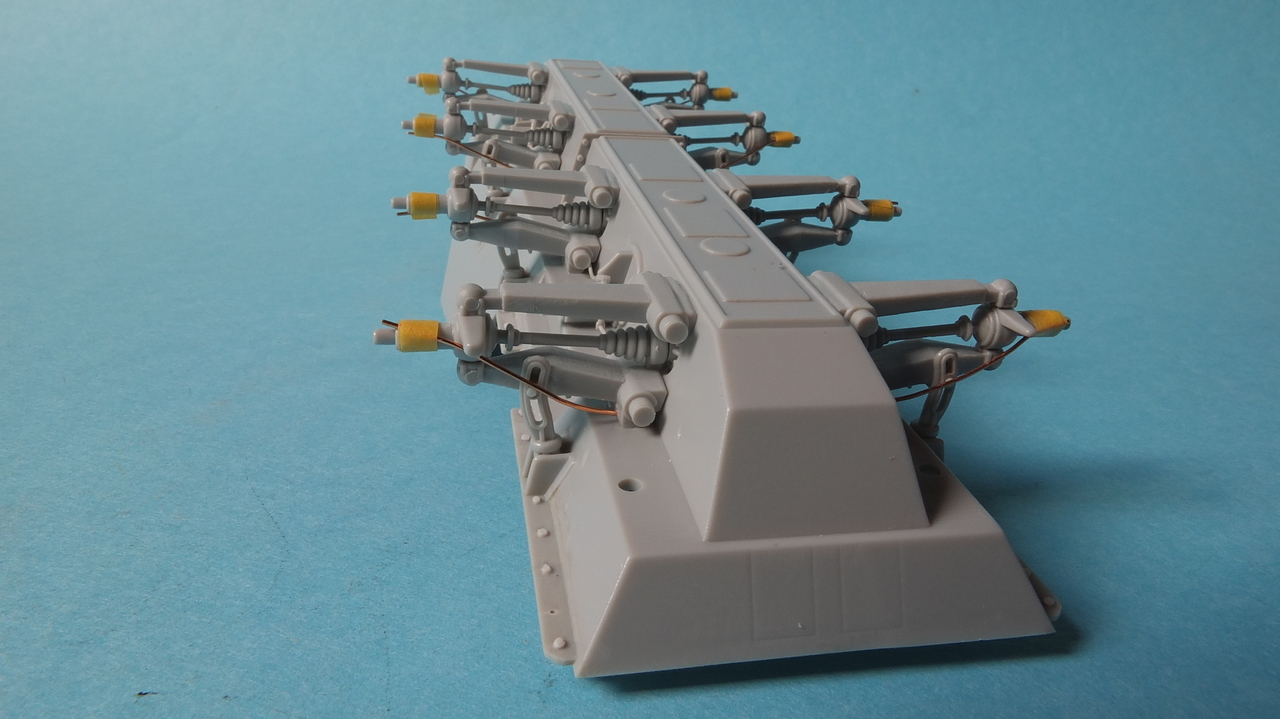 Brake lines on the suspension arms were made from 0.4mm copper wire for stability. The lines along the hull were made from stretched sprue. This is easier to glue to the actuators on the spring bearings. 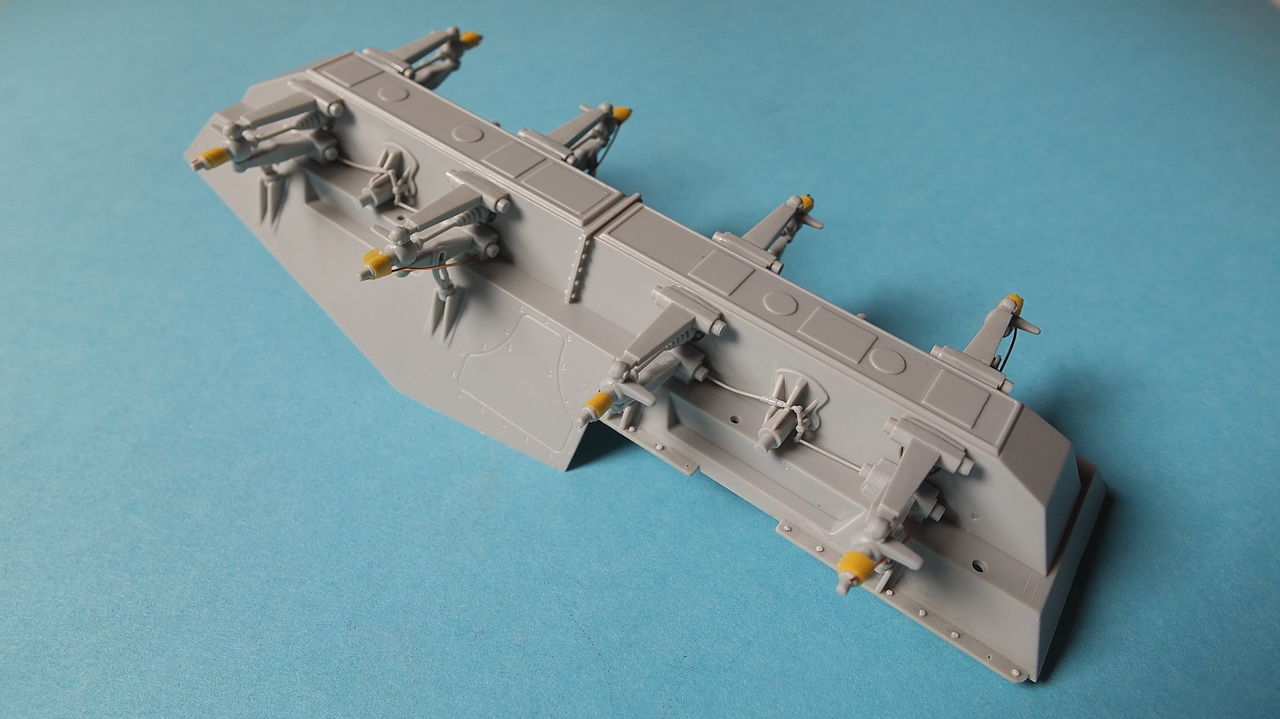 The other end of the copper wire will go into the drum brake housings, but these are part of the wheels, so I simply fixed them for the duration of the build to the hubs with some Tamiya tape. Total building time so far: 6 hours |
|
|
|
Post by Tobi on Jul 17, 2014 10:27:07 GMT -5
There have been some delays lately, but I've managed to spend a little more time on the build again. Installed part of the steering levers. The ones featuring the tie bar which protrudes from the chassis inside were too short by 1mm. I drilled out the hull and inserted Evergreen rods cut to size. 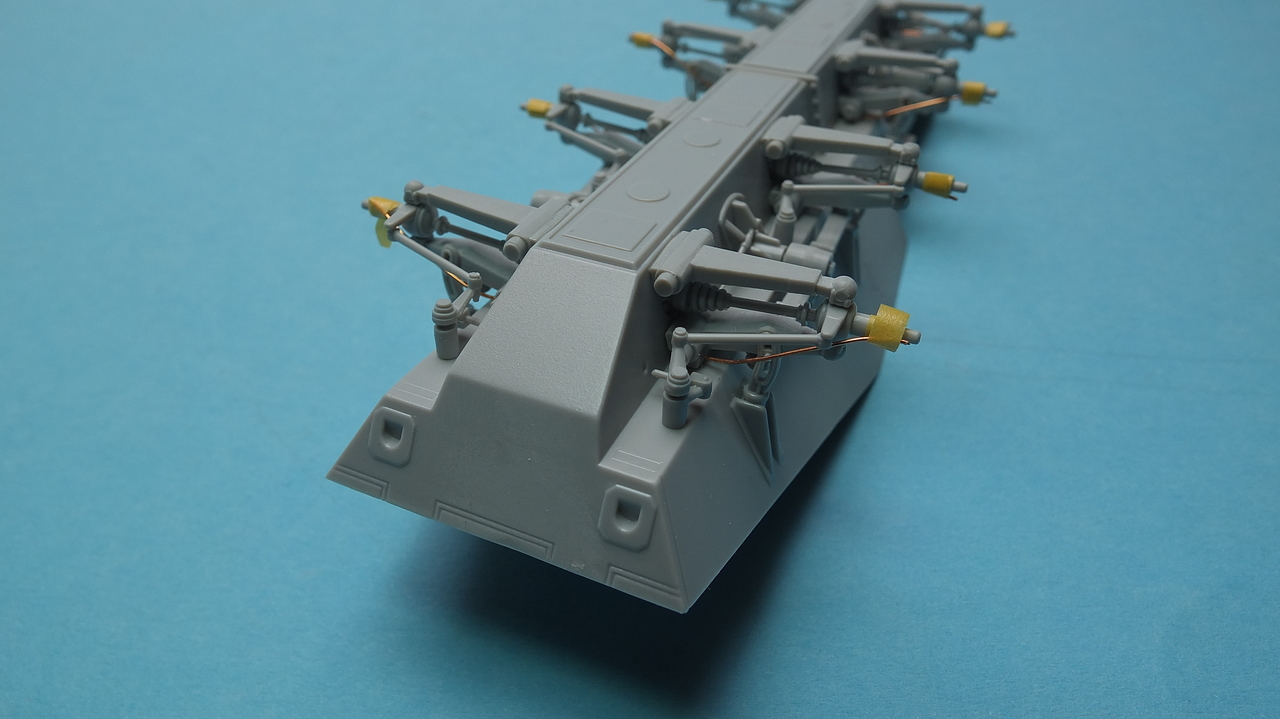 Next came priming. The color is Vallejo Surface Primer Dark Yellow with White from the same range, mixing ratio 1:3. You can imagine how dark the pure color actually is then. The engine bay and prop shaft tunnel received some Primer Red, also from Vallejo. Leaf springs and the rest of the steering levers were painted separately to avoid blind spots. Even then I found it really hard to reach every area of the suspension with the AB. After the missing parts had been also assembled, everything was finally misted over. 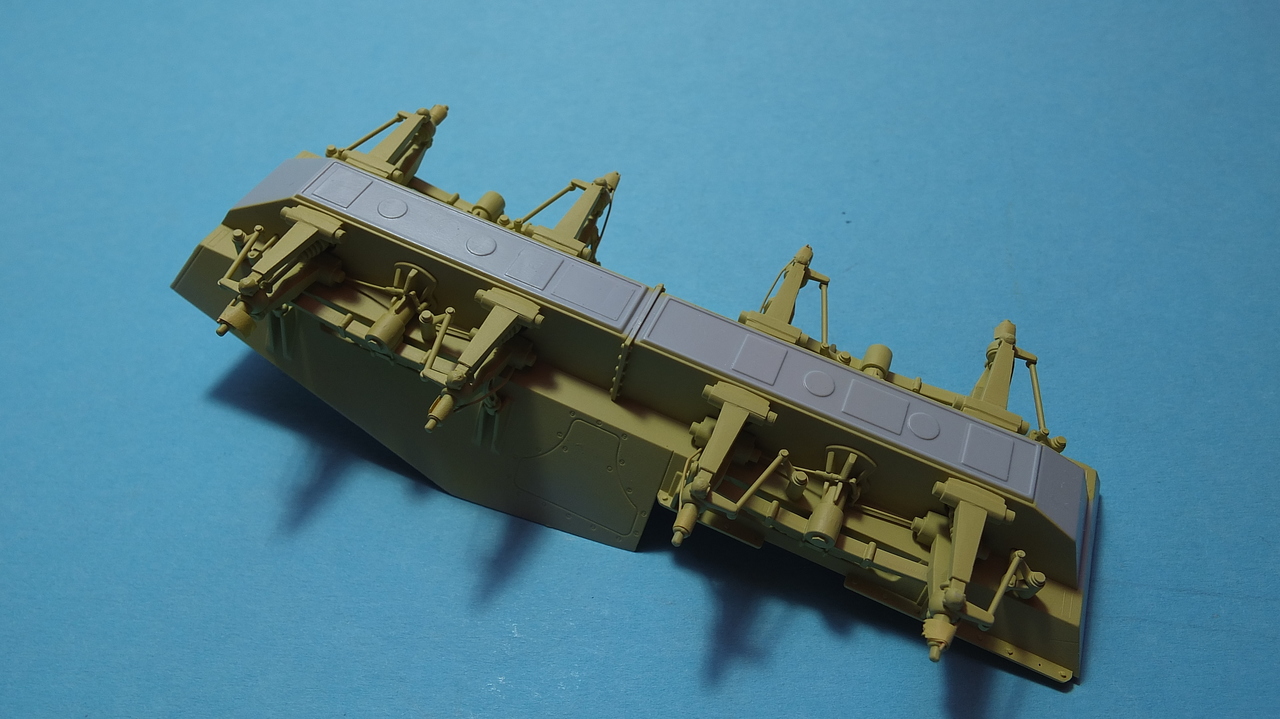  The prop shaft tunnel will need further detailing with final drive houses and cross members, but again I placed ease of painting above ease of construction. We'll see how it turns out. The wheels from MIG were primed in Vallejo black from the rattle can, then the rubber hand painted with LC anthracite. The rims were sprayed with the same yellow mixture as the chassis. Not necessarily very accurate, as they will be pretty much dusted and muddy-fied. 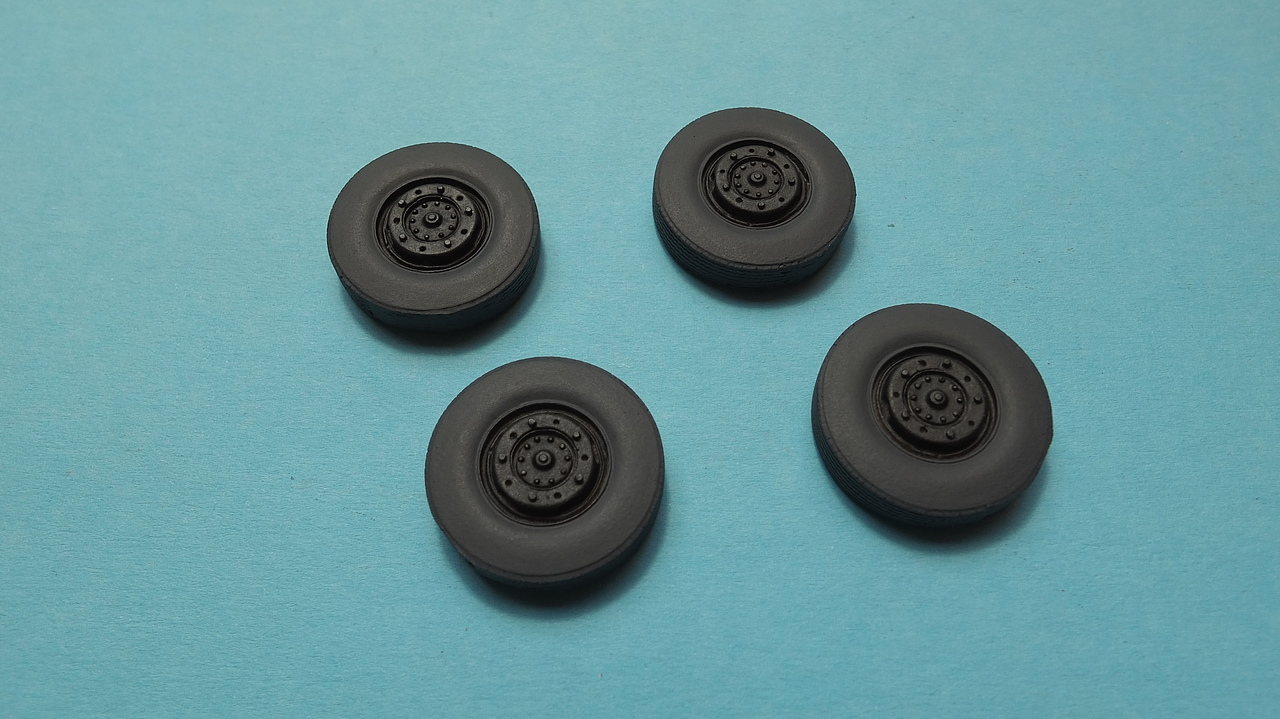  Time for instructions step 2: 6.5 hrs. Total so far: 12.5 hrs. Thanx for watching and commenting! |
|
|
|
Post by Tobi on Jul 17, 2014 10:28:29 GMT -5
Started to work on the engine from CMK. This is meant for the Dragon kit, but I see no reason why it shouldn't fit to the Italeri as well. It's a kit inside the kit, with 40 parts, plumbing not included. Clean up of parts was 1,5 hours. Priming was 1 hour. 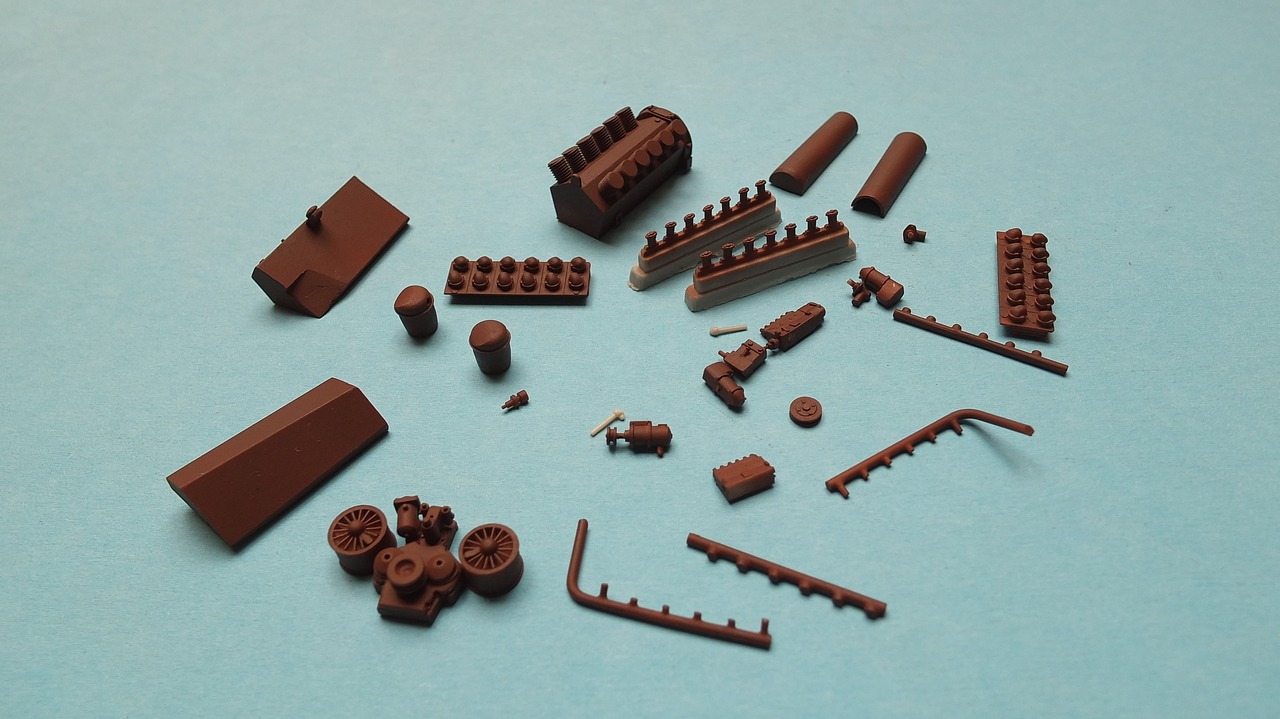 I need the engine now to decide what can be seen in the engine bay in the end, what is needed to be added from scratch. It won't be much, I suppose! That makes the total working hours 15 now. |
|
|
|
Post by Tobi on Jul 17, 2014 10:29:46 GMT -5
After AK Worn Effects and basepaint with Tamiya (total 2hrs.) it looks like this: 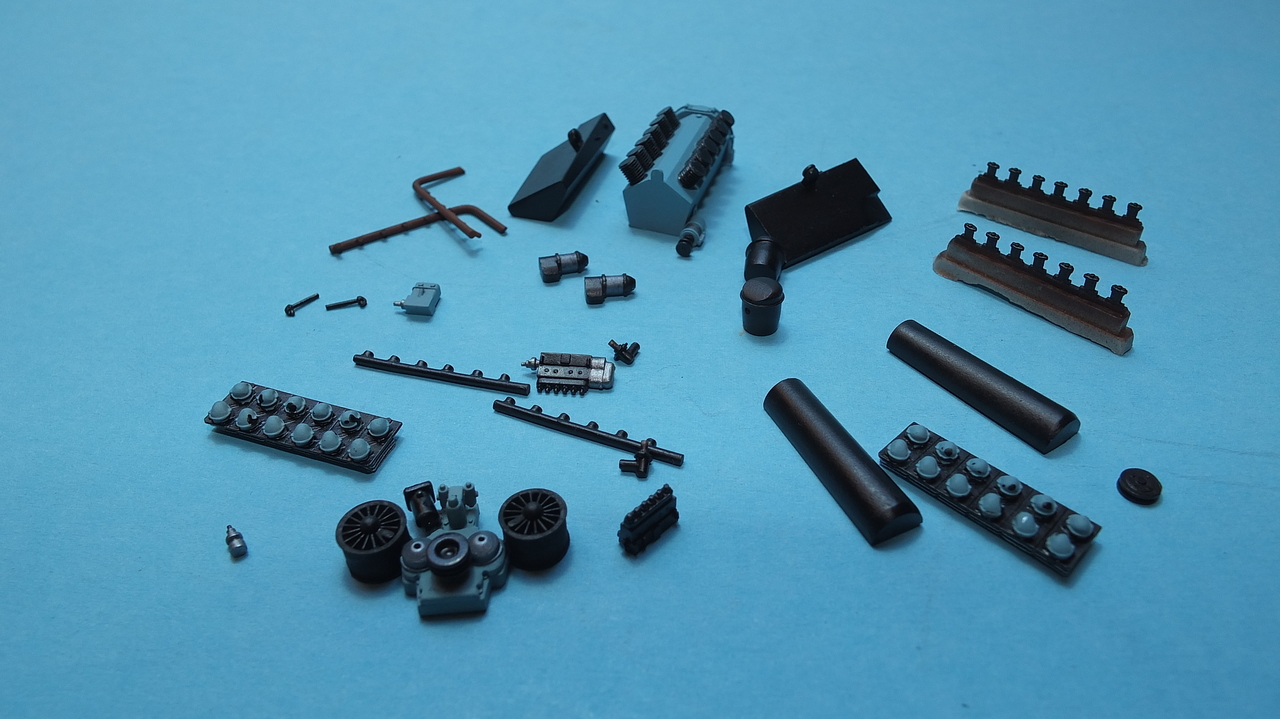 Time for assembly and a nice round of chipping  |
|
|
|
Post by Tobi on Jul 17, 2014 10:31:22 GMT -5
Another two hours and the engine is assembled. I still have to do the plumbing, wiring and the belt drive. Apart from some minor fit issues with the right hand cooling channel (the Tatra is an air-cooled affair) everything went together smooth. After the usual chipping with water and a stiff brush, I now have a nice base for weathering. 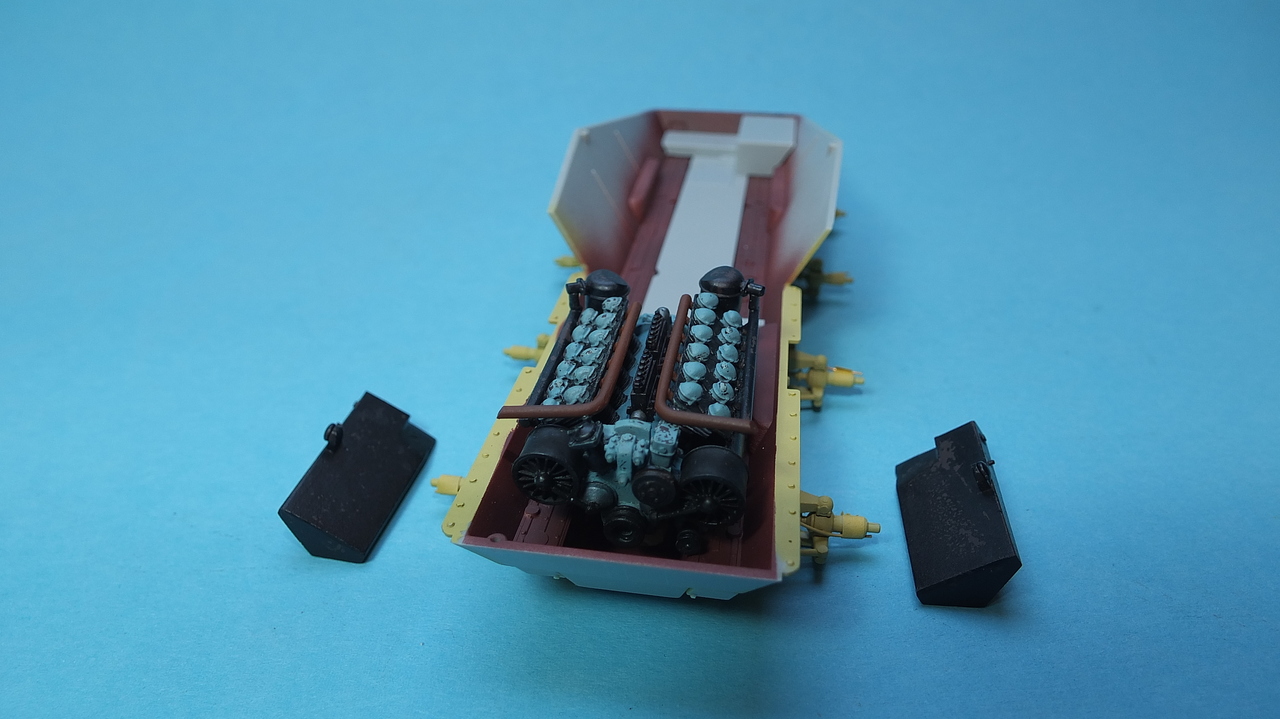 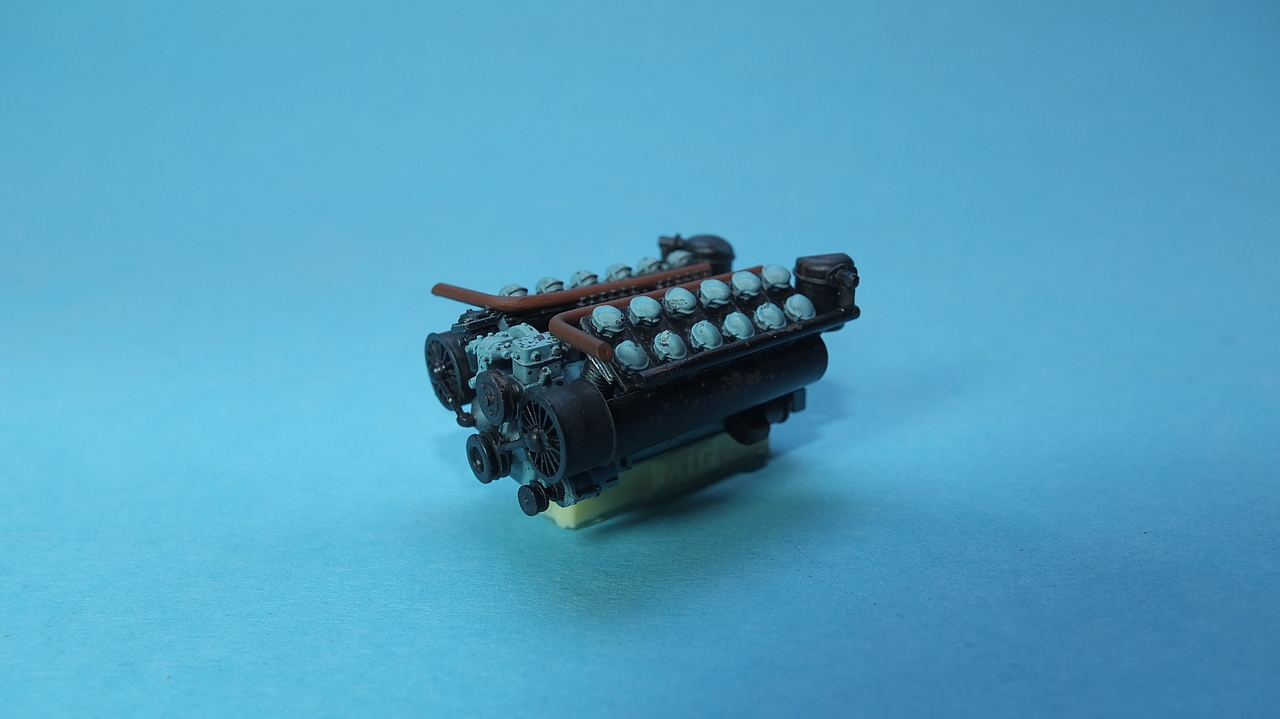 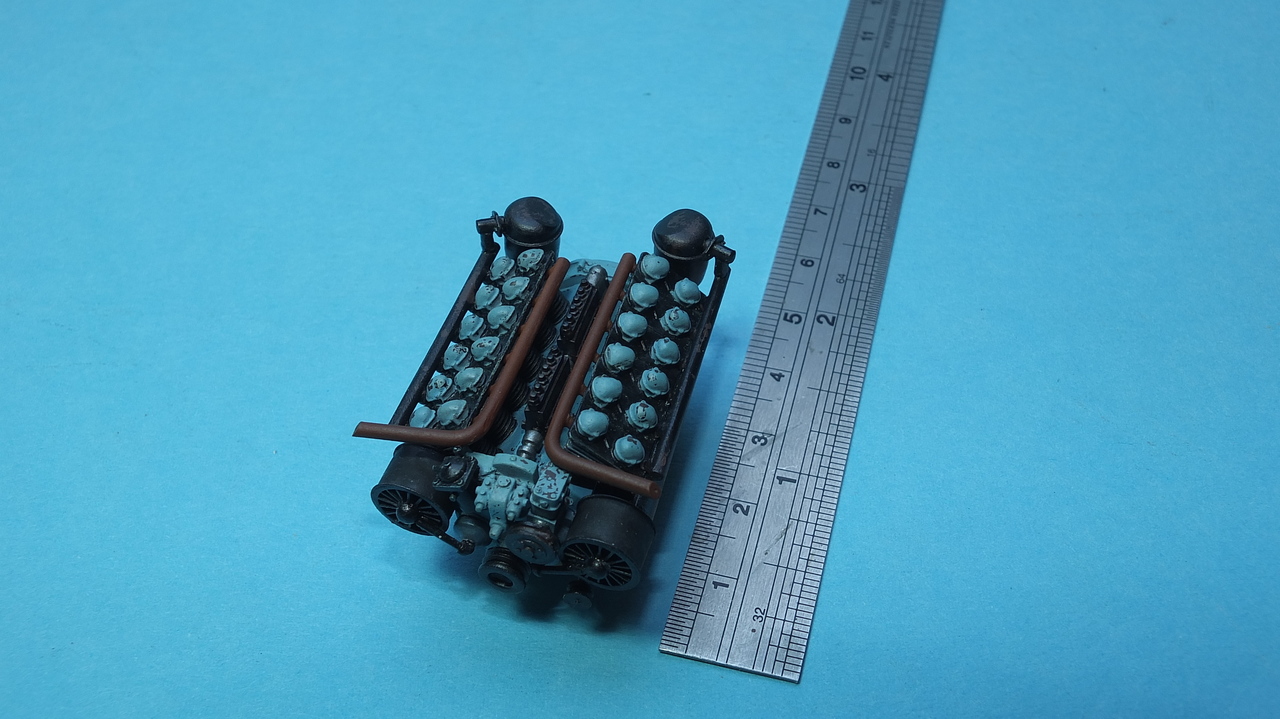 Maybe I will run into problems when I try to fit the tanks into the engine bay, hard to tell! As I've already suspected there's not much to be seen of the stuff beneath the engine. I suppose working on the steering levers will also be a waste of time. Perhaps I have to come up with something for the space between firewall and crank case. I'll see later. |
|
|
|
Post by Tobi on Jul 17, 2014 10:33:11 GMT -5
|
|
|
|
Post by Tobi on Jul 17, 2014 10:35:06 GMT -5
Not much progress, but progress anyhow! Got surgical on the upper hull in preparation of the Aber PE details. Removed the rear deck and also the front hatch. Took me three hours but I've been careful. Better safe than sorry... 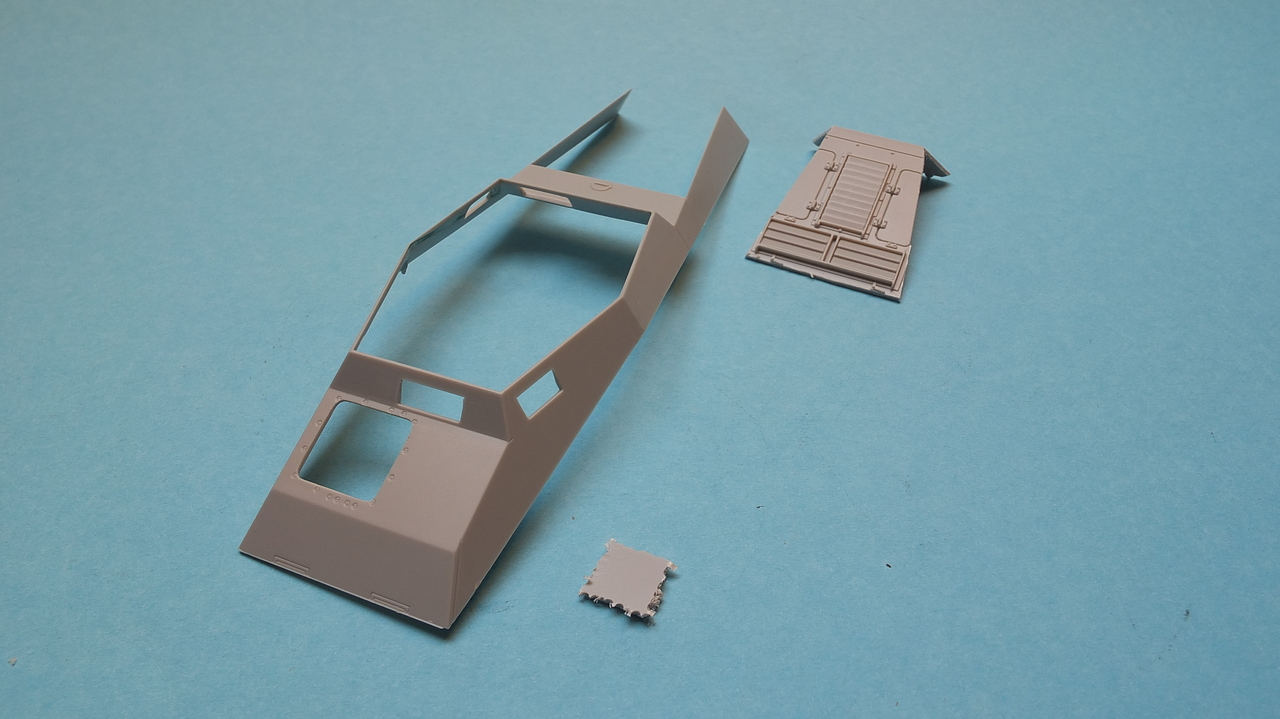 The instructions say you shall thin the side walls to 0.15mm and the front plate to 0.9mm. I did my best to make this happen. Will be interesting to see how everything fits later. I also puttied and sanded smooth some mold marks on the inside. 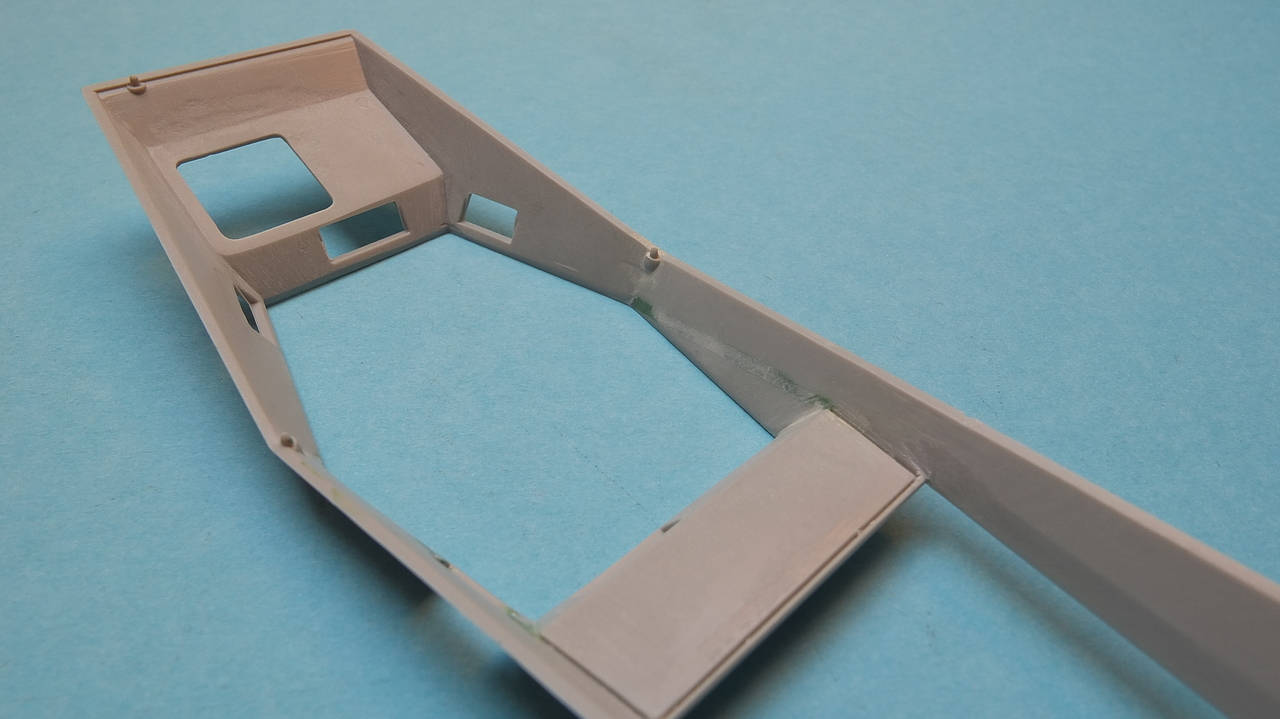 When I look at the fixation pins left and right I don't like these at all. I think I will simply remove them! Thanks for watching and commenting! Onward from here the build will be only continued on MSC. |
|
|
|
Post by wbill76 on Jul 17, 2014 11:13:58 GMT -5
Looking forward to more on this one Tobi, nice!
|
|
|
|
Post by tobias5555 on Jul 17, 2014 11:32:45 GMT -5
Cool extras for that Oldie. It was my first 1/35 scale kit.
I´ll follow.
|
|
|
|
Post by Deano on Jul 17, 2014 11:33:32 GMT -5
Woaha thats a lot of shtufff and an awesome build in progress!!!!
|
|
|
|
Post by deafpanzer on Jul 17, 2014 14:11:57 GMT -5
NOOOOOO! I am so weak for any 234 stuff! Looking great especially the engine like I mentioned earlier. Glad we can follow your builds here as I can not get enough... LOL
|
|
|
|
Post by Tojo72 on Jul 17, 2014 14:51:38 GMT -5
Lotsa goodies,this will be a very nice build to follow
|
|
pantherf
Full Member

Member since: July 2013
"Best Job I've Ever Had"
Posts: 1,253 
|
Post by pantherf on Jul 17, 2014 15:05:01 GMT -5
Holy cr... YIKES! I just now tuned into what was going on here!  This is an EPIC build or what? Parts, heck are there any other parts available for this or do you have them all?!!! So mind blowing to be honest and you have my total support for such an undertaking!  I must now go back to my bench and be so happy with my little parts count. And tiny little investment too.  Jeff
|
|
|
|
Post by Tobi on Jul 18, 2014 0:34:47 GMT -5
Bill - as soon as my holidays start I will be pushing really hard on this one! Tobias - It was not my very first 1/35 kit, but also one of the earliest I had. I was eight or nine. Deano, Jeff - Yes, it will be impossible to use everything, some stuff is double or even triple! Pimp my ride... Andy - Thx for this huuuge compliment my friend. I start to blush! |
|
|
|
Post by panzerjager2 on Feb 22, 2016 15:57:07 GMT -5
Nice work so far... I really like the engine
|
|


 This is an EPIC build or what? Parts, heck are there any other parts available for this or do you have them all?!!! So mind blowing to be honest and you have my total support for such an undertaking!


