82s1
Full Member

Member since: July 2014
Posts: 101
Jul 21, 2014 19:11:49 GMT -5
Jul 21, 2014 19:11:49 GMT -5
|
Post by 82s1 on Jul 22, 2014 18:59:52 GMT -5
I started this diorama several months ago. The inspiration comes from a beer bar and barbeque that existed in Louisiana in the 1940s. I am not making any attempt to duplicate the original building. I am, however, trying to capture the spirit of the place.
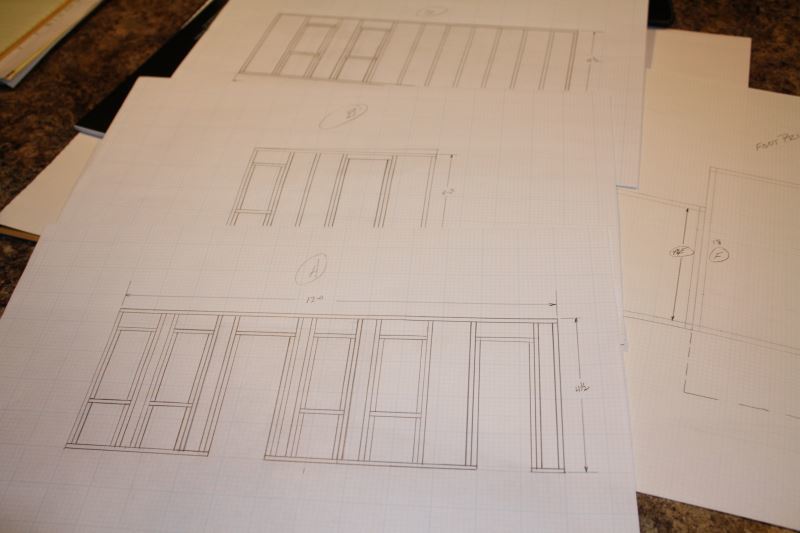
I build in 1/24 scale and attempt to do as much scratch building as possible. I start off with very rough sketches of the diorama. I'm not going to subject you to those as I am not an artist and my sketches mean little to anyone but myself. After completing the sketches I then draw up line drawings to scale.
I mill my own lumber from mill ends of bass wood that I purchase from a local exotic wood dealer.

I have found this to be much less expensive, but more time consuming. Considering the size of this diorama though, the money saved is significant.
When I began the project I intended for the interior walls to be open. For that reason I did a full frame job on the structure.

I also completed trusses for the roof of the diorama.

I'm out of time for this evening. I'll attempt to get more posted in the next day or so. |
|
|
|
Post by TRM on Jul 22, 2014 19:18:55 GMT -5
Fantastic project!! Looks like you are well underway!! Count me in!!
|
|
|
|
Post by Leon on Jul 22, 2014 19:33:37 GMT -5
WOW that is some awesome work  .Count me in to.  |
|
|
|
Post by deafpanzer on Jul 22, 2014 20:08:11 GMT -5
WOW! This is going to be one great build to follow... framing just like the real thing!!
|
|
|
|
Post by bullardino on Jul 23, 2014 3:19:49 GMT -5
Cool
|
|
82s1
Full Member
Member since: July 2014
Posts: 101
Jul 21, 2014 19:11:49 GMT -5
Jul 21, 2014 19:11:49 GMT -5
|
Post by 82s1 on Jul 23, 2014 9:37:37 GMT -5
A few days later a friend suggested that I actually finish the interior of the bar. I gave it some thought and decided to do just that and to make the main portion of the roof removable so that the interior can be viewed. First though, I prepared the outside walls and aged the wood. Because I am trying to catch this up to the present time I am not going to go into detail of how the aging was done. If anybody is interested in the actual steps let me know and I will go back into detail. 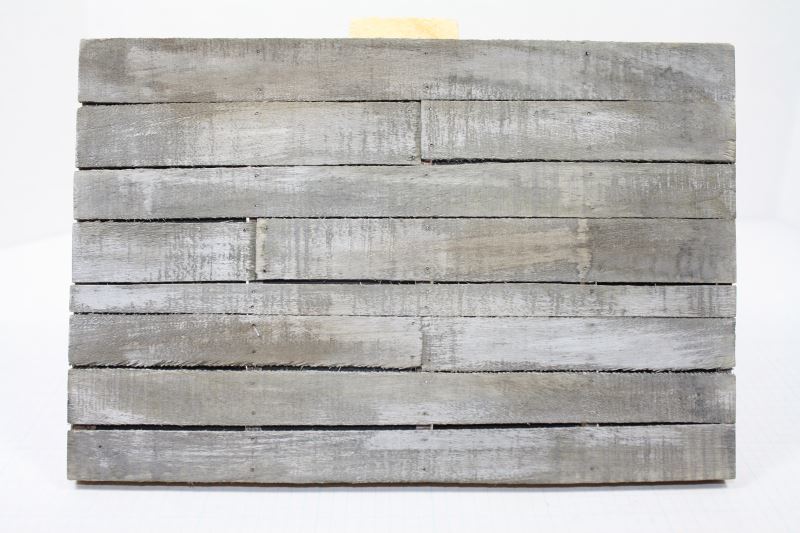 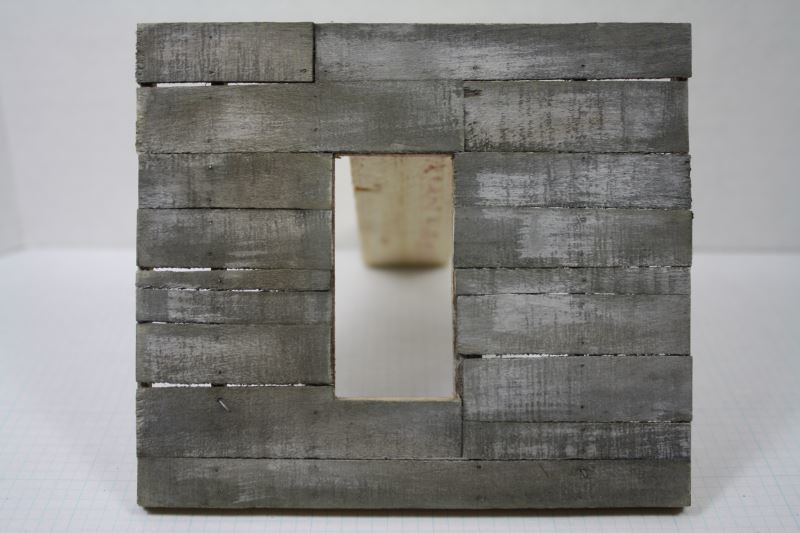 |
|
82s1
Full Member
Member since: July 2014
Posts: 101
Jul 21, 2014 19:11:49 GMT -5
Jul 21, 2014 19:11:49 GMT -5
|
Post by 82s1 on Jul 23, 2014 9:49:03 GMT -5
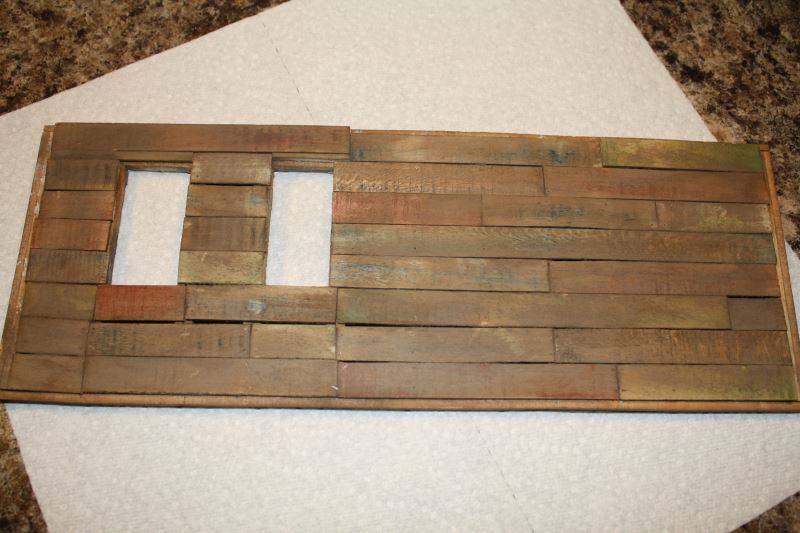
Sorry about that. I accidentally posted the last post. Got to get used to a new forum. Anyway, I prepared the outside siding, installed it, gathered signs from the internet, applied them and set the building up to check for square.

After checking on the outside, I disassembled the building and installed the wooden siding to the inside of the bar. The siding is stained several different colors to replicate the use of used wood in building the bar.
That's it for today. She who must be obeyed has much on her agenda so I will try to add to the thread again tomorrow. As always, I welcome comments, questions, suggestions, criticism and friendly ridicule. |
|
|
|
Post by bullardino on Jul 23, 2014 10:26:13 GMT -5
A SBS would be fine Very nice job, really. |
|
82s1
Full Member
Member since: July 2014
Posts: 101
Jul 21, 2014 19:11:49 GMT -5
Jul 21, 2014 19:11:49 GMT -5
|
Post by 82s1 on Jul 23, 2014 12:36:46 GMT -5
Afraid I don't understand SBS.
|
|
|
|
Post by wbill76 on Jul 23, 2014 14:53:06 GMT -5
Afraid I don't understand SBS. SBS=Step by Step.  Love how this one's coming together. Can almost hear the mosquitoes (they're everywhere in Louisiana!). |
|
|
|
Post by deafpanzer on Jul 23, 2014 21:27:11 GMT -5
WOW! Keep up with the great work... loving it already.
|
|
82s1
Full Member
Member since: July 2014
Posts: 101
Jul 21, 2014 19:11:49 GMT -5
Jul 21, 2014 19:11:49 GMT -5
|
Post by 82s1 on Jul 23, 2014 22:24:38 GMT -5
Okay, now that I know what SBS means  , I'll give it a try. , I'll give it a try.
I think the steps concerning the framing are pretty self-explanatory so I won't go back into them. I'll start with how the outside walls are done.

The sheeting on the walls is cut to approximately scale 1X6. I then dip each board into a homemade gray stain. The stain is a combination of 97% alcohol and black water soluble India Ink. I can't give you the proportions as I just take a pint of alcohol and add the India Ink until I have the shade I'm looking for. I lay the wood on paper towels and allow it to dry for roughly 24 hours. Be sure to lay the wood out individually, not in a stack. If you stack it when it dries you will have a stack of wood that might as well have been glued together. Ask me how I know!!
When the gray stain has dried I then dip the wood into a homemade brown stain made in the same manner as the gray. Again lay the wood out and allow it to dry for 24 hours. When it is dry you should have a batch of wood that appears to have weathered for a number of years. If you are not happy with the color of the wood, then dip it again. The dipping can be repeated any number of times until you are happy with the effect.
After I have the weathering effect I am looking for I apply the boards to the wall framing board by board. This is where things can get somewhat tedious.
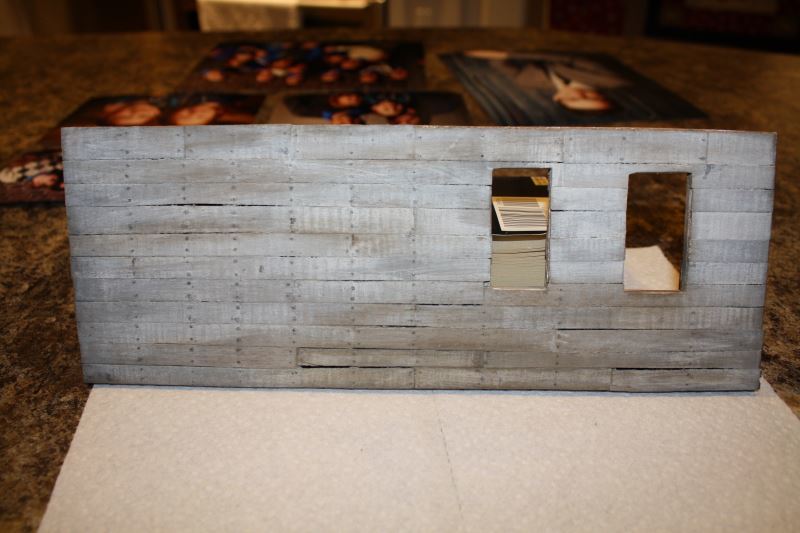
To create the appearance of the boards having been nailed, I pre-drill nail holes in each board at the appropriate spacing. I then use #26 unplated bead wire to create the appearance of nails. The wire is glued into the predrilled hole and anchored with CA. It is then cut off with flush cutters and tapped with a small hammer. The tapping give the individual "nails" a slight head. Some "nails" are left a bit long and then bent over for effect.
I then use Bragdon Powders to further age the wood until I am satisfied. After all this is done, I then will apply a stain using dirty alcohol thinner that I save when cleaning paint brushes. The thinner smooths and blends the powders and the earlier stains. When all is said and done the wall should look similar to this.

That's it for now. I hope this helps and is what you wanted with "SBS". Tomorrow I will discuss the door, windows, screens and the signs on the building.
BTW, I forgot to mention that before the Bragdon powders are applied I paint the wall with a thinned coat of slightly off white craft paint -- the cheap kind you get in a craft store. When the pain is dry I used 3-M sanding pads to remove much of the paint giving the appearance of an old worn paint job. |
|
|
|
Post by bullardino on Jul 24, 2014 2:35:27 GMT -5
Thanks a lot |
|
82s1
Full Member
Member since: July 2014
Posts: 101
Jul 21, 2014 19:11:49 GMT -5
Jul 21, 2014 19:11:49 GMT -5
|
Post by 82s1 on Jul 24, 2014 11:48:57 GMT -5
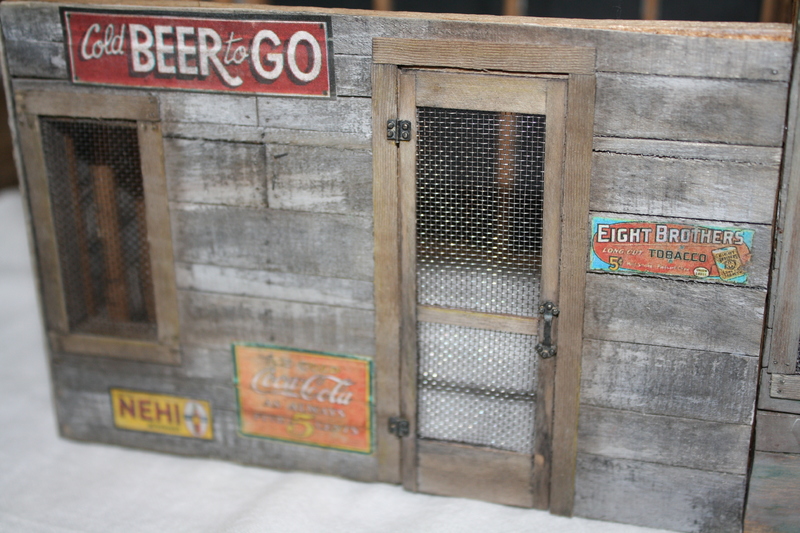
After the walls were aged to the point I wanted I added the windows and screens. 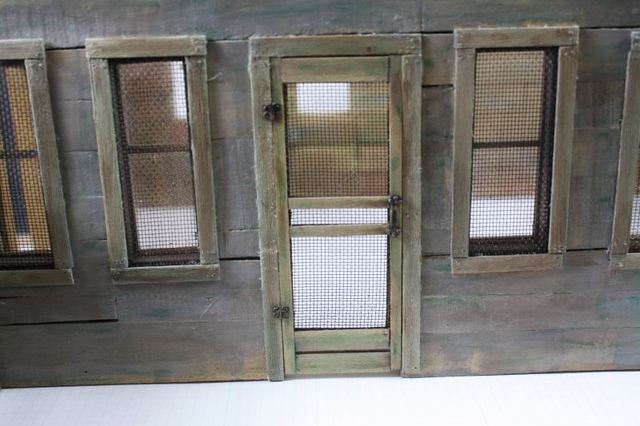 I wasn't planning on a how-to so did not take construction photos. The windows are nonfunctional and I use plastic sheet protectors for the glass. I have found that the "glass" can be glued in using CA without fogging as styrene will. The screens are made from screen material out of a skillet frying guard that I got at the Dollar Store. The mesh is a bit out of true scale, but I thought with the size of mosquitos in Louisiana it was close enough. The screen doors are made the same way and the hardware is from Ozark Miniatures here in Utah. After completing the windows and doors I moved on to the signage. 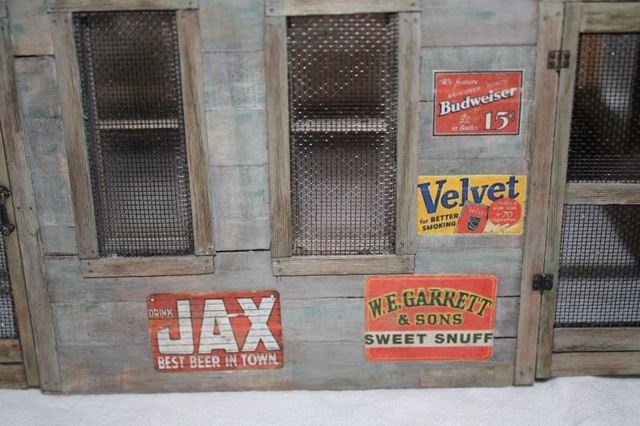 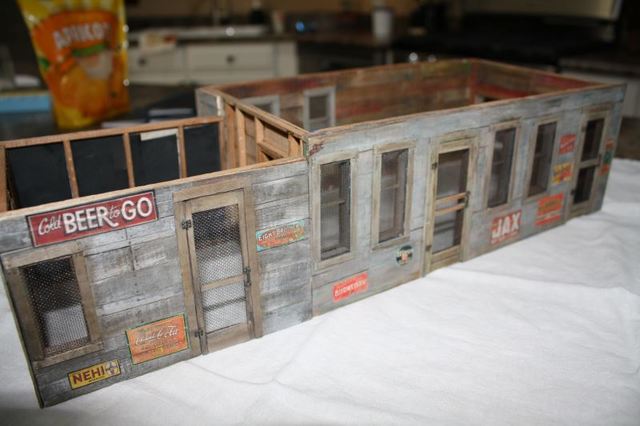 I search the internet for appropriate signs and photos. I then resized the selected signs using Photoshop Elements. After resizing the signs are printed on regular copy paper. I then use a fine grit sandpaper to remove paper from the back of the sign until what remains is just the first couple of layers containing the ink. This requires a really light touch because as the paper gets thinner and thinner it has a real tendency to tear. After the signs are thin enough I use a 50/50 mixture of white glue and water on the back to adhere the sign to the wall. Many times it is at this point that I end up making another sign. Several of the signs on this building are second and third generation because the first ones tore beyond use. When done properly though signs like this give the impression of being painted on. I can't take credit for this technique. I found it in a magazine several years ago. I believe it was originally done by Chuck Doan. Okay, that's it for today. I'll try to get back on this tomorrow and we'll take a look at the barbeque smoker. Hope you guys are enjoying this. |
|
|
|
Post by Leon on Jul 25, 2014 16:40:20 GMT -5
Great work on the siding and windows and doors.Thanks for the how to on the sign making. |
|
|
|
Post by 406 Silverado on Jul 25, 2014 17:40:11 GMT -5
Man this is awesome. Looks more like 1/1 scale to me. LOVE the weathered wood both inside and out as well as the signs.
|
|
82s1
Full Member
Member since: July 2014
Posts: 101
Jul 21, 2014 19:11:49 GMT -5
Jul 21, 2014 19:11:49 GMT -5
|
Post by 82s1 on Jul 25, 2014 21:21:49 GMT -5
Tonight we'll take a look at the smoker/barbeque in Frenchie's. It is made out of unstained mosaic tiles. 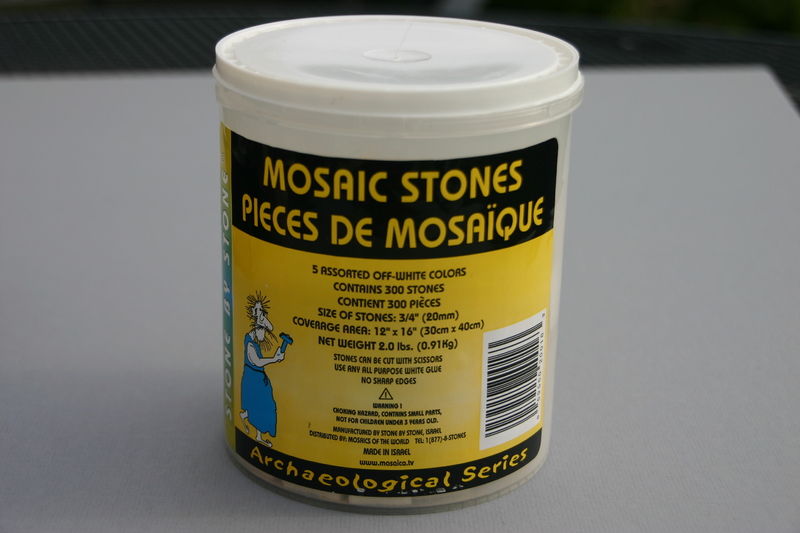 They are available at Michael's. I have used them in the past for stacked stone walls and found that they accept stain well and will replicate a very believable wall. 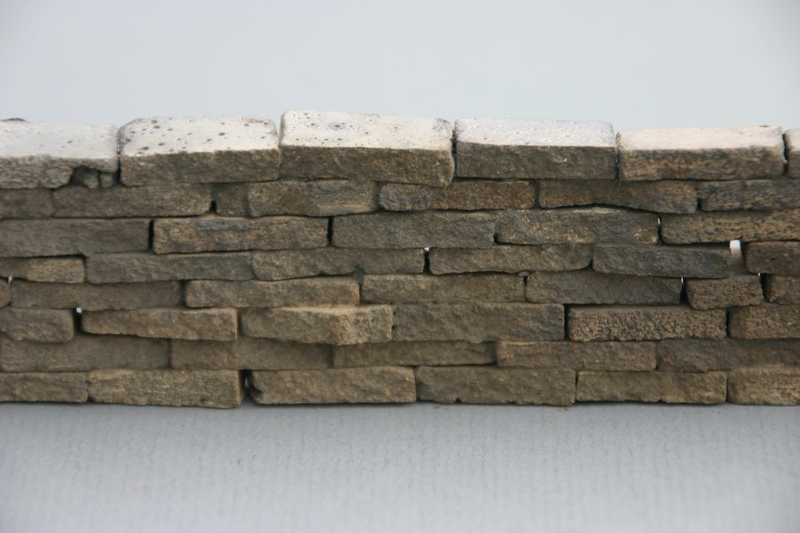 To begin with, the container states the tiles are 3/4" square, but I have found that they actually vary in size and thickness. Actually this works out for the best when using them for a wall or something like the barbeque. I first score each tile down the middle and break it in half to make them a more acceptable size. 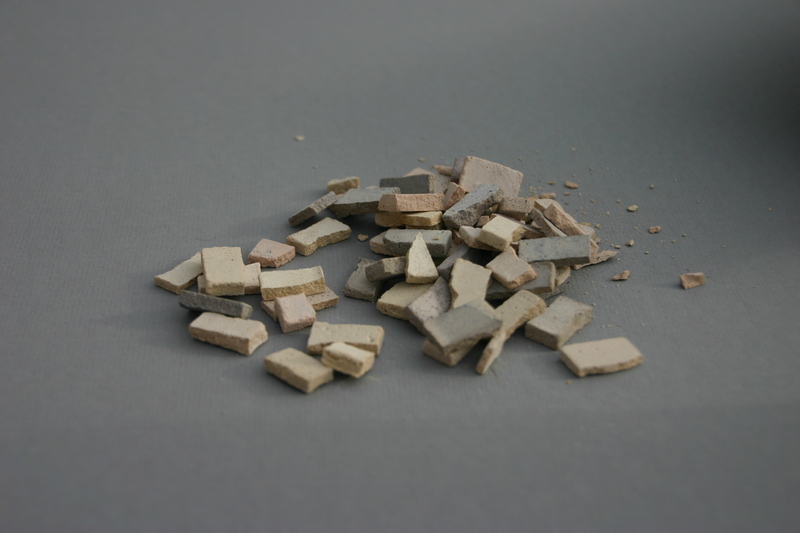 After sizing the tiles they are dipped into the homemade gray and homemade brown stains I have already described. It usually takes two or three times to get the color I want in the tiles. I then set them aside to dry for a couple of days. After the tiles are thoroughly dry I begin stacking them to form the structure I am building. Unfortunately I didn't intend to do a "SBS" on this so there are no construction photos. Here is the finished smoker/barbeque.  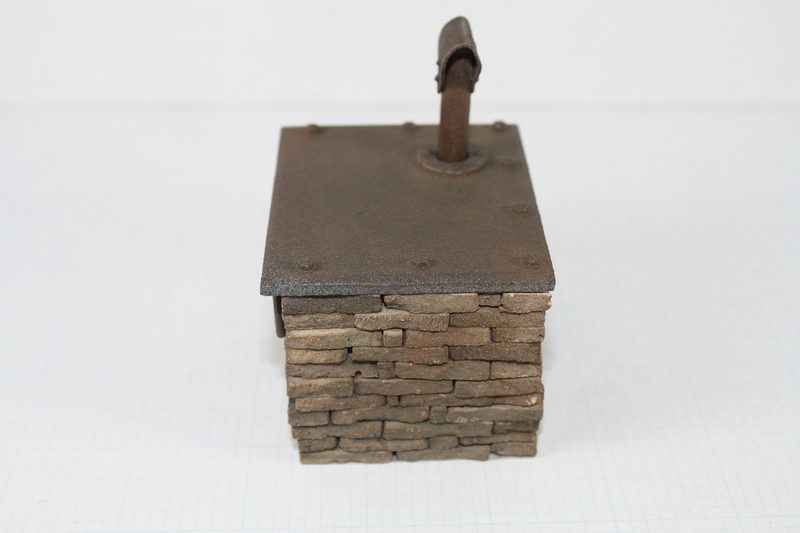 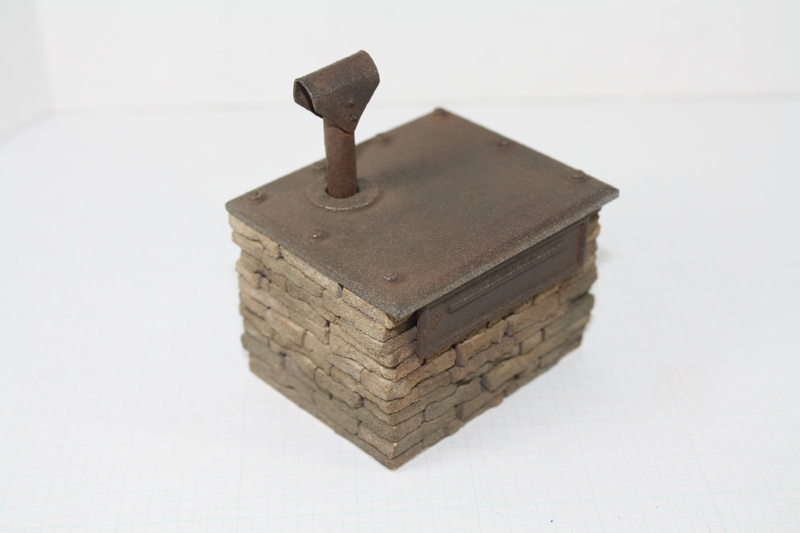 As you can see, the tiles have taken on a pretty believable color. The "metal" portions are actually styrene that has been aged to give the appearance of rusted metal. I follow these steps. 1. Spray with a coat of gray primer and allow to dry. 2. Spray with a coat of Oily Steel (a Model RR color) and allow to dry. 3. Spray with a coat of rust colored acrylic paint and allow to dry. 3. Lightly sand the rust color to the point where the steel color shows is a few places. BE CAREFUL NOT TO OVER DO THIS. You just want a very few places where you can see the steel and then you want it very subtle. 4. Spray a mist coat of Rustoleum textured black paint. I spray it directly from the rattle can. Again, don't over do this. If you are satisfied then quit here. Personally though I go on to use various Bragdon powders to finish off the aging process. There really is no set stopping point, you just want to be happy with the appearance. If you are happy then that is what matters. That's it for tonight. Let me know if you want me to continue this or if I have worn out my welcome. If you want me to continue then next is the rusted corregated roofing. Have a good one. |
|
|
|
Post by bullardino on Jul 26, 2014 3:17:16 GMT -5
I really like the outcome, I'll look if I can find those stones here.
What do you use to glue them together?
|
|
|
|
Post by Leon on Jul 26, 2014 5:36:54 GMT -5
John that is looking excellent .I want to see more so please continue sir. |
|
82s1
Full Member
Member since: July 2014
Posts: 101
Jul 21, 2014 19:11:49 GMT -5
Jul 21, 2014 19:11:49 GMT -5
|
Post by 82s1 on Jul 26, 2014 8:40:35 GMT -5
I really like the outcome, I'll look if I can find those stones here. What do you use to glue them together? They are glued with CA. I use a thick CA that sets in 10-25 seconds.
If you run a Google search for Stone by Stone Mosaic Tiles you will find a number of suppliers. The only problem I saw was all of the tiles were colored, but maybe they have the plain and they aren't listed. Good luck.
|
|
|
|
Post by TRM on Jul 26, 2014 8:55:24 GMT -5
Truly some great stuff there John! The stones are great and thanks for the SBS on the wood...always a helpful thing when building no matter the scale! One small question..but first, your make up of the signs is brilliant by the way. I will have to give that one a shot for sure!! The question...are you looking for these signs to look painted on the wood? I only ask as I see they go right over the joints on the boards. Where you panning on maybe slicing the joints out after? Sorry, just something that popped into my head while trolling through you build!! Either way...keep it going, this is fantastic!
|
|
82s1
Full Member
Member since: July 2014
Posts: 101
Jul 21, 2014 19:11:49 GMT -5
Jul 21, 2014 19:11:49 GMT -5
|
Post by 82s1 on Jul 26, 2014 9:27:44 GMT -5
I kind of misstated about the signs; should have been clearer. What I meant is that if you want to make the signs look painted you can. Take a look at the signs on the Texaco station and you will see that on several of them I did just what you suggested; cut the signs at the joints in the siding. The large TEXACO on the end of the building, though, is an example of a sign that was not thin enough. It has a definite outline. I should have done it over or framed it, but to be honest I was really tired of signs at that point.
In the case of Frenchie's I really don't want the signs to have the appearance of being painted on. Rather, they are the type of sign that was printed on paper and then glued to the wall; not meant to be permanent.
Also, the Thompson's Garage sign on the front of the Texaco station was so large I just could not thin it out enough and still keep it together while gluing it to the wall. After three tries I took the fourth sign and glued it to a separate board and then framed it. Then I hung the framed sign.
I have a couple of other signs that will be on Frenchie's. They are done with a different technique. Rather than discuss the roof today I'll do the signs. Check back on Frenchie's later. John |
|
82s1
Full Member
Member since: July 2014
Posts: 101
Jul 21, 2014 19:11:49 GMT -5
Jul 21, 2014 19:11:49 GMT -5
|
Post by 82s1 on Jul 26, 2014 9:39:59 GMT -5
Okay, here are the signs I was talking about. Got to this sooner than I thought I would.

Both are made the same way.
1. Size and prep the board you are going to use.
2. Spray the board black and allow it to dry thoroughly.
3. Apply adhesive vinyl letters with the sign message.
4. Spray the board white and allow it to dry thoroughly.
5. Remove the vinyl letters. You will have black letters painted on a white sign.
6. Age to the degree you want for your model.
Tomorrow we'll take a look at how to construct the rusted out roof. |
|
|
|
Post by TRM on Jul 26, 2014 9:42:17 GMT -5
Nicely done on the painted signs John! Great tip on making them too...thanks!
|
|
John Everett
Full Member
Member since: January 2012
July, 2016 MoM Winner
Posts: 1,278
Jan 17, 2012 0:53:48 GMT -5
Jan 17, 2012 0:53:48 GMT -5
|
Post by John Everett on Jul 26, 2014 10:42:39 GMT -5
There's nothing like real wood for building models. Done right, it beats plastic any day.
Are you sure you're not trying to duplicate any particular building? Because I'm pretty sure a once ate a bucket of crayfish and spicy sausage in that place.
I'll also have to have a look for these loose stones. I could see them being very handy for a lot of things.
|
|
82s1
Full Member
Member since: July 2014
Posts: 101
Jul 21, 2014 19:11:49 GMT -5
Jul 21, 2014 19:11:49 GMT -5
|
Post by 82s1 on Jul 26, 2014 11:34:03 GMT -5
John: If you feel like you have ate there, then my efforts have been successful. Thanks.
John
|
|
82s1
Full Member
Member since: July 2014
Posts: 101
Jul 21, 2014 19:11:49 GMT -5
Jul 21, 2014 19:11:49 GMT -5
|
Post by 82s1 on Jul 27, 2014 7:17:56 GMT -5
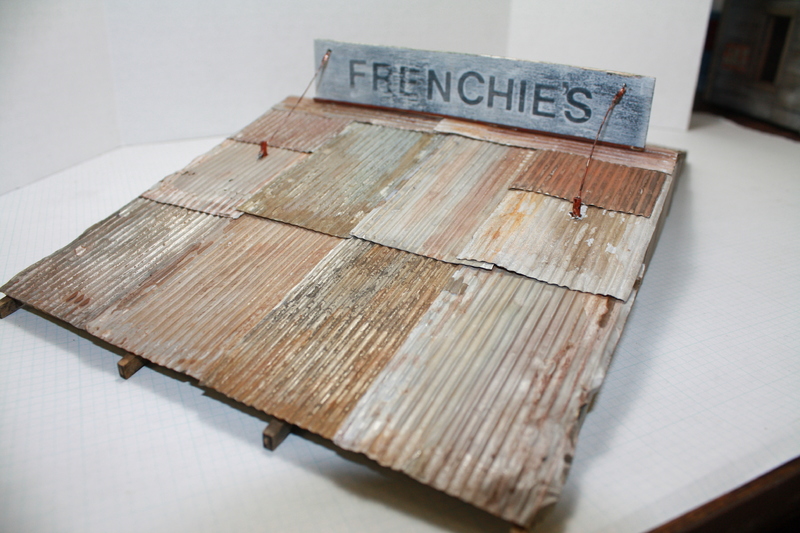
Okay, here we go on the roof. Here's a shot of the finished metal roof.
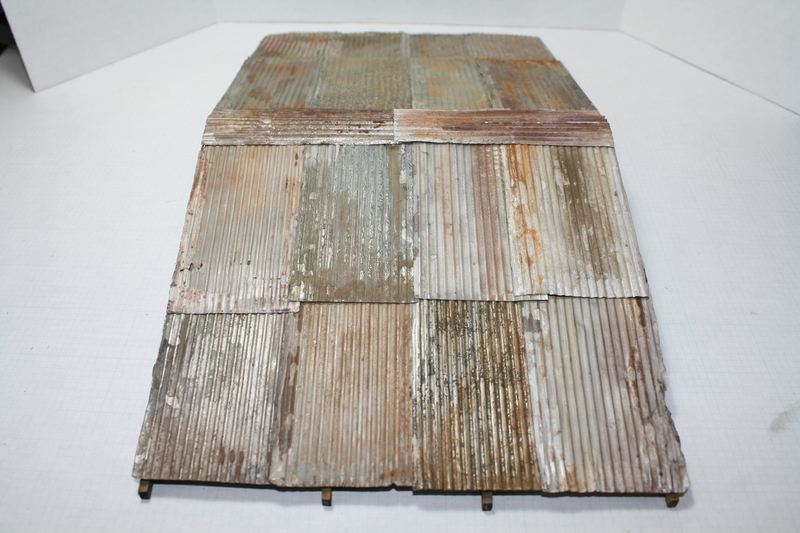
Here is what you need to get started. (I apologize for the next several photos. I had my white balance set wrong and didn't notice. Too lazy to go back and reshoot the photos.)
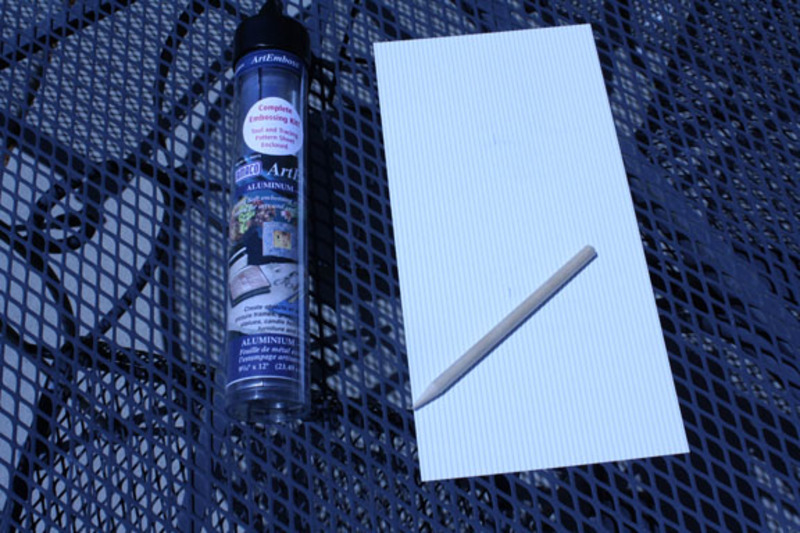
The ArtEmboss is a craft foil that is available at Michael's and other craft stores. The styrene is "corregated roofing". I use 3/16" spacing for 1/24 roofing. The wooden stylus comes with the foil.
I first cut the foil to size. I use a paper cutter myself, but you can use almost anything; scissors, x-acto knife, etc. I cut to a size of scale 4'x8'.
When the foil is cut, place it on the styrene corregated roofing. Then using the stylus shape the foil by dragging the stylus down the grooves in the styrene.

In a short time you will have a pile of corregated roofing looking like this.
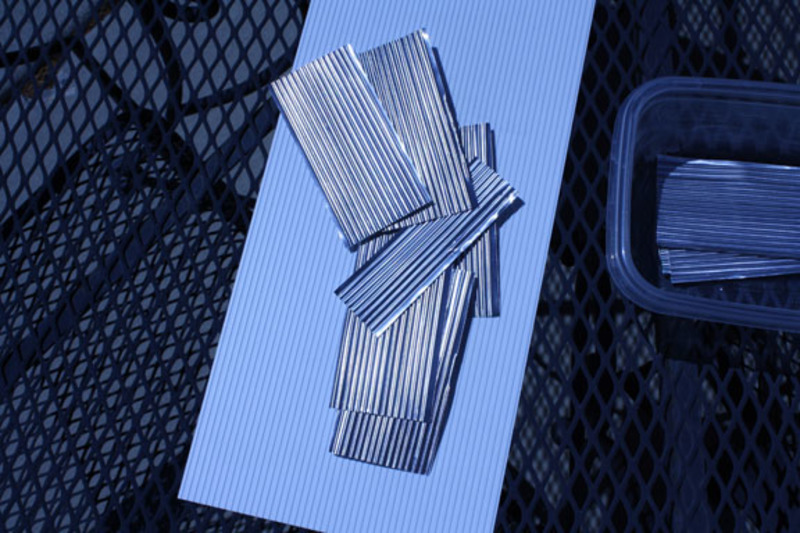
From this point there are two ways to go. One is quick, dirty, unpleasant and relatively dangerous. The other is slower, safer and much more pleasant. I'll address both ways in the next post. I'm going to close this one because I don't know if there is a limit on photos in a post. Be back in a minute. |
|
82s1
Full Member
Member since: July 2014
Posts: 101
Jul 21, 2014 19:11:49 GMT -5
Jul 21, 2014 19:11:49 GMT -5
|
Post by 82s1 on Jul 27, 2014 7:57:59 GMT -5
The first method of aging the foil is by using ferric chloride, a very nasty acid. It is available here in Utah at Radio Shack. I understand it is not available in some parts of the country or goes under another name in other places.
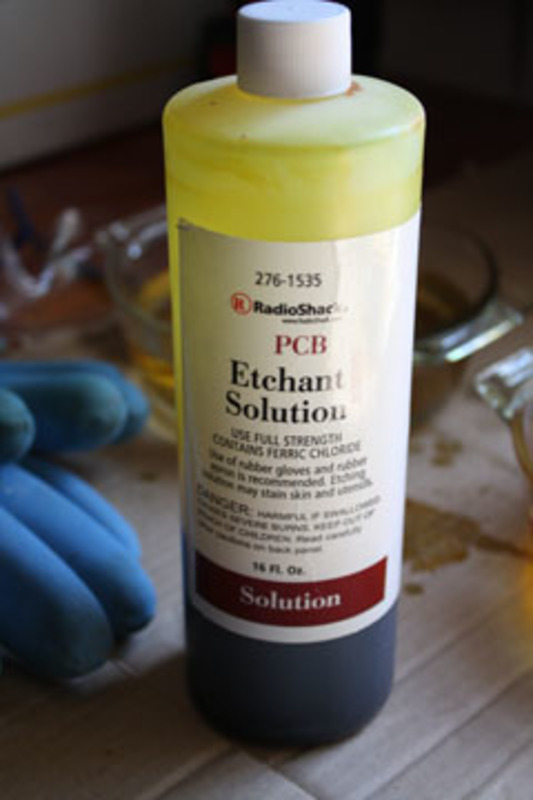
I can't stress enough how nasty this stuff is. DISCLAIMER: I do not recommend this method or approve of this method. If you do decide to age metal in this manner you are cautioned to use all safety equipment. I am presenting this just for your information. Once again do not use this method unless you are familiar with caustic chemicals and are willing to use all safety equipment. This is dangerous stuff guys. DISCLAIMER.
If using this method be sure to be in a well ventilated place such as an open garage or the great outdoors. Wear a long sleeve shirt, a respirator mask, good eye protection, heavy rubber gloves. Use long tweezers to move the metal from one bath to the next.
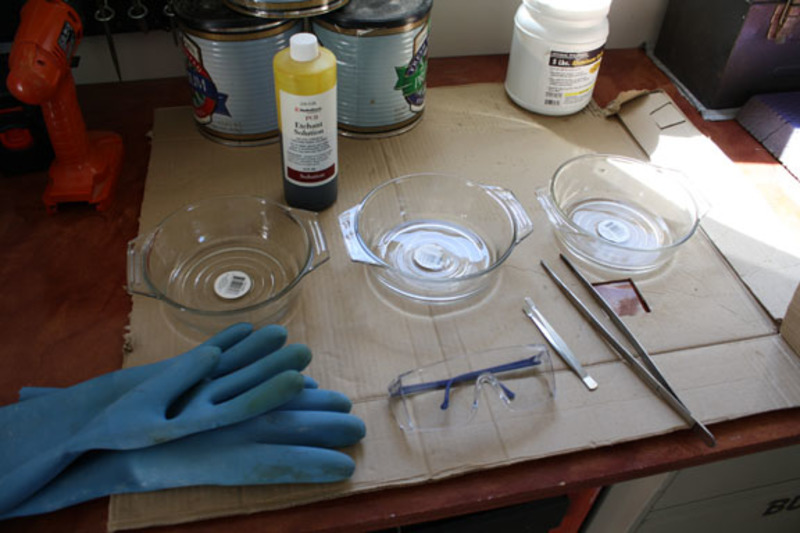
This is how I used to set up the procedure. The acid is in the bowl on the right. It is followed by two bowls containing water that are used to stop the chemical reaction.
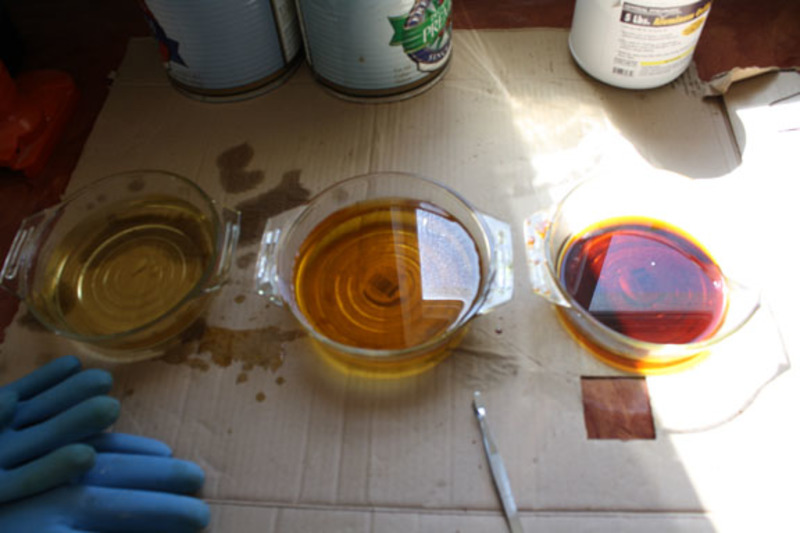
First dip the metal into the bowl containing the acid. In a few seconds the acid will begin to bubble. It only takes a few seconds for the metal to be etched enough, but you will have to just get a feel for how long is long enough. Believe me it is not long though. After removing the metal from the acid dip it into the second bowl containing water. Leave it there for a short period to stop the chemical reaction. Then move the metal to the third bowl, also containing water to clean as much acid off the metal as possible.
Finally, lay the metal out on paper towels or such and leave it for 24 hours or so. You will end up with something that looks like this.

The degree of corrosion will depend on how long you left the metal in the acid. This method does an excellent job of aging the metal, but I have stopped using it. Frankly guys, the acid scares me.
Method #2 is much more pleasant an much more safe. It takes longer, but you will end up with the same results and will have the same corroded effect. You follow the same procedure for preparing the metal as before. You will need a large glass baking dish. I managed to get my wife to donate an old pyrex pan she no longer used.
For the chemical bath get DRANO!!! Don't bother with the expensive gel, just get the cheapest liquid Drano. Pour an inch or so into the baking pan and spread the metal pieces in the Drano. Make sure they are completely immersed. Leave them there for about three hours and then check them. They should be pretty well etched and ready to be rinsed. After rinsing -- I just put them under running water -- place them on paper towels to dry. After about 24 hours they will be ready to clean. You will find a white powder residue on the metal, but it is easily removed with a small wire brush. At this point the roofing is ready to be installed.
Just for info, I once tried putting the metal in the Drano when I went to bed. When I got up in the morning I had pieces of metal lace. Pretty, but useless for roofing. The real beauty of using Drano is that it only takes minimal precautions and when done you can just pour the remainder down the drain. After all it is a drain cleaner.
I hope this has been clear and has not bored you to death. If you have any questions let me know. In the next update we will take a look at some of the scratch built interior details. |
|
|
|
Post by Leon on Jul 27, 2014 8:16:54 GMT -5
Awesome work on the roofing John and a great SBS also.
|
|
82s1
Full Member
Member since: July 2014
Posts: 101
Jul 21, 2014 19:11:49 GMT -5
Jul 21, 2014 19:11:49 GMT -5
|
Post by 82s1 on Jul 29, 2014 10:15:46 GMT -5
Because Frenchie's will have a removable roof to view the interior it was necessary to create a number of detail pieces.
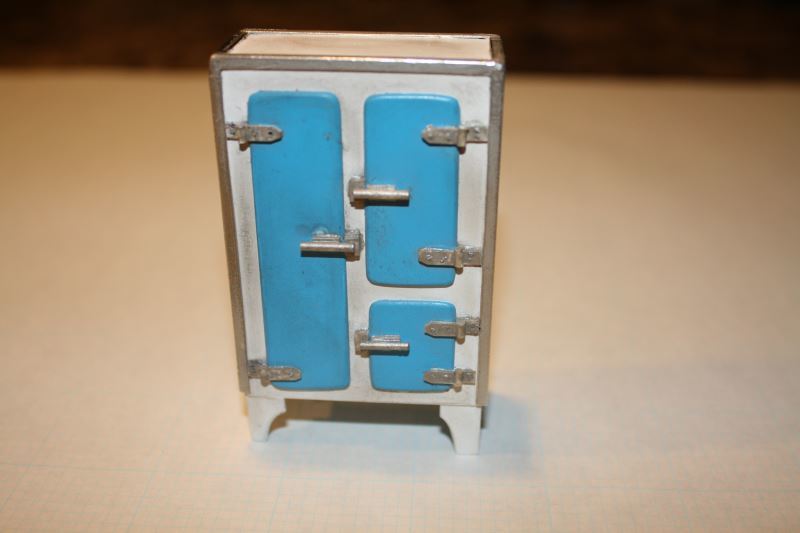
The first is an old time ice box. This was scratch built out of styrene sheet. There was no commercially available hardware so the hinges and handles were scratched from styrene. The color is typical of ice boxes of the 1930s and 1940s used commercially.
Unfortunately there are no construction photos.
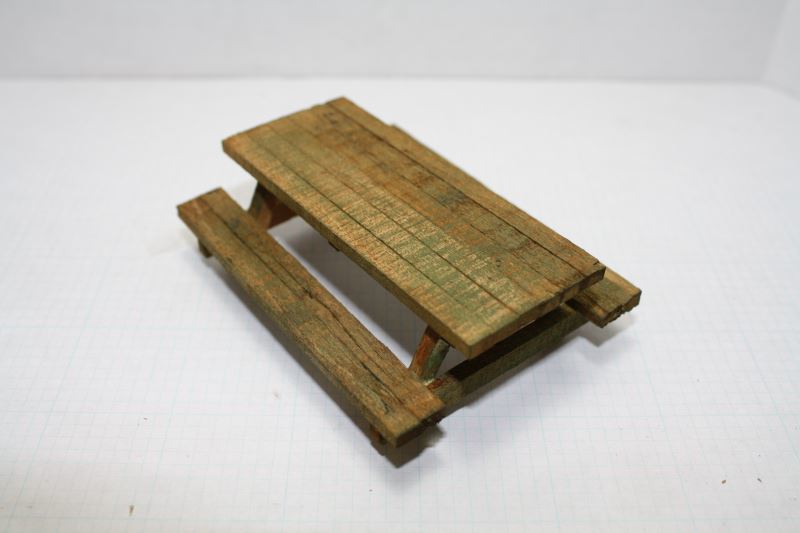
Six of these picnic tables were scratched for use inside and outside of the building.
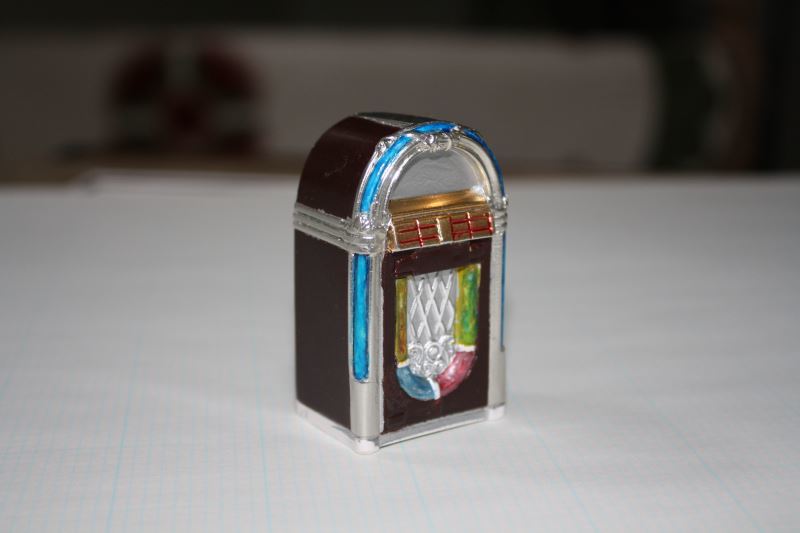
The juke box is a casting purchased from Jimmy Flintstone and painted by me.
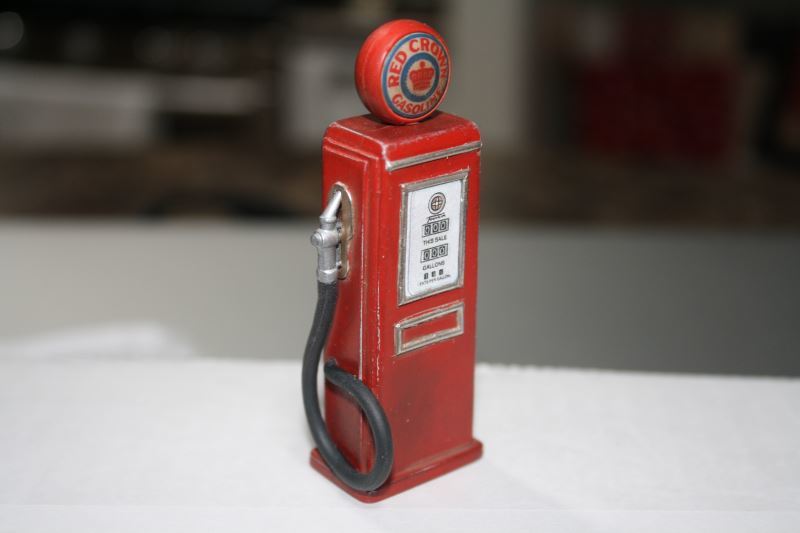
Outside the building there will be one gas pump. This pump was scratched from some parts I had in my stash. The body of the pump is sheet styrene and is completely scratch built.

The ball, hose and crank are from my stash.
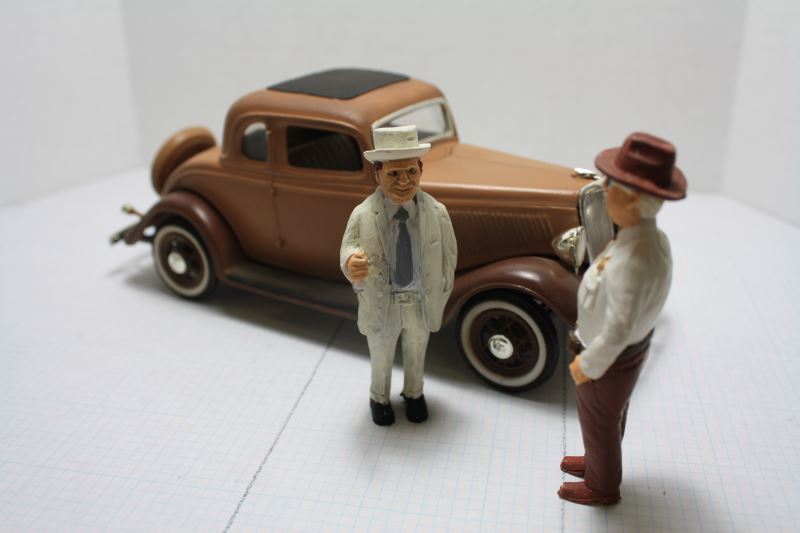
There will be a number of figures on the diorama. They were purchased from various vendors and painted as needed.

There are others, but you get the idea.
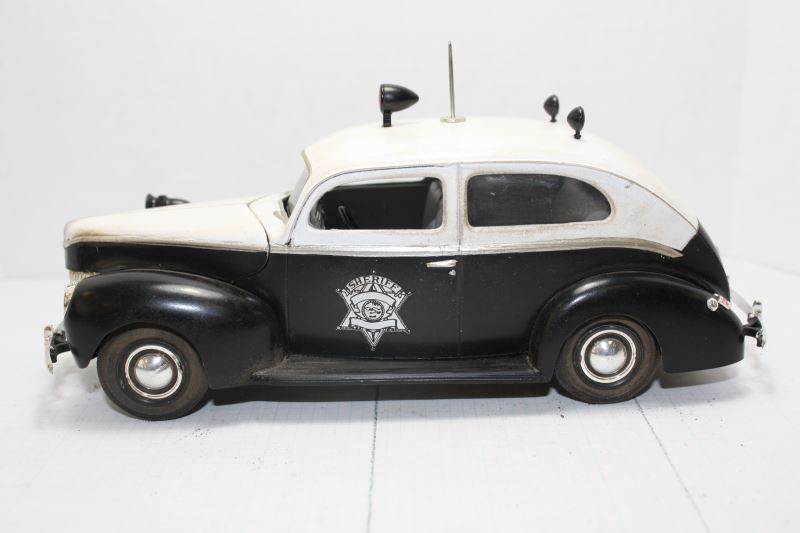
The following three photos depict the vehicles that will populate the diorama.

Okay, that's it!!! Frenchie's Bar diorama is up to date. Further updates will occur as appropriate as Frenchie's progresses. I began this diorama last November and hope to have it finished -- that is as finished as a diorama ever is -- by this September. I hope you guys enjoy watching it grow. |
|


 .Count me in to.


 Love how this one's coming together. Can almost hear the mosquitoes (they're everywhere in Louisiana!).
 , I'll give it a try.


