delta
Full Member

Member since: January 2015
Posts: 365 
|
Post by delta on Mar 1, 2015 22:04:30 GMT -5
The T28 Super Heavy Tank with its super-heavy part count: 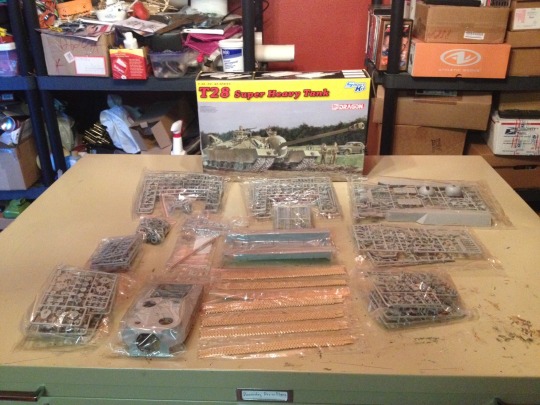 This one is quite a beast! After one week, I've finally finished step one in the instructions. 68 pieces in: 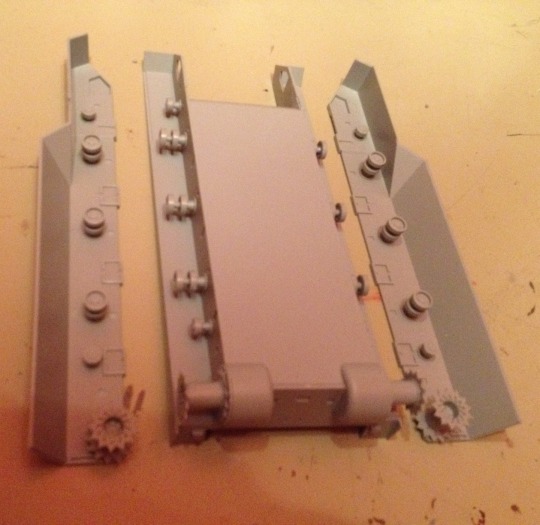 Then 8 bogies at 21 parts each for another 168 parts: 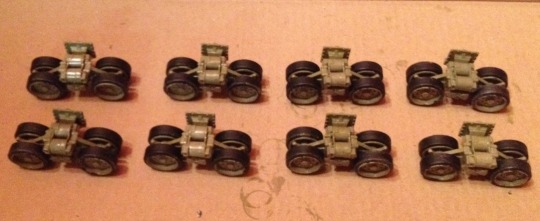 And that's when I realized there were in fact 16 bogies total with tires, springs and all. I put the second half off and assembled the main tank body for a bogie break. Here it is with shiny bits: 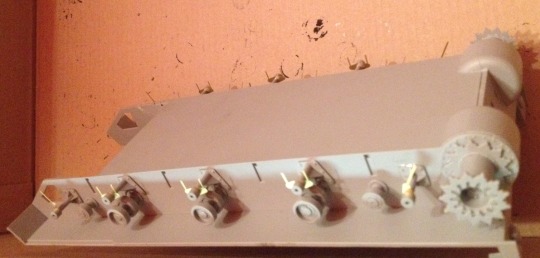 And at 353 parts with the surface detail, additional suspension and the first set of bogies attached and a test fit hull for the photo: 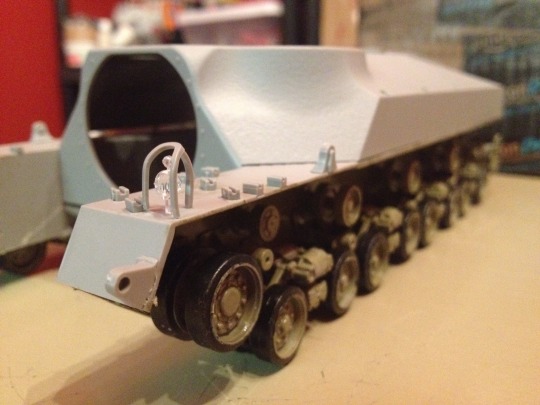 Finally today I got to the rest of the bogies and peripheral suspension systems for a total of 505 parts at completion of the first step (with a couple bits from steps 2-6 that were better accomplished before their placement in the instructions): 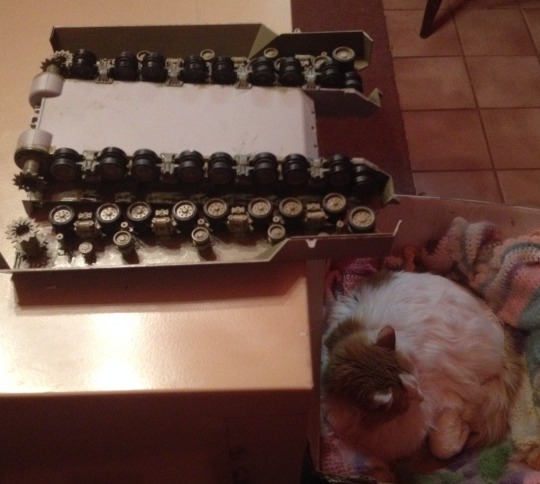 Mork was unimpressed. But the suspension is done! Next comes more surface detail and the tracks, which are provided mostly intact as Dragon's proprietary semi-styrene assembled tracks. They only require one additional tiny part per link to complete, of which there are 324 provided. Not sure how many get used, this kit has more unused parts than anything I've seen before. Lots of greebles for the carrier! Fun kit so far, enough of a variety of things to do that it never becomes tedious or too repetitive. Note: I've put this in Post-WW2 as the prototypes were built after the war, as far as I can tell. Though it was conceived for the war and only two were built, I figured it fit best here rather than in What-Ifs (as working prototypes were made) or WW2 (As they were not built until after the war). Wiki also files it under Cold War tanks. If this is not the proper forum section, I apologize and would be happy to move it. |
|
johnt
Full Member
Feb 2012 MoM and 2012 Model of the Year Winner
Member since: November 2011
Posts: 1,174
Nov 15, 2011 5:38:32 GMT -5
Nov 15, 2011 5:38:32 GMT -5
|
Post by johnt on Mar 2, 2015 9:46:48 GMT -5
Hi mate, nice work so far! Must admit I have a soft spot for super heavy tanks.
Cheers
JT
|
|
afvfan
Senior Member

Member since: December 2012
Bob
Posts: 1,772
Dec 10, 2012 17:32:38 GMT -5
Dec 10, 2012 17:32:38 GMT -5
|
Post by afvfan on Mar 2, 2015 12:01:02 GMT -5
Impressive start on the beast.
|
|
|
|
Post by TRM on Mar 2, 2015 12:23:52 GMT -5
This thing is a beast!! Count me in!! Looking good already!!
|
|
Wes
Full Member
Member since: November 2011
Posts: 686
Nov 16, 2011 9:34:50 GMT -5
Nov 16, 2011 9:34:50 GMT -5
|
Post by Wes on Mar 2, 2015 13:06:37 GMT -5
Wow thats a crazy parts total so far. Keen to see more.
|
|
|
|
Post by wbill76 on Mar 2, 2015 16:57:34 GMT -5
Suspension is the most labor-intensive part of this build for sure. Looks like you've got it well under control!  |
|
delta
Full Member
Member since: January 2015
Posts: 365
|
Post by delta on Mar 2, 2015 18:32:02 GMT -5
Thanks all! JT- I enjoy the super heavy things too,the bigger the better. I'm especially a fan of the German WW2 mega-weapons. There's something very James Bond about them. Thanks AFVfan and TRM! And Wes as well! Bill- Definitely. I enjoyed it but I'm glad its over and I can get to the more diverse tasks. I've just finished the sides, which contain the weirdest PE I've ever done. Big boxes with no detail. I have no idea why they weren't plastic, there's no advantage or purpose to them being in PE than I can tell. You can see them here, the two big things on the left: 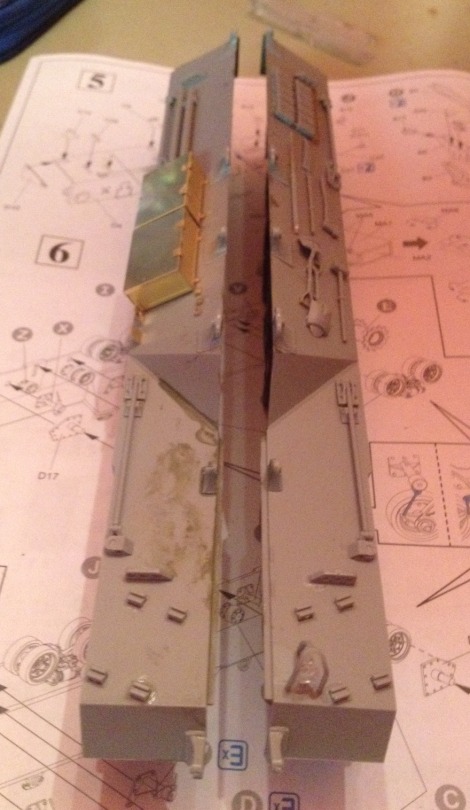 I don't object, I need PE practice and these were just at my skill level with a dash of challenge to keep me learning. But definitely the weirdest use of photo etch I've seen to date. In all four of the models I've done with it... Also no PE for the tool straps on the shovels. Seems like they didn't do the expected PE and did something else. |
|
|
|
Post by JimD on Mar 2, 2015 18:48:44 GMT -5
The sheer size of this thing is intriguing. Great work so far. I wish you luck with the tracks  It's going to be impressive when done. |
|
|
|
Post by dupes on Mar 2, 2015 19:09:31 GMT -5
Egads! While I like the look of this beast, I don't know that I'd want to tackle this kit with all of those parts. Wow.
|
|
|
|
Post by Tojo72 on Mar 2, 2015 19:16:24 GMT -5
That is some beast,looking forward to it.I have seen where some leave the teeth off the upper part of the track runs that no one will see anyway.So you would only have to deal with half the number of teeth.
|
|
|
|
Post by Leon on Mar 2, 2015 19:18:16 GMT -5
Great start Ari! Looking good.  |
|
delta
Full Member
Member since: January 2015
Posts: 365
|
Post by delta on Mar 2, 2015 20:35:52 GMT -5
Thank you Jimmydel! I think it will Dupes- The part count is daunting indeed, but well worth it. It's a really cool tank, I love the sphinx like shape of it, and of course the four tracks that mandate the part count. Tojo72- I've seen the same, and those reviews were very helpful in avoiding some instruction errors. I'll likely put all the teeth on. They're not working tracks but knowing the unseen detail is there is part of the fun. Sometimes. We'll see if I feel the same way after applying 150 of them with tweezers… Thanks Leon!!! It's finally starting to look like a tank, at last in dry test assemblies: 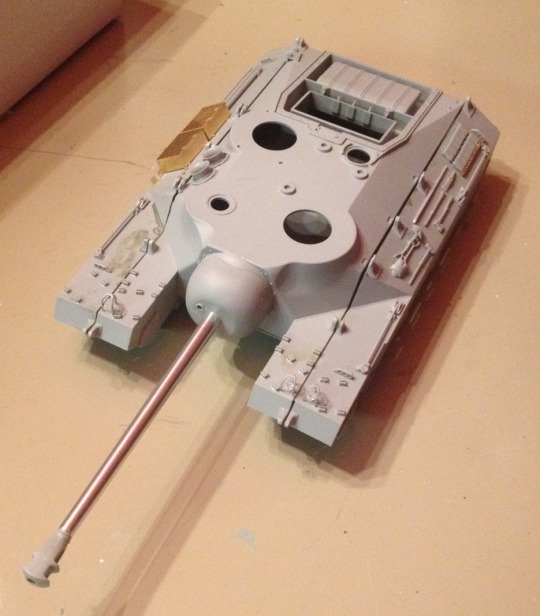 And I really like the hatches. In addition to the adorable half millimeter handle, I like the clear bits. Almost tempted to fill that huge empty interior with a light… 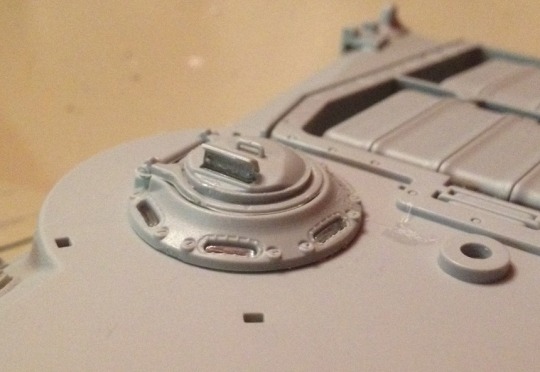 Probably should've painted those bits first. Oh well, good test of brush skills coming up |
|
|
|
Post by deafpanzer on Mar 2, 2015 20:41:07 GMT -5
Man, so many wheels!!! Looking sharp!!!
|
|
|
|
Post by TRM on Mar 2, 2015 22:18:43 GMT -5
Nice looking beast!! Great to see things coming together!!
|
|
delta
Full Member
Member since: January 2015
Posts: 365
|
Post by delta on Mar 3, 2015 2:43:10 GMT -5
Thank you both! Approaching 1AM, construction is almost complete with the gun and its railing finished. 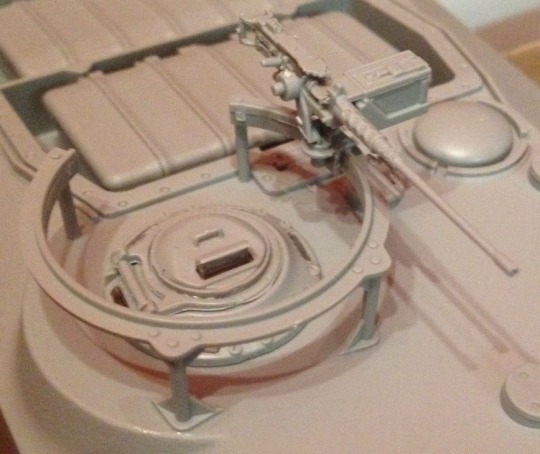 All that's left in the instructions is to attach the track spikes, attach the tracks (Which test fit flawlessly!) and glue the sides on.  I also need to figure out where the tow cable goes, as one is provided but not explained in the instructions. Box art shows it curiously half curled around the cannon dome. Box art also shows the cranes attached to more pulleys, which are not provided nor is the rope for them, or an explanation of their rigging for the instructions. I may have to scratch them or adapt some of the many spare parts into them. But soon, paint shall be slung. Slinged? Slang? I'll get to paint the thing soon. |
|
|
|
Post by Leon on Mar 3, 2015 5:03:09 GMT -5
WOW!! Great progress Ari .Looking forward to the paint however you do it. |
|
sabre
Full Member
Member since: September 2013
Posts: 414
|
Post by sabre on Mar 3, 2015 5:30:11 GMT -5
Looking good Delta, this site may help with the location of the tow cable. T28 Super Tank"For illustration purposes only" 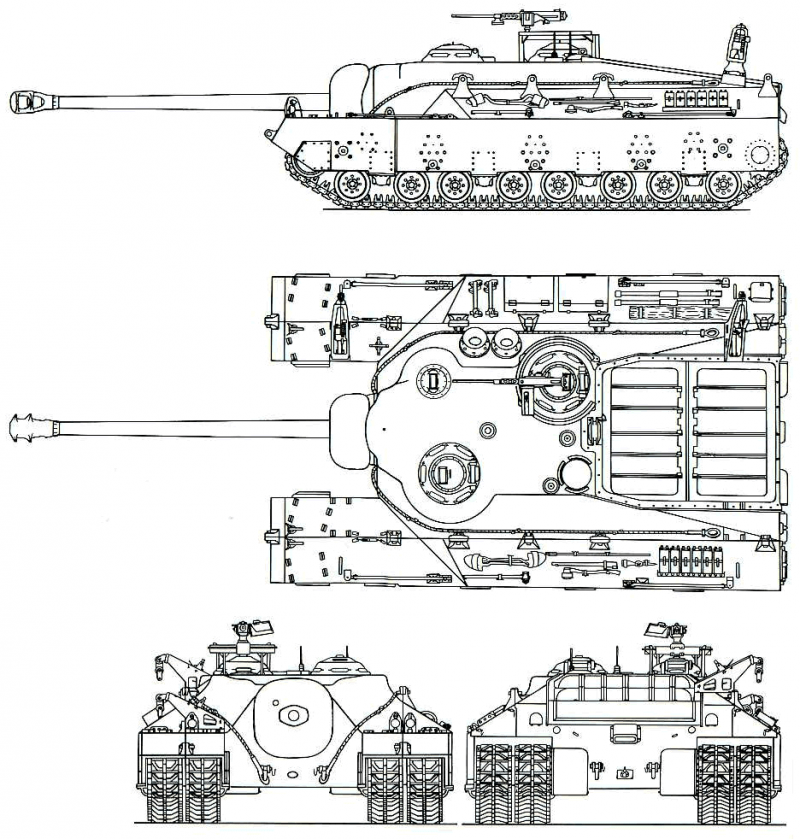 |
|
sabre
Full Member
Member since: September 2013
Posts: 414
|
Post by sabre on Mar 3, 2015 5:39:38 GMT -5
A couple of actual photos of this Beast   Hope this helps Delta. |
|
|
|
Post by wbill76 on Mar 3, 2015 13:48:45 GMT -5
Kind of makes you wonder what they would've had to hook it to in order to tow this monster... Built up fairly quickly, looking forward to seeing it with paint on! |
|
delta
Full Member
Member since: January 2015
Posts: 365
|
Post by delta on Mar 3, 2015 23:19:32 GMT -5
Sabre- Thank you!!! Thank you very, very much for the site and pictures, they'll be very helpful! I couldn't make out any of the cables on the pictures I googled up so far and the diagram helps a lot. The link seems to lack a colon, but I assume this is the page if anyone else wants to look- survincity.com/2009/10/south-american-super-heavy-tank-t28-t95-self/Bill- I was wondering that too. Yes, the body built quickly after a couple weeks of wheel work. I figured I'd wait to post until that bit was done to spare everyone the long haul. But yeah, I'd love to see whatever can tow this thing. Maybe a couple tortoises, one on each cable? The tank, not the animal. Though that would make an interesting diorama... |
|
|
|
Post by JimD on Mar 4, 2015 0:47:27 GMT -5
Wow. That was fast. I don't know how you built that up so perfectly in such a short time, but I applaud you. I look forward to paint too. Kind of makes you wonder what they would've had to hook it to in order to tow this monster... Built up fairly quickly, looking forward to seeing it with paint on! I do not want to see the monster machine that would be used to tow this thing. |
|
delta
Full Member
Member since: January 2015
Posts: 365
|
Post by delta on Mar 4, 2015 1:45:11 GMT -5
Thanks Jimmy! I worry that my speed may have sacrificed quality. We'll see when the primer goes on. Hopefully though the speed is simply a result of doing very little else in my recent free time. The treads though will be hard to work on full time, they're pretty nerve wracking. Each spike has to be applied individually, you can see my progress so far- 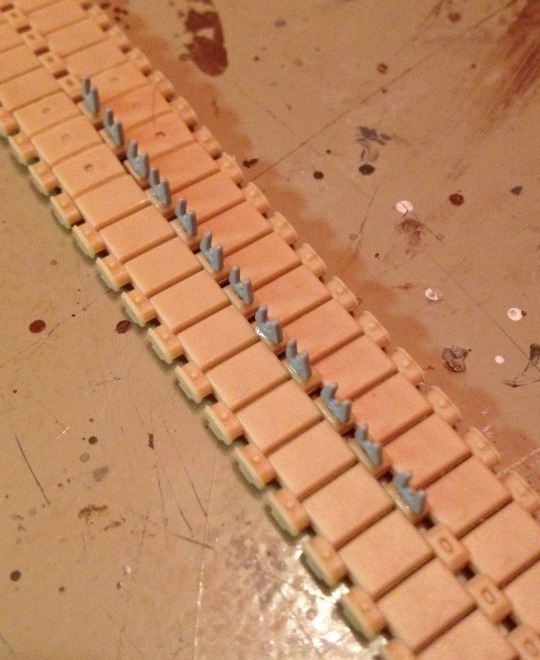 Which looks decent until you see how much there is left to do: 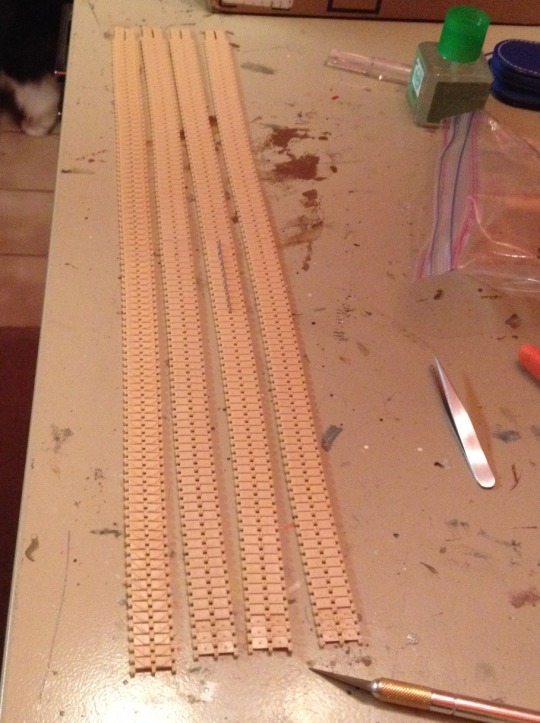 Tojo72's mention of some not doing the hidden upper track halves will look pretty appealing by halfway through. If you should ever want to see something that could tow this with ease, check out NASA's crawler transporter- The thing that moved the shuttles and their gantries. It weighs in at 3,000 tons, over 30 times this lilliputian 95 ton scooter. It can move at an entire mile per hour. I hope to do a full crawler transporter with shuttle and gantry some day. I've yet to see a really good kit of them though that captures the scale and detail. |
|
|
|
Post by deafpanzer on Mar 4, 2015 20:51:58 GMT -5
YIKES! That's the worst part probably... WOW! Try not to have too much fun...
|
|
delta
Full Member
Member since: January 2015
Posts: 365
|
Post by delta on Mar 4, 2015 21:06:57 GMT -5
It's a strange mix of pleasure and pain. I'm 1/8 done now, with half the first track spiked. Hard to motivate myself to work on it though, so much so I've actually gotten some work done in the last few days. I suppose in that respect it's a more useful kit than normal |
|
afvfan
Senior Member
Member since: December 2012
Bob
Posts: 1,772
Dec 10, 2012 17:32:38 GMT -5
Dec 10, 2012 17:32:38 GMT -5
|
Post by afvfan on Mar 4, 2015 21:12:40 GMT -5
I'd shoot myself before I got done installing all those guide teeth! Seems there might be great wisdom in Tojo's advice.
|
|
|
|
Post by JimD on Mar 4, 2015 21:17:57 GMT -5
Now that I've come to after having fainted at the thought of those tracks.....lol.
Just keep at it a little at a time. It's not a race. Unless you're in a hurry to get to the asylum.
|
|
delta
Full Member
Member since: January 2015
Posts: 365
|
Post by delta on Mar 4, 2015 21:43:28 GMT -5
Excellent advice! And luckily I have several models on the bench so I can still keep some diversity in my hobby during the great spikening.
|
|
sabre
Full Member
Member since: September 2013
Posts: 414
|
Post by sabre on Mar 5, 2015 10:31:20 GMT -5
Sabre- Thank you!!! Thank you very, very much for the site and pictures, they'll be very helpful! I couldn't make out any of the cables on the pictures I googled up so far and the diagram helps a lot. The link seems to lack a colon, but I assume this is the page if anyone else wants to look- survincity.com/2009/10/south-american-super-heavy-tank-t28-t95-self/Glad I could help Delta and sorry about the link but it's looks like you found right one in the end. Here's a bit of trivia about this Tank. It's interesting that you guys have brought up how were these the T28/T95 Tanks or should I say Gun Motor Carriage or is it a Tank were transported (confusing isn't it). The T28 and T95 are the same tank by the way. This photo shows a T28 being loaded for transport. Notice T28 painted on the side  and being off loaded from a ship  onto a beach with T28 clearly painted on the back  and a front on view but notice something missing. 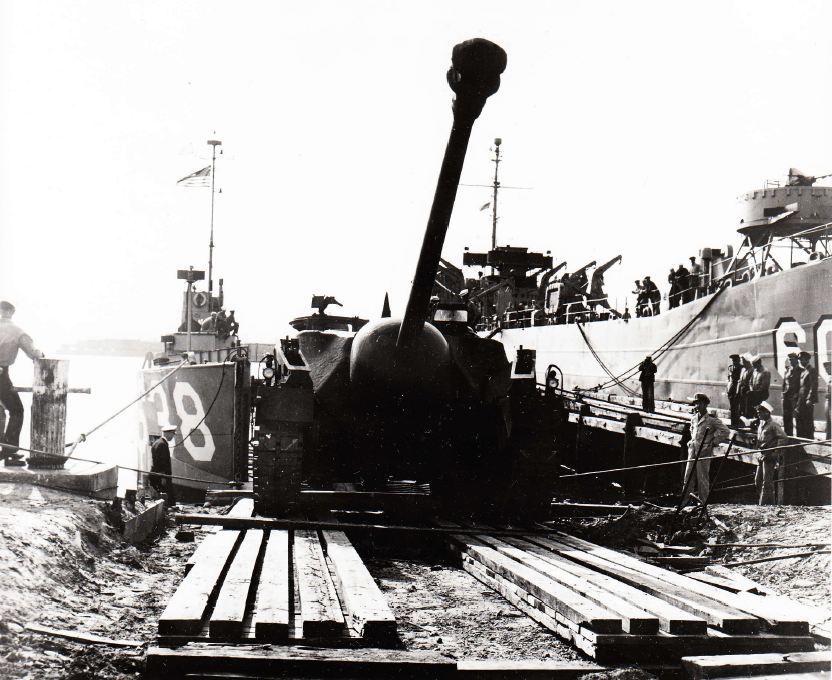 Yes that's right single tracks, there is a misconception going round that the T28 had single tracks and the T95 had double tracks but this is all brought about by tanks that are in the popular online game World of Tanks. In this photo you can clearly see T95 painted on it. 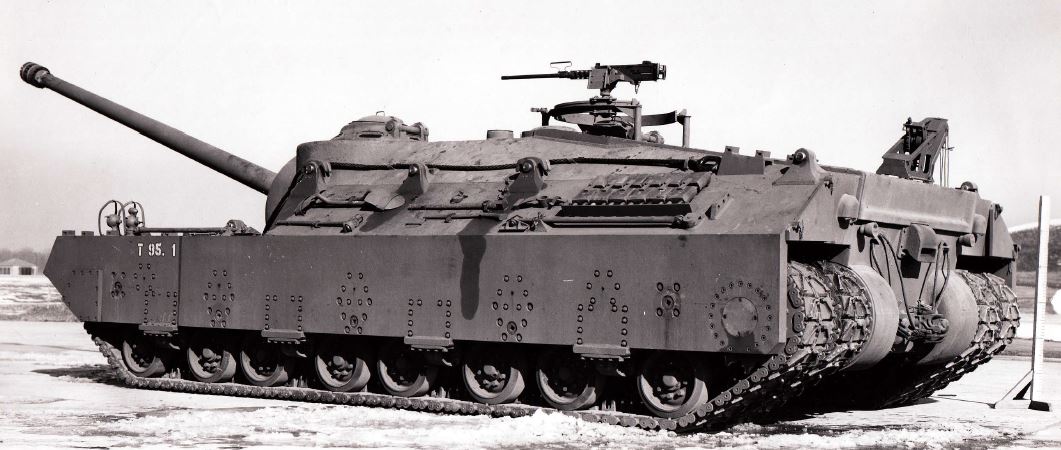 Now here comes the first part of how these Tanks were transported and something that could play into your favour if you get sick of doing that many tracks . Just like the Tiger these tanks are wide with a width of 179 1/4 inches or a touch over 4 1/2 metres so a bit like the Tiger the outer shirt comes off along with a set of outer road wheels. 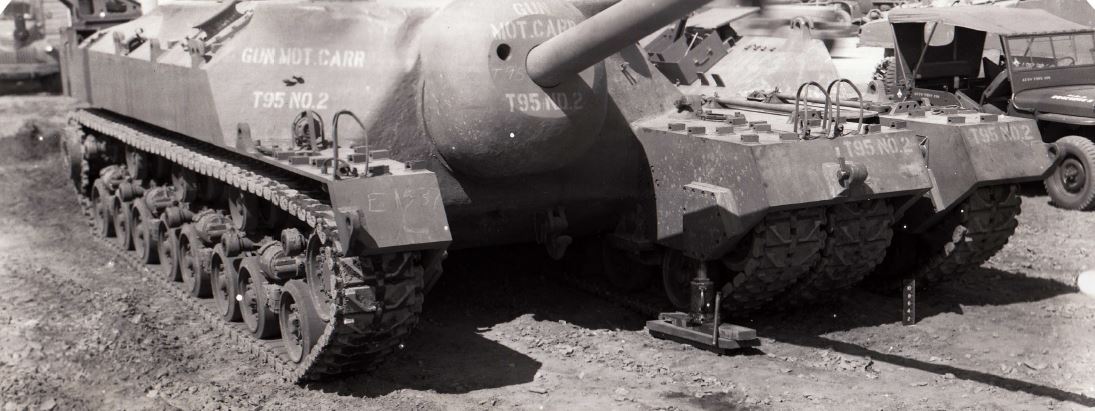 The outer road wheels were then bolted together and towed behind the tank 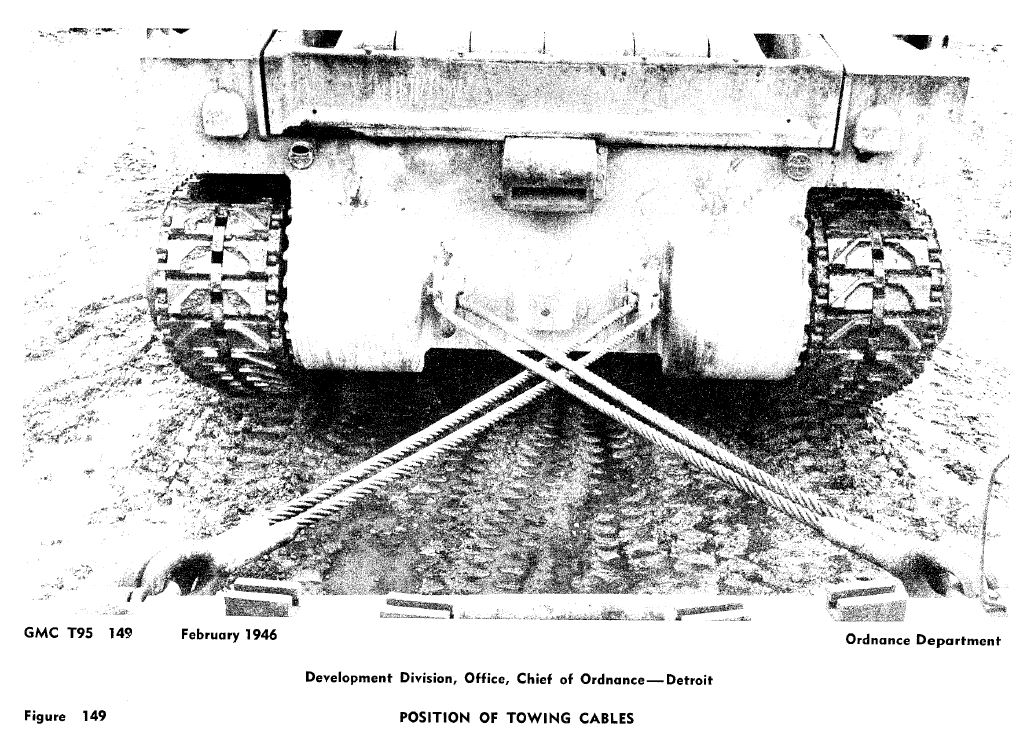 like a trailer. 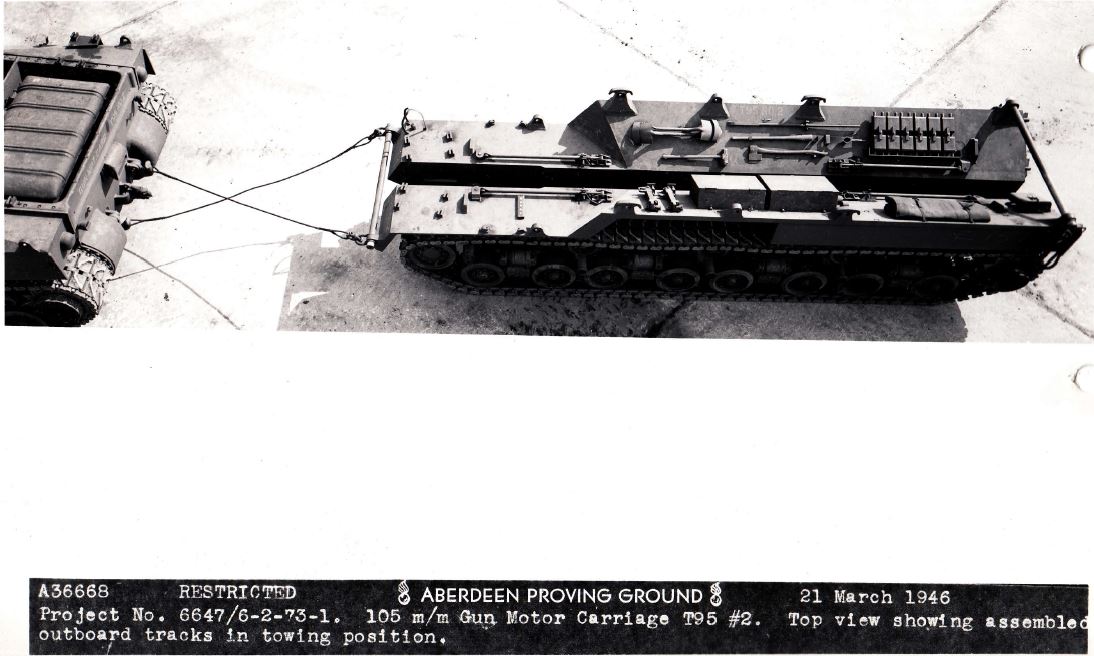 Now to clear up why some call them a tank while others call it a Gun Motor Carriage (GMC) and why some people get confused between the T28 and the T95. Please correct me if I'm wrong but this is my understanding of it.
The vehicle was developed as a super-heavy tank which was designed to breach the Siegried Line fortifications, so was designated in the tank nomenclature. Coming somewhere between a T26 (Pershing) and the T29 Heavy Tank, T27 was taken by an armoured car so T28 was assigned. Someone decided around 1945/46 that the thing wasn't really a tank and was more of a self-propelled artillery piece. So it was redesignated to a Gun Motor Carriage and the GMCs were way up the numbering list but T95 was available so it was designated a T95. Then a year or so later they decided that perhaps it actually was a tank after all and renamed it back to it's original name of T28. Although all the T28's and T95's built were identical and were to have 12 inches of frontal armour a number of hulls were cast with only 8 inches of armour. These were only ever called T28 castings and as the decision to build the complete vehicles with of the thicker armour basis was done long before the GMC shennanigans started. There was no distinction in the armour basis/nomenclature as there was in the heavy and lighter armoured tanks of the T25 and T26. The vehicle only ever carried a 105mm gun. I couldn't resist posting this photo for those of you who love to doing rust effects on your models.  |
|
delta
Full Member
Member since: January 2015
Posts: 365
|
Post by delta on Mar 5, 2015 15:48:05 GMT -5
Sabre- No problem about the link at all! Thank you for the wealth of information, amazing stuff! The kit actually has directions for finishing the tank both with and without its side treads, and for the set up in which it tows them behind it. This set up actually demands more attention to the spikes as they become clearly visible for all four tracks at all times, where the assembled version hides nearly everything. I'll be going for the assembled version but I have noticed in dry tests that once together, you can still see the spikes inside the treads even on the upper, most hidden portions of the interiors. I'm undecided on how old to make it look. I probably won't go for any rust but I also don't want the gloss sealed flawless version sitting outside the Patton Museum. The last photo you included is pretty compelling though, and it reveals that one was desert tan at some point (I think, I'm color deficient so I may be wrong) and that offers another option. The one on the box seems to be a sort of Bomber Tan and that's the paint I got for its base coat. But we'll see where it goes. Thank you again for the history and pictures, you seriously made my day when I saw that! Thank you!!! |
|
delta
Full Member
Member since: January 2015
Posts: 365
|
Post by delta on Mar 7, 2015 19:56:36 GMT -5
1.5/4 tracks spiked, body primed: 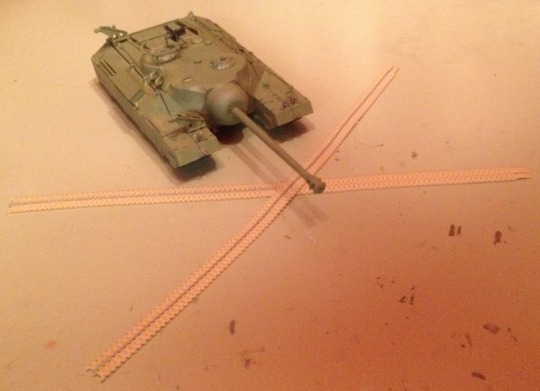 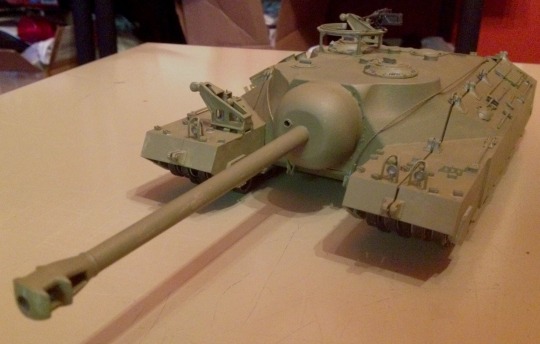 I have also been informed that the primer I used is khaki rather than green. Curse my deuteranopia! |
|


 It's going to be impressive when done.


