detailfreak
Full Member

Member since: July 2012
Crazy Swede
Posts: 369
Jul 28, 2012 15:12:35 GMT -5
Jul 28, 2012 15:12:35 GMT -5
|
Post by detailfreak on Mar 5, 2015 12:21:59 GMT -5
Greetings fellow modelers and anyone who dares enter the realm of the vacu-formed kit. This is not the first thread I've started here but with any luck it will be a thread I will see to its completion. Without further delay: The Normandy City Building. 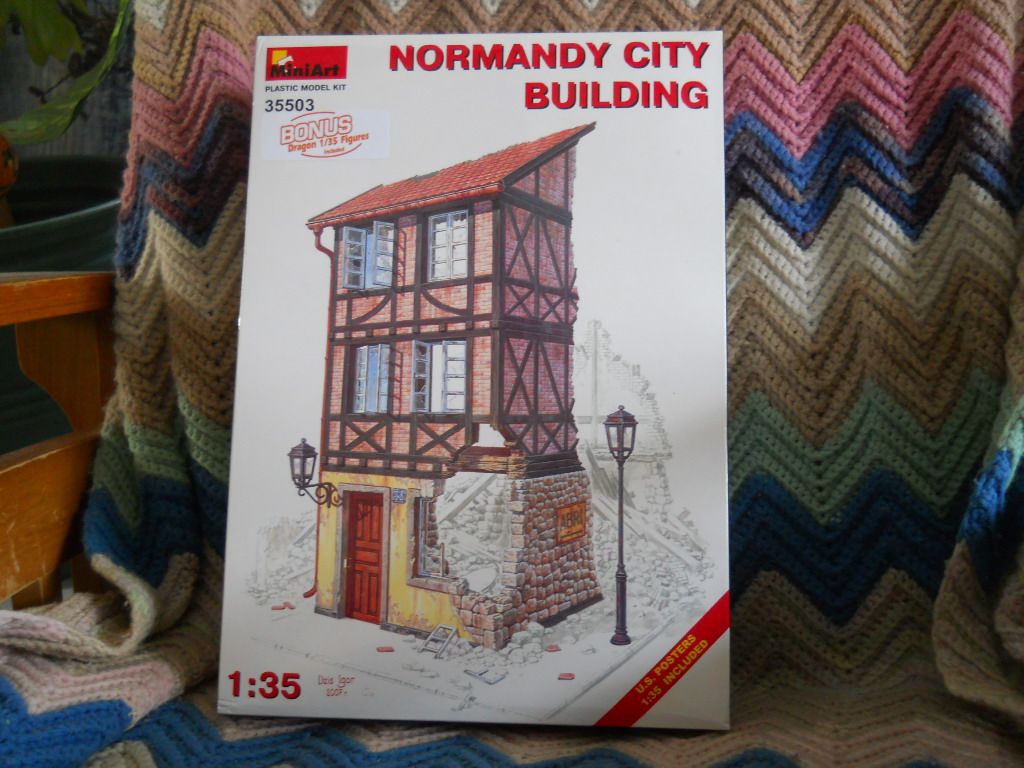 The kit is molded in a medium gray styrene with very nice detail. The one thing that is very noticable is the mold process, or better the manufacture of the kits elements. Vacu-forming as many of us know is the process of placing a sheet of styrene over a mold and the using a vacuuming process the sheet is drawn down over the mold. The many tiny dimples present on the finished sheet are most likely vents for trapped air to be released.A sprue shot.  The photo below some of the dimples are visible. 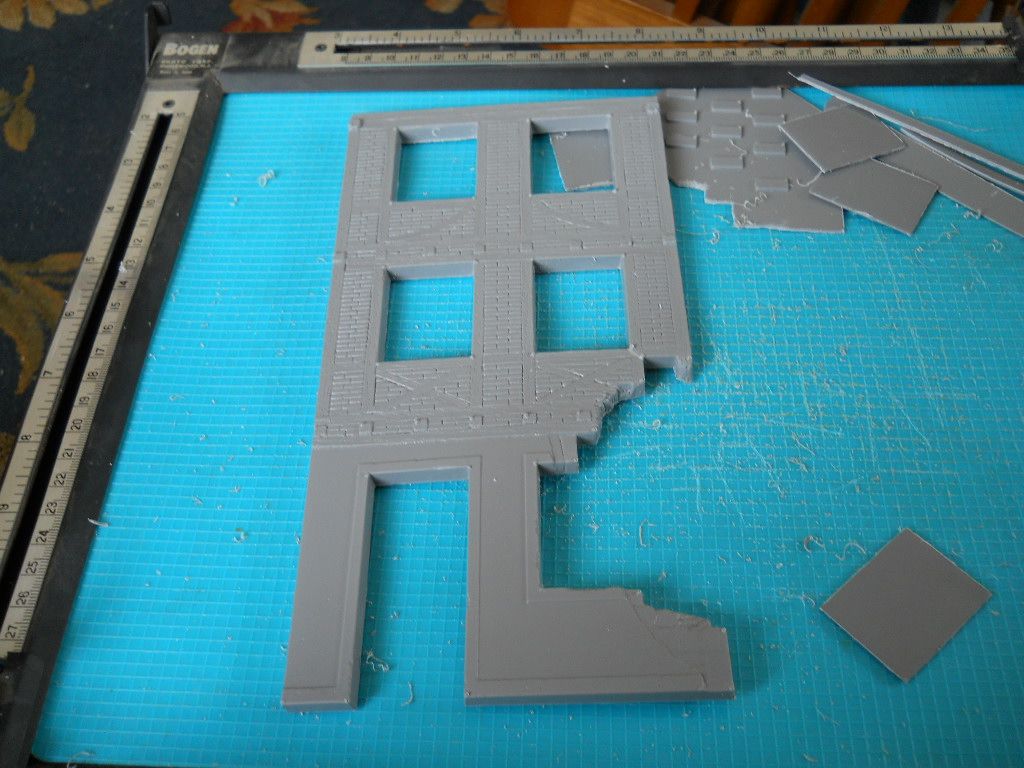 I have removed the excess material from the two halves of the front wall and joined them and I will show how this tricky task was accomplished in the next few photos. The method I began using to remove the wall sections from the excess material was the score and snap method which many of us know of all to well.I did not photograph much of this process but I will say it only adde to much additional clean-up. With that I must prepare for my eight hours of paid labor ,more this evening. |
|
|
|
Post by TRM on Mar 5, 2015 12:36:13 GMT -5
Interesting build!! Count me in!! These MA Dio kits aren't the most fun, for me anyway, to construct, but the end result is not half bad most of the time!! Looking forward to following along!!  |
|
legend
Full Member
Member since: November 2011
Posts: 577
Nov 30, 2011 13:49:32 GMT -5
Nov 30, 2011 13:49:32 GMT -5
|
Post by legend on Mar 5, 2015 12:48:46 GMT -5
I didn't realise that these kits were vac-forms! when I did vac-forms years ago I used to cut the surround to within an 1/8 inch or so and then lay it on a flat sanding board, two sheets together depending on size and then sand away until the surround was gone. much better edge especially with curved parts.
bill
|
|
|
|
Post by deafpanzer on Mar 5, 2015 21:24:19 GMT -5
Holy cow!!! Always wanted to see how it comes out... I think I have couple of kits similar to this in stash. Its great having you back... hope you are all settled at your new place by now?
|
|
reserve
Senior Member

Member since: July 2012
Si vis pacem para bellum
Posts: 2,348
Jul 11, 2012 9:11:45 GMT -5
Jul 11, 2012 9:11:45 GMT -5
|
Post by reserve on Mar 6, 2015 11:31:21 GMT -5
Hey brother long time no look
The difficulty factor in these kits is rather high but with patience they turn out pretty well. MiniArt has tutorials on their website that helped me quite a bit when I was fumbling thru my first one of these ya might check it out
Regards,
Mark
|
|
|
|
Post by Deano on Mar 6, 2015 13:58:44 GMT -5
I really like these kits ... they can be a PITA but well worth the effort . I think the challenge is part of the fun , good luck !
|
|
|
|
Post by Leon on Mar 6, 2015 17:54:25 GMT -5
I'm with Legend on not knowing these were vacuum formed! I'll be following closely.
|
|
detailfreak
Full Member
Member since: July 2012
Crazy Swede
Posts: 369
Jul 28, 2012 15:12:35 GMT -5
Jul 28, 2012 15:12:35 GMT -5
|
Post by detailfreak on Mar 8, 2015 23:02:30 GMT -5
Alrighty then,sorry for the delay in posting but you know how life can be. Gettng right down to business,as I mentioned I was using the back edge of a no.11 blade to score and then snap the plastic which made for an awful lot of clean-up so I changed gears and grabbed the razor saw.  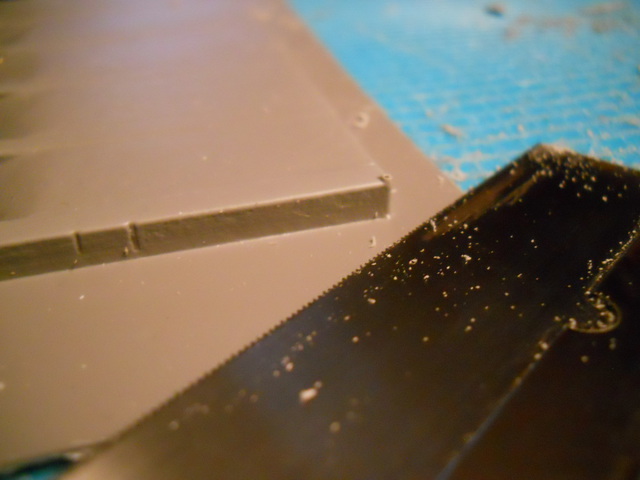 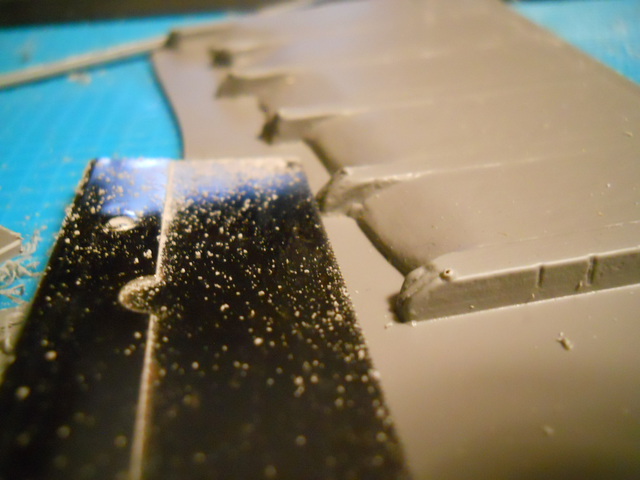 Strips of the carrier material were cut and used to reinforce and add material to the join as there is nothing to help locate any of the pieces.  So far the kit has been a pleasure to assemble,did I say that?? Your comments and questions are always welcome. |
|
John Everett
Full Member
Member since: January 2012
July, 2016 MoM Winner
Posts: 1,278
Jan 17, 2012 0:53:48 GMT -5
Jan 17, 2012 0:53:48 GMT -5
|
Post by John Everett on Mar 9, 2015 0:33:22 GMT -5
Strips of the carrier material were cut and used to reinforce and add material to the join as there is nothing to help locate any of the pieces. I was going to suggest exactly this technique. Most guys don't think of it. But it's a great way to both strengthen the joint and add surface area for the glue to soak. |
|
|
|
Post by TRM on Mar 9, 2015 7:17:11 GMT -5
Great to see you pushing this along DF! The last one of these I did, adding that strip here and there helped immensely!! I like the saw bit! I did the score and snap method and ended up sanding...and sanding.....and.....
Keep up the good work!!
|
|
detailfreak
Full Member
Member since: July 2012
Crazy Swede
Posts: 369
Jul 28, 2012 15:12:35 GMT -5
Jul 28, 2012 15:12:35 GMT -5
|
Post by detailfreak on Mar 9, 2015 12:33:33 GMT -5
Legend your sanding method is/was probably the way to go, you were doing aircraft with I would guess much thinner plastic ? The razor saw makes for a cleaner edge with just a light sanding. If I were to guestimate I will say the score and snap method along with the sanding probably 3 hrs. ,with the saw less than 30 minutes. More when I have time.. thanks for looking..
|
|
|
|
Post by wbill76 on Mar 9, 2015 16:22:16 GMT -5
Will be interesting to see how this all comes together. Nice start to the freeing of the parts and also the joining practice.
|
|
detailfreak
Full Member
Member since: July 2012
Crazy Swede
Posts: 369
Jul 28, 2012 15:12:35 GMT -5
Jul 28, 2012 15:12:35 GMT -5
|
Post by detailfreak on Mar 14, 2015 12:15:11 GMT -5
|
|
|
|
Post by wbill76 on Mar 14, 2015 14:17:10 GMT -5
Looks like it's coming together Greg. have fun with the wood cutting! |
|
|
|
Post by Leon on Mar 14, 2015 17:01:30 GMT -5
Looking really good Greg! :)Your patience is paying off. |
|
|
|
Post by dupes on Mar 14, 2015 19:42:44 GMT -5
I've got a couple of these that I have yet to attempt...they appear to be a bit more work than I had assumed! I'd better stock up on sanding implements judging by the look of some of those seams.  |
|
|
|
Post by deafpanzer on Mar 15, 2015 21:16:20 GMT -5
I agree... great details on the house! Can't wait to try it I have couple in the stash.
|
|
detailfreak
Full Member
Member since: July 2012
Crazy Swede
Posts: 369
Jul 28, 2012 15:12:35 GMT -5
Jul 28, 2012 15:12:35 GMT -5
|
Post by detailfreak on Apr 1, 2015 9:39:16 GMT -5
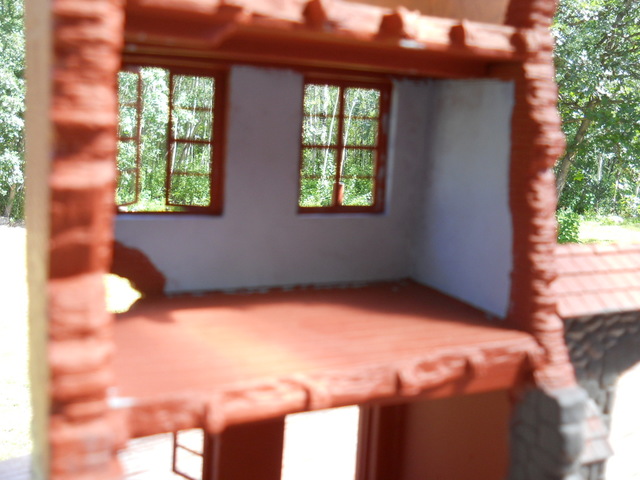
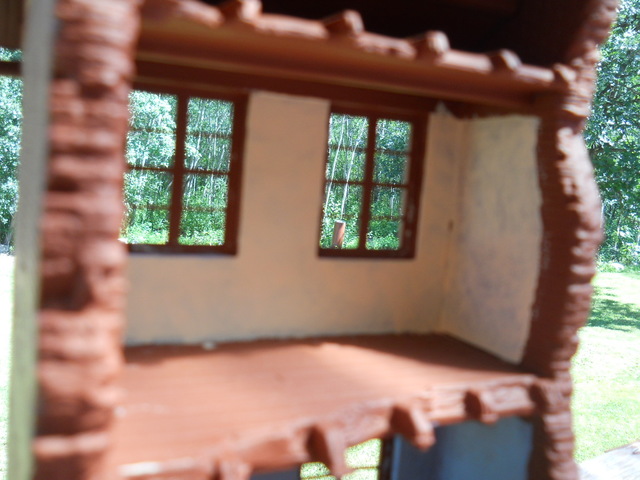
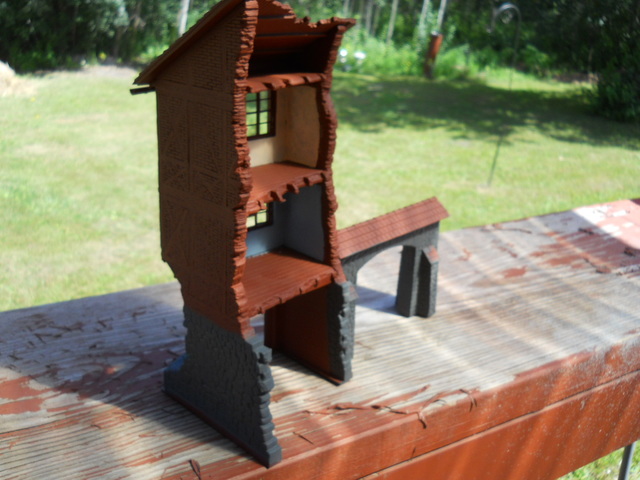
Well I am back with an update, been working on my chariot as it has been lacking attention and I do not like to pay extravagant shop rates. So anyway, all the walls and floors have been added and the clean-up has begun , and there is no shortage of it either. The seams where the wall and floor halves meet are all in need of sanding and filling. 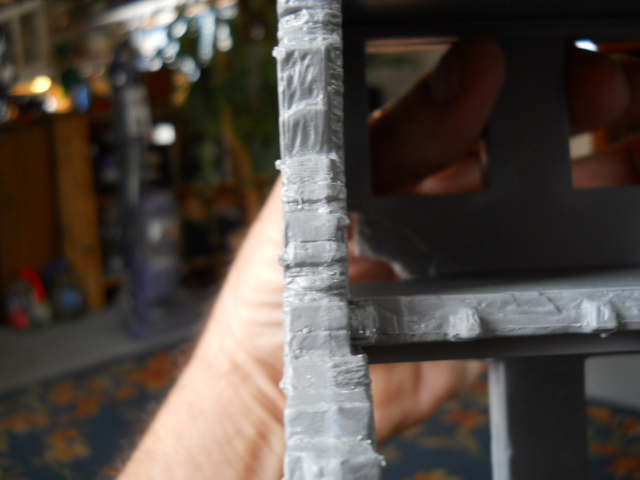  all of those little dimples on the outside and inside have been sanded down and cleaned up. A couple of windows have been added and a piece of styrene strip to square up the door opening were added , more on them tonight if time allows but alas I am on the move again. All questions and comments are welcome. |
|
|
|
Post by wbill76 on Apr 2, 2015 11:36:28 GMT -5
Looks like you're bending this one to your will and whipping it into shape there Greg, making good progress.
|
|
John Everett
Full Member
Member since: January 2012
July, 2016 MoM Winner
Posts: 1,278
Jan 17, 2012 0:53:48 GMT -5
Jan 17, 2012 0:53:48 GMT -5
|
Post by John Everett on Apr 2, 2015 19:16:18 GMT -5
Excellent work in blending the seams.
|
|
|
|
Post by deafpanzer on Apr 2, 2015 21:03:00 GMT -5
Looks like you will be busy for while... they will look great once filled and sanded!
|
|
itsonlyakit
Full Member
Member since: November 2011
dog gone
Posts: 114
Nov 27, 2011 21:30:36 GMT -5
Nov 27, 2011 21:30:36 GMT -5
|
Post by itsonlyakit on Apr 3, 2015 19:38:42 GMT -5
Excellent work so far, as all MA buildings are not created equal, some have very "soft" detail. Looks like interior/exterior walls are lining up well in regards to the brick and mortar detail, careful mortar painting will add to realism. Photo 039, the gap between floor joists will have to be hollowed out to create the air space between floorboards and ceiling, suggest basswood or balsa for new joists. Breaking the wood or singing it before installing will increase WoW factor. Also when you get to the roof find good ref. pics. MA cheats on the battens. Just trying to help. Cheers Eh!
|
|
|
|
Post by Deano on Apr 4, 2015 15:57:47 GMT -5
Coming together nicely , your careful work is paying off with some nice joints !
|
|
detailfreak
Full Member
Member since: July 2012
Crazy Swede
Posts: 369
Jul 28, 2012 15:12:35 GMT -5
Jul 28, 2012 15:12:35 GMT -5
|
Post by detailfreak on Apr 12, 2015 15:15:32 GMT -5
Anyone ever use Kencali products ? I have a bunch of cobblestone and was just wondering.  |
|
detailfreak
Full Member
Member since: July 2012
Crazy Swede
Posts: 369
Jul 28, 2012 15:12:35 GMT -5
Jul 28, 2012 15:12:35 GMT -5
|
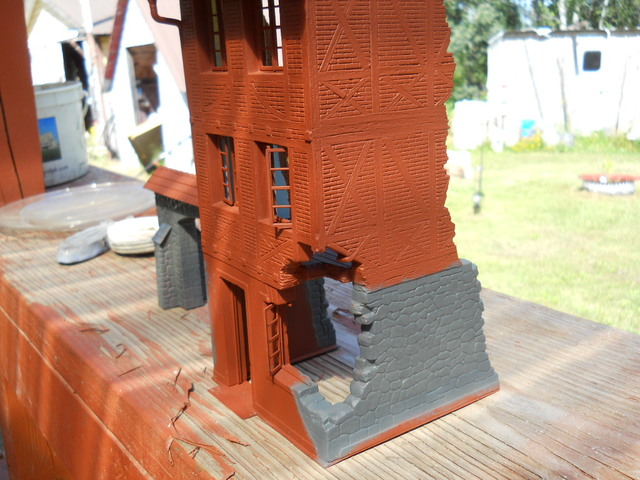
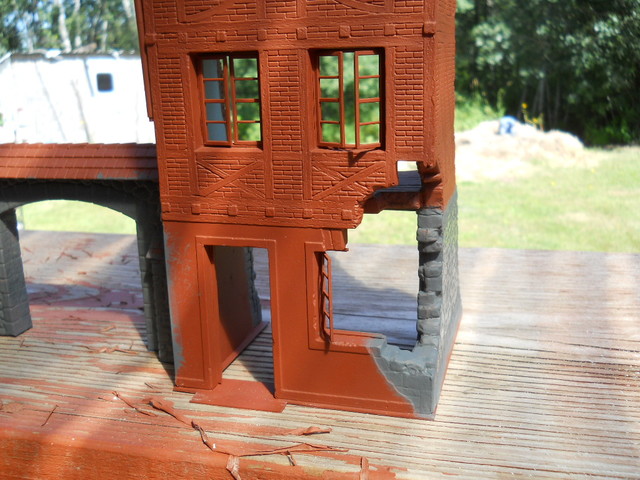
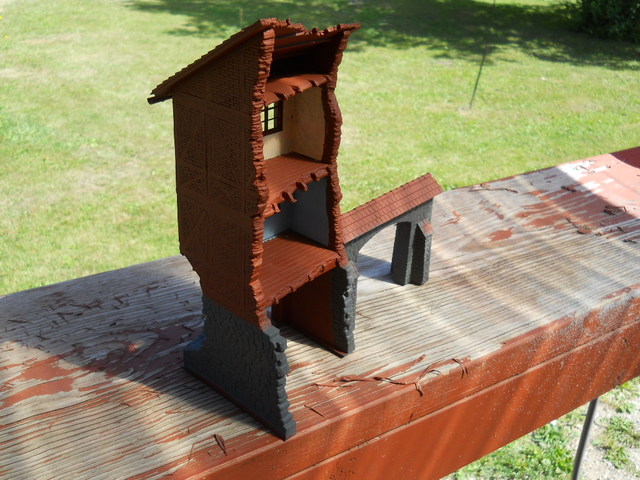
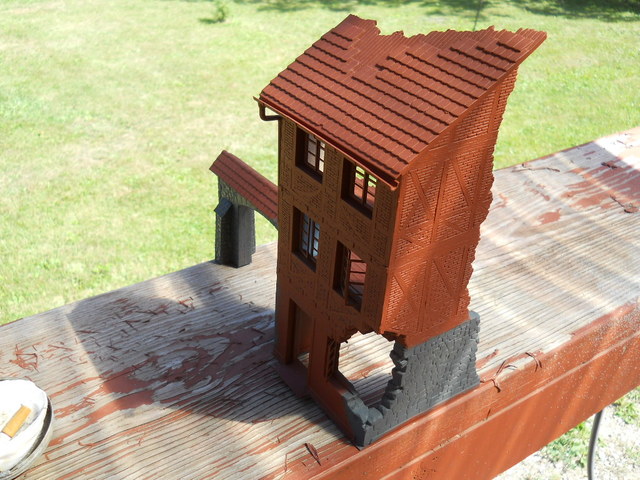
Post by detailfreak on Aug 20, 2015 10:06:58 GMT -5
|
|
|
|
Post by deafpanzer on Aug 20, 2015 11:24:28 GMT -5
Looking good buddy! Wait a minute I don't see snow in the background... I thought it always snow in Minnesota?
|
|
|
|
Post by Leon on Aug 20, 2015 11:25:56 GMT -5
No apologies need,and glad to see you back at the bench.Primer is looking good.
|
|
|
|
Post by wbill76 on Aug 20, 2015 12:14:09 GMT -5
Glad to see you've been able to make some progress on this one, looking good!
|
|
Wes
Full Member
Member since: November 2011
Posts: 686
Nov 16, 2011 9:34:50 GMT -5
Nov 16, 2011 9:34:50 GMT -5
|
Post by Wes on Aug 20, 2015 13:10:55 GMT -5
Good to see this one back
|
|
detailfreak
Full Member
Member since: July 2012
Crazy Swede
Posts: 369
Jul 28, 2012 15:12:35 GMT -5
Jul 28, 2012 15:12:35 GMT -5
|
Post by detailfreak on Dec 17, 2018 18:27:04 GMT -5
|
|