BJ
Full Member

Member since: July 2014
Posts: 378
Jul 24, 2014 12:31:35 GMT -5
Jul 24, 2014 12:31:35 GMT -5
|
Post by BJ on Apr 23, 2015 1:05:08 GMT -5
Got some more done on the Bruckenleger IVc. Now have the Bridge Sections all made.. Now just to punch out a million rivets and glue them all on. Going to be interesting trying to paint this with all those Hollow sections.  The Pins connecting it to the Hull lower trunnions are just temporary. From looking at what photos I can find of this, The top deck looks like steel to me.. I know Trumpeters kit was wood, But I can't find any evidence confirming that. So I am going to make my steel. 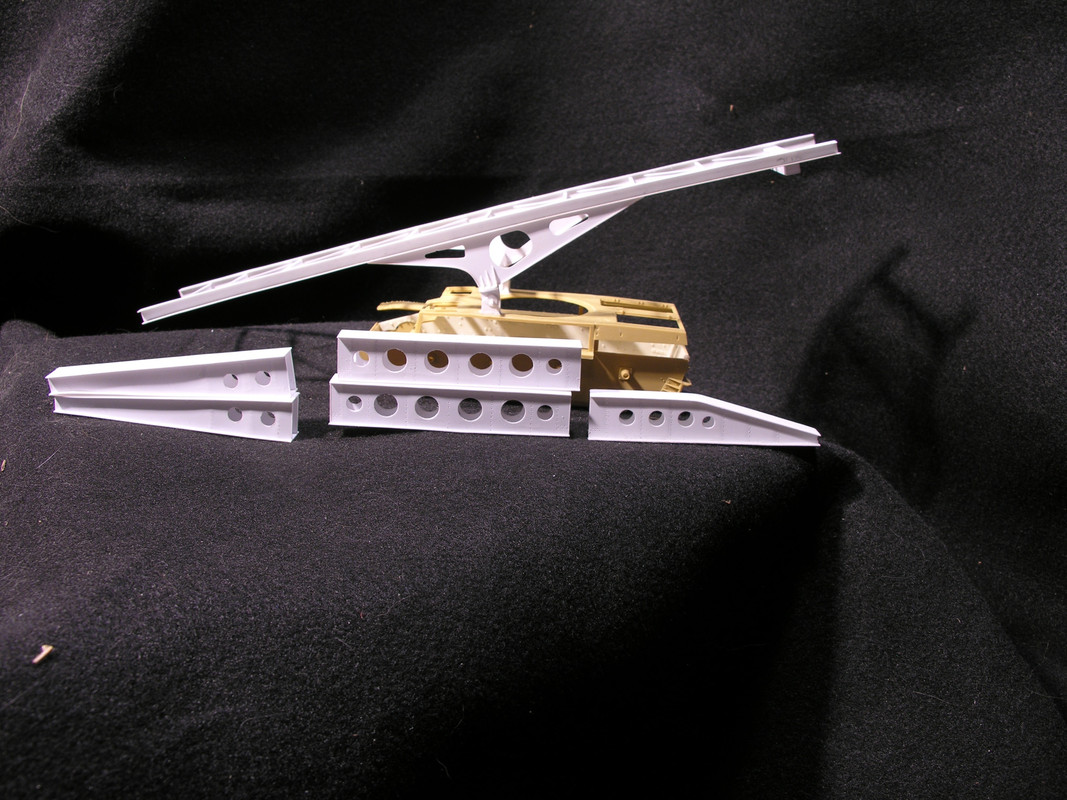 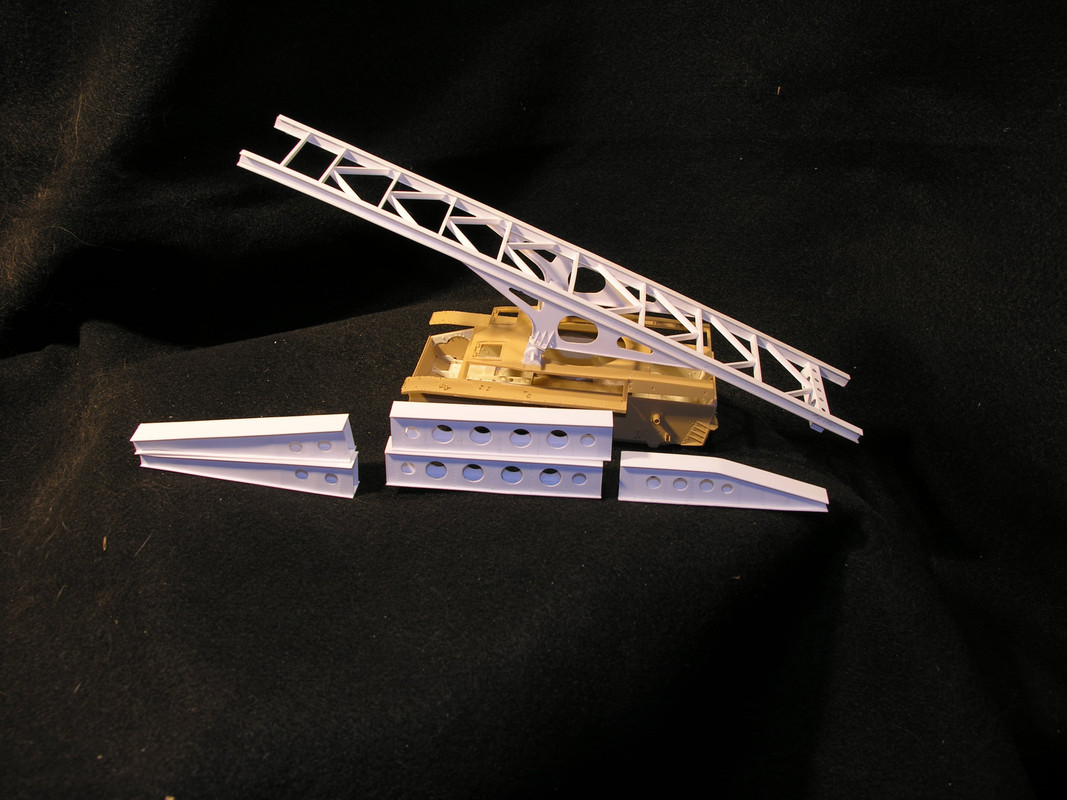 |
|
|
|
Post by Leon on Apr 23, 2015 4:40:52 GMT -5
Really making good progress Billie jean.  |
|
|
|
Post by dierk on Apr 23, 2015 5:27:43 GMT -5
Stunning work! I'm in awe of your skills (and toys). But you are wrong when you say your cats 'think everything in the house is for them to lay on' They don't think it, they know this with absolute certainty lol. You know the difference between dogs and cats? Dogs have owners, cats have servants.
And I agree that making a hobby into a job is usually not a good idea - I used to be a motorbike courier (messenger), thinking 'what better way to earn money doing what you love best' - but it got to the point where I wouldn't go out on the bike unless I got paid for it, really took the fun out of it. Also started to realise I wasn't immortal, and having survived about 10 years without serious injury (still averaging 1 crash a week, though) I decided to stop before my luck ran out on a permanent basis, as it did for a number of my friends and colleagues.
|
|
BJ
Full Member
Member since: July 2014
Posts: 378
Jul 24, 2014 12:31:35 GMT -5
Jul 24, 2014 12:31:35 GMT -5
|
Post by BJ on May 10, 2015 2:30:42 GMT -5
Made all new parts for the main bridge section as I wasn't real happy with the styrene parts on the first go around, so I decided to go ahead and machine out the sections with the rivets in place. Then made a mold of the flats sections and center supports, then cast up a bunch in resin then assembled. This way I can have the 2 bridge sections I am planning for the Dio. Also cut all the wood cross beams with the bandsaw. I ended up using some old growth Clear heart red cedar. This wood has an extremely tight grain and in 1/35th scale the grain looks similar to Douglas Fir or Pine. I cut a few extras since I was already set up so I'll have a few 6x6, 8x8 and 2x4 beams for a future house or something.  While working on the Bridgelayer tonight I was at the point that I needed to start adding all the welds, I really wasn't looking forward to hours of welding, so I started thinking, that there has to be a better way then my old way of rolling out magic sculpt and texturing or melting sprue with glue, so I started playing with different Puttys,Plastics, Glues and so on and came up with this and I am very happy with the results and to top it off, I ran all the welds in less then 20 minutes. First I took a syringe with a larger needle #10 I think and filed down the point until I had just a slight angle. Same way you would cut a tube of Caulk. This was my first line of thought was to see if I could squeeze the green crap through like a caulk gun, but it was to thick and plugged the needle. So this got me thinking. The green Stuff shrinks like hell when you use it anyway so how can I use this to my advantage.. So I thinned the bejesus out of it with lacquer thinner to the point I had more of a green wash then filler, now it will flow through the needle with little effort. Now I took it and applied a small bead along all my joints where I wanted a weld and as a added bonus it flows like a pin wash, Now for the real magic, Since the green Stuff has Toluene as its binder and I used Lacquer Thinner as my reducer they have different dry times. The lacquer almost evaporates on contact with the air and as the Toluene drys a little slower it causes the putty to crack as it shrinks and this results in a very convincing weld in my book. See for yourself and let me know what you think. I know I am happy with the results. One thing though. If using it on styrene only make one pass, if you miss a spot wait till it dries then go back and add some more. If you try to do while the mix is still wet you will scratch/score the styrene as these to chemicals are pretty hot and softens the styrene pretty fast, just like liquid glue or MEK. (I only use MEK as glue. I don't waste money on "Model" Glues.) Also if the needle gets plugged with dried green stuff, Drop it in some MEK. It will dissolve the gunk, I just threw it on another syringe and flushed it out a couple of times. Hope this helps some of you out on your projects.    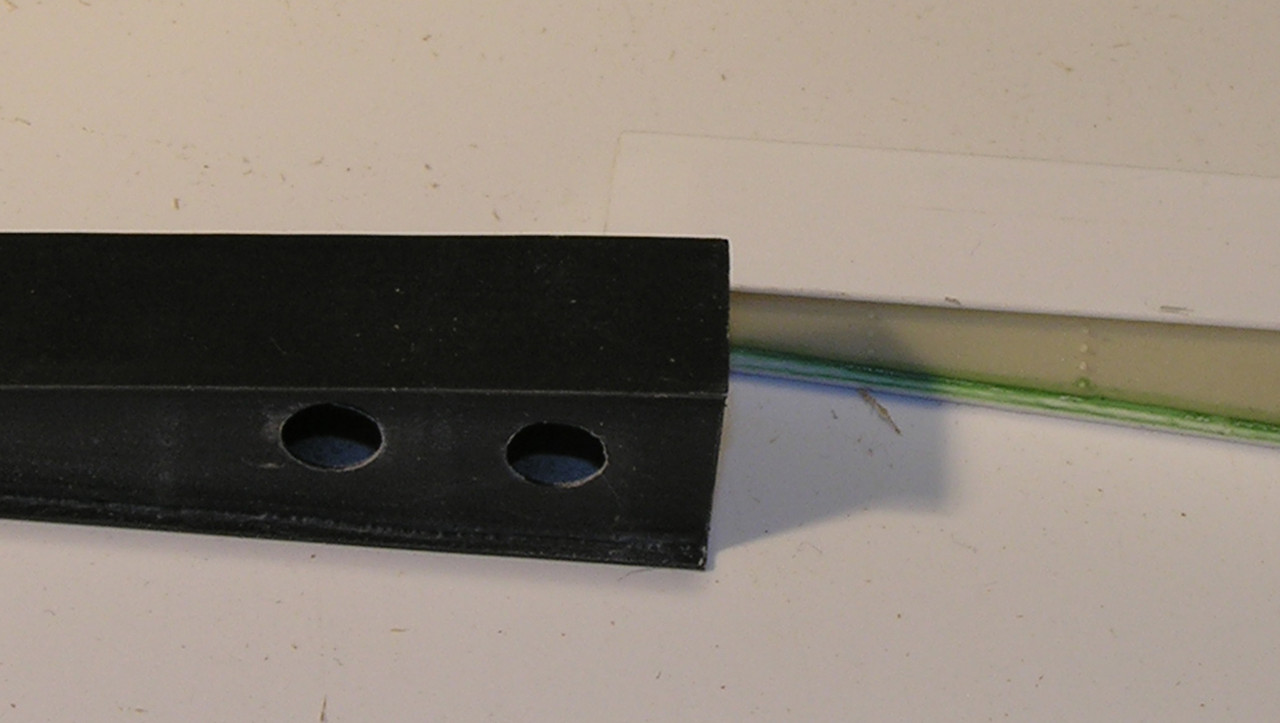 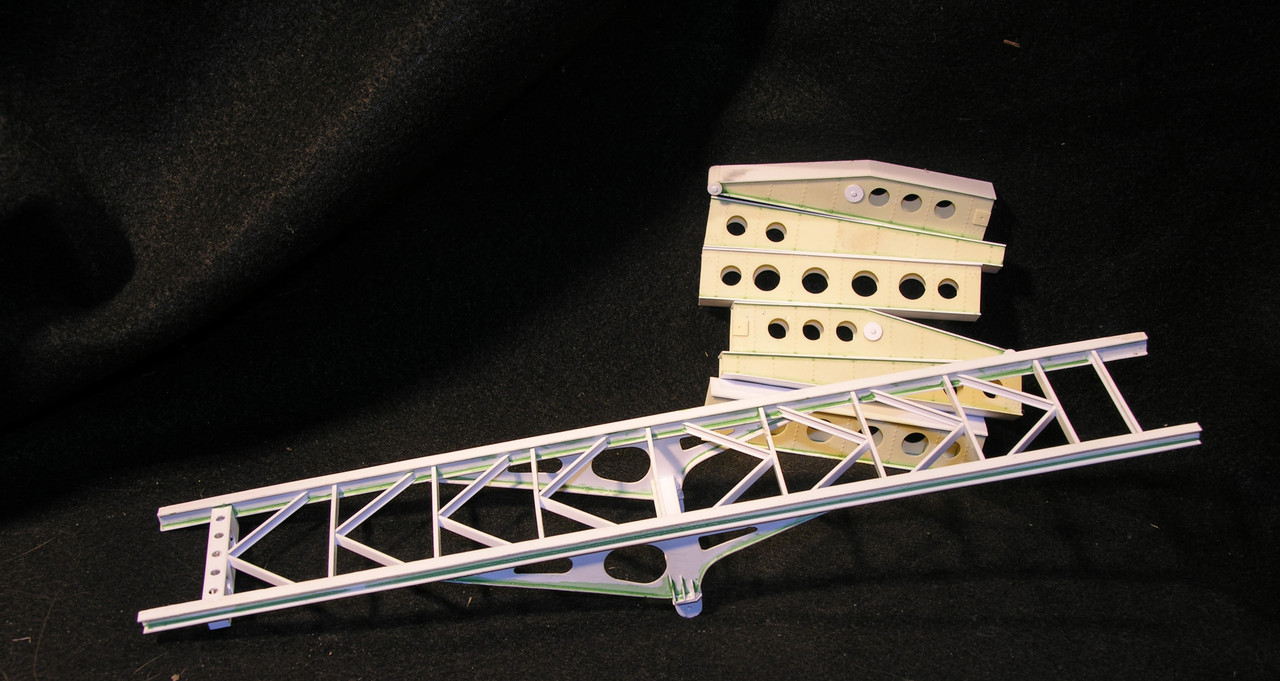 |
|
|
|
Post by kaytermarram on May 10, 2015 6:15:36 GMT -5
This really looks like a Mastermodel for production. Absolute amazing!
Frank
|
|
|
|
Post by Leon on May 10, 2015 6:28:51 GMT -5
Great job on the welds Billie Jean!
|
|
BJ
Full Member
Member since: July 2014
Posts: 378
Jul 24, 2014 12:31:35 GMT -5
Jul 24, 2014 12:31:35 GMT -5
|
Post by BJ on May 10, 2015 10:12:52 GMT -5
Thanks guys, Naa Kayterman, My days of worrying about if someone else could build my ideas are over. It's time just to build for the build. |
|
|
|
Post by wbill76 on May 10, 2015 12:10:46 GMT -5
Neat weld trick! Looking good BJ.
|
|
|
|
Post by dierk on May 16, 2015 2:36:51 GMT -5
Excellent work! Stunning display of skills. May I have a slice of your talent (with cream on top)? |
|
BJ
Full Member
Member since: July 2014
Posts: 378
Jul 24, 2014 12:31:35 GMT -5
Jul 24, 2014 12:31:35 GMT -5
|
Post by BJ on May 25, 2015 1:43:33 GMT -5
Well, Finally was able to get some desk and design time on my Bridge Layer. Here is a complete exercise in Insanity. The bridge was moved of the Top Gantry by a Hydraulic Chain Drive so I am at a point I need to do the Chain So I can get the rest of the gantry finished. So in my infinite wisdom I decided to do a individual Link Chain Drive. Step 1. Machine out the masters (OOPs Photo 1 and 2 are swapped) Step 2 Make mold of masters and cast up 10 sheets of Chain LInks. Step 3 Sand and Clean 800 Individual Chain Links. Step 4. Drill 800 Individual Chain Links Step 5 Start Assembling 800 Individual Chain Links. Step 6.. Take a Break and drink 3 bottles of wine and post all this on Facebook. Step 7 Wake up and repeat Step 5 700 more times. Each link consists of 2 parts and 2 pins so I made a jig where I do 15 at a time roughly, 2 1/2 inches worth. After I get them all assembled I put them in my Mini vice and mushroom all the heads to hold them all together. Now that I have the process down I can do a 15 link section in around 30 minutes so we'll see where I get to tomorrow. I figure I roughly need 40 inches of chain to do both drives..   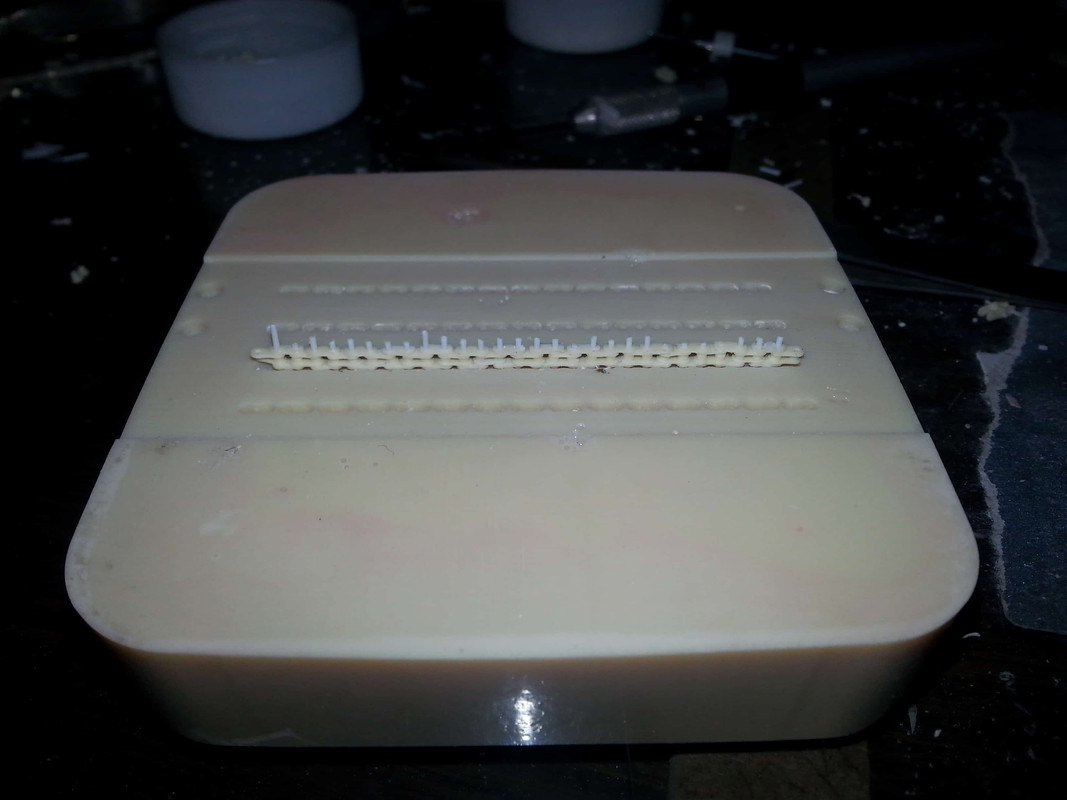    |
|
|
|
Post by dierk on May 25, 2015 2:08:20 GMT -5
And they say I'm a glutton for punishment - you redefine the term! Well done though! Thumbs Up!
|
|
|
|
Post by Leon on May 25, 2015 6:00:38 GMT -5
WOW!!!!  That is totally insane....Your doing an awesome job Billie Jean,the chain looks great. |
|
Foenetik
Full Member
Member since: March 2014
Posts: 573 
|
Post by Foenetik on May 25, 2015 7:33:25 GMT -5
i can see why you decided to cast your own chain now. the top studio ones are less work but way more money. and really that chain looks good. you did a nice job. cant wait to see more.
|
|
John Everett
Full Member
Member since: January 2012
July, 2016 MoM Winner
Posts: 1,278
Jan 17, 2012 0:53:48 GMT -5
Jan 17, 2012 0:53:48 GMT -5
|
Post by John Everett on May 25, 2015 8:33:56 GMT -5
Holy crap!
That's beautiful work!
|
|
afvfan
Senior Member

Member since: December 2012
Bob
Posts: 1,772
Dec 10, 2012 17:32:38 GMT -5
Dec 10, 2012 17:32:38 GMT -5
|
Post by afvfan on May 25, 2015 9:30:12 GMT -5
WOW!!!! That is totally insane....Your doing an awesome job Billie Jean,the chain looks great. Ditto! That is insane! |
|
reserve
Senior Member
Member since: July 2012
Si vis pacem para bellum
Posts: 2,348
Jul 11, 2012 9:11:45 GMT -5
Jul 11, 2012 9:11:45 GMT -5
|
Post by reserve on May 25, 2015 10:20:42 GMT -5
Gorgeous! My patience does not extend nearly as far as yours apparently, if I tried such a thing I'd be in the psycho ward in short order
Regards,
Mark
|
|
BJ
Full Member
Member since: July 2014
Posts: 378
Jul 24, 2014 12:31:35 GMT -5
Jul 24, 2014 12:31:35 GMT -5
|
Post by BJ on May 25, 2015 11:56:23 GMT -5
Thanks Guys.. This is why I usually have 1 or 2 major builds going at once and join the Group Builds in between.. It keeps one from suffering burnout. The Joys of A.D.D. |
|
TomN
Full Member
Member since: August 2013
Posts: 143
|
Post by TomN on May 25, 2015 12:26:13 GMT -5
Amazing work Billie Jean! Sometimes in the back of your head you just know the best way to do something, crazy as it seems... Wow, three bottles... Bravo!!! Tom |
|
elco
Full Member
July & Oct 2014 MoM Winner
Member since: May 2013
MOY 2014 Winner
Posts: 660
|
Post by elco on May 25, 2015 13:02:50 GMT -5
It is insanity! Great work, this is mind blowing!
|
|
legend
Full Member
Member since: November 2011
Posts: 577
Nov 30, 2011 13:49:32 GMT -5
Nov 30, 2011 13:49:32 GMT -5
|
Post by legend on May 25, 2015 13:11:34 GMT -5
Boy! Am I glad I didn't include chains in my build all those years ago. Ignorance is bliss!!!!!!!
Bill
|
|
|
|
Post by wbill76 on May 25, 2015 14:58:52 GMT -5
Chain will be an impressive detail feature once you get it all together BJ! In the meantime, make sure you've got a well stocked wine cellar to draw on.  |
|
Deleted
Member since: January 1970
Posts: 0
Apr 24, 2024 12:33:07 GMT -5
Apr 24, 2024 12:33:07 GMT -5
|
Post by Deleted on Jun 22, 2015 18:24:33 GMT -5
Talking about limited editions, I've recieved these pre-production samples from Billie Jean the last week. Considering that honor of the fact that I'm among the first few to see these up close and personal, it took a couple of days to work up the guts to open the package...just as I've expected: gorgious and delicate! See some of them soon in my DML Pz IV/70(a) Thank you Billie Jean! 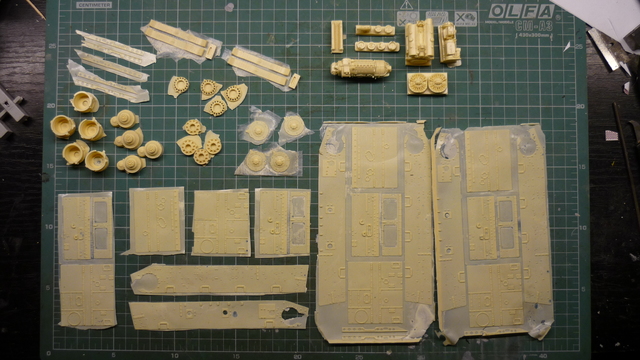 |
|
|
|
Post by panzerjager2 on Jul 11, 2015 23:28:45 GMT -5
WOW is all I can say
|
|
4bogreen
Full Member
Member since: January 2014
On the bench; Yak-1B, T-30, T-34 model 1940
Posts: 568
|
Post by 4bogreen on Jul 13, 2015 4:30:37 GMT -5
Awesome work!!!!!
|
|
|
|
Post by Tobi on Jul 13, 2015 13:19:23 GMT -5
So, when's the chain going into mass production? I have a use for this, too! Offering Italian wine...  |
|
BJ
Full Member
Member since: July 2014
Posts: 378
Jul 24, 2014 12:31:35 GMT -5
Jul 24, 2014 12:31:35 GMT -5
|
Post by BJ on Jul 13, 2015 16:17:20 GMT -5
LOL.. I wouldn't wish that upon anyone. If I was to make it again I would do things a little different. When I started making this I never planned on anyone else trying to build it. |
|
remarc777
Full Member
Member since: October 2013
May 2014 MoM winner
Posts: 142
|
Post by remarc777 on Oct 8, 2015 15:11:37 GMT -5
Hi there Billy Jean,
First off, I want to congratulate you on a job amazingly done so far: incredible! I don't like building that much myself, it's a "must do" that only gets me to the point where I want to be: weathering and diorama. Let alone PE and/or scratchbuilding. My deepest respect for your work....
Wich gets me to this: are you any further on this one? I'd love to see some progress  . .
Thanks for the inspiration!
greetings, Richard. |
|
BJ
Full Member
Member since: July 2014
Posts: 378
Jul 24, 2014 12:31:35 GMT -5
Jul 24, 2014 12:31:35 GMT -5
|
Post by BJ on Oct 23, 2015 14:49:05 GMT -5
Thanks remarc,
I recently acquired a slew of new information on the this version so I am having to make some changes, So in short. Yes. I have worked on it some but more on the backside of research and redesigning parts.
I have been so tied up with my real work that I haven't had a chance to actually build on it. Now that things are finally slowing down a bit and I will be wrapping up a build review this weekend I will be getting back on it soon.
Been doing some conversion/update parts for the 1/16th scale PZ IV Trumpy kit and that should be out in the next week or so.
I am going to take a break from anything Panzer IV related for a few weeks as I have been looking at Panzer IV parts and designs pretty much non stop for the last 2 years.
So I am going to take a break and actually build something just for me that I have been wanting to do for some time and it ties in with the beer budget build.
The 17cm K-18.
Should be starting a build log in the next few days on this kit.
|
|


 That is totally insane....Your doing an awesome job Billie Jean,the chain looks great.


 .
.