mrversatile
Full Member
   July '23 Showcased Build Awarded
Member since: January 2013
Posts: 682
Jan 20, 2013 10:52:24 GMT -5
Jan 20, 2013 10:52:24 GMT -5
|
Post by mrversatile on Jun 14, 2017 19:48:27 GMT -5
While waiting for my missing sprue for my bf-110C to arrive, I decided to jump into another Tamiya offering. Its the newly released 2016 Acura NSX. The complicated body is beautifully cast and as per usual Tamiya, the kit includes window masks, metal transfers, and nicely cast wheels with correctly sized tires. The color will be a tri-coat factory color, "Valencia Red," and the following pictures will show that I have already prepared, primed, and painted the base and mid coats of the Gravity colors lacquer on the body parts. These went on soooo smooth and you can see the results prior to the clear coat application. I am also adding some factory optioned carbon fiber decals by Studio 27. 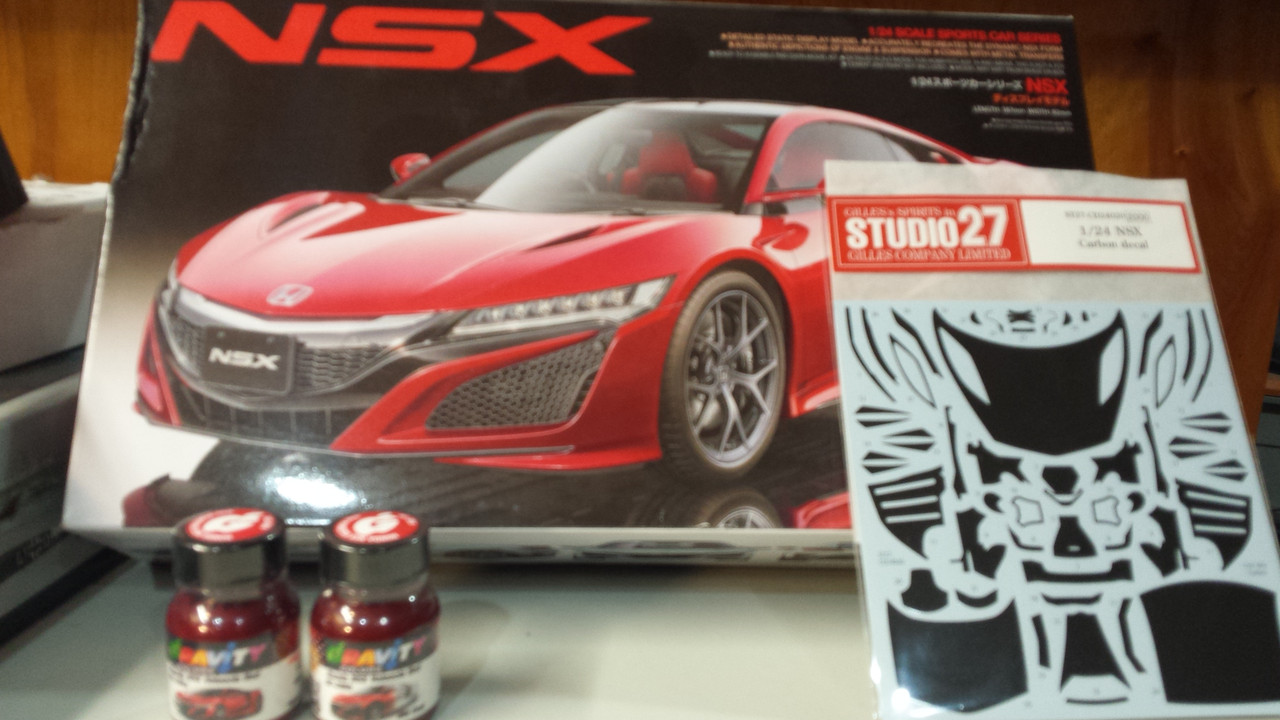 mold lines on the body were cleaned up, then the body was sanded and primed with Tamiya fine primer. 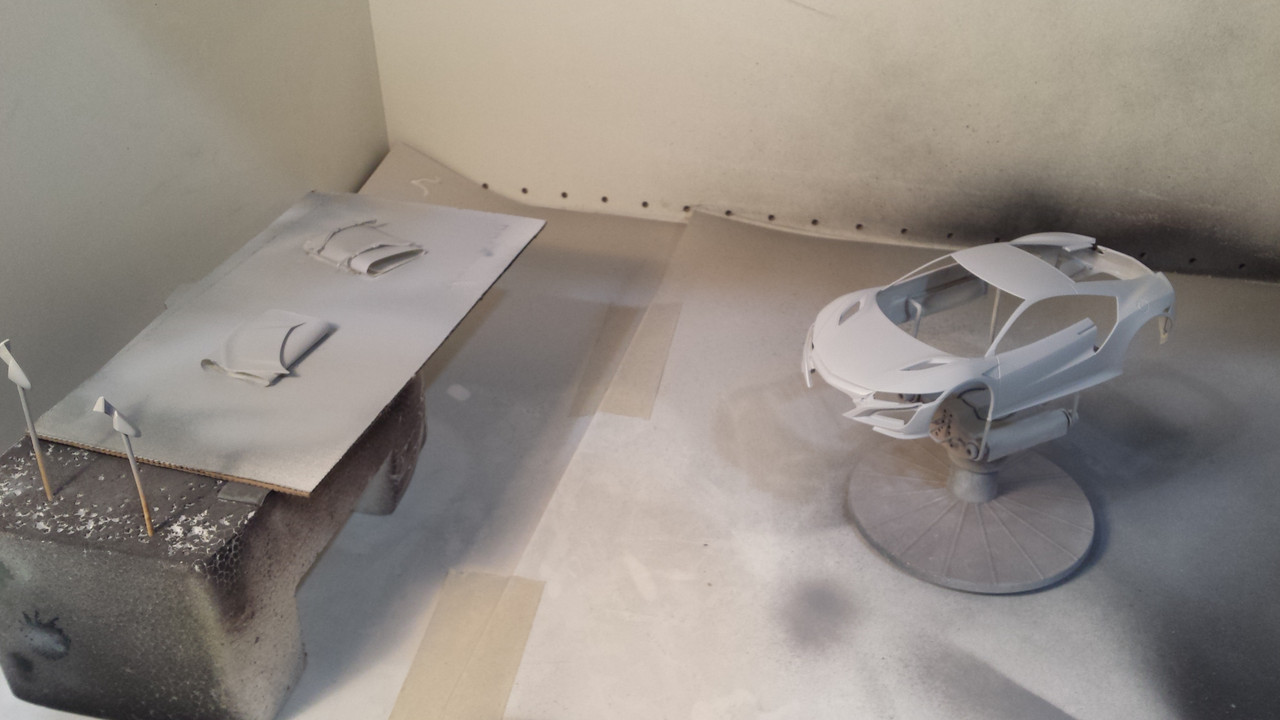 Here are the body parts painted with the base and mid-coats prior to clear coat 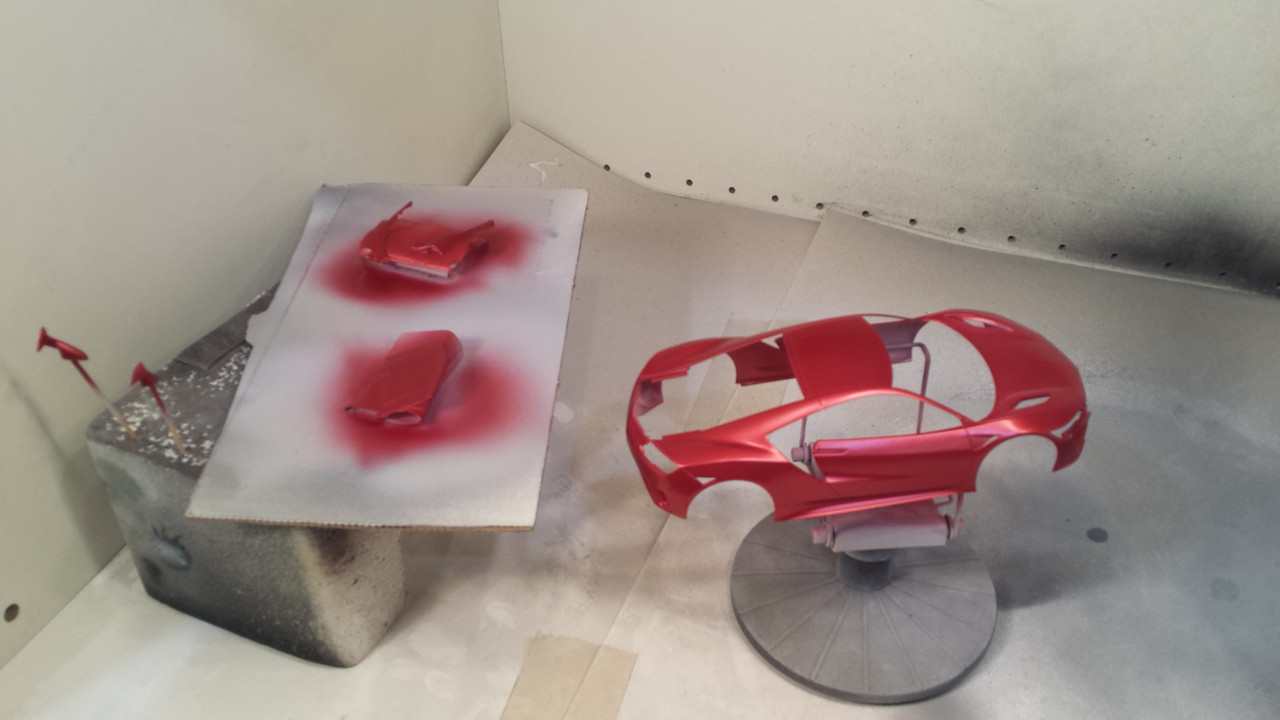 |
|
|
|
Post by Leon on Jun 15, 2017 4:40:21 GMT -5
That looks sharp Gil!
|
|
jpc1968
Full Member
  
Member since: May 2015
May '17 Co-Mom Winner, October '17 MoM Winner
Posts: 504 
|
Post by jpc1968 on Jun 15, 2017 7:25:28 GMT -5
Nice
|
|
John Everett
Full Member
  
Member since: January 2012
July, 2016 MoM Winner
Posts: 1,278
Jan 17, 2012 0:53:48 GMT -5
Jan 17, 2012 0:53:48 GMT -5
|
Post by John Everett on Jun 17, 2017 18:08:52 GMT -5
The car painting has always been a mystery to me.
I can succeed at a nice gloss.
But I've no idea how they get that appearance of gloss under a gloss over a clear gloss protected by a layer of gloss. You know what I mean.
|
|
mrversatile
Full Member
   July '23 Showcased Build Awarded
Member since: January 2013
Posts: 682
Jan 20, 2013 10:52:24 GMT -5
Jan 20, 2013 10:52:24 GMT -5
|
Post by mrversatile on Jun 19, 2017 0:01:10 GMT -5
John, the color or base coat is really a satin finish, the mid coat is a tinted transparent pearl to add an effervescence to the color which also lacks gloss. That is where the clear gloss coat comes in. It makes all the previous coats pop and provides depth. This clear gloss coat can be sanded and polished smooth to create a flawless finish.
|
|
jpc1968
Full Member
  
Member since: May 2015
May '17 Co-Mom Winner, October '17 MoM Winner
Posts: 504 
|
Post by jpc1968 on Jun 19, 2017 15:28:46 GMT -5
Did you understand all that?  |
|
John Everett
Full Member
  
Member since: January 2012
July, 2016 MoM Winner
Posts: 1,278
Jan 17, 2012 0:53:48 GMT -5
Jan 17, 2012 0:53:48 GMT -5
|
Post by John Everett on Jun 19, 2017 19:08:50 GMT -5
Are you using model products or paint designed for full scale cars? I read that the Zero paint has fumes so bad they make model products look kid-friendly by comparison.
|
|
mrversatile
Full Member
   July '23 Showcased Build Awarded
Member since: January 2013
Posts: 682
Jan 20, 2013 10:52:24 GMT -5
Jan 20, 2013 10:52:24 GMT -5
|
Post by mrversatile on Jun 19, 2017 23:10:40 GMT -5
John, the paints I used for this and my Mercedes build are lacquer based paints made for scale model cars from Gravity Paints. These paints are factory colors with scaled down metallic flakes for a more realistic appearance. There are other model paint companies like Scale Finishes and Model Car World which also make Lacquer based scale paints. Zero paints, as you mentioned, also offer their own line of lacquer paints. The common denominator here is that they are all lacquer for a reason. Lacquer dries quickly reducing the chance of particles ruining your finish and they allow one to re-coat and polish more quickly. The disadvantage is they are caustic to breath and require protection to use safely. I have also used actual 1:1 car touch up paint for factory colors not offered by the aforementioned and these are usually urethanes that I cut with MEK, another caustic chemical. It isn't a problem for me because I use a spray booth and respirator, but these takes some experience and trial and error to get correct. One has to be careful of the risk of mixing different paints or types. Some aren't compatible and will ruin a lot of effort in preparation. These are the challenges of car modeling, often overlooked, when compared to other genres.
|
|
James Duff
Full Member
  
Member since: November 2013
Posts: 101
Nov 16, 2013 16:44:36 GMT -5
Nov 16, 2013 16:44:36 GMT -5
|
Post by James Duff on Jul 3, 2017 22:49:23 GMT -5
Just be aware with this one, those metal transfers aren't transfers, they're metal stickers. If you try to "transfer" them like you would the traditional kind...well you can imagine that doesn't go very well.
|
|
|
|
Post by mustang1989 on Jul 16, 2017 6:44:21 GMT -5
The car painting has always been a mystery to me. I can succeed at a nice gloss. But I've no idea how they get that appearance of gloss under a gloss over a clear gloss protected by a layer of gloss. You know what I mean. Sanding grits whether they be the small sanding pads or in paper form with grits ranging from 3200 all the way up to 12000 grit are your friends in the paint smoothing business of scale auto modeling (although I'm straying from the pads as they'll scratch the finish with the harsh corners). Alot of times no matter how smooth the paint/ gloss lays down it's going to dry with an ever so slight amount of roughness to it. Depending on how rough the finish turns out will dictate where I begin my sanding grit choice to start the wet sanding process. If it's pretty bad then I'll start with 3200 and work my way through all the ranges to 12000. If it's fairly smooth to begin with I'll start at 4000 or so. Once I've sanded everything down (being PARTICULARLY careful at the raised details and corners-you'll burn through the paint quicker than you think at those points) to where I want it then I'll wash the entire (body in this case) in cool water and mild detergent (cool water dissipates soap suds quicker than warm water.). If its the gloss coat that I wet sanded now we're ready for the Novus 2 polish using a chamois (like what you use to dry your 1:1 car-you can't get much smoother than cow skin for polishing) then after I'm satisfied with those results I'll move to the Novus 1 and finish 'er off. I thought the same as you when I started auto modeling 3 years ago. Attaining that "perfect" gloss finish was truly a mystery to me after building aircraft for so long. It takes a few tries but it aint all that bad. Hope this helps out in addition to the great advice that Gil has already given. |
|
|
|
Post by mustang1989 on Jul 16, 2017 6:46:58 GMT -5
Will be watching this Gil. Looks like a pretty "kick A " project to me.
|
|
mrversatile
Full Member
   July '23 Showcased Build Awarded
Member since: January 2013
Posts: 682
Jan 20, 2013 10:52:24 GMT -5
Jan 20, 2013 10:52:24 GMT -5
|
Post by mrversatile on Aug 16, 2017 22:29:35 GMT -5
|
|
|
|
Post by Leon on Aug 17, 2017 4:32:16 GMT -5
The body and wheels look sharp Gil!  |
|
|
|
Post by dupes on Aug 17, 2017 5:52:24 GMT -5
Dang. That is hot!
How do you like the Gravity paint? Seems like they come with a lot of warnings and caveats...still easy to use?
|
|
mrversatile
Full Member
   July '23 Showcased Build Awarded
Member since: January 2013
Posts: 682
Jan 20, 2013 10:52:24 GMT -5
Jan 20, 2013 10:52:24 GMT -5
|
Post by mrversatile on Aug 17, 2017 6:48:34 GMT -5
Thanks, and Dupes, Gravity Paints are super easy to use. Just remember to keep the PSI at 15 and spray close as you do most auto lacquer and it goes on smooth as glass. In fact, this is one of the easiest paint jobs I have ever done. Even the clear, (UPOL clear decanted from spray and thinned further), left me with very little polishing.
|
|
|
|
Post by mustang1989 on Aug 17, 2017 6:58:44 GMT -5
That paint work looks magnificent!!! Wow Gil!!!
Didn't know that tip about the 15psi. I'll be giving that a shot. |
|
|
|
Post by wing_nut on Aug 17, 2017 11:03:19 GMT -5
Hmmm makes me wanna do a car. Love that color.
|
|
|
|
Post by mustang1989 on Aug 17, 2017 16:20:06 GMT -5
Hmmm makes me wanna do a car. Love that color. Go for it.  |
|
reserve
Senior Member
   
Member since: July 2012
Si vis pacem para bellum
Posts: 2,373
Jul 11, 2012 9:11:45 GMT -5
Jul 11, 2012 9:11:45 GMT -5
|
Post by reserve on Aug 21, 2017 1:28:52 GMT -5
Ah, the shiny...I really must learn how to do this one day
So good it almost hurts to look at, stupendous job Gil
Regards,
Mark
|
|
mrversatile
Full Member
   July '23 Showcased Build Awarded
Member since: January 2013
Posts: 682
Jan 20, 2013 10:52:24 GMT -5
Jan 20, 2013 10:52:24 GMT -5
|
Post by mrversatile on Aug 21, 2017 7:51:23 GMT -5
Thanks guys, more to follow soon. This has been on my bench too long.
|
|
|
|
Post by mustang1989 on Aug 22, 2017 13:29:22 GMT -5
Thanks guys, more to follow soon. This has been on my bench too long.
Good God do I ever know that feeling!!!! Looking forward to more Gil.
|
|
mrversatile
Full Member
   July '23 Showcased Build Awarded
Member since: January 2013
Posts: 682
Jan 20, 2013 10:52:24 GMT -5
Jan 20, 2013 10:52:24 GMT -5
|
Post by mrversatile on Sept 5, 2017 15:16:59 GMT -5
|
|
|
|
Post by Leon on Sept 5, 2017 15:25:05 GMT -5
Sharp looking interior and engine Gil!  |
|
reserve
Senior Member
   
Member since: July 2012
Si vis pacem para bellum
Posts: 2,373
Jul 11, 2012 9:11:45 GMT -5
Jul 11, 2012 9:11:45 GMT -5
|
Post by reserve on Sept 5, 2017 23:45:45 GMT -5
Very nice job brother
I wonder just how much work would have been involved to have the mill exposed, does not look like it'd be an easy task
Regards,
Mark
|
|
mrversatile
Full Member
   July '23 Showcased Build Awarded
Member since: January 2013
Posts: 682
Jan 20, 2013 10:52:24 GMT -5
Jan 20, 2013 10:52:24 GMT -5
|
Post by mrversatile on Sept 6, 2017 10:03:11 GMT -5
Thanks guys, and Mark, I guess the easiest way would be to just leave the undercarriage pan off and install the clear engine cover or just leave it out but I like to reproduce factory stock examples so that isn't an option for me.
|
|
|
|
Post by mustang1989 on Sept 6, 2017 12:26:46 GMT -5
Thanks guys, and Mark, I guess the easiest way would be to just leave the undercarriage pan off and install the clear engine cover or just leave it out but I like to reproduce factory stock examples so that isn't an option for me. Glued to the screen dude!! Fantastic progress so far Gil. Do I see an entry at the end of the month? |
|
mrversatile
Full Member
   July '23 Showcased Build Awarded
Member since: January 2013
Posts: 682
Jan 20, 2013 10:52:24 GMT -5
Jan 20, 2013 10:52:24 GMT -5
|
Post by mrversatile on Sept 6, 2017 15:26:18 GMT -5
Thought I would just add a quick update. I finished the carbon fiber decaling of the engine cover and installed it along with the glass firewall partition. I also have a "before" picture of the rear lower chassis cover with diffuser which will also be covered in carbon fiber. Thanks Joe, and yes I anticipate another MOM effort at the end of this.  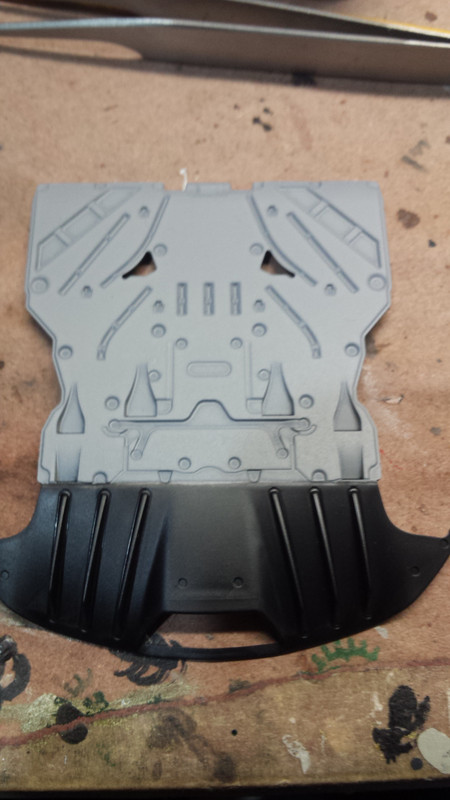 |
|
mrversatile
Full Member
   July '23 Showcased Build Awarded
Member since: January 2013
Posts: 682
Jan 20, 2013 10:52:24 GMT -5
Jan 20, 2013 10:52:24 GMT -5
|
Post by mrversatile on Sept 9, 2017 8:57:38 GMT -5
Ok, last picture before this one is done....I just wanted to show the rear chassis cover with carbon fiber added to the rear diffuser. Now you can compare the previous picture. 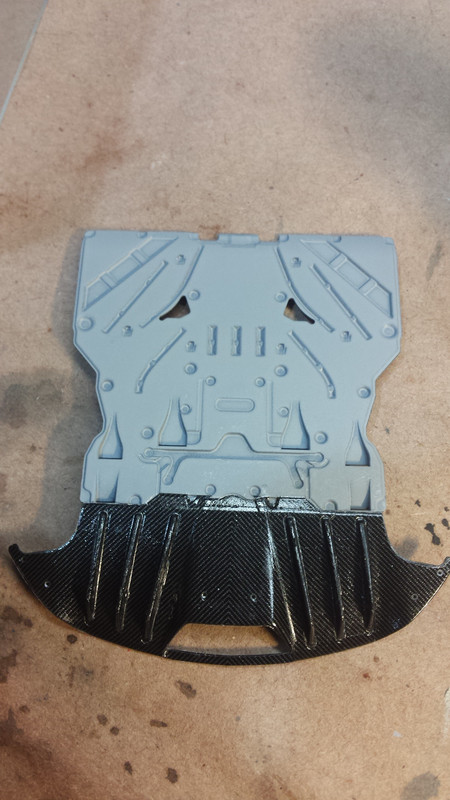 |
|
|
|
Post by Leon on Sept 9, 2017 9:18:12 GMT -5
The carbon fibre makes a huge difference Gil!  |
|
mrversatile
Full Member
   July '23 Showcased Build Awarded
Member since: January 2013
Posts: 682
Jan 20, 2013 10:52:24 GMT -5
Jan 20, 2013 10:52:24 GMT -5
|
Post by mrversatile on Sept 14, 2017 16:24:49 GMT -5
|
|