|
|
Post by bullardino on Jun 2, 2012 5:01:28 GMT -5
I'm building the base for my T-34, and I need to recreate some debris coming from wrecked buildings.
What's the best way to achieve a realistic result?
|
|
|
|
Post by spud on Jun 2, 2012 6:08:38 GMT -5
Plaster of Paris might be the best
|
|
|
|
Post by robbo on Jun 2, 2012 6:11:45 GMT -5
Make a thin, flat shape out of filler when it's dry break it up and add some cat litter to the dry mix too
|
|
|
|
Post by bullardino on Jun 2, 2012 7:22:44 GMT -5
The diorama should look like this: 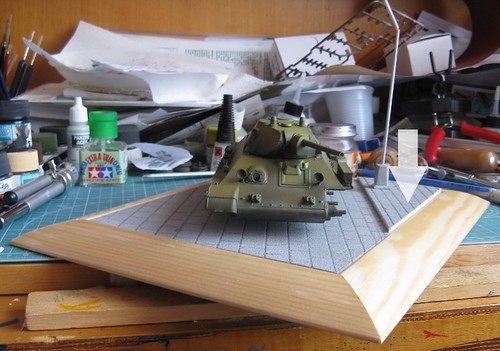 The arrow shows where I think the debris should be. |
|
|
|
Post by 406 Silverado on Jun 2, 2012 8:30:08 GMT -5
Like Robbo stated. You can take very small pebbles and mix with cat litre. The plaster thing is the best. Make it between 1/4 to about 1/2" thick and break it into pieces. You can make small or large pieces to give variety. Do a bit of stone carving into the chunks and your all set.
|
|
|
|
Post by spud on Jun 2, 2012 9:28:59 GMT -5
some Fine looking base you have there Luigi
|
|
|
|
Post by bullardino on Jun 2, 2012 9:31:07 GMT -5
Thanks spud, it all homemade  |
|
|
|
Post by TRM on Jun 2, 2012 9:36:16 GMT -5
Hi Luigi!!! Looks like your covered now!! I was going down the same path there...plaster, tiny wire pieces, wood, whatever you think could be blown out of a building would be there....the ruble alone would looks sweet!! Excellent work on the base too!!! |
|
panzerjager
Full Member

Member since: June 2012
Posts: 204
Jun 5, 2012 21:56:23 GMT -5
Jun 5, 2012 21:56:23 GMT -5
|
Post by panzerjager on Jun 8, 2012 21:14:54 GMT -5
Let me explain some methods I use for my Staghound Mk.III scene: I take a piece of plasticard and I sand and file to get a 1/35 "brick". I superglue it to a wood stick  I take some modelling clay, flattened rolling an old marker over it and then I push the plastic brick to obtain some molds. (Of course, you can buy rubber silicone molds instead of make your own) I prepar the plaster, adding some red brown pigment or acrilic paint, to color it (OK, is not the exact color, but the trick is, in case of the brick broke, not show the plaster white color) I pour the plaster on the molds, let it dry and...voilá....1/35 bricks. You can break it in pieces to obtain debris. In both cases may be necessary to paint it in a more suitable color. 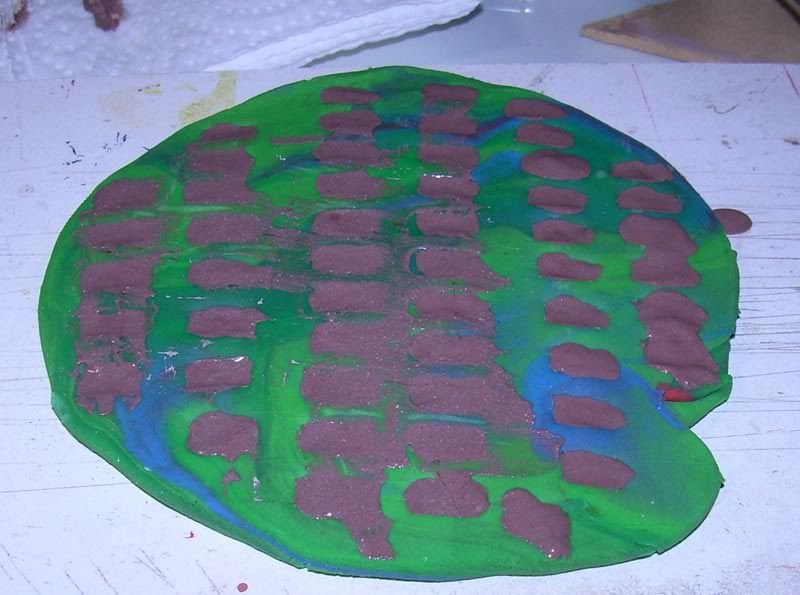 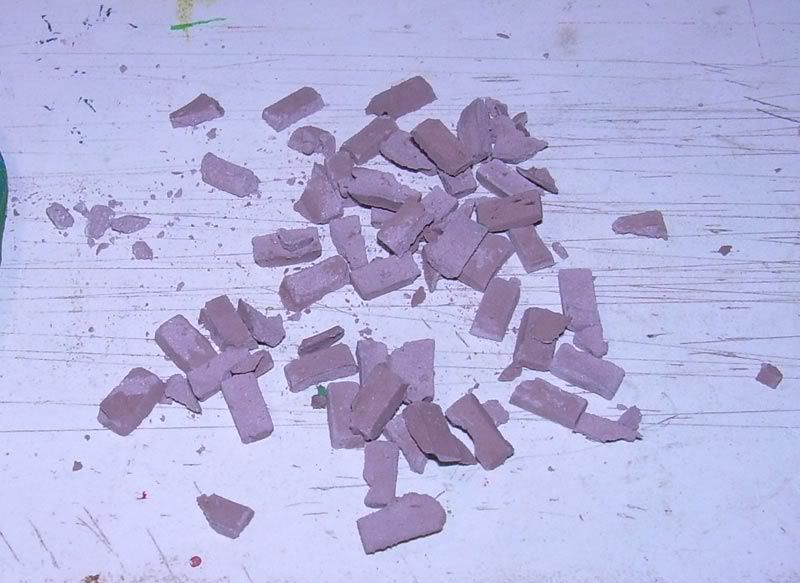 I complemented the debris with....debris; I mean, I take some pieces of real bricks, wrapped in paper, take my light hammer and I hit many times, thinking all the evil things of the world are wrapped in the paper: Bang! Bang! Bang! Ahhhhh!! Relaxing ;D I take a noodle strainer to separate the dust from the little parts, and store it in little jars: 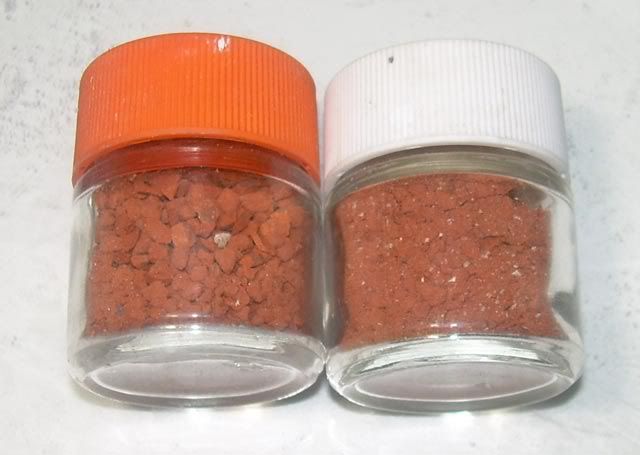 I made a little frame of plasticard (old plastic advertising, actually) and prepare more plaster, this time adding a little black acrilic paint to obtain grey color. I let it dry, then I draw some rectangles with a ruler and an old X-Acto blade, then brake the plaster in rectangles to obtain some concrete debris 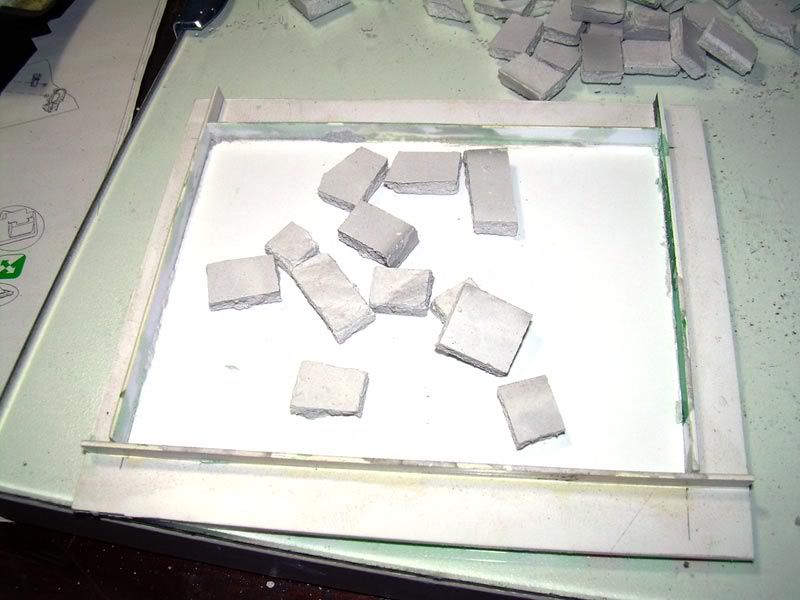 The elements in place: 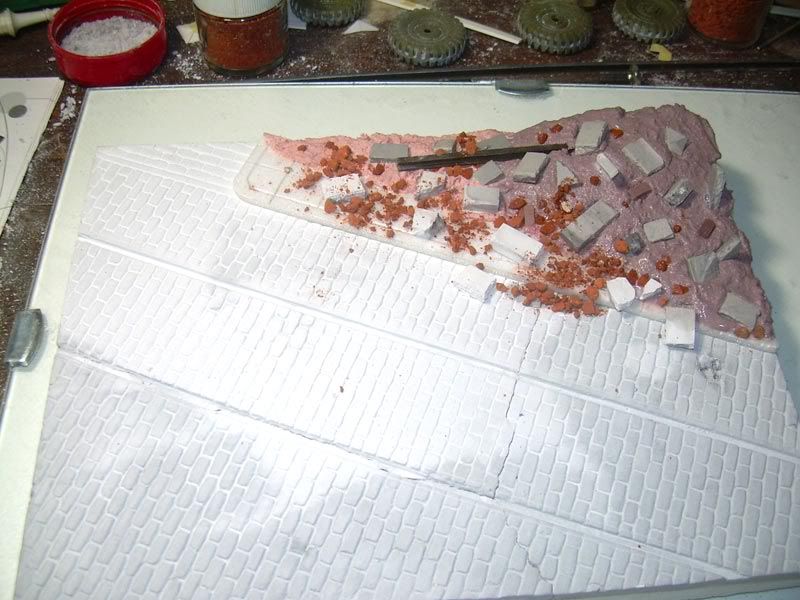 You can see the finished work in this spanish forum: www.calibre135.com/t6527-t17e1-staghound-mkiii-bronco-35021Sorry if the message is too long, but I like to explain my methods ;D And please excuse my bad english Darío |
|
|
|
Post by spud on Jun 9, 2012 5:04:58 GMT -5
Very cool sbs dario
|
|
|
|
Post by bullardino on Jun 9, 2012 10:56:37 GMT -5
Thanks for the sbs  It's truly inspiring. |
|
|
|
Post by 406 Silverado on Jun 9, 2012 18:08:42 GMT -5
Great SBS and awesome results Dario. That's what this forum is all about, sharing with others.
|
|
panzerjager
Full Member
Member since: June 2012
Posts: 204
Jun 5, 2012 21:56:23 GMT -5
Jun 5, 2012 21:56:23 GMT -5
|
Post by panzerjager on Jun 9, 2012 19:58:41 GMT -5
Well, I'm glad you like it! Let me show you a similar method to make ruined walls. Unfortunately, I have not detailed pictures of the steps, so I will try, in my poor english, to explain the method. I use any material to have idea of the display of the elements; in this case I made the ruined wall with cardboard and simulate the debris with cat litter (not used, please! ) 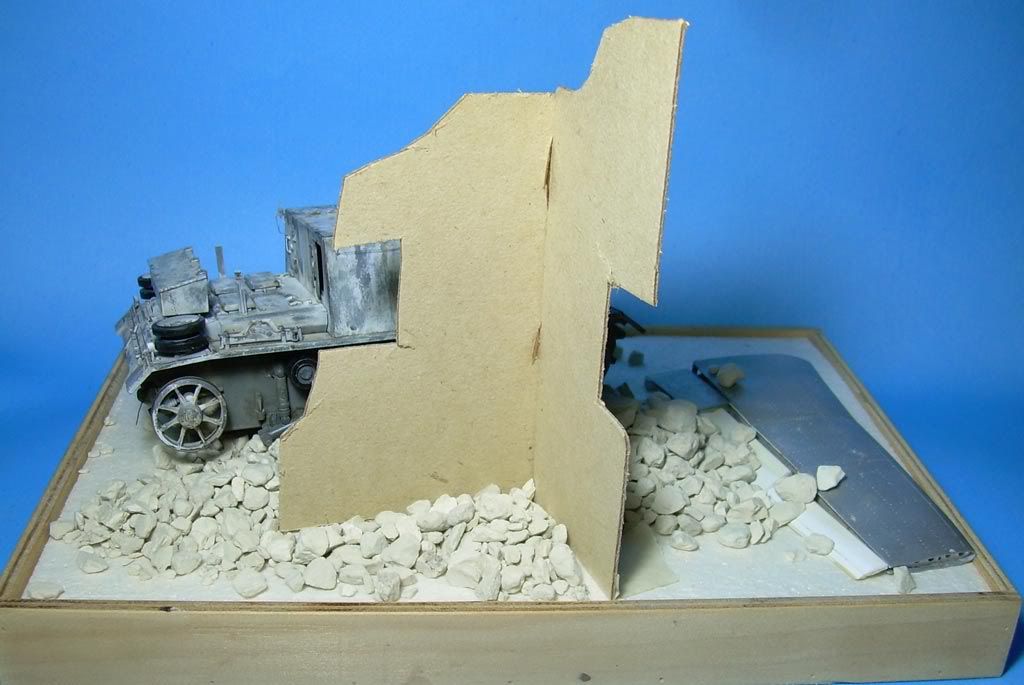 Then I make a simple drawing with MS Word, with the right measures. I transferred the drawing to a piece of plasticard; note that plasticard has a shining side and a dull one; I think the shinning side must be the side in contact with the plaster, it looks easier to remove the finished piece. I cut strips of plastic of the same wide of the final wall; this depends of the type of wall: with 1 or 2 lines of bricks, with or without er..."stucco"?, etc. I glue some rectangles of the same strips to mask the holes for the windows and /or doors. I prepare the plaster and pour it into the mold; I let it dry until it is almost dry and carefully remove it from the mold, with care not to break the plate. We will brake it anyway, but when and where we need, according to our plan. You can draw with a pencil where you want to brake the wall and then make some marks with a sharp blade or scriber and broke the part with your fingers. Don't discard the little parts broken, those will be used as part of the debris As the plaster is not completely dry, is easy to carve the bricks, stucco coat, small arms holes, etc. I usually use, again, an old ball pen or the tip of an old X-Acto knife or a scriber to make some grooves, separates the thick of a brick (1,5 - 2 mm. or so) and form the bricks; this grooves will serve later as a guide to add thin lines of wall filler diluted with water (after the brick was painted) and applied with a fine brush. This should be done on the smaller parts we obtain when broke the main plaster plate 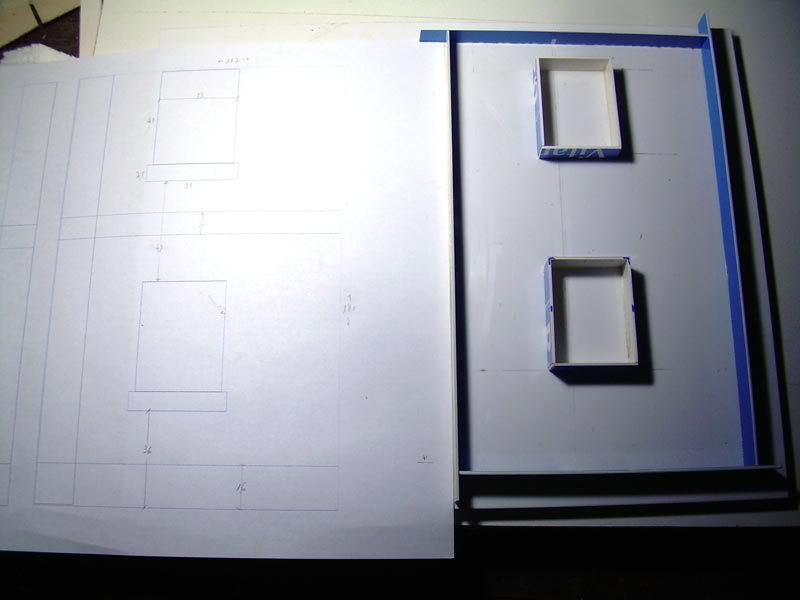 I use artist acrilic colors to paint the bricks: raw sienna is my favorite color for this; I use it pure or adding another colors: burnt siennaa, red, yellow, black...leave the artist in you emerge!! If I need references for the brick colors, I like to visit this webpage: en.diorama.ru/library/ I usually diluted my artist acrilics with windows cleaner, so they flux better than using just water. 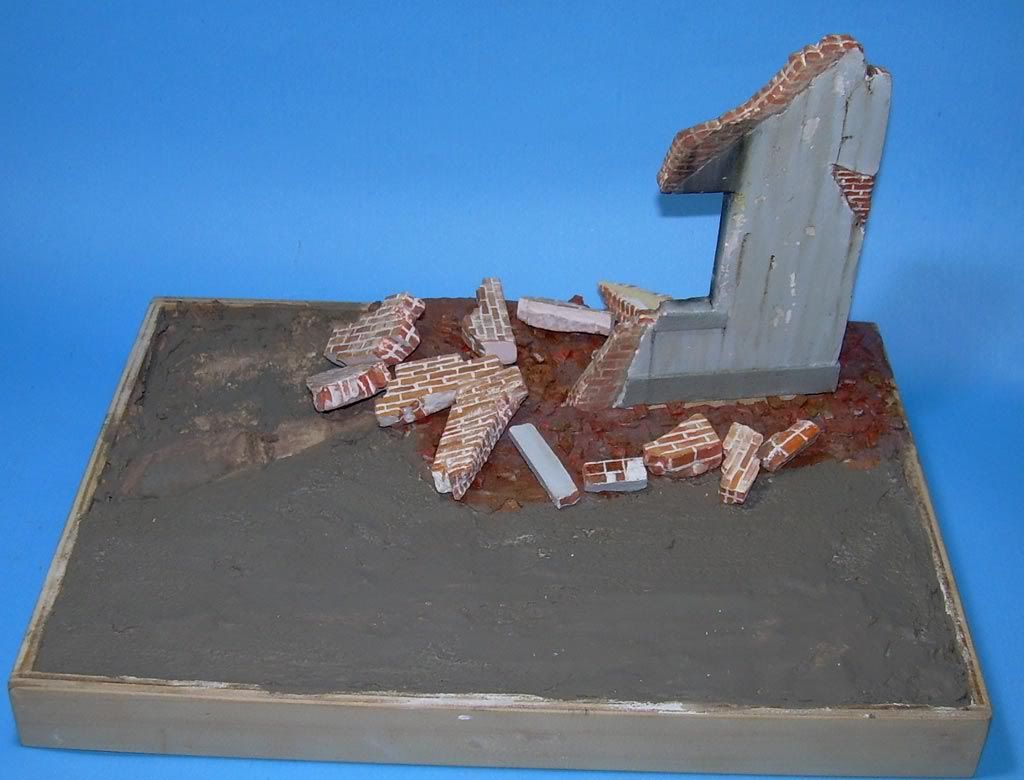 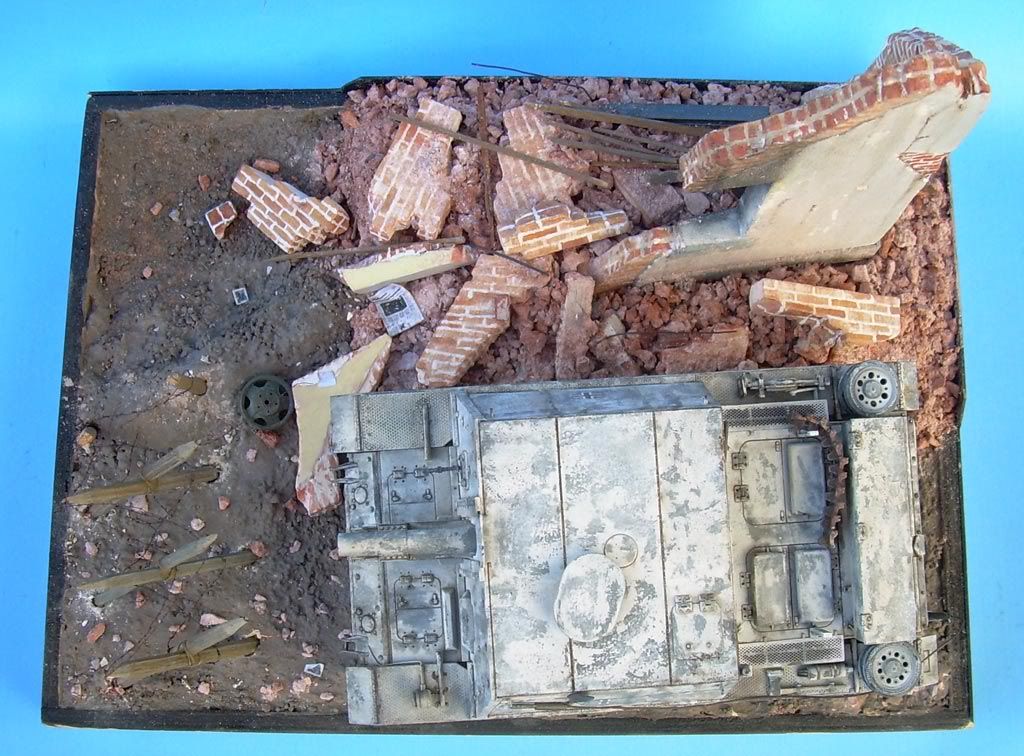 I finally study the display of the debris, including the small parts of walls and adding the debris made as I explain in the above post. You can add some brick dust (remember when we separate the broken bricks in jars?) and some plaster dust to imitate ...dust. All this materials can be glued with white glue. In case of make a corner of wall is better to insert toothpicks in one side and make the corresponding holes in the other wall, to reinforce the join. If you will imitate some paint on the walls, you can imitate the paint peeling too; paint the walls with the acrilics, in plaster or concrete color; Let it dry 6-12 hours, then paint the color of the wall and let it dry ...5 minutes or so; then use a good masking tape (or scotch tape) to peel off the paint; the concrete color will appear under the peeled paint This effect can be see in the next pic:  I use pigments and oils to weather the rest of the walls You can see the finished scene here: www.calibre135.com/t6756-stuig-33b-stalingrado-1942Well, that's all; please, let me know if I missed some detail or anything you need to know Darío |
|
|
|
Post by TRM on Jun 9, 2012 21:06:27 GMT -5
Hey Dario!! Thank you for posting this! No worries on posting this here, I think Luigi will not mind as the rest of us. I will create a link to this in the library until all the SBS links are resolved in to their own threads.
Thanks again, this is great!!
|
|
|
|
Post by bullardino on Jun 10, 2012 3:52:21 GMT -5
Another stunning example Dario Thanks for sharing. I hope to go on painting the base, so I'll experiment something in between the two methods |
|
|
|
Post by spud on Jun 10, 2012 6:45:50 GMT -5
wow this is fantastc Dario im going to have to try this
|
|
|
|
Post by robbo on Jun 10, 2012 7:04:46 GMT -5
Some very nice tips here for dio building
|
|
multicam
Senior Member

Member since: January 2012
Nate
Posts: 2,039
Jan 10, 2012 14:35:41 GMT -5
Jan 10, 2012 14:35:41 GMT -5
|
Post by multicam on Jun 10, 2012 10:39:45 GMT -5
Great stuff Dario and Panzerjager! Wonderful SBS's. Dario, what did you use for the window sill and frame on your wall? Plastic card or plaster or what?
|
|
panzerjager
Full Member
Member since: June 2012
Posts: 204
Jun 5, 2012 21:56:23 GMT -5
Jun 5, 2012 21:56:23 GMT -5
|
Post by panzerjager on Jun 10, 2012 11:40:59 GMT -5
Thanks, guys, glad you like it!
Multicam, for the window sill I use some wood strips, sold as architecture articles; they comes in wide variety of measures, even from pine or balsa.
Darío
|
|
WigWag Workshop
Reviews member 
Member since: May 2012
"Keep The Glue On The Styrene"
Posts: 720
May 22, 2012 7:25:45 GMT -5
May 22, 2012 7:25:45 GMT -5
|
Post by WigWag Workshop on Jun 11, 2012 9:05:47 GMT -5
Thanks for sharing the tips, they are very helpful.
-Steven
|
|