Whiterook
Full Member

Member since: March 2013
Posts: 837
Mar 13, 2013 15:29:19 GMT -5
Mar 13, 2013 15:29:19 GMT -5
|
Post by Whiterook on Apr 1, 2023 11:36:18 GMT -5
Question on groundwork: Many modelers apply drywall plaster or similar to a wooden base (like an award plaque or wooden base from a craft store). I’ve looked online to find out how to attach something like drywall spackle, plaster, celluclay, permastone, and other such type compound onto a wooden base, and I can’t find squat.
How do you do this? For instance, do you just scoop it down on the wood base and hope it adheres and stays put? …or do you spread some white glue (or similar) to help it grab and stay? …do you screw it down? What’s your method?
|
|
|
|
Post by tcoat on Apr 1, 2023 14:08:01 GMT -5
Rough up the wood surface with some grooves for the compound to stick too. Then seal it well with any form of flat enamel paint. Then just slap the compound on in a thin layer.. If you want several levels use Styrofoam to make the levels. Always keep the layers of compound under about 14 inch thick so you don't get cracking. I usually will push sawdust or kitty litter into the surface to give the texture I want. Let it dry thoroughly and then seal and paint. With fine kitty litter. .thumb.JPG.8143f4985baef65bd4b9e79028549230.JPG) Sawdust .jpg.adf6721c2578e71ca9c1a5028bdaf093.jpg) Heavy kitty litter 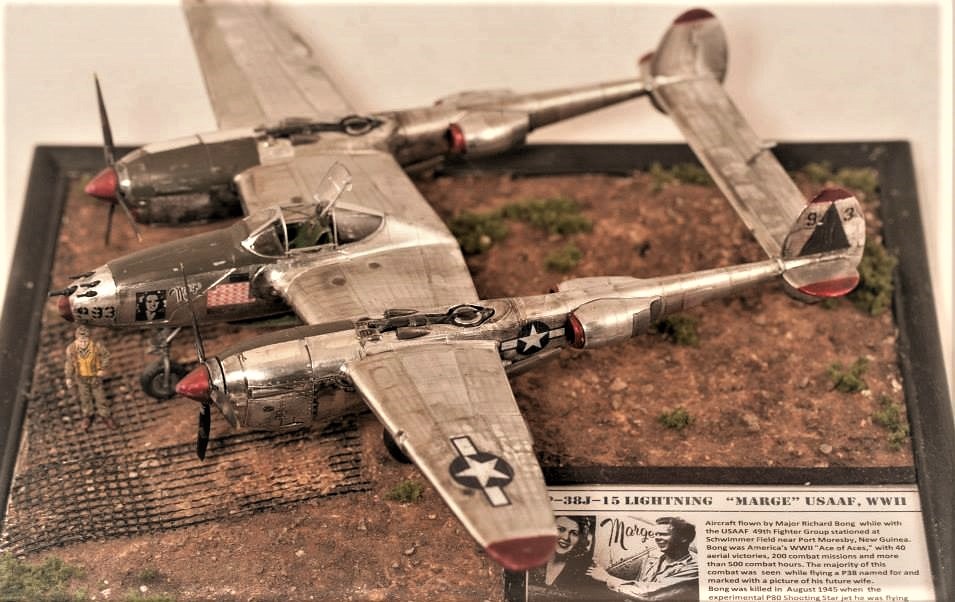 |
|
creading
Full Member
Member since: April 2020
alive & breathing
Posts: 143
Apr 30, 2020 15:32:21 GMT -5
Apr 30, 2020 15:32:21 GMT -5
|
Post by creading on Apr 1, 2023 18:31:36 GMT -5
If I'm putting cell-u-clay or something like it directly on the a trophy plaque or wood base I will either drill 1/2"+ holes or put small screws in to anchor the material when it dries. If you are using foam board (to build levels) on a flat wood base, I'd use hot glue to hold it to the base and build the spackle/plaster on that.
Cheers,
C.
|
|
|
|
Post by mustang1989 on Apr 1, 2023 18:41:07 GMT -5
Ya see, I really enjoy threads like this because I can learn alot about this kind of stuff which I known next to nothing about. Thank you guys for the info.  |
|
reserve
Senior Member

Member since: July 2012
Si vis pacem para bellum
Posts: 2,355
Jul 11, 2012 9:11:45 GMT -5
Jul 11, 2012 9:11:45 GMT -5
|
Post by reserve on Apr 1, 2023 22:59:33 GMT -5
I stopped using wood some time ago; I now use foam insulation board as it's easier to carve, shape, and avoids trouble with warpage. I begin by cutting the base to size, carving out ruts and terrain variations. I'll sand this with 100 grit sandpaper to eliminate sharp edges  Then I roll out strips of air dry clay, spread some white glue where the clay's going, and work the clay into the desired shape, and make any desired impressions such as track and tire marks  Once dry the clay will crack. I fill this in with Vallejo arcylic filler  then fill in the edges of the clay  Once dry I coat the whole thing with diluted white glue and spread fine dirt and blue gerbil dust (finer particles) where I want texture  Then when dry add grass, rocks, etc.  There are commercial acrylic ground texture pastes available from MIG and AK, I've used them also but they are best used in thin layers. Hope this helps |
|
garydavis
Full Member
Member since: March 2023
RIP- September 2023
Posts: 440 
|
Post by garydavis on Apr 2, 2023 9:56:19 GMT -5
There is some very good info from you folks. Thank you ALL for sharing.
|
|
Whiterook
Full Member
Member since: March 2013
Posts: 837
Mar 13, 2013 15:29:19 GMT -5
Mar 13, 2013 15:29:19 GMT -5
|
Post by Whiterook on Apr 2, 2023 10:13:36 GMT -5
|
|
Medicman71
Full Member
Member since: May 2023
Posts: 1,341
|
Post by Medicman71 on May 16, 2023 21:11:43 GMT -5
Great tips here… thank you! Hope to see more, as well…there seems to be a different take on the subject by different modelers, yet a lot of commonalities, as well! Roughing up the wood for compound adhesion makes perfect sense. Anchor screwing is a good idea, as well. Using just foam seems to be something I’ve seen more and more of lately. Hot glue is something I thought of on my last dio…I used white glue to glue down foamcore board and then apply drywall spackle to, afterwards…    Painted the edge black; added rocks and moss for terrain; fake snow atop. It was a quick down and dirty base on a moments notice for a donation to a tournament…the winner…  This is what I want to do for my AT-ST Walker. I have a base for it just need to learn how to make the ground work. |
|
stikpusher
Forum Moderator 
Member since: April 2023
Living The Dream
Posts: 3,454
MSC Staff
|
Post by stikpusher on May 16, 2023 22:39:54 GMT -5
This base was done with drywall spackle onto a wooden plaque from Hobby Lobby. I smoothed down the road area with a trowel tool, then textured up the roadside for a drainage ditch and raised berm behind. Static grass and spices such as oregano for the ground cover, along with some finely sifted garden dirt held down with thinned white glue, then brush was model railroad type plants. The sign was made using a Tamiya accesories label onto a piece of strip styrene mounted on a length of aluminum tubing. I painted the road surface and markings. 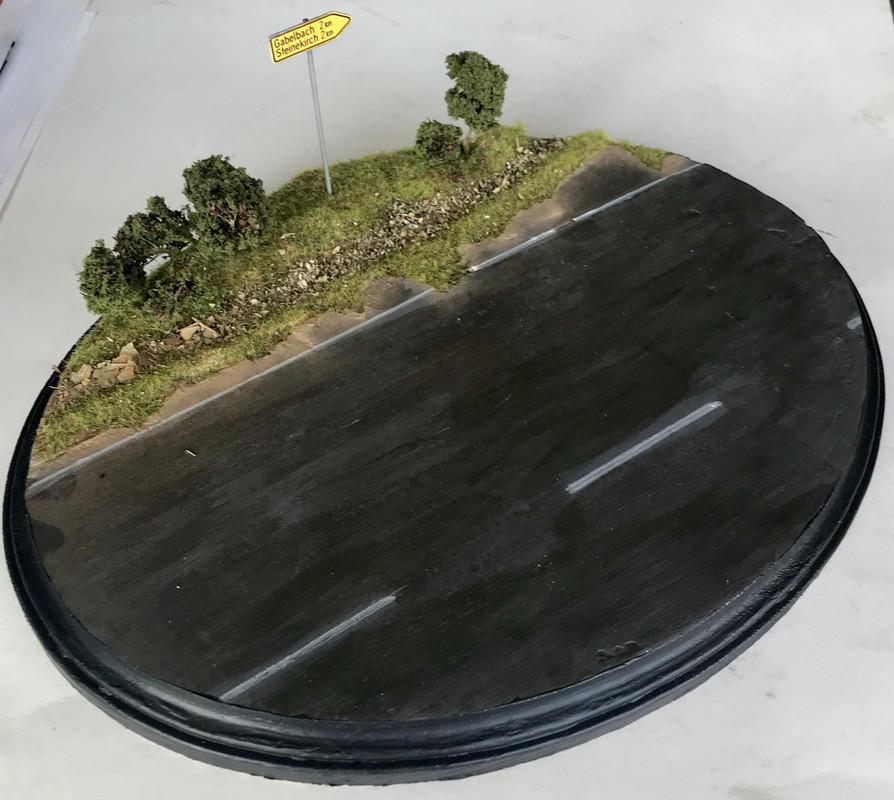 |
|
|
|
Post by chromdome35 on May 16, 2023 22:51:40 GMT -5
Great thread with great info!!!
Thanks for the step by step description!
|
|
Whiterook
Full Member
Member since: March 2013
Posts: 837
Mar 13, 2013 15:29:19 GMT -5
Mar 13, 2013 15:29:19 GMT -5
|
Post by Whiterook on Sept 10, 2023 19:50:26 GMT -5
Great tips here… thank you! Hope to see more, as well…there seems to be a different take on the subject by different modelers, yet a lot of commonalities, as well! Roughing up the wood for compound adhesion makes perfect sense. Anchor screwing is a good idea, as well. Using just foam seems to be something I’ve seen more and more of lately. Hot glue is something I thought of on my last dio…I used white glue to glue down foamcore board and then apply drywall spackle to, afterwards… Painted the edge black; added rocks and moss for terrain; fake snow atop. It was a quick down and dirty base on a moments notice for a donation to a tournament…the winner… This is what I want to do for my AT-ST Walker. I have a base for it just need to learn how to make the ground work. Snow scenes are pretty easy, since there’s mostly or al snow, with just a bit of groundwork… the spackle is great because it dries white, so it seals easy with just white acrylic paint, or you could spray some a basecoat first and then white. I simply hand brushed white on this dio base. Added rocks and foliage (simple packaged “foliage” material from the craft or dollar stores); some Citadel “Devlin Mud” wash tp dirty up the snow a bit; and finally, some fake snow from the model railroad store…very fine stuff that i spray a white glue/water mix in a section and then sprinkle the snow on (one warning though…if the white glue is too concentrated in the mix, it’s can yellow a tad, but some wash will knock that down quick). This base was done with drywall spackle onto a wooden plaque from Hobby Lobby. I smoothed down the road area with a trowel tool, then textured up the roadside for a drainage ditch and raised berm behind. Static grass and spices such as oregano for the ground cover, along with some finely sifted garden dirt held down with thinned white glue, then brush was model railroad type plants. The sign was made using a Tamiya accesories label onto a piece of strip styrene mounted on a length of aluminum tubing. I painted the road surface and markings. Love this base! Static Grass is amazing stuff… I just bought an applicator last year for this very reason, as well as model railroad layouts. |
|