reserve
Senior Member

Member since: July 2012
Si vis pacem para bellum
Posts: 2,368
Jul 11, 2012 9:11:45 GMT -5
Jul 11, 2012 9:11:45 GMT -5
|
Post by reserve on Dec 24, 2012 19:53:16 GMT -5
Well it's been zero and below the past couple of days here so the base for the zombie crowd pleaser is slow to dry. While I'm waiting for that to occur I've taken back up something I stopped due to lack of interest back in July. It's got quite a bit of work left to be done.   Tamiya's M8 HMC, improved with a Verlinden interior set. The armored trailer is the Verlinden resin offering and was a surprisingly easy tho time consuming build..Should probably be posting this in the diorama section, huh? Regards, Mark |
|
multicam
Senior Member
Member since: January 2012
Nate
Posts: 2,039
Jan 10, 2012 14:35:41 GMT -5
Jan 10, 2012 14:35:41 GMT -5
|
Post by multicam on Dec 24, 2012 20:07:13 GMT -5
This is sure to be a cool one! Looking forward to it:)
|
|
|
|
Post by eastrock on Dec 24, 2012 20:59:19 GMT -5
same here  |
|
|
|
Post by wbill76 on Dec 24, 2012 21:06:55 GMT -5
Nice little WIP, sounds like the perfect solution to cold temps outside! Look forward to seeing this one get back to the front of the line!
|
|
Deleted
Member since: January 1970
Posts: 0
May 19, 2024 3:38:06 GMT -5
May 19, 2024 3:38:06 GMT -5
|
Post by Deleted on Dec 25, 2012 4:24:15 GMT -5
Sweet dio !
|
|
redleg12
Full Member

Member since: August 2012
www.redleg2scale.com
Posts: 401
Aug 28, 2012 18:59:10 GMT -5
Aug 28, 2012 18:59:10 GMT -5
|
Post by redleg12 on Dec 25, 2012 7:40:18 GMT -5
Reserve - nice idea... the M8 normally had an ammunition trailer since it had limited storage. Now being the artilleryman...the trailer you have is the M332 which is the modern ammo trailer, in service since the mid 1960s. The correct trailer would be the M10 ammo trailer. Looks similar but would have more civilian looking tires, the military tires did not come into WWII until late 44. The third wheel is much smaller. Lots of other small details.
Now with all that said, except for someone like me, no one will notice.
There is a resin version of the M10, I have to look up who has it if you are interested.
Rounds Complete!!
|
|
|
|
Post by wing_nut on Dec 25, 2012 10:32:02 GMT -5
Looks good but the 3 guys look dead  Hope top see 'em with some spring in their step. |
|
|
|
Post by wouter on Dec 25, 2012 12:01:13 GMT -5
interesting project you got there Mark...can say it looks good allready ^^
Cheers
|
|
reserve
Senior Member
Member since: July 2012
Si vis pacem para bellum
Posts: 2,368
Jul 11, 2012 9:11:45 GMT -5
Jul 11, 2012 9:11:45 GMT -5
|
Post by reserve on Dec 25, 2012 13:35:12 GMT -5
Thanks, gents Nate, ER, Bill, Carl-Thanks for the vote of confidence will do my best to uphold my end Redleg-Thanks also for the info, I sort of thought this may be the wrong trailer but it was a good excuse to get the kit off the shelf where it had been gathering dust for quite some time. I'll take the close enough this time Wingy-They kind of do don't they? Now more work I guess Nemo-Thanks, I'd have ruined it had I not stopped 'till I "felt" it again Wouts-Thanks for the kind assessment Have started messing about with oil paints and here's the result on the outbuilding  I have no idea how long it takes for oils to dry guess I'll find out now. Anyone know? Regards, Mark |
|
|
|
Post by wbill76 on Dec 25, 2012 13:48:57 GMT -5
Oils will dry at different speeds depending on the brand, the temperature, and humidity. Only way to know just how long is to time it and make note of it for the future.  Nice work on the building so far, it's got some nice color variation in the stone work. |
|
|
|
Post by `Boots` on Dec 25, 2012 14:01:10 GMT -5
Hey Mark that is a little gem bud and i love the scene fella ;D As for the oils.............Bill is right, humidity and temp play a big part!!, you can speed up the process by using a hairdryer set on warm and just do gentle blasts but oils can still smear/smudge even after a prolonged time.................i`d give it a good few days untouched and maybe a protective coat over the top if poss........................try doing a test piece on a piece of scrap plasticard, first to check out the drying time and secondly to use with a test protective coat to see how they react!!! I use a lot of oils but whilst still wet i apply Mig powders for rust effects................the powders add to the drying time and it dries much quicker. HTH ,and just my limited tuppence worth .............it`s a bit of trial and error but just be patient till ya get the right result.......  |
|
|
|
Post by bullardino on Dec 26, 2012 9:01:56 GMT -5
Nice scene, there I agrre with the guys above, oils curing time depends on humidity and temp. I tend to leave them cure for a week or so, just to be sure they won't be ruined by the next layer. |
|
|
|
Post by deafpanzer on Dec 26, 2012 11:29:02 GMT -5
WHOA! Looks like another fun subject to follow... please count me in! Have same Tamiya kit with Verlinden upgrade sets in stash. Nice work on the outbuilding... more colors the better which you did!
|
|
Deleted
Member since: January 1970
Posts: 0
May 19, 2024 3:38:06 GMT -5
May 19, 2024 3:38:06 GMT -5
|
Post by Deleted on Dec 26, 2012 17:05:30 GMT -5
LOL Dicky ! Mark that is a good looking buiding . |
|
|
|
Post by bbd468 on Dec 27, 2012 20:17:18 GMT -5
Mark, i like what you got goin' here man! Ill be watchin' my friend. Gary |
|
reserve
Senior Member
Member since: July 2012
Si vis pacem para bellum
Posts: 2,368
Jul 11, 2012 9:11:45 GMT -5
Jul 11, 2012 9:11:45 GMT -5
|
Post by reserve on Dec 28, 2012 17:28:11 GMT -5
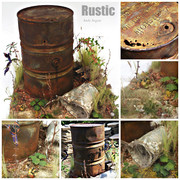
Thank you kindly, gentlemen Well the Verdict's in on Winton oil paint drying, 72 hours till it'd resist smudging. Flat coated it  And have been playing with the art of making resin and plastic look like old wood    I'm not sure what to think of my old wood results, how's it look to you guys? Honest opinions will be treasured... Regards, Mark |
|
|
|
Post by wouter on Dec 29, 2012 5:24:14 GMT -5
think your wood looks great mate (errrm ;D), no really, I like the graining on the barrel and both the beer box and the water thingy...especially that one has my preference. Cool!
Cheers
|
|
redleg12
Full Member
Member since: August 2012
www.redleg2scale.com
Posts: 401
Aug 28, 2012 18:59:10 GMT -5
Aug 28, 2012 18:59:10 GMT -5
|
Post by redleg12 on Dec 29, 2012 8:30:46 GMT -5
Great results.....the wood looks almost like.....wood
Rounds Complete!!
|
|
|
|
Post by eastrock on Dec 29, 2012 9:38:34 GMT -5
work looks great Mark, but you need to work on the wheel and with the water tub a bit more wash Happy New Year |
|
|
|
Post by wbill76 on Dec 29, 2012 14:10:58 GMT -5
I'd say you did a fine job with those wood effects from here Mark! Nice to know the verdict on the time-to-dry results as well...72 hours doesn't seem too bad. |
|
|
|
Post by bullardino on Dec 29, 2012 14:13:09 GMT -5
I really like the way your wood turned out |
|
reserve
Senior Member
Member since: July 2012
Si vis pacem para bellum
Posts: 2,368
Jul 11, 2012 9:11:45 GMT -5
Jul 11, 2012 9:11:45 GMT -5
|
Post by reserve on Jan 2, 2013 0:41:02 GMT -5
Thanks guys for the feedback on the wood appearance, it helps me out quite a bit. Calling this one done. Did not quite make it in 2012 but since we did not evaporate or blow up on 12/21 I can't be too disappointed. 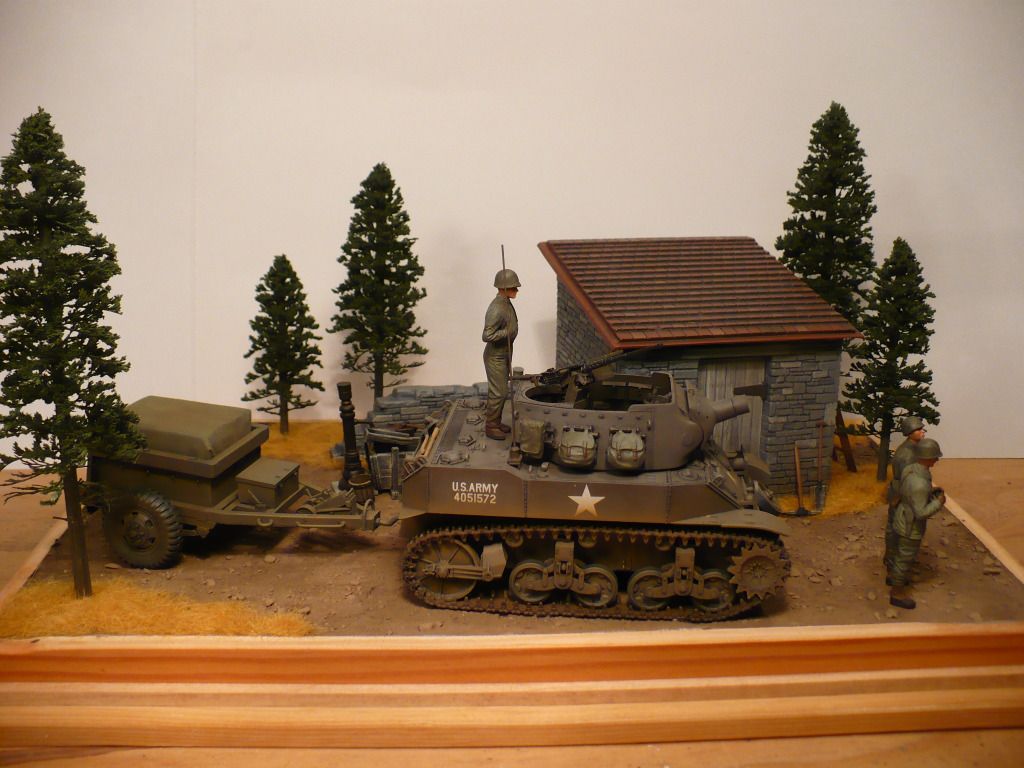      I used Mini Art figures which I have always had good luck with but had to transplant Dragon Gen II heads as the ones that came with the set were uncharacteristically bad. Fussed with the level of dusting, still don't know if it's enough but it's better than overdoing it I thought. Thanks for the look Regards, Mark |
|
|
|
Post by bullardino on Jan 2, 2013 2:20:53 GMT -5
Great result Mark I think it is the right amount of dust, more could be too much, IMHO. |
|
|
|
Post by eastrock on Jan 2, 2013 5:40:02 GMT -5
Great Finished for Start of the year!
|
|
|
|
Post by deafpanzer on Jan 2, 2013 9:37:27 GMT -5
GREAT work Mark! If it was me I would considered it part of 2012 because my clock battery has died on me...
I really like those trees... did you make 'em or who does? Thanks!
|
|
reserve
Senior Member
Member since: July 2012
Si vis pacem para bellum
Posts: 2,368
Jul 11, 2012 9:11:45 GMT -5
Jul 11, 2012 9:11:45 GMT -5
|
Post by reserve on Jan 2, 2013 11:14:47 GMT -5
Thanks Luigi, ER
Andy, thanks and no I did not make the trees look here
>http://www.sterlingmodels.com/<
Regards,
Mark
|
|
|
|
Post by deafpanzer on Jan 2, 2013 11:20:26 GMT -5
Impressive trees!!! Far better than what I see at hobby shops. Thanks for the link buddy! Again, great work!
|
|
|
|
Post by bbd468 on Jan 2, 2013 11:33:02 GMT -5
Very nice indeed Mark! I love what you've done with the wood tones...and the whole dio is very impressive. Well done Mark! Gary |
|
AndyArgent
Senior Member
Aug 2013 MoM Winner
Member since: November 2011
Andy Bodge Argent - Aug 2013 MoM Winner
Posts: 1,746
Nov 17, 2011 17:09:43 GMT -5
Nov 17, 2011 17:09:43 GMT -5
|
Post by AndyArgent on Jan 2, 2013 13:57:23 GMT -5
Hi Mark this is looking real sweet. I love the whole layout. The woodwork is awsome on the crate and the bottles look excellent. If it was mine and i am only trying to help you out to create an even more realistic look than you all ready have . I would add some diluted washes to the stonework in several shades and in small random area,s to break up the monotone to the stonework .I tend to use Migs dark wash along with light sand in pigment form well dilute with water .Strt in an area that wont show to much or exsperiment on something out of the spares box. Hope this will help you and wont affend you.  |
|
reserve
Senior Member
Member since: July 2012
Si vis pacem para bellum
Posts: 2,368
Jul 11, 2012 9:11:45 GMT -5
Jul 11, 2012 9:11:45 GMT -5
|
Post by reserve on Jan 2, 2013 15:28:12 GMT -5
Thanks again, Andy
Sterling is a very good company. They aren't cheap and they are kind of slow but they make a fabulous product and I respect them immensly for refusing to speed up production at the expense of quality.
Gary-Glad ya like it, thanks, and finally it seems all the messing about I've been doing is beginning to produce acceptable results
bml22-Thank you for the kind assessment, I've a last got the balance thing sort of figured out.
Nemo-Thank you sir, it was my only shelf queen. This, however, has taught me a lesson in that as soon as I begin to feel the "get it over with" urge it's time to stop. Guess this means I'll be generating more queens in the future. Gonna have to call this a '13 finish, it was a day too late for '12 after all.
AndyArgent-Thank you also, sir, and please do not be troubled, I am NEVER offended at constructive criticizm or advice. I am not, nor will I ever be the last word in this hobby and the advances in my technique and results are almost 100% due to the kindness of others such as yourself.
Regards,
Mark
|
|


 Hope top see 'em with some spring in their step.


 Nice work on the building so far, it's got some nice color variation in the stone work.