DennisM
Full Member

Member since: January 2012
Posts: 201
Jan 24, 2012 8:18:54 GMT -5
Jan 24, 2012 8:18:54 GMT -5
|
Post by DennisM on Dec 8, 2013 7:09:23 GMT -5
I've looked into painting a model with tools on it and it's been suggested that I slide 'Onion Skin' paper behind the tools before painting them to keep paint off the tank body. I haven't heard of of this stuff - is it like Tracing Paper (i.e. very thin paper to slide into the gaps between the body and tools to stop making a mess). Thanks guys, Ben  I have always just used a piece of 3X5 note card which is pretty thick and never had any problems with it fitting. Dennis |
|
|
|
Post by ceresvesta on Dec 8, 2013 8:45:54 GMT -5
Paper never miss for me either Ben....when I use it... Mostly, I used the magnifying glasses and a fine brush, but if you think you gonna smear all over Dennis is right good `ol`paper works.
Glad youre back in the game!
Phil.
|
|
Hinksy
Full Member
Member since: June 2012
THE ENGLISH LIONHEART - HINKSY!
Posts: 1,016
Jun 22, 2012 16:46:21 GMT -5
Jun 22, 2012 16:46:21 GMT -5
|
Post by Hinksy on Dec 8, 2013 8:57:20 GMT -5
Thanks guys |
|
Hinksy
Full Member
Member since: June 2012
THE ENGLISH LIONHEART - HINKSY!
Posts: 1,016
Jun 22, 2012 16:46:21 GMT -5
Jun 22, 2012 16:46:21 GMT -5
|
Post by Hinksy on Dec 9, 2013 7:10:39 GMT -5
Hiya lads, Well, I've made a start! My head's a bit 'fuzzy' at the moment so all I did was get the Idlers and Drive Sprockets assembled and the road wheels cleaned up and prepped for when I get the suspension stuff fitted today. I didn't bother with a photo update for obvious reasons but will when the lower hull is all done - either today or tomorrow - there's a fair few little bits to go on not to mention the Torsion Bars. I'm having some lunch with my parents soon and will do another couple of hours on her today. Looks like it's going to be a lovely little kit - I'm going with Friuls on this one as nothing beats them imo. Update ASAP! Ben |
|
Hinksy
Full Member
Member since: June 2012
THE ENGLISH LIONHEART - HINKSY!
Posts: 1,016
Jun 22, 2012 16:46:21 GMT -5
Jun 22, 2012 16:46:21 GMT -5
|
Post by Hinksy on Dec 9, 2013 12:41:23 GMT -5
Hi chaps, Just a quick update - nothing fancy I'm afraid! The suspension is sorted so now I can turn my attention to the next steps which cover the smoke candle rack etc and look like fun. The only annoying bit so far was realising that the mounting point for the front return rollers are not fitted - not an issue in itself but the instructions are vaque at best as exactly where to put them.   Off we go - this should be fun! Update tomorrow! Ben |
|
|
|
Post by bbd468 on Dec 9, 2013 12:46:11 GMT -5
Nice update Ben. Hey, progress is progress mate, Great to see ya kick this off!  |
|
|
|
Post by deafpanzer on Dec 9, 2013 13:15:34 GMT -5
Nice start... it will be fun like Pz III GB where you built three kits!
|
|
Hinksy
Full Member
Member since: June 2012
THE ENGLISH LIONHEART - HINKSY!
Posts: 1,016
Jun 22, 2012 16:46:21 GMT -5
Jun 22, 2012 16:46:21 GMT -5
|
Post by Hinksy on Dec 10, 2013 5:56:07 GMT -5
Nice start... it will be fun like Pz III GB where you built three kits! I think I built Dragon's original Sig 33 on the Pz.III chassis (I've got the newly released version of that upstairs in the stash), that awful Cyber Hobby Mutant StuG III kit that you wanted built to complete the list of versions and I can't recall what the third was now? They are both still in the cabinet but will look pretty poor now compared to my recent offerings so I must be doing something right. The Sig will become a test bed when I start the new one and the StuG will be whitewashed I think. Anyway, like most modellers I am not the biggest fan of Suspension assembly so I'm glad all that stuff is out the way now! Today will see the back of the tank assembled with the tow hitches and exhausts on. Smoke candle box at the rear assembled (it can either be assembled 'stowed' or shown protruding with supplied PE chains for each smoke grenade - I like the chain look so I'll go with that I reckon) and the start of the Fenders and Turret base/drivers compartment exterior etc. I've got an appointment between 1pm and 3pm so will start when I get back and post a photo or two later when I've worked up to a nice point to stop at. GOD - IT IS SO NICE TO BE BACK AT THE BENCH NOW! Update later lads, Ben  |
|
Hinksy
Full Member
Member since: June 2012
THE ENGLISH LIONHEART - HINKSY!
Posts: 1,016
Jun 22, 2012 16:46:21 GMT -5
Jun 22, 2012 16:46:21 GMT -5
|
Post by Hinksy on Dec 10, 2013 12:33:15 GMT -5
Hi chaps, Ok - a bit more done! Time restraints put on me this afternoon meant only an hour and a bit of build time. As Mum was wrapping presents in the Kitchen my 'bench' was off limits so it was a sit in the Conservatory with a tray on my lap build today! Dragon really went the extra mile in trying to make the instructions as confusing as bleedin' possible for today's section. The Mufflers dropped on easy (typical Pz.III) but the crank hole and cover along with the smoke candle housing just looked 'wrong' compared to what I had in front of me. I had the right parts and checked for any other parts that should be needed instead but none were found so after about 30 minutes of dry fitting I committed to glue and it looks okay. I managed to get nice glue covered fingerprints on the smoke candle housing and Muffler which I hate doing but a light buffing will see them sorted. Sorry not more to show but progress all the same and more to do tomorrow    Cheers guys, Update tomorrow! Ben |
|
Deleted
Member since: January 1970
Posts: 0
May 3, 2024 13:08:38 GMT -5
May 3, 2024 13:08:38 GMT -5
|
Post by Deleted on Dec 10, 2013 13:10:30 GMT -5
HMMM! nice rear end! looks very nicely detailed
|
|
Hinksy
Full Member
Member since: June 2012
THE ENGLISH LIONHEART - HINKSY!
Posts: 1,016
Jun 22, 2012 16:46:21 GMT -5
Jun 22, 2012 16:46:21 GMT -5
|
Post by Hinksy on Dec 12, 2013 14:06:06 GMT -5
HMMM! nice rear end! looks very nicely detailed Cheers Smudge - tasty ain't it Onto todays work: Not a lot of time at my disposal today but enough to get sections 9 & 11 done which is just the rear engine deck. Pretty simple but made tricky by an odd exclusion of locator holes for the moulded tow cable - there's no holes on the underside to drill out either so I ended up simply slicing off the locator nubs and sticking it straight onto the deck. All hatches are on and the two PE grills for the intakes - unfortunately I didn't cut one of the PE things on the frame that hold the right hand grill in place and upon going to pluck it off, 75% of the PE frame came away from the grill making an excellent mess  However, some patient rolling out and straightening has enabled it to be fixed in place ok - obviously it looks a little bit tatty but that intake will end up looking either a little battle-scarred or a nicely placed 'rag' can be arranged to cover the worst bit up. I haven't done section 7 & 8 yet that cover the two fenders yet - I'll do them tomorrow along with thesections 10 & 12 which deals with the front hatches and turret base etc. Turret, Fenders, upper hull and Friuls and we'll be ready for paint! Photos:  The damaged grill: The damaged grill:  Sections 10 & 12 to do tomorrow plus the Fenders Sections 10 & 12 to do tomorrow plus the Fenders Thanks for looking guys, More tomorrow! Ben |
|
|
|
Post by wbill76 on Dec 12, 2013 19:35:15 GMT -5
Despite the screen mishap, things are rolling along pretty quickly on this one Ben. Making good progress.
|
|
|
|
Post by bbd468 on Dec 12, 2013 19:43:01 GMT -5
Hiya brother Ben, great update bro! Despite the PE mishap, your progressing very nicely. Lookin towards the next installment. |
|
Deleted
Member since: January 1970
Posts: 0
May 3, 2024 13:08:38 GMT -5
May 3, 2024 13:08:38 GMT -5
|
Post by Deleted on Dec 12, 2013 20:46:51 GMT -5
Looks good.
Consider the PE mishap as a "character" for the build.
G
|
|
|
|
Post by Leon on Dec 12, 2013 20:49:23 GMT -5
Great update Ben ,as far as the PE mishap you'll get it sorted.Looking forward to your next update. |
|
Deleted
Member since: January 1970
Posts: 0
May 3, 2024 13:08:38 GMT -5
May 3, 2024 13:08:38 GMT -5
|
Post by Deleted on Dec 12, 2013 23:43:58 GMT -5
I'm liking this one Ben .
|
|
Hinksy
Full Member
Member since: June 2012
THE ENGLISH LIONHEART - HINKSY!
Posts: 1,016
Jun 22, 2012 16:46:21 GMT -5
Jun 22, 2012 16:46:21 GMT -5
|
Post by Hinksy on Dec 13, 2013 4:27:59 GMT -5
Thanks guys! Thanks for the kind comments lads. They aren't really warranted and I know you are trying to make me feel a bit better as this build looks very rough at present there's a nasty few blobs of glue evident under the central tow eyelets of the moulded cable and that PE mishap was just daft, clumsy and bleedin' annoying BUT as you know, I've been a little outta sorts of late and very much outta practice! Thanks for the encouragement as it is appreciated - A LOT I know in 1/35 scale these grills are brittle as anything but having seen the real things I'm not sure which way to go with this (the rear deck isn't fixed btw yet). I might have a spare in my erm, spares box but will work something out. It's going to have to be hidden under a bit of rag or Swastika flag which I plan for for this as I'm not keen on the moulded cables. They look great but I was planing to leave it off and have just the mounting points in place but they aren't on the sprue they should be and after 30 mins looking yesterday was still lost. I might load up the rear with stowage to cover the cable and put an Aerial Recognition Flag further up draped roughly over the damaged PE grill. Like this maybe: www.archertransfers.com/PAGE_FlagInstructions.htmlNOTE - CAN ANYONE HELP ME WITH A FLAG: i.e. do you have a spare one that you would be willing to let me have or could you point me to the best place to source one (Remember, I'm in the UK). It needs to be a bigger flag as obviously it's for air recognition. I did pick up a 'flag kit' at a show earlier this year which comprises of a large piece of thin reddish/maroon coloured material for the flag. There are multiple Swastikas supplied on a piece of paper to be cut out - they said to use a UHU type glue to stick the paper Swastika onto the material and then use PVA glue to soften and shape/affix. Thig is they are a bit thick and even though the set only cost a pound coin I'd rather do it properly and use the link I've put on this post and use tinfoil as it's thin and easy to shape. 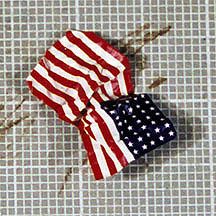 Update later - a good one hopefully as I hope to have the entire upper hull done today Ben [/b] |
|
|
|
Post by Tojo72 on Dec 13, 2013 7:54:03 GMT -5
Nice for you to be back at the bench,I have not had nearly the amount of time I wanted either,but remember
OT=More money=more kits so its all good
|
|
|
|
Post by ceresvesta on Dec 13, 2013 7:58:48 GMT -5
Ben! Nice start my friend, I love that damaged grill! You should damage the inner grill also, so it looks more battle damage than bench damage.
Keep it up Ben, I want more!
|
|
Hinksy
Full Member
Member since: June 2012
THE ENGLISH LIONHEART - HINKSY!
Posts: 1,016
Jun 22, 2012 16:46:21 GMT -5
Jun 22, 2012 16:46:21 GMT -5
|
Post by Hinksy on Dec 13, 2013 8:24:50 GMT -5
Thanks Tojo & CV, I'll work the Grill out - is it 'grill' or 'grille' btw? Anything to suggest re the flag guys? Tanks chaps, Ben |
|
Deleted
Member since: January 1970
Posts: 0
May 3, 2024 13:08:38 GMT -5
May 3, 2024 13:08:38 GMT -5
|
Post by Deleted on Dec 13, 2013 9:55:52 GMT -5
nice work on this old chap
|
|
Hinksy
Full Member
Member since: June 2012
THE ENGLISH LIONHEART - HINKSY!
Posts: 1,016
Jun 22, 2012 16:46:21 GMT -5
Jun 22, 2012 16:46:21 GMT -5
|
Post by Hinksy on Dec 14, 2013 16:27:48 GMT -5
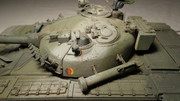
Hi guys, Cheers Smudge! Made some great progress this afternoon. I had only planned to make the turret base and the gearbox housing up-front ready for fitting tomorrow but ended up fitting the front hatches and additional armour plate, the entire turret base and a few little fiddly bit's I'd not got round to doing! Apart from the front section I have left these all as sub-assemblies as they can't go on without the Fenders. I'll do them tomorrow and drop everything else on ready for the turret assembly on Monday - I always enjoy building these Panzer III turrets! Undecided on Friuls or the kit Magic Tracks - if I go with the kit tracks nows the time to get them on and sized up before dropping the Fenders on - hmmmm? Today's work:  Dry fitted sub-assemblies: Dry fitted sub-assemblies:  Cheers for looking lads, Any comments or suggestions etc all appreciated! Update tomorrow! Ben |
|
|
|
Post by bbd468 on Dec 14, 2013 16:56:47 GMT -5
WOW Ben, you have been a busy man! I have a suggestion.......carry on mate, awesome build! |
|
|
|
Post by wbill76 on Dec 14, 2013 21:02:23 GMT -5
Making good progress Ben, looks like everything fits the way it should. |
|
|
|
Post by deafpanzer on Dec 14, 2013 22:59:58 GMT -5
You have been busy!!! Glad you made a great process... of course you'd do anything for a Pz III! LOL
Magic Tracks look pretty good in my opinion unless you have money to spend on the Friuls.
|
|
Deleted
Member since: January 1970
Posts: 0
May 3, 2024 13:08:38 GMT -5
May 3, 2024 13:08:38 GMT -5
|
Post by Deleted on Dec 15, 2013 13:35:40 GMT -5
yeah, looking very nice indeed
|
|
Hinksy
Full Member
Member since: June 2012
THE ENGLISH LIONHEART - HINKSY!
Posts: 1,016
Jun 22, 2012 16:46:21 GMT -5
Jun 22, 2012 16:46:21 GMT -5
|
Post by Hinksy on Dec 15, 2013 16:32:04 GMT -5
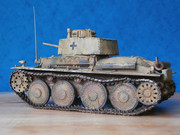
Thanks guys! I've just spent a couple of hours on her now getting these sub-assemblies fitted. I've decided to leave the tools on the sprues for painting - remember I was going to paint them on the vehicle but I've decided against that for now! I've prepped the Fenders and drilled out the required holes for the tools so now it's turret and roadwheel time! I love building these Pz.III turrets! There's some vague instructions relating to the Glacis and the PE pieces that go there and the Fenders aren't the best of fits but it's looking ok. A bit of paint and damage and she'll look the part (hopefully)!      Thanks for looking guys, Have a good week! Ben |
|
|
|
Post by Deano on Dec 18, 2013 10:42:17 GMT -5
Great progress here Ben , these kits sure pack a load of detail . This blog is making me wanna build a panzer III variant |
|
|
|
Post by bbd468 on Dec 18, 2013 10:55:18 GMT -5
She's looking fine Brother Ben! Your builds are always very clean and crisp. Keep it comin bro. |
|
|
|
Post by bullardino on Dec 18, 2013 11:13:17 GMT -5
Ben, unfortunately I had totally missed this one. Great job so far, if you don't mind I'll follow |
|


 However, some patient rolling out and straightening has enabled it to be fixed in place ok - obviously it looks a little bit tatty but that intake will end up looking either a little battle-scarred or a nicely placed 'rag' can be arranged to cover the worst bit up.