Post by wing_nut on Dec 28, 2013 21:13:15 GMT -5
I was asked to post this in FB and wanted to share it here too. The running commentary should follow the photos easy enough. Hopefully someone will find some use for it.
Start with a simple 8x10 picture frame that is deep enough for the cobblestone to have some thickness to work with. Tape the face to protect. Remove the glass and save for something else like cutting decals or PE. Pull off all the little side clips and the fold out stand thingy. Seal the holes and back edge with caulk. Seal the front as well but this time spread a thin coat over the entire surface so it doesn't absorb the moisture from the water putty and get soft. Mix the Durham's water putty to the consistency of a thin milk shake and pour into the frame.
This is the fun part.... and the work part. Let this set up until it's hard(ish) but the surfaces still feels damp and it can be still by chipped or marked easy(ish). All the (ish) stuff is that you'll have to get a feel for when to start working the surface. I practiced on a couple of jar lids that I filled with the putty. Because it mixed thin the surface will chip easier than is it was mixed thicker and let set. Anyone that has ever worked with too wet of a concrete mix know what I am talking about.
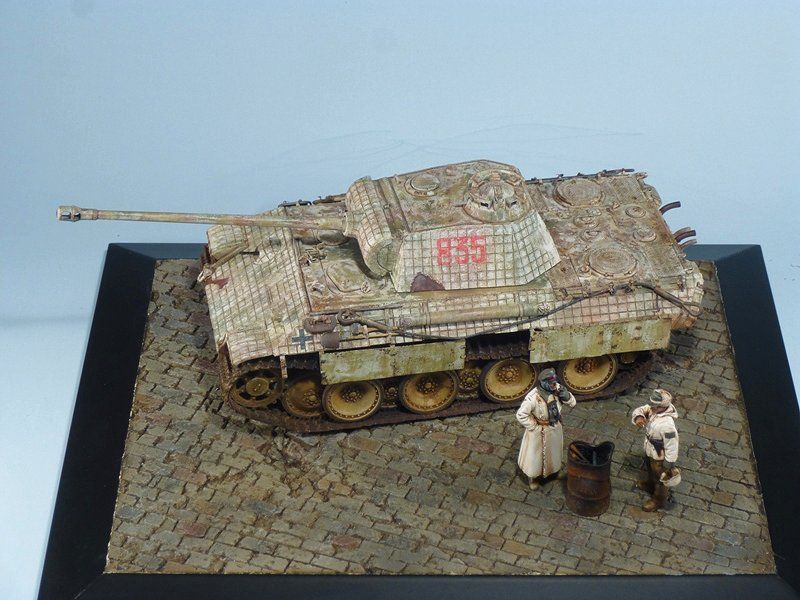
Take a sharp rock to start the texturing process. This will give each stone a nice start to the textured surface. Use different scribing tools to scrape the joints. Make all the parallel lines 1st. The marked stick makes it easier to follow where you need to cut. Just alternate the position back and forth for each row. How hard you press was you scrape out the lines and what type of tool you use will cause more or less chipping as desired. You can always go back and chip the edges more later... even after it has set hard. After working a hole where I wanted with some damage radiating outward like a grenade or small shell went off on the road, I went back into the hole to shape the block side that would be exposed. Let that harden more. Just before it's really set rock hard I took a wire brush to clean off the loose stuff at the block edges and from in the spaces. Now let it set over night. Like the name of the putty says... it will be rock hard.
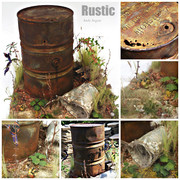
I didn’t take any progress pics of the painting but it was pretty simple. First a base coat of a neutral gray. Individual block were colored with very thinned Vallejo color using dirty reds, brownish tans and darker grays. Let dry over night. I took a stiff brush and worked some raw umber artist oil into the entire surface getting it down into all the nooks and crannies leaving as thin a coat as I could. This was left for about 5-10 minutes then wiped over with a soft cloth or paper towel. Don’t run too hard. Better a few times lightly than less with more force. When most of it was off a last wipe with a cloth barely damp, as in if it were not for the smell you would swear it was dry, with white spirits cleans off the block faces but laves a little film of the oil. Again… dry over night. A pit of Japan Dryer speeds the drying process. A light gray dry brush and, Bob’s your uncle, cobblestone.
Sounds like a lot but it was harder typing this up than making the base.


.
Start with a simple 8x10 picture frame that is deep enough for the cobblestone to have some thickness to work with. Tape the face to protect. Remove the glass and save for something else like cutting decals or PE. Pull off all the little side clips and the fold out stand thingy. Seal the holes and back edge with caulk. Seal the front as well but this time spread a thin coat over the entire surface so it doesn't absorb the moisture from the water putty and get soft. Mix the Durham's water putty to the consistency of a thin milk shake and pour into the frame.
This is the fun part.... and the work part. Let this set up until it's hard(ish) but the surfaces still feels damp and it can be still by chipped or marked easy(ish). All the (ish) stuff is that you'll have to get a feel for when to start working the surface. I practiced on a couple of jar lids that I filled with the putty. Because it mixed thin the surface will chip easier than is it was mixed thicker and let set. Anyone that has ever worked with too wet of a concrete mix know what I am talking about.
Take a sharp rock to start the texturing process. This will give each stone a nice start to the textured surface. Use different scribing tools to scrape the joints. Make all the parallel lines 1st. The marked stick makes it easier to follow where you need to cut. Just alternate the position back and forth for each row. How hard you press was you scrape out the lines and what type of tool you use will cause more or less chipping as desired. You can always go back and chip the edges more later... even after it has set hard. After working a hole where I wanted with some damage radiating outward like a grenade or small shell went off on the road, I went back into the hole to shape the block side that would be exposed. Let that harden more. Just before it's really set rock hard I took a wire brush to clean off the loose stuff at the block edges and from in the spaces. Now let it set over night. Like the name of the putty says... it will be rock hard.
I didn’t take any progress pics of the painting but it was pretty simple. First a base coat of a neutral gray. Individual block were colored with very thinned Vallejo color using dirty reds, brownish tans and darker grays. Let dry over night. I took a stiff brush and worked some raw umber artist oil into the entire surface getting it down into all the nooks and crannies leaving as thin a coat as I could. This was left for about 5-10 minutes then wiped over with a soft cloth or paper towel. Don’t run too hard. Better a few times lightly than less with more force. When most of it was off a last wipe with a cloth barely damp, as in if it were not for the smell you would swear it was dry, with white spirits cleans off the block faces but laves a little film of the oil. Again… dry over night. A pit of Japan Dryer speeds the drying process. A light gray dry brush and, Bob’s your uncle, cobblestone.
Sounds like a lot but it was harder typing this up than making the base.
.