doogsatx
Senior Member
 Feb and Sept 2014_ MoM Winner
Member since: November 2012
Posts: 1,642
Nov 14, 2012 21:29:10 GMT -5
Nov 14, 2012 21:29:10 GMT -5
|
Post by doogsatx on Dec 29, 2013 15:36:53 GMT -5
I'm getting ready to embark on my first...I won't call it diorama...but first vignette ever, and would love to get some pointers from those who know far more about it. Here's the inspiration... 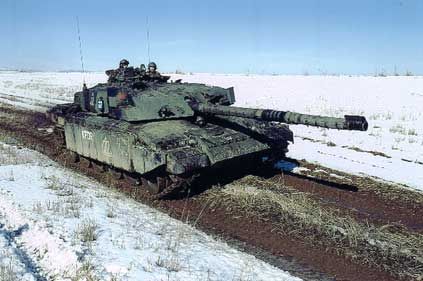 I'm actually fairly confident about the later stages - the snow and grass and mud. What's flummoxing me is getting to that point. - What should I use as a base? I've heard picture frames mentioned frequently, but I guess I don't quite see how that works. - How best to add some contour to the terrain? I made an attempt last night with some styrofoam, but 1) it was a nightmare and a half to cut and 2) I used the wrong glue and it ate it. I'm not going for a ton of elevation, just a gentle slope, and of course the ruts lower than the ground to either side. - How does one create the smooth edges on bases with elevation? Foam is very much not smooth, so I'm assuming there's some kind of applique, but then how to get that to match the contours? Apologies if these are really stupid questions - total novice at this side of the hobby, but I'm determined to change that. |
|
Deleted
Member since: January 1970
Posts: 0
May 19, 2024 5:11:40 GMT -5
May 19, 2024 5:11:40 GMT -5
|
Post by Deleted on Dec 29, 2013 16:32:43 GMT -5
Doog,I like your idea..it'll be a really good show off for the Chally.I'd love to be able to help ya,but groundwork ain't my forte...BUT...you are lucky that there are some of the best dio guys in the game here,so be patient,and I'm SURE one of these guys will chip in with some good info!
|
|
|
|
Post by TRM on Dec 29, 2013 18:58:51 GMT -5
Hey Doogs, Picture frames work great, but often whatever you have at hand...old shelving, MDF, pine...This is not the part I think you sounded most concerned with. First off...EPS (Expanded Polystyrene; i.e. Styrofoam) and XPS (Extruded Polystyrene; Dense, blue and/or pink foam boards used in construction) Are both similar in nature and properties. Both react rather violently with solvent based adhesives. PVA (Polyvinyl Acetate - white Glue)is best to adhere the piece to the base and other objects. For creating the ruts....I suppose there are a number of choices; depress the sides and the material will stay compressed to a certain percentage of the force you exert on it, lightly dig away at it with any number of tools...knives, spoon even really course sandpaper and even a drum sanding attachment for the Dremel or hand drill. This one you need to go slow or you will just heat things up and it will melt the polystyrene... The contoured side can be created with Luan, or thin wood planking, hold in place and mark with a pencil and cut accordingly or an easier method if you plan on painting is to use something like foam board (poster board) or styrene sheet stock. Cut in the same fashion after marking or glue it to the EPS/XPS with PVA and use a sharp knife to cut after it is dry. Probably best to cut first, slightly higher than you Foam board and bring the dirt base up to the contour line. No stupid question brotha'....only stupid answers!  This is my take on it! I am sure there will be others that have their methods at going at it! Good luck! Second - When trying to cut large pieces, try a hacksaw blade or even a dovetail saw which both are longer blades and should be able to contour just the same...also a retractable box-cutter knife, the one with the tiny section you can break off when it starts to go dull, work well for fine tuning the contours. |
|
|
|
Post by Leon on Dec 29, 2013 19:25:12 GMT -5
Doogs another tip for attaching the foam to your base is to use Weldwood contact cement.I just used it on my dio and it holds fast. ;)HTH
|
|
|
|
Post by wing_nut on Dec 29, 2013 20:04:19 GMT -5
|
|
|
|
Post by bbd468 on Dec 29, 2013 20:05:20 GMT -5
Hiya Doogs! Man, if you got a Hobby Lobby or Michaels Craft store close, you'll have a great supply off bases for vignettes and small dio's. Several sizes and shapes and are very inexpensive. Bunch of examples shop.hobbylobby.com/crafts-hobbies-and-fabric-crafts/craft-wood-and-wood-crafting-supplies/?perpage=96&subcat=Wood%20PlaquesFor contour and ground ill glue (PVA) down foam where i need and when dry i use Cellu-Clay mixed with water and PVA glue and spread as i need it and while still wet i heavily sprinkle dry dirt from the back yard, let absorb a while and then shake off excess and VOILA! Base, contour & ground/earth, ready to go! I paint, drybrush, use washes,....whatever to achieve the colors of earth i want. To make my sides smooth, i use whatever putty i have handy and spread on sides of the raised contour and sand smooth.....repeat as necessary. I just use what i got handy for alot of my little scenes brother Doogs!  |
|
|
|
Post by deafpanzer on Dec 30, 2013 13:00:29 GMT -5
If you really want to tackle snow... I used the snow product from Woodland Scenic and they worked just great. Be sure to add plenty of watered down white glue I think it will make them look more realistic. You can find them anywhere especially at Hobby Lobby. I went for end of winter scheme when snow is going away slowly.  |
|
doogsatx
Senior Member
Feb and Sept 2014_ MoM Winner
Member since: November 2012
Posts: 1,642
Nov 14, 2012 21:29:10 GMT -5
Nov 14, 2012 21:29:10 GMT -5
|
Post by doogsatx on Dec 30, 2013 16:16:45 GMT -5
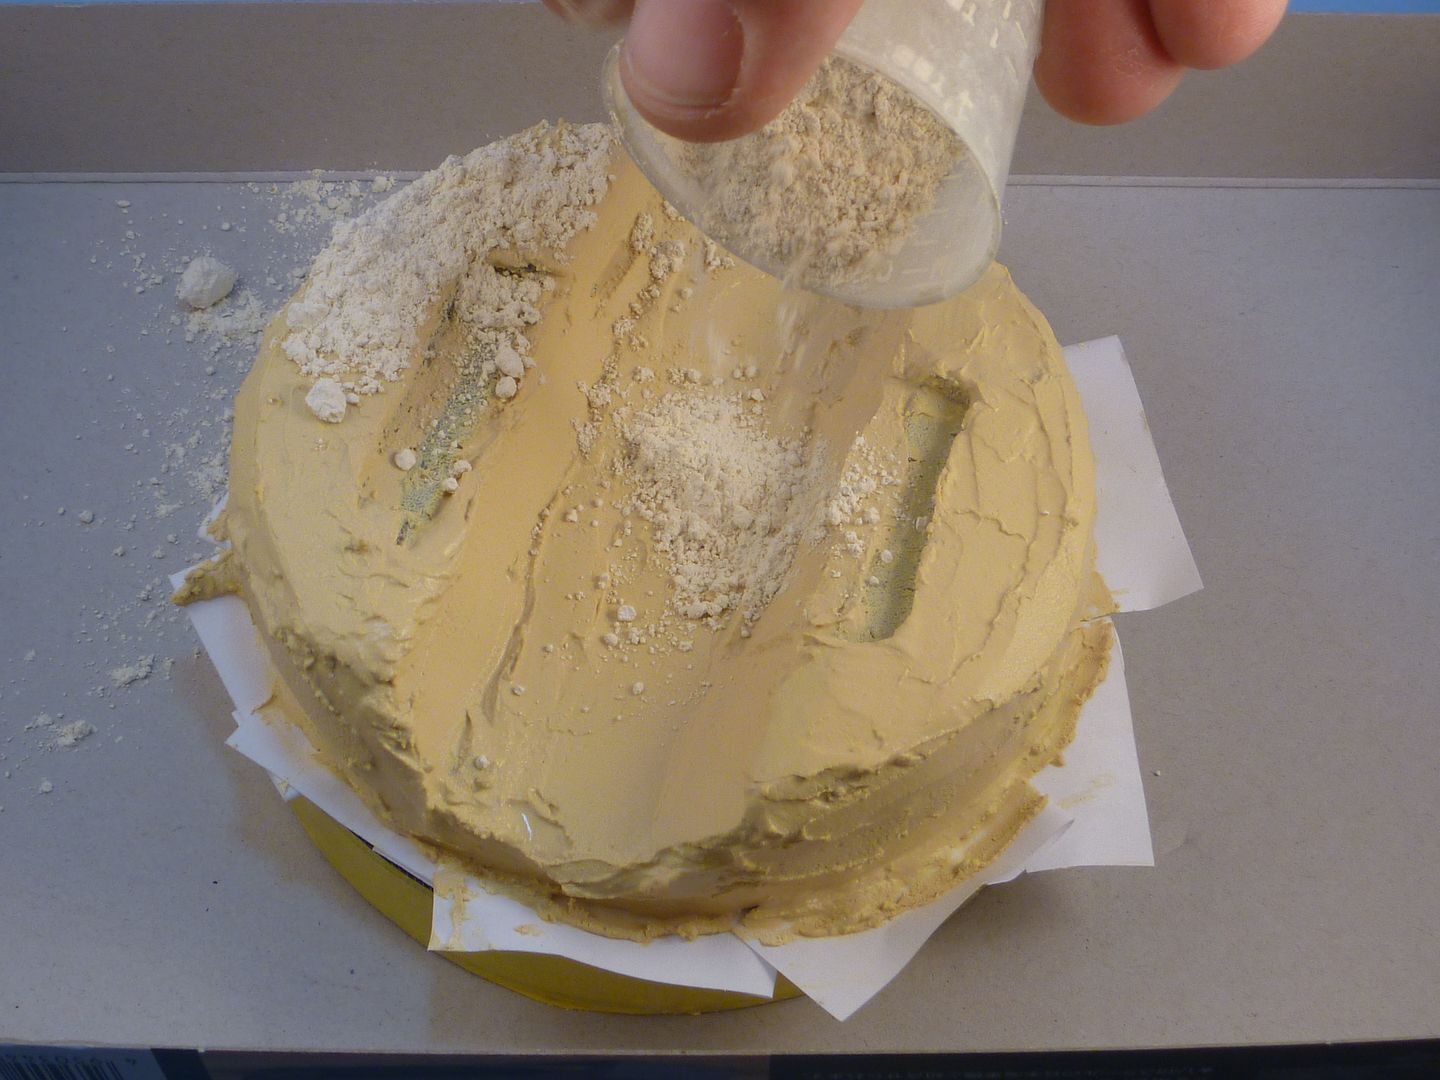
Thanks all! Got a start last night...  I've been told an electric knife is amazing for this kind of work. Well, I don't have one (and am having a hell of a time sourcing one from a physical store...). Instead I turned to my friend Mr. Dremel, and his friend Mr. Rotary Cutting Blade (the one that looks like a drill bit). It worked pretty well until the battery ran out, but it made stupid mess. 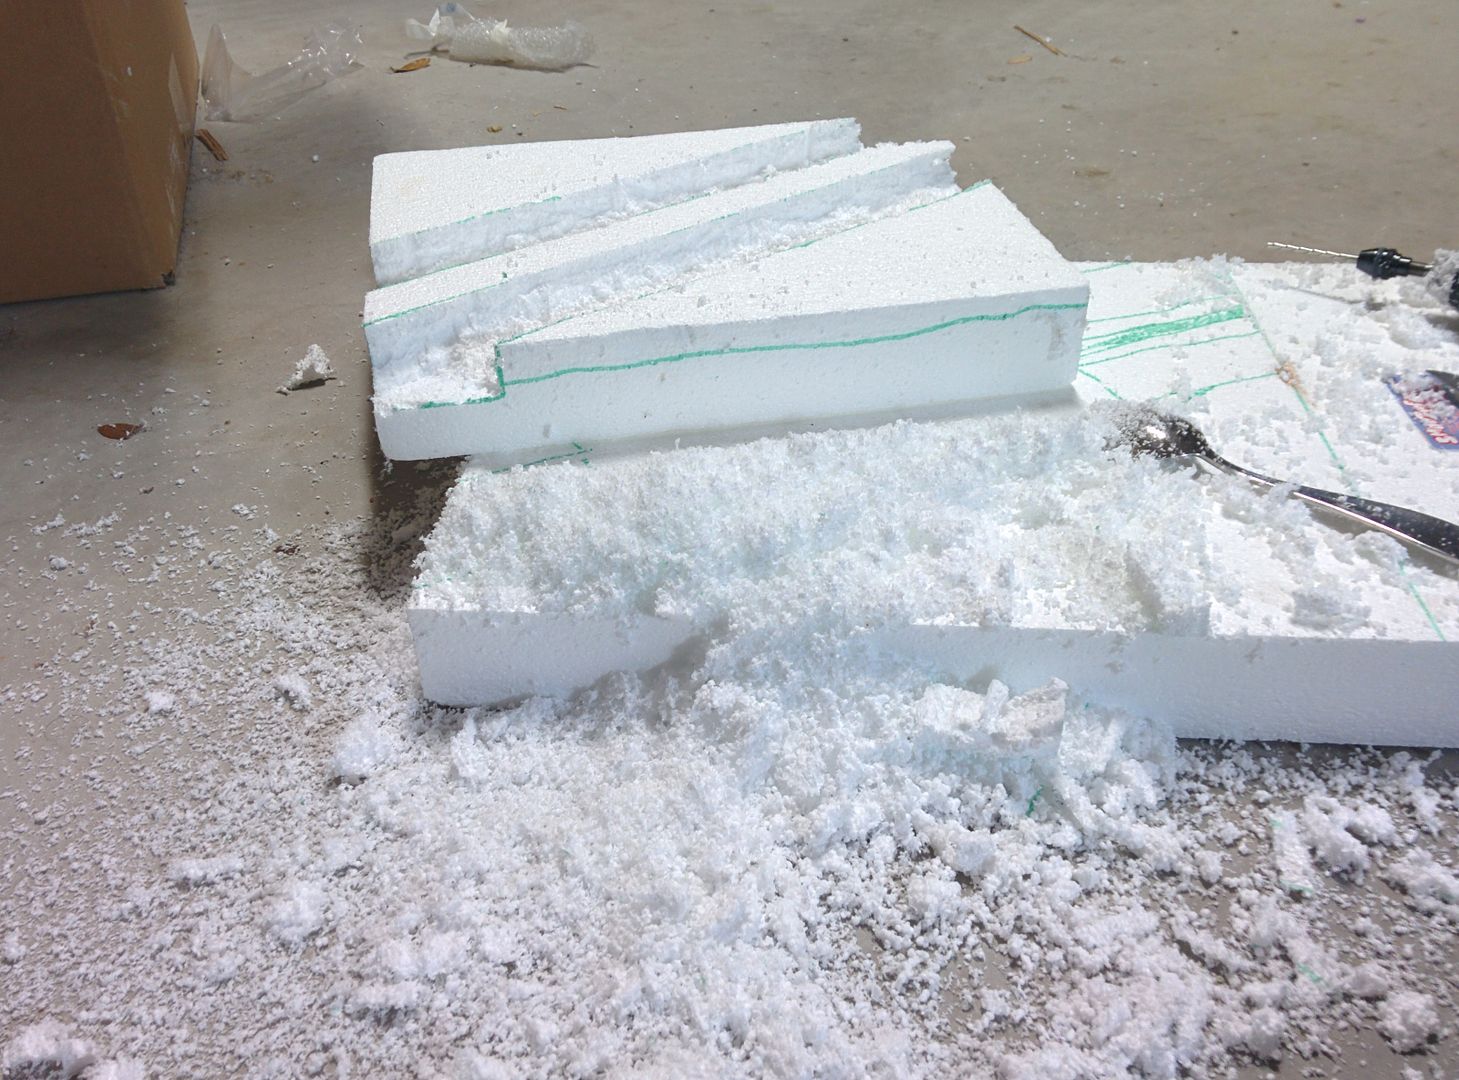 Still have to contour the terrain outside the mud tracks, and the center "median", but so far, not too bad I guess. 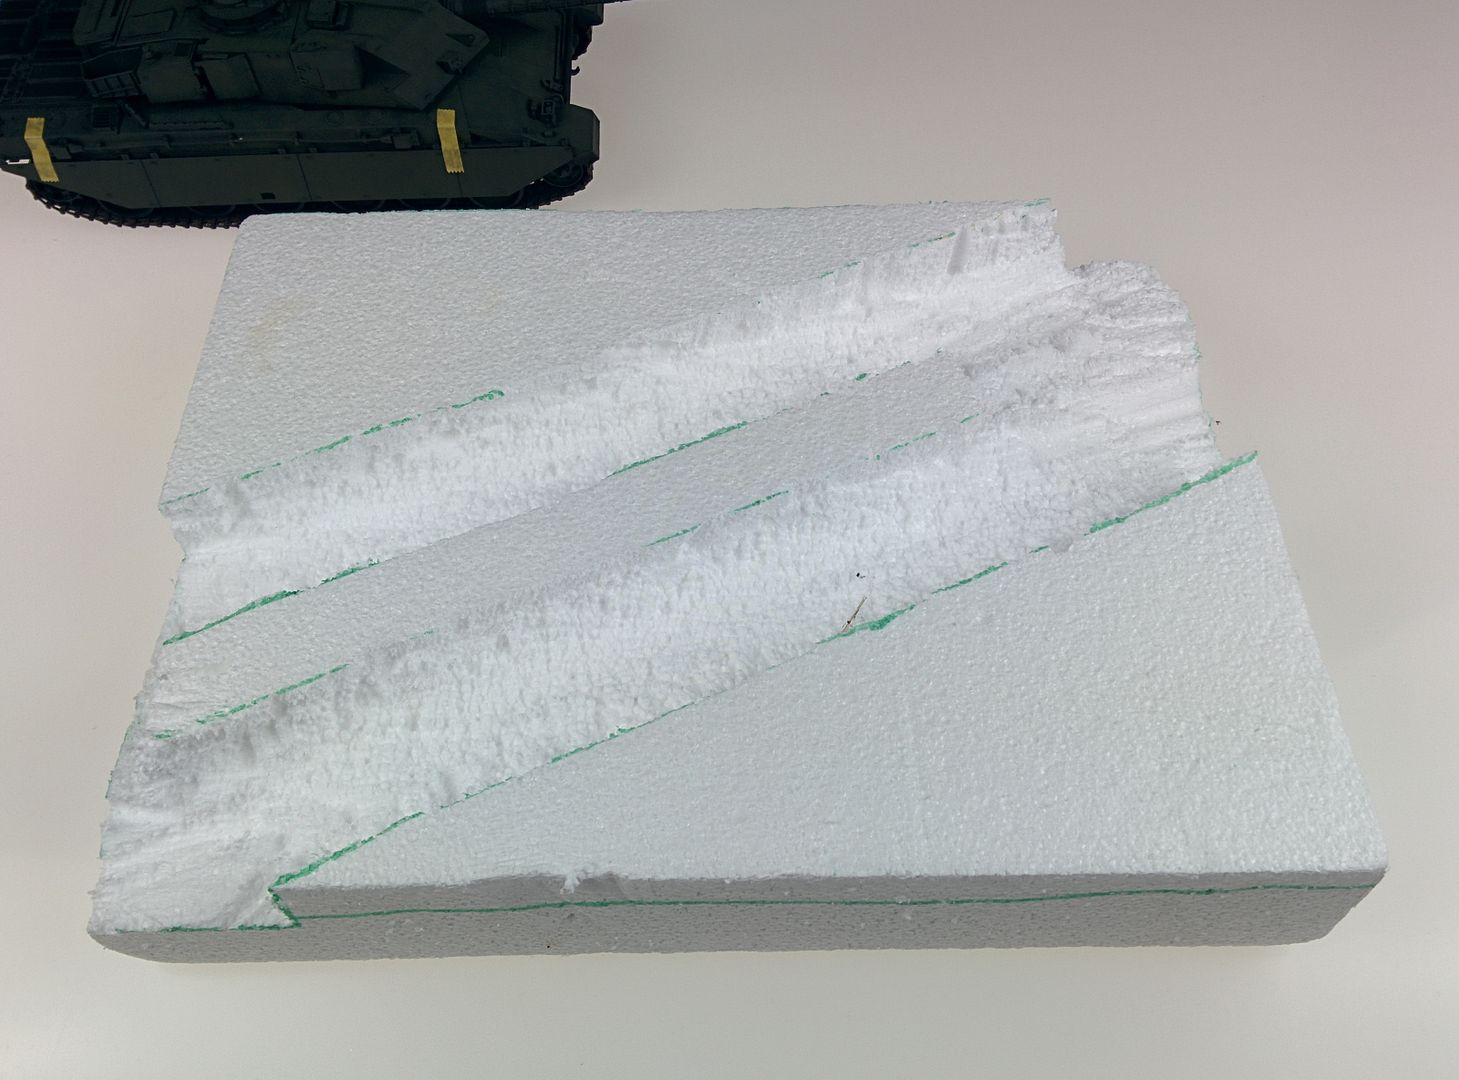 |
|
doogsatx
Senior Member
Feb and Sept 2014_ MoM Winner
Member since: November 2012
Posts: 1,642
Nov 14, 2012 21:29:10 GMT -5
Nov 14, 2012 21:29:10 GMT -5
|
Post by doogsatx on Dec 30, 2013 16:23:24 GMT -5
If you really want to tackle snow... I used the snow product from Woodland Scenic and they worked just great. Be sure to add plenty of watered down white glue I think it will make them look more realistic. You can find them anywhere especially at Hobby Lobby. You know, I've tried their stuff before and HATED it - didn't come out anywhere near as pretty as yours, and the flakes, such as they were, looked huge and fake.  I'm planning to snag some Precision Ice and Snow: precisioniceandsnow.com/Precisioniceandsnow/Home.htmlBut I may end up putting it over something else... |
|
|
|
Post by deafpanzer on Dec 30, 2013 16:31:16 GMT -5
Thats why I applied extra watered down white glue on those... it seemed to do the trick. I learned the trick from a friend a while ago...
Todd did a review on Ice and Snow and he liked it. I'd love to see you try it too.
|
|
|
|
Post by Leon on Dec 30, 2013 19:00:38 GMT -5
Nice start on the base Doog ;)somebody show me foam that isn't messy.  |
|
|
|
Post by bbd468 on Dec 30, 2013 19:15:11 GMT -5
Doogs, ya got it sorted nicely bro! |
|
|
|
Post by TRM on Dec 30, 2013 21:43:44 GMT -5
Looking real good the Doog!! Dig in and get dirty!! If you haven't seen them already, I did get the chance to play with the Precision Ice and Snow twice so far: MSC Precision Ice and Snow ReviewArmorama Feature w/ Prec. Ice & SnowBoth the Scenic and the Precision take a bit of playing around with the get the feel just right. But if you are looking for the ground coating as in the picture you 1st posted, P I&S is a good start!! PM Inbound... |
|
John Everett
Full Member

Member since: January 2012
July, 2016 MoM Winner
Posts: 1,278
Jan 17, 2012 0:53:48 GMT -5
Jan 17, 2012 0:53:48 GMT -5
|
Post by John Everett on Dec 31, 2013 1:40:52 GMT -5
- What should I use as a base? I've heard picture frames mentioned frequently, but I guess I don't quite see how that works. - How best to add some contour to the terrain? - How does one create the smooth edges on bases with elevation? Foam is very much not smooth, so I'm assuming there's some kind of applique, but then how to get that to match the contours? You're off to a very good start with the white foam. You could probably get all the way through the project with nothing more than what you've done there. Adding it to a picture frame is simple enough so long as you can work within the size constraints of the frame. Using a picture frame as a border is easy, fast, and the pre-stained/painted edges look great. To get your foam in a frame requires only that you be able to cut the foam rectangle to fit exactly inside your chosen frame. Power tools will make the cuts fast and accurate, but hand tools can do just as well with some investment in time. Part of the challenge with picture frames will be in how to deal with the higher sections of foam which stand proud above the edge of the frame. You could cover the exposed edges with dirt or paint it to match the frame with acrylic. (Acrylic craft paints, the cheap ones in the small squeeze bottles, are generally foam friendly.)Another advantage provided by a layer of acrylic paint will be protection of the foam, sort of a thin layer of armor plating. The styrofoam you have there is light, but prone to damage and may warp if too much landscaping material is applied and pulls the foam into an odd shape as it dries. (This is why most of us use the pink or blue insulation foam from home centers. It's much tougher and more ridged than styrofoam. As you've already discovered, any tool sharp enough to cut wood can certainly cut foam. Saws, rasps, files, even steak knives make effective foam carving tools. Just keep your vacuum handy. There are several ways to smooth out the surface of foam. The simplest being a layer of PVA or white glue. Be careful though. As it dries, any water based product will begin to shrink and pull against the foam and might cause warpage. Several thin layers are better than one heavy layer. There are also regular landscaping materials like paper mache, Celluclay (a type of high-tech paper mache), plaster of Paris, plaster cloth (from the model railroad section), acrylic caulk from the home center or just mix up a batch of real dirt and kid's school glue and splat the heavy goop right down on that foam base. In short, you have many, many options. All them them are good, some will work better for your needs. Go with what makes the most sense. "Trust your feelings, Luke!" |
|
doogsatx
Senior Member
Feb and Sept 2014_ MoM Winner
Member since: November 2012
Posts: 1,642
Nov 14, 2012 21:29:10 GMT -5
Nov 14, 2012 21:29:10 GMT -5
|
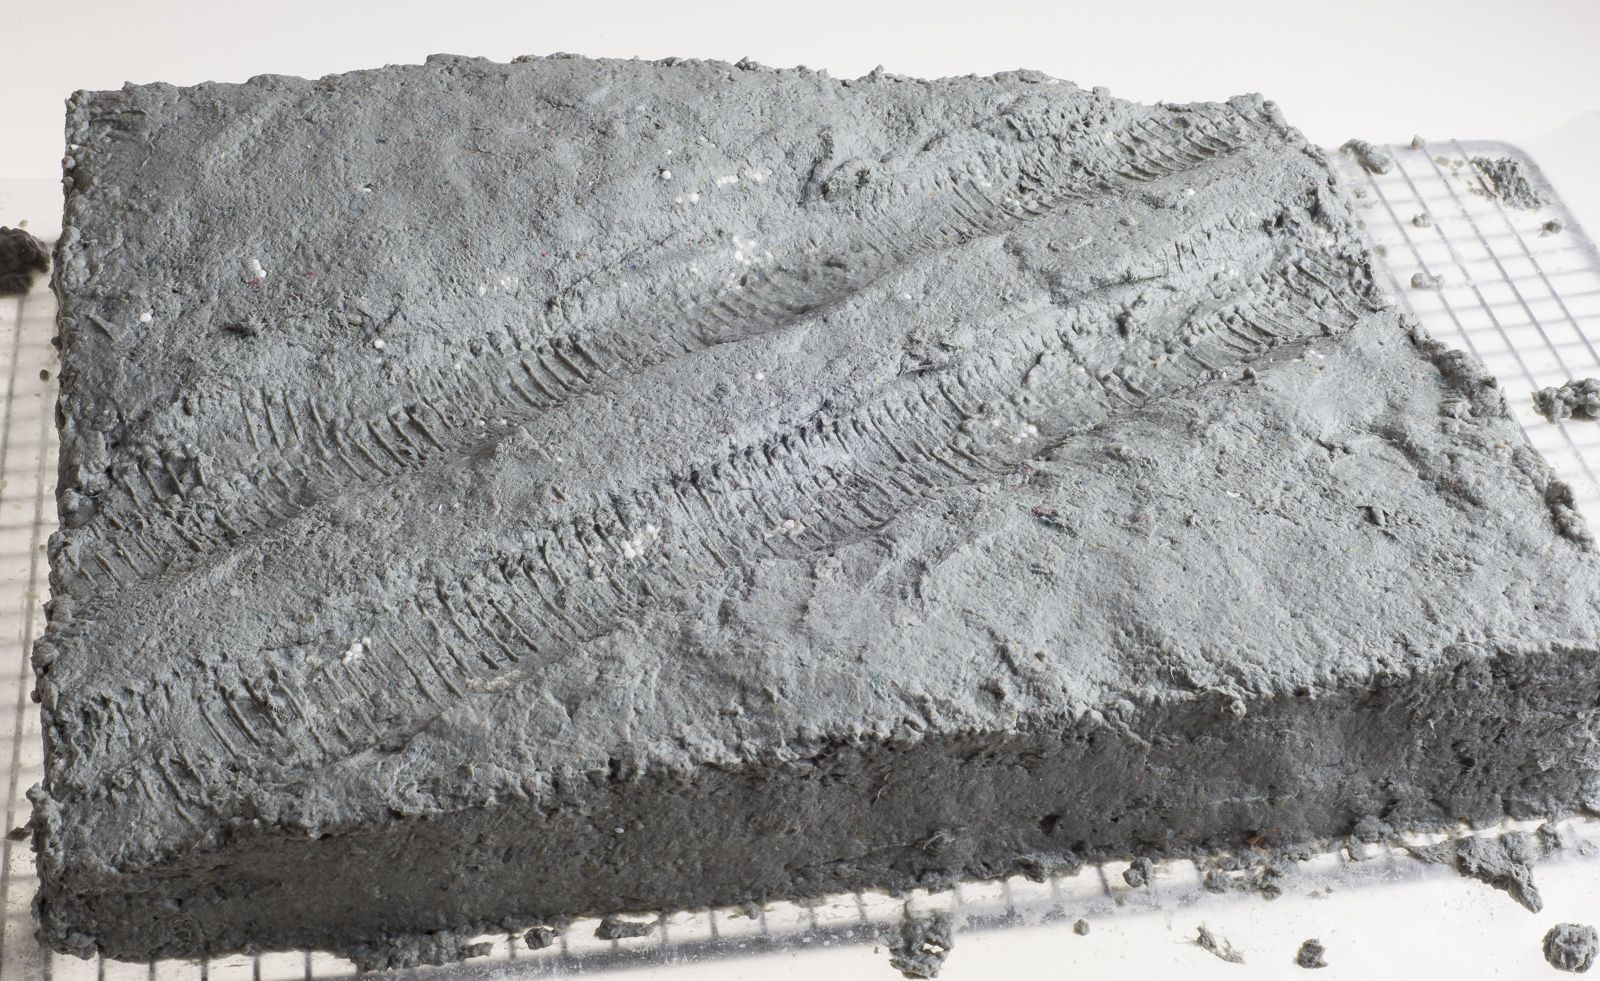
Post by doogsatx on Dec 31, 2013 3:24:58 GMT -5
|
|
|
|
Post by deafpanzer on Dec 31, 2013 11:17:07 GMT -5
Base looking good already!
|
|
|
|
Post by tigrazor on Jan 15, 2014 20:43:45 GMT -5
Hi Doogs... Good process so far. When it comes to snow I use hairspray and baking soda, that works perfect in most cases. The more hairspray you use, the thicker the snow will get. If you want fresh and shiny snow, just add some glass powder - it costs almost nothing and is available in building stores and glass factories. If you put on too much snow on a certain spot, that doesnt matter - just wet a brush with some water and wipe it away. A picture frame for the dio is one possibility and loads of modellers prefer them. Not me, dont ask me why, maybe because of it looks a bit "old fashioned" or something. It seems you want to make a custom made frame? I dont know if you know Vallejos "Crackle Medium". In combination with gloss coat it gives perfect icy crackles for puddles and stuff. Do you have powder sugar at home? Thin it and you have your perfect icy puddles, a cheap and convincing method. Sounds a bit strange, but it really works: modelerssocialclub.proboards.com/thread/5560/ank-smoking-victorianized-ft-tank?page=1  |
|


 This is my take on it! I am sure there will be others that have their methods at going at it!