DeafStuG
Full Member
  
Member since: May 2013
..
Posts: 1,283 
|
Post by DeafStuG on Oct 7, 2015 19:05:40 GMT -5
Very good.
|
|
|
|
Post by wbill76 on Oct 7, 2015 19:43:31 GMT -5
Thanks Jeremy!  |
|
|
|
Post by armorguy on Oct 7, 2015 23:23:23 GMT -5
This is a piece of art on its own Bill !
|
|
|
|
Post by wbill76 on Oct 8, 2015 10:04:32 GMT -5
This is a piece of art on its own Bill ! Thanks AG! |
|
|
|
Post by wbill76 on Oct 8, 2015 18:32:02 GMT -5
The latest round of effort was another case of a lot of time being consumed by little, but necessary, details. The focus was on getting the details attached to the tripod masts so they could be permanently fixed in position with the rest of the superstructure. To that end, I added the two lookout stations near the top of the masts as well as the two spotlight stations at the bottom that are called out in Step 12. The whole reason I had waited to fix the masts in position was to ensure that I could get both of those features aligned properly, no easy task as they stick out at different angles relative to each other and different features on the rest of the superstructure. I had to modify the bases for the searchlights slightly by thinning the rear portion somewhat so they would fit the slots in the mast legs properly. I also drilled out the solid faces of the searchlights so they would have more depth to their finish. A bit of Silver enamel paint did the trick for their reflective inner faces. The railings called out in Step 13 that protect their little platforms were very tricky to shape properly as the two platforms aren't quite the same shape and the railings also interact with the mast legs. I had shaped the railings before I added the platforms to the legs and the railings were gently slipped into position and then glued down with CA. Again, this is a maneuver that would've been virtually impossible IMHO if the superstructure had already been attached to the deck as the instructions would have you do it. For good measure, I also added the railings and floater net basket PE parts that are called out in Step 13. I had deliberately waited a while to add them as they sit in a spot that gets a lot of handling while adding the other stuff with the superstructure levels. Last but not least, I test fit the superstructure once more on the hull, adjusted the height of the tripod legs slightly, and then secured the legs into a permanent position with the little platform E37 from Step 10. The starboard leg needed a little coaxing to pull into the correct alignment so some patient use of finger pressure was called for to keep it in place until the glue grabbed enough to do the job. The three little sections of railing that are called out in Step 16 were added to top it off. 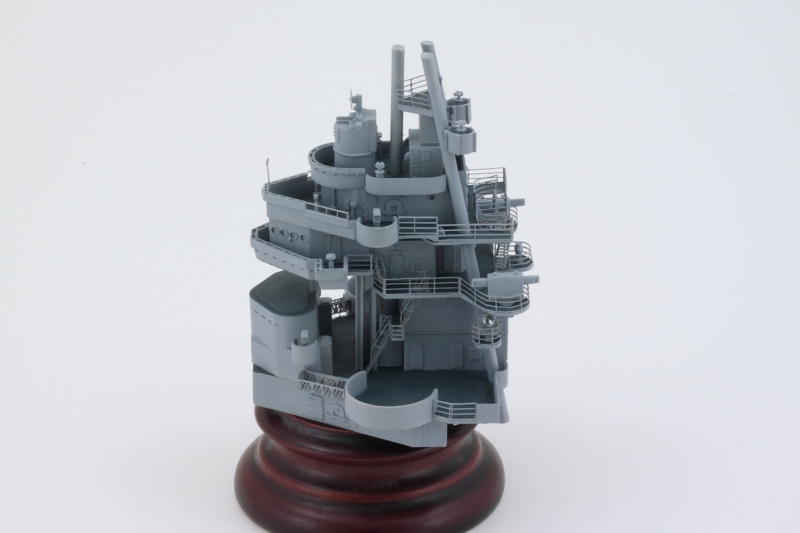 Whew! After all that, I've finally completed all the stuff called for in the first 16 steps of the instructions. Before I had committed to the tripod masts getting locked into place, I had knocked together the main part of the fighting top so I could check one more time that the legs were all lining up properly. Here's how it will look with the hull later on when the top is added. 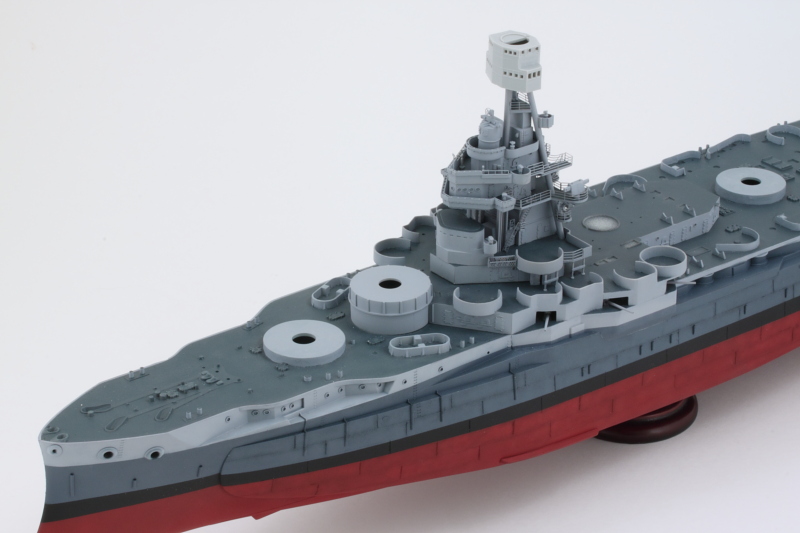 Still a lot more to do on this one, I'm still debating on just how far to go with the fighting top before installing it as it's got a lot of complicated PE and snaggable parts that go into its assembly. Have to give it some thought vs. the other areas of the ship that still need a lot of detail attention. |
|
|
|
Post by Leon on Oct 8, 2015 20:18:15 GMT -5
Coming together nicely Bill! I like your approach of knowing what to add and when.   |
|
|
|
Post by Tojo72 on Oct 8, 2015 21:35:00 GMT -5
I love it when all the sub assemblies on a ship start sprouting,looking real good.
|
|
|
|
Post by JimD on Oct 8, 2015 23:30:11 GMT -5
You're doing the mighty girl proud. I'm certainly taking notes in the off chance I someday want to tackle this beast. Sometimes the instructions are better suited for screwin' you over than helping you. I think your method of assembling the structure off the main hull was the smart decision. Your experience pretty much proves that really. Keep it comin!
|
|
|
|
Post by dierk on Oct 9, 2015 3:58:23 GMT -5
Jimmy took the words right out of my mouth!
Looks like you're mastering the art of interference fitting (interfere with it until it fits) Thumbs Up!
|
|
|
|
Post by deafpanzer on Oct 9, 2015 10:17:33 GMT -5
Professor, is it too early to ask you if you have lost your sanity yet? That massive tower is looking lovely!
|
|
|
|
Post by wbill76 on Oct 9, 2015 11:58:43 GMT -5
Thanks Leon! Something this complicated takes a lot of studying of the instructions and thinking through how it all has to be handled at every step along the way, no question about it! No different than a tank build except that there's a lot more opportunity for a 'gotcha' moment if you aren't paying attention.  Anthony Anthony, I agree! It's actually starting to look like a ship now instead of just a floating hulk.  You're doing the mighty girl proud. I'm certainly taking notes in the off chance I someday want to tackle this beast. Sometimes the instructions are better suited for screwin' you over than helping you. I think your method of assembling the structure off the main hull was the smart decision. Your experience pretty much proves that really. Keep it comin! Trying my best Jimmy! Glad the notes will be of help to you if you decide to tackle the big girl in the future. I'm convinced that the instruction designers are often driven by other priorities than true 'buildability' in terms of how they layout the diagrams, arrows, etc. when it comes to the supplied instructions. In some cases they are probably damned if they do or don't in making their choices...how many times will you encounter a diagram that asks you to install all of the detail parts to a tank's hull top before it's joined to the lower for example?  Modular construction for ships is something I picked up on when reading other people's logs when I tackled the Z-28 and HMS Dreadnought and it really pays off...but at some point you do have to commit to pulling it all together so it's always good to leave yourself some way to handle it throughout that process or you'll be stuck with beautiful sub-components that you can't get together!  Dierk Dierk, love that 'art of interference'!  It's always true to some degree...you have to be smarter than the kit sometimes to get it all together or else resort to brute force!  Professor, is it too early to ask you if you have lost your sanity yet? That massive tower is looking lovely! , that happened a looong time ago my friend...probably somewhere around build #20.  Glad you like how Texas is shaping up! |
|
|
|
Post by mrt51 on Oct 9, 2015 12:35:22 GMT -5
Work from the inside out and the bottom up.
Terry
|
|
|
|
Post by wbill76 on Oct 9, 2015 17:04:15 GMT -5
Work from the inside out and the bottom up. Terry Only way to fly!  |
|
|
|
Post by wbill76 on Oct 9, 2015 17:05:00 GMT -5
In keeping with the modular approach I've been taking with the superstructure, I decided to go ahead and give the main structure a dose of Future so I could do some pin washing to bring out its details before it gets installed permanently. It's now curing as we've had a lot of humidity lately so I'll leave it a good 24 hours before I touch it for the pin wash treatment. In the meantime, I turned my attention to the 02 deck other details. Most of these need a two-tone paint treatment to match up with the Measure 22 scheme, so I went through the instruction Steps 17-22 hunting for the different elements so I could make the most out of the airbrush sessions. Since the Carley floats/rafts were painted to match the Measure 22 patterns wherever they were mounted, I also cleaned them up and created the double and triple stacks where appropriate. Virtually all of the box-like structures were two-part assemblies, so they needed some careful sanding once glued together to remove their join lines. Part of the curse of having good reference photos to work from is that you keep finding stuff that you need to do!  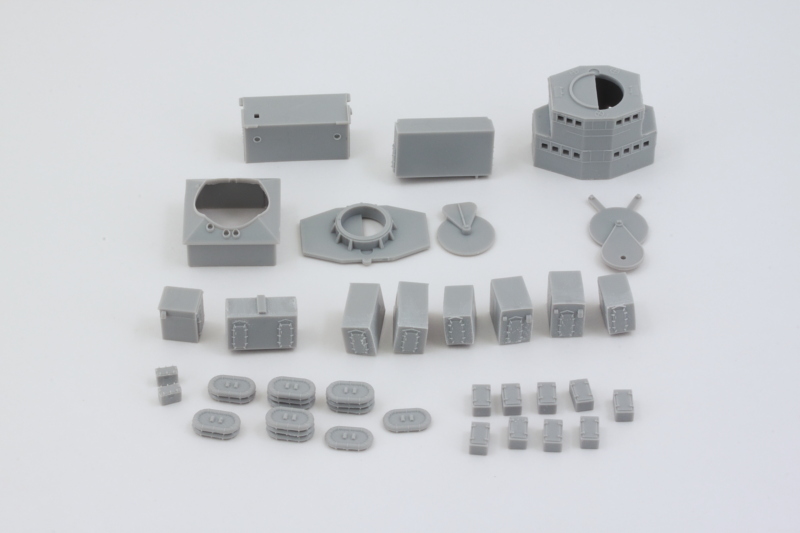 |
|
|
|
Post by wing_nut on Oct 9, 2015 17:31:52 GMT -5
I think there there is a boat in my not to distant future. And once again.... I BLAME YOU!
|
|
|
|
Post by Leon on Oct 9, 2015 18:58:24 GMT -5
Marc that makes two of us! Was just looking at the Trumpeter John F Kennedy aircraft carrier.  |
|
|
|
Post by wbill76 on Oct 9, 2015 19:38:27 GMT -5
I think there there is a boat in my not to distant future. And once again.... I BLAME YOU! Now you've got my attention. Which one?  Texas is now the 3rd 1/350 ship that I've built and I have to say that I really do enjoy working on them. If only they weren't so expensive and took up so much space when built, I'd probably do more of them. Leon, the JFK should keep you really busy!  |
|
|
|
Post by dierk on Oct 10, 2015 1:55:48 GMT -5
Nice rapid progress Bill! Leon, stop looking at boats and build something Russian  |
|
|
|
Post by wbill76 on Oct 10, 2015 16:23:52 GMT -5
With the Future coat fully cured, I set about applying a pin wash to the superstructure. I used a pointed 10/0 brush and used highly thinned Burnt Umber to bring out all the different access doors, details, etc. Went back over it with some clean thinner to tighten it up where needed and then sprayed a coat of MM Lusterless Flat in the spray can to eliminate the Future's residual gloss. 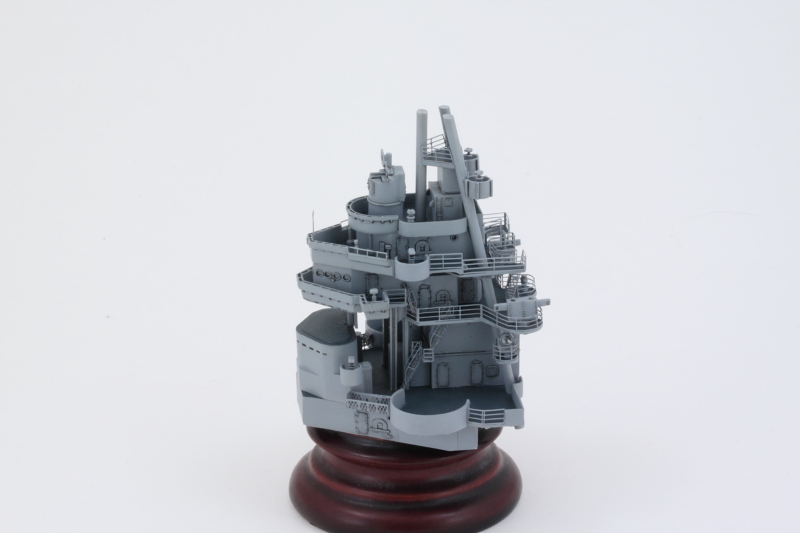 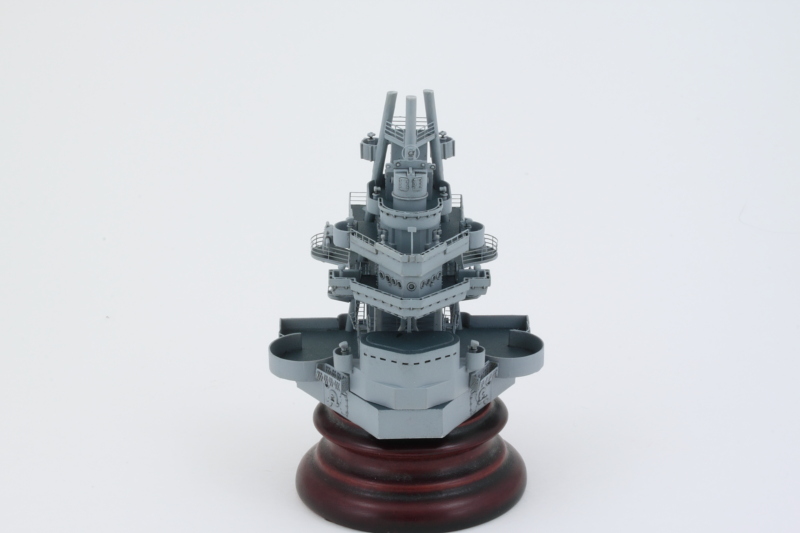 That means the superstructure is now ready for final installation. The only thing missing from the conning tower deck level are the twin 40 mm AA guns that go in the tubs, those will get added after the whole thing is attached to the deck as the tubs have been serving as my main handle point up until now. I also got the airbrush out and applied the Deck Blue to all the stuff I worked on yesterday. Once that sets up, will mask it off and then airbrush the Haze Gray portions. 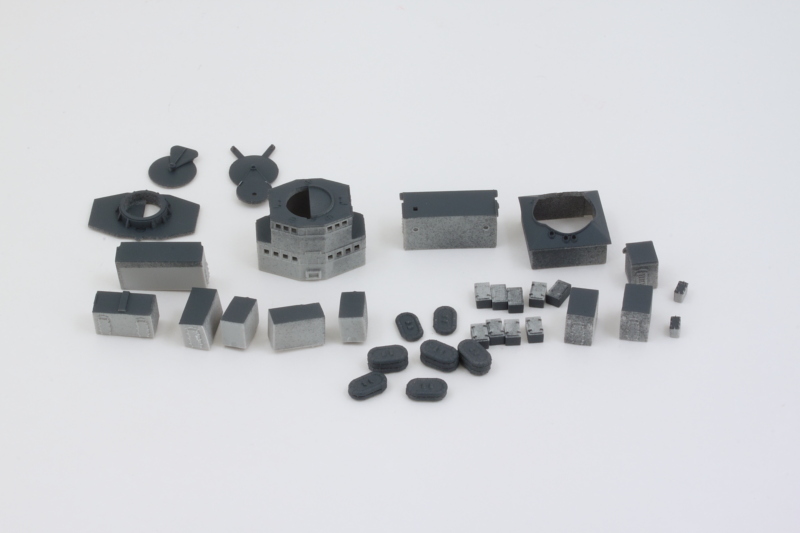 |
|
M1Carbine
Senior Member
    November '23 Showcased Model Awarded
Member since: November 2012
Posts: 1,730
Nov 16, 2012 2:49:11 GMT -5
Nov 16, 2012 2:49:11 GMT -5
|
Post by M1Carbine on Oct 10, 2015 16:36:51 GMT -5
Bill - looks freaking gorgeous buddy. Im going to hit you up for some ship building techniques when I start my USS Indianapolis.
Bob
|
|
|
|
Post by Leon on Oct 10, 2015 16:41:55 GMT -5
Details are really popping out with the pinwash Bill!  |
|
|
|
Post by wbill76 on Oct 10, 2015 16:48:28 GMT -5
Thanks Leon! Never ceases to amaze me how such a simple thing can make such a huge difference. That and of course Trumpeter did a very nice job creating all of that detail, it just cries out for this kind of treatment!  Bill - looks freaking gorgeous buddy. Im going to hit you up for some ship building techniques when I start my USS Indianapolis. Bob Thanks Bob! You and Andy should get together and plot out a joint effort, he's got all the conceivable AM on the planet for an Indy I hear.  Happy to offer whatever advice I can when the time comes, this is only my 3rd 1/350 ship so I'm not an expert by any means.  |
|
|
|
Post by wbill76 on Oct 12, 2015 19:42:51 GMT -5
As a follow-up to the previous airbrush session, I masked off all the Deck Blue areas and airbrushed the Haze Gray as needed. The secondary tower that sits aft of the funnel had the most complicated surface to deal with, all the others were pretty straightforward. I've been spending plenty of time with my trusty roll of 3M blue painter's tape that's for sure!  In anticipation of the session, I went ahead and assembled the funnel tube as called out in Step 26 and carefully sanded down its join seam. Most of it gets hidden by a pair of pipes, but enough of it is still visible that it requires some attention regardless. 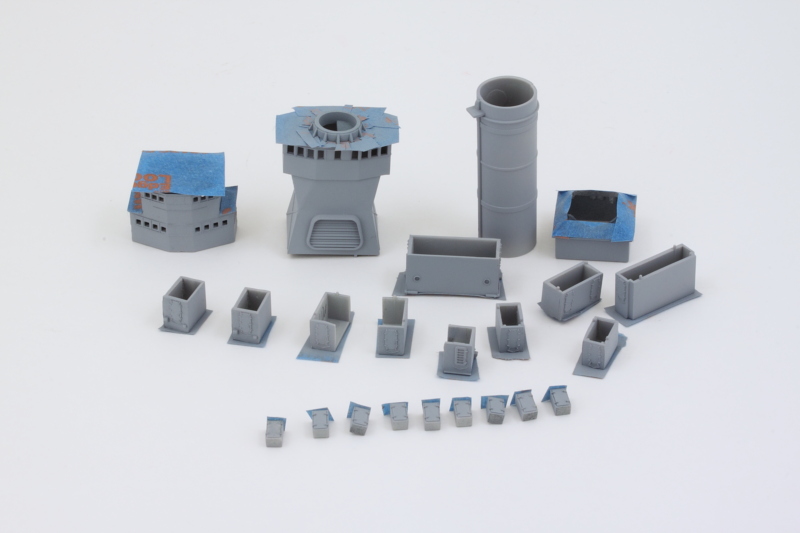 The masking tape came off and only a little touch-up was needed in a couple of spots. I applied some Flat Black to the top of the funnel and installed it after also painting the inside of the tube with Flat Black to give it depth and avoid bare plastic showing up beneath it. The little 'starfish' grate comes as a flate piece of PE and getting it bent into shape is an exercise in patience but adds a nice detail. The two front vent pipes on the funnel had solid faces so I drilled those out to give them a little better detail. 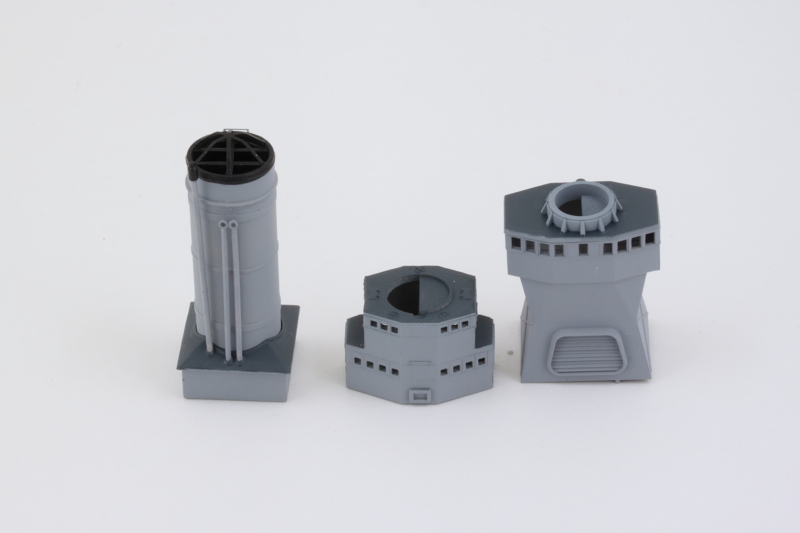 Still slogging away on the rest of the 02 deck details a little bit at a time but not enough yet to justify their own photo. The fighting top and secondary tower both need their PE roundhouse structure added along with the tops and antennas as well, plenty to keep me busy! |
|
|
|
Post by TRM on Oct 12, 2015 21:03:32 GMT -5
Some excellent work...as usual Bill! Tight washing there!!  |
|
|
|
Post by dierk on Oct 13, 2015 3:32:32 GMT -5
Couldn't agree more with Todd!
|
|
|
|
Post by Leon on Oct 13, 2015 4:34:58 GMT -5
Making good progress Bill!  |
|
|
|
Post by wbill76 on Oct 13, 2015 10:09:15 GMT -5
Thanks Todd, Dierk, and Leon! Texas is starting to take shape slowly but surely!  |
|
|
|
Post by Deano on Oct 13, 2015 11:04:31 GMT -5
Great progress Bill , tis coming on a treat . Have you never been tempted to do a dio in your ship building , water effect ect ..... ?
|
|
|
|
Post by wbill76 on Oct 13, 2015 12:04:09 GMT -5
Great progress Bill , tis coming on a treat . Have you never been tempted to do a dio in your ship building , water effect ect ..... ? Yes but for a ship in this scale it's a massive undertaking. In 1/350 scale, Texas is 20 inches in length and 4 inches wide, so she will be taking up a good chunk of space as-is!  Glad you're enjoying the voyage with me. |
|
|
|
Post by wbill76 on Oct 13, 2015 15:47:43 GMT -5
I didn't have a huge amount of bench time today but did make the most of the hour or two that I could squeeze in. One of the most challenging things in the world of PE IMHO Is turning flat pieces into perfectly round shapes. This is doubly hard when the round shape isn't solid and has to be perfectly round at both top and bottom to fit properly. Such is the case with the two 'roundhouse' structures that sit atop the fighting top and secondary tower. I decided to tackle them both today and the amount of metal at the top of the PE piece is thinner than at the bottom. As a result, I focused on shaping the bottom thicker part first and then worked on getting the top shaped correctly. Lots of back and forth with a round shaping tool, tweezers, and very careful use of needle nose pliers. I even pressed a tube that holds a finger drill into service since it had almost the exact same diameter on its bottom end. The parts were carefully annealed as well to avoid the thinner parts from incinerating/fragmenting, they are that delicate. Here's the bending arsenal employed. 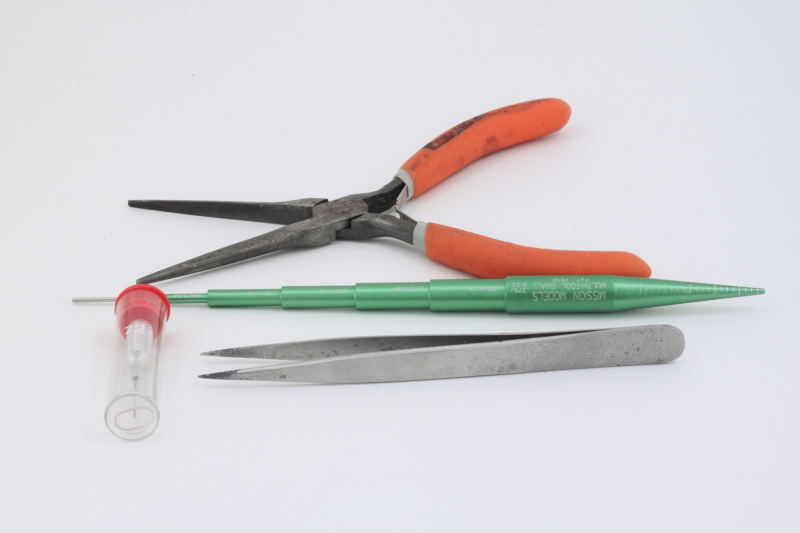 In order to keep things easier for painting, I only attached the PE to the top parts with CA after dry-fitting them to their respective elements and adding the little half-moon post that supports the deck on the fighting top. 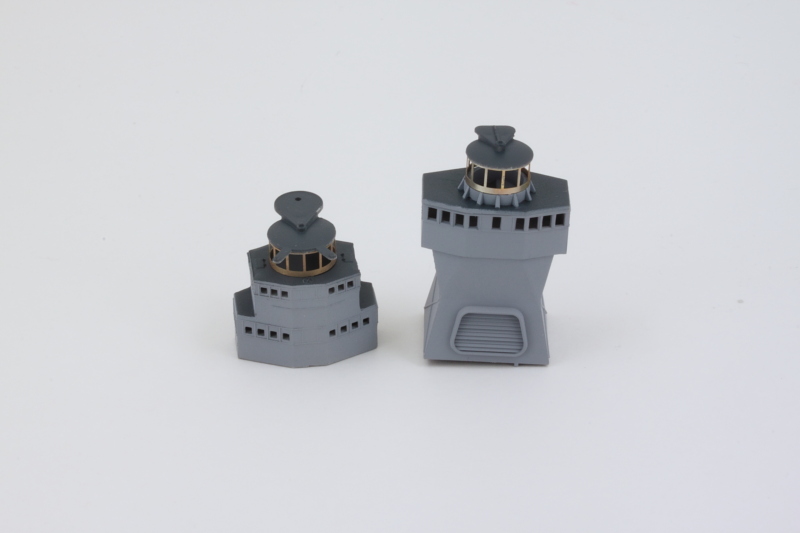 Some careful work with a detail brush and the Optivisor and they were all painted up and permanently added. I used the Gator Grip thin blend to mount them to the bases to give me a little bit more flexibility to ensure their placement vs. using CA. For good measure, I also added the little PE railing and painted it up on the funnel so it could sneak in as a cameo once more.  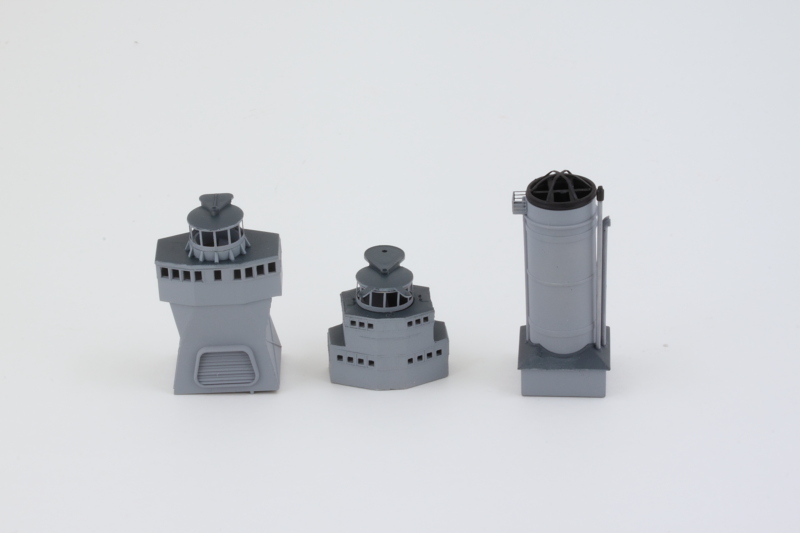 One thing that kind of jumped out at me is that at the back of the secondary tower there are molded slots/impressions that make it look like something should go there to complete the whole roundhouse/roof arrangement. Sure enough, when I checked reference photos, there should be a support there but for whatever reason Trumpeter doesn't include it in the kit. I hunted over all of the sprues with no luck in finding anything remotely resembling what should go there, so I scratched up a suitable part using a short length of 1.5mm diameter styrene rod. The rod had to be shaped to fit the half-moon impression and accommodate the back of the roundhouse, but was a relatively easy fix. The omission by Trumpeter is an odd one for sure...in all of the follow-on diagrams from Step 26, nothing is shown as occupying that space but yet the molded in slots are clearly there. Maybe someone just forgot the part design completely in the layout? Who knows...  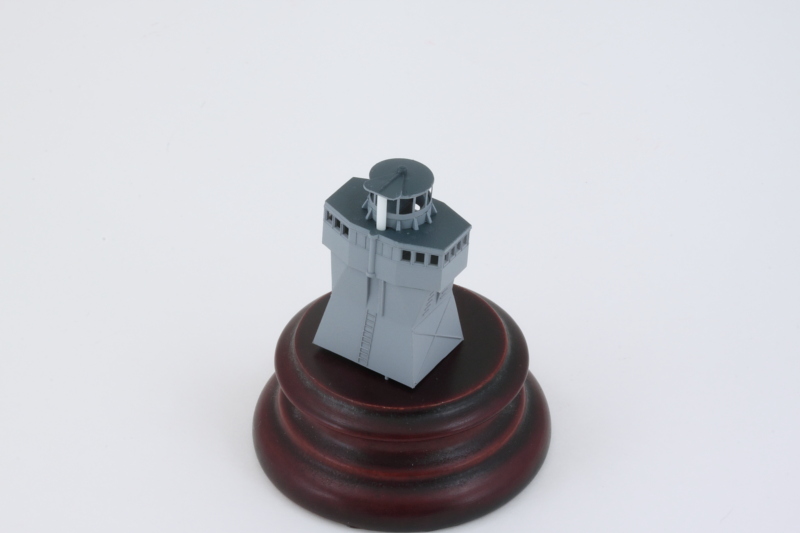 Both the fighting top and secondary tower top still need the radar antennas and the fighting top still has a lot more little details that go with it. One step at a time! |
|