|
|
Post by wbill76 on Sept 30, 2015 20:35:46 GMT -5
I really like the look of those big clamps you've got up there - I'm going to need to round some of those up. Do you recall where you found them? Picked them up at Harbor Freight a couple of months ago when a buddy of mine needed to stop by there for some things and I found them while we were browsing around. They were about $2 or $3 a piece IIRC. Pretty handy to have for light duty clamping stuff like plastic kits. |
|
|
|
Post by dupes on Sept 30, 2015 20:37:01 GMT -5
Cool! We just got one of those (relatively close by) this year. Will check there for sure!
|
|
|
|
Post by wbill76 on Oct 2, 2015 20:03:10 GMT -5
The latest round of effort focused on the superstructure deck above the conning tower. It's got the most complicated railing situation and my decision to work on it without the support legs in place was a sound one. It took a lot of careful effort to bend the railings called out in Step 14 into shape and I used a combination of pointed tweezers and round rolling objects including a paint brush handle, my Xacto handle, etc. to get it done. Definitely an exercise in patience and not one I would recommend trying to do with the decks already attached together as the instructions would have you do it. The railings were hand painted off the deck first then installed with small amounts of CA glue since they have some tension due to their unusual shapes and touched up where needed post-install. For the slightly raised forward area, I had to file down the edge that overhangs so that the railing could clear in that spot as it's slightly too low. I also added the access ladders and the fire direction stations as called for in Step 12. There's a small error in the instructions in Step 14, the small railings are PE-B10 and not PE-B9 as called out since those are already used on the conning tower deck level below this one. 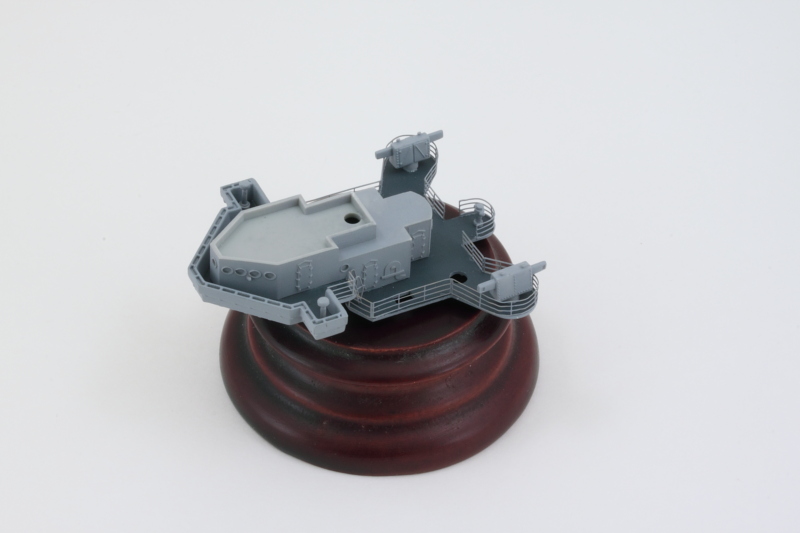 With that out of the way, I could return to Step 8 and fit the support legs and little PE lattice structure that I had skipped earlier. This turned out to be an extremely finicky arrangement that was a bear to get lined up properly. This was mostly due to the fact that the two single legs have a finned portion that's supposed to line up with the paired legs but which is slightly too wide to do that and allow the legs to sit square with each other. Once that was taken care of, it was a case of getting all four legs to sit in the proper alignment with their slots in the conning tower deck and not twist in the process. It turned out that my decision to add the two ladders that sit right next to the legs was a mistake and they were removed so I could have enough room to adjust the legs as needed. Currently, the two decks are only dry fit together as I don't want to commit to glue until I'm sure that the three tripod legs are going to play nice with all the deck levels. 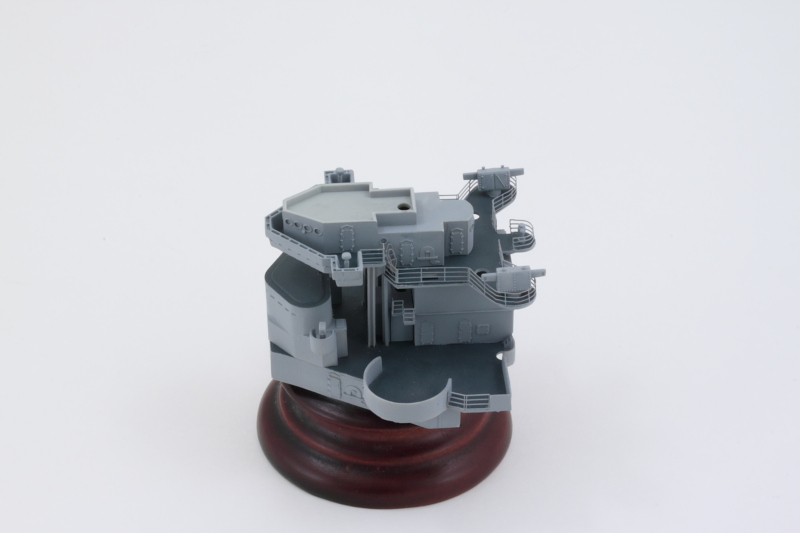 Next up will be dealing with the third level's railings which are only slightly less complicated than the deck I worked on today.  |
|
|
|
Post by dierk on Oct 3, 2015 1:44:05 GMT -5
Railings look the canine's danglies! Your patience and preserverance are paying off!
|
|
|
|
Post by Leon on Oct 3, 2015 1:53:36 GMT -5
Nice work on the railings Bill!  |
|
|
|
Post by TRM on Oct 3, 2015 7:46:16 GMT -5
Solid work there my friend!! The old girl is really coming together well!!
|
|
|
|
Post by wbill76 on Oct 3, 2015 10:37:35 GMT -5
Thanks Dierk, Leon , and Todd! The Trumpeter PE railings are a little delicate and have a tendency to distort if too much pressure is applied so shaping them is definitely an exercise in patience! It took roughly 4 hours to bend, paint, and place that one level's worth of stuff. Whoever designed the assembly order in the instructions either has gymnast fingers or was working only from theoretical possibilities!  |
|
|
|
Post by dierk on Oct 3, 2015 10:43:17 GMT -5
Maybe Dragon's instructions-guy is moonlighting for Trumpy?  |
|
|
|
Post by wbill76 on Oct 3, 2015 11:15:09 GMT -5
Maybe Dragon's instructions-guy is moonlighting for Trumpy?  Oh the horror!  Can you imagine that resume?  |
|
|
|
Post by dierk on Oct 3, 2015 11:26:45 GMT -5
LOL! Or maybe they're emulating Meccano? In the 50's they used to introduce mistakes into their instructions - making it impossible to finish the model if you followed them to the letter. This was done to teach kids independent thinking and problem-solving skills - those attributes used to be considered desirable...So maybe those instructions should actually be applauded, instead of derided?  |
|
|
|
Post by wbill76 on Oct 3, 2015 11:39:11 GMT -5
LOL! Or maybe they're emulating Meccano? In the 50's they used to introduce mistakes into their instructions - making it impossible to finish the model if you followed them to the letter. This was done to teach kids independent thinking and problem-solving skills - those attributes used to be considered desirable...So maybe those instructions should actually be applauded, instead of derided?  That would be giving them too much credit! Does remind me of some of Da Vinci's drawings though.  |
|
|
|
Post by wbill76 on Oct 3, 2015 17:32:18 GMT -5
Round 2 on the superstructure's railings was taken care of today. These are called out in Step 15 and the rear railing has a gull-wing shape to it that was a challenge to get shaped since the little middle part isn't truly square, it's slightly angled at the sides. No sooner would I get one side lined up then I would have to adjust the other side and so on until I finally got them both lined up and curved just right. Same drill as before, the railings were bent to shape first, then hand painted, and installed with small amounts of CA. 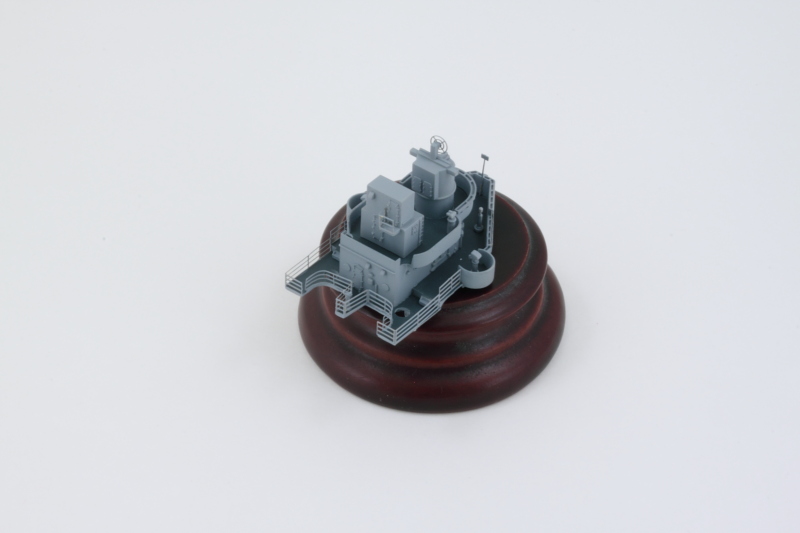 The three levels stack up nicely together, I'll add their connecting ladders once they are permanently joined together along with the tripod masts. This is just a dry fit so I could check the tripod masts. Test fits with the mast poles shows that everything lines up fairly close, but it will still be a complicated matter to get them all sitting properly as a single unit. While not pictured, I've already hand-painted the masts to get them ready for primetime in the next round of effort. 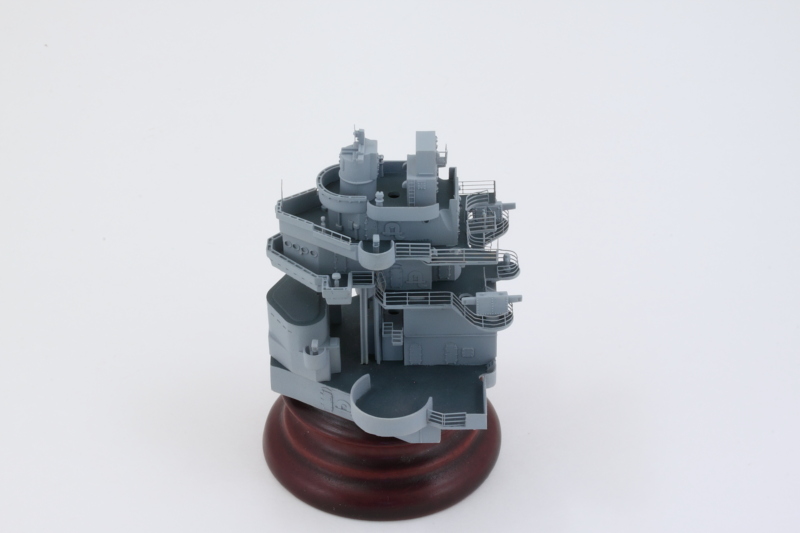 |
|
|
|
Post by wing_nut on Oct 4, 2015 8:45:14 GMT -5
The ship is taking shape in a very ship shape manner. Again, these super structure chucks remind me of those massive ship sections craned into position on those ship building TV shows.
|
|
|
|
Post by wbill76 on Oct 4, 2015 11:06:21 GMT -5
The ship is taking shape in a very ship shape manner. Again, these super structure chucks remind me of those massive ship sections craned into position on those ship building TV shows. Wish I had some of those cranes myself Marc!  Tweezers and holding my breath has to stand in though.  |
|
|
|
Post by JimD on Oct 4, 2015 11:29:52 GMT -5
I'm still watching. Great stuff as per. All that PE around curves and such is what really scares me about any ship build. I'm butter fingers with the stuff and it drains my patience meter quick like. Maybe one day though. Im enoying this. Keep it up.
|
|
|
|
Post by wbill76 on Oct 4, 2015 11:49:08 GMT -5
I'm still watching. Great stuff as per. All that PE around curves and such is what really scares me about any ship build. I'm butter fingers with the stuff and it drains my patience meter quick like. Maybe one day though. Im enoying this. Keep it up. Thanks Jimmy! It can be pretty intimidating but like anything in the hobby it just takes patience...no different really than picking out knobs on an instrument panel or assembling workable tracks!  Different people have different tolerances for stuff though...my last aircraft build and all those markings/details reminded me of why I gave up on aircraft for example, so I can relate to your patience meter issue.  Of course, I can't say that I truly enjoy assembling workable tracks, but there's a certain satisfaction in getting the detail to fit like it should I guess when it comes to the railings and other PE details. One of the huge challenges with dealing with the curves on the railings is you can't do it by annealing the railings...otherwise they will just deform like crazy if you look at them the wrong way and start imitating Dali paintings! Maybe I need to seek professional help or just get a stronger prescription...  |
|
|
|
Post by Leon on Oct 4, 2015 16:25:37 GMT -5
Nice work on the railings Bill! Taking shape nicely.  |
|
|
|
Post by wbill76 on Oct 4, 2015 17:24:29 GMT -5
Thanks Leon! There's over 200 PE parts on the 4 frets included so I've got plenty to keep me busy.  |
|
|
|
Post by deafpanzer on Oct 4, 2015 21:15:23 GMT -5
Loved the last update... its like a puzzle trying to get all pieces to fall together flawlessly! You have reminded me why I am not ready to do my USS Indy! LOL
Catching up... you know where I have been. Keep up with the great work Captain!
|
|
|
|
Post by wbill76 on Oct 4, 2015 21:56:37 GMT -5
Loved the last update... its like a puzzle trying to get all pieces to fall together flawlessly! You have reminded me why I am not ready to do my USS Indy! LOL Catching up... you know where I have been. Keep up with the great work Captain! A puzzle where sometimes the box art doesn't match the actual pieces! Indy will always be there for you when you are ready.  |
|
|
|
Post by wbill76 on Oct 5, 2015 18:45:01 GMT -5
Today's efforts was a moment of destiny, sort of! It was time to get the main superstructure levels together and all of the ladders connected to create the three-level structure as an integrated unit. First up was the main bridge level above the conning tower. I started by permanently gluing it down using the tripod masts and the deck level above it to ensure everything lined up while the glue set. I went to work on the ladders that connect up to the bridge deck and quickly realized that the openings in the bridge deck are too narrow for the ladders to fit...so some careful sanding with a square needle file was needed until the openings could take the ladders. I also ended up removing temporarily the little side railings (parts PE-B20 from Step 9) as the ladders couldn't quite fit over them and some adjustments were needed. So much for that effort previously!  The bottom level ladders and railings were re-installed now that the bridge support legs were in place to complete the process of joining these two levels. 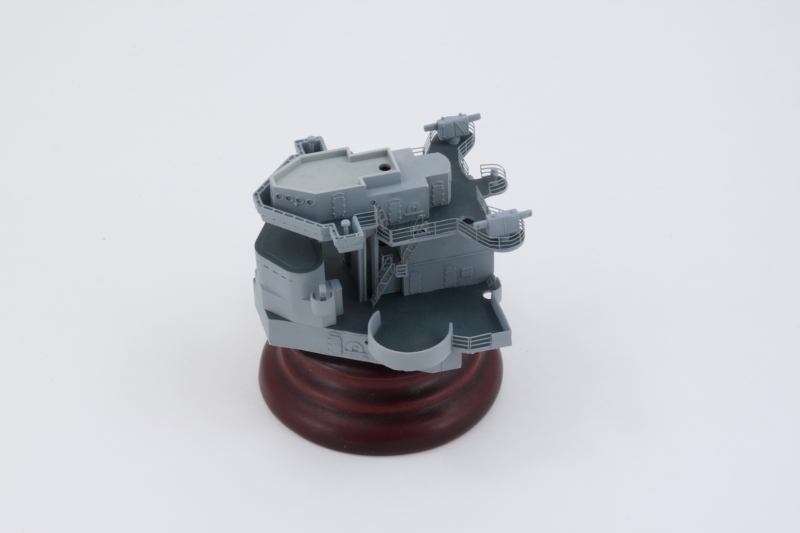 Now came the really fun part, adding the third level above the bridge deck. Test fits with the tripod legs showed that the front leg was causing the deck to want to tip up at the front and create a gap with the level below. This is due to the fact that the front leg doesn't install straight down but is slightly inclined and by the time all the levels are stacked up, it puts some tension on the top deck. To correct that, I used a round needle file to slightly enlarge the opening. I added the triangular supports for the little deck extension that was originally called for in Step 8 and then installed the top level into place. Some slight finger pressure at the front was needed until the glue set. Once it did, friction and the angles involved is holding the tripod legs in place as they haven't yet been glued down since they still need some details added to them in steps to come. 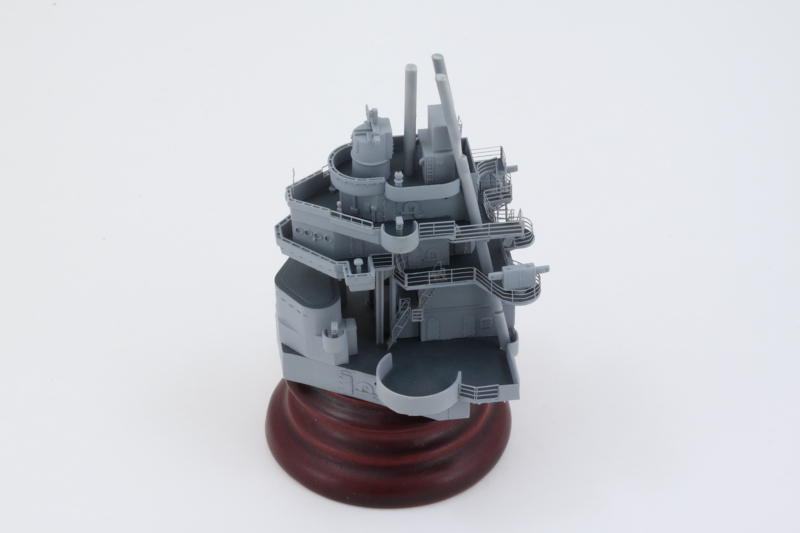 Rounding out the day's efforts, the two long ladders that connect the rear areas of the two decks were added. These are very tricky as the contact surfaces are tiny and both ladders are in a very tight space and you can only place them after the two deck levels have been joined. Some Gator Grip Thin Blend glue gave me enough work time to get them in place. It's worth noting that the instructions tell you to install the same ladders twice, once in Step 14 and then again in Step 16!  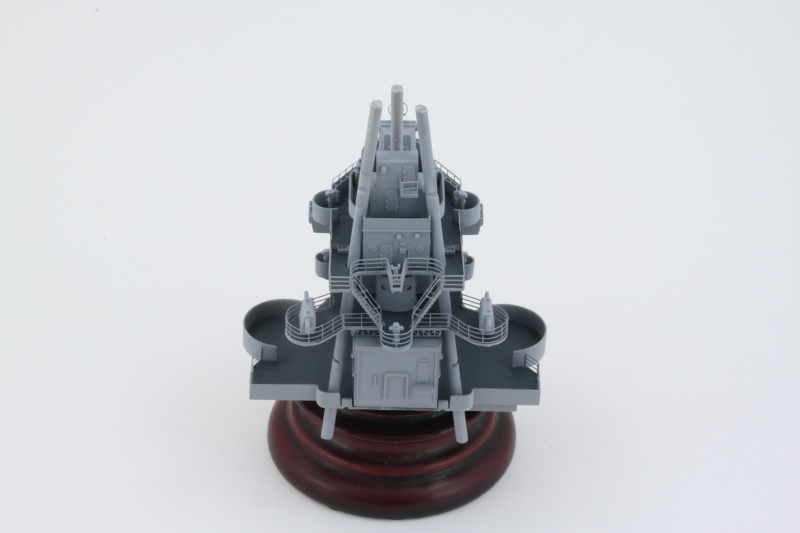 Next up will be taking care of those tripod leg details. |
|
|
|
Post by Leon on Oct 5, 2015 19:11:21 GMT -5
Great job on the superstructure Bill!  |
|
|
|
Post by wbill76 on Oct 5, 2015 19:29:42 GMT -5
Thanks Leon!  The fighting top that sits on the tripod is going to be another complicated chunk, I'm thinking of waiting to tackle that until later just because of all the snag potential it represents with yard arms, antennas, etc. |
|
S e r z h--Rest In Peace
Full Member
  
Member since: November 2014
RIP- December 2023
Posts: 650 
|
Post by S e r z h--Rest In Peace on Oct 6, 2015 0:26:19 GMT -5
Bill - patience and accuracy! Do you have it! I watch with great interest!
|
|
|
|
Post by wbill76 on Oct 6, 2015 10:34:22 GMT -5
Bill - patience and accuracy! Do you have it! I watch with great interest! Thanks Serzh. Having fun with it but definitely have to move slowly and spend a lot of time thinking through how everything goes together.  |
|
|
|
Post by deafpanzer on Oct 6, 2015 12:15:26 GMT -5
Solid painting job! Bet it was tricky painting those floors.
|
|
|
|
Post by wbill76 on Oct 6, 2015 13:46:37 GMT -5
Solid painting job! Bet it was tricky painting those floors. Couldn't have done it without my trusty cancer-causing cutting mat and LOTS of small pieces of masking tape!  |
|
|
|
Post by wing_nut on Oct 6, 2015 13:51:01 GMT -5
It is appropriately named cuz it is a super structure.
|
|
|
|
Post by wbill76 on Oct 6, 2015 14:04:31 GMT -5
It is appropriately named cuz it is a super structure. You've been dying for the chance to use that one right?  Thanks for the smile regardless and for following along on this descent into madness!  |
|
|
|
Post by wing_nut on Oct 6, 2015 15:36:29 GMT -5
You're most welcome for the smile. I was happy to hear that I hadn't used it already  |
|