afvfan
Senior Member
   
Member since: December 2012
Bob
Posts: 1,772
Dec 10, 2012 17:32:38 GMT -5
Dec 10, 2012 17:32:38 GMT -5
|
Post by afvfan on Dec 27, 2015 10:05:46 GMT -5
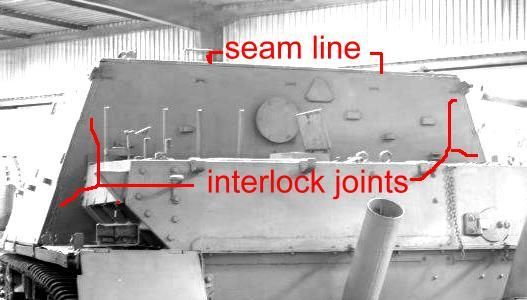
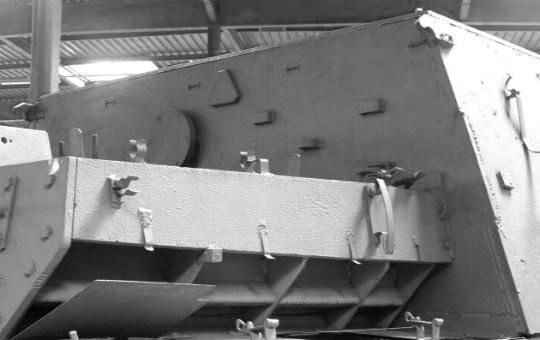
Thanks for the suggestions, SMJ. I actually broke down and finally did a little much needed research on this beast.... something I wish I had done much earlier. Here are a couple pics from the one at Saumur (borrowed from the Maquetland.com website and modified by me):   Seems I messed up alot on the seams. First, as can be seen in the 2nd pic, the top seam is not totally flush with the back wall. If anything, the real problem is that the seam is too low (indicating a thicker top piece). To properly correct it the existing seam would need to be filled and rescribed higher, all the way around the top. Then many bolt heads would need to be added on the top plate since it was bolted on, and not welded. The other places where the work is needed are the interlock joints on the sides. The ones showing on the back wall aren't even hinted at on the kit, and the one showing on the side is too thick. Finally, there's a weld seam across the bottom by the intakes. With everything listed here to do it "right", I've decided it'd be in the best interest of my sanity to leave well enough alone and run with what I've got. I'll file all this away for the next time I tackle one of these.  {b]T[/b] also pointed out to me, and is backed up by the pics, that the tiedowns are placed too high. As fiddly as they are to work with, and their propensity of disappearing when you try, lead me to the conclusion that they're fine right where they're at.  |
|
|
|
Post by dierk on Dec 27, 2015 10:32:03 GMT -5
The curse of the internet strikes again...things used to be so much simpler when all you had to go on were a few b/w pictures in a book. I totally understand your decision not to rip everything apart and start again.
|
|
406 Silverado
Global Administrator     
Member since: November 2011
Posts: 10,211
Member is Online
MSC Staff
|
Post by 406 Silverado on Dec 27, 2015 10:35:28 GMT -5
Looking good, love the battle damage.
|
|
|
|
Post by TRM on Dec 27, 2015 11:04:13 GMT -5
There is that balance where the research does end allowing us to actually finish the models...LOL! Nice shot of the casmate joints. DML was a bit heavy on there mold, but with a nice coat of paint and some weathering, she still builds up into a fine model! Not too many folks would pick up on the handle placements...they serve the purpose of showing the detail sufficiently. Looking forward to the color flying around soon my friend! Enjoy!
|
|
afvfan
Senior Member
   
Member since: December 2012
Bob
Posts: 1,772
Dec 10, 2012 17:32:38 GMT -5
Dec 10, 2012 17:32:38 GMT -5
|
Post by afvfan on Dec 27, 2015 20:24:48 GMT -5
Dierk, it's only a curse if you try to use it after the fact.  Thanks Rob. I'm sure it brings back great memories of where you were at 25 years ago.  T T - Appreciate the comments. Minor update.... well the paint flew. I tried out a new mix for the basecoat. It looked pretty good in the bottle, but when it dried, the yellow sure came out. It looks like a 28 ton lemon!  I'm going to have to mix up a different batch of paint and try it again. Hope I don't end up losing too many details. The thought of stripping it and starting over is giving me a migraine. 
|
|
|
|
Post by Leon on Dec 27, 2015 20:52:53 GMT -5
Bad news on the paint Bob! Hope the next session comes out better.   |
|
SMJmodeler
Junior Member
 
Member since: October 2015
Posts: 90
Oct 28, 2015 13:55:05 GMT -5
Oct 28, 2015 13:55:05 GMT -5
|
Post by SMJmodeler on Dec 28, 2015 10:32:34 GMT -5
"With everything listed here to do it "right", I've decided it'd be in the best interest of my sanity to leave well enough alone and run with what I've got. I'll file all this away for the next time I tackle one of these." - afvfan afvfan: Well said, excellent attitude. I certainly wasn't trying to be a rivet counter...just offering some practical advice.  28 ton lemon!?,  that would be a sight. I hope that paint fix works out!
|
|
afvfan
Senior Member
   
Member since: December 2012
Bob
Posts: 1,772
Dec 10, 2012 17:32:38 GMT -5
Dec 10, 2012 17:32:38 GMT -5
|
Post by afvfan on Dec 28, 2015 20:01:50 GMT -5
Thanks Leon. I redid the preshade today. Hope to spray color tomorrow. afvfan: Well said, excellent attitude. I certainly wasn't trying to be a rivet counter...just offering some practical advice.  Not to worry SMJ, like I said, you're comments are more than welcome.  Never thought of it as a "rivet counting" thing. Even if it was, there's nothing wrong with offering the expertise. In this case, I was looking more at how much I'd have to disassemble to get to a point where I could implement the changes, than anything else. |
|
afvfan
Senior Member
   
Member since: December 2012
Bob
Posts: 1,772
Dec 10, 2012 17:32:38 GMT -5
Dec 10, 2012 17:32:38 GMT -5
|
Post by afvfan on Dec 29, 2015 15:07:07 GMT -5
Mixed up a shade more to my liking today and laid down the base coat. Here's the results:   |
|
|
|
Post by tonylee-Rest In Peace on Dec 29, 2015 15:16:31 GMT -5
|
|
|
|
Post by Deano on Dec 29, 2015 17:22:06 GMT -5
Looks great buddy , keep it coming !!!
|
|
|
|
Post by wbill76 on Dec 29, 2015 17:39:01 GMT -5
It's always interesting to see the differences in the moldings on these older kits vs. the newer offering when it comes to details like those weld seams. I think you've made the right call when it comes to the state of things Bob, sometimes the sanity selection is the best of poor options! That 28-ton lemon comment really made me smile. Been there too!  V2 in the basecoat looks a lot more inline with what you were probably shooting for the first time out. |
|
afvfan
Senior Member
   
Member since: December 2012
Bob
Posts: 1,772
Dec 10, 2012 17:32:38 GMT -5
Dec 10, 2012 17:32:38 GMT -5
|
Post by afvfan on Dec 29, 2015 18:21:48 GMT -5
Tonylee -  ? Too bright?  j/k Thanks Deano. Bill - It all wouldn't have been a problem it I had thought it out and done a bit of research ahead of time. It'll all work out. I've got a Red Ryder in the corner that guarantees it!  V2 may be a little too light, but I'd rather start the weathering like that. As we all know, it's much easier to darken a finish than it is to lighten one that's too dark. 
|
|
|
|
Post by dupes on Dec 30, 2015 11:48:53 GMT -5
Nice progress! Love a good dunkel-scheme.
|
|
afvfan
Senior Member
   
Member since: December 2012
Bob
Posts: 1,772
Dec 10, 2012 17:32:38 GMT -5
Dec 10, 2012 17:32:38 GMT -5
|
Post by afvfan on Dec 30, 2015 12:48:46 GMT -5
Thanks Dupes.
|
|
|
|
Post by Leon on Dec 30, 2015 14:56:42 GMT -5
Nice work on round 2 Bob!
|
|
afvfan
Senior Member
   
Member since: December 2012
Bob
Posts: 1,772
Dec 10, 2012 17:32:38 GMT -5
Dec 10, 2012 17:32:38 GMT -5
|
Post by afvfan on Dec 31, 2015 5:19:02 GMT -5
Appreciate it, Leon.
|
|
pt109
Full Member
  
Member since: April 2013
Stop staring at me! heheheh
Posts: 491 
|
Post by pt109 on Jan 3, 2016 22:29:21 GMT -5
Quite an odd varient but yours looks good.....looking forward to paint.
Paul
|
|
|
|
Post by TRM on Jan 3, 2016 23:45:40 GMT -5
Nice seeing the base down Bob!! Looks great!  |
|
afvfan
Senior Member
   
Member since: December 2012
Bob
Posts: 1,772
Dec 10, 2012 17:32:38 GMT -5
Dec 10, 2012 17:32:38 GMT -5
|
Post by afvfan on Jan 4, 2016 8:32:21 GMT -5
Paul and T - Thanks guys. I shot a clear coat on it, but then set her aside while I move back to my Char B project (which is just as challenging as I thought it would be).
|
|
afvfan
Senior Member
   
Member since: December 2012
Bob
Posts: 1,772
Dec 10, 2012 17:32:38 GMT -5
Dec 10, 2012 17:32:38 GMT -5
|
Post by afvfan on Jan 19, 2016 18:18:15 GMT -5
|
|
|
|
Post by Leon on Jan 19, 2016 18:39:16 GMT -5
Nice start on the weathering Bob! Looking really good.  |
|
|
|
Post by dierk on Jan 20, 2016 4:13:09 GMT -5
Very impressive start on the weathering Bob!
|
|
vindicareassassin
Full Member
  
Member since: May 2015
Posts: 569 
|
Post by vindicareassassin on Jan 20, 2016 6:43:26 GMT -5
Lovely job so far, can't wait to see more!
|
|
adt70hk
Forum Moderator     
Member since: November 2015
Currently attempting to build something decent!!! ;)
Posts: 2,833 
MSC Staff
|
Post by adt70hk on Jan 20, 2016 7:21:00 GMT -5
Excellent job so far!! Keep it coming!!
|
|
afvfan
Senior Member
   
Member since: December 2012
Bob
Posts: 1,772
Dec 10, 2012 17:32:38 GMT -5
Dec 10, 2012 17:32:38 GMT -5
|
Post by afvfan on Jan 20, 2016 11:28:03 GMT -5
Appreciate the comments guys.
|
|
|
|
Post by deafpanzer on Jan 20, 2016 19:02:35 GMT -5
Great weathering work on the beast!
|
|
noname
Full Member
   March 2012 / April 2013 MoM Winner
Member since: January 2012
I like building models
Posts: 726
Jan 29, 2012 9:24:03 GMT -5
Jan 29, 2012 9:24:03 GMT -5
|
Post by noname on Jan 21, 2016 7:38:56 GMT -5
I'd say this is looking very good so far. look forward to more.
|
|
Wes
Full Member
  
Member since: November 2011
Posts: 686
Nov 16, 2011 9:34:50 GMT -5
Nov 16, 2011 9:34:50 GMT -5
|
Post by Wes on Jan 21, 2016 7:49:44 GMT -5
Wonderful stuff.
What have you used in the weathering process so far?
|
|
Tojo72
Forum Moderator      Sept '24 Showcased Model Awarded
Member since: November 2012
Posts: 5,318
Member is Online
MSC Staff
|
Post by Tojo72 on Jan 21, 2016 9:12:52 GMT -5
Looking real good Bob
|
|