|
|
Post by armorguy on Mar 15, 2016 8:14:23 GMT -5
Opening up the deck grilles was the best thing to do, what a difference this makes. A bit more scalpel knife fiddling to square them and tataa !
|
|
adt70hk
Forum Moderator      November '24 Showcased Model Awarded
Member since: November 2015
Currently attempting to build something decent!!! ;)
Posts: 2,834 
MSC Staff
|
Post by adt70hk on Mar 15, 2016 8:39:45 GMT -5
Opening up the deck grilles was the best thing to do, what a difference this makes. A bit more scalpel knife fiddling to square them and tataa ! Guy Indeed!! All I need to do is get myself a finer blade e.g a no. 11. I've only just bought my first scalpel and it only came with a slightly 'fatter' blade - a 10a I think. Thanks as always for stopping by! Andrew |
|
|
|
Post by Leon on Mar 15, 2016 10:47:03 GMT -5
Nice work on drilling out the grills and tube Andrew! Your doing a fine job.
|
|
adt70hk
Forum Moderator      November '24 Showcased Model Awarded
Member since: November 2015
Currently attempting to build something decent!!! ;)
Posts: 2,834 
MSC Staff
|
Post by adt70hk on Mar 15, 2016 11:06:43 GMT -5
Nice work on drilling out the grills and tube Andrew! Your doing a fine job. Thanks leon! My heart was thumping a bit as I drilled into the end the tube!!! Fortunately is went surprisingly smoothly!!  |
|
|
|
Post by deafpanzer on Mar 15, 2016 11:09:31 GMT -5
Looking real good. Catching up as i have been absent for last 2-3 weeks. I had to laugh out when I saw your post about the curtain and the wife. Good one! Keep up we enjoy your posts...
|
|
|
|
Post by wbill76 on Mar 15, 2016 12:37:22 GMT -5
Will definitely improve the look of this one Andrew! As for the cleaning rod tube, German crews would stick stuff wherever they thought it would fit on a vehicle...so it wouldn't surprise me to know they used it to also hold spare antennas. Those were just hollow metal rods, so no harm in shoving them in with the gun cleaning rods too!  |
|
afvfan
Senior Member
   
Member since: December 2012
Bob
Posts: 1,772
Dec 10, 2012 17:32:38 GMT -5
Dec 10, 2012 17:32:38 GMT -5
|
Post by afvfan on Mar 15, 2016 13:52:21 GMT -5
Andrew, looking better and better. The off-center hole in the rod tube is easily taken care of with a sharp x-acto blade, or a small half round file to even the edge thickness out.
As for the rear engine deck, in the future do this kind of work before putting the hull together. It's easier opening up holes like that when you can work from both, the top and underneath. Another hint to file away for the future is to hold the upper hull up to a light and outline the grill areas with a pencil underneath. You can then take a dremel tool and thin the plastic in those areas making trimming them out easier.
Last hint is to paint the inside of the hull black anywhere that can be viewed through the vent and fan holes.
|
|
adt70hk
Forum Moderator      November '24 Showcased Model Awarded
Member since: November 2015
Currently attempting to build something decent!!! ;)
Posts: 2,834 
MSC Staff
|
Post by adt70hk on Mar 16, 2016 16:38:57 GMT -5
Looking real good. Catching up as i have been absent for last 2-3 weeks. I had to laugh out when I saw your post about the curtain and the wife. Good one! Keep up we enjoy your posts... Andy No problem at all - I know what it's like and thank you for the compliment (on the tank build)!!  As for my posts I'm glad you enjoy at least some of them! If I do ever go too far then please let me know - seriously - I mean it!!! I know British humour isn't always appreciated/understood on your side of the 'pond' and vice versa. And I have very dry/wierd/warped sense of humour even by most British standards and combine that with a job in the compliance for a large multi-national whch is pretty serious most of the time and so when I'm at home and get let loose on a place like this my imagination and fingers run away with me!!!  And seriously no problem about being a bit late - the activity on the forum seems to have rally taken off since Christmas and I really struggle as 'normal' user - I can only imagine what it must be like for a moderator!! Andrew Will definitely improve the look of this one Andrew! As for the cleaning rod tube, German crews would stick stuff wherever they thought it would fit on a vehicle...so it wouldn't surprise me to know they used it to also hold spare antennas. Those were just hollow metal rods, so no harm in shoving them in with the gun cleaning rods too!  Bill Thanks as always for stopping by! Looks like some spare antenna will be appearing inside the tube. I'm assuming the rods would have been a similar thickness, if not identical to the ones in use below? Andrew For reference purposes only Andrew, looking better and better. The off-center hole in the rod tube is easily taken care of with a sharp x-acto blade, or a small half round file to even the edge thickness out. As for the rear engine deck, in the future do this kind of work before putting the hull together. It's easier opening up holes like that when you can work from both, the top and underneath. Another hint to file away for the future is to hold the upper hull up to a light and outline the grill areas with a pencil underneath. You can then take a dremel tool and thin the plastic in those areas making trimming them out easier. Last hint is to paint the inside of the hull black anywhere that can be viewed through the vent and fan holes. Bob Thanks as always for taking the time to comment and for the tip on the rod tube. I was intending to try and even it out a bit anyway so I'll bare you ideas in mind!! As for doing the work before assembling it, a truly excellent idea - I just wish I had thought of it before I began the build!!   I have literally lost count of the number of times since I started this thinking something along the lines of " why the !)"&£$"@# did I assemble it first...."   But at least I've learnt a valuable lesson for my Cuckoo build which was the whole point of doing this first!! Black paint, inside - noted!! Now.....given Bill's point above about my rod tube and how " German crews would stick stuff wherever they thought it would fit on a vehicle", have I finally found a place for that bubble belching frog clock you're so obsessed with!!?!?!  Andrew |
|
afvfan
Senior Member
   
Member since: December 2012
Bob
Posts: 1,772
Dec 10, 2012 17:32:38 GMT -5
Dec 10, 2012 17:32:38 GMT -5
|
Post by afvfan on Mar 17, 2016 15:09:03 GMT -5
.... As for doing the work before assembling it, a truly excellent idea - I just wish I had thought of it before I began the build!!   Don't feel like the Lone Ranger (or Solitary Knight, or whatever the Englander equivalent is Don't feel like the Lone Ranger (or Solitary Knight, or whatever the Englander equivalent is  ), most of us had to learn the same lesson exactly the same way. ), most of us had to learn the same lesson exactly the same way.Black paint, inside - noted!! It's a good habit to get into. If you ever get to the point of doing shows, it's a good way to hold those flashlight weilding judges at bay  Now.....given Bill's point above about my rod tube and how " German crews would stick stuff wherever they thought it would fit on a vehicle", have I finally found a place for that bubble belching frog clock you're so obsessed with!!?!?!  Oh yeah, I can see it now. A lone Panther waiting to pounce from concealment on to the approaching Allied column. Just as the lead tank is coming into range, the clock chimes the hour, bubbles start spewing, and the Panther is instantly obliterated by the fighter bombers circling overhead before it has a chance to fire. Oh yeah, I can see it now. A lone Panther waiting to pounce from concealment on to the approaching Allied column. Just as the lead tank is coming into range, the clock chimes the hour, bubbles start spewing, and the Panther is instantly obliterated by the fighter bombers circling overhead before it has a chance to fire.  |
|
|
|
Post by ceresvesta. on Mar 18, 2016 9:34:49 GMT -5
Haha, here you are! Great start, I am in!!
|
|
adt70hk
Forum Moderator      November '24 Showcased Model Awarded
Member since: November 2015
Currently attempting to build something decent!!! ;)
Posts: 2,834 
MSC Staff
|
Post by adt70hk on Mar 18, 2016 10:43:33 GMT -5
.. Now.....given Bill's point above about my rod tube and how " German crews would stick stuff wherever they thought it would fit on a vehicle", have I finally found a place for that bubble belching frog clock you're so obsessed with!!?!?!  Oh yeah, I can see it now. A lone Panther waiting to pounce from concealment on to the approaching Allied column. Just as the lead tank is coming into range, the clock chimes the hour, bubbles start spewing, and the Panther is instantly obliterated by the fighter bombers circling overhead before it has a chance to fire. Oh yeah, I can see it now. A lone Panther waiting to pounce from concealment on to the approaching Allied column. Just as the lead tank is coming into range, the clock chimes the hour, bubbles start spewing, and the Panther is instantly obliterated by the fighter bombers circling overhead before it has a chance to fire.  Bob I knew there was a reason it was a bad idea!!!  And I have to admit I spent 10 minutes rolling around on the floor after I read your post!!  Andrew Karma +1 on its way!! |
|
adt70hk
Forum Moderator      November '24 Showcased Model Awarded
Member since: November 2015
Currently attempting to build something decent!!! ;)
Posts: 2,834 
MSC Staff
|
Post by adt70hk on Mar 18, 2016 10:44:25 GMT -5
Haha, here you are! Great start, I am in!! Welcome aboard!! I hope you have a lot of popcorn - this won't be a quick build!! Andrew |
|
afvfan
Senior Member
   
Member since: December 2012
Bob
Posts: 1,772
Dec 10, 2012 17:32:38 GMT -5
Dec 10, 2012 17:32:38 GMT -5
|
Post by afvfan on Mar 18, 2016 10:56:45 GMT -5
I knew there was a reason it was a bad idea!!!  Sorry to burst your bubble.  ....on a side note, I'm obsessed by all things frogs and lizards.  |
|
|
|
Post by wbill76 on Mar 18, 2016 13:36:42 GMT -5
Bill Thanks as always for stopping by! Looks like some spare antenna will be appearing inside the tube. I'm assuming the rods would have been a similar thickness, if not identical to the ones in use below? Andrew For reference purposes only I would say that's a safe assumption. The diameter of the rods themselves wasn't that important beyond being manageable by the crews, it was the brush head on the end that made all the difference!  So far as I know, the rod diameters were the same on Panthers and Tigers and I doubt highly that anyone will challenge you on it regardless.  |
|
adt70hk
Forum Moderator      November '24 Showcased Model Awarded
Member since: November 2015
Currently attempting to build something decent!!! ;)
Posts: 2,834 
MSC Staff
|
Post by adt70hk on Mar 19, 2016 2:05:09 GMT -5
I knew there was a reason it was a bad idea!!!  Sorry to burst your bubble.  ....on a side note, I'm obsessed by all things frogs and lizards.  No problem!!! I think I'm over the disappointment!!  |
|
adt70hk
Forum Moderator      November '24 Showcased Model Awarded
Member since: November 2015
Currently attempting to build something decent!!! ;)
Posts: 2,834 
MSC Staff
|
Post by adt70hk on Mar 19, 2016 2:07:16 GMT -5
Bill Thanks as always for stopping by! Looks like some spare antenna will be appearing inside the tube. I'm assuming the rods would have been a similar thickness, if not identical to the ones in use below? Andrew For reference purposes onlI would say that's a safe assumption. The diameter of the rods themselves wasn't that important beyond being manageable by the crews, it was the brush head on the end that made all the difference!  So far as I know, the rod diameters were the same on Panthers and Tigers and I doubt highly that anyone will challenge you on it regardless.  Bill Thanks for that - I couldn't see it would make much difference - and let's face it, as this scale could anyone really tell the difference!!  Andrew |
|
adt70hk
Forum Moderator      November '24 Showcased Model Awarded
Member since: November 2015
Currently attempting to build something decent!!! ;)
Posts: 2,834 
MSC Staff
|
Post by adt70hk on Mar 31, 2016 6:53:07 GMT -5
Hi all Thanks as always for your support so far.  I've not had much time for anything model related recently  but I have managed to finish carving out the ventilation holes and then covered them with mesh. As some of you may have seen, I've used printing screen mesh kindly supplied by Sean ( see here for full details). I think it looks good at this scale, is easy work with and because of the plastic it's made from ordinary modelling glue works well!   As Sean has pointed out by though I'm not sure if grilling out the ventilation holes was necessary because of the size of the mesh but I'll let you be the judges.  Sean Sean - have a look and see what you think! And thanks as always mate!! As always all comments are welcome. Take care! Andrew PS apologies for some slightly blurry pics - they were taken in a rush..... PPS the camera angle makes the deck look out of square but it's not!! ------------------------------------------------------------
|
|
Deleted
Member since: January 1970
Posts: 0
Nov 25, 2024 17:45:33 GMT -5
Nov 25, 2024 17:45:33 GMT -5
|
Post by Deleted on Mar 31, 2016 8:59:35 GMT -5
Grate work Andrew! 
|
|
|
|
Post by dierk on Mar 31, 2016 9:18:32 GMT -5
Vast improvement Andrew!
|
|
|
|
Post by deafpanzer on Mar 31, 2016 10:43:05 GMT -5
You nailed it... keep it coming!
|
|
afvfan
Senior Member
   
Member since: December 2012
Bob
Posts: 1,772
Dec 10, 2012 17:32:38 GMT -5
Dec 10, 2012 17:32:38 GMT -5
|
Post by afvfan on Mar 31, 2016 10:50:25 GMT -5
Screens look good, Andrew. You might want to think about finding some narrow, super thin strips of plastic to cover the edges of the mesh to give it a more finished look. For the round fan screens, you can put some liquid cement on a piece of stripping to soften it enough to form the circle.
|
|
|
|
Post by wbill76 on Mar 31, 2016 13:38:41 GMT -5
Definitely an improvement Andrew, careful, you're turning fully to the dark side now!  |
|
vindicareassassin
Full Member
  
Member since: May 2015
Posts: 569 
|
Post by vindicareassassin on Mar 31, 2016 13:41:11 GMT -5
Here's mine.... And no, I didn't bother drilling out the steel grills in the end, washes and weathering will distract the eye for the most part any way unless put under quite intense scrutiny  I'm currently on the look out for something the same diameter as the round grills so I can make a former to bend some wire to make the grill frame. Failing that I'll drill a hole the same size as the grill in some wood and form some evergreen into a ring that way. 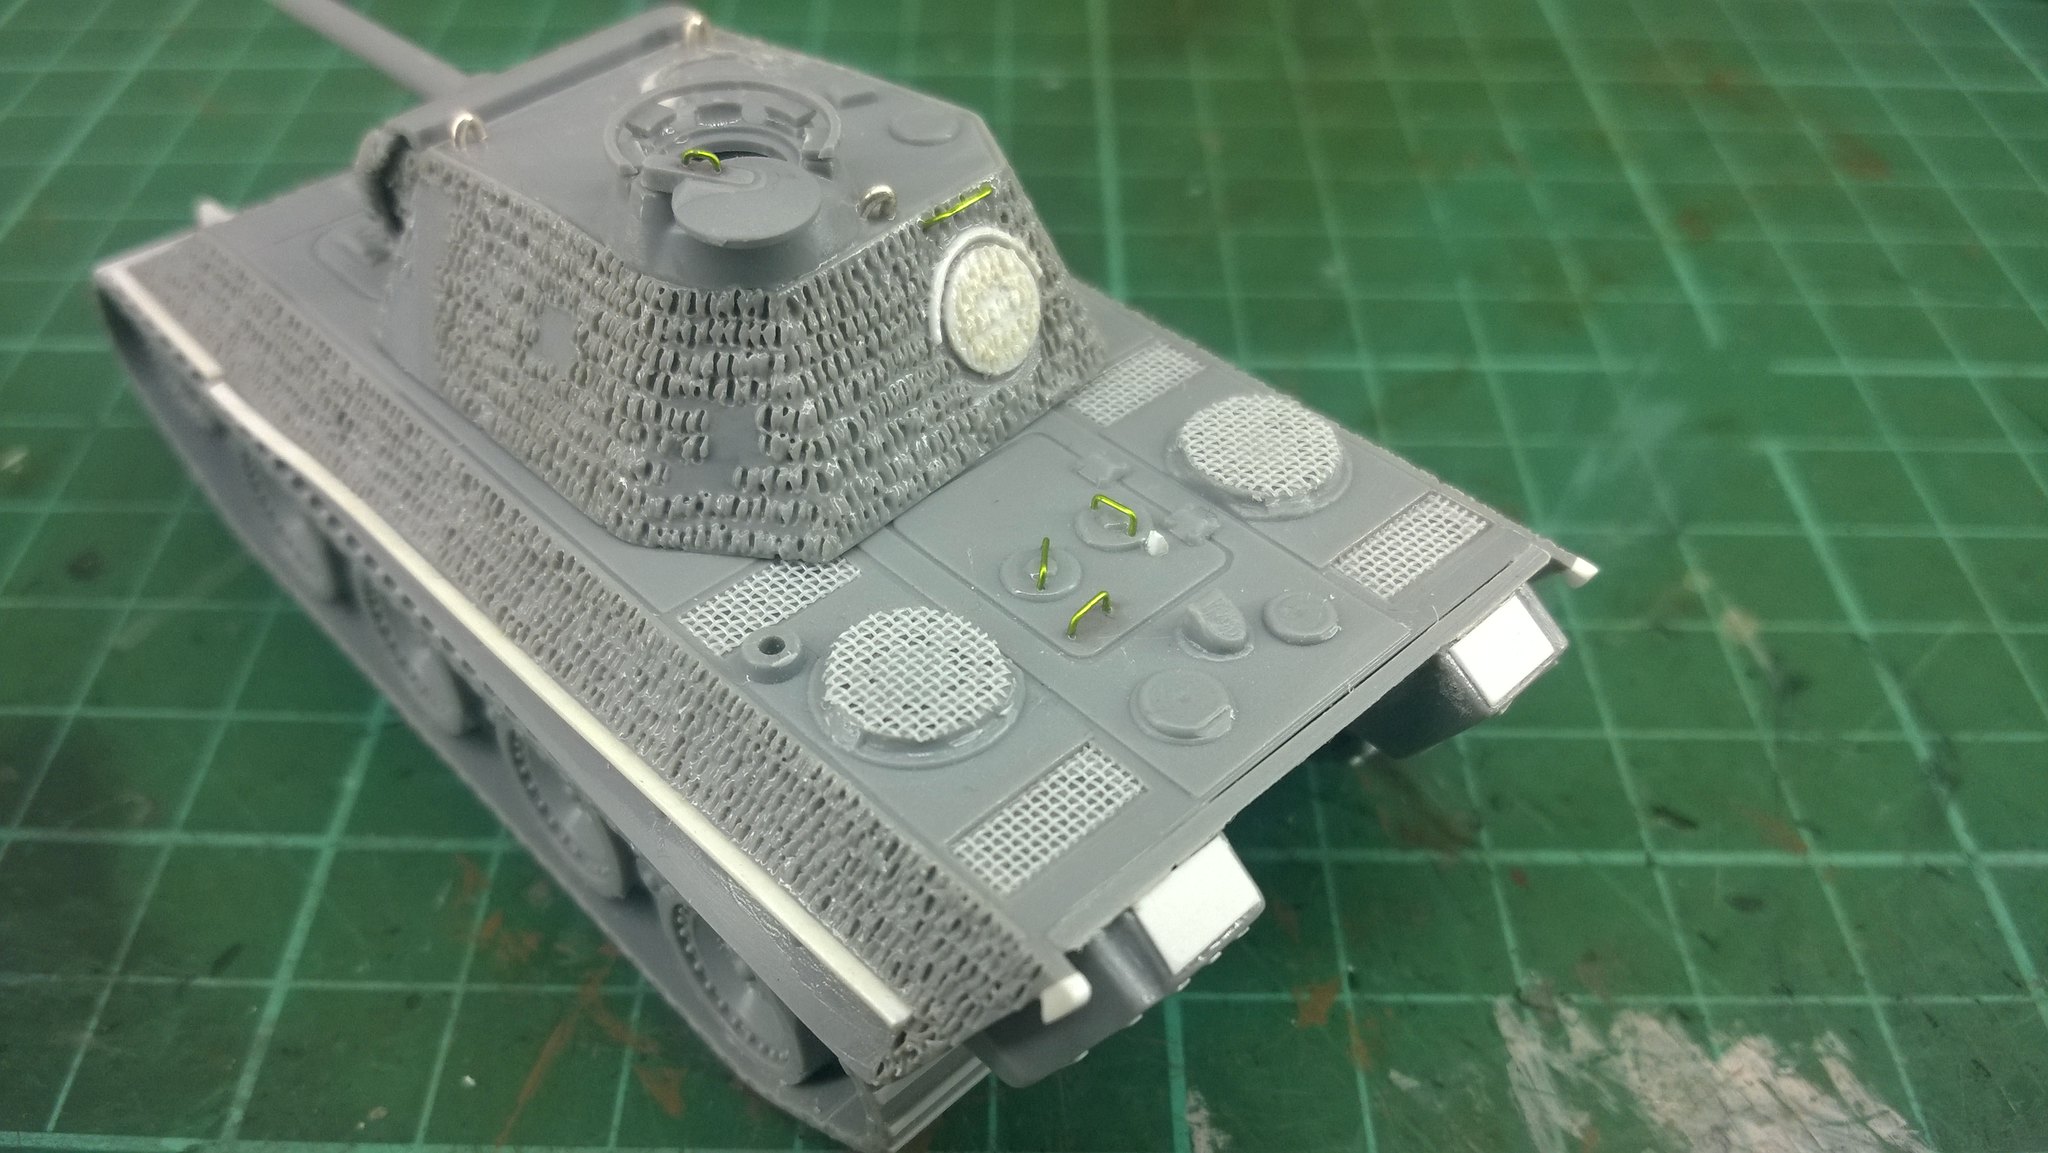 Sean |
|
adt70hk
Forum Moderator      November '24 Showcased Model Awarded
Member since: November 2015
Currently attempting to build something decent!!! ;)
Posts: 2,834 
MSC Staff
|
Post by adt70hk on Apr 1, 2016 7:40:04 GMT -5
Grate work Andrew! 
Dogfish Thanks for the compliment and taking the time stop by!! Love the pun by the way!!!  Dierk Glad you like it!!  It's been an interesting journey so far - most of which has actually gone according to plan!!!  You nailed it... keep it coming! Andy - thanks as always for the encouragement! One day it might actually be deserved!  Definitely an improvement Andrew, careful, you're turning fully to the dark side now!  Bill Thank you!  My problem is wanting to run before I can walk - both in terms of my skill and the materials and equipment I have at home!!  But it will all come with time and encouragement from everyone on here!! Screens look good, Andrew. You might want to think about finding some narrow, super thin strips of plastic to cover the edges of the mesh to give it a more finished look. For the round fan screens, you can put some liquid cement on a piece of stripping to soften it enough to form the circle. Bob Thanks stopping by and for the suggestion!  I knew they weren't quite right but wasn't sure how to finish them off!! Fortunately the manufacture of the brush I use for my antenna supplies saw fit to use varying thicknesses of bristles and I think the really thin ones will do the job nicely!! Here's mine.... And no, I didn't bother drilling out the steel grills in the end, washes and weathering will distract the eye for the most part any way unless put under quite intense scrutiny  I'm currently on the look out for something the same diameter as the round grills so I can make a former to bend some wire to make the grill frame. Failing that I'll drill a hole the same size as the grill in some wood and form some evergreen into a ring that way. Sean As I've said already mate it's looking great!! |
|
afvfan
Senior Member
   
Member since: December 2012
Bob
Posts: 1,772
Dec 10, 2012 17:32:38 GMT -5
Dec 10, 2012 17:32:38 GMT -5
|
Post by afvfan on Apr 1, 2016 8:35:39 GMT -5
Bob Thanks stopping by and for the suggestion!  I knew they weren't quite right but wasn't sure how to finish them off!! Fortunately the manufacture of the brush I use for my antenna supplies saw fit to use varying thicknesses of bristles and I think the really thin ones will do the job nicely!! The bristles, being round, wouldn't truly look right. If thin plastic isn't available, try thin slices of index card, or maybe even paper (probably the closest to scale thickness). |
|
|
|
Post by wouter on Apr 2, 2016 6:16:58 GMT -5
I agree with the gents Andrew, those new mesh screens really are a great improvement, well done!
Cheers
|
|
adt70hk
Forum Moderator      November '24 Showcased Model Awarded
Member since: November 2015
Currently attempting to build something decent!!! ;)
Posts: 2,834 
MSC Staff
|
Post by adt70hk on Apr 5, 2016 7:52:11 GMT -5
Bob Thanks stopping by and for the suggestion!  I knew they weren't quite right but wasn't sure how to finish them off!! Fortunately the manufacture of the brush I use for my antenna supplies saw fit to use varying thicknesses of bristles and I think the really thin ones will do the job nicely!! The bristles, being round, wouldn't truly look right. If thin plastic isn't available, try thin slices of index card, or maybe even paper (probably the closest to scale thickness). Bob Good point!! Will have a rethink along the lines you've suggested!! I agree with the gents Andrew, those new mesh screens really are a great improvement, well done! Cheers Wouter Thank you very much for the compliment and stopping by! I just wish the idea of using mesh had been mine - buy yet again, Sean deserves all the credit!! Andrew |
|
desertrat
Full Member
  
Member since: October 2013
Posts: 934 
|
Post by desertrat on Apr 12, 2016 15:43:04 GMT -5
them grilles look spot on,
|
|
adt70hk
Forum Moderator      November '24 Showcased Model Awarded
Member since: November 2015
Currently attempting to build something decent!!! ;)
Posts: 2,834 
MSC Staff
|
Post by adt70hk on Jan 14, 2017 18:49:24 GMT -5
Hi all Well my trial run for the Panther Ausf G used by the British 6th Guards Tank Brigade is back on the table!!  I've finished the engine grilles using some thin wire and styrene to provide surrounds.  I've also had a go at some DIY Zimmerit. I used No More Nails glue smeared onto the plastic and then used a junior hacksaw blade to create the pattern. I go the idea from from this Youtube video, that someone posted on the Britmodeler site. As you'll see from the pics below, it's not come out too bad for my first attempt and if it doesn't work out a warm damp cloth/sponge cleans off the glue very easily if you get to it before it sets, so you can have another go. Also, even after it has set, it's still workable with a knife if needed! And it also dries almost completely clear. It's not without its faults though as anything you want glue on top will need CA, unlike Sean's patented soldering iron method, which partly melts the plastic. This means masking some areas is necessary. There are few other things I need to refine but I'm going to keep perserving for a bit and see how I get on! As usual please feel free to comment! All the best. Andrew DAMN!! Have just noticed two short lengths of styren have disappeared from the rearmost grilles......  -------------------------------------- Read deck grillesThe odd texture you can see on the hull sides is the zim pattern 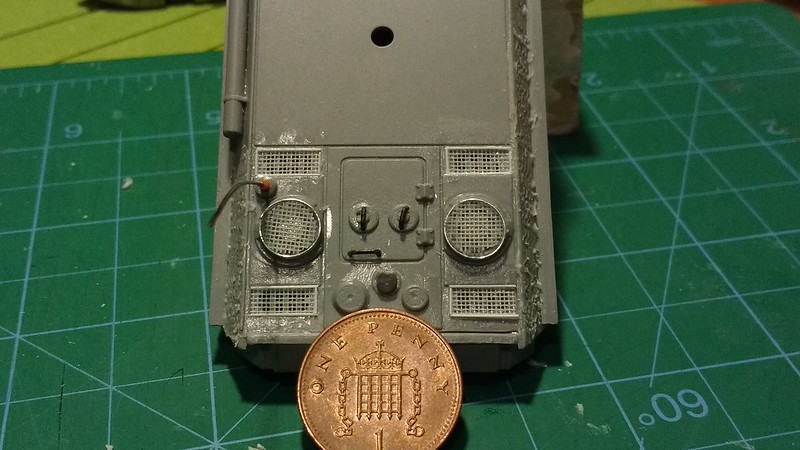 Freshly added 'zimmerit' Freshly added 'zimmerit'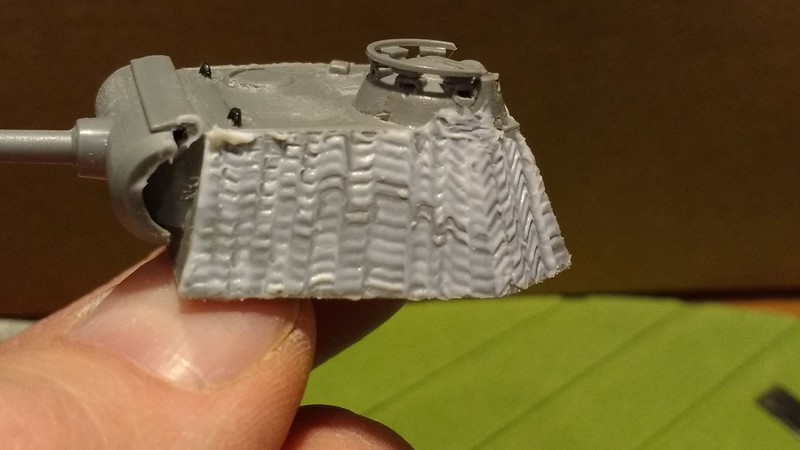 Nearly dry Nearly dry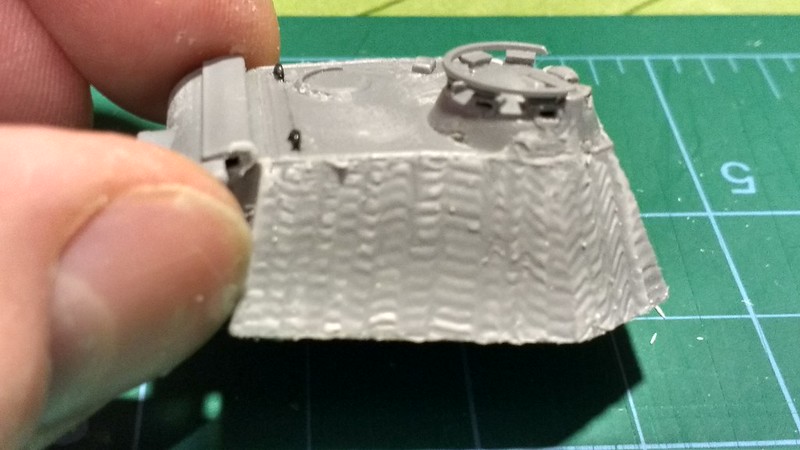 |
|
vindicareassassin
Full Member
  
Member since: May 2015
Posts: 569 
|
Post by vindicareassassin on Jan 15, 2017 14:41:16 GMT -5
Alex clark, look him up he's like a god when it comes to modeling braille scale, uses a special tool he made from a CD case side, he uses Miliput spread very thin as his base, I've not tried it over a whole model just on a small panel,.... did my loaf in trying to spread the putty thin enough so gave up, had better results from an acrylic filler but the timings to get it right between to wet and to dry are mind numbingly small...... I'm glad I've now moved on to Brit Softskins.....
ATB
Sean
|
|