|
|
Post by robbo on Jan 15, 2017 15:44:59 GMT -5
Nice extras your doing to this, makes all the difference
|
|
adt70hk
Forum Moderator      November '24 Showcased Model Awarded
Member since: November 2015
Currently attempting to build something decent!!! ;)
Posts: 2,834 
MSC Staff
|
Post by adt70hk on Jan 16, 2017 8:27:48 GMT -5
Alex clark, look him up he's like a god when it comes to modeling braille scale, uses a special tool he made from a CD case side, he uses Miliput spread very thin as his base, I've not tried it over a whole model just on a small panel,.... did my loaf in trying to spread the putty thin enough so gave up, had better results from an acrylic filler but the timings to get it right between to wet and to dry are mind numbingly small...... I'm glad I've now moved on to Brit Softskins..... ATB Sean Hi mate Thanks for the tip! I'll check it out. Take care. Andrew |
|
adt70hk
Forum Moderator      November '24 Showcased Model Awarded
Member since: November 2015
Currently attempting to build something decent!!! ;)
Posts: 2,834 
MSC Staff
|
Post by adt70hk on Jan 16, 2017 8:32:06 GMT -5
Nice extras your doing to this, makes all the difference Hi Robbo Having checked out some of your work - the Scimitar looks great - I'll take that as a compliment!! It's all very new to me, this white styrene stuff, but I'm enjoying it so far! Thanks for stopping by. Andrew |
|
adt70hk
Forum Moderator      November '24 Showcased Model Awarded
Member since: November 2015
Currently attempting to build something decent!!! ;)
Posts: 2,834 
MSC Staff
|
Post by adt70hk on Feb 14, 2017 17:12:49 GMT -5
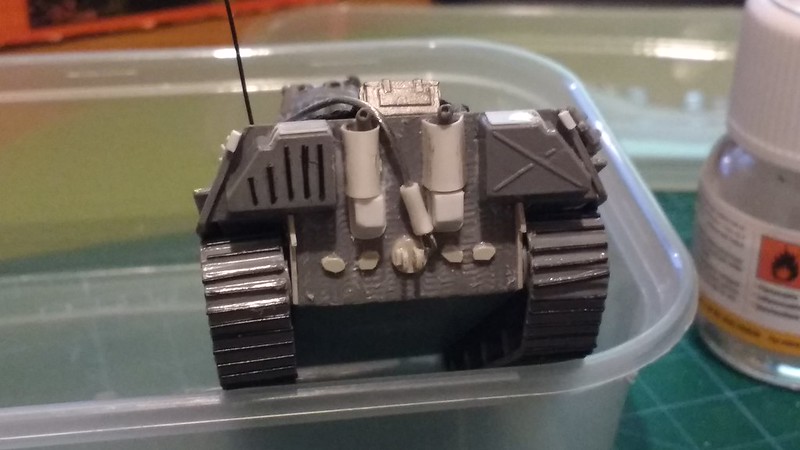
Hi all I've been plodding along with and would have posted some pictures sooner but after having yet more issues with the amount of time my daughter spends on her mobile and in front of the TV she decided it would good if we all had an almost screen/phone/tablet/mobile/PC free week in our leisure time......only 10 minutes per day   .........I'll pause for a minute whilst that sinks in.................. ..........................pause over! So obviously I'm a long way behind all of you and I'm still learning what works with styrene and what doesn't but I'm definitely enjoying working with it. So I guess that that means I really have gone over to the dark side......  I've added the track racks on the back (not entirely successfully) and the equipment racks on the front, albeit I realised too late I'd used slightly too wide a strip - 0.8 instead of .5 or even 0.3. I've also almost finished the rear, replacing the curved exhaust bases with squared of ones as per the real Cuckoo but need to work on my styrne shaping technique I've also experimented a bit more with the 'No More Nails' glue zim, which is starting to show some real promise. I had been using an old (and fairly blunt) junior hacksaw blade, with 18 TPI, to make the pattern as per the video above but it wasn't great. However, I picked up some new 32 TPI blades for next to nothing and it really seems to be working nicely. I accept I need to refine the techinique but here's what I've discovered: - correcting mistakes is easy, assuming you get to the glue with a warm damp sponge before it dries. Wipe it off and simply try again. - the pattern is much closer scale wise, which I know is a real issue at this scale, albeit I'm resticted to one pattern, but then this is only meant to be a representation. - it occurred to me that if I prepared all the attachments and fittings in advance I could simply attach them direct onto the glue. So I tried fixing some styrene dto the wet glue as an experiment and it refuses all attempts to remove it. I realise that this might not be the 'done' thing but it means I don't have to apply the pattern around anything, which gives a much smoother overall finish to the Zim. - I also discovered by accident that that poly glue seems to adhere pretty well to the 'No More Nails' direct - not sure why but it does, so I can still add items even after the glue has dried. - if that doesn't work I've also discovered that with careful use of a blade it's possible to cut out and remove small sections of the dried 'No More Nails' to reveal the plastic underneath. It's also pretty easy to trim it if necessary. The zim on the rear has come out the best. Most of the rest is done with the 18 tpi blade. Below are some pics of the 'progress'. I know it's not perfect and I need to do some tidying up after a couple of accidents with some of the finer styrene breaking off  . Interestingly I find the problem solving aspects as interesting at the putting together bits Please feel free to pass comment, advise and if necessary tell me it needs completely reworking.....  Thanks as always for stopping by. All the best. Andrew ----------------------------------------- |
|
|
|
Post by Leon on Feb 14, 2017 18:24:25 GMT -5
Andrew,for the scale your working in your doing a darn fine job.  The only way to find out what works and what does'nt is by trial and error and your learning that now.  Carry on mate.  |
|
adt70hk
Forum Moderator      November '24 Showcased Model Awarded
Member since: November 2015
Currently attempting to build something decent!!! ;)
Posts: 2,834 
MSC Staff
|
Post by adt70hk on Feb 15, 2017 3:47:51 GMT -5
Andrew,for the scale your working in your doing a darn fine job.  The only way to find out what works and what does'nt is by trial and error and your learning that now.  Carry on mate.  Thanks Leon! I know I've got a long way to go but I am enjoying the learning process - for the most part!!  Andrew |
|
Wes
Full Member
  
Member since: November 2011
Posts: 686
Nov 16, 2011 9:34:50 GMT -5
Nov 16, 2011 9:34:50 GMT -5
|
Post by Wes on Feb 15, 2017 4:10:45 GMT -5
She sure does look good Andrew. 1/72 makes it even more impressive.
|
|
|
|
Post by panzerjager2 on Feb 15, 2017 4:16:27 GMT -5
WOW, for a build that small, NICE WORK
|
|
adt70hk
Forum Moderator      November '24 Showcased Model Awarded
Member since: November 2015
Currently attempting to build something decent!!! ;)
Posts: 2,834 
MSC Staff
|
Post by adt70hk on Feb 15, 2017 9:22:37 GMT -5
WOW, for a build that small, NICE WORK She sure does look good Andrew. 1/72 makes it even more impressive. Wes, PJ Thanks for stopping by and for the compliments but if you could see what I see under the magnifying glass you might change your opinion slightly.  A you may be aware this a forerunner to a duel build with (Sean aka vindicareassassin). Check out this thread and you'll see what it looks like when done properly....... modelerssocialclub.proboards.com/thread/10870/andrew-sean-armourfast-72-cuckoo?page=2But nonetheless I am enjoying the experience and it's given me a lot of things to consider for the proper go, particularly using the glue zim as the adhesive..... So watch this space. All the best. Andrew |
|
|
|
Post by deafpanzer on Feb 15, 2017 9:38:52 GMT -5
Jeez, adding Zimm to 1/72 kit I would have lost my mind fast! Impressive work there!
|
|
|
|
Post by dierk on Feb 15, 2017 10:31:33 GMT -5
Nice work Andrew!
|
|
afvfan
Senior Member
   
Member since: December 2012
Bob
Posts: 1,772
Dec 10, 2012 17:32:38 GMT -5
Dec 10, 2012 17:32:38 GMT -5
|
Post by afvfan on Feb 15, 2017 10:48:19 GMT -5
Coming along nicely, Andrew.
|
|
adt70hk
Forum Moderator      November '24 Showcased Model Awarded
Member since: November 2015
Currently attempting to build something decent!!! ;)
Posts: 2,834 
MSC Staff
|
Post by adt70hk on Feb 15, 2017 18:04:18 GMT -5
Coming along nicely, Andrew. Thanks Bob! It really has been an interesting experience and I've lost count of the number of times I've gone "if only I'd..." or "why did I do that first...."  But at least I know for next time.  Cheers mate. I'm really looking forward to having a crack at Cuckoo and implemeting all the lessons I've learnt so far. It's not too bad, as long as you don't get too close.....  Jeez, adding Zimm to 1/72 kit I would have lost my mind fast! Impressive work there! Thanks Andy, your support is appreciated as always!!  And actually it really isn't that hard, move the hacksaw blade a couple of mm across the fresh glue, move it up or down a bit, move it across the glue a few more mm and move the blade up or down - repeat as many times as necessary! Easy!!!!  In fact I was thinking of suggesting a group build to see what other ideas the experts out there would come up with - German Armour only, 1/72 only, must be a proper quickbuild e.g Armourfast or PSC, no aftermarket parts and homemade zimmerit would be mandatory......  I promise the idea has absolutely nothing to do with bringing the rest of you down to my level (or size). Honest!  Seriously though thanks again! Andrew |
|
|
|
Post by TRM on Feb 15, 2017 18:41:40 GMT -5
Fantastic work on this Andrew! Looking like it's going to be a fun one to paint! As for the GB....pop a thread out there. If there is enough interest, we can set one up easy! I was looking at a couple DML kits recently, so it would not take too much convince me to join in!  |
|
adt70hk
Forum Moderator      November '24 Showcased Model Awarded
Member since: November 2015
Currently attempting to build something decent!!! ;)
Posts: 2,834 
MSC Staff
|
Post by adt70hk on Feb 16, 2017 3:59:33 GMT -5
Fantastic work on this Andrew! Looking like it's going to be a fun one to paint! As for the GB....pop a thread out there. If there is enough interest, we can set one up easy! I was looking at a couple DML kits recently, so it would not take too much convince me to join in!  Todd Thanks for stopping by and the compliment!  Although looking back at the photos there are defintely some place where I need to thin the zim a bit but at least the dried glue responds well to a sharp blade. I must admit I was joking about the GB but it might be a bit of light 'relief' for everyone to just throw a kit together without worrying too much about the detail! Although we'd btter make sure the League of Rivet Counters doesn't find out or we could be in trouble!  Thanks again. Andrew |
|
|
|
Post by TRM on Feb 16, 2017 4:27:41 GMT -5
LOL...an OOB 72nd scale GB kind of sounded like fun if you ask me!  Of course I am not opposed to "rivet counters" joining in, especially around MSC! If you noticed, it is the manner in which one actually counts rivets first f all  and of course how the message about said counting is conveyed! LOL Too many dicks on both sides of that fence out there! Thankfully not here! "Looking back at the photos"....I always find stuff after the fact, that I thought I should change or add. It is the nature of the beast so to speak. Once the color goes down and possibly weathering, everything will come together quite nicely!  |
|
adt70hk
Forum Moderator      November '24 Showcased Model Awarded
Member since: November 2015
Currently attempting to build something decent!!! ;)
Posts: 2,834 
MSC Staff
|
Post by adt70hk on Feb 16, 2017 6:43:57 GMT -5
LOL...an OOB 72nd scale GB kind of sounded like fun if you ask me!  Of course I am not opposed to "rivet counters" joining in, especially around MSC! If you noticed, it is the manner in which one actually counts rivets first f all  and of course how the message about said counting is conveyed! LOL Too many dicks on both sides of that fence out there! Thankfully not here! "Looking back at the photos"....I always find stuff after the fact, that I thought I should change or add. It is the nature of the beast so to speak. Once the color goes down and possibly weathering, everything will come together quite nicely!  Todd You make a very good point about it being about how the rivets are counted. And I have to say everyone on here does it the right way. Nonetheless i'd still not want to upset the League and find myself looking down the wrong end of a rivet held by one their Black Ops assassins - can you imagine it, death by a 1000 rivets....😩 Now back to reality...I might just float the idea of the GB afterall! Andrew |
|
afvfan
Senior Member
   
Member since: December 2012
Bob
Posts: 1,772
Dec 10, 2012 17:32:38 GMT -5
Dec 10, 2012 17:32:38 GMT -5
|
Post by afvfan on Feb 17, 2017 8:33:19 GMT -5
Coming along nicely, Andrew. Thanks Bob! It really has been an interesting experience and I've lost count of the number of times I've gone "if only I'd..." or "why did I do that first...."  But at least I know for next time.  You're just following in the footsteps of all those who have gone before you. There's not a modeler out there who can't make the same statement about themself. |
|
|
|
Post by robbo on Feb 23, 2017 12:26:45 GMT -5
This is going to look so good when the paint goes on
|
|
adt70hk
Forum Moderator      November '24 Showcased Model Awarded
Member since: November 2015
Currently attempting to build something decent!!! ;)
Posts: 2,834 
MSC Staff
|
Post by adt70hk on Feb 24, 2017 8:01:35 GMT -5
This is going to look so good when the paint goes on Thanks Robbo and I'm glad you have some confidence in my painting skills. I'll try not to let you down! Andrew |
|
adt70hk
Forum Moderator      November '24 Showcased Model Awarded
Member since: November 2015
Currently attempting to build something decent!!! ;)
Posts: 2,834 
MSC Staff
|
Post by adt70hk on Mar 1, 2017 8:53:12 GMT -5
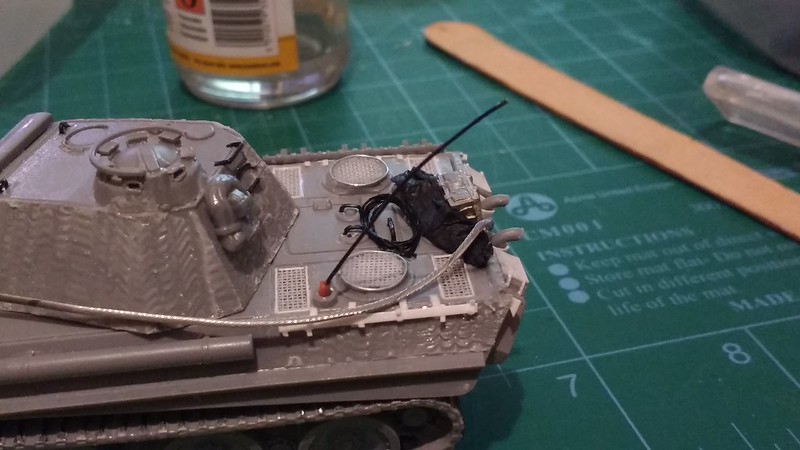
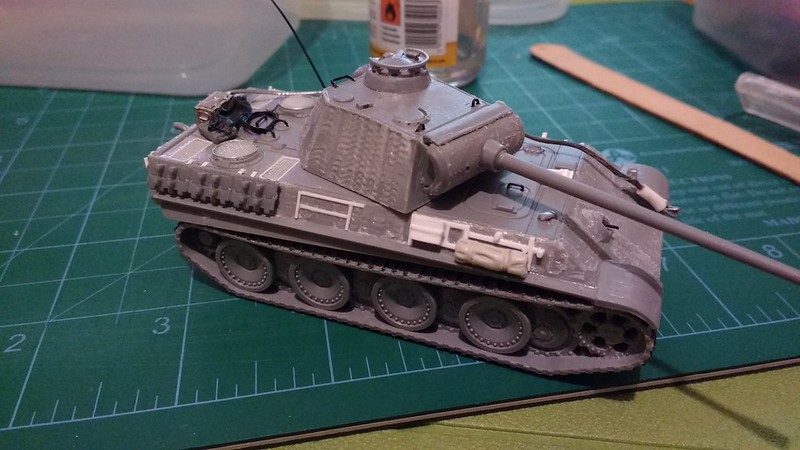
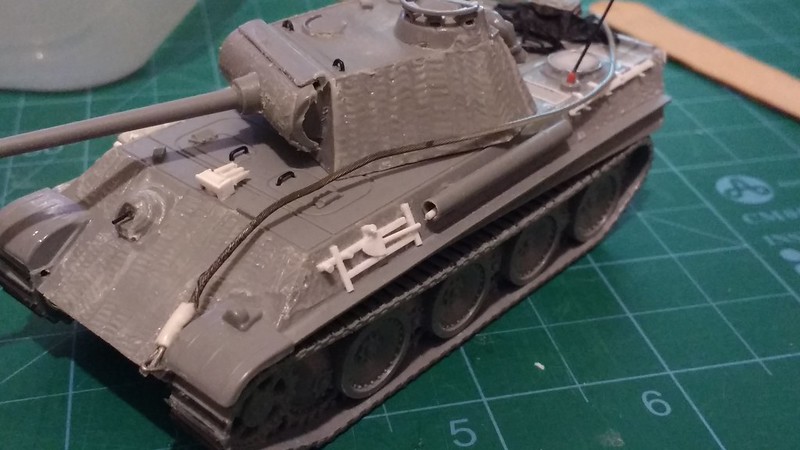
Hi all Well I think I've just about finished the build phase on this one.  I still need to work on some of the techniques and I've already thought about doing some things differently for the full Cuckoo build - hopefully for the better.  The glue zimmerit is definitely worth pursuing as a technique but it is will be much easier to do when the hull is completely clean. So for Cuckoo I'll prep a lot of the hull attachments first and the apply them directly to the glue whilst it is still wet. I've also discovered it helps to give the zim a liberal coating of liquid poly glue to help it adhere and harden off properly. I've added a barrel travel lock and some exhaust covers (not entirely successfully but I've thought of a better solution now) and the tow cable won't be fixed at the rear until the end and once the kit has been painted. As you'll see I've also added a bit of stowage and spare tracks but I didn't want to overload it and hide all the detail I'd added (the black 'lump' at the back is tissue paper for tarpaulin). I did learn a big lesson from Sean (thanks mate! Karma on its way) when I clicked on one one of his Cuckoo build pics and it took me through to the full size pic on flickr. Looking at the pics on here I had assumed he had faithfully recreated the track racks on the rear but the full size pic showed otherwise! His solution was far more simple than the two I attempted - DOH!  BUT BUT the impression he gave was that he had!! Note to self - at this scale and for my purposes - for some things the impression of something often does just as good a job as a faithful recreation and in this case probably better! Thanks to everyone who has stopped by and commented - it very much appreciated - and I hope you've enjoyed the 'ride'! I certainly have and I'm looking forward to cracking on with Cuckoo.  ACW as usual. All the best. Andrew -----------------------------------------------------------------       |
|
|
|
Post by panzerjager2 on Mar 1, 2017 8:58:57 GMT -5
Nice updates 
|
|
|
|
Post by deafpanzer on Mar 1, 2017 10:49:30 GMT -5
It is really looking good... can't wait to see it painted soon!
|
|
adt70hk
Forum Moderator      November '24 Showcased Model Awarded
Member since: November 2015
Currently attempting to build something decent!!! ;)
Posts: 2,834 
MSC Staff
|
Post by adt70hk on Mar 1, 2017 13:26:12 GMT -5
Nice updates  Thanks PJ, although I'm very conscious it's far from perfect but as I'm just starting out with this styrene malarky I'm reasonably pleased. |
|
adt70hk
Forum Moderator      November '24 Showcased Model Awarded
Member since: November 2015
Currently attempting to build something decent!!! ;)
Posts: 2,834 
MSC Staff
|
Post by adt70hk on Mar 1, 2017 13:29:19 GMT -5
It is really looking good... can't wait to see it painted soon! Thanks Andy. Every time I look at it close up I notice something but then that's all part of learning process. I'll try not to let you down on the paint front!!  ATB Andrew |
|
desertrat
Full Member
  
Member since: October 2013
Posts: 934 
|
Post by desertrat on Mar 1, 2017 15:23:37 GMT -5
bring on the paint !!!!!!!!!!!!! can't wait to see this big cat's stripes,
|
|
|
|
Post by wing_nut on Mar 1, 2017 17:25:10 GMT -5
Do I hear the sound of paint jars opening?
|
|
|
|
Post by Leon on Mar 1, 2017 19:09:22 GMT -5
Your doing a fine Job Andrew!  Now were's the paint?  |
|
|
|
Post by TRM on Mar 1, 2017 19:43:28 GMT -5
Woo....PAINT IS COMING!!!  Build looks fantastic, bring on the color! |
|
adt70hk
Forum Moderator      November '24 Showcased Model Awarded
Member since: November 2015
Currently attempting to build something decent!!! ;)
Posts: 2,834 
MSC Staff
|
Post by adt70hk on Mar 2, 2017 8:17:28 GMT -5
Woo....PAINT IS COMING!!!  Build looks fantastic, bring on the color! bring on the paint !!!!!!!!!!!!! can't wait to see this big cat's stripes, Do I hear the sound of paint jars opening? Your doing a fine Job Andrew!  Now were's the paint?  All I might be misjudging this but I get the impression you'd like to see some paint being applied......or am I wrong??   Seriously though thanks for stopping by and the compliments. Coming from such top modellers as yourselves it is very much appreciated. The paint will have to wait for a bit I'm afraid though. I've decided to have a crack at actually doing Cuckoo and will then paint them both at the same time - partly because I want to try out my new ideas but mainly because my son keeps pestering me wanting to know when it can make appearance in his British forces! Thanks again for the encouragement!    Andrew |
|