totalize
Full Member
  
Member since: February 2013
Don't take yourself too seriously. It's just plastic.
Posts: 260 
|
Post by totalize on Aug 14, 2016 19:53:28 GMT -5
Hi Guys, This is my other armour project on the go at the moment. I am building AFV Club's Tiger I late. I am going to model Tiger 211, a very late Tiger from SS.Abt. 102 that saw action in Normandy. Here are some pics. The Kit: 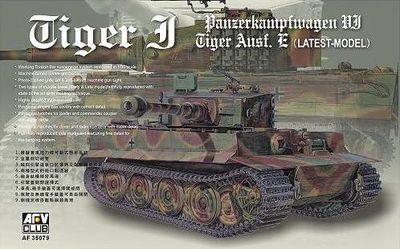 Some Pics of the Actual Tiger 211. 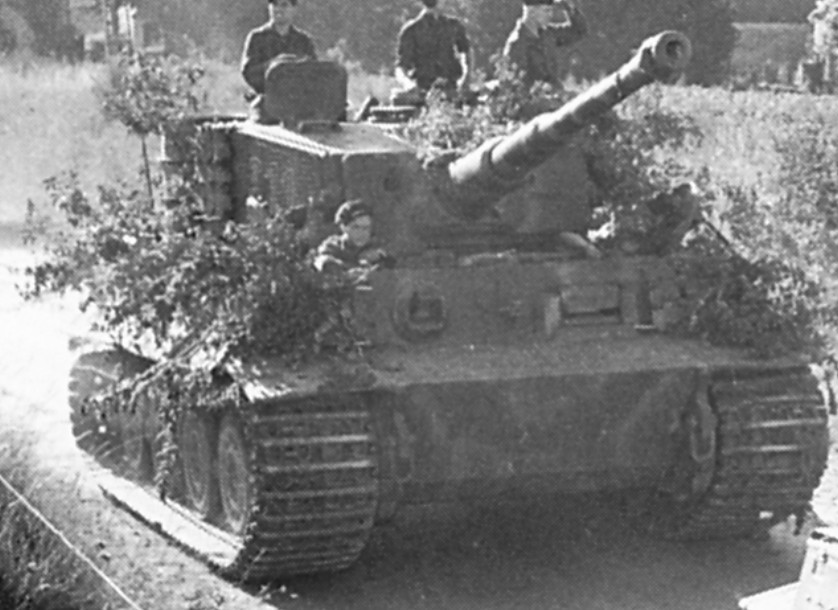 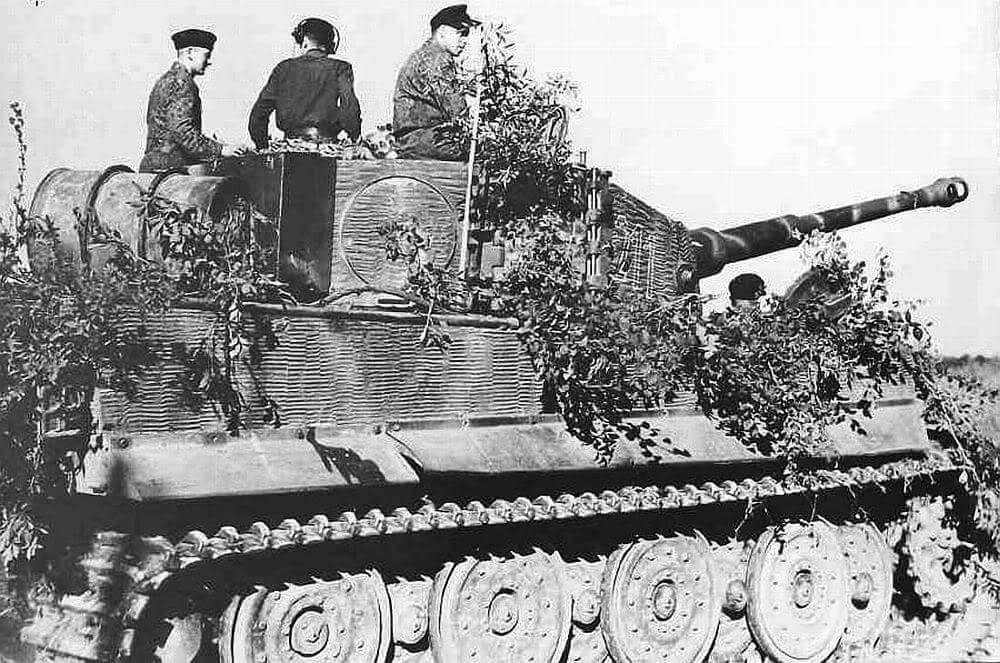 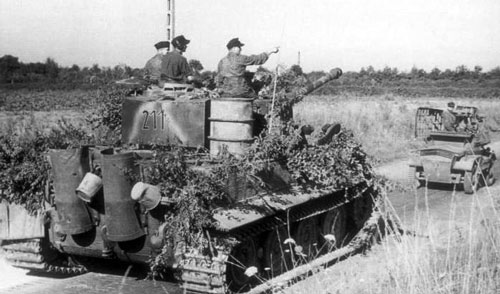 |
|
totalize
Full Member
  
Member since: February 2013
Don't take yourself too seriously. It's just plastic.
Posts: 260 
|
Post by totalize on Aug 14, 2016 19:59:23 GMT -5
I started by doing the zimmerit on the mantlet/gun shield using Miliput. Pretty messy stuff and fairly time consuming to get it thin enough. Going to try Tamiya's 2 part putty. I also added the recessed screws on both sides of the gun collar.. The barrel is the one from the kit. The mantlet was primed with Tamiya primer. 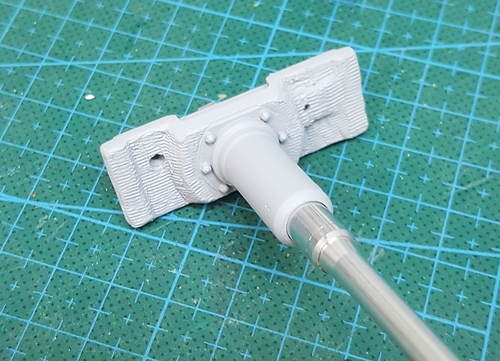 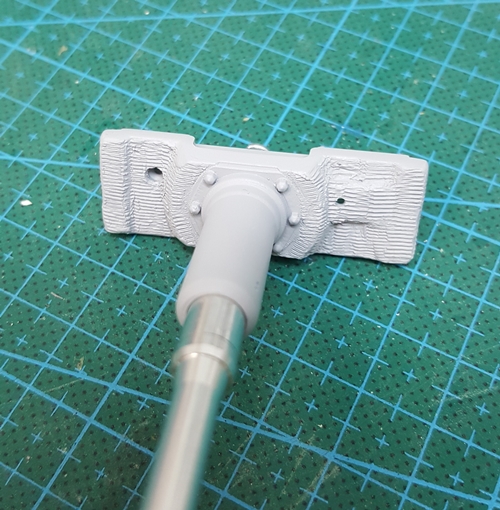 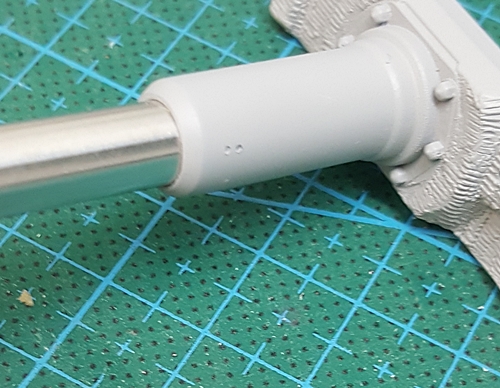 |
|
totalize
Full Member
  
Member since: February 2013
Don't take yourself too seriously. It's just plastic.
Posts: 260 
|
Post by totalize on Aug 14, 2016 20:02:14 GMT -5
I circled back to the instructions step for step and worked on the suspension and road wheels. Once everything is done I will put on the inner road wheels first (you can see I already have one in place) then the middle four center wheels then attach the four outer wheels to the four inner wheels. Have been trying out my new tamiya extra thin "quick setting" cement. I like it thus far. Here are a couple of pics. Note the ugly sink marks on the drive sprocket. The outer facing gear section had a lot of flash as well which I had to trim off. Not good AFV Club. Not good. 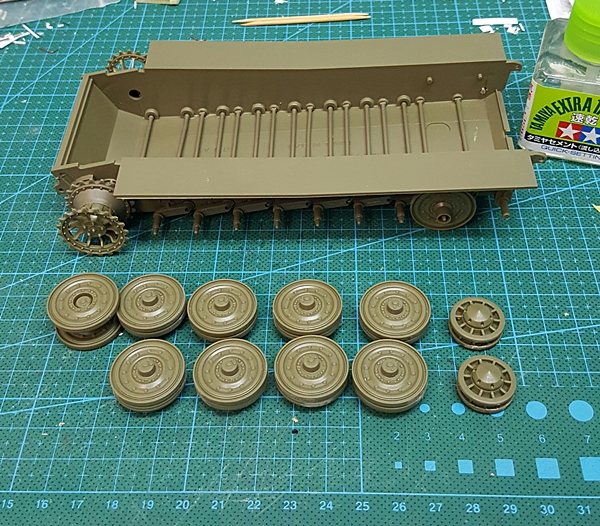 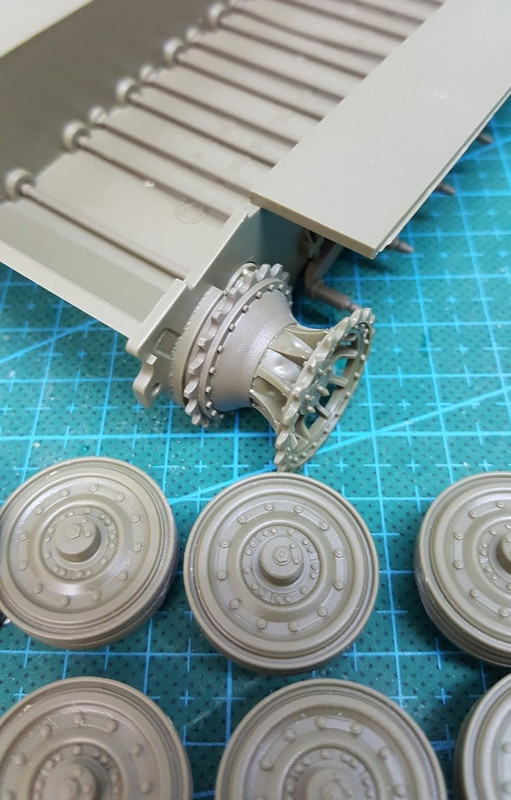 |
|
totalize
Full Member
  
Member since: February 2013
Don't take yourself too seriously. It's just plastic.
Posts: 260 
|
Post by totalize on Aug 14, 2016 20:05:43 GMT -5
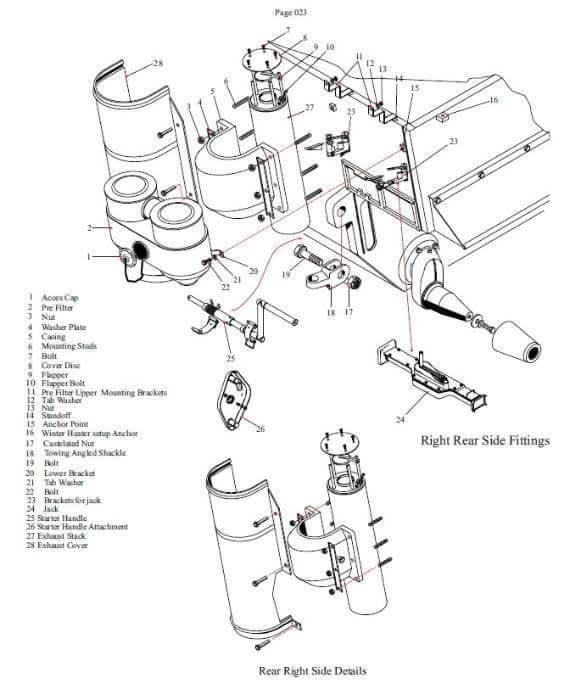
Had some issues working on the rear plate and exhausts. Firstly, I went to assemble the exhausts and found that I was missing part of one of the exhausts.So, I checked my Tamiya Early Tiger and thankfully it had the spare upper part I needed. Also, checking the AFV Club part I found that once assembled the bolts on the top of the exhaust cover are not in the correct position. One of the bolts should directly at the 6 o'clock position/bottom of the cover but it was actually at the 5 o'clock position. The Tamiya part is actually correct. Below you can see the result of how I fixed the problem with the AFV Club Part. I just cut the exhaust in half, low where it would be covered by the armored exhaust cover and re-positioned the top section in the correct alignment then glued everything back together. I had to use some putty to fill the gaps but it turned out okay. The Tamiya part did not fit very well either so I had to do some cutting, sanding and filling to make it look acceptable. 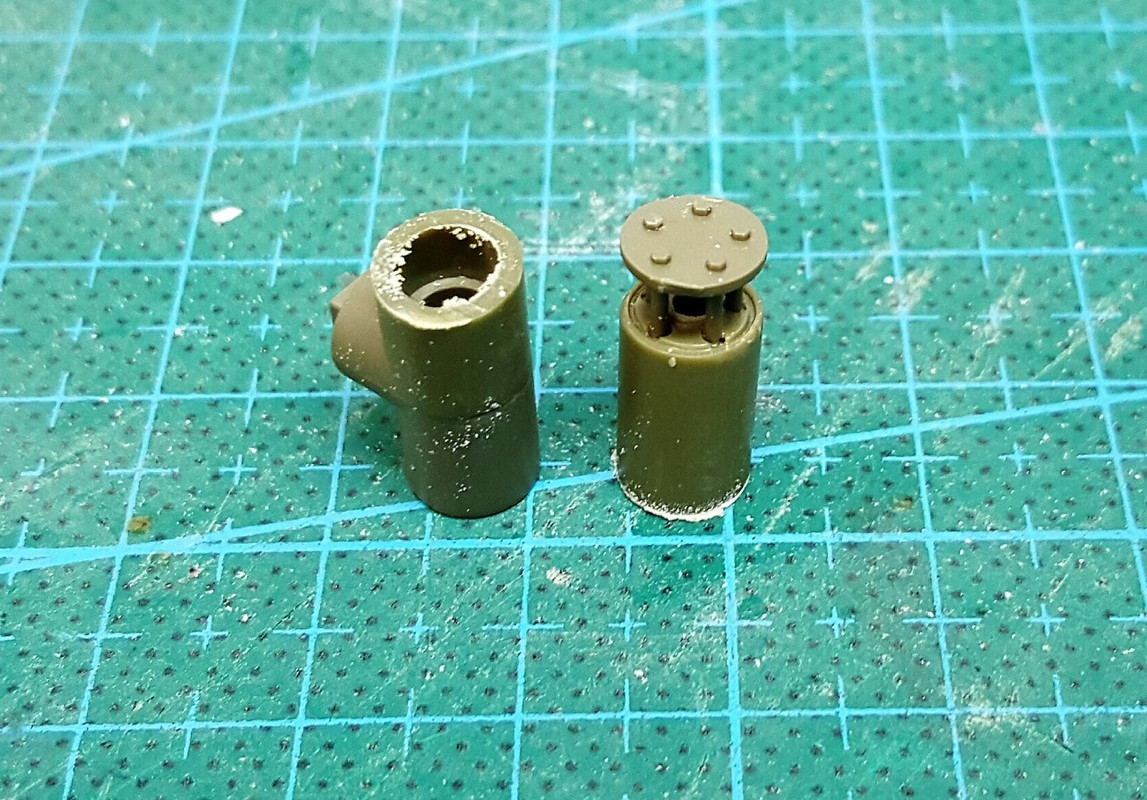 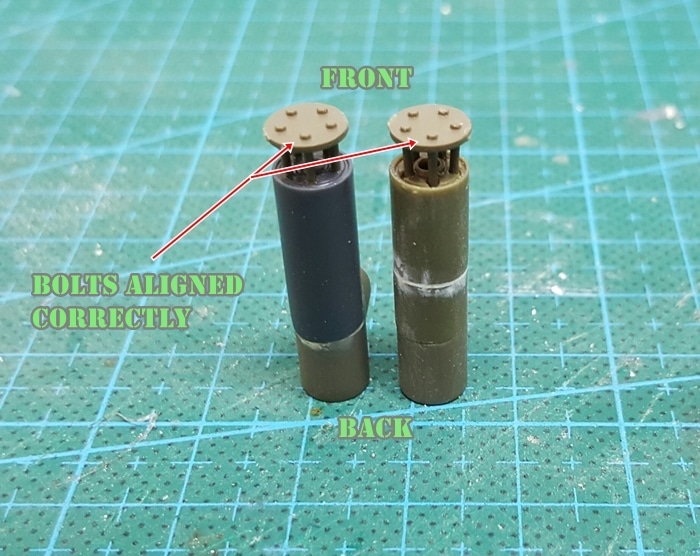
 |
|
totalize
Full Member
  
Member since: February 2013
Don't take yourself too seriously. It's just plastic.
Posts: 260 
|
Post by totalize on Aug 14, 2016 20:07:34 GMT -5
The exhaust shields are too thick for my liking so I began the process of thinning them out. Below is a pic of the work thus far. The thinned shield is on the left and the original part on the right. I decided not to use photo etch here. I used a rounded needle file for this work. 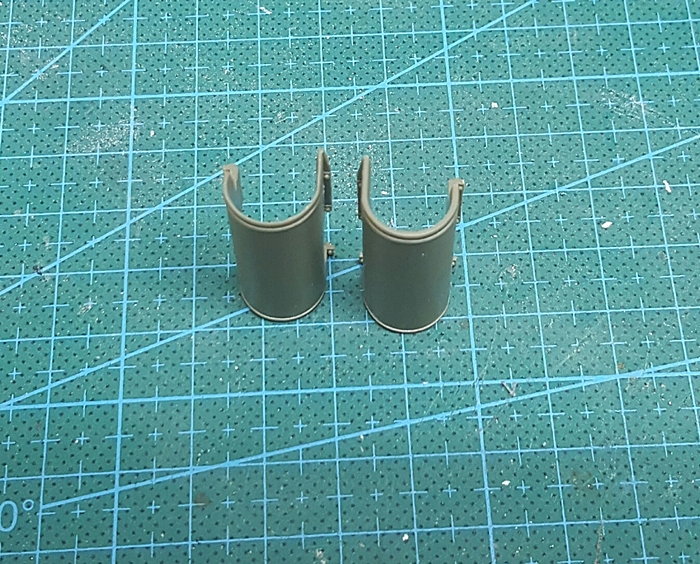 |
|
|
|
Post by Leon on Aug 15, 2016 4:54:07 GMT -5
Nice work on the zim and reworked parts Dave!  |
|
Tojo72
Forum Moderator      Sept '24 Showcased Model Awarded
Member since: November 2012
Posts: 5,331
Member is Online
MSC Staff
|
Post by Tojo72 on Aug 15, 2016 7:16:53 GMT -5
You got a nice project going on there,always enjoy a good tiger.I seem to remember a FSM review that mentioned that the metal gun was too heavy for the mantlet causing it to droop,not a biggie but something to remember.
|
|
|
|
Post by dierk on Aug 15, 2016 8:10:53 GMT -5
Nice work on, what appears to be, not one of AFV's finest offerings.
|
|
|
|
Post by wbill76 on Aug 15, 2016 9:14:16 GMT -5
Looks like you're off and running on this one, will be pulling up a chair to follow along.
|
|
totalize
Full Member
  
Member since: February 2013
Don't take yourself too seriously. It's just plastic.
Posts: 260 
|
Post by totalize on Sept 2, 2016 13:15:00 GMT -5
Man oh man. I was heading into my hobby room the other day and guess what greeted me on the floor by the door??? Yep the damn exhaust part that went missing and which caused me to improvise and use the Tamiya part. ARRRRGHHHHH.
|
|
totalize
Full Member
  
Member since: February 2013
Don't take yourself too seriously. It's just plastic.
Posts: 260 
|
Post by totalize on Oct 14, 2016 14:32:22 GMT -5
|
|
totalize
Full Member
  
Member since: February 2013
Don't take yourself too seriously. It's just plastic.
Posts: 260 
|
Post by totalize on Oct 14, 2016 14:49:50 GMT -5
Next up were the tracks. I tossed the kit rubber band tracks which I didn't like the look of and which were not accurate anyway as they didn't have the open guide horns which All Tiger I's had. In place of them I used the AFV Club aftermarket late Tiger I tracks. These tracks are pretty good I must say. They have a bit of flash on them and ejector marks on the top of each track but they were cheap enough and easy to assemble. I was able to get them done fairly quickly using my Tamiya Quick Set liquid cement. Once I got them done I simply sanded down the ejector marks on the tracks and it was good enough. The sag on them is pretty good I must say and they fold up like the real ones  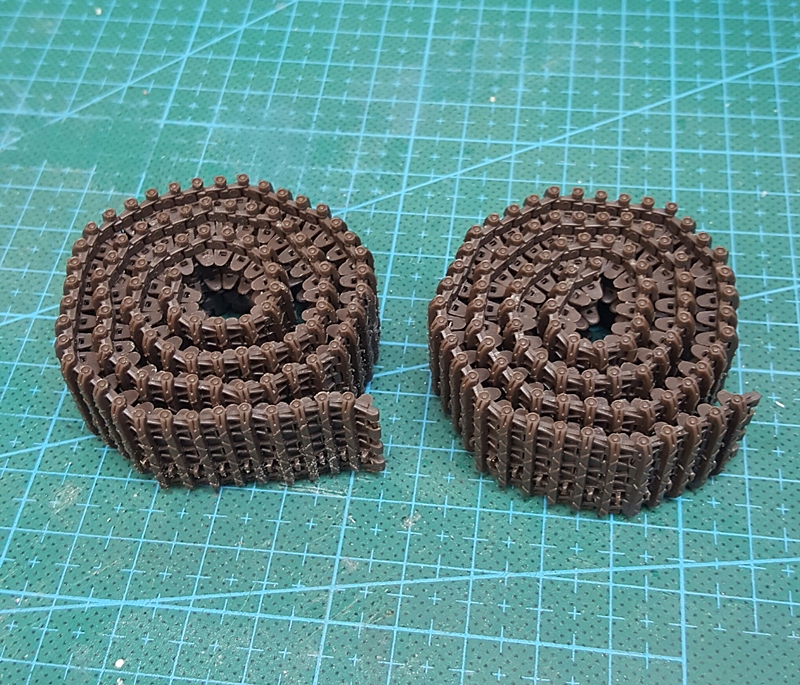 |
|
|
|
Post by Leon on Oct 14, 2016 16:48:51 GMT -5
Nice work on the zim and tracks Dave!  I'll be following this closely so i know what to expect when i start mine.  |
|
Tojo72
Forum Moderator      Sept '24 Showcased Model Awarded
Member since: November 2012
Posts: 5,331
Member is Online
MSC Staff
|
Post by Tojo72 on Oct 14, 2016 20:49:29 GMT -5
They do look very nicely done.
|
|
|
|
Post by dierk on Oct 15, 2016 3:41:24 GMT -5
Looking good!
Good move binning the lazzy band tracks! Replacements look much better.
|
|
totalize
Full Member
  
Member since: February 2013
Don't take yourself too seriously. It's just plastic.
Posts: 260 
|
Post by totalize on Oct 18, 2016 17:48:03 GMT -5
Thanks Guys, One of the issues with this kit is the bolt locations on the turret deflector ring. They are wrong. So, I re-did this area by drilling the correct location of the holes in the ring and filling the incorrect ones. 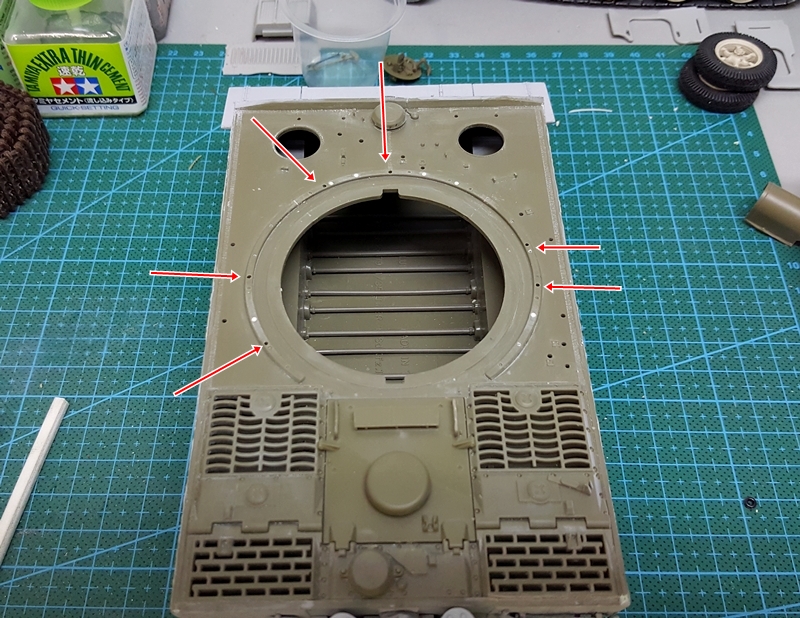 |
|
|
|
Post by Leon on Oct 18, 2016 18:24:43 GMT -5
Nice rework on the deflector ring Dave!  Have to remember this when i start mine.  |
|
totalize
Full Member
  
Member since: February 2013
Don't take yourself too seriously. It's just plastic.
Posts: 260 
|
Post by totalize on Oct 19, 2016 9:17:32 GMT -5
Replaced the Tamiya stick on zimmerit with my own using the Lionroar zimm roller and stamp along with Tamiya's epoxy putty. No primer has been applied as yet. I was able to get it pretty thin using a toothpick, water and ISO Alcohol. 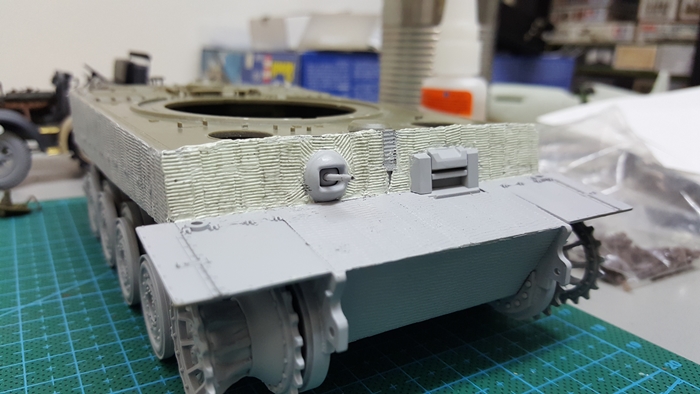 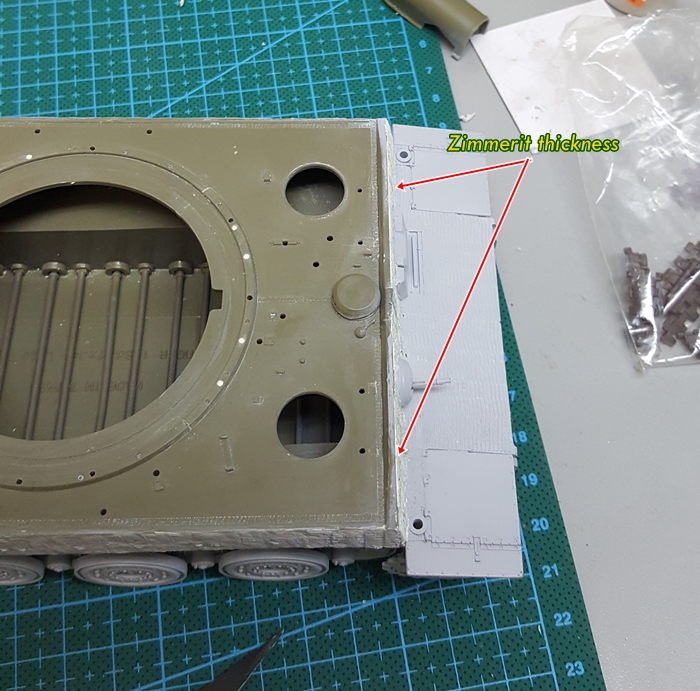 |
|
totalize
Full Member
  
Member since: February 2013
Don't take yourself too seriously. It's just plastic.
Posts: 260 
|
Post by totalize on Oct 27, 2016 10:46:29 GMT -5
|
|
|
|
Post by deafpanzer on Nov 14, 2016 14:37:08 GMT -5
Lovely work on Zimmerit... you nailed it!!!
|
|
|
|
Post by Deano on Nov 15, 2016 11:32:24 GMT -5
Gotta luv the big cats and this one is rocking , Zimm and build look spot on !!!
|
|
|
|
Post by wing_nut on Nov 15, 2016 16:42:30 GMT -5
Lovely work on Zimmerit... you nailed it!!! Boy howdy did he ever. Some of the best I've seen. |
|
Deleted
Member since: January 1970
Posts: 0
Nov 26, 2024 22:04:20 GMT -5
Nov 26, 2024 22:04:20 GMT -5
|
Post by Deleted on Nov 18, 2016 2:39:18 GMT -5
Amazing zimmerit, you achieved to combine a thin layer with a great looking structure.
Eddy
|
|
totalize
Full Member
  
Member since: February 2013
Don't take yourself too seriously. It's just plastic.
Posts: 260 
|
Post by totalize on Nov 21, 2016 19:10:08 GMT -5
Thanks a bunch guys. Progress has been slow but I managed to put a major dent into the amount of work still to be done on this bad boy. First up, I finally got the tools and clasps done. I used a set of Griffon Model Clasps. These are not the traditional 3 part type but rather a 2 part type with the base and clasp forming one part and the locking arm another. I think they are easier to work with then the 3 part type but still a tough go. One area that was another challenge was the shovel. Here I had to scratch build the mount for it as the kit part just basically has it lying flat on the hull. The actual shovel mount had legs on the part that holds the head of shovel in place and a raised pedestal approximately half way down the shovel that held the clamp. I used some bits of Photo etch I had from another Tiger PE set to reproduce this feature. During my clean up of the sledge hammer to remove the molded on clamps I managed to snap it in two. Undaunted, I grabbed some 1.2mm plastic rod and sanded it down on two sides to give it a flatter appearance. Next, I drilled out a hole in the head of the sledge then carved out the area in the shape I needed for the shaft and fixed the new handle to the head. A quick and fairly simple fix. For the bolt cutters there was no way I was going to be able to remove the molded on clamps without destroying the part so I snipped off the end where the locking arm goes, cleaned it up and added said locking arm to the part. The kit part does not give you the the retaining loop that the bolt cutters slide into so I made this with some lead foil. For the cleaning rods and tow cable mounts and the tow cables themselves, the kit gives you the all in one version which is pretty much standard with most kits. I didn't like these as the detail was soft especially on the tow cables. In looking through the sprues I found that AFV Club gives you the individual mounts/brackets for the tow cables and cleaning rods. This was a nice surprise as I was planning on scratching my own. Definitely a time saver. You can see them in the pics below. Also, I discovered that I had a set of Eureka XXL Tiger I tow cables which I had purchased and forgot about a few years back. Because I had forgot about them I purchased a Griffon set which also comes with the brass cleaning rods. So, no need to scratch the cleaning rods another time saver. Of course both sets have the track changing cables as well which is nice. Tiger 211 did not have its head lamp in place in the pictures of the actual vehicle so I am leaving it off. After adding the head lamp base and bracket I punched out a disc from plastic card with my punch and die and added this to the HL base to replicate the lamp socket. The lamp cable/conduit itself is from lead wire. As you can see it has a distinct loop that clears the top of the front armour plate. A number of models I have seen have this conduit flush with the top of the armor plate which was not the case. Finally, I added the camo net loops on the sides and rear of the hull. The C-Clamps on German Tigers had two Butterfly nuts to secure and remove the clamp. Fortunately, I had some Bronco 1/35 German butterfly nuts so I used these on the top hull C-Clamp. I am going to add them to the rear C-Clamp as well. Didn't want to add them at this early stage as they would have probably broken off with all my rough handling of the model up to this point 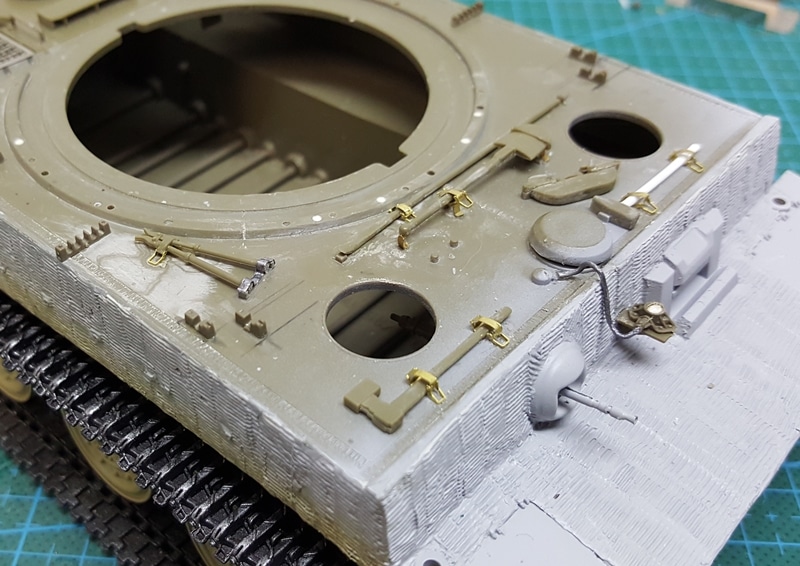 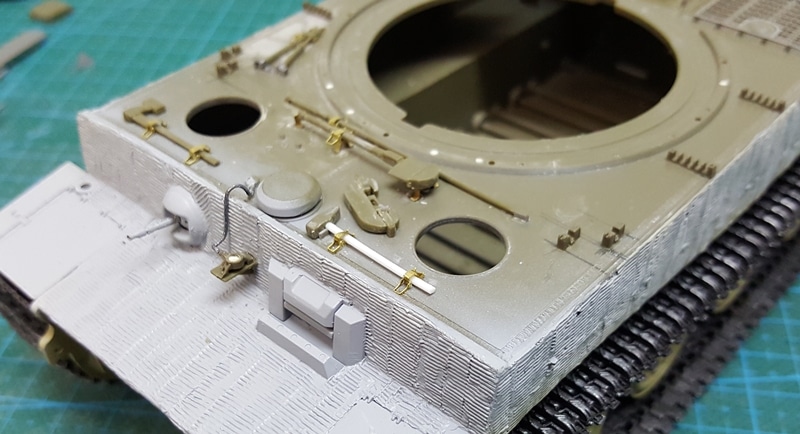 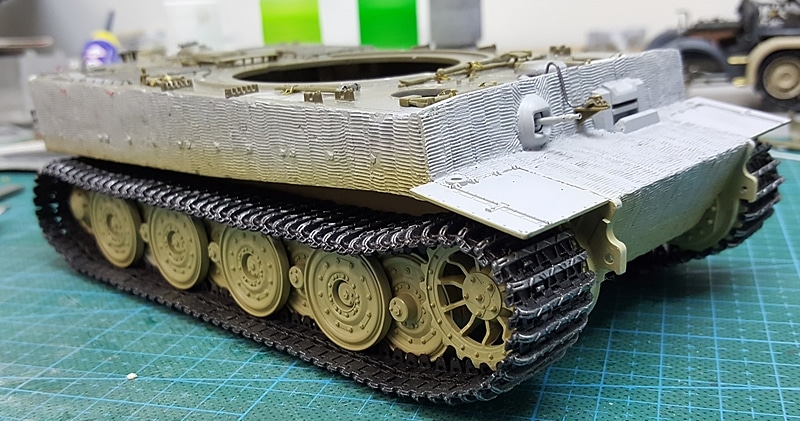 |
|
|
|
Post by wbill76 on Nov 21, 2016 20:21:06 GMT -5
Looking sharp in the details department, nice!
|
|
|
|
Post by Leon on Nov 21, 2016 20:52:11 GMT -5
Nice work on the tools Dave!
|
|
|
|
Post by deafpanzer on Nov 22, 2016 14:37:28 GMT -5
Love those PE clasps... nothing can beat those!
|
|
totalize
Full Member
  
Member since: February 2013
Don't take yourself too seriously. It's just plastic.
Posts: 260 
|
Post by totalize on Nov 25, 2016 10:59:45 GMT -5
Thanks guys.
|
|
totalize
Full Member
  
Member since: February 2013
Don't take yourself too seriously. It's just plastic.
Posts: 260 
|
Post by totalize on Jan 16, 2017 17:04:22 GMT -5
Hi guys, Just a small update on the build. Sorry I haven't been around. My Dad passed away over the holidays and things had been quite hectic up and until his passing. He lived a good life, was 95 years old and was a U.S. Navy veteran of WW2 though he moved to Canada after the war in 1956. He was an interesting man. At any rate, I worked on the tow cables and cleaning rods for the Tiger this past weekend. I used Eureka XXL tow cables I had and the Griffon set sans the tow cables. I might still use the griffon track changing cable but I also have one from the Eureka set. Not decided as yet. Both are nice with resin eyelets. I decided to change things up a bit and assembled one section of the cleaning rods and secured it to the vehicle. Tiger crews would often leave these assembled or partially assembled and just secure it in place rather than disassembling all the rods. Guess they couldn't be bothered. 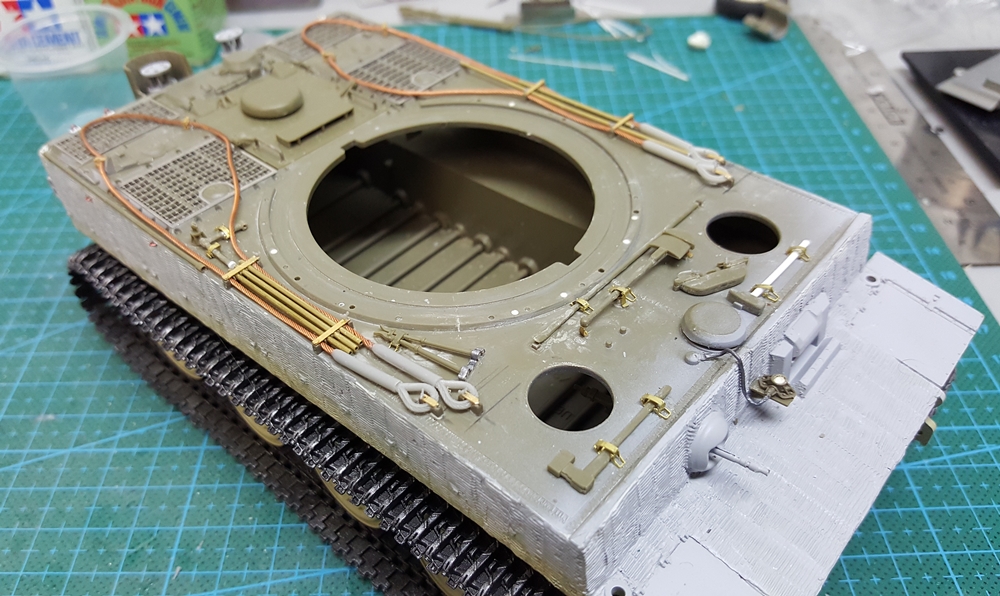 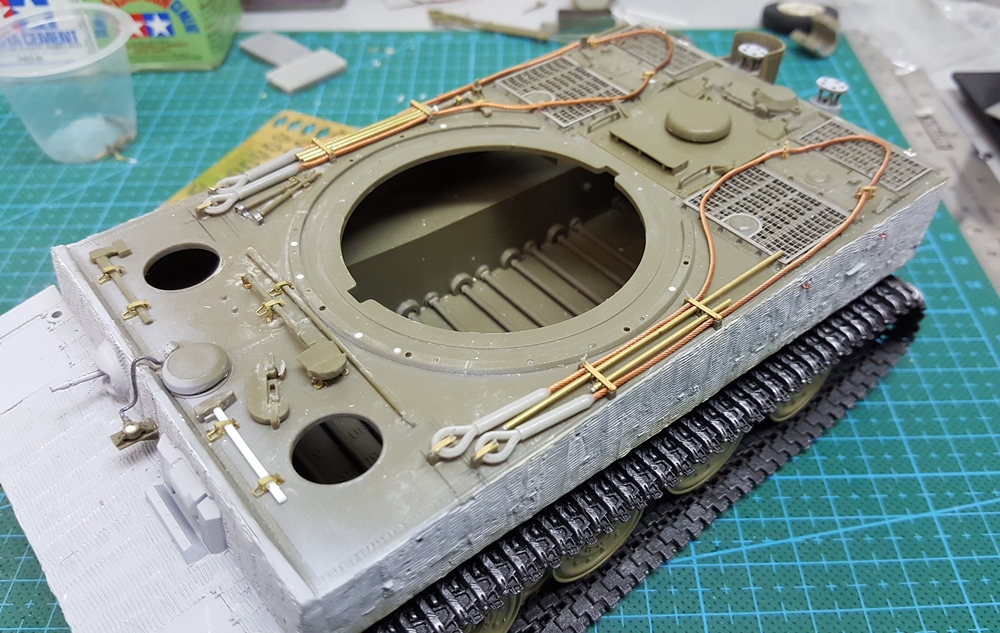 |
|
|
|
Post by panzerjager2 on Jan 16, 2017 17:19:19 GMT -5
Impressive work
|
|